Magento 2 ChatGPT Bot allows the admin to add Magento 2 product database to the ChatGPT bot and thereby allows the users at the storefront to use our real-time virtual assistant.
The module supports OpenAI-compatible LLMs to generate highly contextual and intelligent responses.
You can add an AI-generated order success message after an order gets placed using Magento 2 ChatGPT Checkout Message Generator extension.
To explore more solutions, check out our complete collection of Magento 2 extensions.
Check an overview of the Magento 2 ChatBot –
Features
- Enable or disable the functionality for the store.
- Add/export products to the ChatGPT bot from the Magento 2 backend.
- After enabling the functionality, a ChatGPT bot is added to the Magento 2 store frontend.
- Customers can interact with the ChatGPT bot and ask queries regarding the products within the store.
- ChatGPT bot replies with the required information about the products in the Magento 2 store.
- The extension uses NLP to give customers instant answers from the Magento 2 product database.
- Magento 2 Chatbot supports multiple AI services, including OpenAI, Gemini, and Cohere.
Installation
#Download Module
Firstly, you need to log in to Webkul Store, go to My Account>My Purchased Products section, verify.
And then download and extract the contents of this zip folder on the system.
#Upload Folder
Once the module zip for Magento 2 ChatGPT Bot is extracted, follow the path src>app and then copy the app folder into the Magento 2 root directory on the server as shown below:

#3 Run Commands
Execute the commands below to continue with the setup –
php bin/magento setup:upgrade
php bin/magento setup:di:compile
php bin/magento setup:static-content:deploy
php bin/magento indexer:reindex
php bin/magento cache:flush
php bin/magento setup:chatgptbot
php bin/magento setup:chatgptbot -p 1,2,3,4,5,6,7,8,9
Language Translation
For translating the module language, navigate through src/app/code/Webkul/ChatGptBot/i18n and edit the en_US.csv file.
Thereafter, rename the CSV as “en_SA.csv” and translate all right-side content after the comma in the Arabic language. After editing the CSV, save it.

Now, upload it to the path src/app/code/Webkul/ChatGptBot/i18n, where the installation of Magento 2 is on the server.
The module gets translated into the Arabic Language, supports both RTL and LTR languages.
The user can edit the CSV like the image below.

Generate Secret Key – OpenAI Account
The user has to first create an OpenAI Account and log in to the OpenAI dashboard as shown in the screenshot.

Now the user will have to click on the Personal in the top-right corner, and a pop-up will appear. The user will click on the View API Keys option.

A page will open, and a button Create New Secret Key will be visible as shown in the screenshot.

Once the user clicks on this button, a pop-up will display with the API key.
The user can copy the key from here with the help of the copy button.

The generated key is to be used in the Magento 2 ChatGPT Bot extension’s configuration settings section in the Magento 2 backend.
To Get Cohere – Secret Key
Go to Cohere Dashboard and generate your API key.
To Get Gemini Secret Key:
Visit Google AI Studio and create a new API key.
Generate Pinecone – Secret Key & Index
To generate the Pinecone secret key and the index, navigate to the Pinecone website and register.

After registration, you can sign in to the Pinecone account.

After logging in, navigate to the API Keys section. Here, you can find all of the keys that you have created.

Generate New API Key
To generate a new API key, tap the Create API Key button in the top right-hand corner.
After that, enter the key name and tap the Create Key button.

The key will be created, and then you can copy the key and use it in the extension’s configuration settings in the Magento 2 backend.

Now, to create the Index, navigate to the Indexes section from the side panel option.
Here, tap the Create your first index button.

Now, enter the index name, enter the dimension as 1536, set the metric, select the Pod Type as required, and tap the Create Index button.

After tapping the Create Index button, the index will be created.
Now, you have to copy this index into the extension Pinecore index section.

Magento 2 ChatGPT Bot – Admin Workflow
After successfully installing the extension, navigate to Stores>>Configuration>>ChatGpt Bot.

Here, the admin will be able to see the following configuration under General Settings–
- Enable – Dropdown to enable or disable the extension.
- Choose Service: Select your AI provider – OpenAI, Gemini, or Cohere – to power chatbot responses.
- Secret Key – Enter the Secret key of the respective Chat Model as selected.
- Chat Model – Select the specific chat model from the dropdown.
- Embedding Model – Specify the embedding model from the dropdown.
- Select Attributes To Train the bot – Select attributes: Product Name, SKU, etc.
- Train Super Attributes of Configurable Product – Admin can set yes or no the option to train super attributes of configurable products.

- Max Tokens – Admin enters max tokens or characters, which is the maximum response size, i.e., 248.
- Number of Products – A maximum number of products that are searched for in the chatbot is 2.
- Output Dimensions: Set the size of the AI embedding (e.g., 768 or 1024).
Moreover, under Pinecone Settings, the admin will be able to –
- Secret Key – Enter the Pinecone secret key to enable integration.
- Pinecone Index – Fill in the required Pinecone index for configuration.
Frontend Chat Window Option
Additionally, under the Frontend Chat Window Option, the admin can –
- Chat Window Position – Selects the chat window position from the dropdown.
- Chat Window Background Type – Choose background type as either an image or a solid color.
- Chat Window Background Image – Upload a background image or choose a solid color for the chat window, in jpg, jpeg, gif, or png files formats.

- Chat Window Icon Background Color – Sets the background color for the chat window icon.
- Chat Window Icon Color – Customize the color of the chat window icon.
- Chatbot Text Background Color – Set the background color for chatbot messages.
- Customer Text Color – The text color for customer messages can be set based on the admin’s preference.
- Customer Reply Text Background Color – Define the background color for customer replies.
- Chatbot Reply Text Color – The reply text color for the chatbot can be customized by the admin
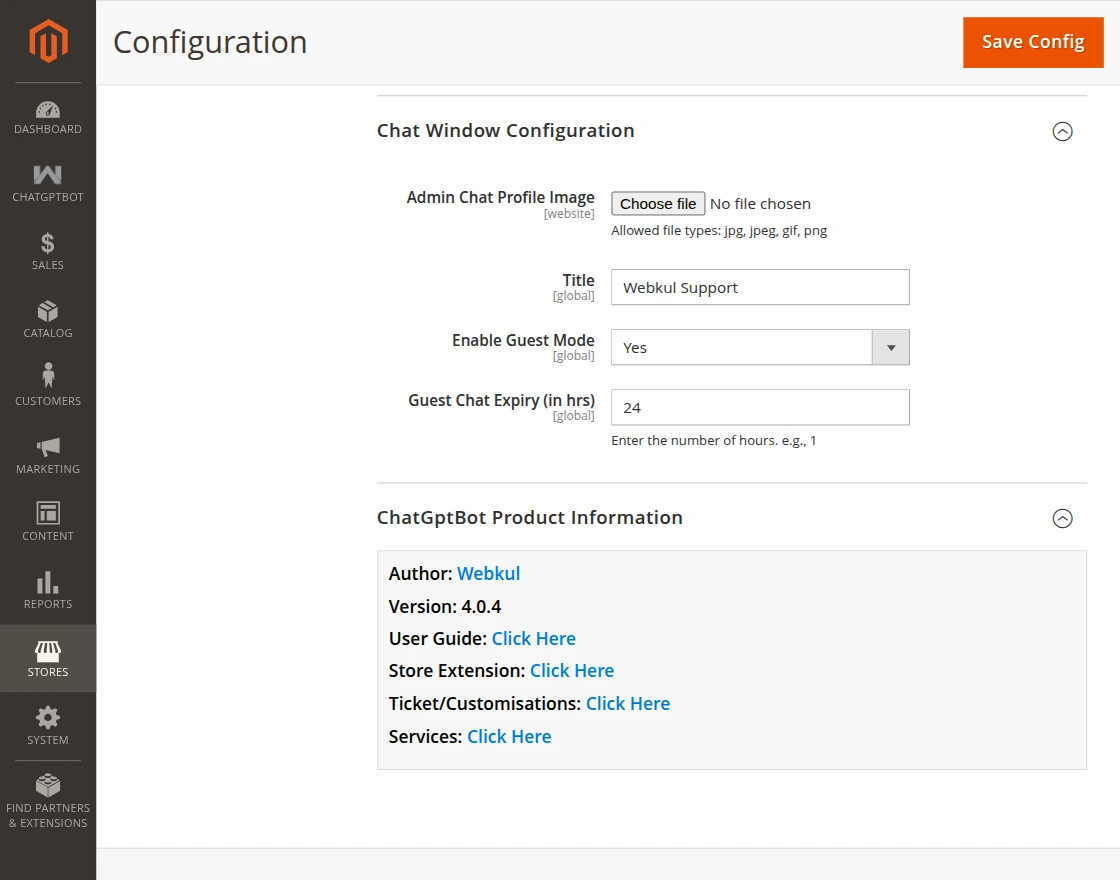
Also, the admin can manage the following through Chat Window Configuration –
- Admin Chat Profile Image – Upload or set a profile image for the chat interface.
- Title – Edit or customize the chat window title.
- Enable Guest Mode – Allows guest users to access and use the chatbot without logging in
- Guest Chat Expiry (in hrs) – Sets the duration after which guest chat sessions are automatically cleared
Once configured, the admin needs to save the settings to apply the changes.
Magento 2 ChatGPT Bot – Chat History
The admin can view the customer’s chat history with the chatbot, as shown in the snapshot below.

Magento 2 ChatGPT Bot – Admin Adding Products to ChatGPT Bot
The admin will navigate to the Catalog>Products.
Admin will select the products that the admin wants to add to the ChatGPT bot.
For the same, select the products and from the actions dropdown select the option Add To AI Bot as illustrated in the snapshot below.

This brings up a prompt, just tap ok on that, as shown in the snapshot below.

As a result, you’ll see a confirmation message, as shown in the image below.

Magento 2 ChatGPT Bot – Frontend Working
The customers can find the ChatGPT bot at the storefront whenever they visit the website.
Customers can ask their queries to the ChatGPT bot by selecting a specific option, such as “Check Your Orders” or “Search Product,” as shown in the snapshot below.

They can ask their queries to the ChatGPT bot by entering their specific queries.

Also, if you want the store admin and the marketplace vendors to generate the product, category, and CMS page content using ChatGPT.
Then you can check the Magento 2 Multi Vendor ChatGPT Content Generator and Magento 2 AI Content Generator extension.
The users can interact with the ChatGPT bot as required. According to the asked query, the ChatGPT bot will respond.
If the customer asks for a product page of the product, the ChatGPT bot will respond with the product page link, as shown below in the snapshot.

Tapping on the Product URL will redirect the customer to the product page, from where the customer can then proceed a checkout as required.

The ChatGPT bot gave the customer the needed information and satisfied their query.
Support
If you have any queries regarding the plugin, please contact us at Webkul Support System.
If you’re looking to create a custom e-commerce website, it’s a great idea to Hire Magento Developers who can help you build a powerful and scalable online store.
Current Product Version - 4.0.4
Supported Framework Version - 2.2.x,2.3.x, 2.4.x

Be the first to comment.