Create a custom indexer in Magento 2 when you need precomputed data for fast storefront reads.
In this guide, you’ll learn why, when, and how to implement a robust indexer step-by-step.
Why create a custom indexer?
First, an indexer precomputes expensive queries so pages load quickly.
Therefore, it avoids heavy joins and runtime aggregations on each request.
For example, a marketplace needs the lowest vendor price per product ready to read.
As a result, the category page queries a small index table instead of aggregating many rows.
When should you build an indexer?
Create one when runtime calculations noticeably slow pages or APIs.
For instance, use an indexer for custom ranking, aggregated metrics, or multi-source pricing.
However, avoid indexers for trivial values that are cheap to compute on demand.
Instead, weigh complexity versus performance benefits before adding one.
High-level components (what you must provide)
First, declare the indexer in etc/indexer.xml.
Next, configure change-tracking in etc/mview.xml for schedule mode.
Then, implement an indexer class with full and incremental methods.
Finally, optionally add observers to call reindexRow() on model saves.
etc/indexer.xml
This file registers the indexer ID and processor class.
<?xml version="1.0"?>
<config xmlns:xsi="http://www.w3.org/2001/XMLSchema-instance" xsi:noNamespaceSchemaLocation="urn:magento:framework:Indexer/etc/indexer.xsd">
<indexer id="vendor_price_indexer"
         view_id="vendor_price_indexer_view"
         class="Vendor\PriceIndexer\Model\Indexer\PriceIndexer">
    <title>Custom Indexer</title>
    <description>Custom Indexer</description>
</indexer>
</config>
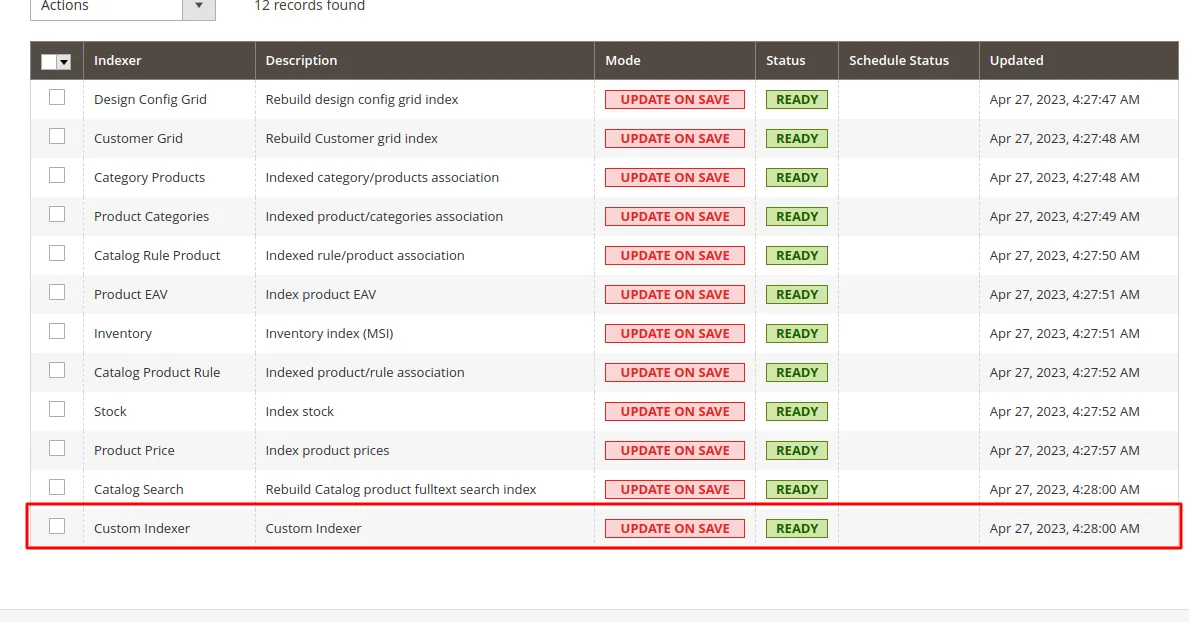
Note: view_id links the indexer to the mview subscription.
Moreover, Magento uses this declaration to show the indexer in admin.
etc/mview.xml
Use mview.xml to subscribe to tables for change detection.
<?xml version="1.0"?>
<config xmlns:xsi="http://www.w3.org/2001/XMLSchema-instance" xsi:noNamespaceSchemaLocation="urn:magento:framework:Mview/etc/mview.xsd">
<view id="vendor_price_indexer_view" class="Vendor\PriceIndexer\Model\Indexer\PriceIndexer" group="indexer">
    <subscriptions>
        <table name="vendor_prices" entity_column="entity_id" />
    </subscriptions>
</view>
</config>
Therefore, changes to those tables are captured in the changelog for scheduled processing.
Consequently, cron + MView will call your execute() periodically.
Indexer class responsibilities (interfaces & methods)
Your indexer must implement \Magento\Framework\Indexer\ActionInterface.
Also implement \Magento\Framework\Mview\ActionInterface to support schedule mode.
You must provide these methods:
executeFull()— rebuild entire index.executeList(array $ids)— reindex a batch.executeRow($id)— reindex a single entity.execute($ids)— called by MView; map changelog ids → entity ids and call incremental update.
Skeleton indexer (conceptual)
Below is a compact class outline you can adapt.
class PriceIndexer implements \Magento\Framework\Indexer\ActionInterface, \Magento\Framework\Mview\ActionInterface
{
    public function execute($ids) { /* map changelog ids, call executeList */ }
    public function executeFull() { /* rebuild index table */ }
    public function executeList(array $ids) { /* update these product ids */ }
    public function executeRow($id) { $this->executeList([(int)$id]); }
}
This pattern separates full and incremental flows.
Thus, incremental updates stay fast and avoid heavy full rebuilds.
Indexer Update modes: update_on_save vs schedule
If you set the indexer to update_on_save, Magento runs updates during saves; this gives fresh data.
However, it increases write-time work and can slow saves under load.
Alternatively, schedule mode uses MView + cron to batch and process changes; this scales better.
Therefore, for high-volume sites, prefer a schedule and robust cron configuration.
Conclusion
In summary, a custom indexer transforms heavy runtime work into fast reads for the storefront.
Moreover, when you implement full and incremental flows, map changelog ids, and add observers, your store scales while remaining responsive.
For related admin tips and enhanced controls, see our Webkul guide on Enhanced Indexer Management:
https://webkul.com/blog/magento-2-enhanced-indexer-management/.
Commands
Use the following command to reindex the custom indexer:
bin/magento indexer:reindex vendor_price_indexer
Use the following command to invalidate the custom indexer:
bin/magento indexer:reset vendor_price_indexer
We hope it will help you. Thank you!!
If any issue or doubt please feel free to mention them in the comment section.
We would be happy to help. Happy Coding!!
For technical assistance, please get in touch with us via email at [email protected].
Discover powerful solutions to enhance your Magento 2 store by exploring our Magento 2 plugins page.
Bring your vision to life with custom-built solutions—hire skilled Magento 2 developers today.

Be the first to comment.