Introduction- CyberSource Payment Extension
CyberSource payment gateway is a solution that provides fraud management and payment security services. Hence, allowing the merchants to securely accept payments from the customers.
Magento 2 CyberSource Payment Gateway enables you to accept payments securely, without involving the risks in handling payment data.
So additionally, this solution enables you to deliver seamless payment experiences to consumers.
This module supports the SOAP toolkit API for capturing the payment and for refunds. Additionally, it supports all kinds of cards. For example, Visa, Mastercard, American Express, Discover, Diners Club, Carte Blanche, etc.
Do check the Magento 2 PhonePe Payment Gateway to add the PhonePe payment gateway to your Magento 2 store.
Please Note:
- This module does not work with Multiple Address Checkout.
- The module sends a device fingerprint id to Cybersource. However, because the service is not enabled on our account (available only on paid accounts) and this plugin compatible with 3DS.
For the Merchant Defined Data (MDD) query, only then the decision-maker can proceed with the same to exactly decide with all merchant defined data needs to be added. As this is a paid service. - The payment method will not work for the orders placed through the admin end.
Watch the below video tutorial to understand the extension workflow:
Features
- Provides fully secure payment to handle risk management system.
- It provides support for almost all kinds of cards.
- Avoids handling or storing sensitive customer data.
- Set the new order status from the configuration.
- Set a custom title for the payment method.
- Test mode is available.
- CyberSource Secure Acceptance Web/Mobile Hosted Checkout method supported.
- Manage all payment transactions on the CyberSource server only.
- Bypasses store server & transfers data directly from customer browser to CyberSource server.
- SOAP toolkit API supported for capture and refund.
Installation
Customers will get a zip folder. Then they have to extract the contents of this zip folder on their system.
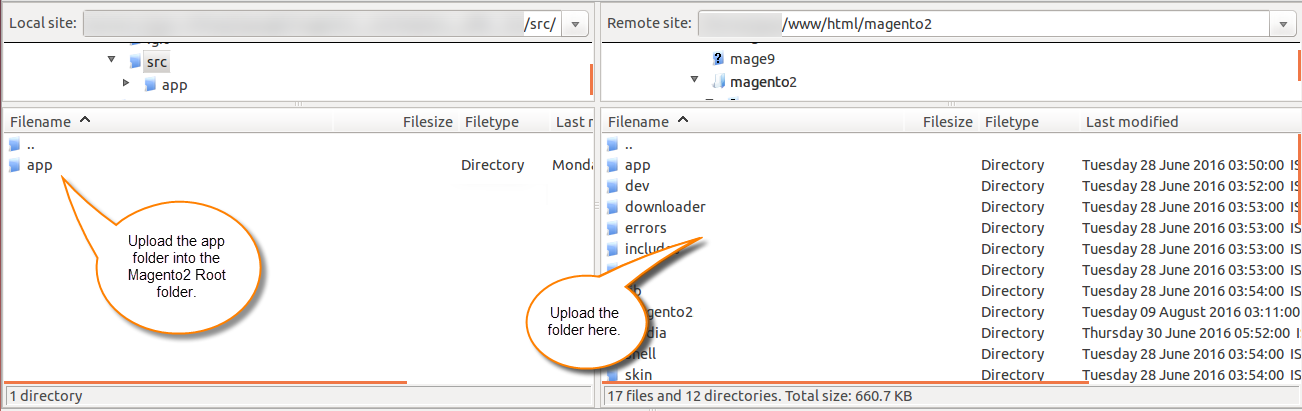
Thus, the extracted folder has an src folder, inside the src folder you have the app folder.
You need to transfer this app folder into the Magento2 root directory on the server as shown below:
After the successful installation, you have to run these commands in the Magento2 root directory.
First Command –
php bin/magento setup:upgrade
Second Command –
php bin/magento setup:di:compile
Third Command –
php bin/magento setup:static-content:deploy
After running the commands, you have to flush the cache from the Magento admin panel by navigating through System > Cache management as shown below:

Thus, in this way the installation of the module completes.
Language Translation
For translating the module language, navigate through src/app/code/Webkul/CyberSource/i18n and edit the en_US.csv file.
Thereafter, rename the CSV as “en_SA.csv” and translate all right side content after the comma in the Arabic language. After editing the CSV, save it.
Then upload it to the path src/app/code/Webkul/CyberSource/i18n where the Magento2 is installed on the server.
The module gets translated into the Arabic Language. It supports both RTL and LTR languages.

CyberSource Configuration
For the setting up of the payment method, the admin needs to create an account on CyberSource.

After that, they need to Login on their CyberSource account to get the credentials for the configuration of the module.
So, for log in to CyberSource, they need to go to CyberSource Login.

After Login, for the Profile ID, Access Key, and Secret Key, the admin has to follow the below path:
Payment Configuration > Secure Acceptance Settings as per below image:

Under Secure Acceptance Settings, the admin can see all the created profile list as shown below:

From here, the admin can also create a new profile:

After the successful creation of the profile, the admin can retrieve the Profile Id of the created profile.
Under General settings:
The admin has to enter the Profile Information, select the Integration Methods. After that, has to enter the Contact Information.

Under the Payment Settings:
Form here, the admin has to select the types of the card. The customer can make the payment only through the selected cards.

Under Security:
From here, the admin can create the Security keys as per below image:

The admin can also download the Access Key and the Secret Key.

Customer Response:
From here, the admin can decide either the Transaction Response Page and the Custom Cancel Response Page is Hosted By CyberSource or Hosted By You.
Now, they can set the URLs for the Transaction Response Page and the Custom Cancel Response Page. The URLs can be set as below:
- http://domainname/cybersource/index/beforesuccess
- http://domainname/cybersource/index/cancel


Process of creating the transaction Key:
For Transaction Key, the admin has to follow the below path:
Payment Configuration > Key Management as per below image:

Here the admin can see all the SOAP and Secure Acceptance transaction processing key. For creating a new one, they need to click on +Generate Key button as per below image:

After selecting the Key type as Transaction Processing, the admin needs to select the Key subtype as per below image:

For the SOAP sub type key, the admin needs to select the SOAP option from the available options.

After that, they need to click on the SUBMIT button and hence the Soap toolkit has been created.
For the reference, check the below snapshot:

Now, for the Secure Acceptance type key, the admin needs to select the Secure Acceptance option from the available options as per below image:

After that, they need to enter the Key Name and select the Signature Version, Signature Method, and the Security Profile. Then need to click on the SUBMIT button.
For the reference, check below:

After that, the Secure Acceptance Key gets generate. Also, the admin can download the keys by clicking on the DOWNLOAD KEY button as per below image:

Webhook Generation
The CyberSource Payment Extension provides Webhook. In web development, a webhook is a method of altering the behavior of a web page, or web application, with custom callbacks. Webhooks are user-defined HTTP callbacks that are triggered by specific events.
For the webhook generation, the URL meets the minimum requirements as mentioned below:
- The listener uses an HTTPS URL (for example,
https://example.com, nothttp://example.com) - URL is served on port 443 (for example,
https://example.comorhttps://example.com:443, nothttps://example.com:8443) - Both HEAD and POST request respond with HTTP code 200. Refer to one of the following specifications for relevant definitions:https://www.w3.org/Protocols/rfc2616/rfc2616-sec10.html or – https://www.w3.org/Protocols/rfc2616/rfc2616-sec9.html.
- The certificate is active and has been issued by a trusted source (for example, https://www.sslshopper.com/ssl-checker.html); certificates cannot be self-signed.
The Webhook can be configured by the admin from the CyberSource Account by navigating through below path:
Payment Configuration > Webhook Settings

The admin has to click on the CONFIGURE button to configure the webhook notification.

Module Configuration
After the successful installation of the module, the admin needs to navigate through the following path to configure the module:
Store > Configuration > Sales > Payment Methods > Cybersource Secured Acceptance By Webkul

Cybersource Secured Acceptance By Webkul:
- The admin can Enable the module.
- Enter the Title of the payment gateway which will show at the payment method page during the checkout time.
- Enter the Merchant Id provided by the CyberSource.
- The admin has to enter the Transaction Key, Profile Id, Secret Key, and Access Key.
- The admin can enable the Test Mode of the module.
- Auto-generated Gateway Url and the Test Gateway Url.
- Set the New Order Status of the new order.
- Enter a Redirect message for the customer while redirecting them to the CyberSource Secure Acceptance website.
Henceforth, after entering all the details the module configuration completes.
Customer End
Now, after the admin has configured the module from the back-end, the customer can easily make the checkout from the shopping cart page by using CyberSource Payment Gateway.
For the reference, check the below snapshot:

Once the customer will click on the Place Order button, they will see the redirect message entered by the admin.
Hereafter, they get redirected to the CyberSource checkout page. For the reference check the below snapshot:

So, here the customer can see their Billing and the Shipping Information.

Now, the customer has to enter the Payment Details to pay for the order such as:

- They can select the Card Type through which they want to pay for the order.
- They have to enter the Card Number.
- Enter the Expiration Date.
- The customer has to enter the CVV of their card in the CVN field.
After entering all the details of the card, they have to click on the Pay button to place the order.

Hence, once the order is placed, the customer can see the Order Information in the order section as per below image:

Admin End
The admin can see the placed order’s details with CyberSource Payment Gateway. For that, they need to navigate through Sales> Orders from the admin dashboard.

Now, the admin can click on the view button to see the order information. For the reference check the image below –

Invoice – CyberSource Payment Gateway
The admin can manually generate the invoice for the order.
For that, the admin has to navigate to Sales> Order and click on the View button for the order. After that, they need to click on the Invoice button to generate the invoice for the order.
For the reference, check the below snapshot:

The admin can click on the Submit Invoice button to generate the invoice.
Henceforth, the admin can see the created invoice in the invoice grid. For the reference check the below image:

Now, the admin can click on the view button to see the details of the invoice.
Invoice Page –

Refund – CyberSource Payment Gateway
Using this module, the admin can also manually generate the credit memo of the order from the admin dashboard.
For that, the admin has to navigate to Sales> Order and click on the view button for the order. After that, they need to click on the Invoice button & need to select the respective invoice for the order and click on the view option, and after that click on the credit memo to initiate the Online Refund for the order.
For the reference check the below snapshot:

To initiate the refund the admin has to click on the Refund button of the Pop-Up.

Once the admin has refunded the amount to the customer, it will reflect under the Credit Memo Section of the order as per below image:

Transaction- Admin End
Also, the admin can click on the Transaction tab to see all the transactions as shown in the image below –

Transaction – CyberSource Payment Gateway
The admin can also check the list of transactions from the CyberSource payment gateway dashboard.
For that, they need to navigate through Transaction management > Transactions as per below image:

Thus, that’s all for the Magento 2 CyberSource Payment Gateway extension. If you face any issue, feel free to add a ticket at our HelpDesk system.
Current Product Version - 4.0.4-p1
Supported Framework Version - Magento 2.0.x, 2.1.x, 2.2.x,2.3.x, 2.4.x

6 comments
The module demo is working fine. If you are facing issues in the same then please write to us at [email protected] with a screenshot. We’ll surely look into the same.
Thank You.
My module is working only for VISA cards for other cards it’s not working.
Can you help me,
You can mail us your requirements at [email protected] with a complete requirement so that we can assist you in a better way.
Thanks & Regards,
Webkul Team
For the reference, check here – https://prnt.sc/qs3llo
In case of any query/doubt, please raise a ticket at our support ticket system https://webkul.com/ticket/ or you can mail us at [email protected].