CS-Cart Elastic Search module allows store owners to integrate the Elastic Search engine into their CS-Cart store.
The extension gives search suggestions and autocompletes search suggestions when customers search on the CS-Cart website.
The customers will get a highly improved search experience with the help of this extension. It will provide quick search results even for large volume data also.
The search results will be faster even if in a real-time search.
If you’re looking to enable direct print in your CS-Cart store, then you can check the CS-Cart Direct Print extension.
Note: The CS-Cart Elastic Search add-on requires Elasticsearch version 8.x or higher for proper functionality.
For example, the module is fully compatible with versions like 8.19.9, ensuring support for advanced features such as NLP (ELSER) and synonym-based search.
Features: CS-Cart Elastic Search
- The admin can easily integrate Elastic search into the CS-Cart site.
- Admin can create indexes for CS-Cart Products.
- Customers can search data by the name of the Product.
- The admin can upload or update products to the Elastic Server.
- The admin can allow Elastic Search login authentication.
- Store data on the elastic server according to the index types.
- A customer can search on the basis of the product description, meta tag title, meta tag description, category, and meta tag keywords.
- Use Hyperlocal – Enables location-based filtering in search results, showing more relevant products based on the customer’s location or store-defined locality.
Note: The Hyperlocal add-on must be installed and enabled to use Hyperlocal functionality.
Check the below mentioned video below to understand the workflow of the extension:
Installation: CS-Cart Elastic Search
When you download the add-on, you get one zip file and the install.txt file. Please read it carefully and follow it.
Firstly, click on the icon and select Manual installation to upload the zip file.

Now, click on “Local” to browse the zip file and then click on “Upload & Install”.

After installation of the add-on, you will find “Elastic Search” in the list of the available add-on. Make sure the add-on is activated.

Workflow-CS-Cart Elastic Search
The admin will click on Elastic Search and go to the settings tab. Now, in this tab, click on General to make the module settings.

Host- Enter the Elastic Search host server details.
Port- Elastic search port details need to enter.
Scheme- Select the Elastic Search scheme.
Login Authentication- Select the login authentication as disabled or enabled.
Username- Enter the username.
Password- Enter the password.
Note: An Elastic Search Engine must be installed on the system before installing this module.
In order to know whether the Elastic Search server is working fine or not,
you have to enter the mentioned URL https://your_server_ip:9200 in the browser, where 9200 is the default port number for the Elastic Search server.

After that, the admin will have to make the search settings from the Search Settings option.
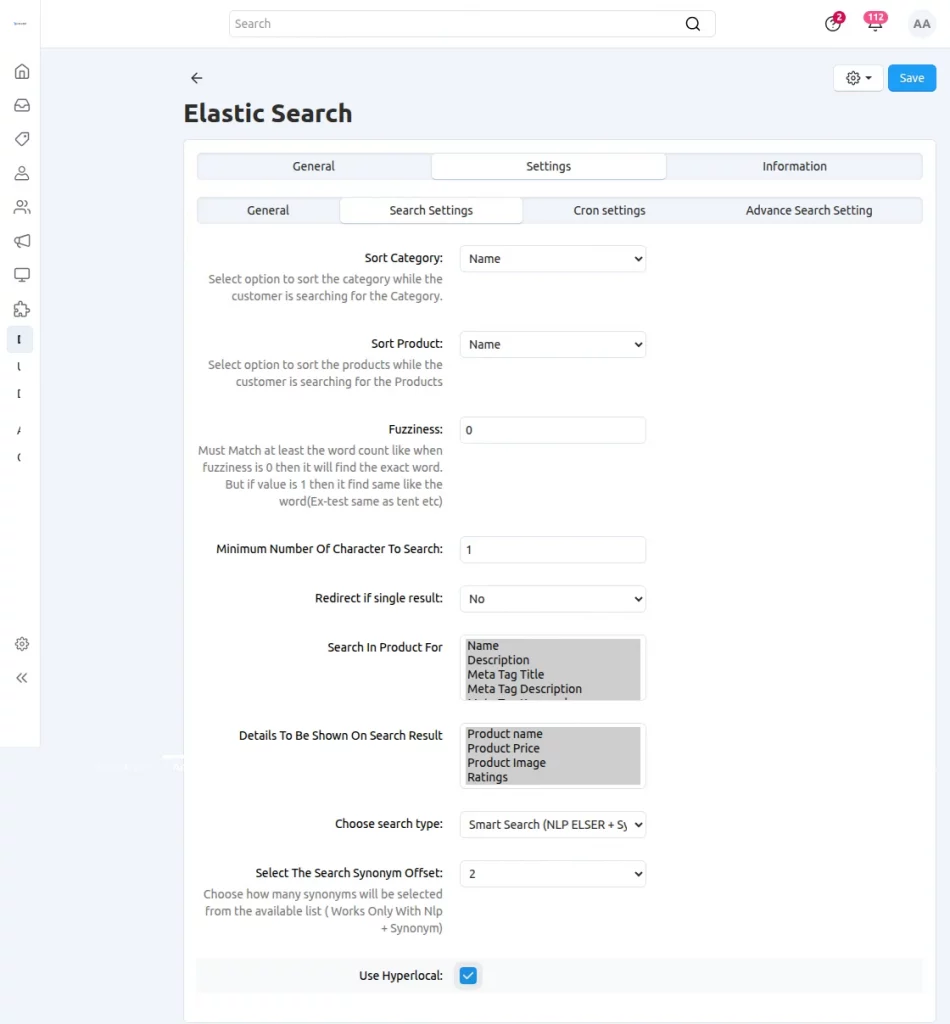
Search Settings:
Sort Category- Select the option to sort the category while the customer is searching for the category.
Sort Product- Select an option to sort the products while the customer is searching for the products.
Fuzziness- The store admin has to specify the number for the word match to show the search result.
Minimum Number of Characters to Search- Here, the admin will enter the number of characters till that the user has to enter the character.
Search in Product For- If the option is enabled, then the product will display if the user searches.
Details to be Shown on Search Result- The store admin will have to select the details which he wants to show on the search result.
Choose Search Type-
- Standard Search – Basic keyword-based search that returns results by directly matching product data.
- Smart Search (Synonyms) – Enhances search by matching synonym-based terms for improved result coverage.
- Smart Search (NLP ELSER) – Uses NLP semantic understanding to deliver intent-based and context-aware results.
- Smart Search (NLP ELSER + Synonyms) – Combines NLP and synonym intelligence for the most accurate and relevant search experience.
Select The Search Synonym Offset – Defines how many synonyms should be used from the available synonym list when processing a search query (works only with NLP + Synonym mode).
Use Hyperlocal – Enables location-based search filtering to show more relevant results based on the user’s geographic or store-defined locality.
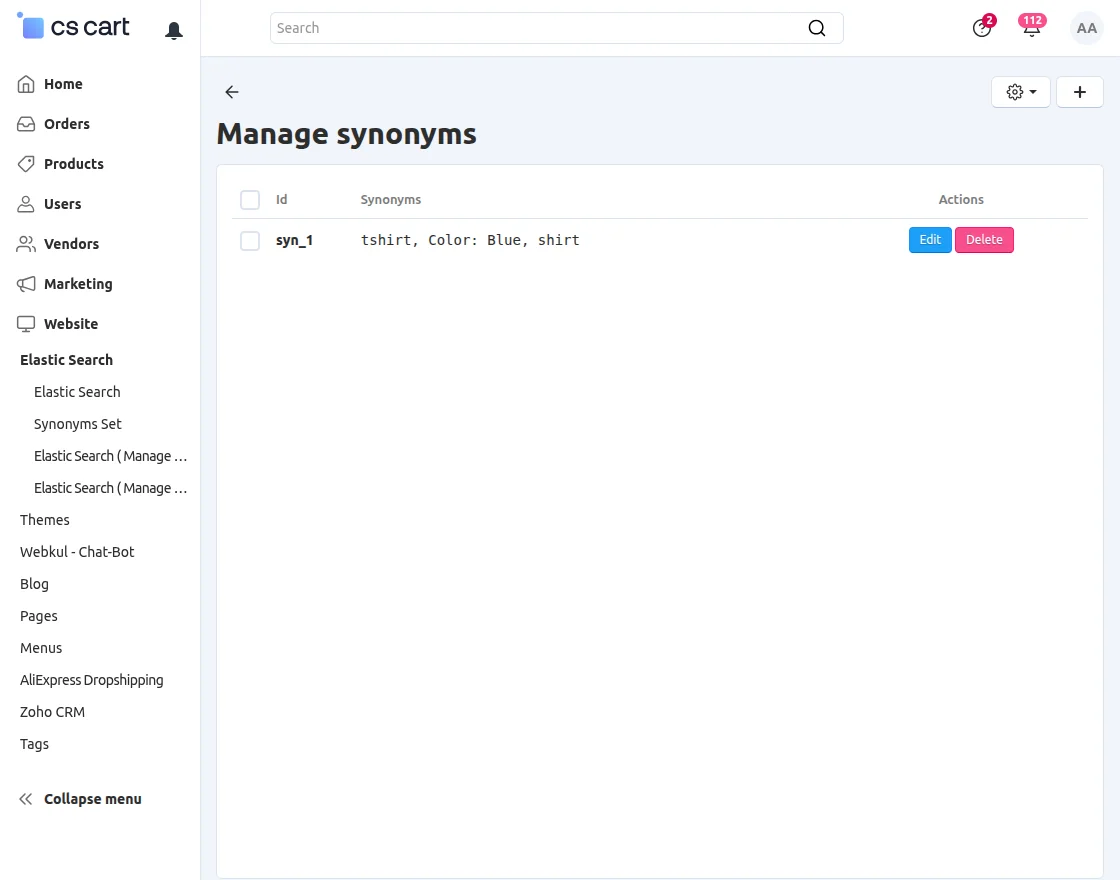
Synonym Functionality – When using synonym-based search, the Admin needs to create, add, or edit synonyms according to their product catalog and search requirements.
This ensures that different terms with similar meaning are properly mapped to return more relevant and accurate search results.
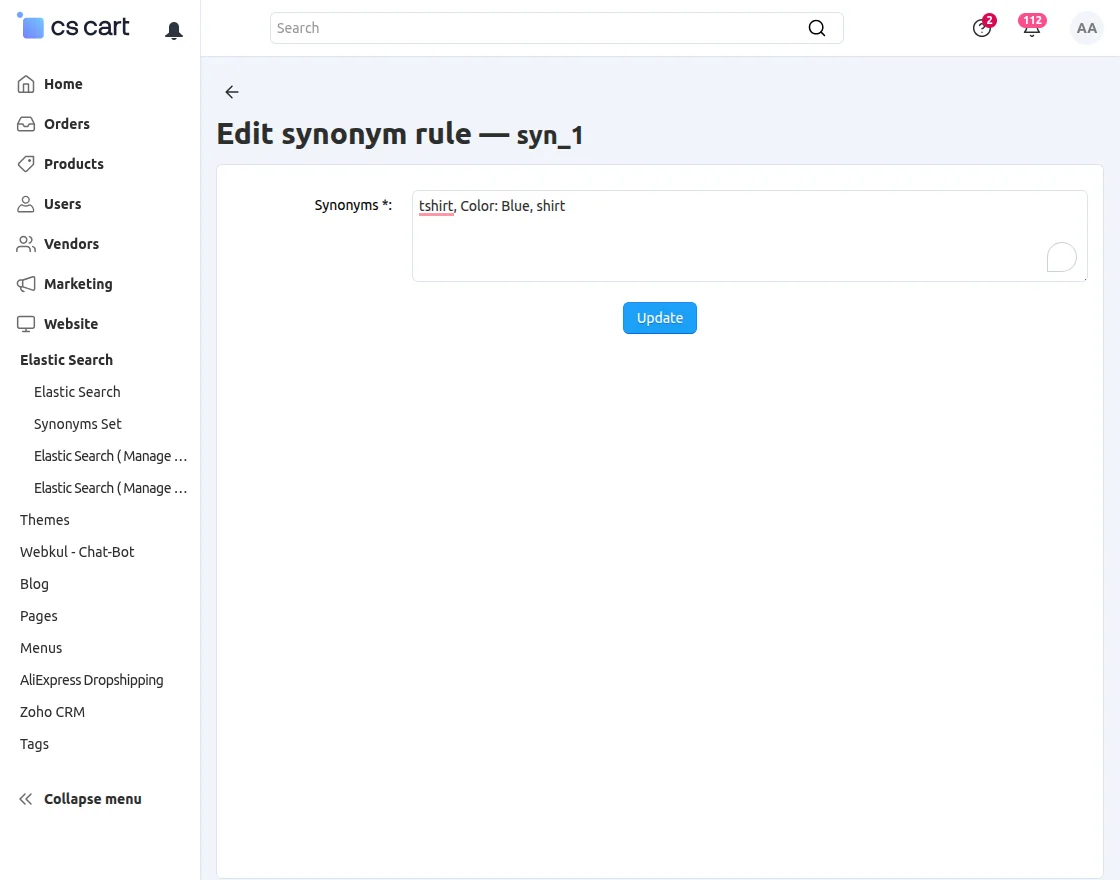
Then click on the Synonym Set option in the Elastic Search section to apply and manage the configured synonym rules.
Cron Settings:

Your site URL: Enter the full URL of your store to connect with the Elastic Search service.
Sync per page: Define how many products to sync per batch (max 500) during cron execution for optimized performance.
Advanced Search Settings
Configure the specific areas where Elastic Search should operate to deliver faster and more accurate search results.

- Search In: Select the sections where you want the search functionality to be applied.
- Products: Enables Elastic Search to return results from your product catalog.
- Category: Allows Elastic Search to include category names and details in search results.
Furthermore, the store admin will navigate through Website>Themes to make the search settings for the layout.

Once the admin clicks on the settings button present below the Search option, a pop-up will appear as shown in the screenshot:

The store admin will have to select the Elastic Search option from the dropdown options for the template.
Now, the admin will have to click on the save button to make the search template settings.
Furthermore, the admin will create the index by navigating through Website>Elastic Search.
The admin will click on the plus sign present at the top-right corner as displayed in the screenshot.
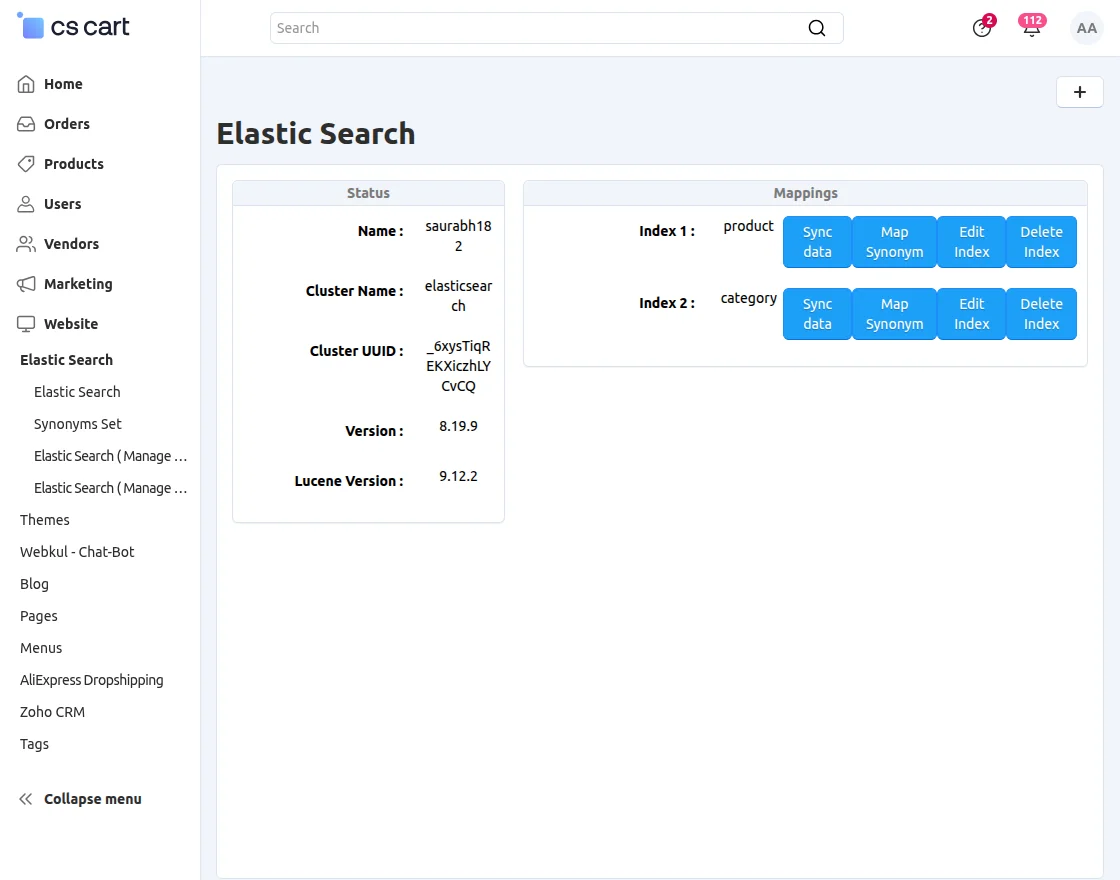
Create Index:
A page will appear to the admin to fill in the information below to create an index.
Index Name- The admin will enter the index name, and it must be in lowercase.
Index Type- After that, select the index type to map the index.
Number of Shards- The number of shards will define the ability to subdivide the created index into various pieces.
No. of Replica- Furthermore, a replica is elevated to the position of the primary shard in the event that the node hosting it dies.
Index Status-Lastly, the admin will have to enable the index status.
Moreover, the admin will click on the create button.

Furthermore, the store merchant can sync the data to the Elastic server once the index is created. Likewise, the store admin can edit and delete the index.
Elastic Search – Customer End Flow
Whenever the customer searches for any product, it shows the search results based on the settings.

Buyers can search for any product by its description also as shown in the below image.

Also, the customer gets the option to search categories by entering the category name in the search bar.

That’s all about the CS-Cart Elastic Search module. However, if you still have any questions regarding the CS-Cart extensions.
Please create a support ticket by clicking Webkul Support System or send an email to [email protected]
Current Product Version - 2.1
Supported Framework Version - 4.18.x , 4.19.x, 4.20.x

Be the first to comment.