Salesforce Advanced Live Currency Converter lets you automatically update currency conversion rates in your Salesforce Org.
Users can set custom time frames for updates and even choose different APIs to convert currencies efficiently.
Let’s explore the key characteristics and features of the Salesforce Advanced Live Currency Converter that make it a must-have tool.
Features
- Automated currency rate synchronization:
- Automatically synchronizes currency rates at regular intervals.
- Keeps currency rates up-to-date without manual intervention.
- Supports advanced currency management:
- This paid feature not only manages dated exchange rates for accurate historical currency conversions.
- But also provides flexibility in handling currency rates for specific dates.
- View scheduled conversion logs:
- Allows users to access logs of scheduled currency conversions.
- Provides visibility into past conversion activities.
- Send error emails during the conversion process:
- Notifies users via email in case of any errors during currency conversion.
- Sends error alerts to keep users informed of any issues.
- Supports multiple API services:
- Integrates with various API services for currency conversion, including Currency Converter API, Fixer, European Central Bank, Currency Layer, Open Exchange Rates, exchangerates, and Oanda.
- Provides flexibility in choosing different API services based on user preferences or availability.
Note: If the client wants any API other than these, it can be added at an additional cost
- Schedule rate updates on a daily, hourly, or weekly basis at a specified time:
- Allows users to set up automatic rate updates with different time intervals (daily, hourly, or weekly).
- Enables scheduling of rate updates at a specific time to accommodate user requirements.
Installation and Configuration of Salesforce Advanced Live Currency Converter
Install Advanced Live Currency Converter
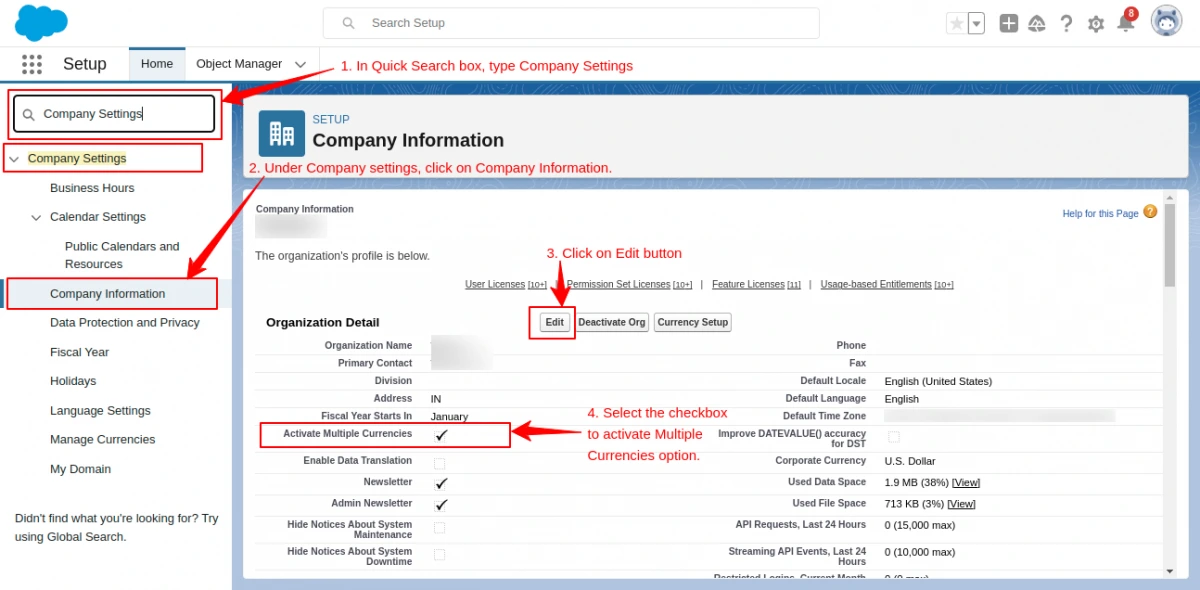
- Type Company Settings in the Quick Search
- Click on the Company Information.
- In this, you have to enable the Activate Multiple Currencies option.
- Click on the Edit button
- Then, Tick Mark Activate Multiple Currencies option
- Click the Save button to save changes.
Note: Once you enable multi-currency in a Salesforce org, it cannot be disabled again.
Install directly from AppExchange, Salesforce Advanced Live Currency Converter
- Click on the Get it Now
- Then it redirects you to the installation page
- Select the option Install for all Users
- Click on the Install button when the installation is complete, and click on the Done button.

- Now you are ready to go.
Check that the package is installed in the Salesforce Org successfully.
- Search for installed packages in a Quick search.
- Here, you can check that the list shows the name Advanced Live Currency Converter.

Permission Set
- Quickly search for Permission Sets and open it.
- Then click on Advanced Live Currency Converter Admin Permissions to grant the user access to the application.

- To assign a user, you have to click on Manage Assignment.

- Click on Add Assignment button to add a new assignment to the permission set.

- Select the user to whom you want to assign the permission set.
- After that, click on the Next button in the bottom right corner.

- On the next page, click on the Assign button, then click on the Done button.
- Now, the permission set is assigned successfully.
Configuration
- In Salesforce Org, click on App Launcher and then click on the View All option.
- Now, look for the “Advanced Live Currency Converter”.
- Then click on it to open the connector.
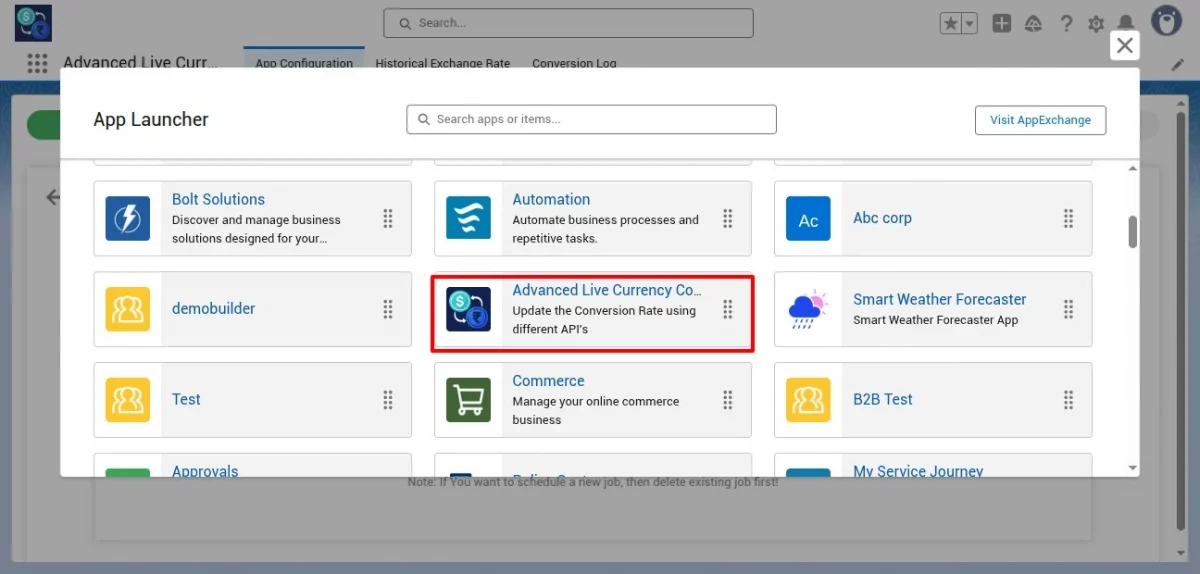
- Now, it redirects you to the App Configuration tab.
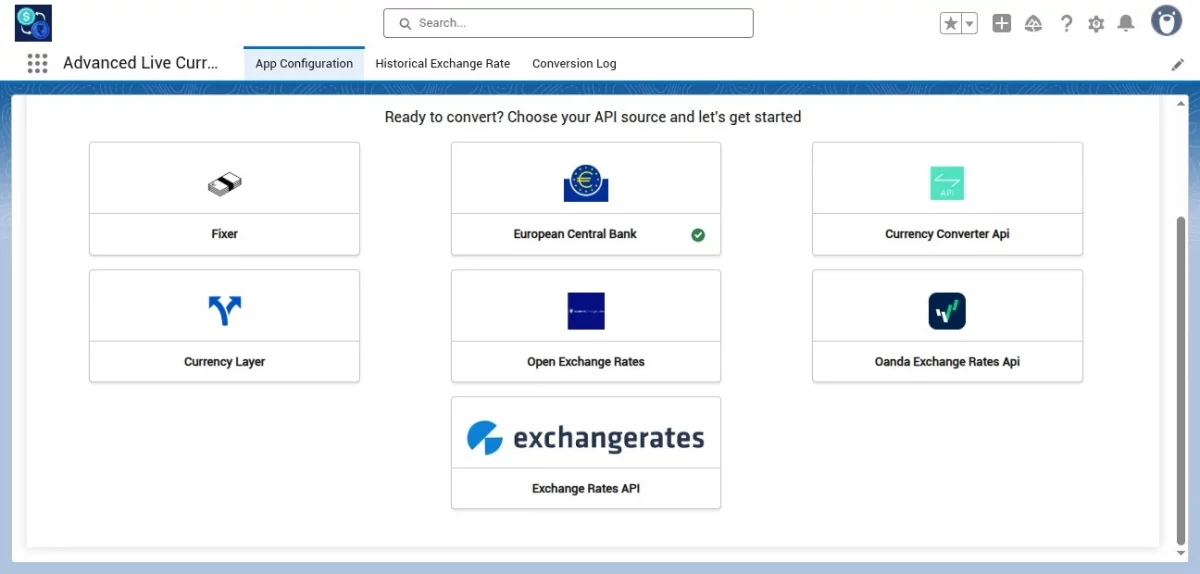
- In the first tab of the Pick your Conversion API, select the Preferred API source. This API will be used to fetch the currency exchange rates.
Note: If you select the European Central Bank, you must set the base currency as the Euro under Manage Currencies. After that, it will work.
- Then you are in the 2nd tab named Connect to Your Source.
- Here, you have to enter the API key to connect your source.
- If you don’t have an existing API key, generate a new one from the link mentioned at the bottom of your screen.
- After entering the API key, click on the Save & Proceed button to continue.

- Proceed to the next tab, named ‘Customize Your Conversion’.
- Here, you have to select the currencies for updating the conversion rates at the Salesforce end. If you deselect any currency, you won’t receive related updates.

- Now you are in the next tab, Automate Your Currency Conversion.
- Select the time interval at which you want to update the currency conversion: Hourly, Daily, or Weekly.
- Then, select the hours, time, and days accordingly.


- Then, click on the Set Schedule button to schedule the conversion as per your requirements.
- After that, you will see the Schedule Job Details.

- Now, you are all set and ready to use Salesforce Advanced Live Currency Converter.

- To enable Data Exchange Rates, click on the Gear icon at the top right corner of Salesforce.
- Then, click on Setup, and in Quick Search, type Manage Currencies.
- In Manage Currencies, click on Enable to activate Data Exchange Rates.

Conversion Logs
In the Conversion Logs tab, you will see the conversions based on the scheduled date and time.
- You can set how long the logs should be maintained. The older logs, beyond the specified duration, will be deleted automatically.

- Click on View Converted Currency to check the currency rates as per your configuration.

- You can also delete the logs in bulk or individually by making a selection.

- When your log job is scheduled, it will look like this. You can also delete this scheduled job to create a new one.

- To view this scheduled job in your Salesforce org:
- Go to Quick Search and type Jobs.
- Then, click on Scheduled Jobs.
- Now, you will be able to see that your Salesforce Advanced Live Currency Converter job is scheduled successfully.

Support
- For any further query, Click To Create Ticket.
- Want to check feature pricing? Contact us here!
- Got questions? Our FAQs have detailed answers to everything you need.
- To view all our applications in AppExchange, go to Webkul Appexchange Apps.

Be the first to comment.