Open AI Product Feed for UnoPim helps businesses create a structured product feed from UnoPim that OpenAI can read.
The module allows you to map attributes, generate feeds in TSV or JSON format, and publish them through a secure token-protected URL.
This guide walks you through every step of configuring feed settings, mapping attributes, generating products feed, and submitting the URL to OpenAI.
Basic Requirements
- UnoPim 1.0.0 instance with OpenAI Feed package installed.
- For UnoPim installation, make sure your server meets these system requirements.
- An OpenAI / ChatGPT Merchant account for feed submission.
Features
- Generate ChatGPT-compatible product feed from UnoPim in TSV or JSON format.
- Protect feed access using a cryptographically secure token-based URL.
- Map UnoPim product attributes to OpenAI feed fields through a simple admin interface.
- Trigger feed generation manually from the admin panel at any time.
- Generate feed on demand from the command line using the Artisan CLI command.
- Print the authenticated feed URL directly from the CLI using the –show-url flag.
- Monitor the last 5 feed generation attempts with real-time status polling in the dashboard.
- Process large product catalogs in configurable batches to prevent memory errors.
- Set target countries and store country for geographic targeting of AI product listings.
Installation
Follow the steps below to install the OpenAIFeed Connector in UnoPim.
Step 1: Extract the Extension
Unzip the extension package and merge the packages folder into the project root directory.
Example structure:
/your-unopim-project
└── packages/
Step 2: Register Service Provider
Open the file: config/app.php
Add the following line under the providers array
Webkul\OpenAIFeed\Providers\OpenAIFeedServiceProvider::class,
Step 3: Register PSR-4 Autoload
Open the project-level composer.json and add the following entry under the psr-4 section:
"Webkul\\OpenAIFeed\\": "packages/Webkul/OpenAIFeed/src"
This ensures Laravel/PHP can autoload the connector classes.
Step 4: Run Setup Commands
Run the following commands from the project root directory.
composer dump-autoload
php artisan migrate
php artisan openai-feed:install
php artisan optimize:clear
Note: For UI theme building, run the npm command inside the package folder: packages/Webkul/OpenAIFeed
npm i && npm run build
You can remove the node_modules after installation.
After the package is installed, the connector appears in the left-hand sidebar of your UnoPim admin panel.
How to Use UnoPim AI Product Feed for openAI search
After the package is installed, the connector appears in the left-hand sidebar of your UnoPim admin panel under the label OpenAI Feed.
Admin Panel → OpenAI Feed
Clicking OpenAI Feed expands two sub-menu items:
- General
- Configuration
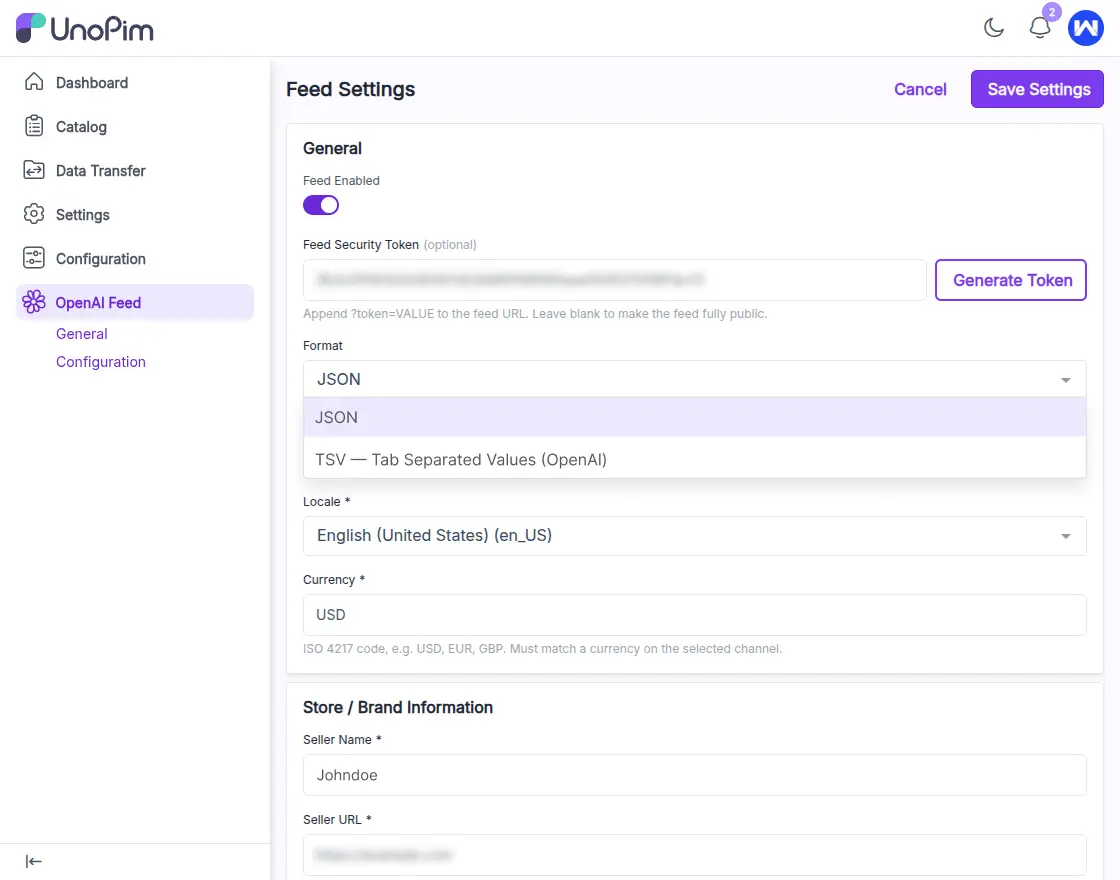
Step 1 — Configure General Settings
Go to OpenAI Feed → Configuration. This section controls the core feed behavior. Fill in each field, then click Save Settings in the top-right corner.
Feed Status: Toggle Feed Enabled to activate the feed. When disabled, the feed URL returns no data even if it has been submitted to OpenAI.
Feed Security Token : Click Generate Token to create a cryptographically secure access token. This token is appended to your feed URL as a query parameter.
Format : Select your preferred feed format from the dropdown:
- TSV — Tab Separated Values: Recommended by OpenAI for ChatGPT Search.
- JSON: Available for broader AI platform compatibility.
Channel & Locale : Select the Channel and Locale that match the storefront you want to expose in the feed.
Currency : Enter the ISO 4217 currency code for your pricing (e.g., USD, EUR, GBP). This must match a currency configured on the selected channel.
Store / Brand Information: Add Seller Name and Seller URL.
OpenAI Commerce Flags : The right-side panel contains additional OpenAI-specific settings:
- Eligible for ChatGPT Search: Enable this to allow products to appear in ChatGPT search results.
- Eligible for ChatGPT Checkout: currently our connector does not allow this, hence requires is_eligible_search = false .
Geography & Targeting (Right Panel)
- Target Countries: ISO 3166-1 alpha-2 country codes, comma-separated (e.g., US, GB, CA).
- Store Country: The country where your store is based (e.g., US).
Click Save Settings before moving to the Configuration tab.
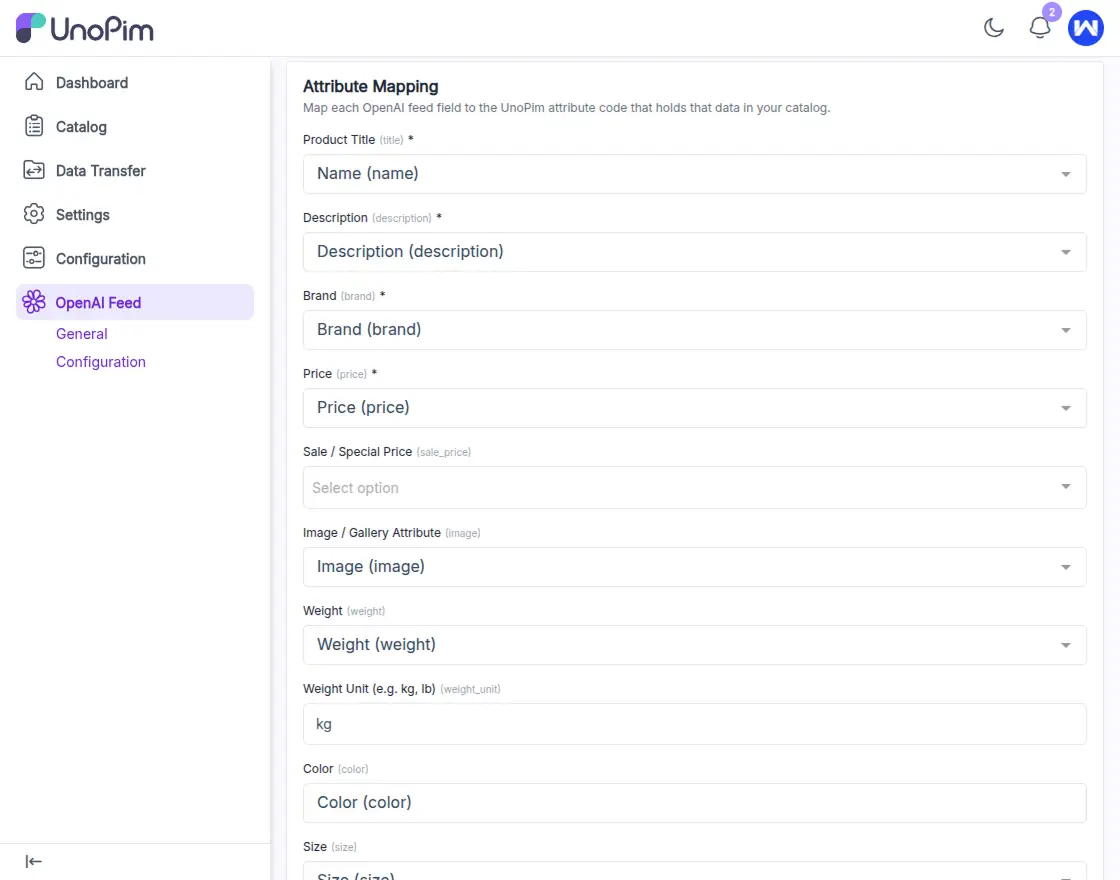
Step 2 — Attribute Mapping & Configuration
Go to OpenAI Feed → Configuration. This is where you connect your UnoPim catalog attributes to the fields OpenAI expects in the product feed.
Attribute Mapping
OpenAI requires specific field names in its product feed. Your UnoPim catalog uses your own attribute codes.
The mapping interface bridges the two. For each OpenAI field, select the corresponding UnoPim attribute from the dropdown.
| OpenAI Field | Internal Code | Map to UnoPim Attribute | Required |
| Product Title | title | name / product_name | Required |
| Description | description | description / short_description | Required |
| Brand | brand | brand / manufacturer | Required |
| Price | price | price / retail_price | Required |
| Image / Gallery Attribute | image | base_image / gallery_images | Required |
| Sale / Special Price | sale_price | special_price / sale_price | Optional |
| Weight | weight | weight | Optional |
| Weight Unit | weight_unit | weight_unit (e.g. kg, lb) | Optional |
| Color | color | color | Optional |
Map at minimum: Product Title, Description, Brand, Price, and Image. Required fields cannot be left empty .
Save Settings after completing all attribute mapping and configuration fields.
Step 3 — Generating Your Product Feed
Once settings and attribute mapping are saved, you are ready to generate the feed. There are three ways to trigger feed generation:
Option A: Manual Generation from Admin Panel
- Go to OpenAI Feed → General in the admin panel.
- Click the Generate Now button.
- The dashboard will show the generation attempt status in real time.
- Once complete, the feed file is ready at your secure token-protected URL.
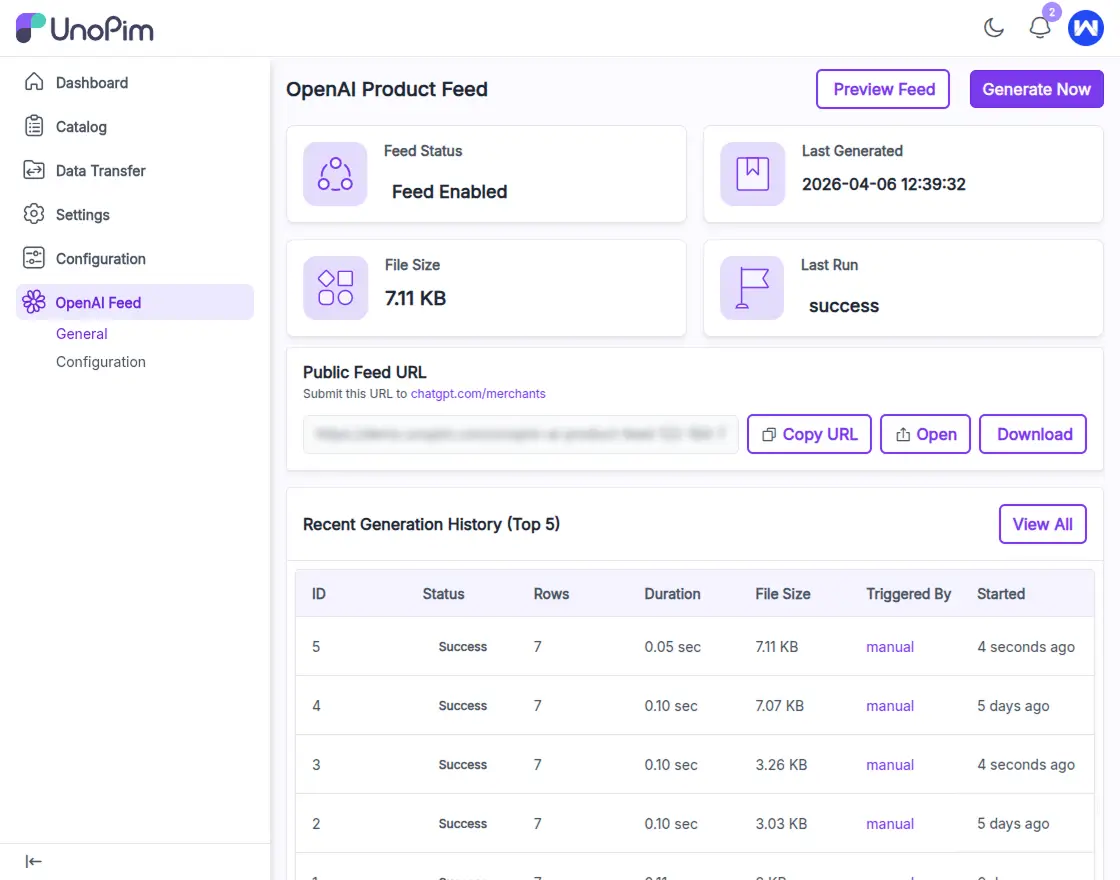
The dashboard shows the last 5 generation attempts with timestamps and status. Use this to confirm success or identify failures.
Option C: CLI Generation
Generate the feed on demand from the command line:
php artisan openai-feed:generate
To generate the feed and print the authenticated public URL in the terminal:
php artisan openai-feed:generate –show-url
Copy the output URL — this is the URL you submit to OpenAI.
Step 4 — Retrieving Your Feed URL
After the feed is generated, you can retrieve the secure feed URL in two ways:
From the Admin Panel
- Go to OpenAI Feed → General.
- After a successful generation, a Download Feed button and a Copy URL button appear in the dashboard area.
- Click Copy URL to copy the token-authenticated feed URL to your clipboard.
From the CLI
Run the following command from your server:
php artisan openai-feed:generate –show-url
The full URL including the security token is printed to the terminal.
The feed URL format is: https://yourdomain.com/openai-feed?token=YOUR_SECURE_TOKEN — the token parameter authenticates the request to OpenAI.
Step 5 — Submitting the Feed URL to OpenAI
With your feed URL ready, submit it to OpenAI to make your products visible to OpenAI Search.
- Log in to your OpenAI Merchant account.
- Navigate to the Product Feed or Shopping settings section.
- Paste your token-authenticated feed URL into the feed submission field.
- Select TSV as the feed format (or JSON if that is what you generated).
- Save and submit the feed for OpenAI review.
OpenAI will crawl and index your feed. Once approved, your products will begin appearing in ChatGPT search results for relevant queries.
Step 6 — Monitoring Feed Status
The admin dashboard logs every feed generation attempt. Navigate to OpenAI Feed → General to view the status panel.
The dashboard shows the last 5 attempts. Each row displays the generation method (manual, cron, CLI), timestamp, and result status.
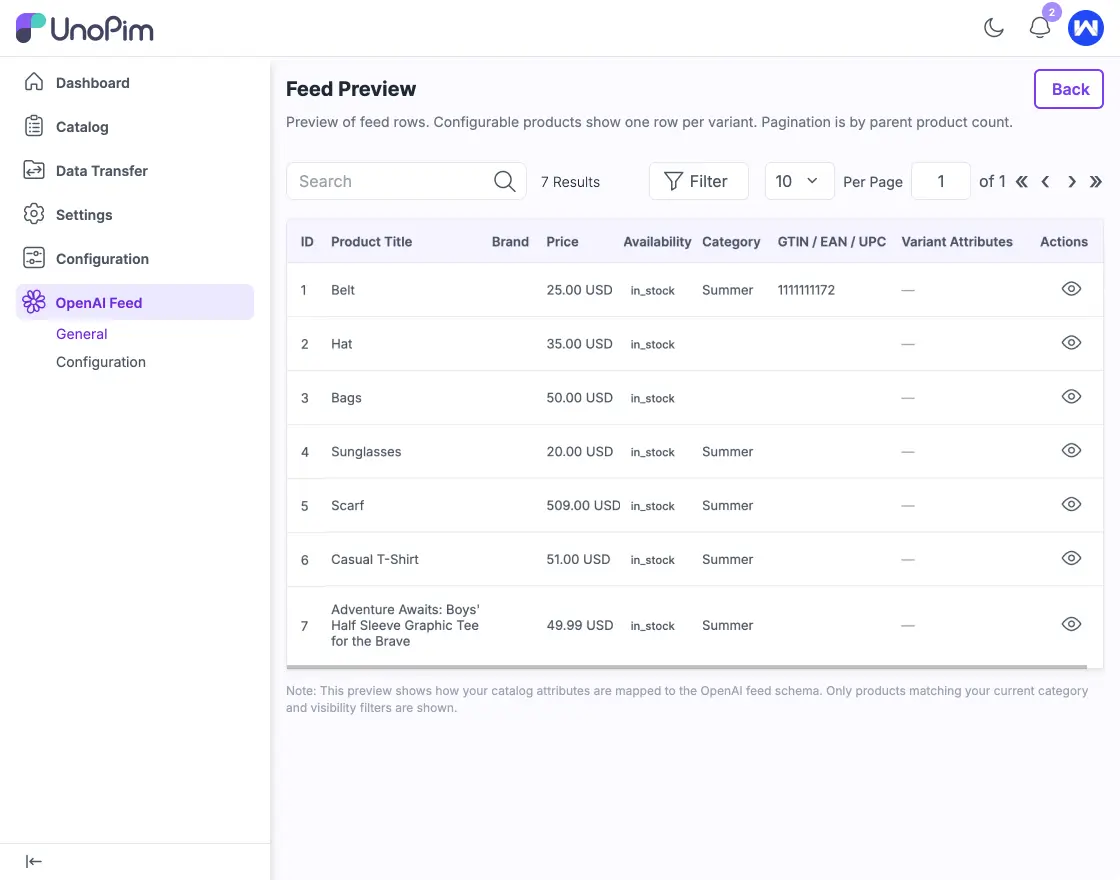
Step 7 – Preview Feed
From the Admin Panel
- Go to OpenAI Feed → General.
- Click on Preview Feed .
Support
This was all about UnoPim AI Product Feed Connector. I hope you have got the idea of our module. Thanks for taking the time to read this blog.
And also, please don’t forget to share your feedback and suggestions in the comment box given below.
Moreover, If you have any queries or suggestions, then feel free to add a ticket at our HelpDesk system or reach out to us at [email protected].
Current Product Version - 1.0.0 || 1.1.0
Supported Framework Version - 1.0.0 || 2.0.0

Be the first to comment.