Integrate your e-commerce store with the world’s largest active social networking platform – Facebook. Share your Facebook updates such as links, stories, images, videos etc. instantly with your store visitors and socialise with them further. All the information appears exactly as it appears on the Facebook website, there is no alteration or modification. The feed information can be retrieved either from your user Facebook page, you need Facebook Account Id, App Id, Secret Key and Access Token for this module to work.
Features
- Feed information is displayed instantly without any delay.
- Wall posts can be retrieved either from any Facebook page.
- Compatible with all the web browsers (Internet Explorer, Firefox, Chrome, Safari)
- Width and height of the Facebook wall can be adjusted by entering your desired pixel values.
- Colour customisation can be done to wall background, comment background, comment and wall data.
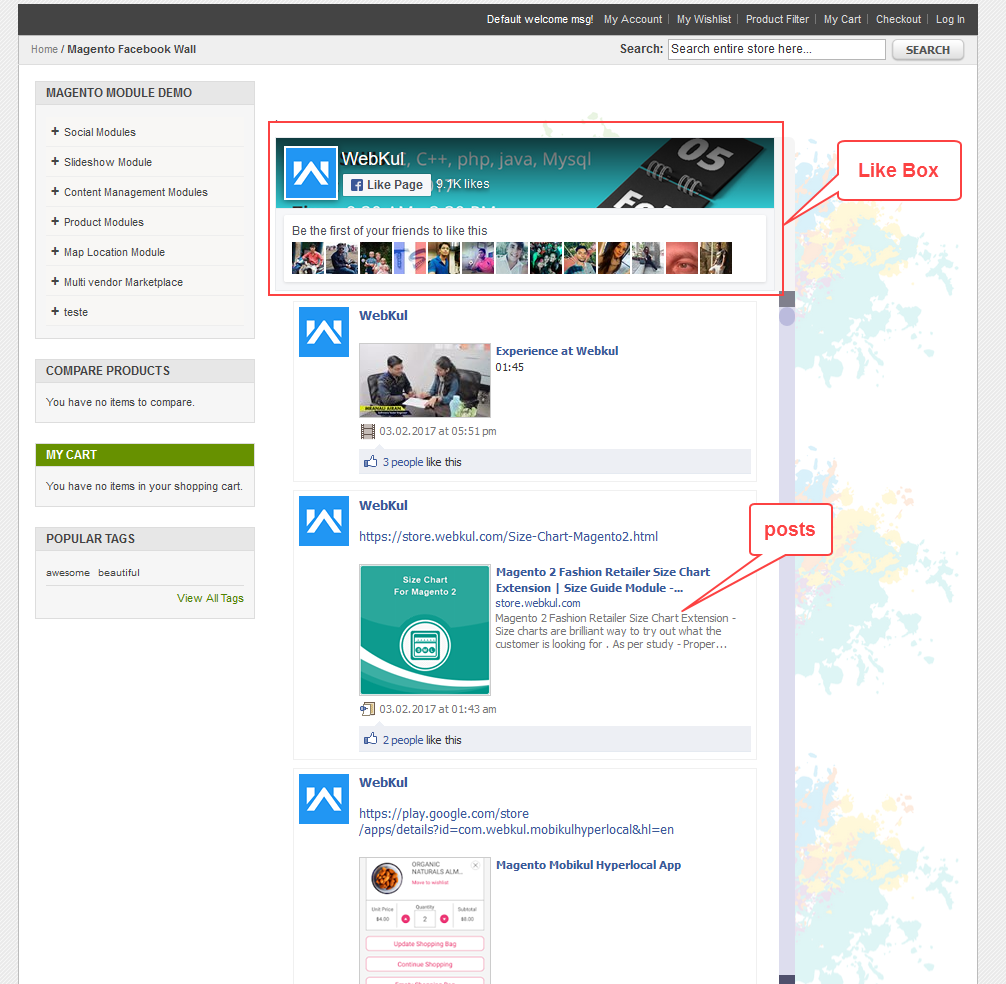
- Facebook Like Box can be shown on the wall which includes your cover photo, the total number of likes and a button to like the page. People who are visiting your page may also see a count of friends who have liked the page, with their profile photos attached in the Like Box.
- Profile picture of the page can be shown or hidden from the wall.
- The comments section can be shown or hidden from the wall, the number of comments and posts to display can also be customised.
- Images on the feeds can be shown or hidden from the wall.
- Character limit to display for the posts can be set according to your requirement.
Installation
To install this module, extract the files from the downloaded zip and copy folders named app and skin into Magento root directory as shown below.

After copying both the folder, flush cache storage from Magento admin panel by navigating through System > Cache Storage Management > Select All > Flush Cache Storage.
How to Get Credentials
To make Facebook Wall Post module work, you need to obtain these four credentials: –
- Facebook Account Id
- App Id
- Secret Key (App Secret)
- Access Token
First, log into your Facebook account and visit this link. The following page will appear, click Register Now button as shown in the screenshot.

A small window will be appearing, click Yes and Next buttons.

Now select your Country and enter your Phone Number to get the Confirmation Code on your phone. Click Register button to register yourself as a Facebook Developer.

Now your Facebook Developer account has been created, click Create App ID button as shown in below screenshot.

Give any Display Name for this App ID, put your email address in the field and choose a category. Click Create App ID button to move on to the next step.

Enter the security check text and click Submit button.

After creating an App ID successfully, you will arrive at the Dashboard. Go to Basic under Settings menu to view and copy your App ID and App Secret for the Magento Configuration, please view below screenshot for reference.

Please enter App Domains as webkul.com and scroll down and click Add Platform button as shown in below screenshot.When adding a new platform, select Website option.


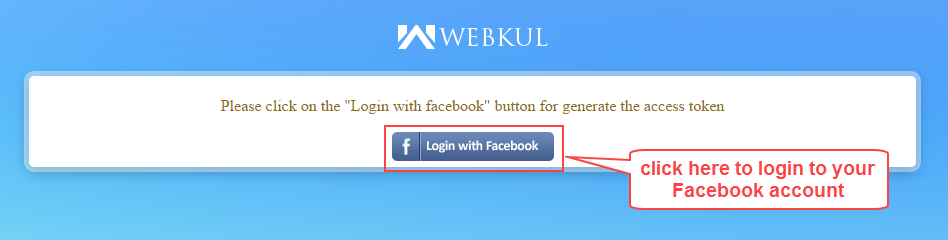
Now visit this link for creating an Access Token for your Magento Facebook Wall Post module. Enter the App ID and APP Secret as shown below.

You will be prompted with a message Login with Facebook , please log in to move on to the next step.
After logging into your Facebook account, you will get this pop-up display, click Continue as.. button.
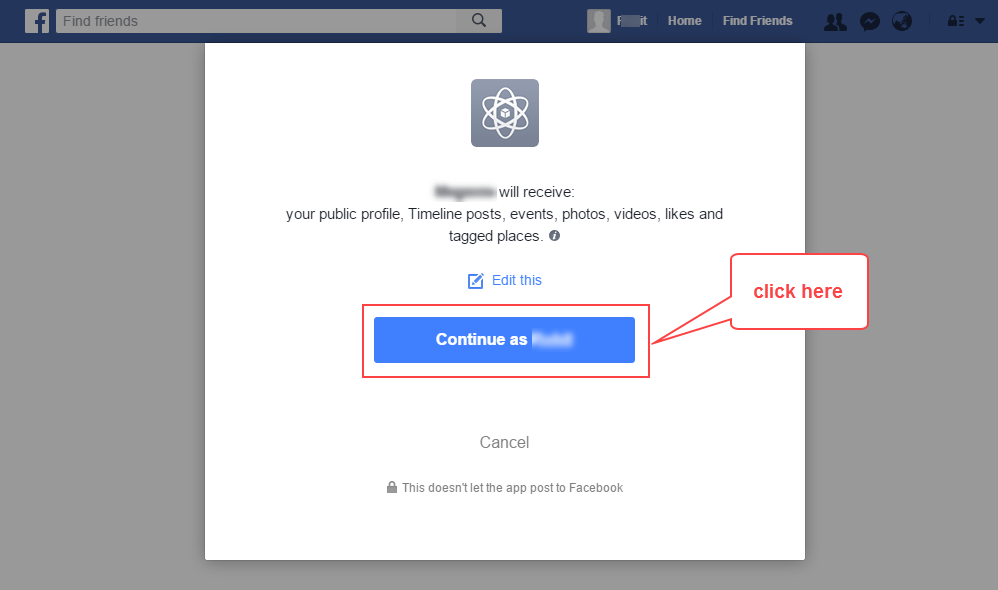
Select the Public option from the menu and click OK button.

Click OK button to move on to the next step.

Finally, you’ll be able to view your newly created Access Token. Copy this and paste it in your Magento Configuration.
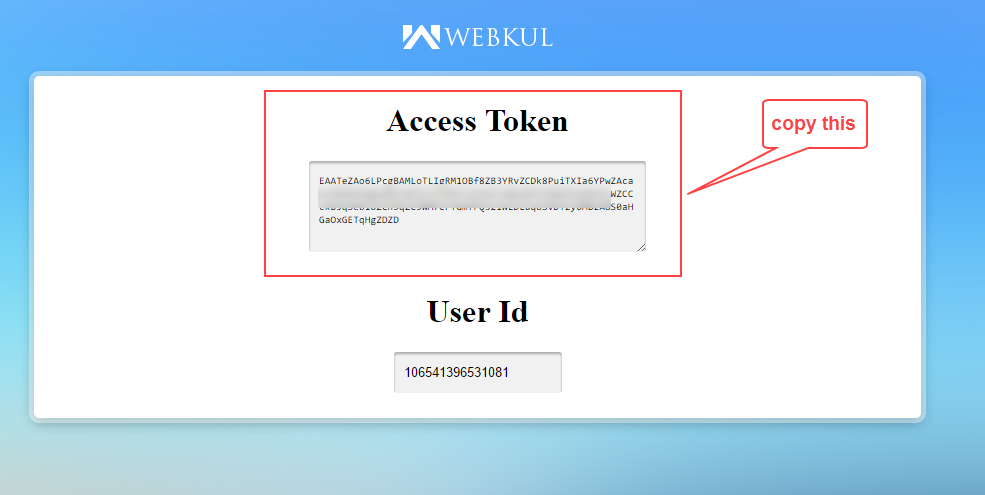
To view your Account ID go to your web browser and open your Facebook page, in the address bar you’ll able to see your Account ID. Please the below screenshot for the reference. Copy this and paste it in the Magento Admin configuration.

Admin Configuration
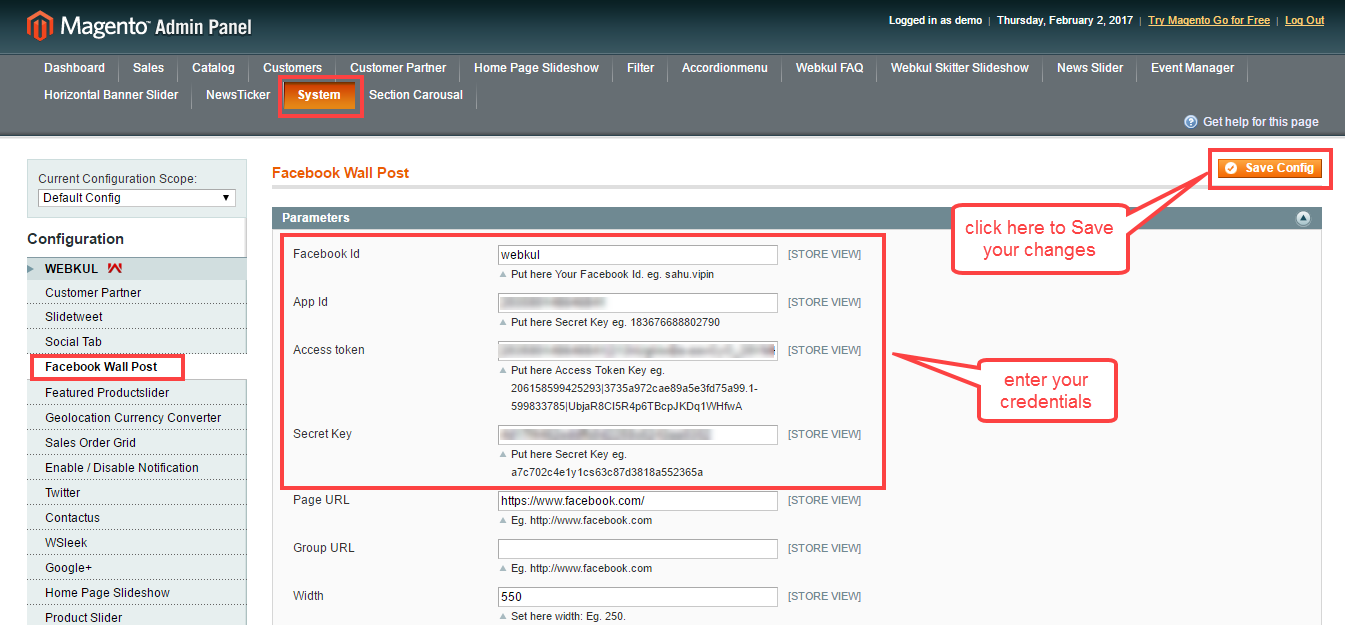
After successfully creating your credentials and installing this module in Magento, login to your admin account. Now to do the configuration of this module navigate through System > Configuration > Facebook Wall Post.
Enter your Facebook Id, App Id, Access Token and Secret Key and click Save Config button.
Now after entering your credentials for Facebook Wall Post module, you need to set up the following parameters according to your preferences:
Page & Group URL – If enabled, links can be set for your facebook page and group page.
Width & Height – Enter the dimensions of the Facebook Wall which will appear on your store.
Show Facebook Like – Set this option to Yes, if you want to display Like button under Like Box.
Show Facebook Like Box – Set this option to Yes, if you want to display Facebook Like Box element on your wall.
Color Preferences – Enter colors for comment background, wall background, comment and wall data.

Show Faces – Set this option to Yes, if you want to display faces of people in Like Box.
Enter Header Text – Enter header text for the Facebook wall which will appear on top.
Show Facebook Logo – Set this option to Yes to display the Facebook logo on your wall.
Show Comments – Set this option to Yes to display comments on posts.
Show Number of Comments – Enter the number of comments and posts to display on your wall.

Show Guest Entries – Set this option to Yes if you want to display visitors posts on your wall.
Show Media Image – Set this option to Yes, if you display images on your wall.
Show Group URL – Set this option to Yes/No to Show/Hide Facebook group page URL link on your wall.
Show Page URL – Set this option to Yes/No to Show/Hide Facebook page URL link on your wall.
Show in Window – Select option Same Window to display new link pages on the current window else select New Tab option to display new pages on another tab of the browser.
Show Date – Select Yes option to display date and time under Facebook posts.

Show Profile Pic – Select Yes to display your Facebook profile picture on your posts.
Theme – Select Yes option to enable below customizations for your Magento Facebook wall.
Content See More & Less Text – Enter the labels for the See More & See Less element on posts.
Limit of Characters You Want to Display – Enter how many characters you want to display in each post.
Delay Need to Open See More – Enter time delay for showing See More content on the wall.

Click Save Config button on the top of the page to save your changes.
Now navigate through CMS > Pages and select a page or create a page where you want your Facebook Wall will appear. Click Content tab and enter the following code in the text editor.
{{block type=”facebookwallpost/facebookwallpost” template=”Facebookwallpost/Facebookwallpost.phtml”}}
Click Save Page to save your changes.

Note- If there are multiple stores then, please make sure that, in the Admin Panel > system > configuration-> Current Configuration Scope :[STORE VIEW] for all fields should be checked.
User Front-End View
From the screenshot below you can see how your Facebook page will appear on the e-commerce store.
Thank you for viewing this blog, please share your views and comments. If you have any query please visit us at webul.uvdesk.com
Current Product Version - 1.0.0
Supported Framework Version - Magento 2.0.x, 2.1.x, 2.2.x,2.3.x, 2.4.x

Be the first to comment.