WCFM Marketplace Shopify Connector plugin allows the vendors to sync products, orders, and map categories between the WCFM Multi-vendor Marketplace Store and the Shopify eCommerce store.
This connector allows real-time synchronization of the product’s price, quantity, and SKU.
Note:
- You must have first installed the WCFM Marketplace before making use of this connector.
- This module is now compatible with WooCommerce’s latest feature Cart and Checkout blocks and WooCommerce’s new High-Performance Order Storage (HPOS) feature.
We provide a production version of the plugin. If you want a development version then you can get it at an additional cost. Please contact [email protected] for it.
Note:
- It will only export those products from WooCommerce which has up to three variation attributes. As per Shopify’s listing policy, Products with more than three options for variation will not be a part of the list in Shopify.
- Before importing products into your WooCommerce store, please ensure all required product details are correctly configured on your Shopify store. If any changes are made to a product on Shopify after import, such as switching from a single variant to multiple variants or vice versa, the sync process may not function correctly.
Looking for a point of sale system for your WooCommerce WCFM Marketplace? Check out our WooCommerce WCFM Marketplace Point of Sale extension.
Features
- Sellers can connect their multiple Shopify accounts to the WCFM vendor account.
- The seller can export and import products with connected Shopify accounts
- The seller can Export and import the orders with connected Shopify accounts
- Seller can map the categories ( It will depend on the Marketplace WCFM end coding )
- Real-time Sync products’ price, quantity, and SKU in real-time.
- Export orders in real time to Shopify.
- Allow sellers to manage the exported order’s shipping status from their Shopify Account.
- Shopify admin manages the order’s shipping status(fulfillment status) so we will allow the seller to do the same for WCFM exported orders.
- The vendors can add a Tracking Number and Shipping Carrier on the Shopify account to mark the WCFM exported orders as fulfilled.
- The customer who ordered from the WCFM end will be able to get the order shipping status(as the default WooCommerce flow).
- If the seller adds a tracking number at the Shopify end then that will be shown at the WCFM order end too for the customers.
- The seller can import the product images in the background to optimize the product’s import process.
Installation – WCFM Marketplace Shopify Connector
The user will get a zip file that he has to upload in the “Add New” menu option in the WordPress admin panel.
For this, login to the WordPress Admin Panel, and Under the Dashboard hover your mouse over the “Plugins” menu option which brings out a Sub-Menu, and then select the “Add New” option.

After this, you will see an option on the top of your page that is “Upload Plugin”, click the option to upload the zip file.

By clicking on the “Upload Plugin” option, below that you will see a button “Choose File” click on the button to browse for the zip file as per the snapshot below.

After browsing the file, click the “Install Now” button to install the plugin as per the snapshot.

Now when the plugin is installed correctly, you will see the success message and an option to activate the plugin.
Henceforth now, click on “Activate Plugin” to activate the installed plugin.

Thus, the admin can install the module. Now, we will navigate to Webkul WC Addons and it will show us the list of all the installed Webkul Woocommerce Addons.

From the Webkul Addons, we will click on the settings of the installed Addon WCFM Marketplace Shopify Connector and then we will be redirected to the Vendors Account List page.

The rest of the configuration is available at the WooCommerce WCFM Marketplace vendor end.
Activate and Update Plugin
Check out how to activate the WooCommerce Plugin through the purchase code and get updates on Webkul Modules directly on the Plugins page
WCFM Marketplace Vendor Configuration
The vendors will log in to their WooCommerce WCFM marketplace from the storefront. To do so, they must enter their vendor account details and tap on the login button.

After logging in, the vendor will see their dashboard and can find a menu option -“Shopify Connector”.

Here, the vendors can add a new Shopify account or manage the already added ones as required.
Add a New Shopify Account – WCFM Marketplace Shopify Connector
To add a new Shopify account, tap on the Add New Account link and the below section opens.
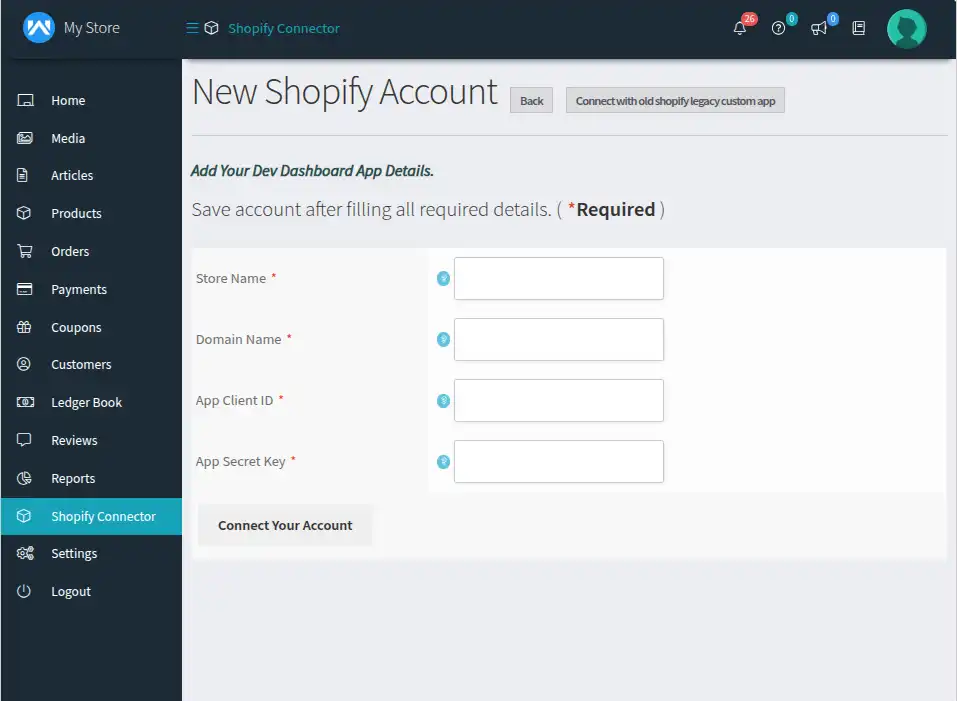
Here, the vendor needs to add the Shopify store details that include –
- Store Name
- Token
- Domain Name
- API Secret Key
After entering the details, tap on the Save option.
How to Get an API Credential From Your Shopify Account
If you are using a Shopify custom legacy app, click here to view the old process.
To get the API credentials, the admin needs to generate the Shopify API credential first using the Shopify account.
The admin can visit the Shopify store for which the admin wants to connect and sync the WooCommerce store.
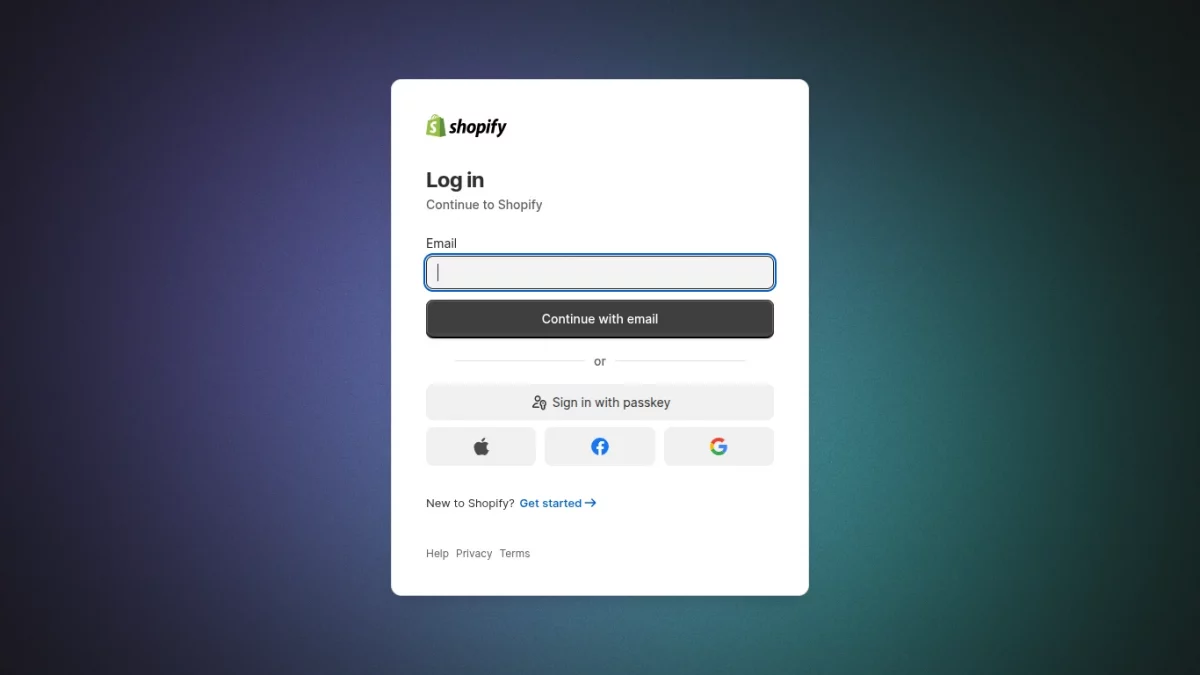
Step 1 – Log in to your Shopify Admin
First, log in to your Shopify store using:
Your store URL
Your admin username and password
Make sure you are logged in as a store owner or have app developer permissions.
Step 2 – Navigate to “Apps ”
From the Shopify left sidebar menu:
Click Settings, then select Apps
This is where all integrations and custom apps are managed.
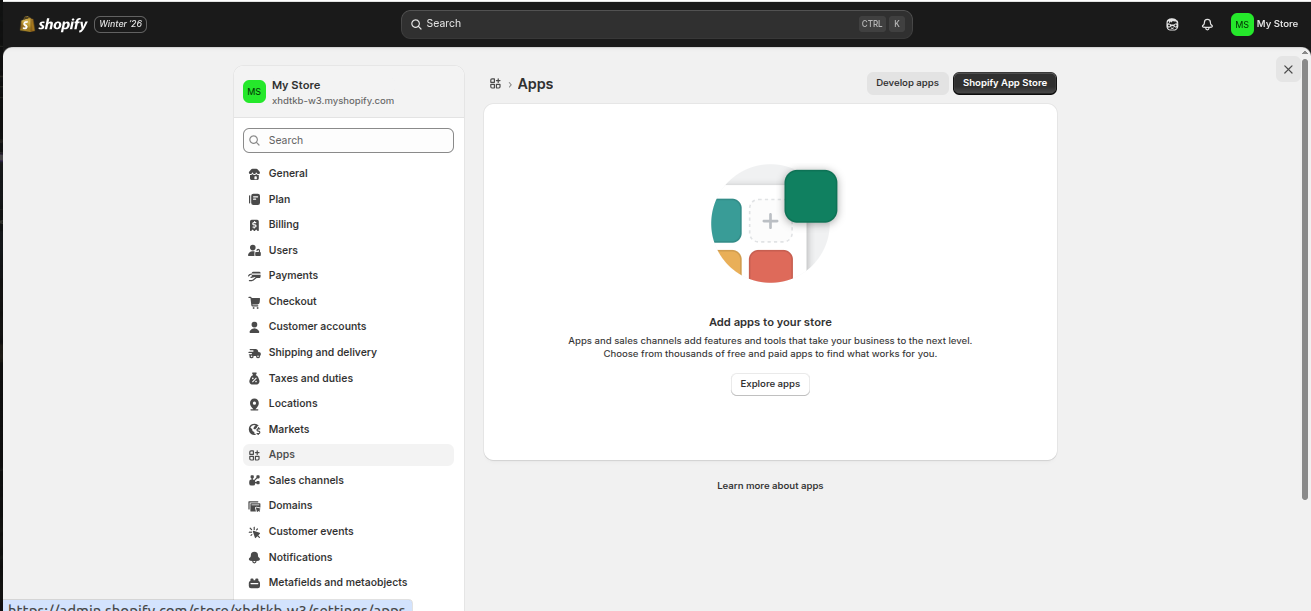
Step 3 – Open the “Develop Apps” Section
On the top-right corner of the Apps page, click:
Develop apps
This option allows you, as a vendor, to create a custom/private app so that APIs can be used for integration.

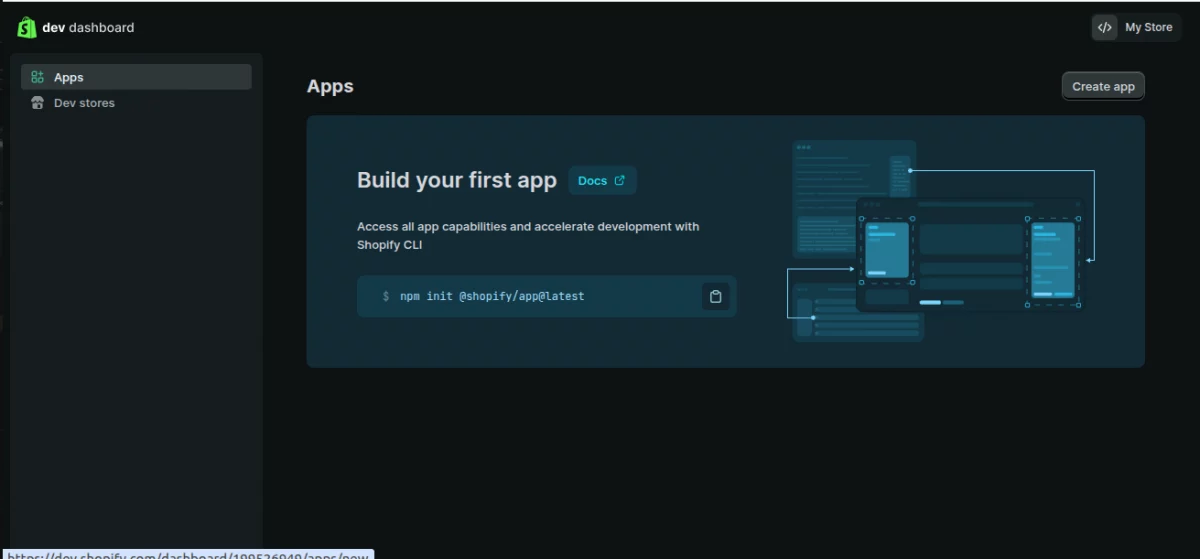
Step 4 – Click on the “Build apps in the developer dashboard” option.
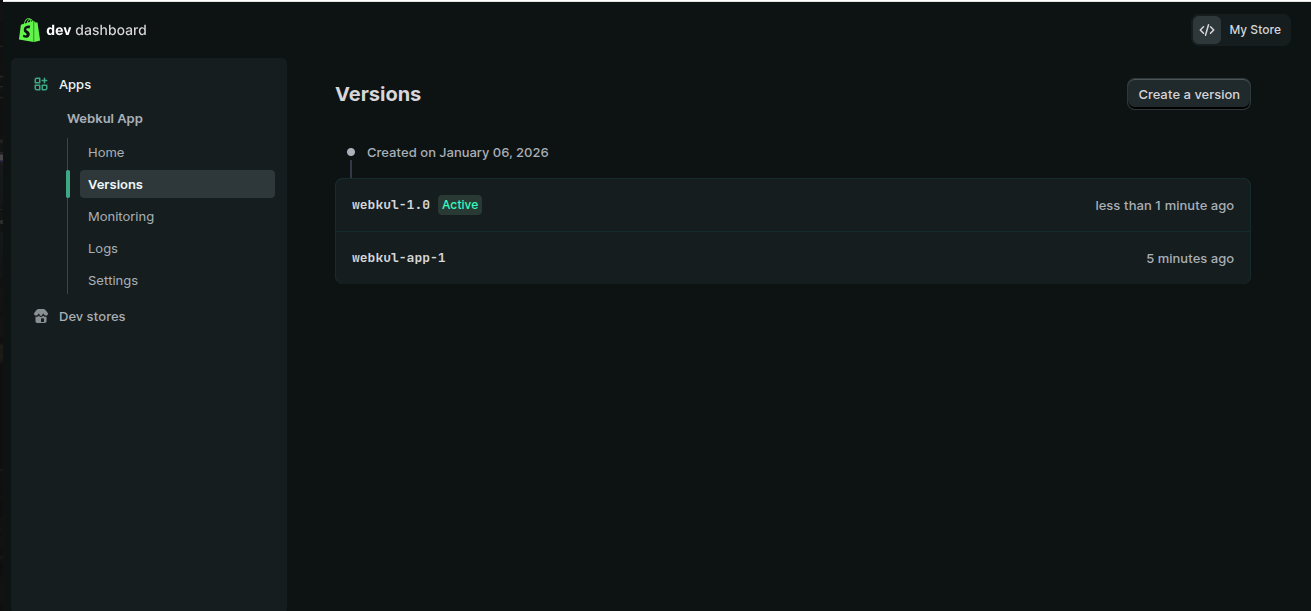
Your Developer Dashboard will open where you can manage your apps.
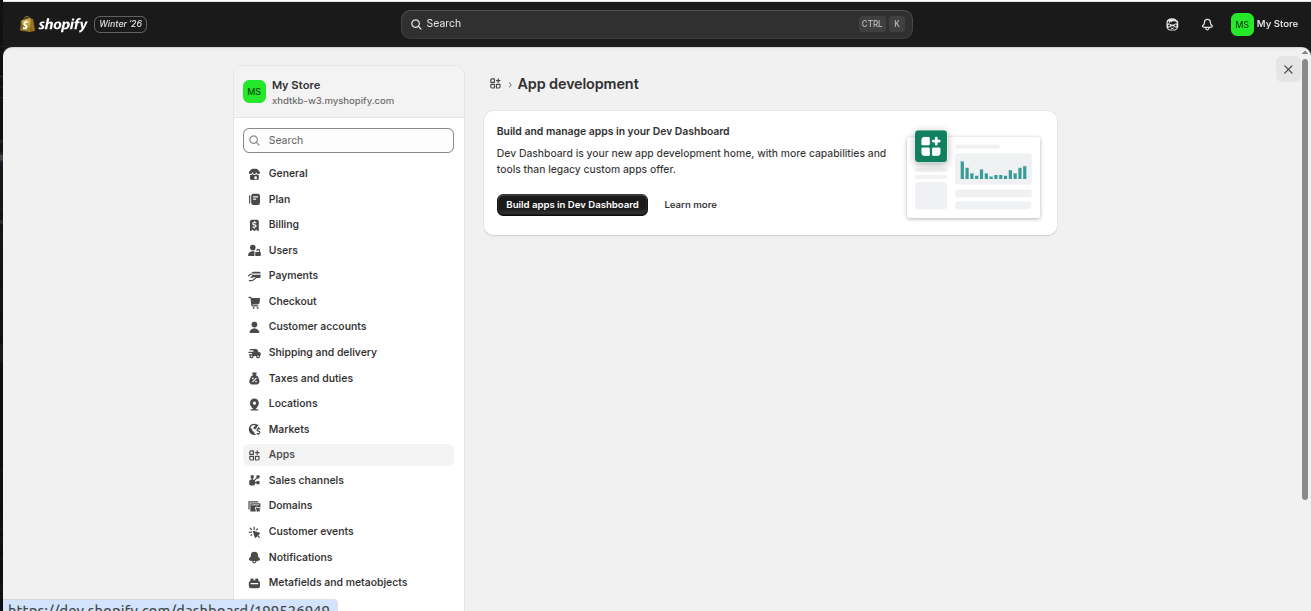
The dev dashboard opens as shown in the image below
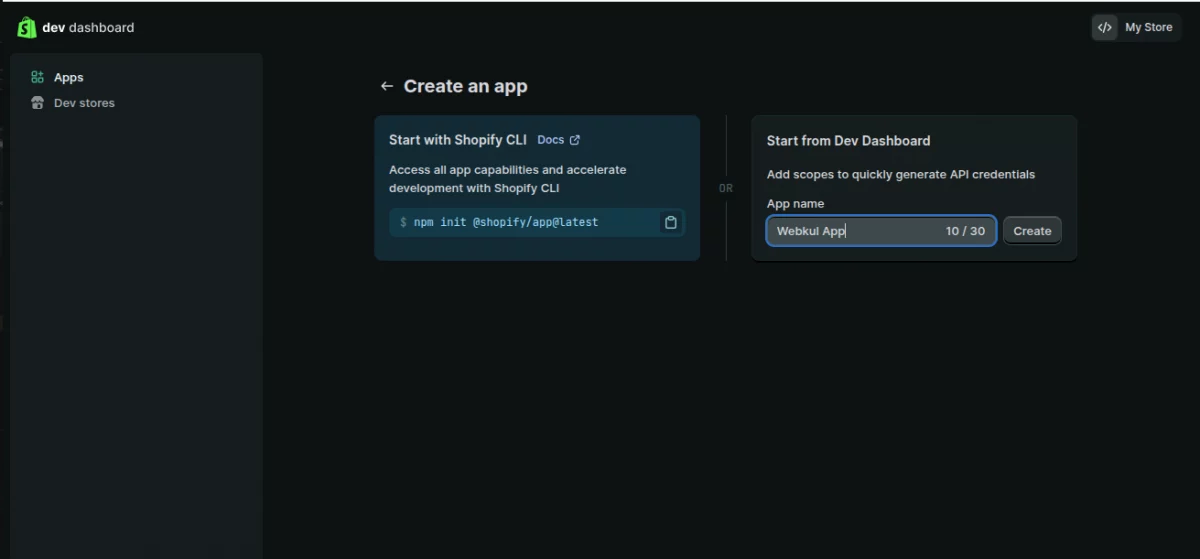
Step 5 – Create a New App
Next, click the button “Create app”
This will open the app creation pop-up.
Fill in the app name – Any name of your choice (In my case, I choose, “Webkul App”)
Then click Create
Now the App Integration and Configuration dashboard opens, where you can assign the required permissions to your app as shown in the image below.
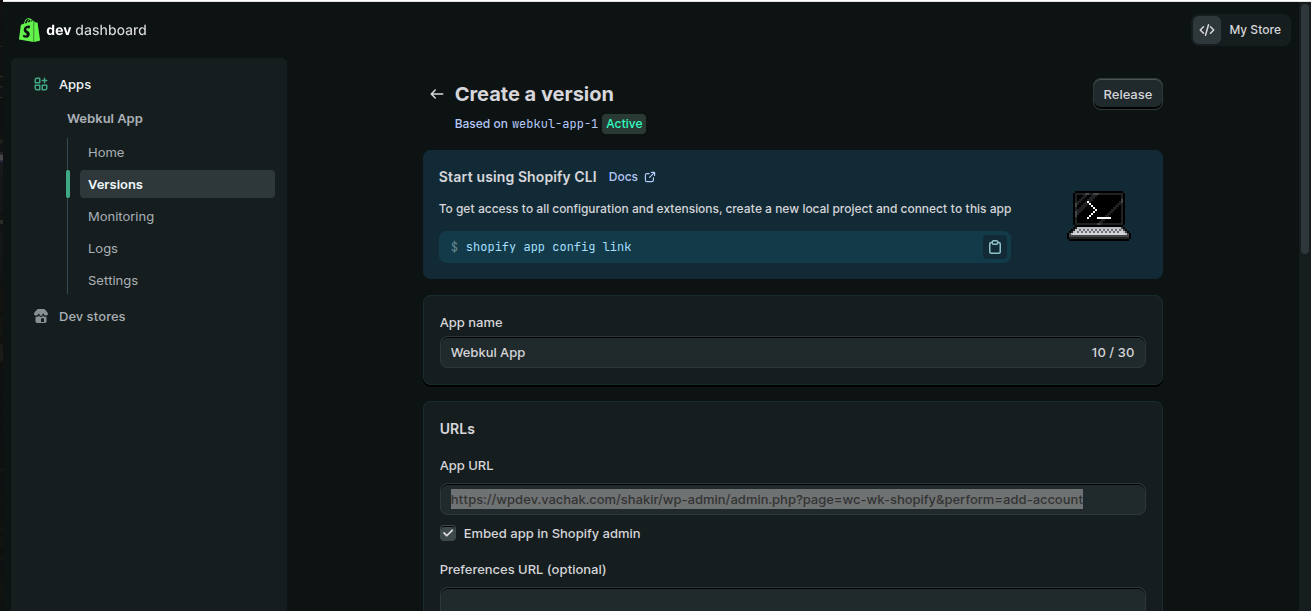
Step 6 – Configure Admin API Scopes
Fill the following details
App URL – This is the URL where your app is hosted or where Shopify should send users after installing or opening the app.
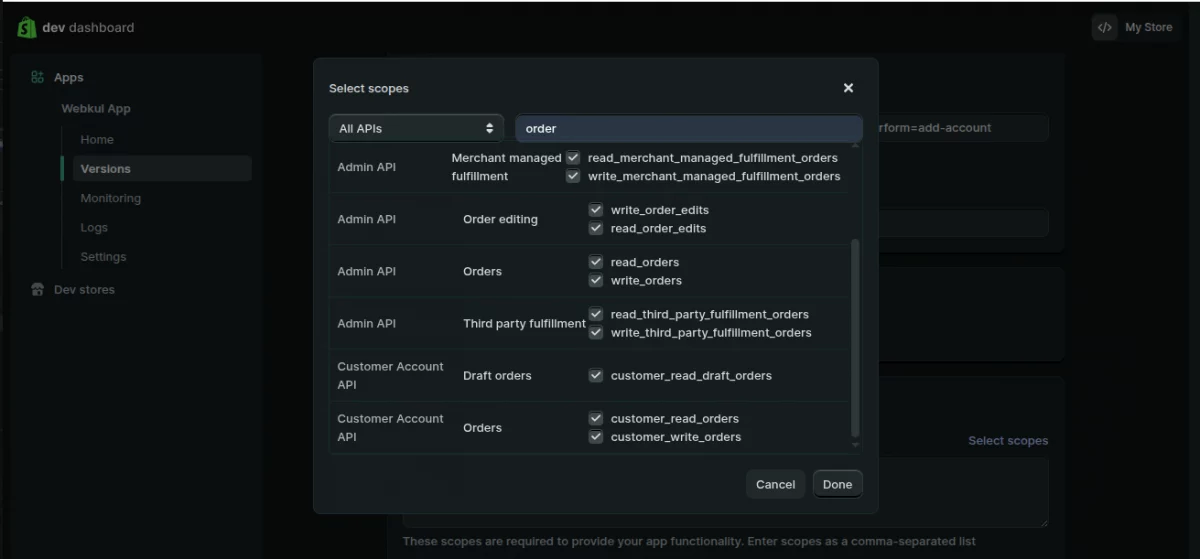
Now you need to assign permissions to your app.
Then go to the Access section
From here, select the required API scopes/permissions (for example: Products, Orders, Inventory, Customers etc.), depending on your module requirements.
Also, it should have Read and Write API permission for the following:
- Customer details and customer groups; inventory; orders, transactions, and fulfillment.
- Product information including products, variants, and collections.
- Locations
- Shipping rates
- Discounts
- Online Store Pages access via the GraphQL API.
Note: While making the Webhook Subscription, please make sure to select the latest Event Version.
After selecting the scopes and Event version, click Release.
After successfully selecting all the required permissions, click the Release button again. A new version of the app will be created as shown in the image below.
Step 7 – Retrieve Your API Credentials
After that, go to the API Credentials section in the app settings, where you can view your generated keys.
You will be able to see:
- Client ID (API Key)
- Client Secret Key
Click Reveal to display the secret key.
Copy both values carefully and keep them stored in a secure location.

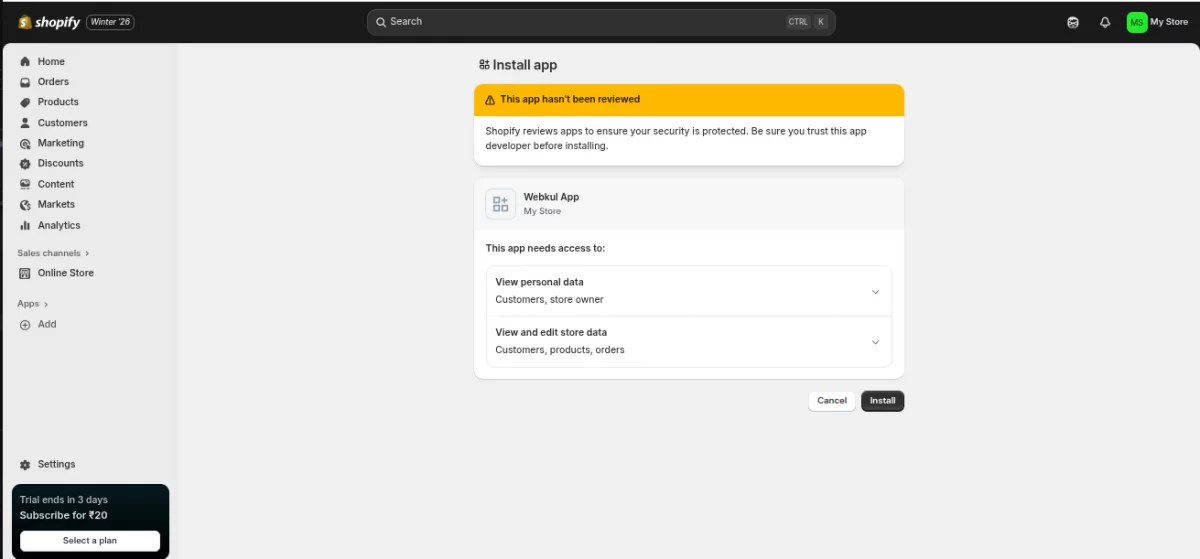
Step 8 – Install the App
Once scopes are configured, install the app to activate API access.
Click on Install app and confirm the installation in the pop-up.
These generated credentials will be used to connect your Shopify vendor store with WooCommerce.
Manage Shopify Account – After Saving
After saving the Shopify account, the WCFM marketplace vendor can see the added account as shown below in the snapshot.
Now, the Vendor and admin can also view whether the account is connected or disconnected.
Here, to manage the respective Shopify account tap the Manage Account button. This brings up the section to manage the account as shown below in the snapshot.

Settings – WCFM Marketplace Shopify Connector
The vendor will be able to make the initial configuration settings for the WCFM marketplace Shopify connector account.
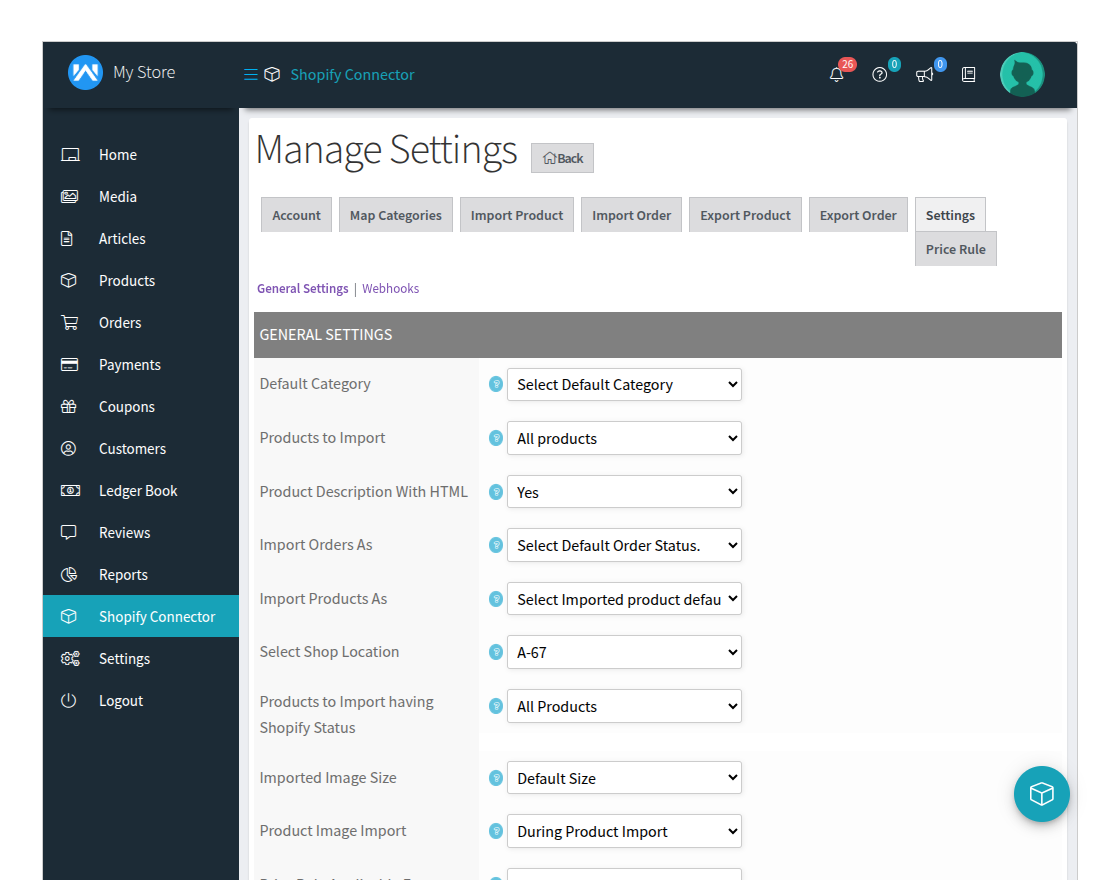
Here, under the general settings, the vendor can select set the –
- Default Category – The vendor can select the default category where the products get imported.
- Products to Import – The vendor can decide which products to import, either all products or only mapped category products
- Product Description With HTML – The vendor can import the product description with HTML.
- Import Order As – The admin can select the order status like pending payment, processing, on hold, completed, canceled, refunded, failed, and draft accordingly.
- Import Product As – Set the product status which will show on the seller product list like draft, pending review, or published.
- Product to Import Having Shopify Status – The vendor can select the product from active, archived, and draft that has Shopify status.
- Imported Image Size – The vendor can select the image size for the imported images from Shopify, in this way, the images get imported to the WooCommerce WCFM Marketplace vendor account in the selected size by the seller.
- Product Image Import – Select the process for product image import in the background. where the image import process will be carried out in the background or During Product Import in which images will be imported at the same time as product import.
Note: For the Large number of product import, it is advisable to keep the product image import setting as In the Background to import products at a faster pace.

Export order settings
Now, the seller needs to configure the Export order settings.
- Shipping: Here, the vendor can select to export the orders with/without the shipping cost.
- Tax: By using the dropdown the vendor can export the orders by Including/Excluding the Tax cost.
- Discount: Here, the vendor can select to export the order by Including/Excluding the discount on it.
SHOPIFY AUTO-SYNCING SETTINGS
At last, the admin can configure the SHOPIFY AUTO-SYNCING SETTINGS.
- Auto-Sync: The vendor can disable Auto-Sync and choose WooCommerce from Shopify or Shopify from WooCommerce for the products. By this admin can import products from WooCommerce WCFM to Shopify and Shopify to WooCommerce WCFM as required.
- Real-Time: The sync settings for orders can be adjusted in real-time or manually, depending on the seller’s preference or requirements. Sellers can also export orders based on their current status, ensuring they can access and process the most up-to-date order information as needed.
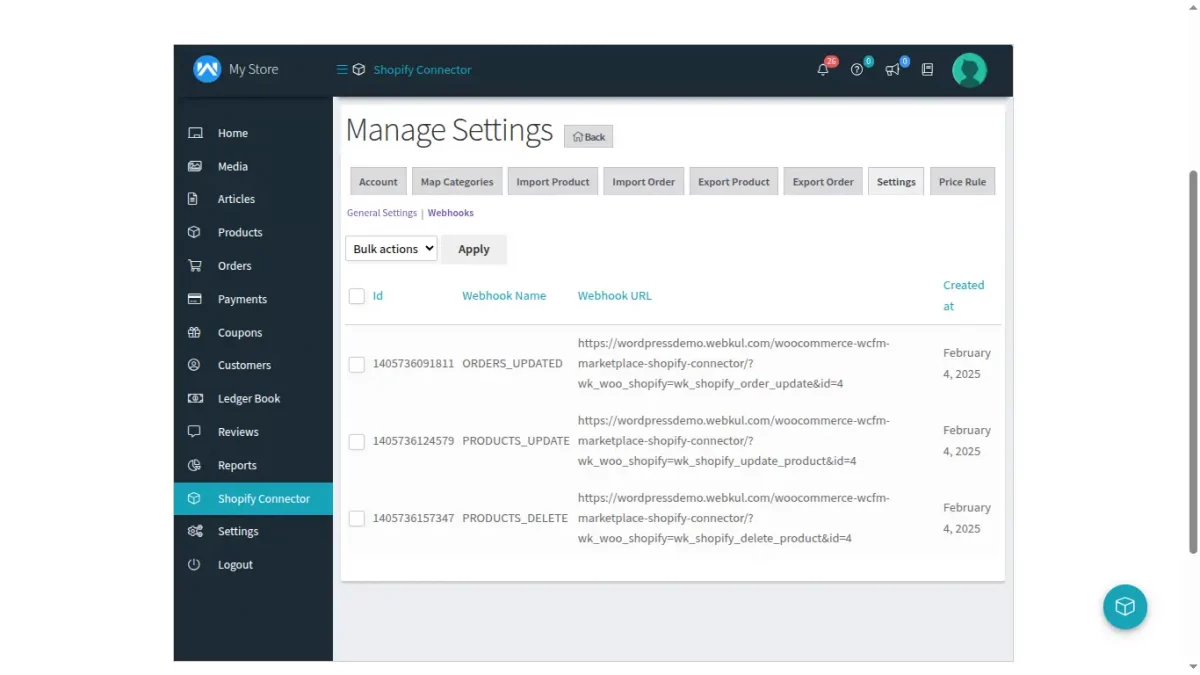
Manage Product Sync
To manage the product sync like product updates, product delete, and more. The vendor will have to configure the webhooks on their Shopify account.
To Generate the webhooks, the vendor needs to click on the Webhooks option shown in the snapshot below.

After that click on the generate webhooks button then it will be generated automatically.
Map Categories
The vendor can click the import category button to list the collections from the Shopify store.
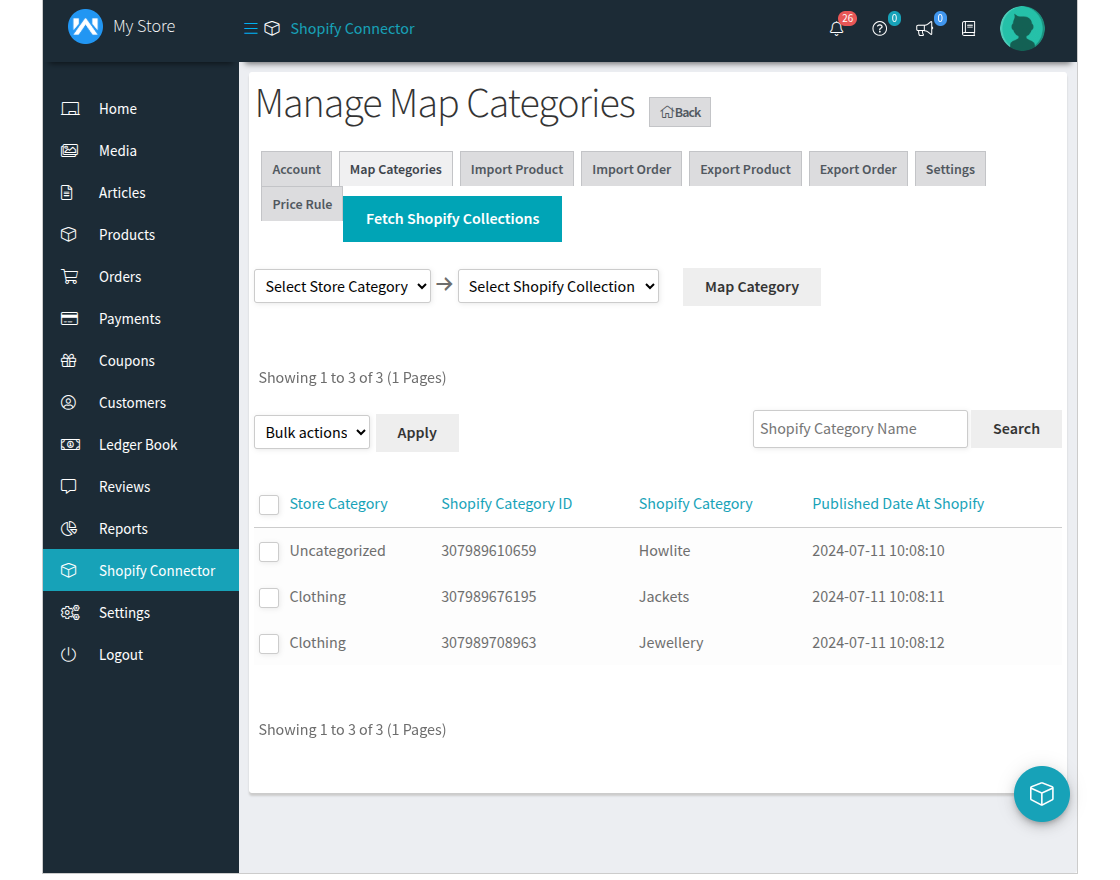
The vendor can see the process on the screen while importing the categories.
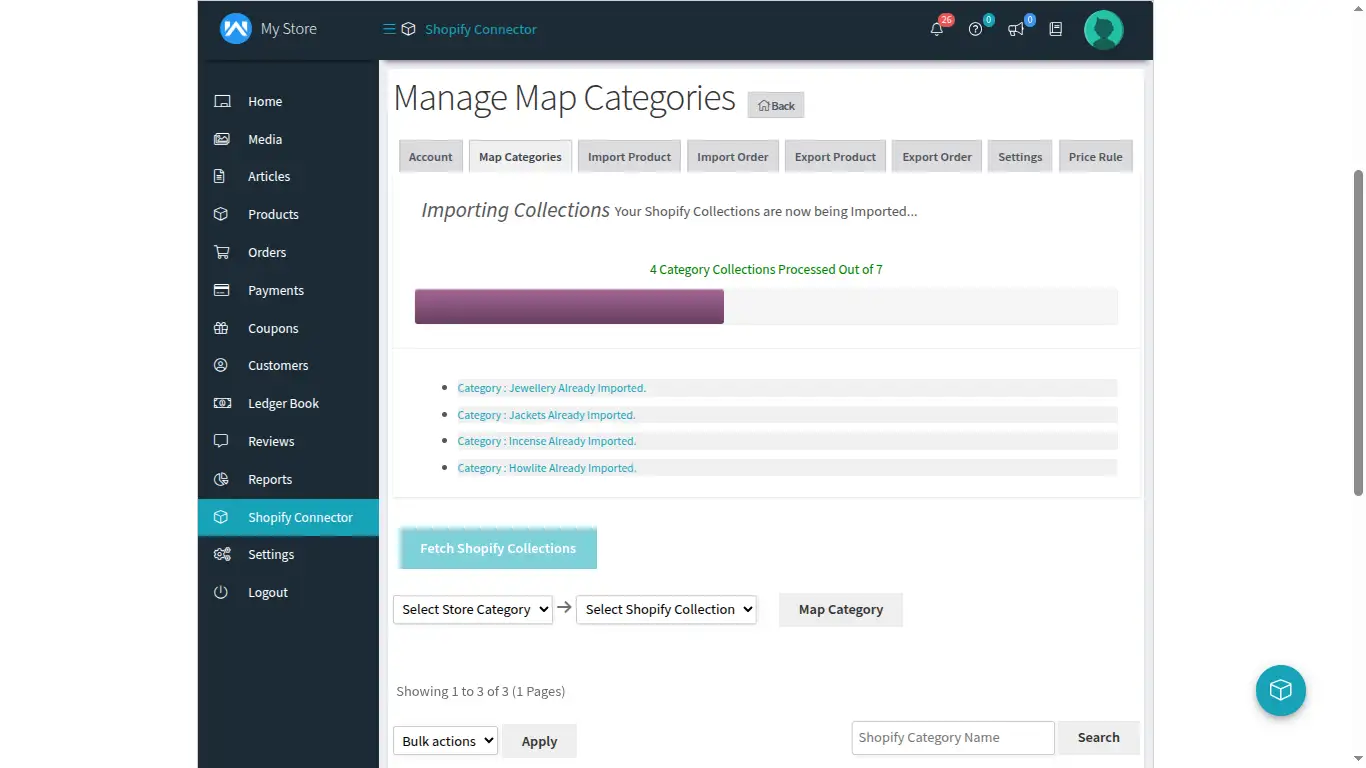
After listing the Shopify collection, the vendor can select the WCFM marketplace store category and the Shopify collection.
After selection, then click on the Map Category button to map the respective categories.

The selected category gets mapped with the Shopify marketplace collection.
The seller can view the Store Category Name, Shopify Category ID, Shopify Category Name, Published Date at Shopify, and Published Scope At Shopify.
The seller can also delete and search for the categories from here as required.
Import Product
The seller can click on the import products and then create the products of those imported products from Shopify to the WooCommerce WCFM store.
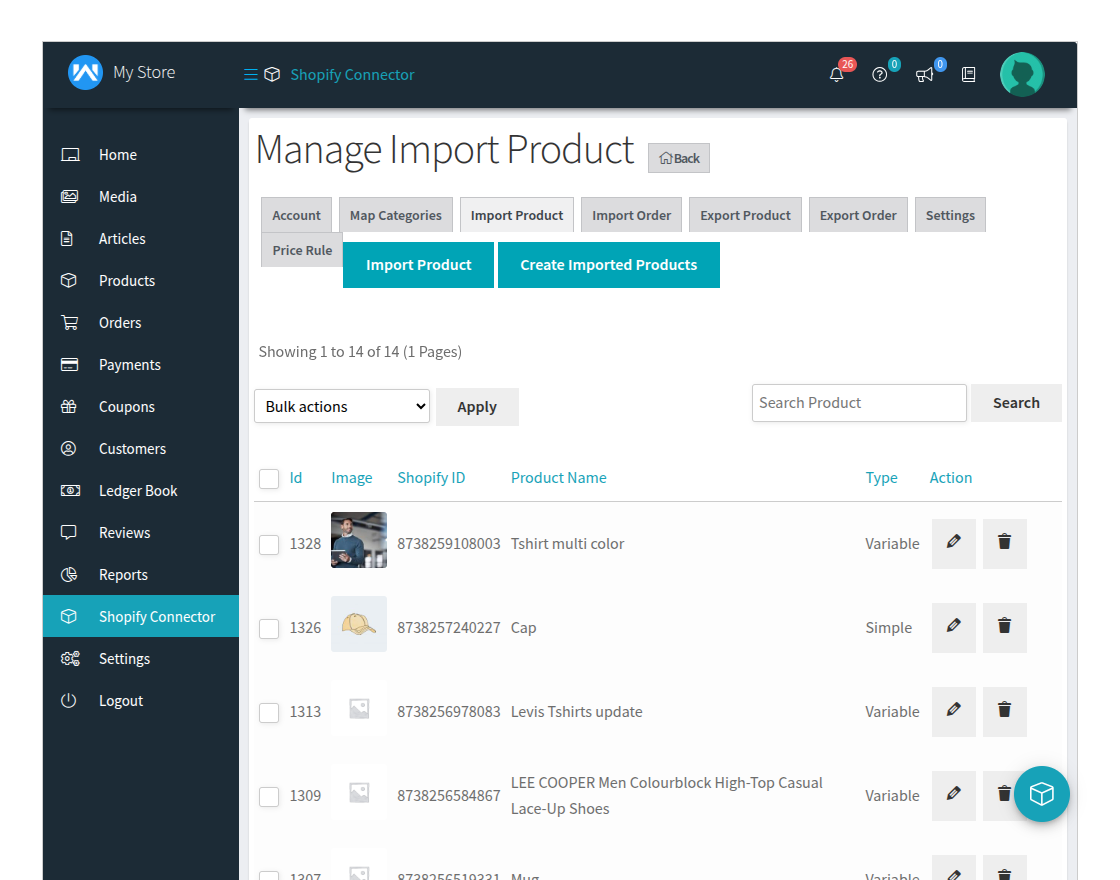
The process bar can be seen while importing the products from Shopify.

The seller can view all their Shopify products from the Shopify store.

After importing Shopify products, click on Create imported products to create the products on WooCommerce WCFM Marketplace Store.

Import Order
Here, the seller can import the orders from Shopify. To do so, first, import the orders by tapping the Import Order button.

Then create the orders from Shopify into the WooCommerce WCFM Marketplace by tapping the Create Imported Orders button.

Shopify Order

Export Product
The seller can easily export WooCommerce WCFM Marketplace store products to the Shopify store.
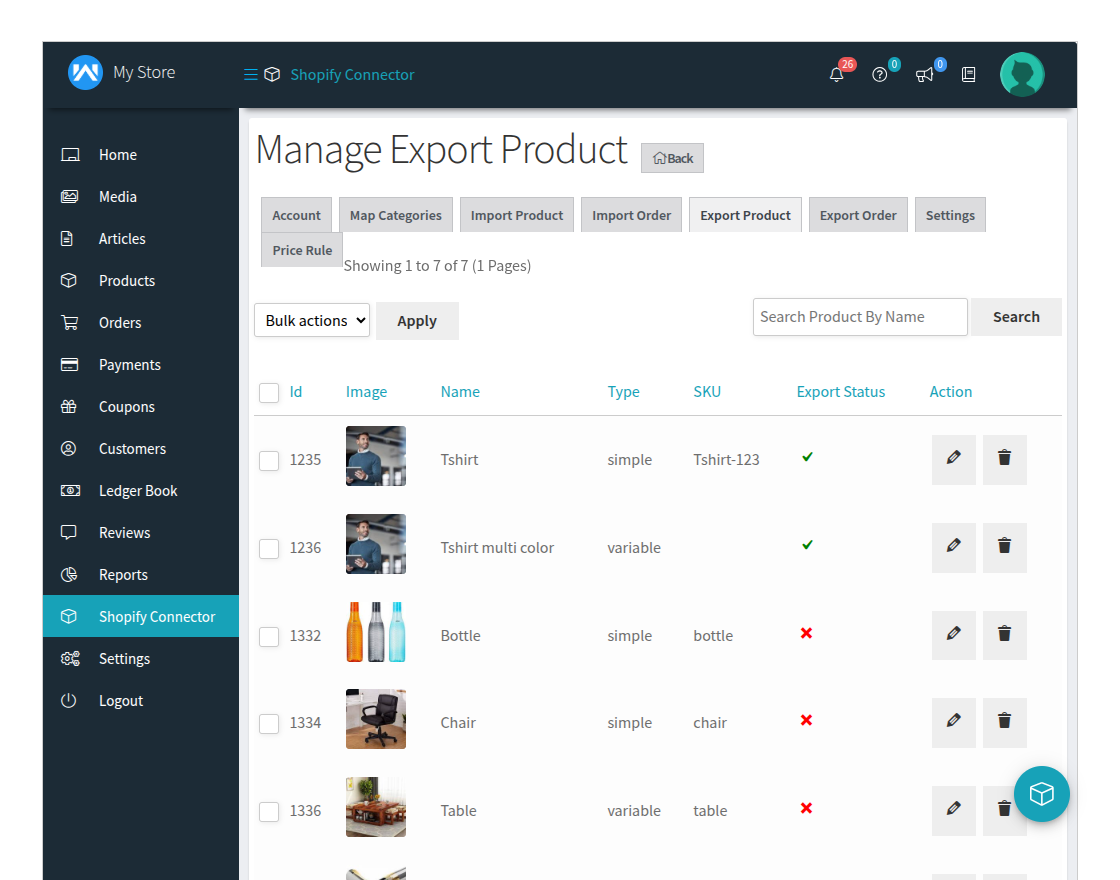
Just select the product and then from the dropdown choose Export and tap the Apply button thereafter.

Also, the seller can export the products in bulk.
Note: The Export/Import feature will work for every product type except for group products.

Export Order
The vendor can Export Orders to the Shopify store by selecting the Export button of the particular order or in bulk mode and then tapping on the Apply button.
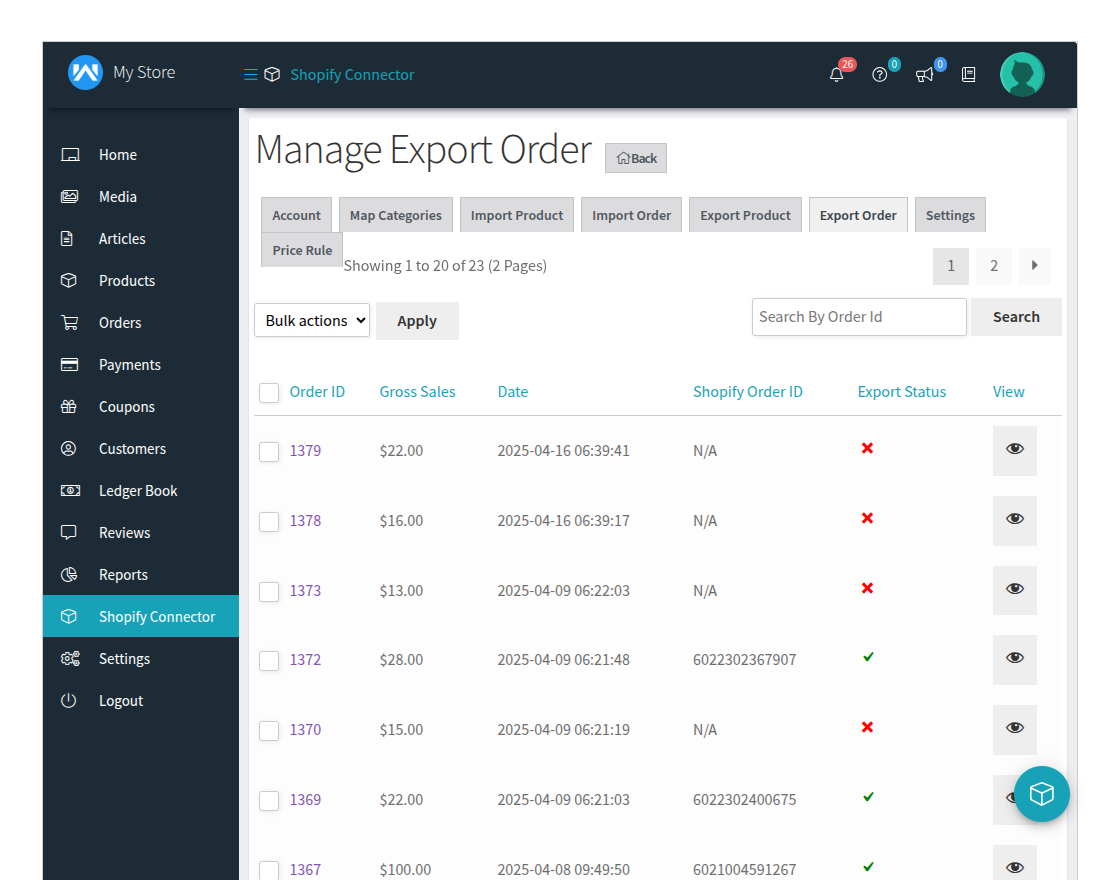
After tapping on the Apply button, you can see the order is being exported to the Shopify store.

Now, The seller can view the exported orders with the order status.

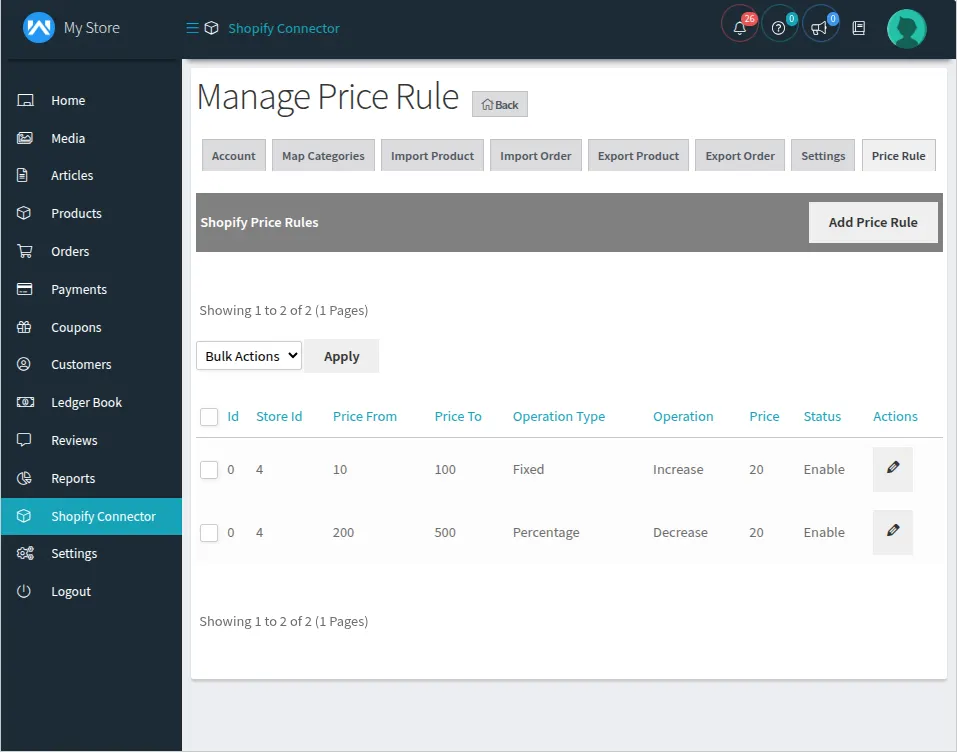
Price Rule
The admin can manage the Price Rule from the admin panel easily. The admin not only can create but also edit the existing price rules.
Note: If the price rule is applied to imported products then it will work in a reverse manner for the exported product.
Add Price Rule
To create a new price rule, the admin can click on the Add New Price Rule and fill in the required details.
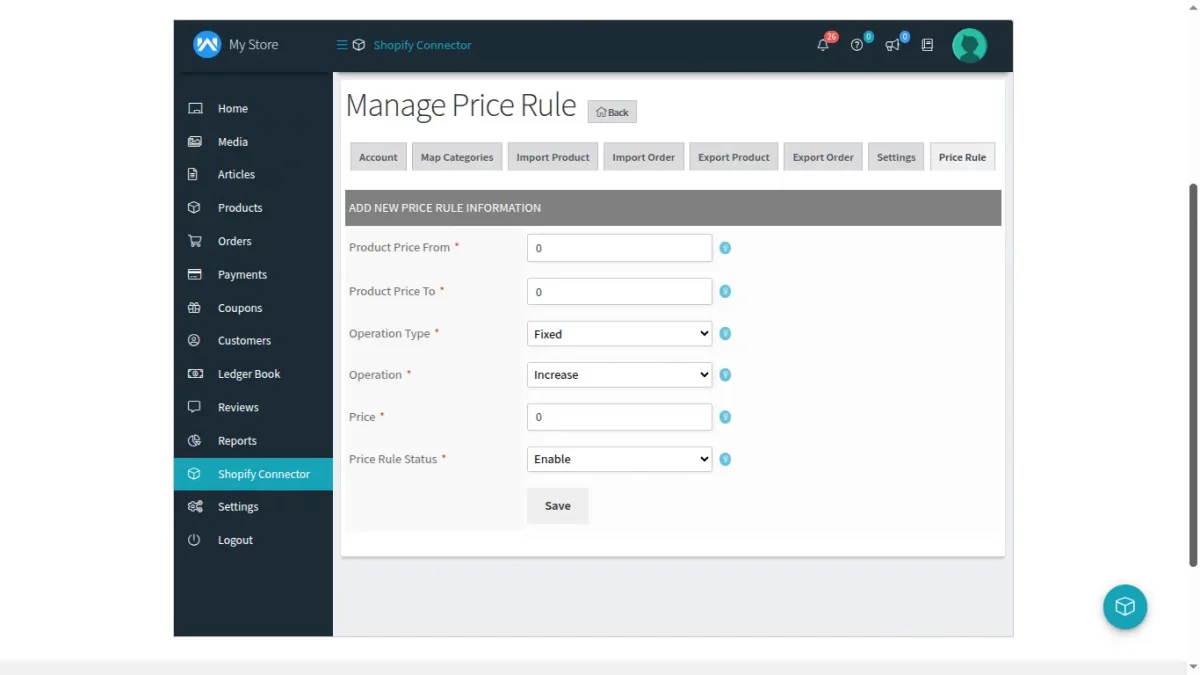
Here the admin can –
- Product Price From – Here, the admin can set the minimum price, for which the rule will be apply.
- Product Price To – The admin can set the maximum price for the rule.
- Operation Type – Set the operation type of the rule i.e Percentage or Fixed.
- Operation – The operation of the price rule can be manage from the operation. The admin can decide if the price of the product will be increase or decrease according to the rule applied.
- Price – The admin can set the price for the applied rule.
- Shopify Store– Select the Shopify store on which the price rule will be apply.
- Price Rule Status- The price rule can be enable or disable from here.
As the seller can see the list of the rules as shown below
Get API Credential From Your Old Shopify Account?
If you’re using the old process, API credentials are still generated through:
To get the API credentials the vendor needs to generate the Shopify API credential first using the Shopify account.
The vendor can visit the Shopify store that the vendor wants to connect and sync with the WooCommerce WCFM store.
To do so, click on the App menu and click on develop an app for your store.

After that, click on Create an app.

Then fill in the required credentials i.e. App name and click on create app button.

After creating the app, the vendor will navigate to the configuration tab. Then, click on the Configure button for Admin API Integration.

Kindly note, it should have Read and Write API permission for the following:
- Customer Details and Customer Group
- Inventory
- Order, transaction, and fulfillment
- Product Information
- Product, variant, and collection
Note: While making the Webhook Subscription, please make sure to select the below-highlighted Event Version – 2025-04

After selecting all the required permissions, click on the Save button.

Lastly, go to the API credentials tab and click on the Install App button.

By clicking on the Reveal token once the vendor will get the token key.
Note – This token key is available only once, please copy and save your vendor API token in a secure place.
That is all about the WooCommerce WCFM Marketplace Shopify Connector. If you have any queries regarding the plugin, please contact us at Webkul Support System.
You can also check our complete WooCommerce plugin list.
Current Product Version - 2.1.0
Supported Framework Version - WordPress 6.9, WooCommerce 10.4

Be the first to comment.