The WooCommerce DIBS Payment Gateway is a seamless and secure solution to integrate DIBS payment processing directly into your WooCommerce-powered online store.
With this plugin, you can offer your customers a smooth and convenient payment experience, accepting credit cards to make the payments, while ensuring the safety of their sensitive card information.
The admin can also configure the settings to embed the payment gateway at the checkout page or allow the redirection to the DIBS payment gateway page for making the payments.
The DIBS payment gateway works in European countries like – Norway, Sweden, and Denmark.
We provide a production version of the plugin. If you want a development version then you can get it at an additional cost. Please contact [email protected] for it.
Check the workflow of the backend configuration of the plugin –
Check the video mentioned below for an overview of the frontend working:
Features
- Customers can make use of their credit/debit cards for making payments within the store.
- Supports all major credit cards like – Visa, MasterCard, American Express, Maestro, and VisaElectron.
- Email payment data to the customers.
- The admin can set the title and description for the DIBS Payment Gateway method at checkout.
- The admin can enable embedding or redirection to the DIBS payment gateway for making the payment.
- The admin can make a refund from the WooCommerce backend or via the DIBS dashboard for the orders placed within the store using WooCommerce DIBS Payment Gateway.
- Enable debugging mode for DIBS from backend configuration settings.
- Enable auto capture so that DIBD charges your customer immediately after payment completion.
- Manual auto-capture feature for the admin.
Installation – WooCommerce DIBS Payment Gateway
The user will get a zip file for the WooCommerce DIBS Payment Gateway that he has to upload in the “Add New” menu option in the WordPress admin panel.
For this, login to WordPress Admin Panel, and Under the Dashboard hover your mouse over the “Plugins” menu option which brings out a Sub-Menu, and then select the “Add New” option.

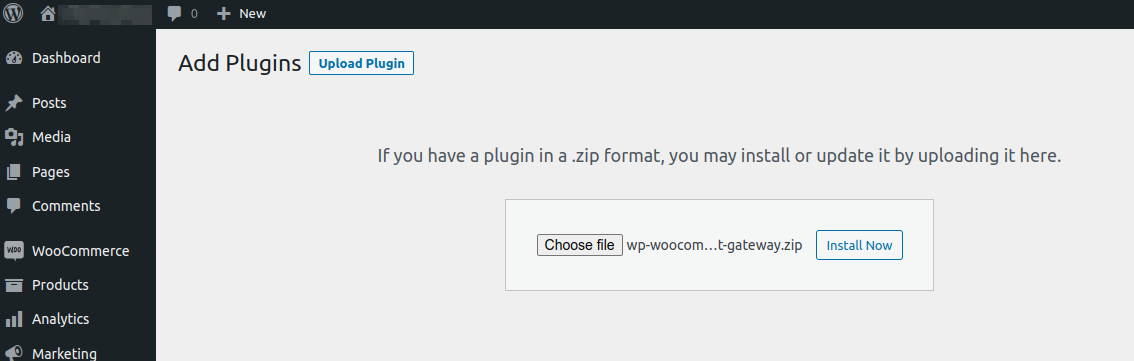
After this, you will see an option on the top of your page that is “Upload Plugin”. Click the option to upload the zip file.

By clicking on the “Upload Plugin” option, below that you will see a button “Choose File”. Click on the button to browse for the zip file as per the snapshot below.

After browsing the file, click the “Install Now” button to install the plugin as per the snapshot.
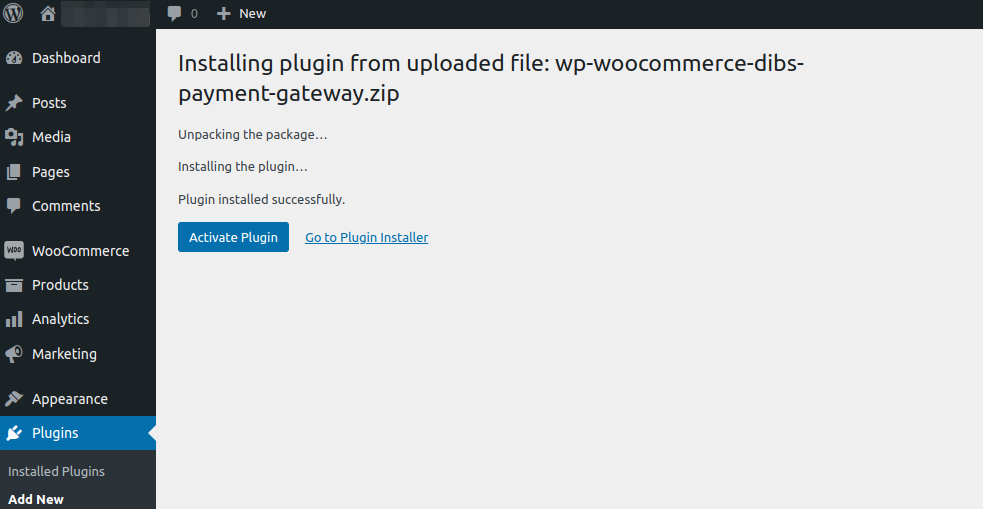
Now when the plugin is installs correctly, you will see the success message and an option to activate the plugin. Henceforth now, click on “Activate Plugin” to activate the installed plugin.
How to get the DIBS Credentials?
Navigate to the DIBD payment gateway site and tap on Don’t have an account? Get Started link.

After that, enter the information in the form and tap on the Get Started button.

Now, you will get an activation link on the registered email. Verify using the link and reset your password. After, that log in to the DIBS dashboard using the same.
Navigate to the Integration menu option under the Company section on the side panel.

Here, you will find the secret and the checkout keys as shown below in the snapshot.

Merchant ID is visible at the top as per the snapshot below.

Now, use these keys in the WooCommerce backend to configure the plugin’s initial settings.
Initial Configuration Settings
After the successful installation of the plugin, the admin needs to navigate through WooCommerce->Settings->Payments->DIBS Payment.
Now, enable it by tapping the respective toggle button under the Enabled column.
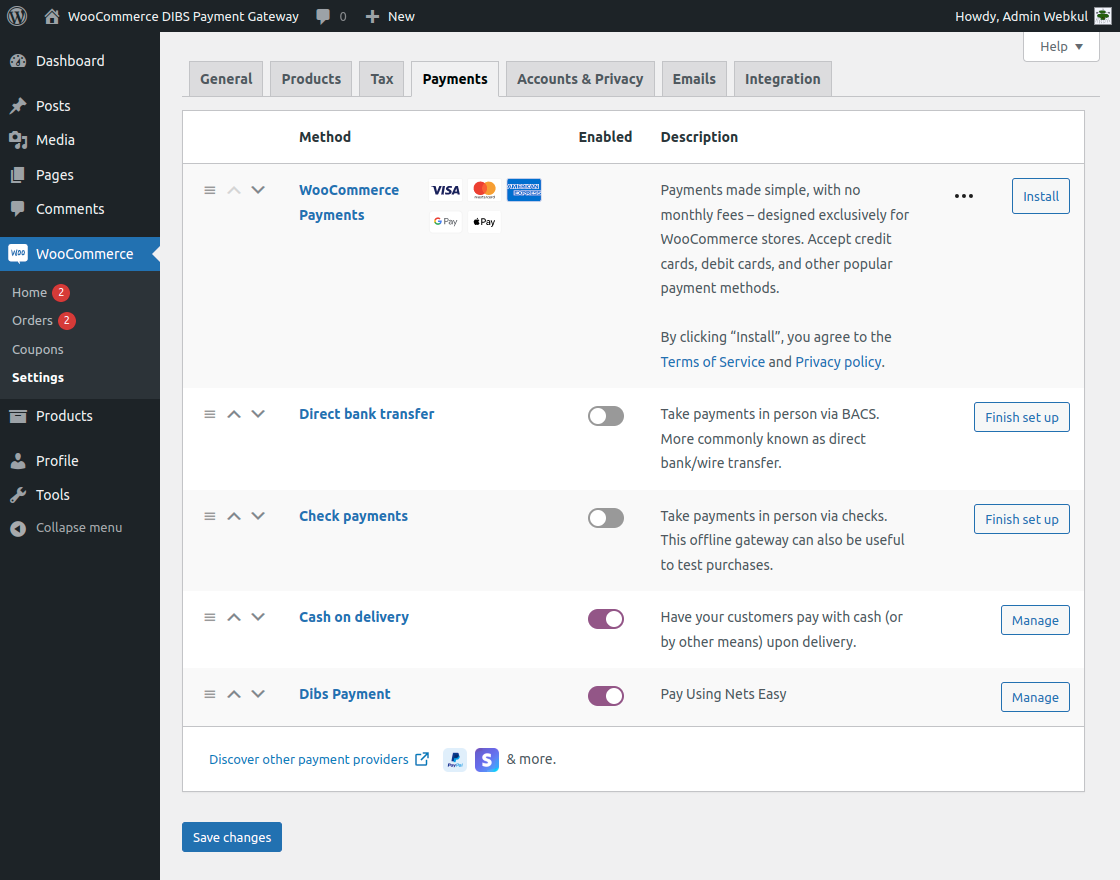
To manage the payment method, tap the Manage button and that brings up the below section.
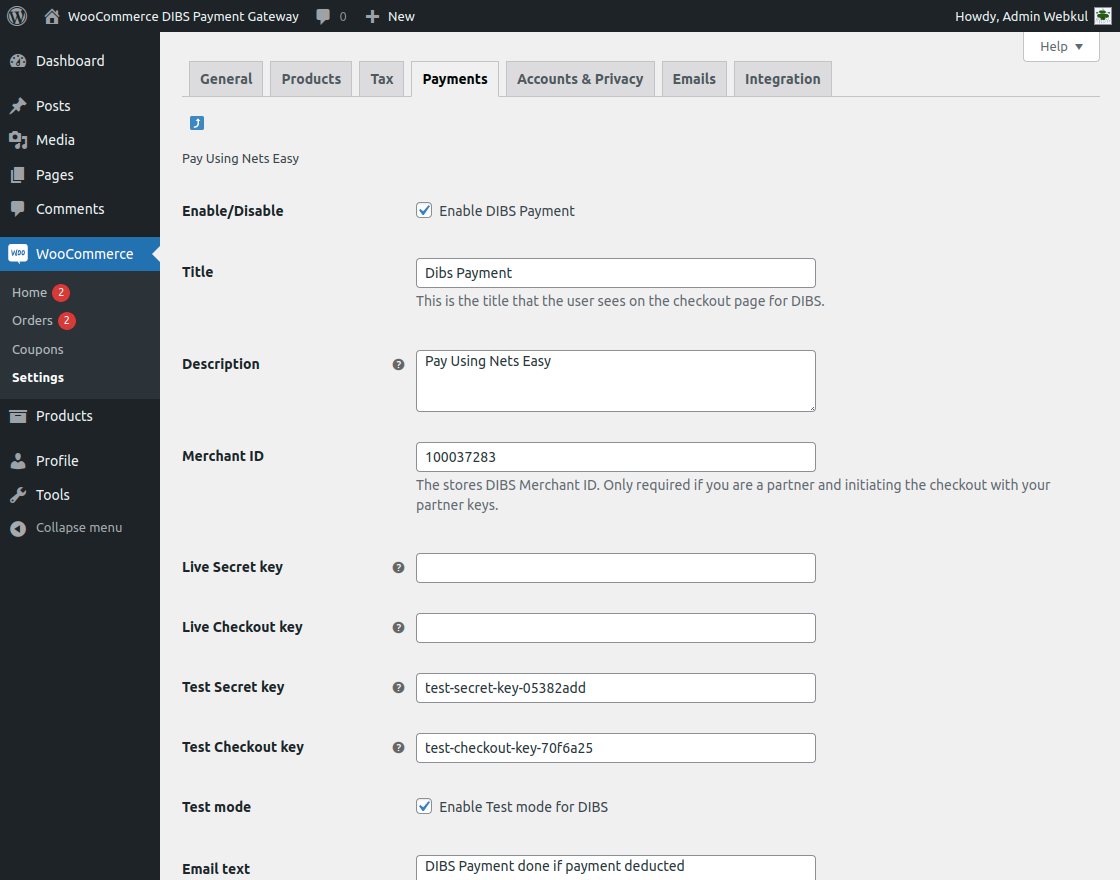
Here, the admin will –
- Enable the DIBS payment gateway for the WooCommerce store by checking the checkbox, to disable it uncheck the checkbox.
- Enter the Payment method title that is visible to the customers on the checkout page.
- Set the description for the payment method.
- Enter the Merchant ID
- Enter the details of the live secret and checkout key if using the plugin in the live or production mode.
- Enter the details of the test secret and checkout key if using the plugin in the testing mode.
- If you want to use the plugin in the testing mode, check the checkbox for the Test mode. Else to use it in the production or live mode uncheck the checkbox.
- Enter the text that adds to your customer’s order confirmation mail.
Apart from that, we also have a few more options as per the snapshot below.

Here, the admin will –
- Enable the option to add Nets payment data to the order confirmation mail.
- Enable the option to manage the WooCommerce orders in the DIBS backend.
- Choose to enable the debugging mode.
- Select the checkout flow as – Embedded or redirect.
Embedded – the checkout is embedded in the WooCommerce checkout page and partially replaces the checkout form. Redirect – the customer is redirected to a payment page hosted by Nets. - Enable auto-capture, If enabled DIBS charges your customer immediately after payment completion.
- Set the other payment method button text.
- Choose a default or upload an icon for the payment gateway.
- Set the payment gateway icon width.
Lastly, save the configuration settings by tapping the Save changes button at the bottom of the page.
Customer Workflow
The customers at the storefront will add the products to the cart to make a check out. On the checkout page the customers can see the DIBS payment gateway.
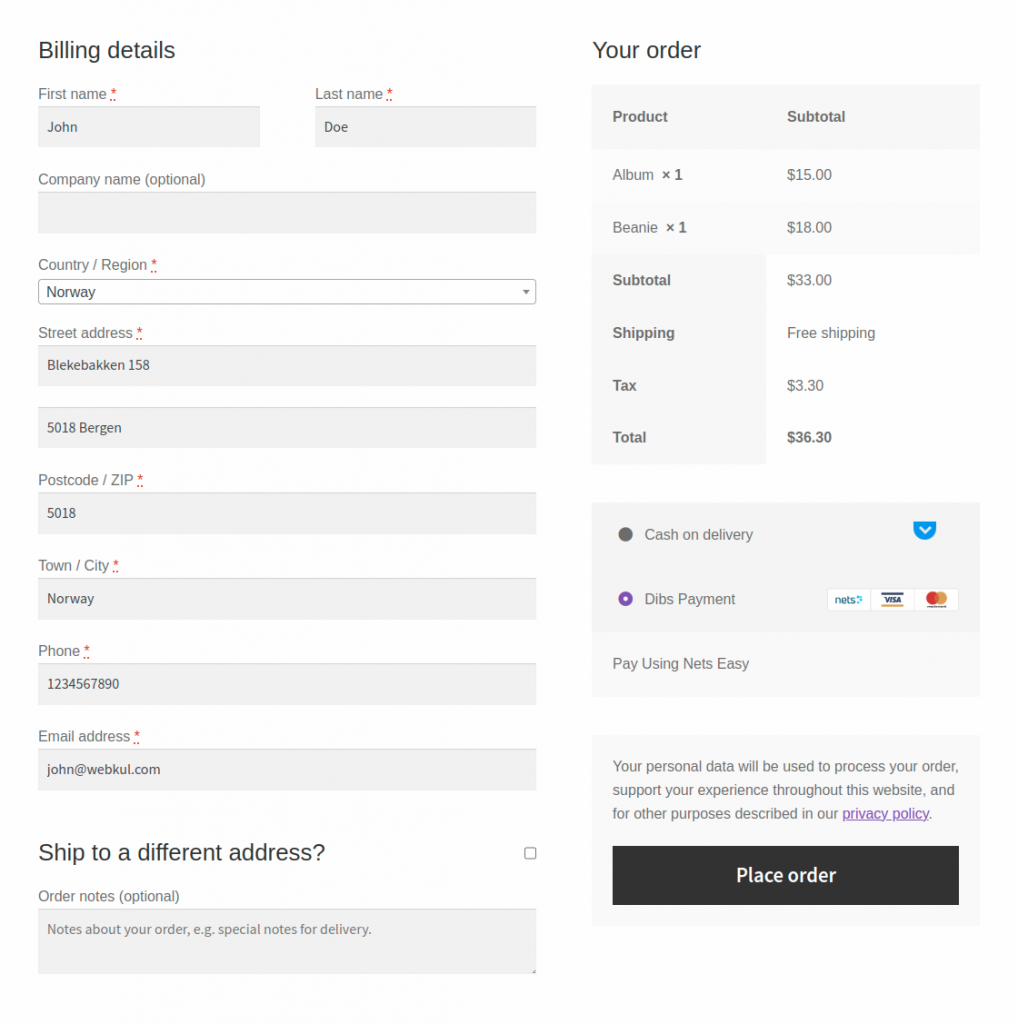
Embedd: In this case, the details to enter the card number will be available on the checkout page itself as shown in the screenshot below.
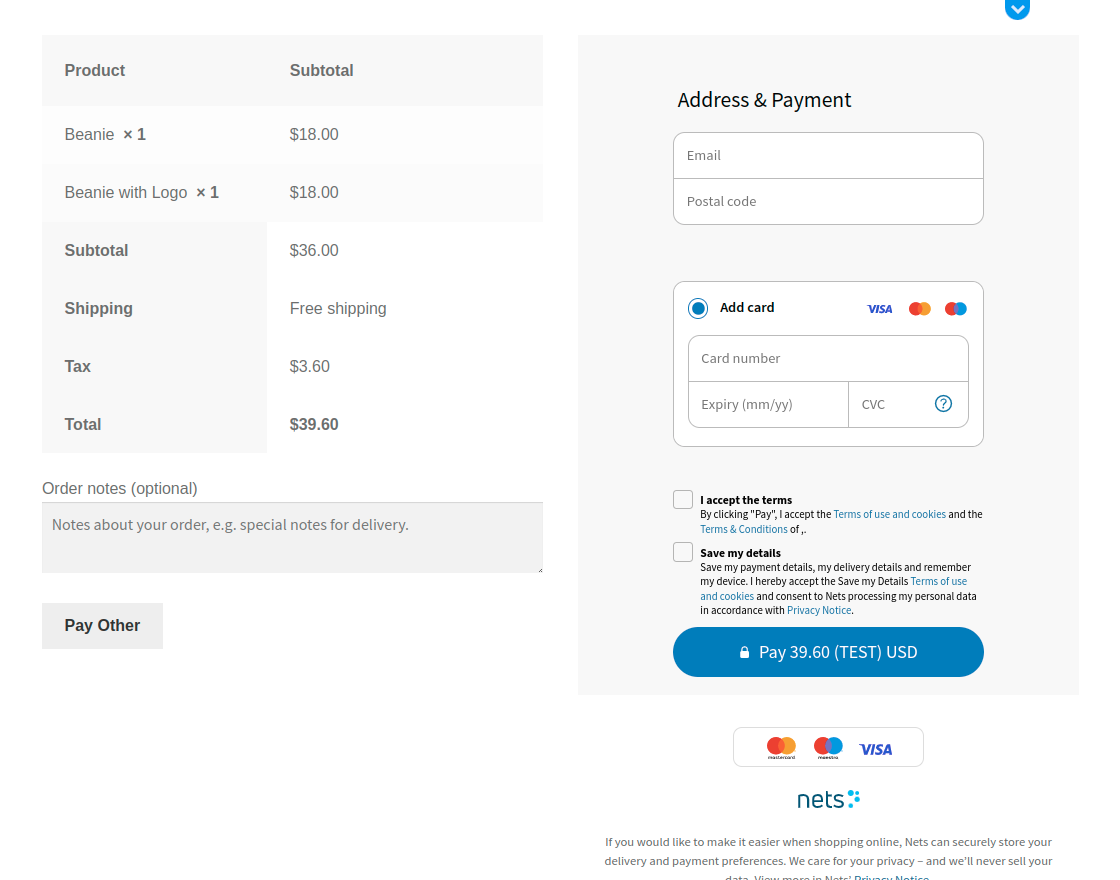
Here, you can see the button for the Pay Other as well as set by the admin in configuration settings.
Redirect:
If the configuration is set to redirect, then the customer is redirected to the Nets Easy hosted page for making the payment.
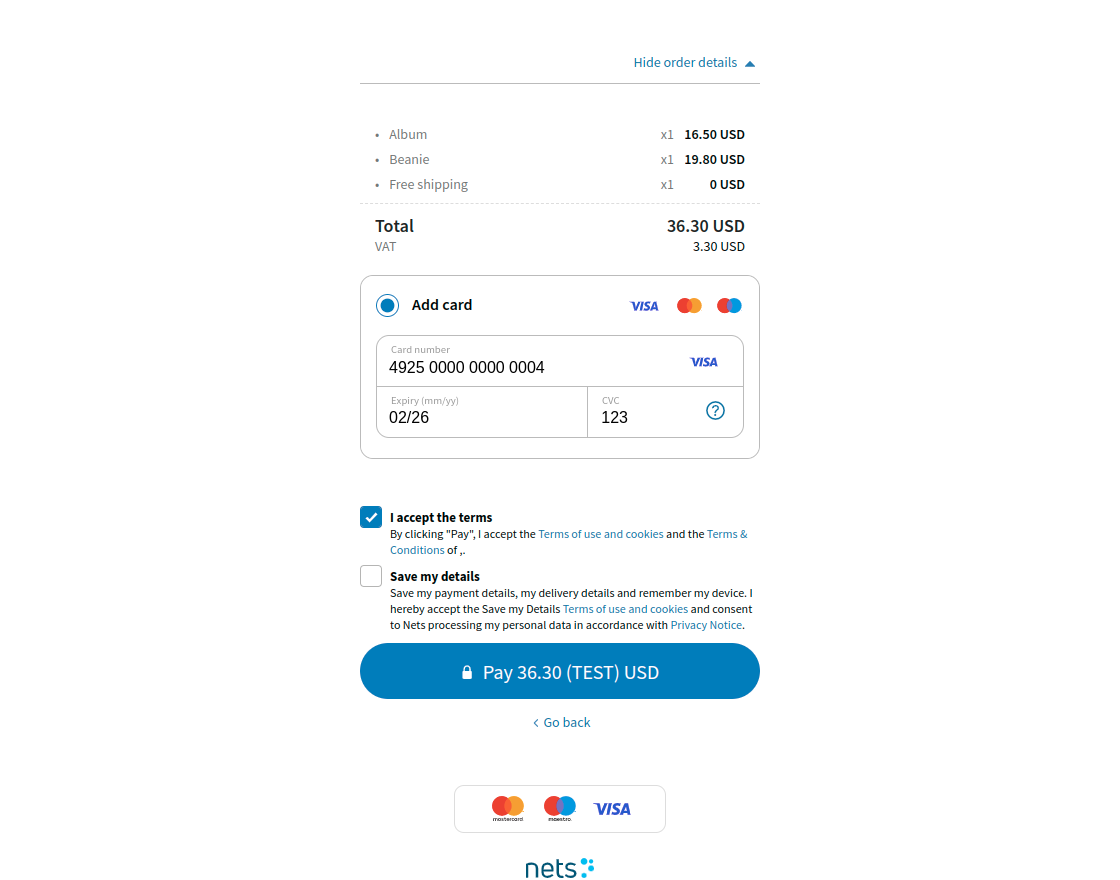
Enter the card details and tap the Pay Button.
After that, approve the payment by tapping the Approve Payment button.

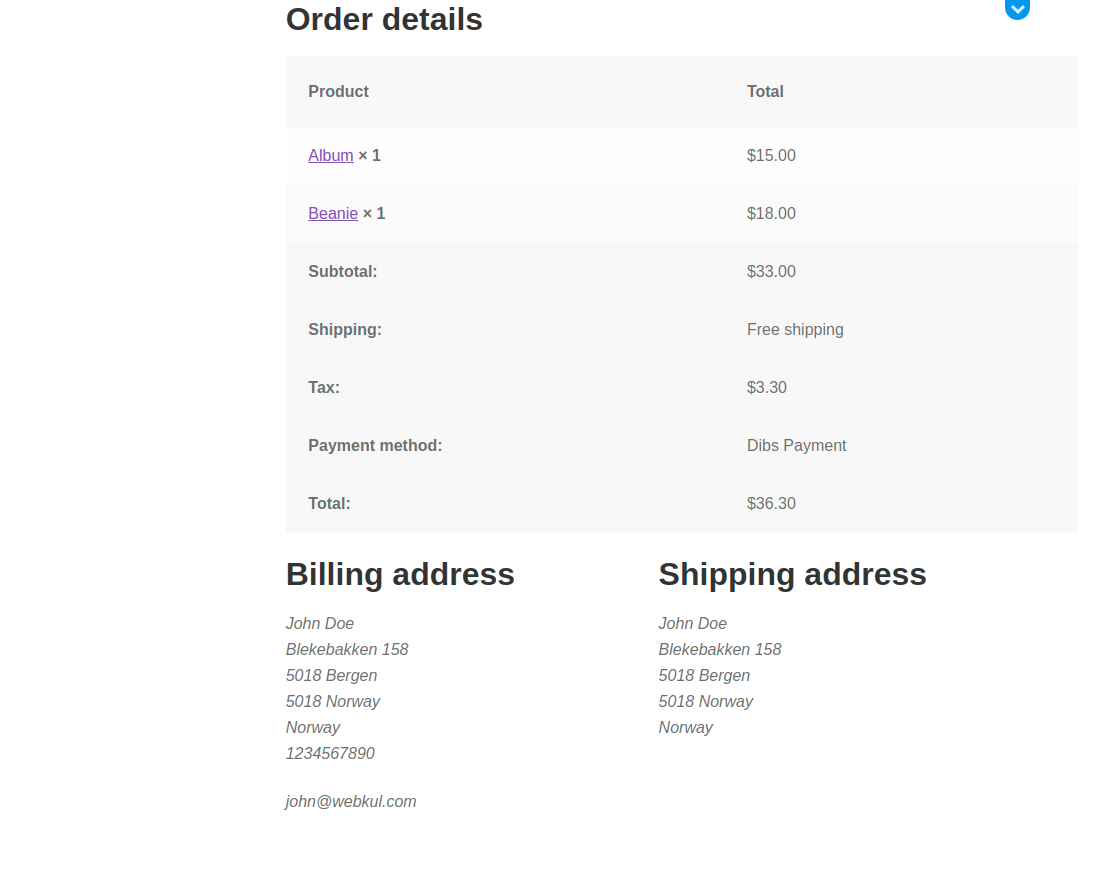
Thereafter the order will be places and the customer can see the order success page as shown below.

Moreover, the customer can go to the order history section and check the payment for the order.
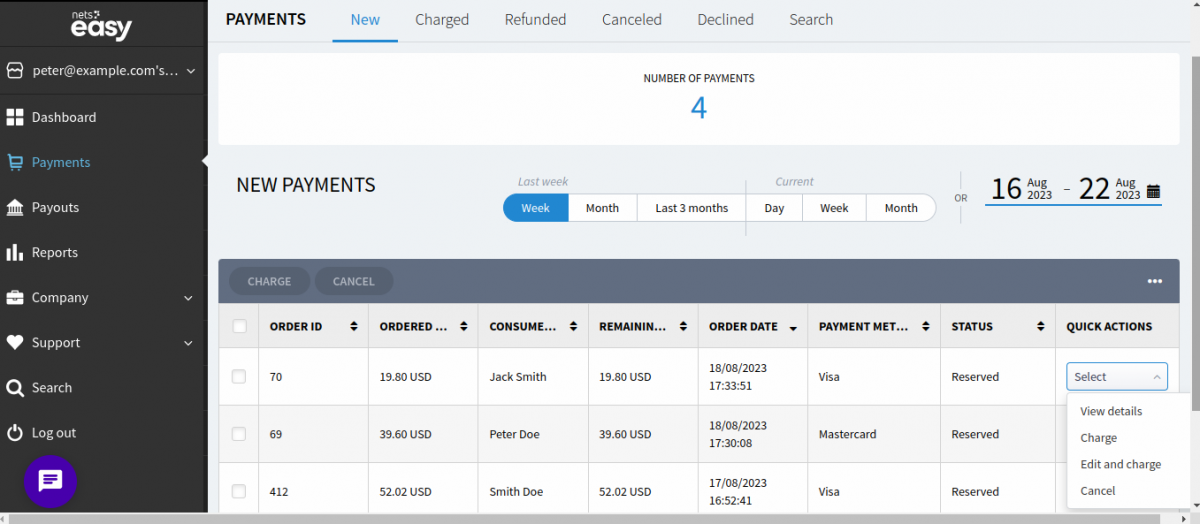
Capture Payment – If Auto-Capture Not enabled
The admin will navigate to the respective order to check the payment method selected for the order by the customer.
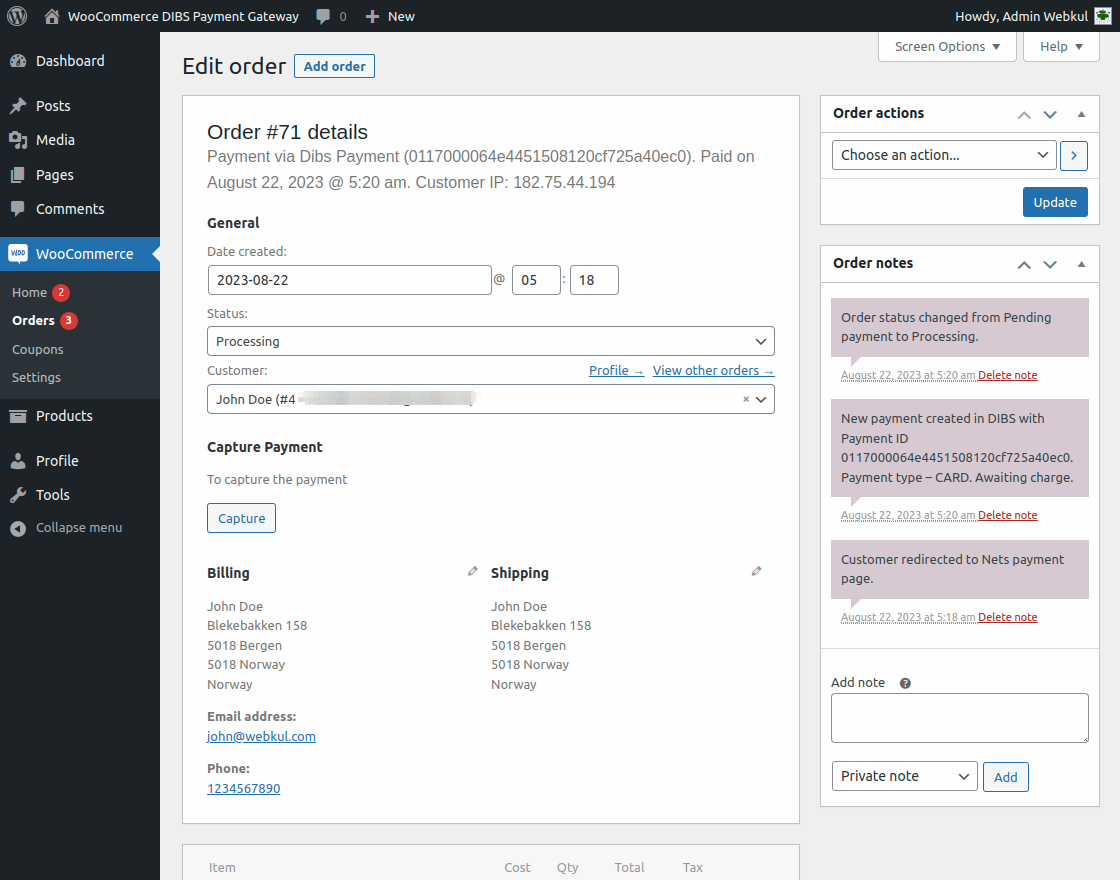
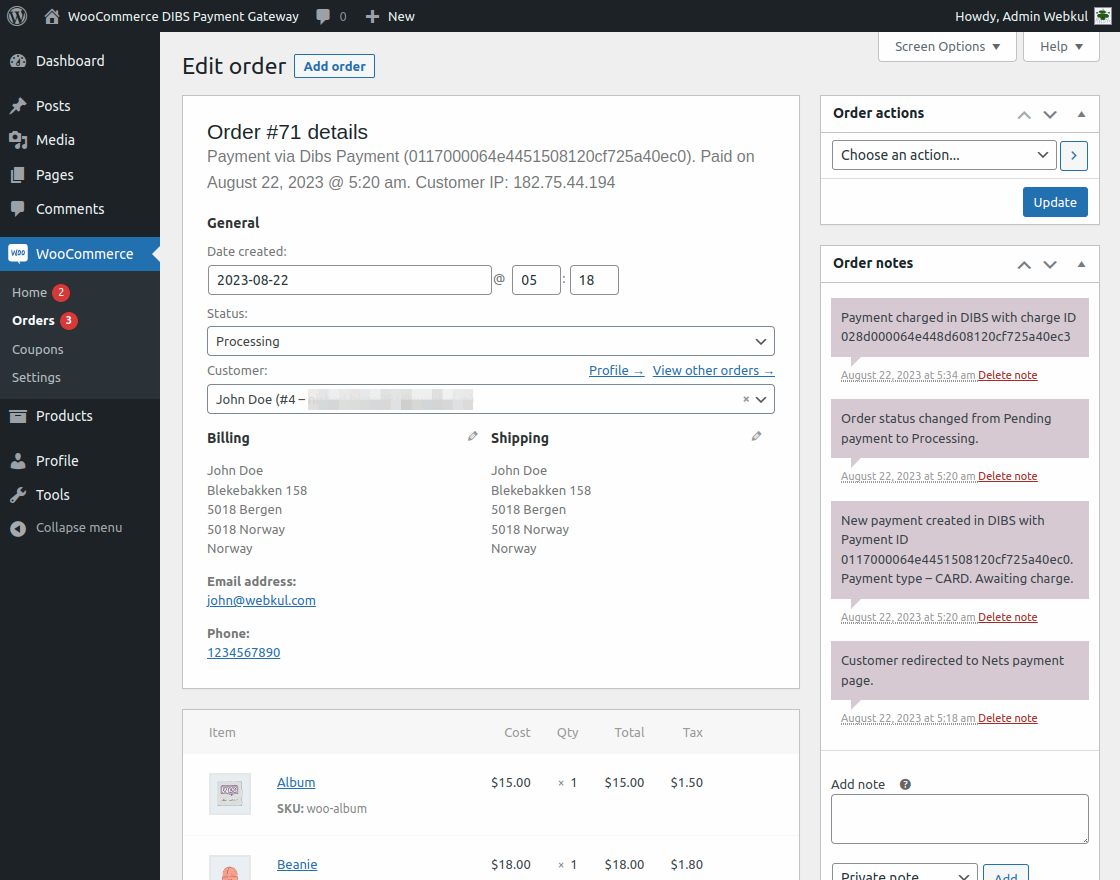
To capture the payment, the admin will tap the Capture button, and the payment is charged in DIBS with a charge ID.
Order Details at DIBS Dashboard
The order details are visible in the DIBS dashboard as well.
If the charge is made at the WooCommerce end manually or is set as auto-charge then the order will be visible at DIBS under the Charged section.
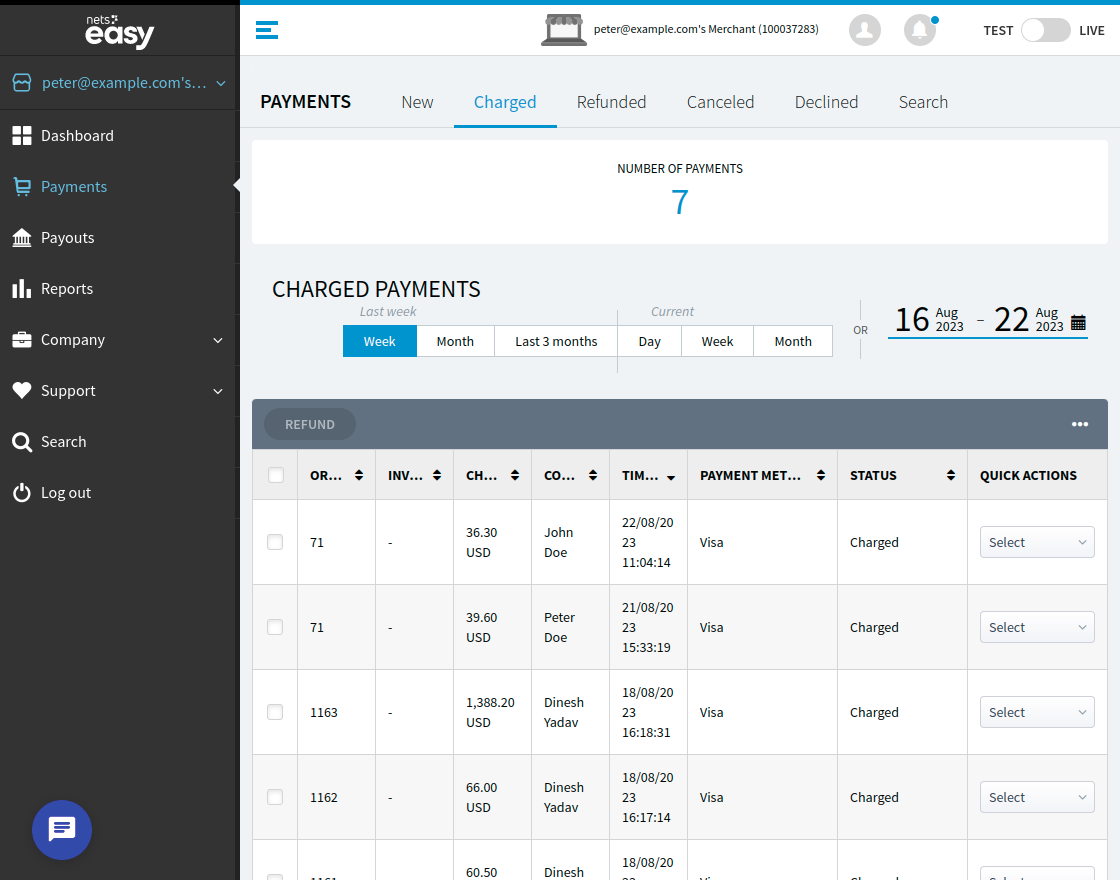
Note: If the charge is not made at the WooCommerce end then the admin can also charge the order at the DIBS dashboard.
Refund Process
The admin can make a refund from the admin backend panel or via the DIBS dashboard as well if enabled.
Note: Capture must be done for the order to make a refund for the same.
DIBS End:

The Refund option will make a complete refund else to do a partial refund the admin can tap the Edit and Refund option.
After selecting the products for which the refund need to do, the admin can refund the amount to the customer via the DIBS dashboard.
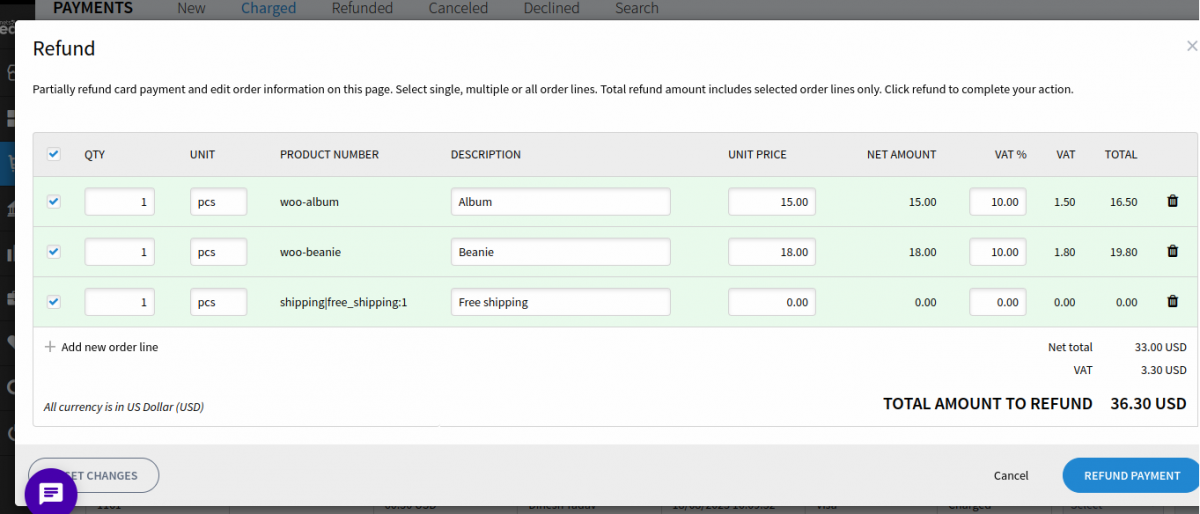
After tapping the Refund Payment, the payment will get refund to the customer. Check the refund section and open the particular order for the refund details.

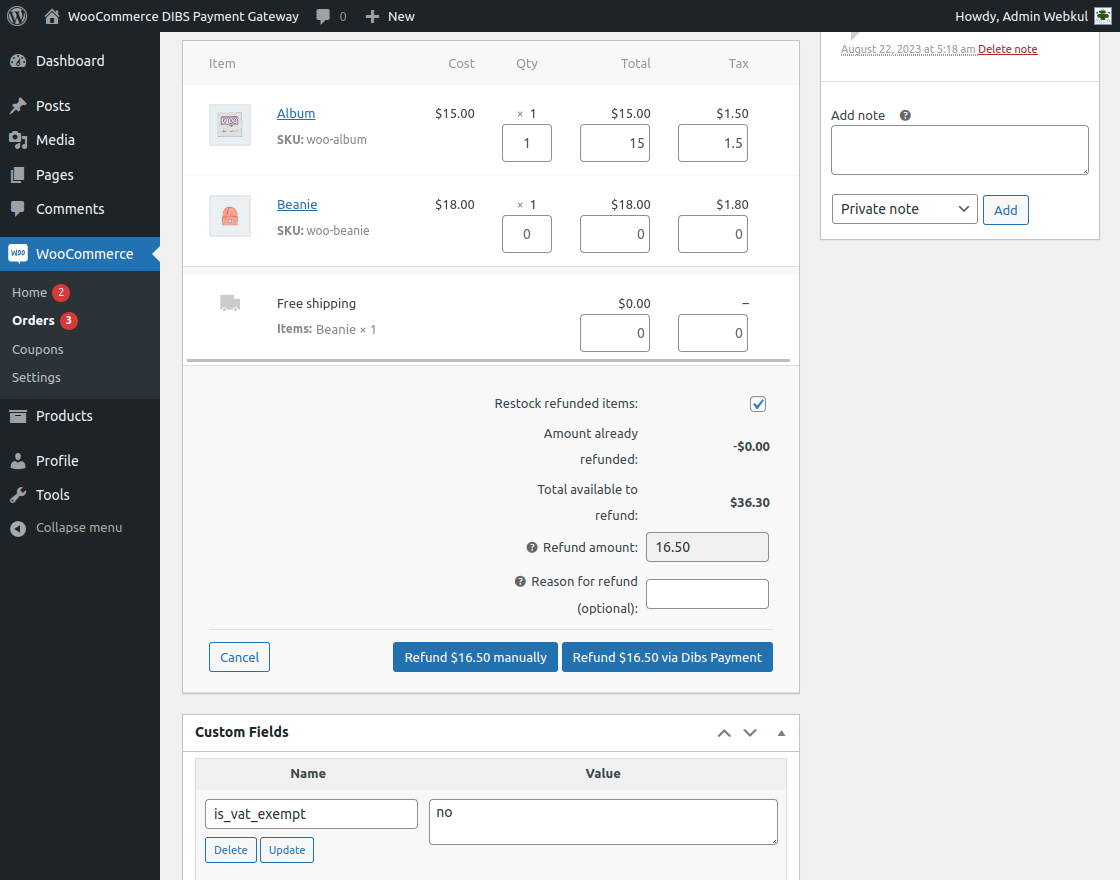
WoCommerce End:
For the respective order, tap the Refund button.

Tapping the refund button brings up the section where the admin can partially or fully make a refund for the order as required manually or via the DIBS refund button.
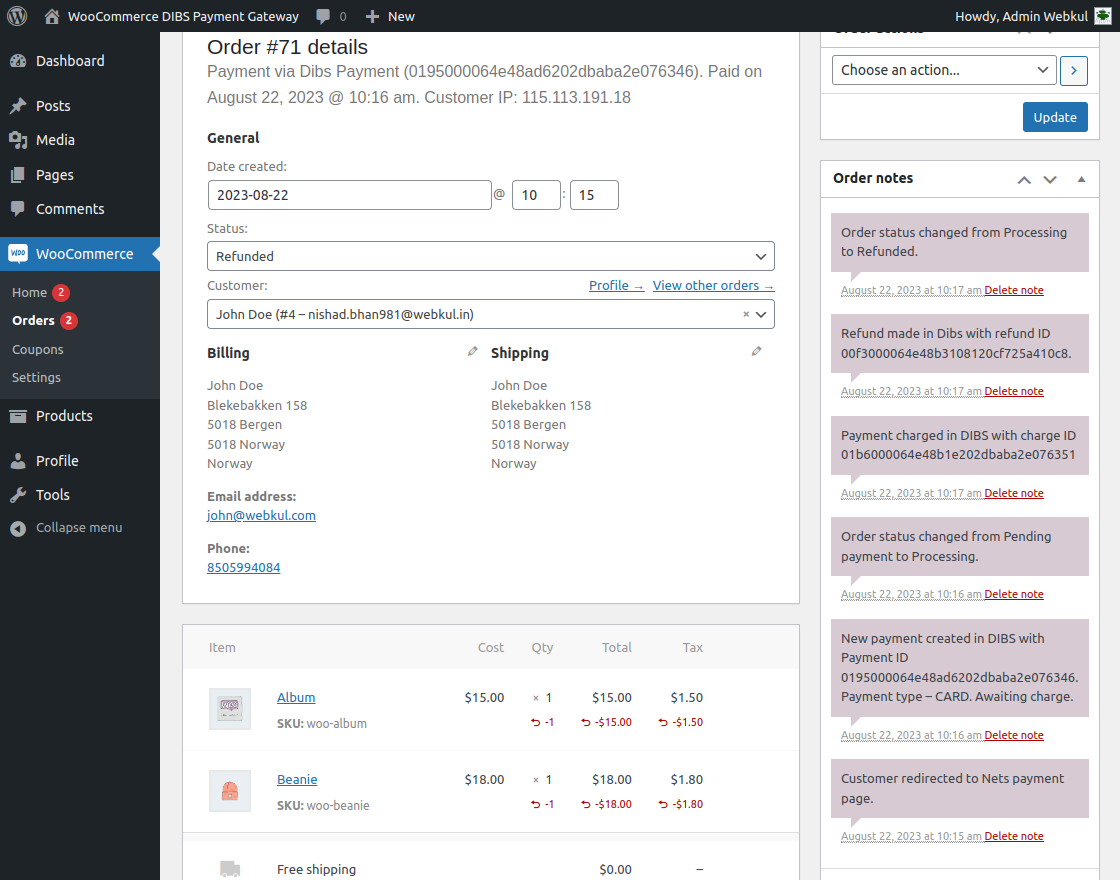
After refunding the details are visible under the order history for the same.
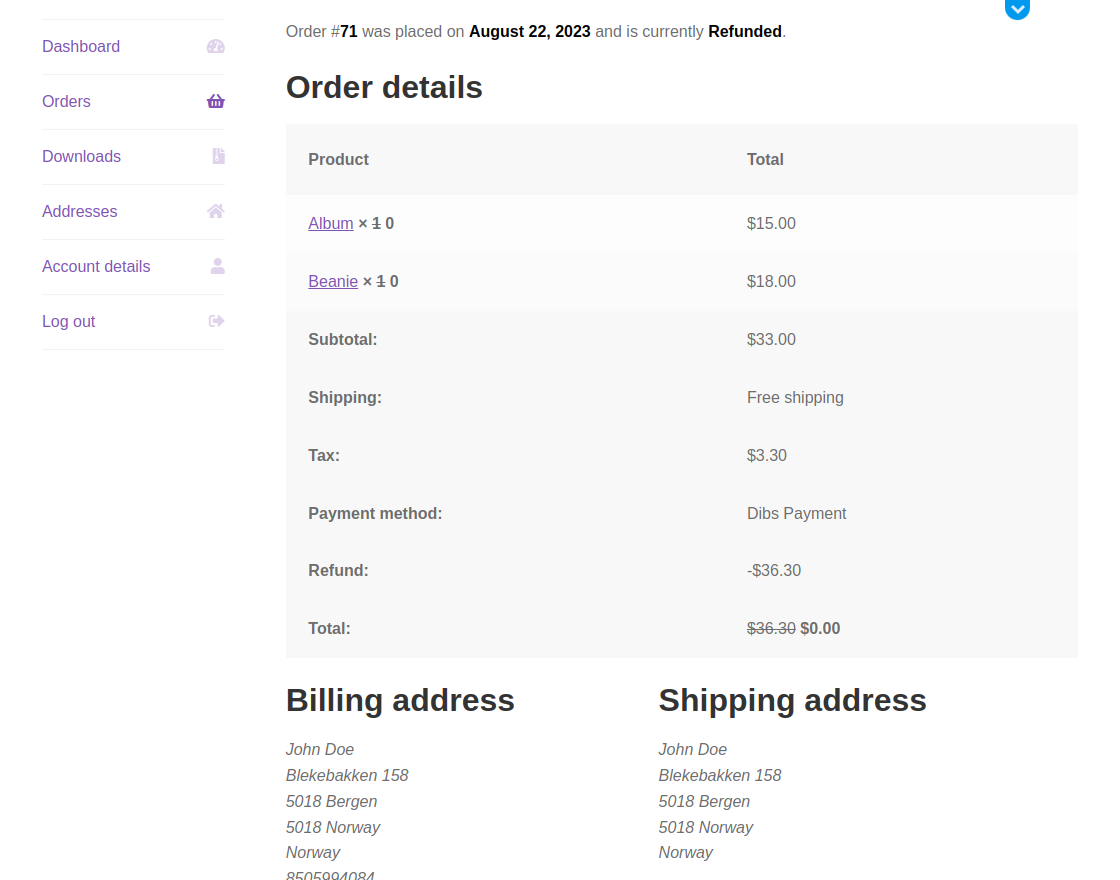
Customer Refund Details
The customers can navigate to their order history and check the refund details as per the screenshot below.
Support
That is all about the WooCommerce DIBS Payment Gateway. If you have any queries regarding the plugin, please contact us at Webkul Support System.
You can also check our complete WooCommerce plugin list.
Current Product Version - 1.0.0
Supported Framework Version - WordPress: 6.3, WooCommerce: 8.0.2

Be the first to comment.