In the Webkul Product Subscription App, the product subscription requires paying a recurring fee for regular deliveries of a product or service on a set schedule.
This model is commonly used in online shopping, entertainment, food, beauty, and technology, simplifying processes and offering a personalized experience that benefits both customers and businesses.
Features
The merchant can add subscription plans to Shopify products and has the authority to create and manage these plans.
Add a subscription to the product to increase the selling growth of your product and also integrate offers into it.
Customers can manually renew their subscriptions if they wish to.
In addition to the auto-charging system, the app also supports recurring invoices mode for added flexibility.
The payment calendar provides a complete overview of upcoming payments, skipped payments, and failed payments.
Set up predefined fixed schedules for your customers to be automatically charged at a specific date.
You can set the app to require customers to renew a subscription a certain number of times before they can cancel it.
App Installation
Go to the Shopify App Store and search for ‘Webkul Product Subscription App.’ Click ‘Install,’ choose a plan, and complete the payment. Once the payment is processed, your app will be ready to use.
Pricing
Free
Basic Plan: $20 per month
Executive Plan: $40 per month
Pro Plan: $70 per month
Select a plan that best fits your business needs. For more details about the plans, visit the Shopify App Store and search for ‘Webkul Product Subscription App.’
Dashboard
Once payment is approved, the dashboard will show total membership details for the last six months, including active, paused, canceled, and expired memberships.
To add a product for a subscription, click on ‘Products,’ then click on ‘Add Product.’ After that, select your product from the dropdown list.
Add Subscription and its rule
To add a subscription and set rules for a product, click the ‘View’ button on the ‘Store Products’ page.
Subscriptions/Selling Plans
Subscription Details
Plan Name: Here, enter your subscription plan name.
Discount on Subscription Products:
Fixed Price: If you select a fixed price discount, the discount amount will be set as a fixed value relative to the product’s original price.
For example, if a product costs 10 USD and the fixed discount for the subscription is 1 USD, the customer will pay 9 USD if they have an active subscription.
In percentage: If you choose a percentage discount for a subscription product, apply the discount as a percentage of the product’s original price. For example, if a product costs 20 USD and the discount is 10%, the subscription holder pays 18 USD.
Delivery Type
Instant Delivery: Instant delivery means receiving a product immediately or very shortly after placing an order.
The delivery cycle will be scheduled according to the date the customer subscribes. Note: Instant delivery is only for digital products.
Specific Delivery: Specific delivery means receiving a product at a designated time or place of your choosing. The product will be delivered on a specific day or date of the week or month.
In specific delivery, you can set a preparation time for the product when creating a subscription plan.
For example, if the delivery date is the 7th of each month and the preparation time is 2 days, a subscriber joining after the 7th will receive their first delivery on the 9th of the next month.
For example, if deliveries occur every Wednesday with a 2-day preparation time, a subscriber who signs up on or after Wednesday will receive their first delivery the next Wednesday.
Note: The number of days taken by the product to be prepared or manufactured is known as the preparation days of the product.
Delivery Count
Maximum Delivery Count: The admin determines the maximum number of deliveries allowed per subscription.
Minimum Delivery Count: It is the minimum duration for which you must deliver orders under a subscription before you can terminate it.Note: The minimum delivery count must be 2 or more.
Choose Delivery Day: When you select a ‘Specific’ delivery type with a ‘weekly’ subscription, choose the day of the week to deliver the ordered product to the customer.
Choose Delivery Date: When you select ‘Specific’ delivery type with a ‘monthly’ subscription, choose the exact date of the month for delivering the ordered product to the customer.
Configuration
To enable or disable the configuration, go to the Shopify backend, access the Webkul Product Subscription App, and navigate to Home Page > Configuration > General Settings.
General Configuration
Retry a failed payment: Enable this option, if you want to allow your customers to retry payment if failed.
Time window for retrying payment: You can set the time interval for customers to retry a payment if a transaction fails. If you do not complete the payment within the retry interval, we will cancel the subscription.
Option available after the failed payment
You can choose how you want to proceed with the subscription when payment has failed or declined.
Skip subscription
Paused subscription
Cancelled subscription
Skip Delivery: Enable this option if you want to allow customers to skip their delivery date or day. Customers can specify the number of days to skip upcoming deliveries before their next billing date.
Note: The next delivery will occur on the same date or day that the admin has scheduled for product or service delivery.
Pause subscription: To enable this feature, allow your customers to pause their subscription if they are unable to receive delivery or according to their needs.
Customers can set the number of days to pause their subscription before the next billing date.
Renewal Subscription: To enable this feature, allow your customers to renew their subscriptions upon expiration to continuously access their benefits and services.
Configuration
To add the extension, go to theme customization and integrate the extension into your theme.
To display the options for customers to purchase a subscription, please follow these steps:
1: Add the product extension
Click ‘Add extension’ above to access your theme customization area.
In the dropdown menu in the middle, select ‘Product,’ then choose ‘Default Product.’
On the left-hand side, under ‘Product Information,’ click ‘Add Block.’
Select ‘Apps’ and then add the ‘Subscription Product’ block.
2: Add the subscription button extension
Click ‘Add extension’ above to redirect to your theme customization area.
In the dropdown menu in the middle, select ‘Classic Customer Account’ and then choose ‘Customer Account.’
If you aren’t logged in, log in to your customer account.
On the left-hand side, under the template section, click ‘Add Block.’
Select ‘Apps’ and then add the ‘Subscription Button’ block.
3: Add the subscription list extension
Click ‘Add extension’ above to go to the theme customization area.
Next, click the dropdown menu in the middle, select ‘Pages,’ and then choose ‘Default Page.’
On the left-hand side, under the template section, click ‘Add Block.’
Choose ‘Apps’ from the options and then add the ‘Subscription Details’ block.
Mail Configuration
This feature automatically notifies customers when they activate or suspend their subscription, debit their account, or experience a payment failure.
You can also customize the email templates to fit your needs.
To customize the email template, go to Mail Configuration, choose the template you want to edit, update the email content, and click Save.
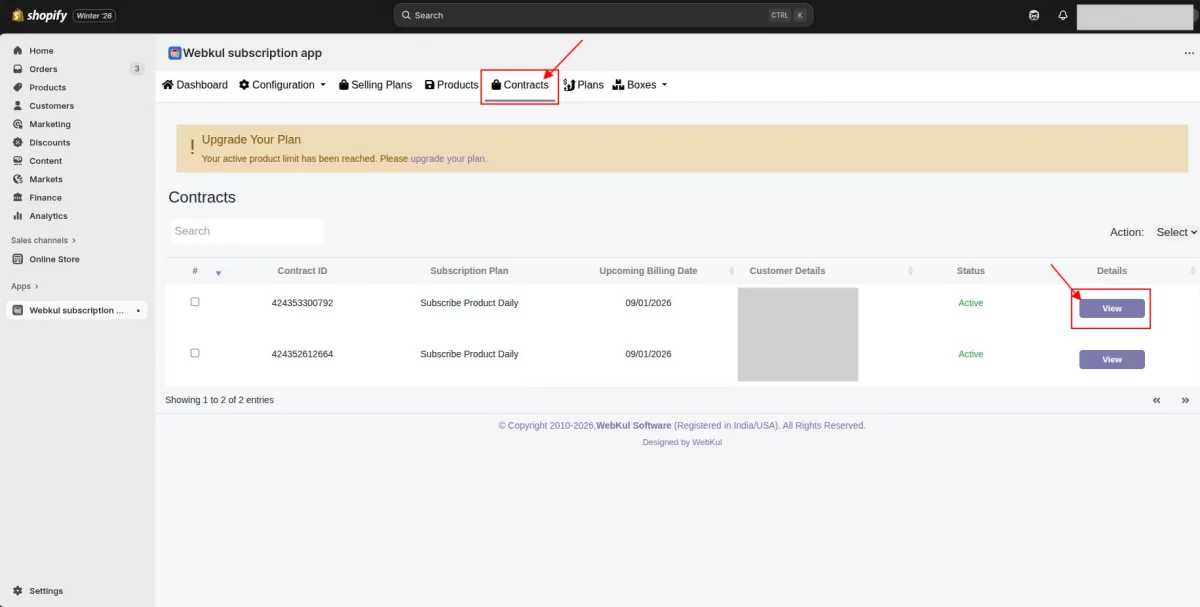
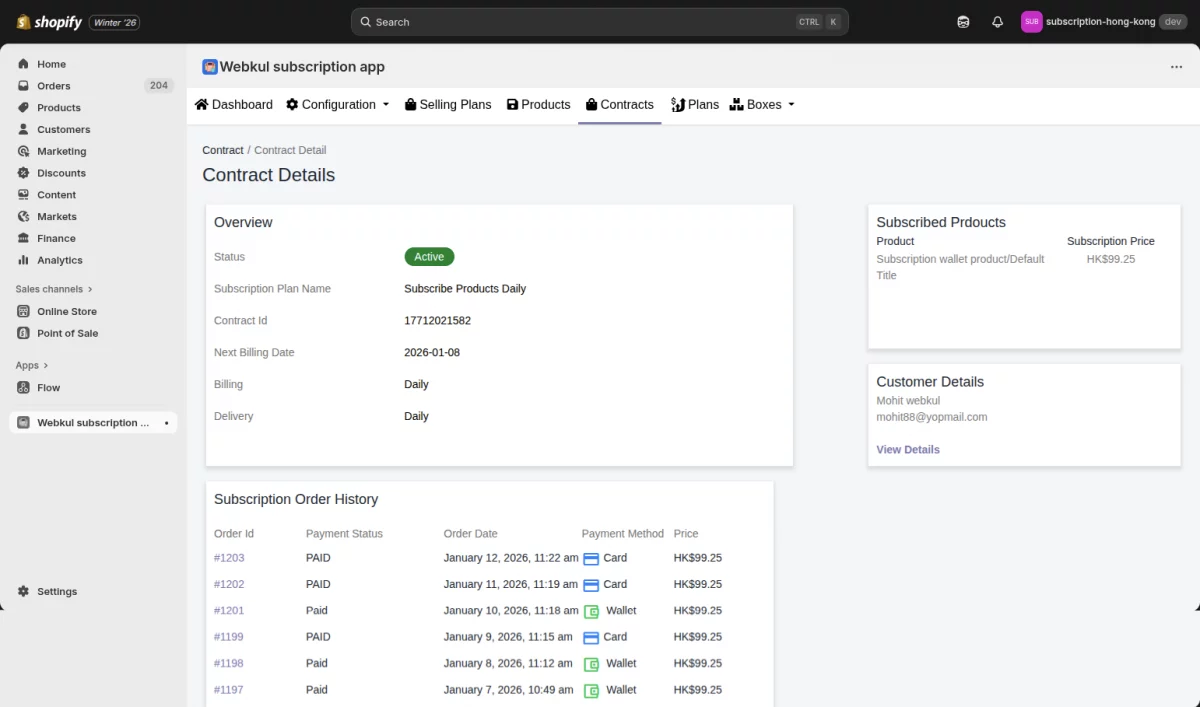
Contracts
When a customer subscribes to a product, their details—including subscription ID, plan, product name, upcoming bill, and status—are accessible in the Contracts section.
The admin can view client contract details, including the subscription plan name, contract ID, next billing date, billing cycle, delivery cycle, subscription status, customer info, and order history.
How can the admin remove a subscription plan from any product?
The admin can remove a subscription plan from any product at any time. To do this, navigate to Webkul Subscription App > Products.
Select the product from which you want to remove the subscription, check the variants, and then click ‘Delete Plan.’
Frontend
Once a subscription option is added to a product, your customers will see it on the product description page in your store.
They can select the subscription option and then proceed to purchase the product, or they can choose the one-time purchase option to buy the product without a subscription.
All the details of the subscription plan, including the plan name and subscription type, will be listed on that page.
Purchase with Subscription: Customers can choose the subscription option to purchase the product, which offers either a weekly or monthly subscription plan.
Weekly Subscription
Monthly Subscription
Purchase without subscription
One-Time Purchase: If your customers prefer to buy the product without a subscription plan, they can select the one-time purchase option.
Please note that choosing this option means they will pay the full original price, and no discounts related to the subscription will apply.
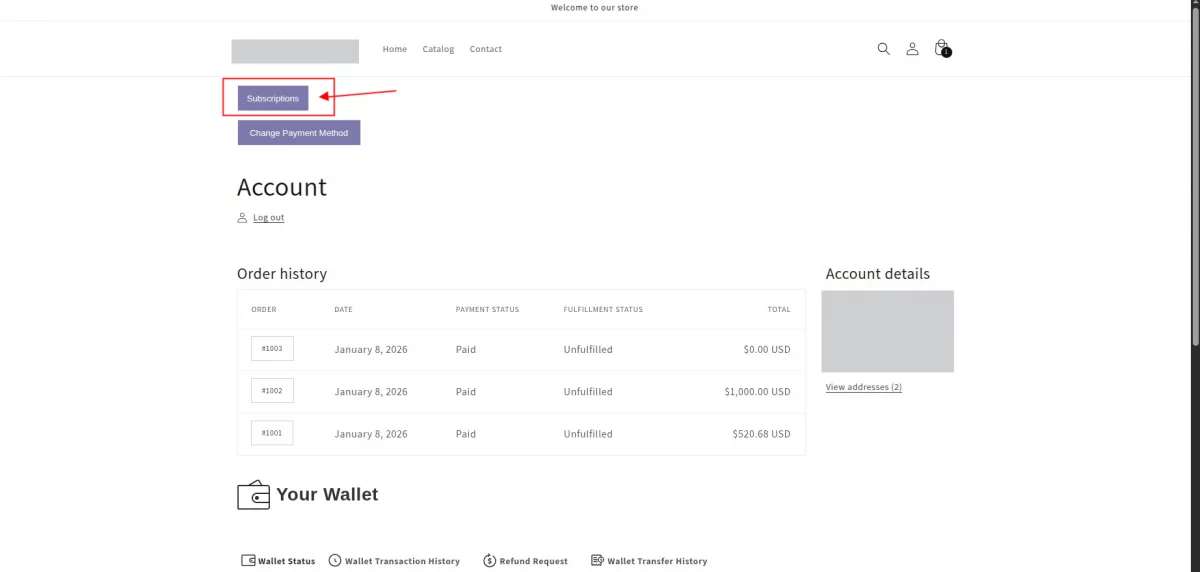
Customers Can Manage Their Subscriptions
When customers purchase products on a subscription basis, they can view and manage their subscriptions anytime through their account page on the store.
They will also be able to see the number of products they have subscribed to.
If your customers want to view their subscribed products, they can easily navigate to the account section of your store. There, they will find a subscription button on their account page.
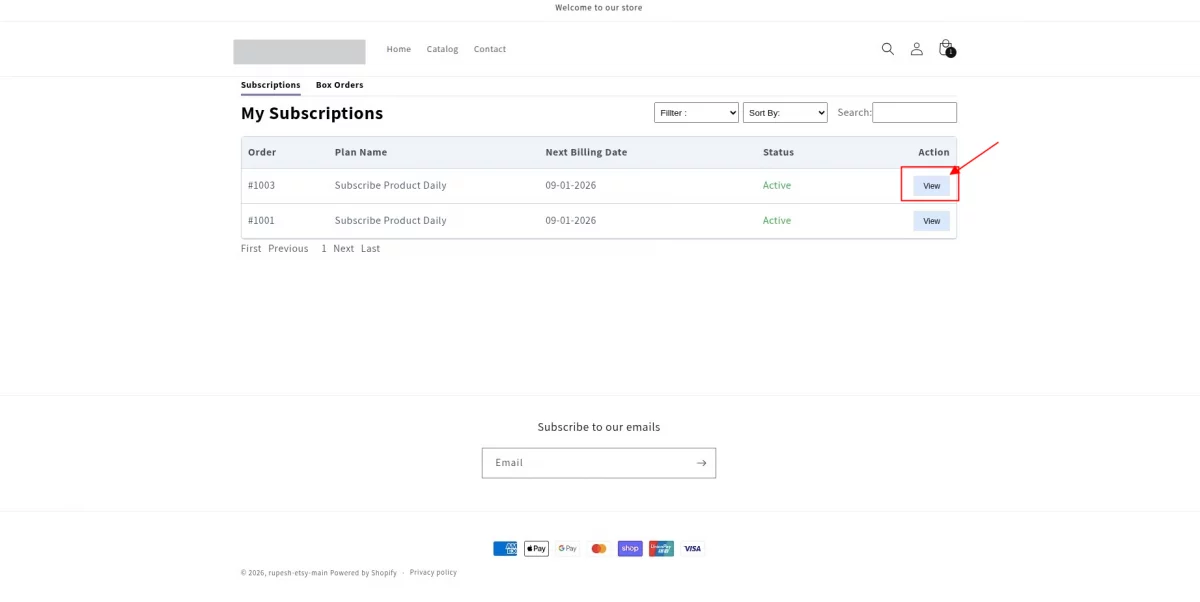
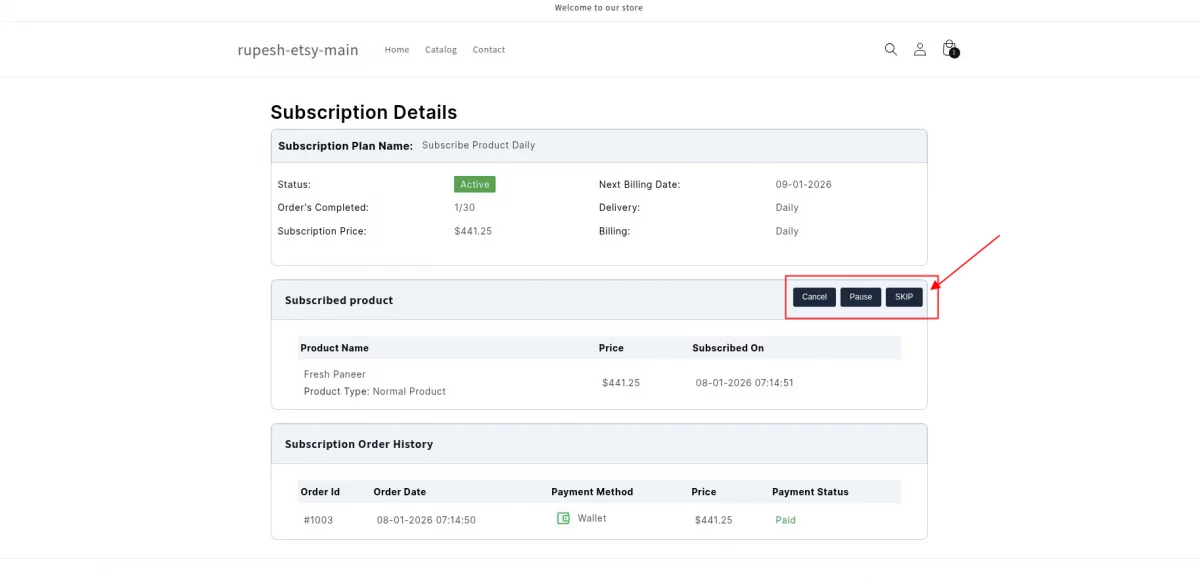
After clicking it, they will see all their subscribed products, and by clicking the ‘view’ button, they can access the details for each product.
They can manage their subscriptions on a product-by-product basis and view full details for each subscribed product.
This includes subscription contract details such as the subscription status, plan name, next billing date, completed orders, delivery cycle, and billing cycle.
Customers can manage their subscriptions and can cancel, pause, or skip them as needed. They also have the ability to check their subscription order history.
Change or Update Payment method
If a payment fails due to an error or incorrect payment details, customers can update their payment information.
To do so, they should visit the account section of the store, where they’ll find an option to change the payment method.
Clicking this option will display their current card details. Once they select their card or payment details, a link to update their payment method will be sent to their registered email address.
They can then follow the link to update their payment information.
The Webkul Product Subscription App enables businesses to offer recurring subscriptions for products or services, with flexible delivery options and features for managing subscriptions.
Such as payment retries and email customizations. It integrates with Shopify to accommodate various business needs.
Box Order and Subscription Box Feature
A new and powerful feature has been introduced in the app — Box Order and Subscription Box.
This functionality allows merchants to create pre-defined product boxes and offer them directly to customers, either as a one-time purchase or as a recurring subscription.
Box Order
The Box Order feature enables the merchant to create a ready-made box containing multiple products and offer it as a single purchasable item.
This allows customers to buy a complete curated set of products at once without having to add each product individually.
Subscription Box
The Subscription Box feature works on a recurring model, allowing customers to subscribe to these boxes for a specific duration.
Merchants can set up subscription plans, define time periods, and choose the type of boxes they want to offer.
There are three types of subscription boxes available:
1. Standard Box
In a Standard Box, the merchant fixes the products, and the customer cannot change them.
Each delivery contains the same set of products defined by the merchant at the time of box creation.
2. Custom Box
A Custom Box lets the merchant add multiple products and set a minimum number of items that customers must select for the subscription.
Customers can then choose their preferred products from the available list and subscribe accordingly.
Example: If a box contains 10 products and the merchant sets the minimum required quantity as 5, the customer can select any 5 products of their choice to create their own subscription box.
Note: Once the subscription starts, before the next delivery date, either the customer or the admin can re-customize the box if needed.
3. Surprise Box
The Surprise Box is designed to offer a fun and engaging experience. Products in this box are selected randomly, creating a mystery or gifting element for the customer.
Each box includes a short hint-based description that gives a slight idea about the theme or nature of the products, but the actual items remain a surprise until delivery.
Rewards or surprise items are always picked randomly from the set of products added by the merchant.
Option to Add a New Plan While Creating a Box
While creating a box, if the merchant wants to add a new subscription plan that is not already available among the existing options, they can easily do so directly from the same interface.
Simply type any plan name of your choice in the plan field — once entered, a new “Add Plan” button will appear automatically.
By clicking this button, the merchant can create a completely new plan and define its duration or time period as per their preference.
Updates on the Buyer End
On the buyer’s profile page, under the Subscriptions section, two new tabs have been introduced to provide better clarity and organization of box-related orders.
1. Box Orders
This section displays all the boxes purchased by customers — whether through a one-time purchase or an active subscription.
It helps buyers easily track all their box orders in one place, regardless of the purchase type.
2. Subscriptions
This section lists all the subscribed box orders that are part of an active subscription plan. Customers can view details of their ongoing subscriptions and manage them directly from here.
New Options in General Configuration
Two new configuration settings have been added under the General Configuration section to provide better control over how subscriptions behave when sub-products are unavailable.
1. Standard Box Subscription
Enable this option to automatically cancel existing subscriptions linked to a box product if any of its sub-products go out of stock.
Note: By default, the subscription will continue even if a sub-product is unavailable.
2. Custom Box Subscription
Enable this option to automatically cancel existing subscriptions associated with a box product if any sub-product goes out of stock or is removed from the store.
Note: By default, the subscription will be put on hold in such cases.
New Mail Configurations Added
Several new mail configurations have been introduced to enhance communication between the store and customers regarding Box Orders and Subscription Boxes.
These automated mails ensure customers are always informed about important updates related to their subscriptions and box purchases.
Box Order Confirmation
This mail is sent to the customer when they successfully place an order for a box product.
Subscription Box Cancelled
This mail is triggered when a customer’s subscription box is cancelled, typically due to one or more sub-products being out of stock or removed from the store.
Subscription Box Information
This mail informs the customer that a sub-product within their subscribed box is currently out of stock.
Shopify Subscription Box Product Update
This mail is sent when the subscribed box product itself has been removed from the store, ensuring customers are aware of product availability changes.
Update Regarding Your Subscription Box
This mail prompts the customer to manage their subscription in case any sub-product is removed from their Custom Box configuration.
New Filters in Product Listing Menu
Two new filters have been introduced in the Product Listing menu to make product management more efficient and organized.
Box Products Filter
This filter allows the admin to view all products that are part of any Box Order or Subscription Box.
It helps merchants quickly identify and manage products associated with box offerings without having to search manually through the entire product list.
Subscription Status Filter
A new Subscription Status filter has also been added, providing the option to sort products based on their subscription activity.
Merchants can now easily filter between Active and Inactive subscription products, streamlining monitoring and management within the product listing section.
Webkul Product Subscription App Compatibility with Wallet App
Webkul Product Subscription App is now compatible with Webkul Wallet Management App, allowing customers to pay for subscription products directly using their wallet balance.
Earlier, when a customer purchased a subscription product, card payment was the only available option at checkout.
With this update, customers can now choose to pay using their wallet, making the subscription payment process more flexible and seamless.
Note: This feature will not work unless the Webkul Wallet Management App is installed and configured.
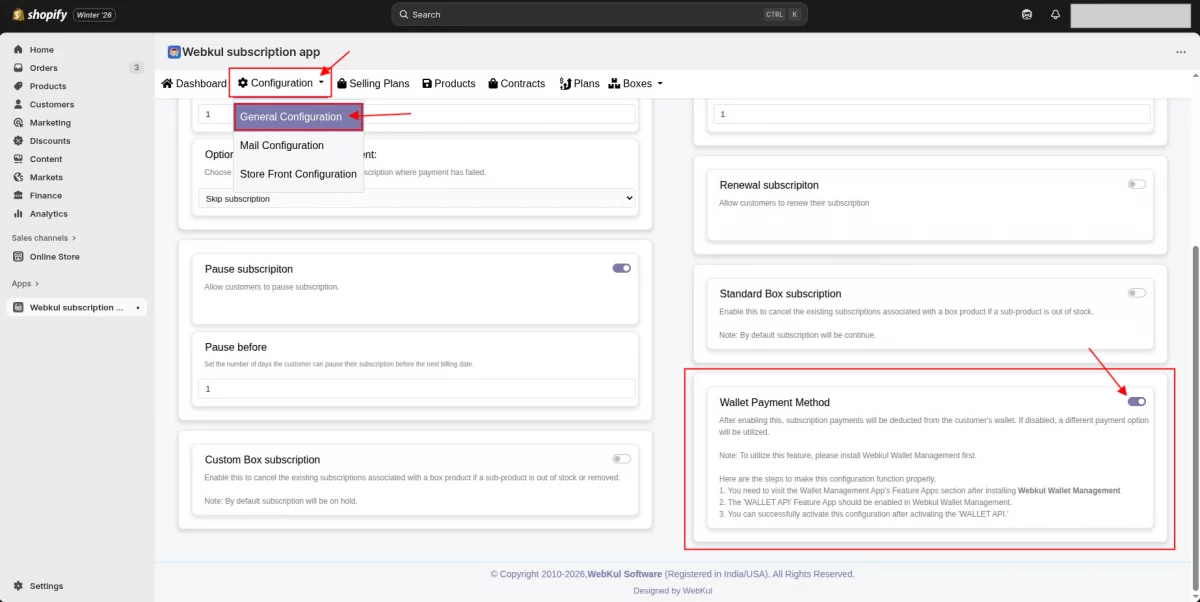
Admin Configuration – Enable Wallet Payment for Product Subscriptions
Follow the steps below to enable wallet payments for subscription products:
Navigate to Webkul Product Subscription App.
Go to Configuration → General Configuration.
Enable the “Wallet Payment Method” option.
Save the configuration.
Once enabled, subscription payments will be prioritised to be deducted from the customer’s wallet. If disabled, the system will use other available payment methods.
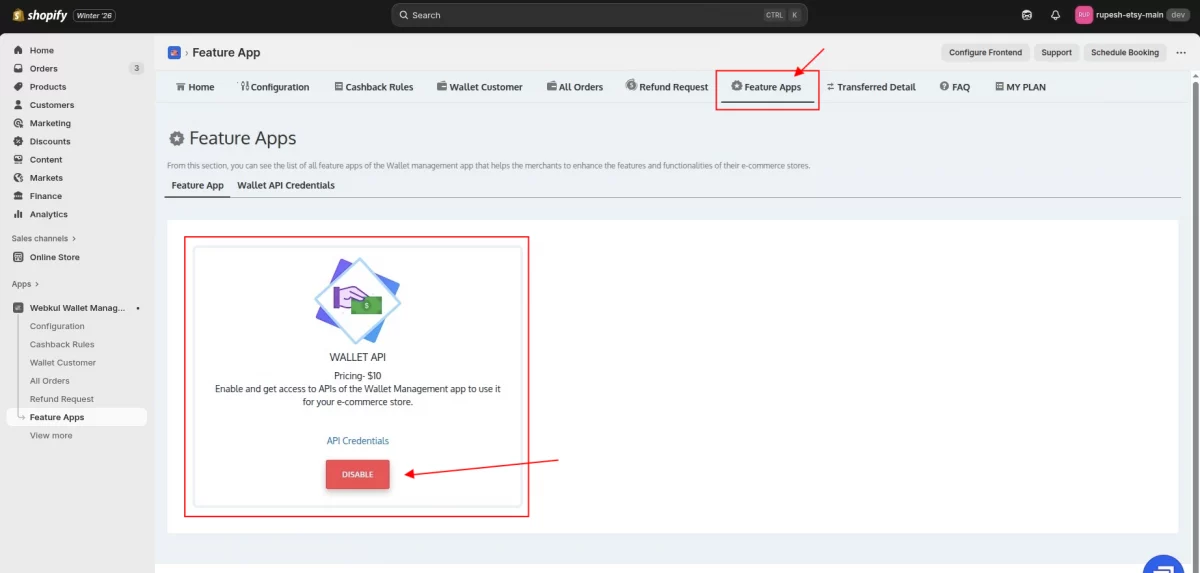
Enable WALLET API in Wallet Management App
To make this configuration work properly, you must enable the Wallet API:
Open Webkul Wallet Management App.
Navigate to Feature Apps.
Enable the “WALLET API” feature.
Save the settings.
After enabling the Wallet API, the wallet payment functionality will be activated successfully.
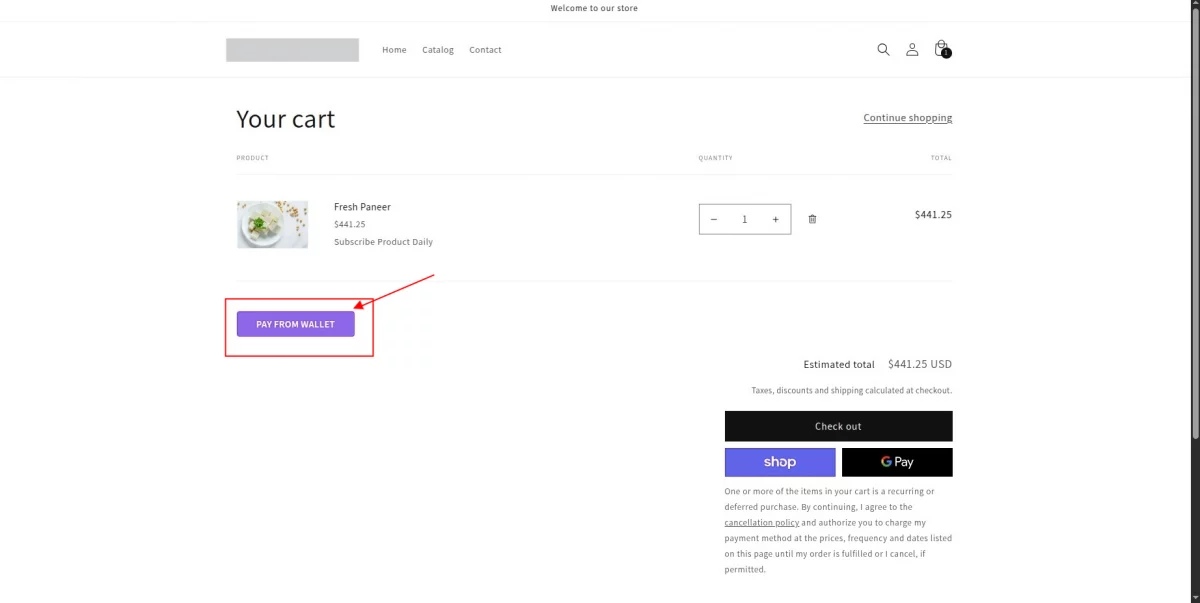
Customer Experience – Paying Subscription Using Wallet
Once the configuration is completed:
When a customer adds a subscription product to the cart,
A “Pay from Wallet” button will be displayed on the cart page.
By clicking this button, the customer confirms that the subscription payment should be processed using their wallet balance instead of a card.
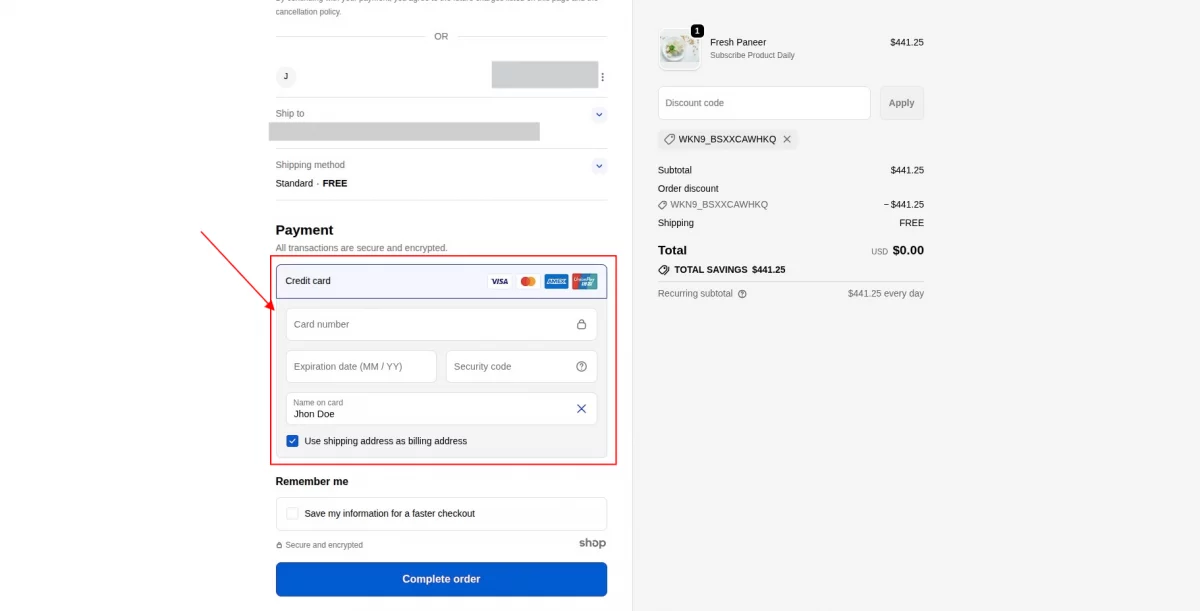
Checkout Flow – Why Card Details Are Still Required
After clicking Pay from Wallet, the customer is redirected to the checkout page.
Even if wallet payment was selected earlier, the customer will still be asked to enter card details at checkout.
Why is this required?
Wallet payment is given first priority.
However, if the customer’s wallet balance is insufficient or exhausted,
The payment is automatically processed using the card.
This ensures that the subscription payment does not fail or get stuck.
This fallback mechanism keeps the subscription flow smooth and uninterrupted.
Customer Account – Subscription Management
Customer Account – Subscription Management
After completing the order:
Customers can view their subscription order details from their profile/account section.
They can:
View subscription details
Pause the subscription
Skip a cycle
Cancel the subscription
All subscription-related actions remain available as usual.
Admin Panel – Subscription & Payment Details
From the admin side:
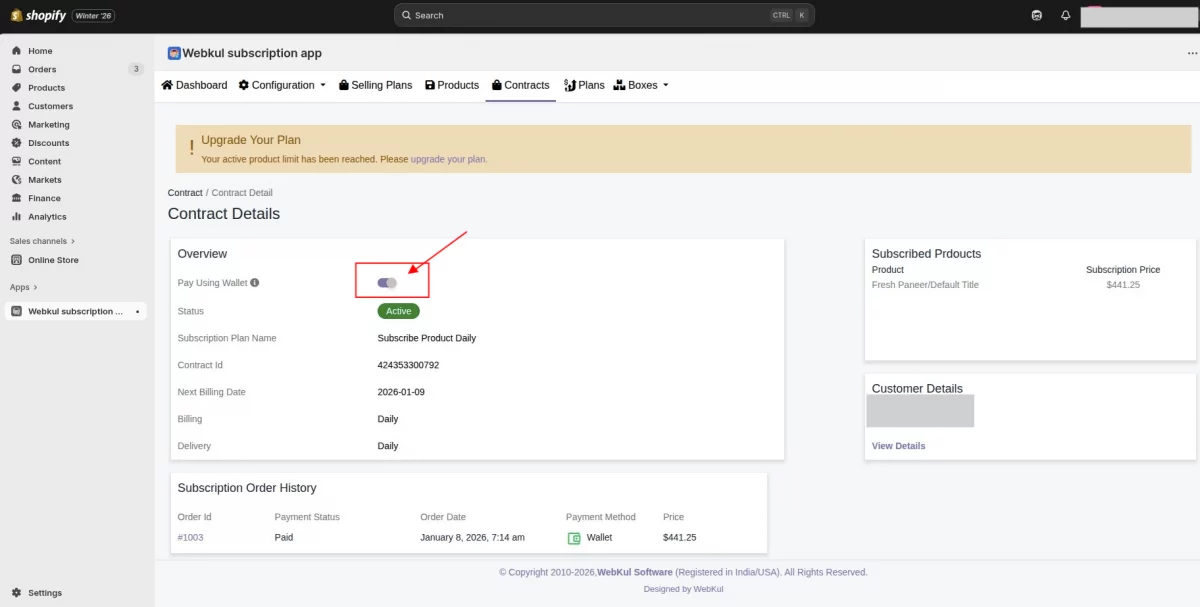
Navigate to Webkul Product Subscription App → Contracts.
A list of all subscription contracts will be displayed.
Click the View button next to any contract to open the detailed view.
On the contract details page:
Admin can see whether the customer chose Wallet Payment or Card Payment.
If wallet payment was selected, the “Pay Using Wallet” option will appear enabled.
The Subscription Order History clearly shows:
Whether previous payments were made via wallet or card.
Manual Control Over Wallet Payments (Admin)
Admin can manually enable or disable wallet payment for future subscription cycles directly from the contract page.
This option is also available for existing/older subscription orders, even if wallet payment was not selected initially by the customer.
This gives the admin full flexibility to manage subscription payment methods.
A skilled business analyst in the Shopify eCommerce platform, specializing in optimizing online store performance and user experience. Skilled in gathering and analyzing business requirements, driving data-driven decisions, and implementing solutions that enhance customer satisfaction and sales growth.


2 comments
We have created a ticket on your behalf and our team will connect with you soon regarding your queries.
Thanks and Regards,
Team Webkul