Prestashop Auto-fill Address Form | Google Address: Nowadays, when there is so much competition in the eCommerce domain. You, as a merchant would not want to take a risk that’s not worth taking.
Generally, on online sites, a customer’s behaviour is highly volatile & thus harder for definitive evaluation.
It gives us all the more reason to implement new features regularly to enhance the customer’s experience.
By taking a step in that direction, we are here with Prestashop Auto-fill Address Form module.
This module not only helps your customer’s but also helps you with the same features at your end.
In other words, the three significant functionalities, i.e. auto-detect location, address suggestions & Google Maps are available at both customer-end & admin-end.
Before delving into the technical details of the module, let’s just see how the aforementioned three functionalities are helpful.
- Auto-detect the location – This feature detects the current location of the user by making the best possible use of the device’s functionality(like GPS).
- Address Suggestions – The JavaScript API retrieves the data from the Places library to show the best possible results based on the search.
- Google Maps – Use Google Maps to pinpoint the location on maps. The address of that location will be filled automatically in the form.
NOTE
- For the functioning of this module, billing must be enabled for the Google Cloud project created for Google Maps APIs in the Cloud Console.
- You can create a new Google Cloud project from https://console.cloud.google.com/projectcreate
- And you can enable billing from https://console.cloud.google.com/project/_/billing/enable
Features of the Prestashop Auto-fill Address Form module
- Set the default zoom level to display Google Maps.
- Enable or disable address suggestions on the back-end as well as front-end.
- Choose to activate or deactivate the auto-detection of location(address).
- Show or hide the Google Maps for address selection.
- Enable or disable the automatic filling of city name based on the location.
- Choose to fill the state of the customer automatically on the basis of location.
- Activate or deactivate the automatic filling of the country based on the location.
- Enable or disable the automatic filling of zip code based on the location.
- Automatically fill country and state based on zipcode.
- Automatically fill the address forms wherever available with the above functionalities.
- Use address suggestions to fill out the address forms.
- Make use of the auto-detect feature to fill out the current location in the form.
- Select the countries for which you want to allow auto-suggestion.
- Pinpoint the location on Google Maps to fill out the address details.
- Prestashop Auto-fill Address Form module is MultiShop Compatible.
How to install the Prestashop Auto-fill Address Form module
- Firstly, go to the module manager in the back office and click on ‘upload a module’.
- Now, drag and drop the module file or select the file from the system.
- In this way, the module installation will be successful.


How to get the API keys of the module
To configure the module, you need the API keys. Therefore, visit https://console.cloud.google.com/ to get the API keys for the module. After that, sign-in on the website with your Google account.
After signing-in to the account, you will land on the home page. Now, go to the APIs & services->Dashboard.


On the dashboard, you will find a button “ENABLE APIS AND SERVICES”. Either you can click this button or click on the library to go to the APIs library.

Find “Maps” section on the page & then proceed to view all the APIs of maps.

After clicking on “View all” button, you will land on a new page. On this page, you can view all the APIs of Maps. On this page, you need to find the following three API:
- Geocoding API
- Maps JavaScript API
- Places API
Click on each of the blocks & proceed to enable these APIs.


After enabling all the three APIs, now go to APIs & Services->Dashboard. There you will find a button of “Credentials“.

Under “Credentials“, you will find a list of all the previously created APIs. Now, click on the “Create credentials” button.

Select the option “API key“.

After clicking on the above option, new API key will be generated. Please note that the new API key will have all the three services enabled.

View this newly created API key under the list too.

In this way, you can easily generate a new API key.
How to configure the Prestashop Auto-fill Address Form module
API Configuration
Under API configuration tab, the admin needs to:
- Specify Google API key that he generated on Google Cloud platform.
- Set the default zoom level for maps. Recommended value is 4.

Autofill fields

- Address Suggestion: You can choose to show google address suggestions to the customer.
- Address Auto-detection: Provide a button for auto-detection of location & consequently fill that in address from too.
- Maps for address selection: Choose to show a button for maps on the address form. So that a customer can pinpoint a location on the map to fill the address automatically
- Auto-complete City, State, Country, Zipcode: You can enable these options to fill the details automatically in the address form. These options work with all the three functionalities viz. auto-detection, address suggestion & pin-pointing of location on Maps.
- Auto-complete country and state from zipcode: Enable this option to automatically fill country and state based on zipcode.
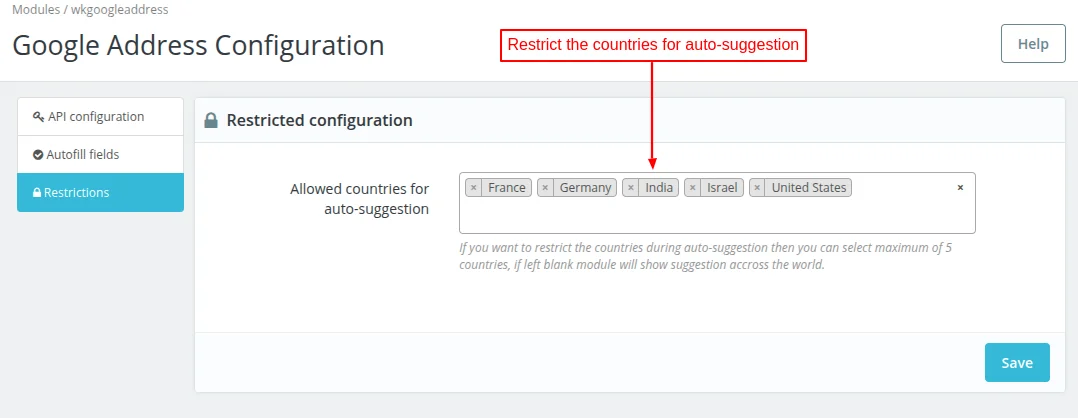
Restrictions
Under this tab, the admin can select the countries for which he wants to restrict auto-suggestion. This means auto-suggestion will be shown for these countries.
If left blank, then the module will show suggestions for all the countries.
Please note, that the admin can select a maximum of 5 countries countries for auto-suggestion.
Address forms at the front-end
Now, let’s see where on the front-end & back-end do we get the functionality of auto-filling the address.
Firstly, let’s see the “Address” section available on the customer dashboard.

After clicking on the “Address“, a customer can see all the saved addresses. Either edit the existing address or proceed to add a new one.

Let’s see, how a customer can add a new address with new functionalities. So, basically there are three ways to add or update the address now. Those 3 ways by which a customer can add new address are:
- By Automatically detecting the location with the help of the “locate me” button
- By selecting a suitable address out of the suggestions
- or By pinpointing the location on the Google Maps

Select the address from the suggestions

Choose a location on Google Maps to fill the address details

A customer gets all the three functionalities while updating the existing address of the customer too.

Checkout Page
Now, let’s see how a customer can use the auto-fill functionality on the checkout page. As you know, a customer needs to select an address before making the payment for the order.
And, a customer can either choose to checkout with the saved address or add a new address. Apart from this, they can also edit the already saved address.

Edit the existing address

Add a new address
While adding a new address at the time of checkout, a customer can auto-fill the address form using auto-fill functionality.

So, this was all about the pages of the front-end where customer can auto-fill the address form. Now, let’s see the address forms available at back-end where this functionality is available.
At the back-end
As you know, admin can also create a new order on behalf of the customer. Firstly, let’s see how an admin creates the order.
Click on the “Add new order” button to create a new order on behalf of the customer.

After that, search & select the customer.

After selecting the customer, following page opens. On this page, you need to select a product & address of the customer to create the order.
Here comes the use of the functionality this module provides.
Either you can edit the addresses of the customer or add a new address to proceed. So, now whether you update or add the new address, a popup will open to fill the address.

In either case, you get all three functionalities to make the work easier at your end. Although I covered them in earlier sections, I’m mentioning them here again.
- Auto detection of location
- Address suggestions based on search
- Pinpointing of location on Google Maps


Apart from the above, let’s see on what other pages do an admin gets the feature.
Customer’ Address
An admin can also use the functionality of the module while updating & editing the customer’s address.

The following two pictures are of:
1. Edit address details of the customer

2. Add a new address of the customer

In both the above cases, an admin can use the features like auto-detect the location, address suggestions etc.
Now, here comes the last page on which the auto-fill address from functionality is available. This page allows the admin to add the contact details & their offline stores.
In both cases, the admin needs to fill in the address. However it’s not necessary to fill address in contact details, but it surely does while adding/editing the store details.
Following page is where an admin can fill the contact details. Moreover, he/she can also add a new store by clicking in the “Add New Store” button.

After clicking on the “Add New Store” button, the following page opens. Here, an admin can fill the address using any of the three functionalities.

This was all about Prestashop Auto-fill Address Form Module. I hope this document will help you in checking the functionality of the module in a better way.
Also, do let us know about your views in the comments.
Support
For any kind of technical assistance or query, please raise a ticket at http://webkul.uvdesk.com or send us a mail at [email protected]
Current Product Version - 4.2.1
Supported Framework Version - 9.x.x, 8.x.x, 1.7.x.x

Be the first to comment.