PrestaShop Amazon Connector is a comprehensive tool that facilitates store owners to import Amazon marketplace products into their PrestaShop store.
This addon also enables the import of the orders received on the Amazon marketplace into the PrestaShop store. Update imported products or import new products on PrestaShop in real-time.
Features of PrestaShop Amazon Connector
- Import Amazon Marketplace products to your PrestaShop store with the PrestaShop Amazon Connector extension.
- Import Amazon orders to the PrestaShop store.
- Import products from Amazon to PrestaShop with or without combinations.
- Import all the orders to PrestaShop at once or one by one via order ID.
- Select the carrier and payment method for imported orders.
- Update imported products on PrestaShop when they are updated on Amazon.
- Update imported products or import new products on PrestaShop from Amazon via cron.
- Map multiple PrestaShop store categories to a single Amazon marketplace category and vice versa.
- Import specific orders from Amazon to PrestaShop using the order ID.
- Set the date range and the number of orders to import within that date range.
- With orders, customer details also get imported to PrestaShop.
Note:
To use this module, you must have the following SP-API Developer keys:
- Seller ID
- LWA Client ID(identifier)
- LWA Client Secret
- LWA Client Refresh Token
How to Install PrestaShop Amazon Connector
- Firstly, go to the module manager in the back office and click on ‘upload a module’.
- After that, drag and drop the module file or select the file from the system.
- In this way, the module installation will be successful.


PrestaShop Amazon Connector Configuration
After the successful installation of the module, the admin needs to configure it.
General Settings
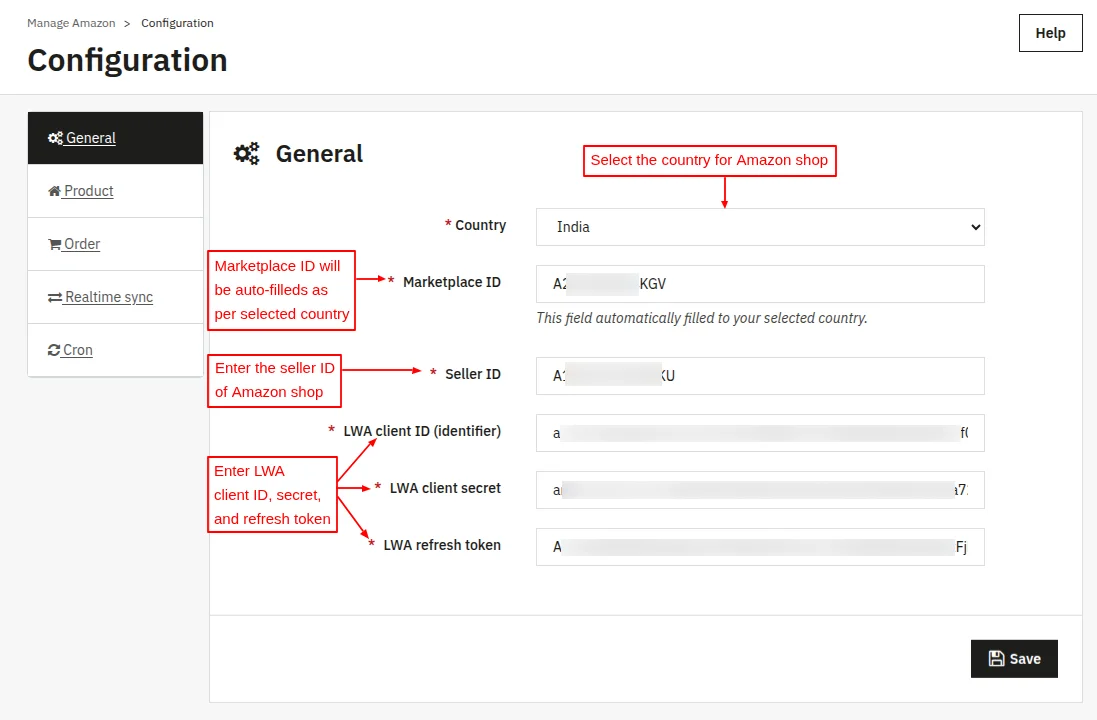
Under General Settings, the admin needs to specify some credentials that are required to integrate the PrestaShop store to Amazon. The admin needs to:
- Select the country for the Amazon shop. Based on the selected country, the marketplace ID will automatically fill.
- Specify the seller ID of the Amazon shop.
- Specify LWA client ID, secret, and refresh token.
Note: The module works for the following countries.
- United States of America
- United Kingdom
- Canada
- Mexico
- Brazil
- Spain
- France
- Netherlands
- Germany
- Italy
- Sweden
- Poland
- Egypt
- Turkey
- United Arab Emirates
- India
- Singapore
- Australia
- Japan
Product Settings
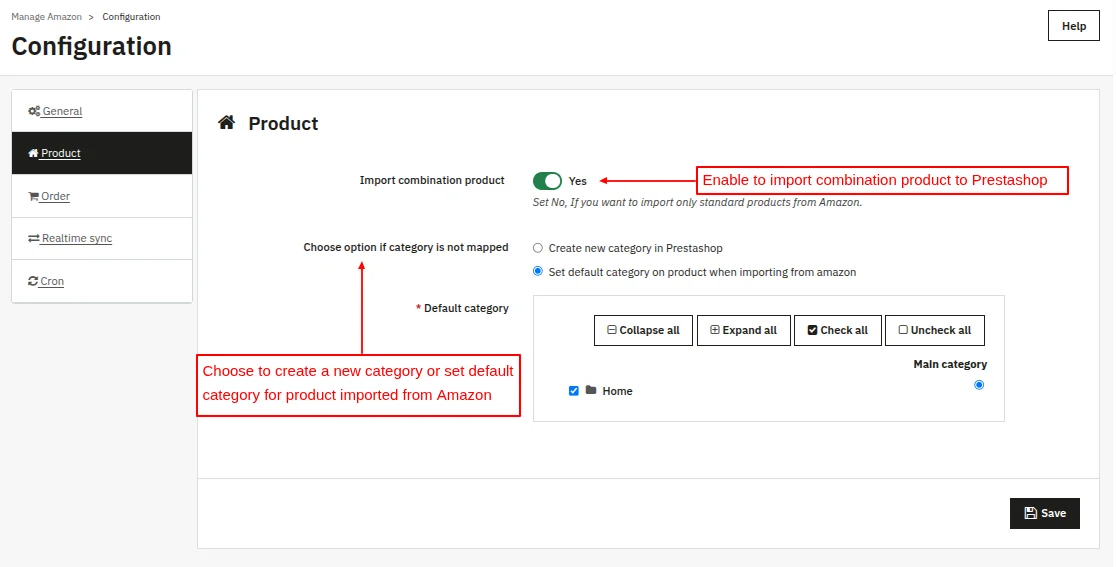
Choose an option if the category is not mapped
While importing the product from Amazon, if the category is not mapped in PrestaShop, a new category will be created in PrestaShop if the admin has selected the first option.
If the second option is selected, then the admin can select a default category, and the products imported from Amazon will be assigned to this category.
Order Settings
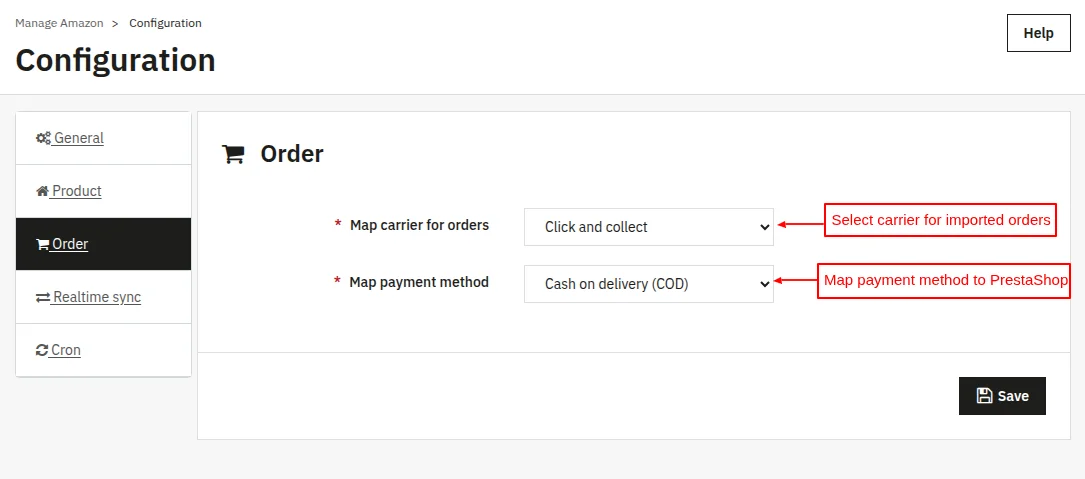
Map carrier for orders: The carrier selected here by the admin will be mapped to the carrier that has been used for placing orders on Amazon.
Map payment method: Select the payment method to be mapped with the payment method used for placing orders on Amazon.
If Japan is selected in the Country name field in General Settings

In case Japan has been selected for the Amazon shop, then the admin needs to map COD, CVS, and other payment methods to PrestaShop under the Order settings tab.

Realtime Sync
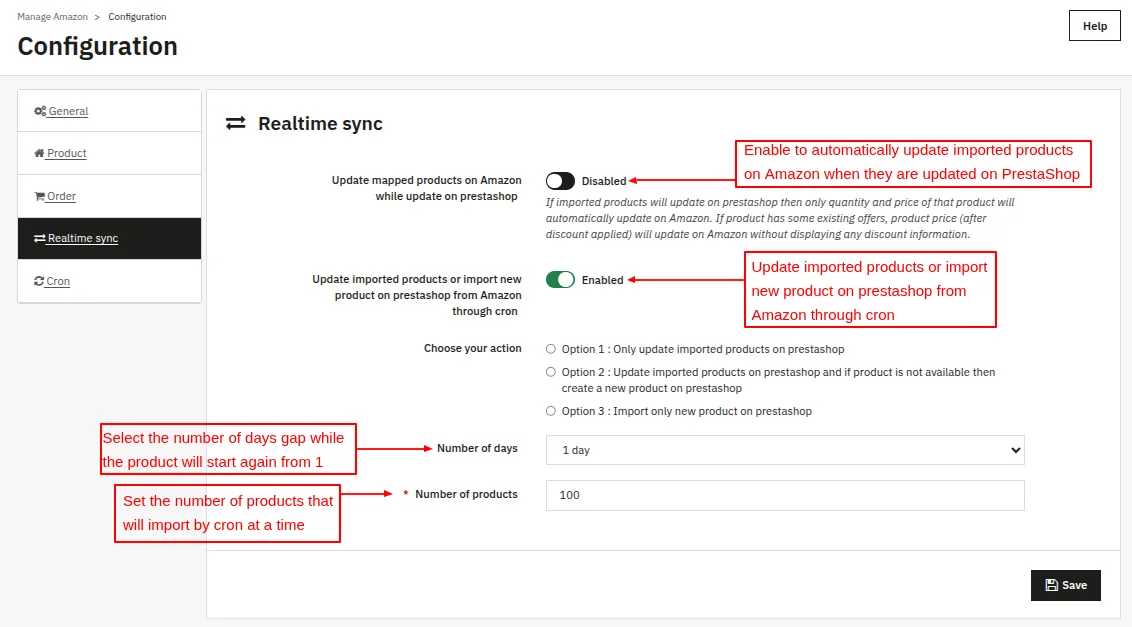
Update mapped products on Amazon while update on PrestaShop
If mapped products get updated on PrestaShop, then the price and quantity of that product will automatically update on Amazon.
Update imported products or import new product on Prestashop from Amazon through cron
The admin can choose to:
- Update only imported products on PrestaShop.
- Update the imported products on PrestaShop and if the product is unavailable, then a new product will create on PrestaShop.
- Import only new product in PrestaShop.
Number of days
In this field, the admin needs to set the number of days for which the imported products will not update.
Suppose the admin has imported the products from Amazon to PrestaShop on 01/01/2024 and set 2 in this field.
If the cron runs on 02/01/2024, the imported products will not update. After two days, the imported products will be updated.
Number of products
This option lets the admin set the number of products that can be imported via cron at once.
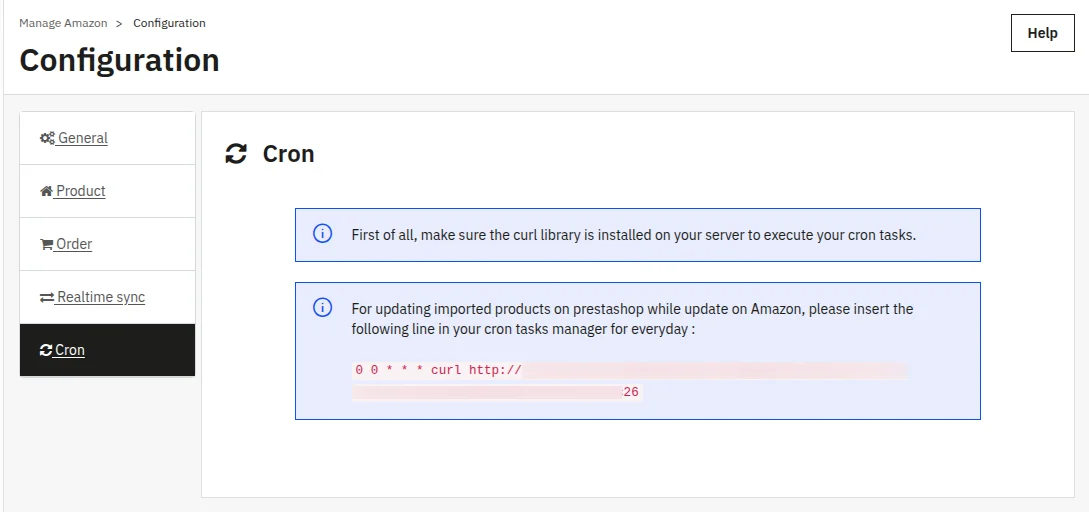
Cron setting
For updating the imported products on PrestaShop when they get updated on Amazon, the admin needs to enter the URL mentioned below in the cron tasks manager for everyday.
How to get the required credentials for the Amazon connector module
1. Developer Registration
Before registering your Selling Partner API, you need to register as a Selling Partner API developer.
The way you register as a developer varies depending on the type of application that you create. We will use the following:
- Private seller applications: Applications for sellers that are available only to your organization and are self-authorized.
To register as a developer (for private seller applications)
- Sign in to Seller Central using the credentials that you want to associate with your developer account.
- In the Partner Network menu, click Develop Apps. The Developer Central page appears.
- If you have not yet completed a developer profile for this selling account, then click the Proceed to Developer Profile button. Otherwise, click on Your Developer Profile link instead.
- Complete the form. In the Data Access section, in the dropdown box, select My organization sells on Amazon, and I only want to integrate to manage my own business only.
Note: If you want to import the buyer information and shipping address with the orders, then you must have access to the customer’s Personally Identifiable Information (PII).
For this, you need Approval for the roles that are required to access buyer information and/or shipping address information. These are:
- Direct-to-consumer shipping. Required to access shipping address information.
- Tax remittance. Required to access buyer information.
- Tax invoicing. Required to access buyer information.
2. Checking the status of your registration request as a developer
After submitting your request to register as a developer, Amazon evaluates the information provided and approves or denies your request.
If denied, you can address the reason for the denial and then resubmit your Developer Profile.
The following procedures will show you how to check the status of your registration request as a developer, depending on the type of application you want to create.
To check the status of your request (private seller applications)
- Sign in to Seller Central with the credentials that you used when registering as a developer.
- In the Partner Network menu, click Develop Apps. The Developer Central page appears.
- Follow the instructions in Your developer registration is under the review banner. The banner will change to reflect the status of your application.
3. Registering your application
We will register applications for:
- Private seller applications: These are seller applications that are available only to your organization, and are self-authorized.
The following procedures show you how to register your application.
To register your application (for private seller applications)
- Sign in to Seller Central using the credentials that you used to register as a developer.
- In the Partner Network menu, click Develop Apps. The Developer Central page appears.
- Click the Add new app client button. The App registration page appears.
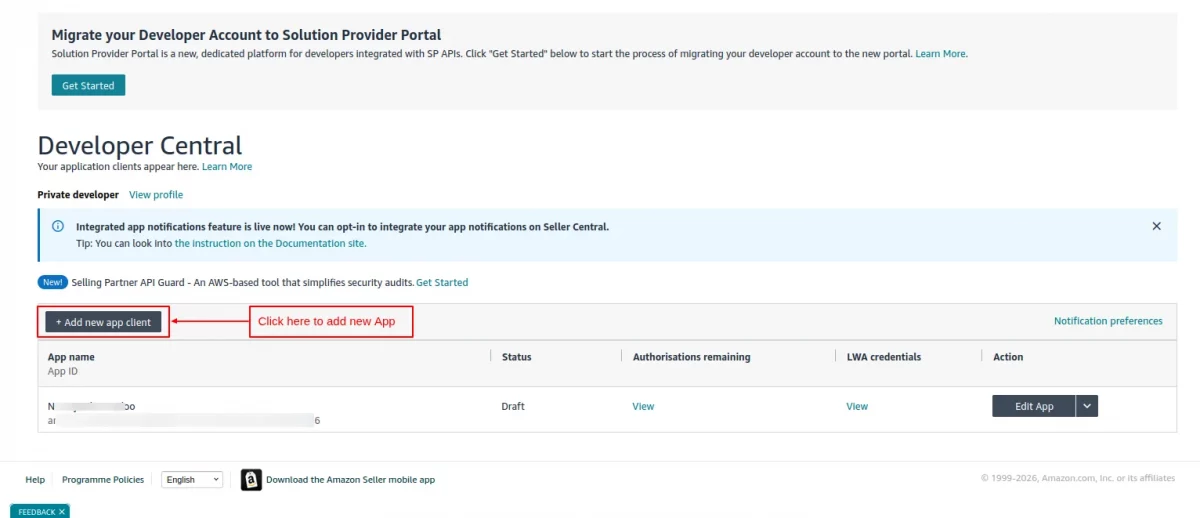
- Complete the form.

4. Viewing your application information and credentials
After you register your application you can view information about your application, as well as your Login with Amazon (LWA) credentials. Here, we have used :
- Private seller applications: These are seller applications that are available only to your organization, and are self-authorized.
The following procedures show you how to view your application information and credentials, depending on the application type.
To view your application information and credentials (for private seller applications)
- Sign in to Seller Central using the credentials that you used to register as a developer.
- In the Partner Network menu, click Develop Apps. The Developer Central page displays information about your application(s).
- Click View under LWA credentials for the application you want.
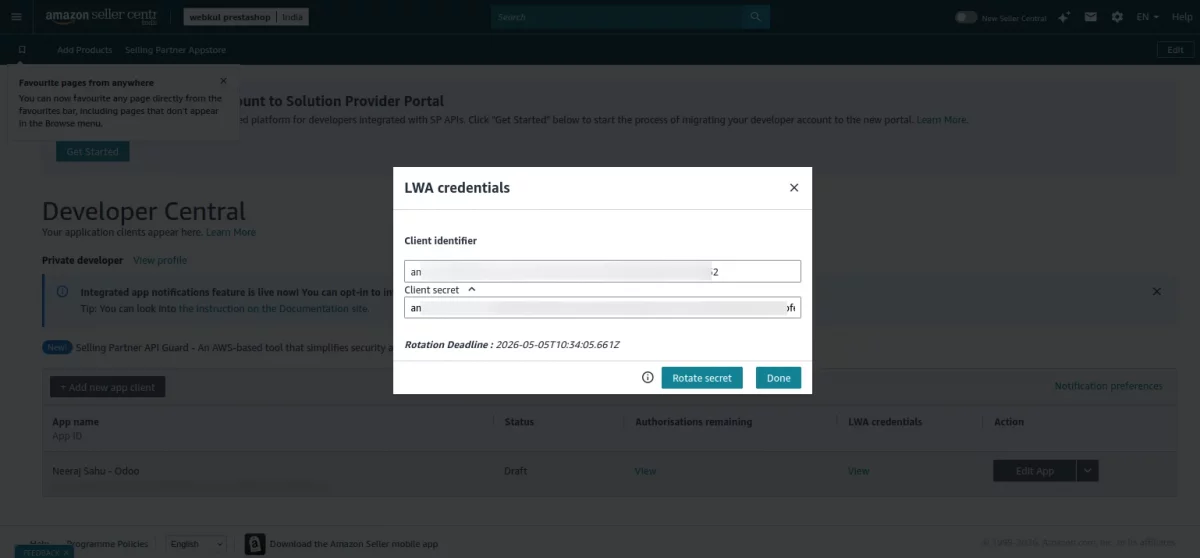
Your LWA client identifier and client secret for that application appear. You will need these credentials in module configurations: App Client ID from Seller Central, The corresponding Client Secret
Self authorization
When you create a private application for your own organization you can self-authorize it to access your account information.
Before doing this you must register as a developer and register your application.
You can self-authorize your application in draft status; there is no reason to publish a private application.
To self-authorize your application (seller application)
- Sign in to Seller Central using the credentials that you used to register as a developer.
- In the Partner Network menu, click Develop Apps. The Developer Central page appears.
- For the application that you want to authorize, click the arrow next to the Edit App button, and then click Authorize. The Authorize application page appears.
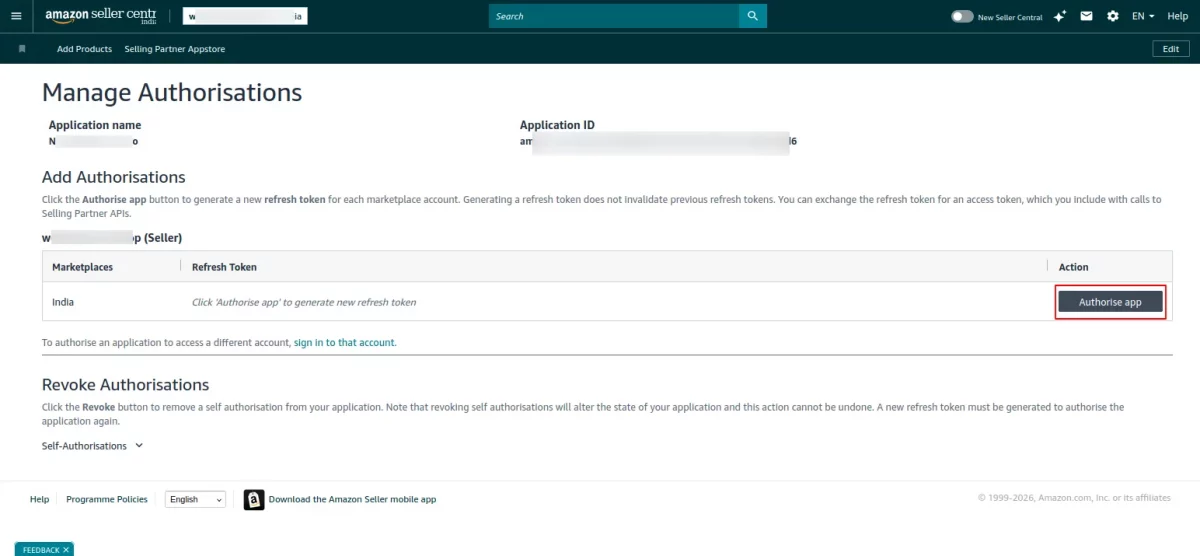
Note. If your selling partner account is merged with accounts in other regions, then you will see an “Authorize app” button for each of your merged accounts.
4. Click on the Authorize app button for each selling partner account that you want your application to access. The Marketplaces column indicates the marketplaces in which an account is active.
A Login with Amazon (LWA) refreshes token appears with every Authorize app button that you click.
Note:
1. Keep this LWA refresh token as this will be used in module configuration: Refresh Token
2. If you click on Authorize app button multiple times, then a new refresh token is generated each time. Generating a new refresh token does not invalidate previous refresh tokens.
How to get Seller ID
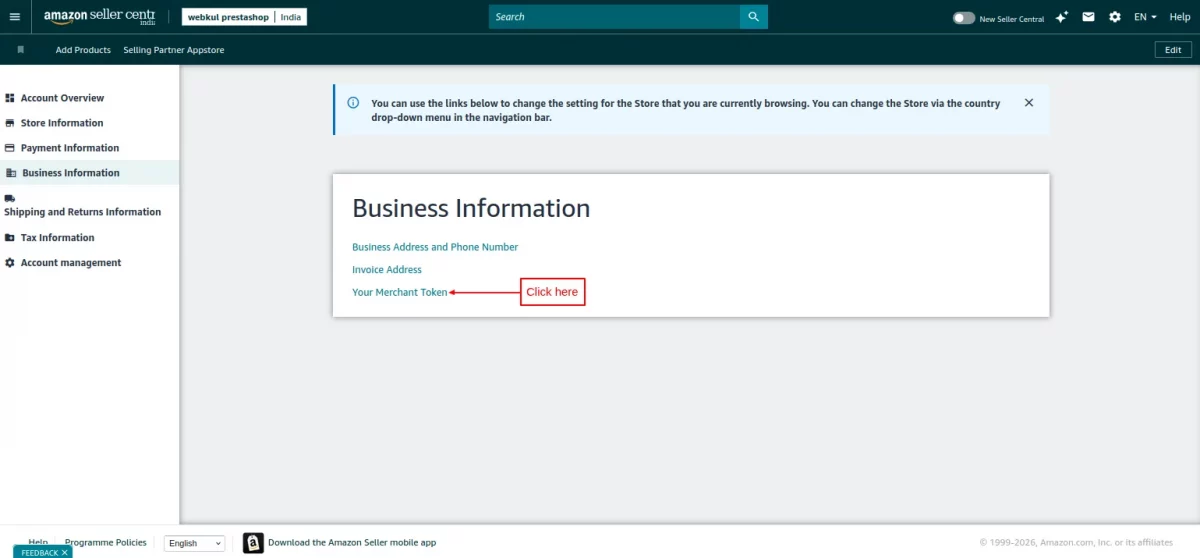
To get the seller ID, the store owner needs to log in to Amazon Seller Central and go to settings.

Click on Account Info tab under settings.

Then, select the Business Information tab in Account Info.

Now, click on Your Merchant Token under Business Information.

Category Mapping
Click on the “Map categories” button to map categories of PrestaShop with Amazon.
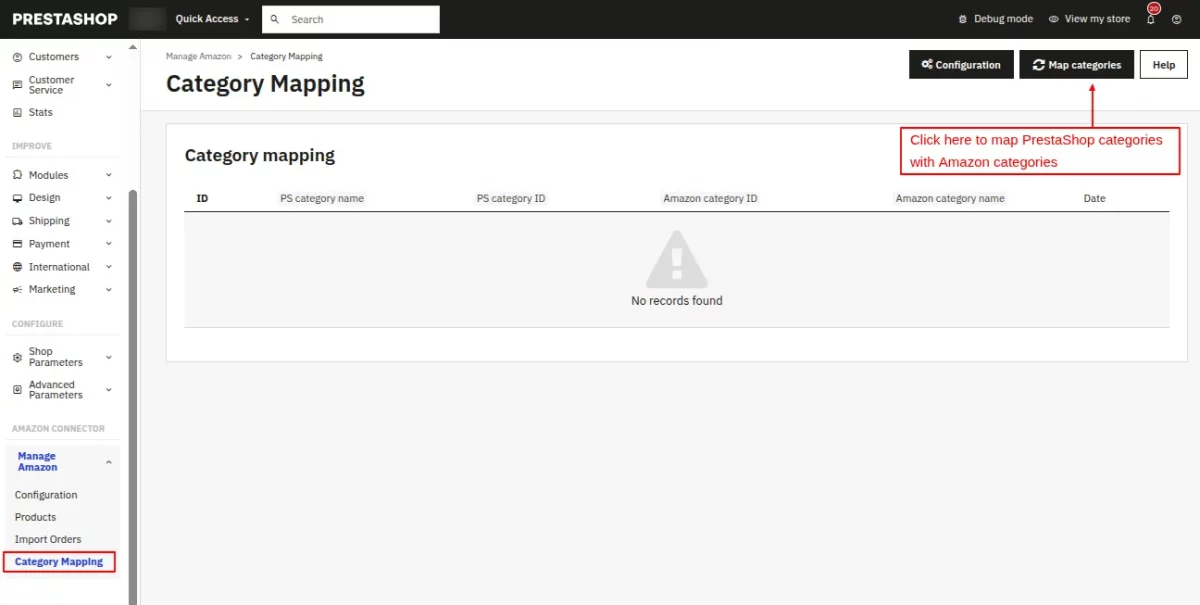
For mapping the categories, the admin needs to download the Amazon categories first.

Once downloaded, the admin can map PrestaShop categories with Amazon.

Select the PrestaShop categories that you want to map with those of Amazon. The admin can map multiple PrestaShop categories with Amazon category.

Products
Under the Products tab, the admin can import products from Amazon to PrestaShop.
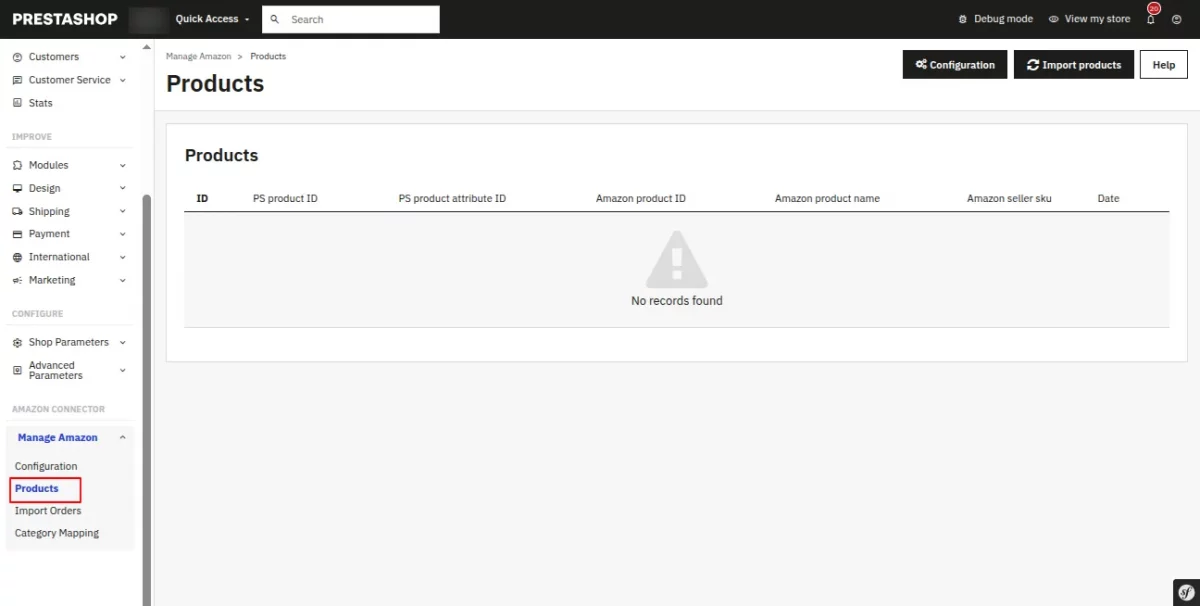
For importing the products to PrestaShop, the admin needs to generate a report.
Create report for single product


At first, the report will be in “In progress” status. In some time, the status gets updated to Ready. Now, click on single product button.

On clicking the button, a popup appears on the page where the admin needs to enter Amazon ASIN No. and Amazon product SKU.

Create report for All products
Select “All products” in Select type field.


Now click on the “Import now” button to import the products.


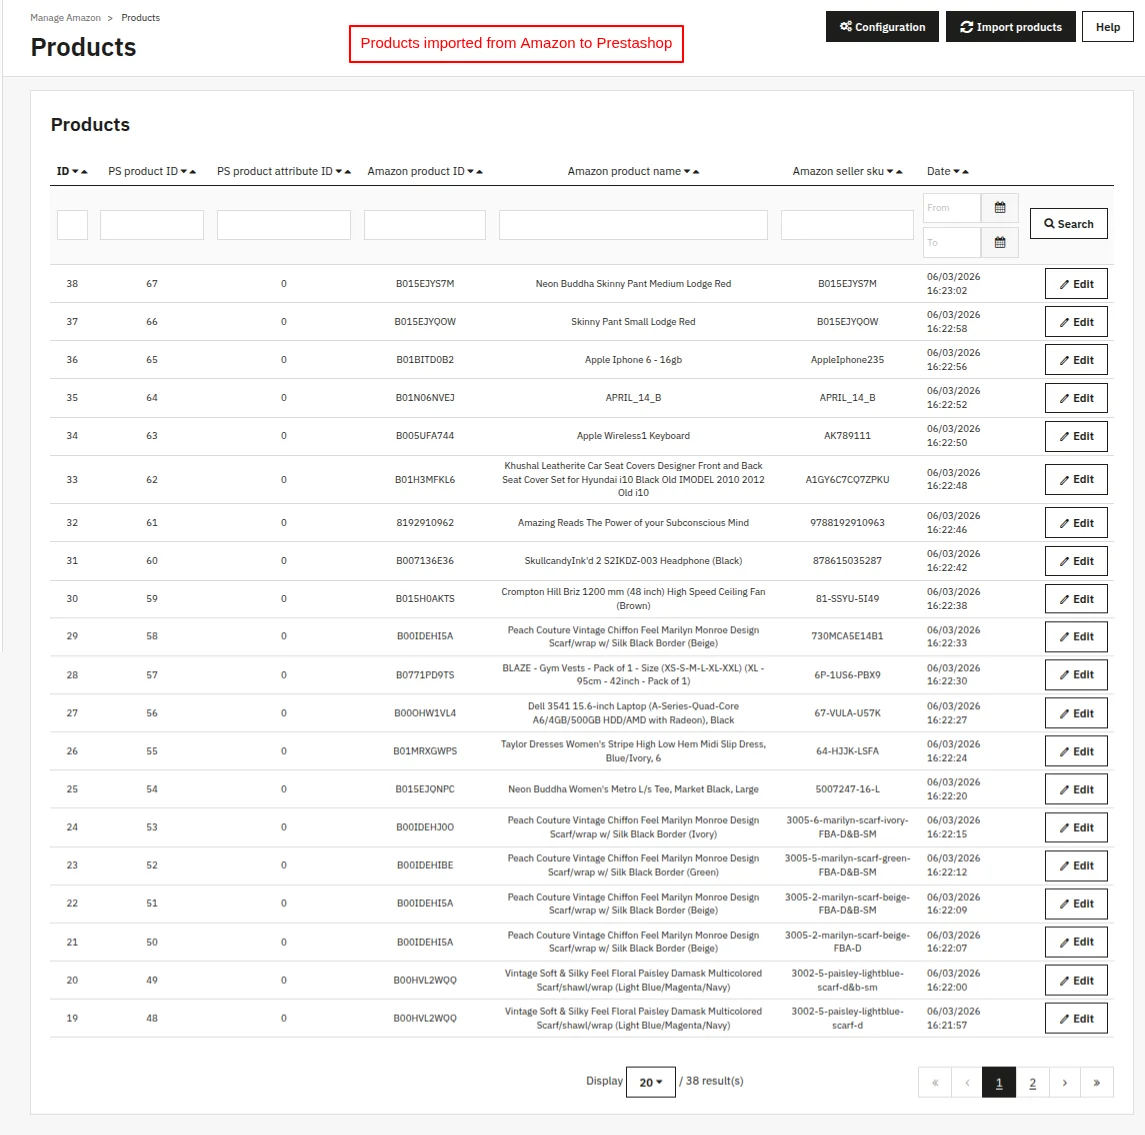
Once imported, the admin can view them under the “Products” tab.
Import Orders
Click on the “Import orders” button to import orders from Amazon to PrestaShop.


The admin can choose to import all the orders to PrestaShop at once or specific orders to PrestaShop by order ID.
Note: If the product does not exist in PS, then the product will create according to this report.

If admin selects to import all orders at once, then a pop up will appear where admin has to specify the date range. The orders received between the specified date range will import to the Prestashop.
Admin can also specify the maximum number of orders he wants to import within the specified date range.


After specifying the order ID, then click on the Import now button. Once the order has been imported, the admin can subsequently view it under Import Orders.


Customers
After importing the orders from Amazon to PrestaShop, the Amazon customer details associated with those order also gets imported in PrestaShop.

Support
For any kind of technical assistance or query, please raise a ticket or send us a mail at [email protected]
Also, please explore our Prestashop development services and a vast range of quality Prestashop addons.
Current Product Version - 5.1.0
Supported Framework Version - 9.x.x, 8.x.x, 1.7.x.x

Be the first to comment.