Prestashop Advanced Progressive Web App – A Progressive Web App (PWA) uses modern web capabilities to deliver an app-like experience to users.
Web apps are actually websites that, in many ways, look and feel like native applications.
Mobile applications with push notifications achieve up to three times more retention than their counterparts.
With push notification, a user is three times more likely to reopen a mobile application than a website.
In addition, a well-designed mobile application consumes fewer data and is much faster because some resources reside on the device.
The Progressive Web Application is fast in comparison to the website and supports push notifications.
With the use of this feature, the website works faster on a slower internet connection.
Due to the faster performance, the user engagement increases on the website and results in a very high conversion rate.
Note: Prestashop Advanced Progressive Web App is compatible with PrestaShop PrestaShop multi-store feature.
Module Highlights
- User-friendly experience for your customers.
- Supports push notification service.
- Slow internet speed will not affect its potential.
- Once a page is opened then you can open the same page even on offline mode.
- Increases user-engagement thereby increasing the conversion rate.
Note
- You need to enable SSL on your shop
- Compatible Browsers – Chrome, Firefox, Opera(latest version)
- Module is also MultiShop compatible
New Features
- Now Admin can create five types of push notification:
- Manual Push Notification- Now admin can schedule the push notification.
- Product Notification- Admin can send the product notification from the product edit page.
- Order Status Notification- Send the order status notification to customer on changing the order status.
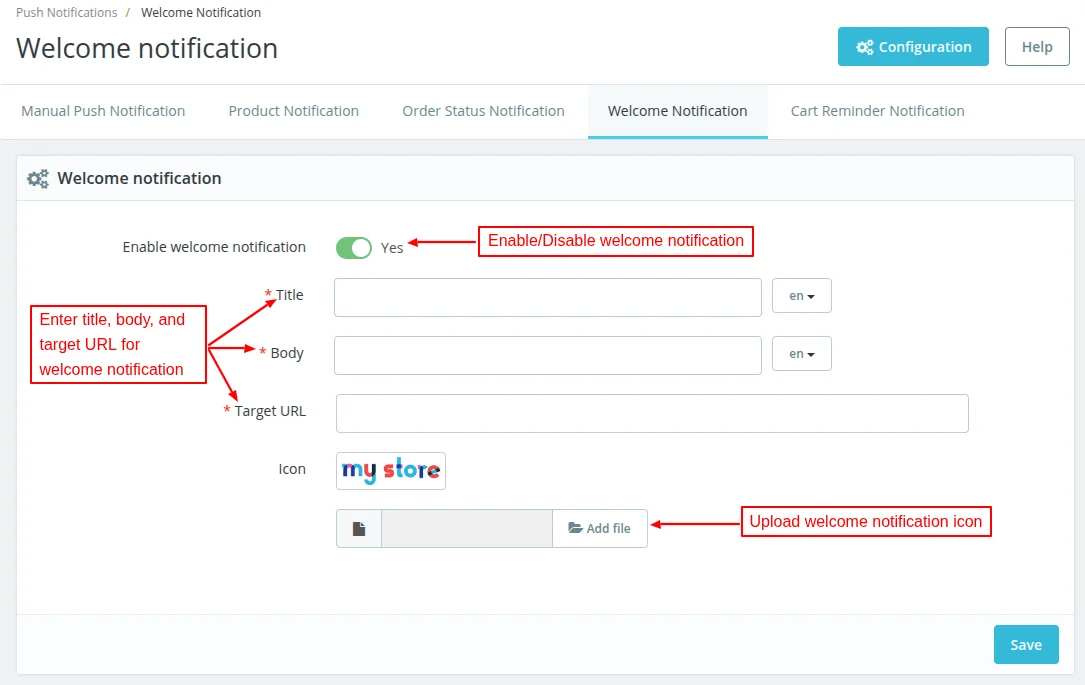
- Welcome Notification- Admin can send the welcome notification to the users if allowed by the users.
- Cart Reminder Notification- Admin can set the cart reminder notification with a specific number of days.
- Admin can manage the subscribers from the “Manage Subscribers” tab.
- Track the live status of notifications while sending them to customers.
- Admin can view/delete the list of notification history from “Manage Notification History” tab.
- Max. character limit for the short name of the app is 12.
- The PWA feature is now compatible with iOS.
- iOS support push notifications in PWA.
- Connectivity status(i.e offline/online) of app will display at the end of screen of mobile.
- Now, product URL automatically attaches with product push notification.
Features of the Prestashop Advanced Progressive Web App module
- Admin can set the application name as it will display when one opens the app on mobile phones.
- An admin can set the application’s short name as it will display on home screen.
- Admin can enter the splash screen background colour.
- Admin can upload the app icon.
- An admin can upload the push notification icon.
- Admin can create push notifications.
- Admin can edit/delete/send push notifications.
- An admin can attach a target URL when a user clicks on push notification.
- Admin can attach a separate notification icon for each push notification.
- Admin can send the push notifications in multi-language.
- Send Product notification for existing products in intervals.
How to install the Prestashop Advanced Progressive Web App module
- Firstly, go to the module manager in the back office and click on ‘upload a module’.
- After that, drag and drop the module file or select the file from the system.
- In this way, the module installation will be successful.
How to Set up the Progressive Web Application
A user can select ‘Add to home screen’ option to add the progressive web application to the home screen available at the footer of the web page.

Once added to the home screen, you can see the PWA on your phone home screen with the selected icon, favicon, and splash screen colour.

Prestashop Advanced Progressive Web App Configuration
The configuration settings contain three sections.
- Progressive Web App Settings
- FCM Push Notification Settings
- General Settings
Progressive Web App Settings
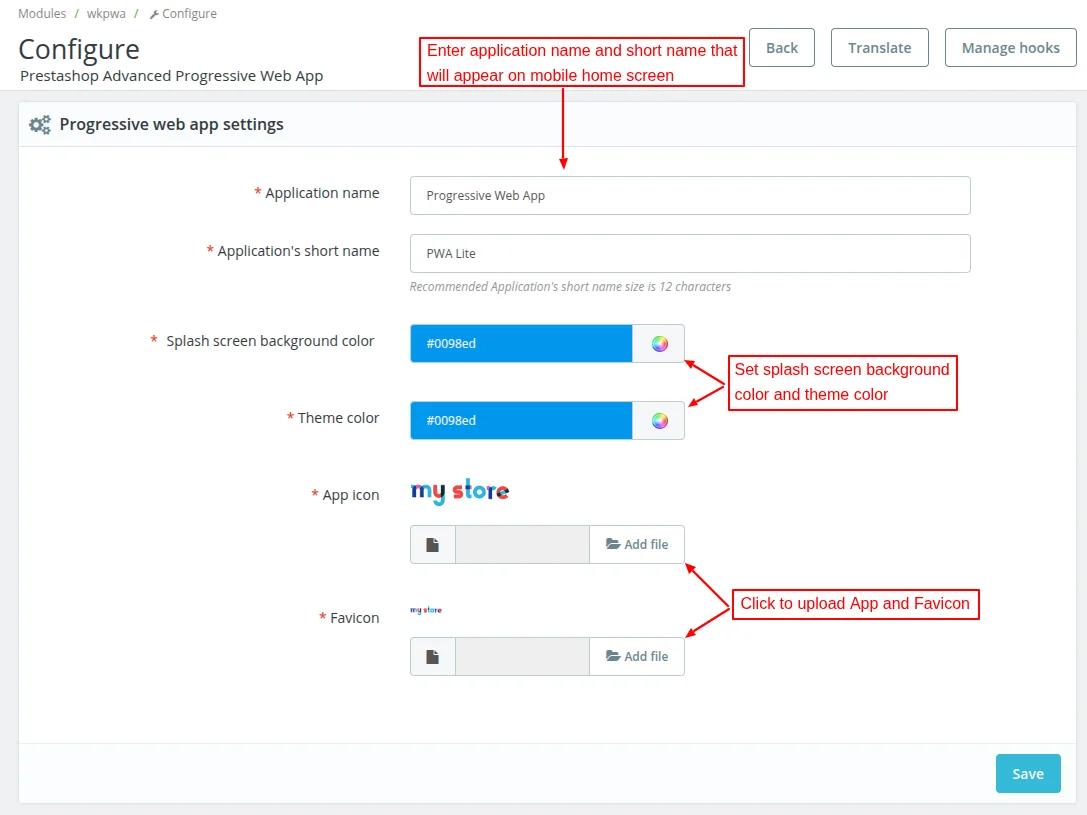
Under Progressive Web App Settings, the admin can:
- Set the application name that will display when customer opens app on mobile phone.
- Set the application’s short name that will display on app home screen.
- Select splash screen background color and theme color.
- Upload the app icon.
- Upload the push notification icon.
Let’s show you what are these actually when opened on a mobile.
Moreover, a user can also see the application icon on the home screen of the mobile like this. Also, a user can click on the application to launch it.
After clicking on the application, the application launches with a splash screen. The splash screen shows the application name and icon.
The application launches in the same way as the native app. Also, the app icon displays on the splash screen on iOS mobile devices.
However, the background colour & app name doesn’t display on the splash screen of iOS devices.

After the splash screen, a user can see the home screen of the application. From here a user can explore your website. Push Notification Configuration
FCM Push Notification Settings
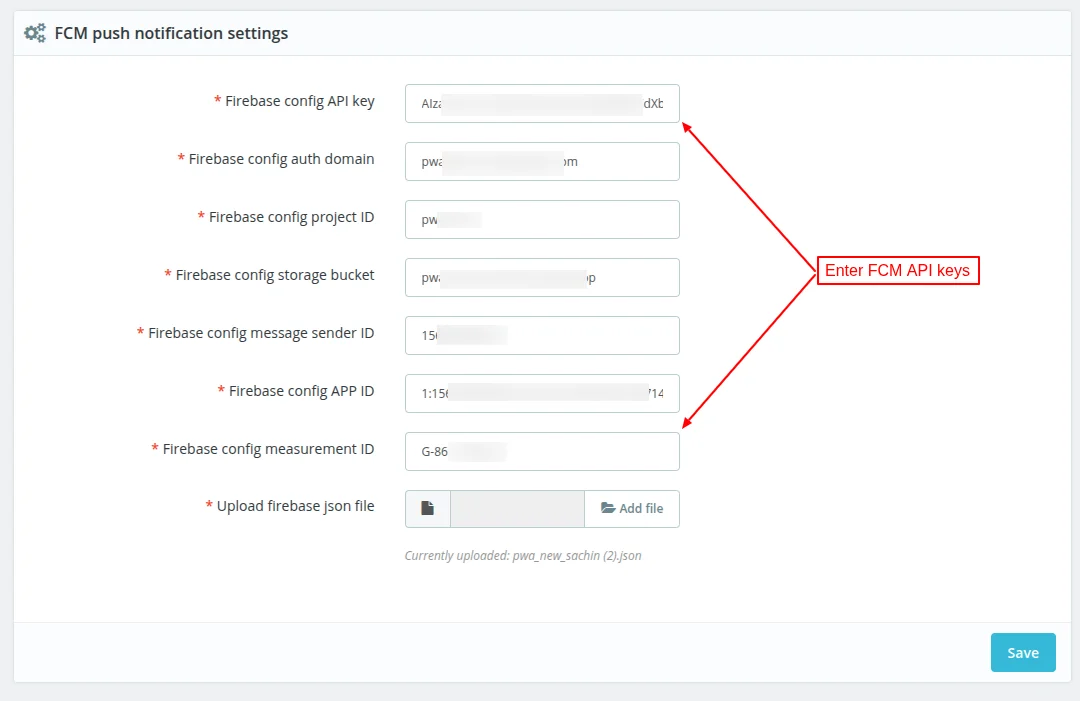
Under FCM push notification settings, the admin needs to specify the Firebase Cloud Messaging API credentials/keys he received from Firebase console.
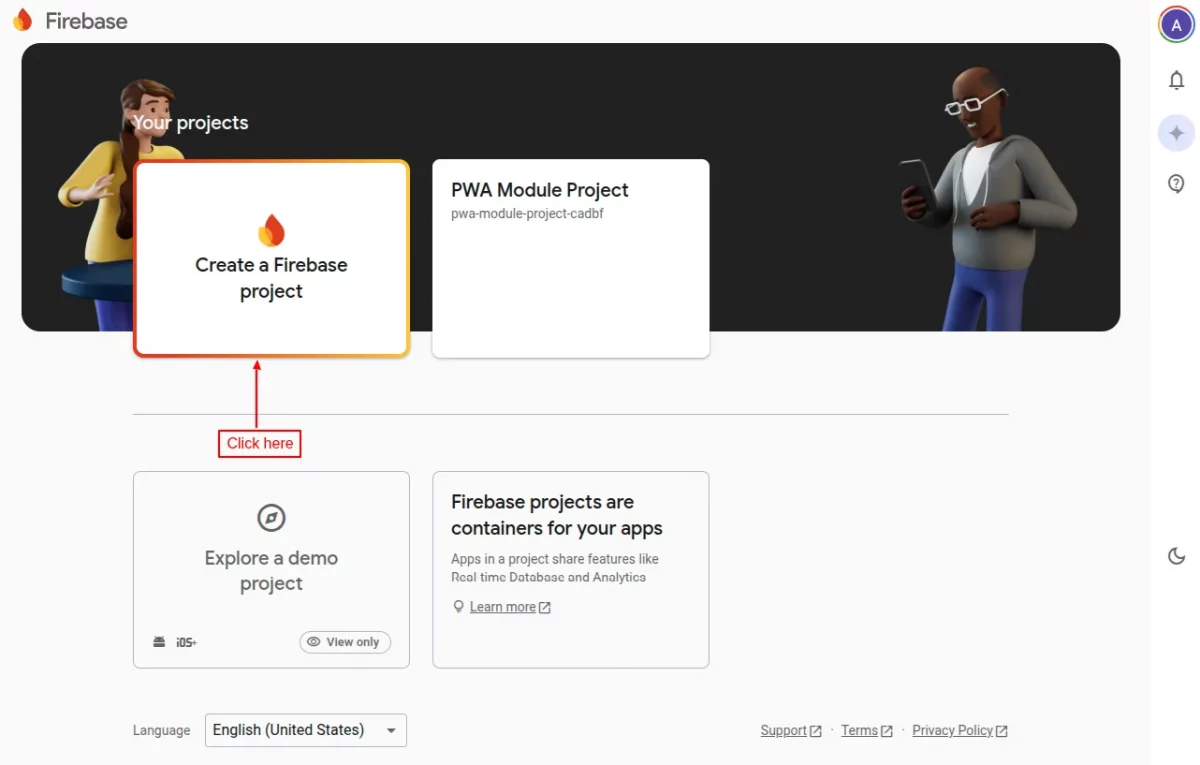
How to obtain push notification credentials
In order to use this module, you need to have Firebase Project Credentials. Please visit this link and create a new project with your Gmail Account.
After opening Firebase website, click on “Create a Firebase project”.
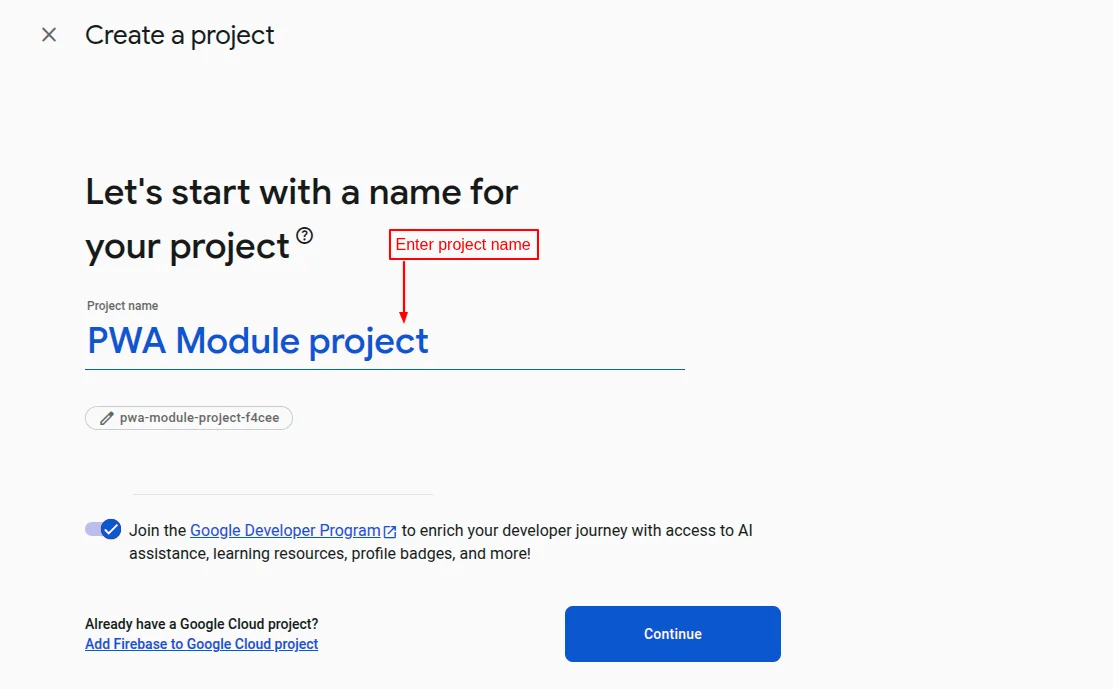
Now, enter the project name and click on continue button.
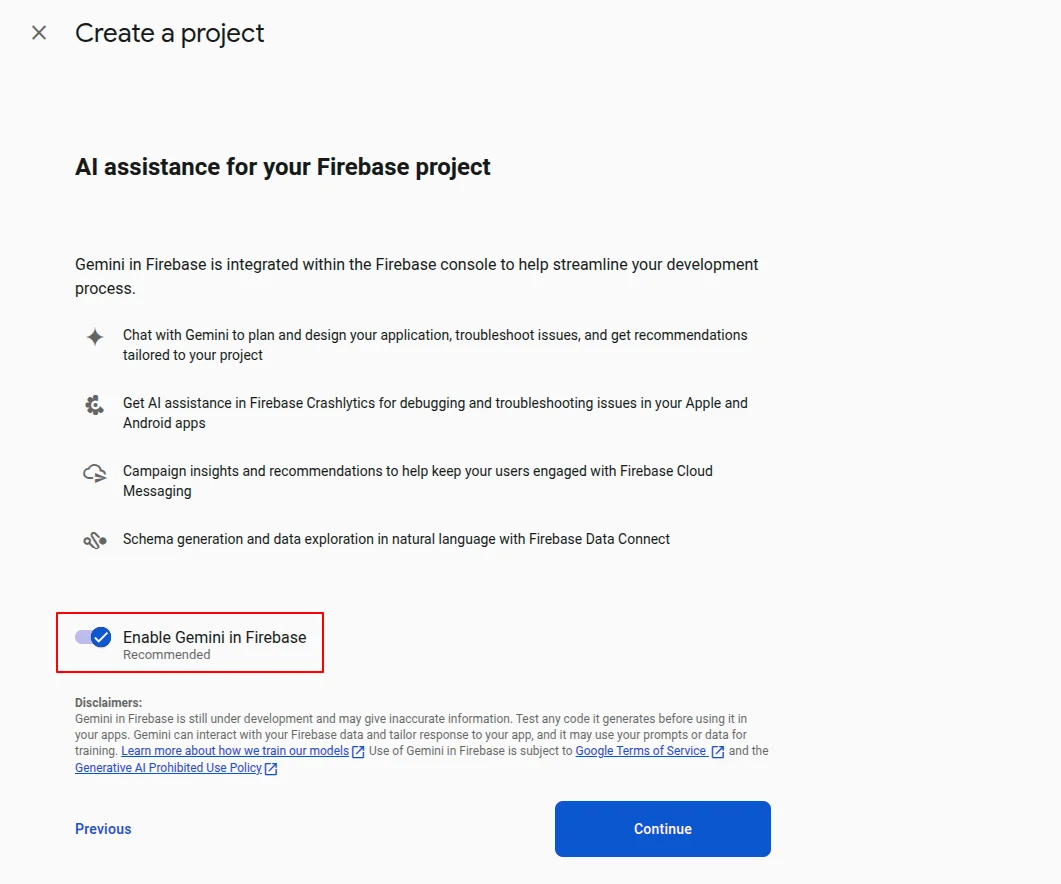
Enable Gemini in Firebase and then click on continue button.
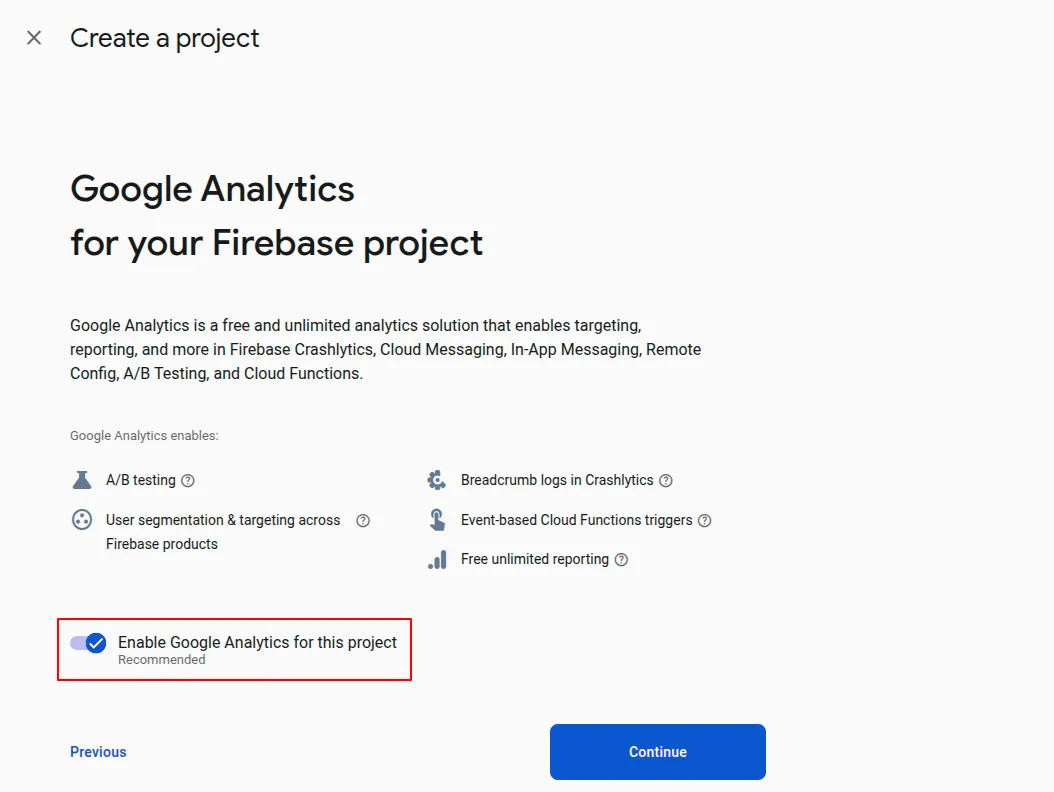
Enable Google Analytics for the project and click on continue button.
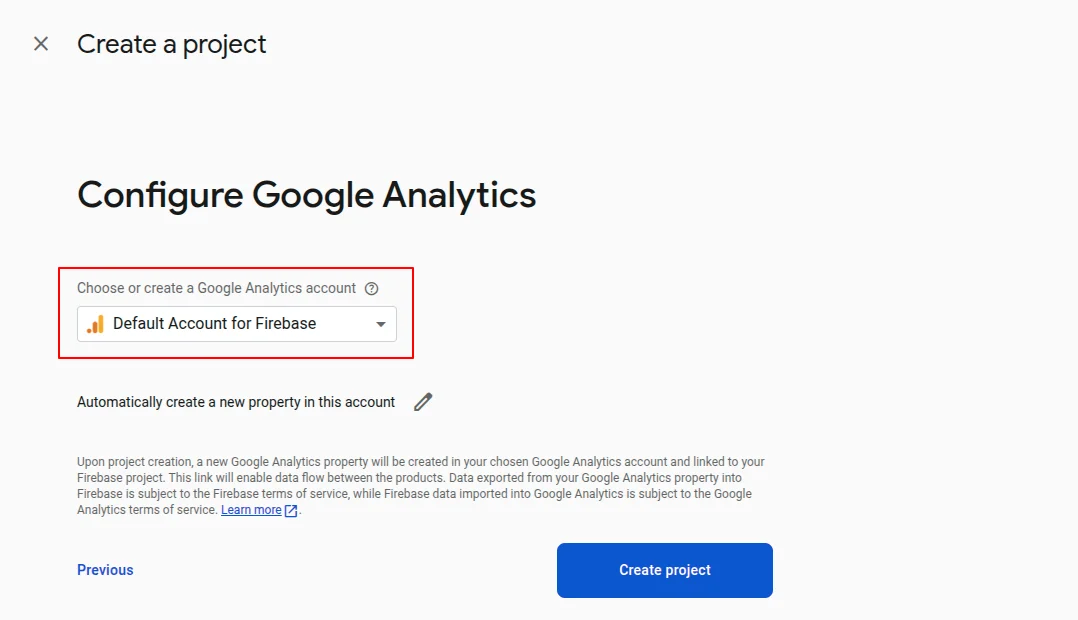
Now, choose Google Analytics account and click on ‘Create project’ button.

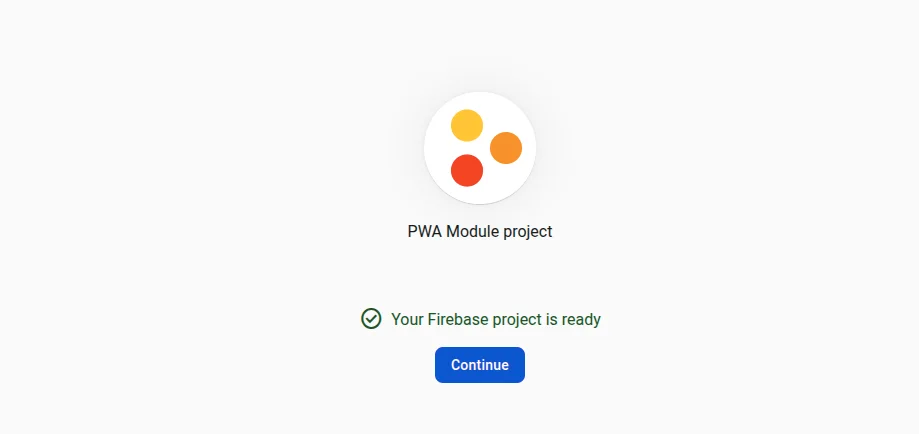
Once the project is ready, you now have to add firebase to your web app.
Click on the ‘web’ icon under Project Overview.

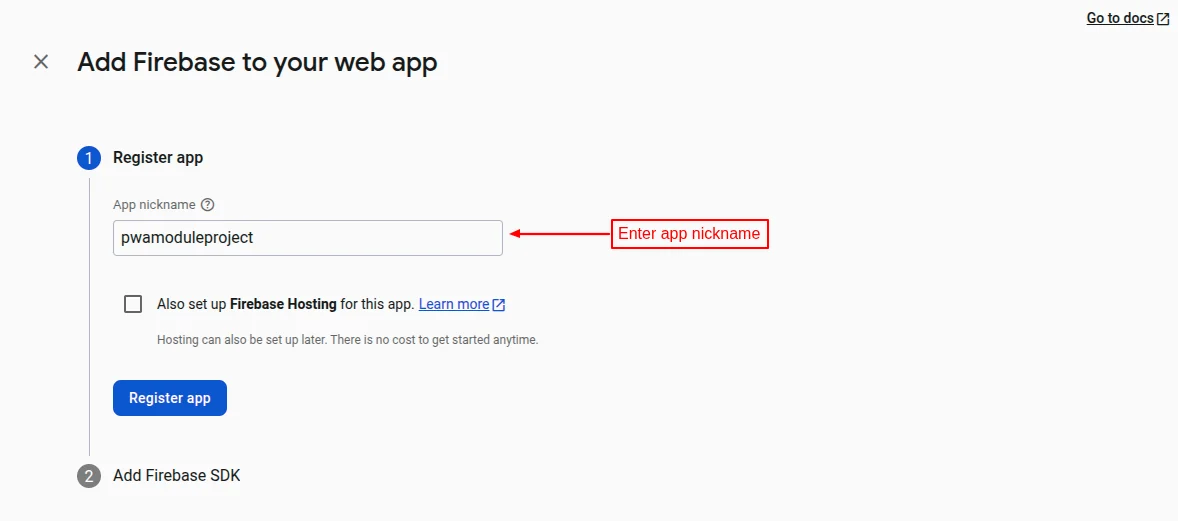
Specify nickname of the app and click on ‘Register app’ button.
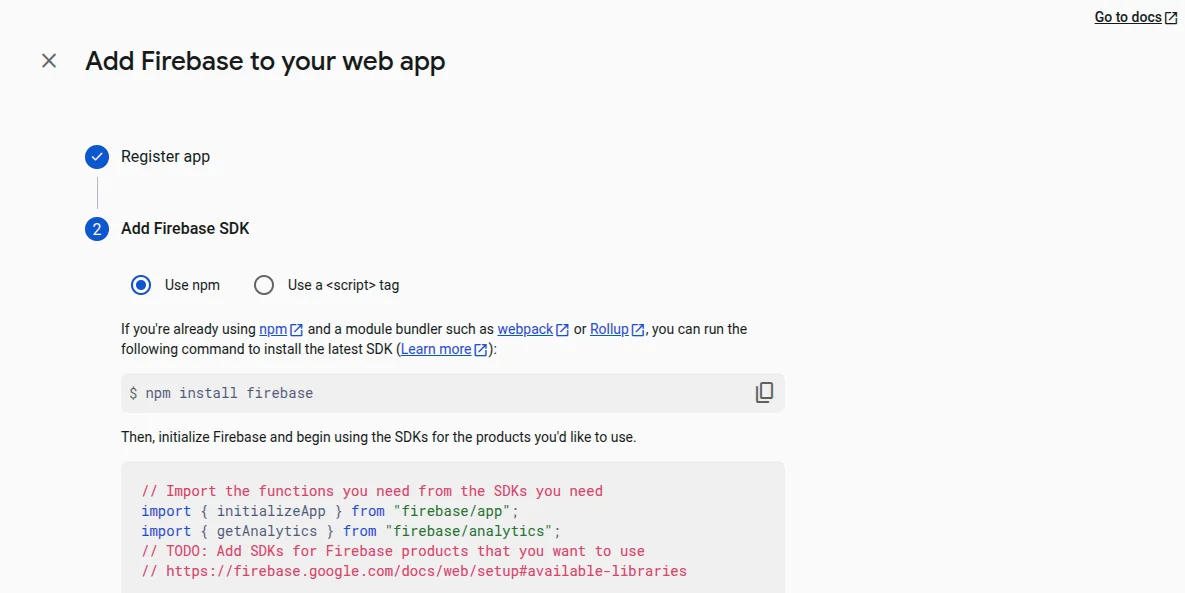
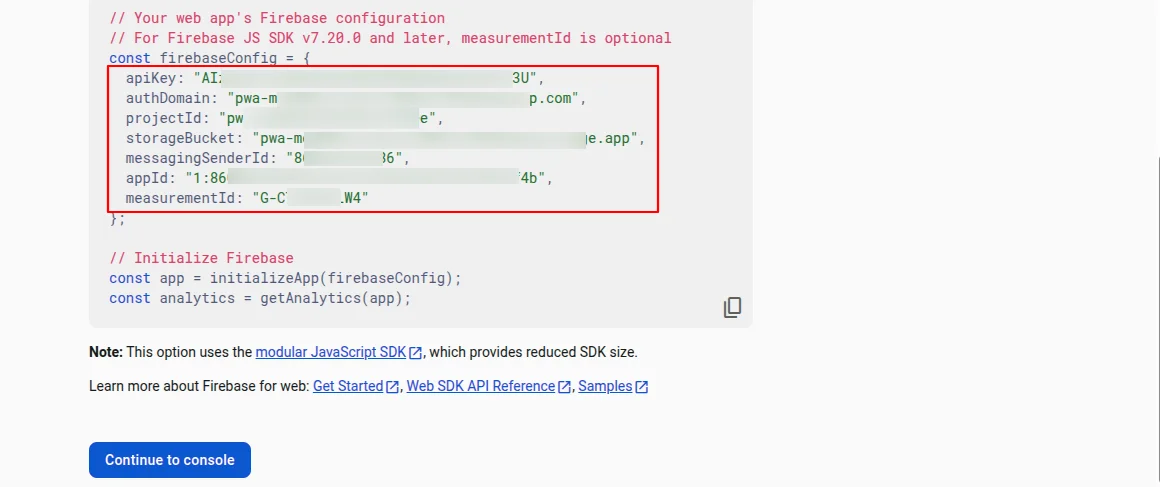
On clicking the button, you can view the credentials under ‘Add Firebase SDK. Now, click on ‘Continue to console’ button.
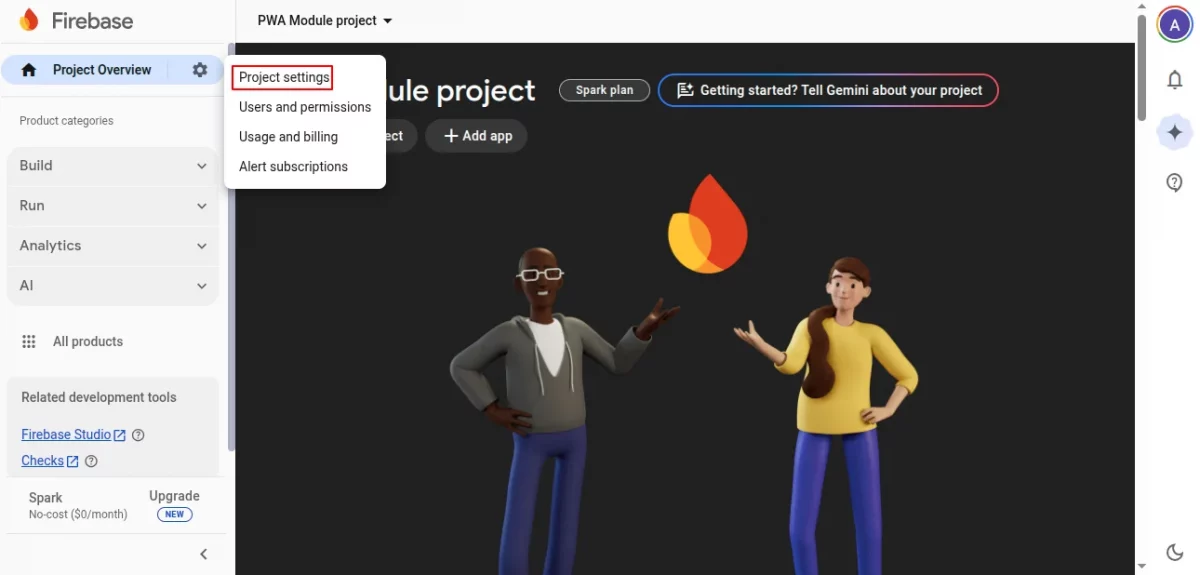
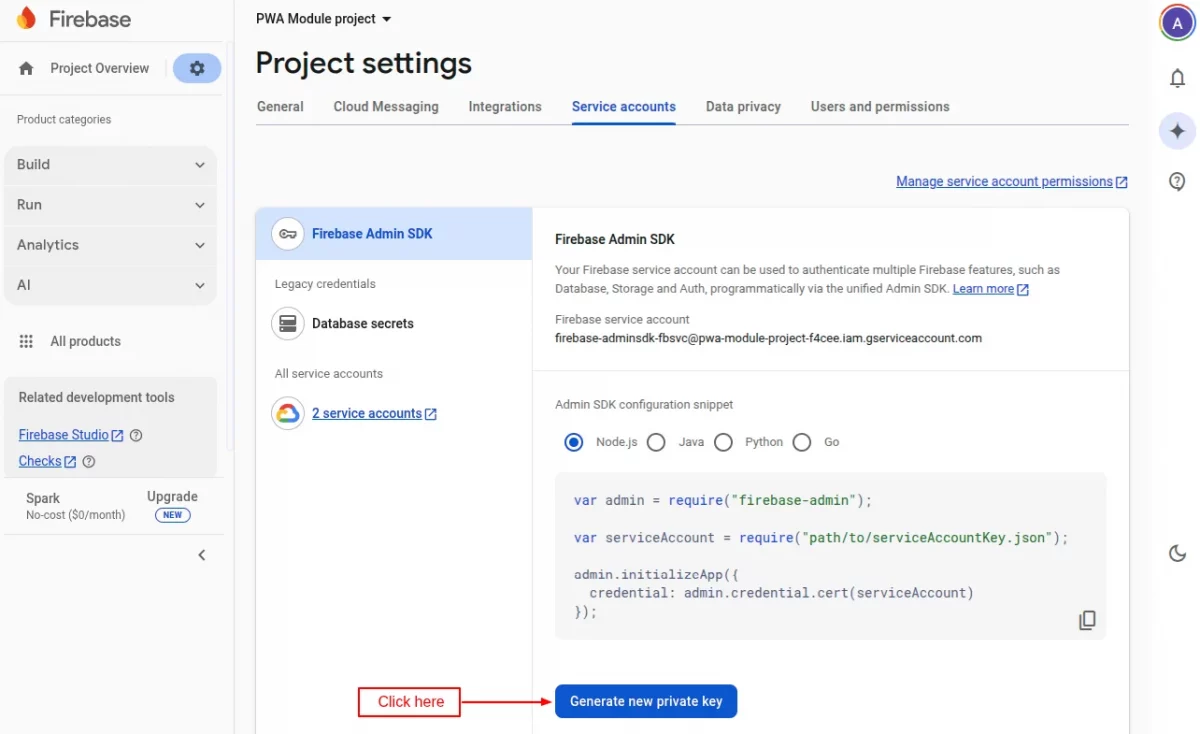
Go to Project Overview -> Project settings.
Now, Go to the “Service accounts” tab. Click on “Generate new private key” to download the service account JSON file.
On clicking the button, a popup appears on the page. Click on ‘Generate key’ button.
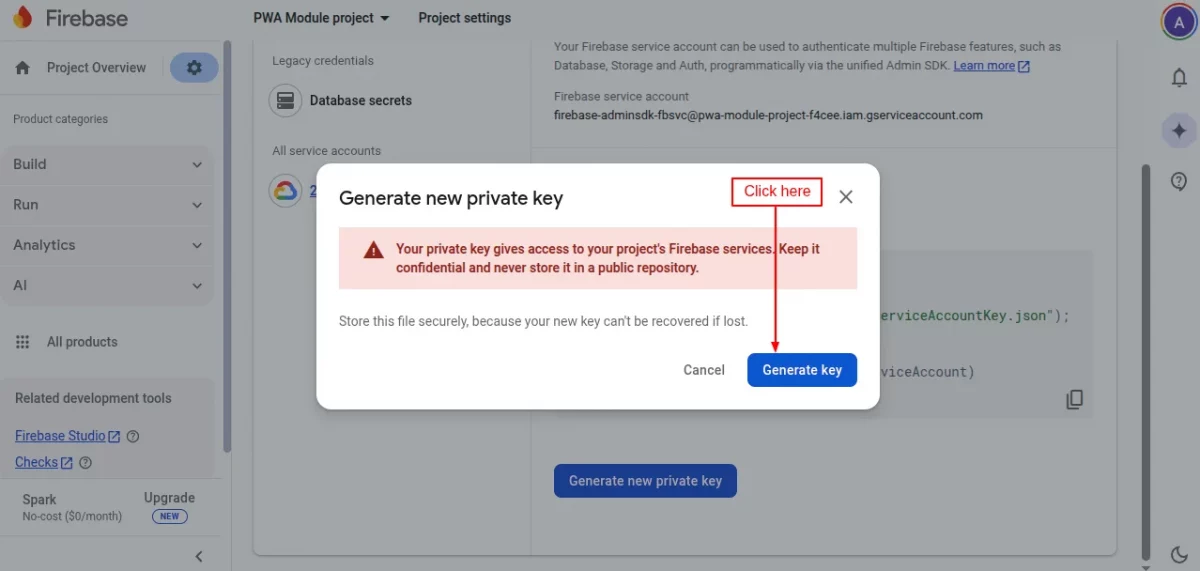
This JSON file contains the necessary credentials to configure server-side modules (e.g., Firebase Admin SDK) to send notifications or manage other Firebase services.
Note: If you update the module to current version i.e. 7.1.0, you need to upgrade these new API keys.
General settings
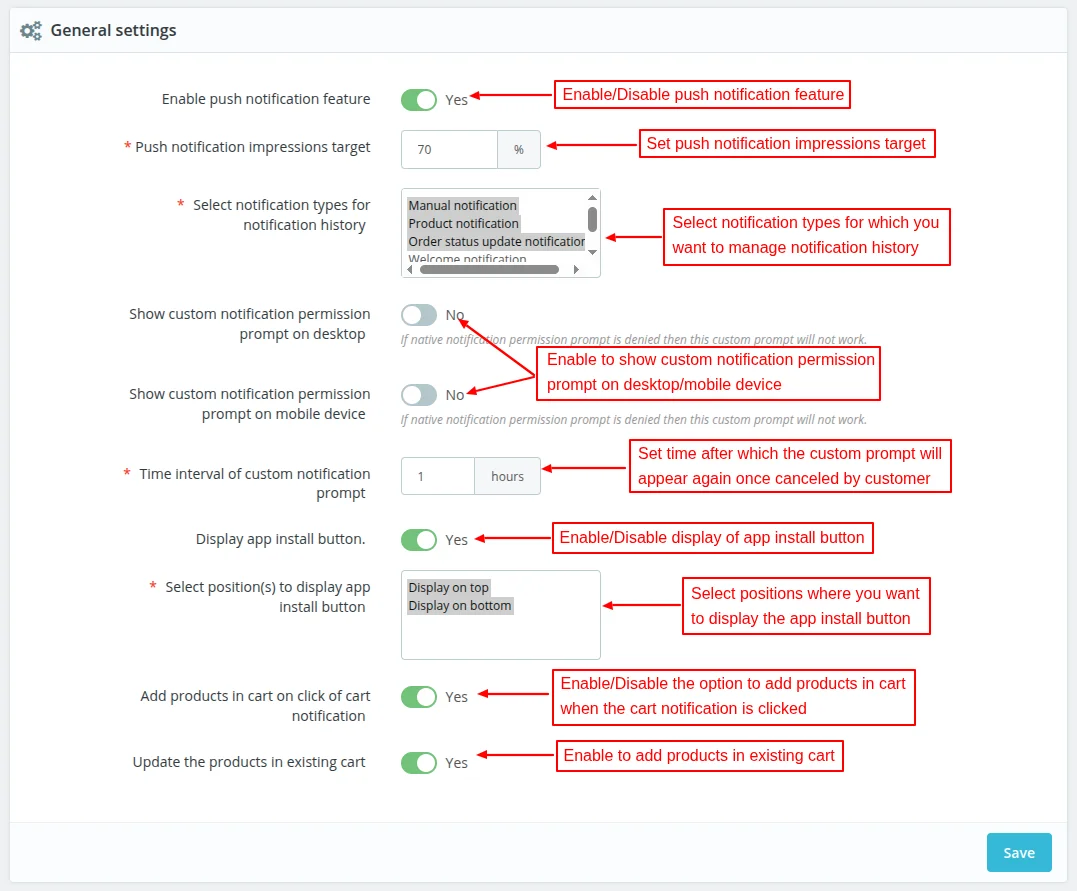
Under General Configuration, admin can:
- Select notification types for which he wants to manage notification history.
- Enable/Disable the display of custom notification permission prompt on desktop/mobile device.
- Set the time duration after which custom prompt notification will again display on desktop once canceled by customer.
- Enable/Disable the display of app install button and select the position where he wants to display the button.
- Enable/Disable the option, whether to add products to the cart when a cart notification is click by a user.
- Set whether the existing cart will get updated with new products or not, when products are added to the cart on the click of cart notification.
Push Notification Impressions Target
Whenever the admin sends the push notifications to the customers, a record of it creates in the back office under the “Manage Notification History” tab.
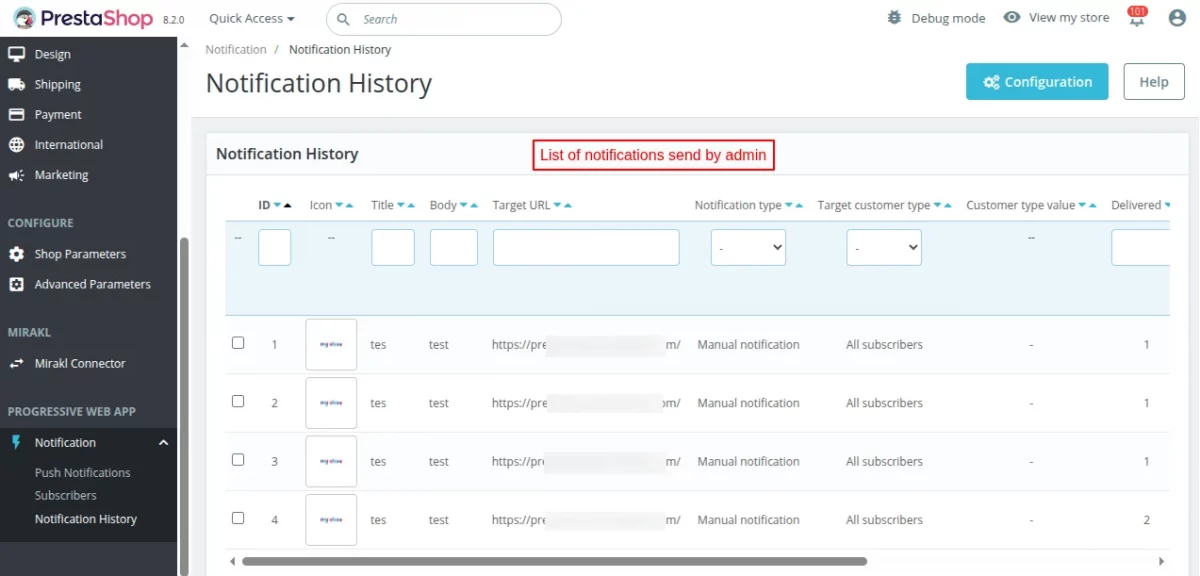
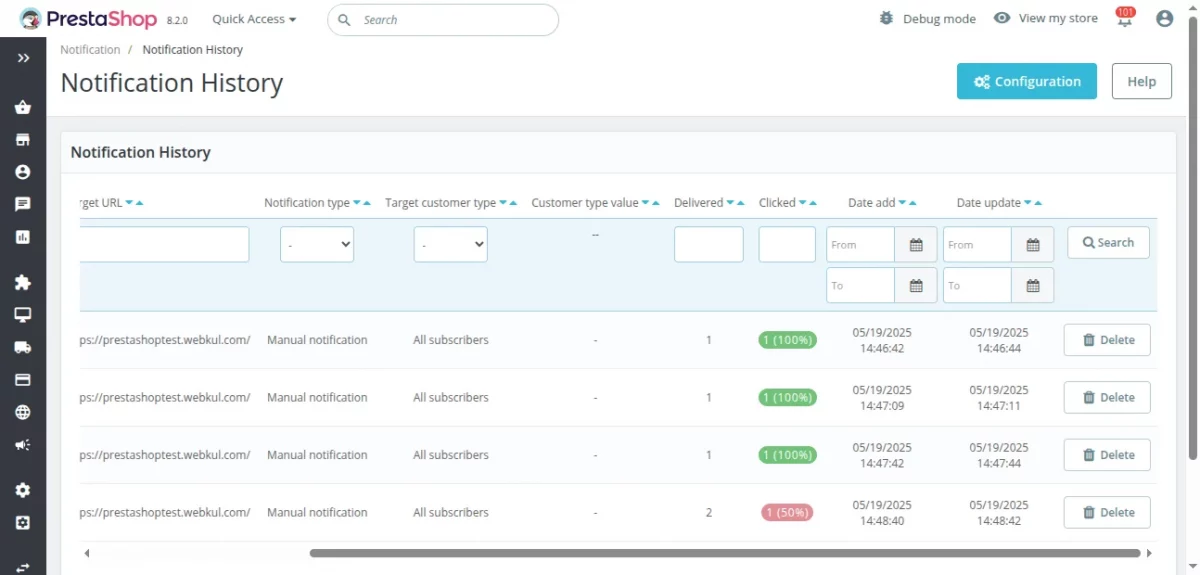
Admin can view the number of times the push notifications are clicked.
When this number reaches the target specified by admin in “Push Notification Impressions Target” field, the badge under clicked column automatically turns green.
This means the impression target has been achieved.
Let’s understand this with the help of an example. Suppose admin has send the push notifications to 100 customers and set the target as 70%.
Now, if 70 out of 100 customers clicked on the push notification then then target get meet and the badge will turn from red to green.
Custom Notification Permission Prompt
Custom notification permission prompt will display on the website before the native permission prompt as enabled by the admin from the back office.

If a custom clicks on “ALLOW” button, then a native permission prompt will appear on the screen as show below:

If a customer clicks on the “NO THANKS” button, then the custom notification permission prompt will display again on the screen after the time set by the admin.
The pop up will not appear on iOS devices. However, the user can use the more button (middle one at the bottom of safari browser) on iOS devices to use the “add to home screen” feature.
Display of install app button
App install button will be displayed on the positions selected by the admin while configuring the general settings.

When a user clicks on the “INSTALL APP” button or the banner, a popup appears on the screen from where he can install the app.

Note: iOS does not support the ‘Install App” functionality.
Push Notification Management
This module provides a striking feature to your website by enabling the Push Notification Mechanism.
After the installation of the module, new tabs get added to the back office.
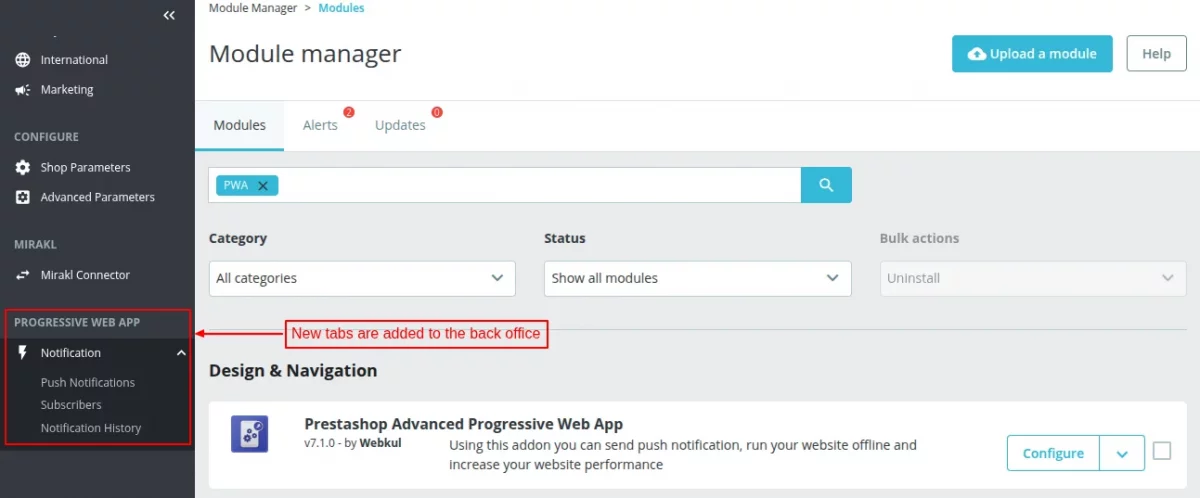
There are five types of push notifications in the “Manage Push Notification” tab.
- Manual Push Notification
- Product Notification
- Order Status Notification
- Welcome Notification
- Cart Reminder Notification
Manual Push Notification
From this tab, the admin can add push notifications manually.
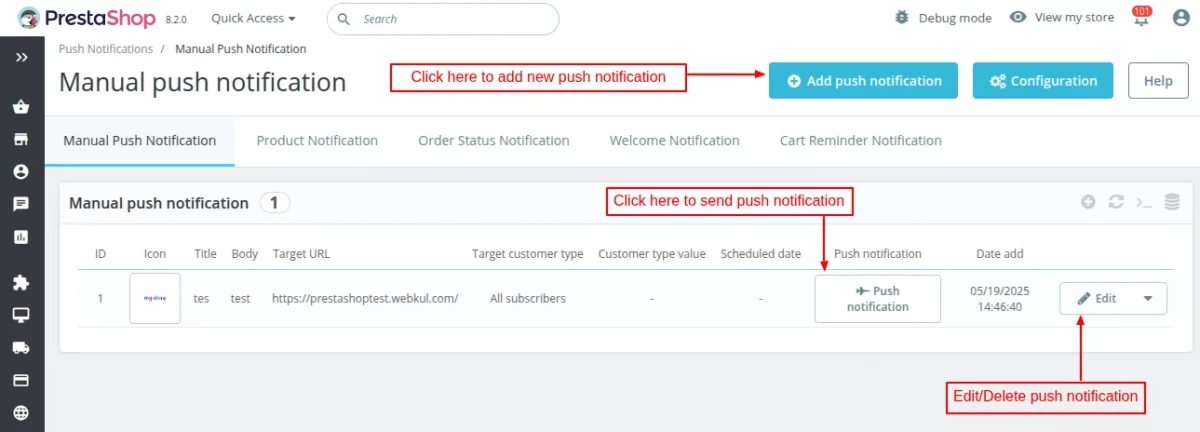
Additionally, the live status of notifications i.e delivered or expired also displays over the list of manual notifications.
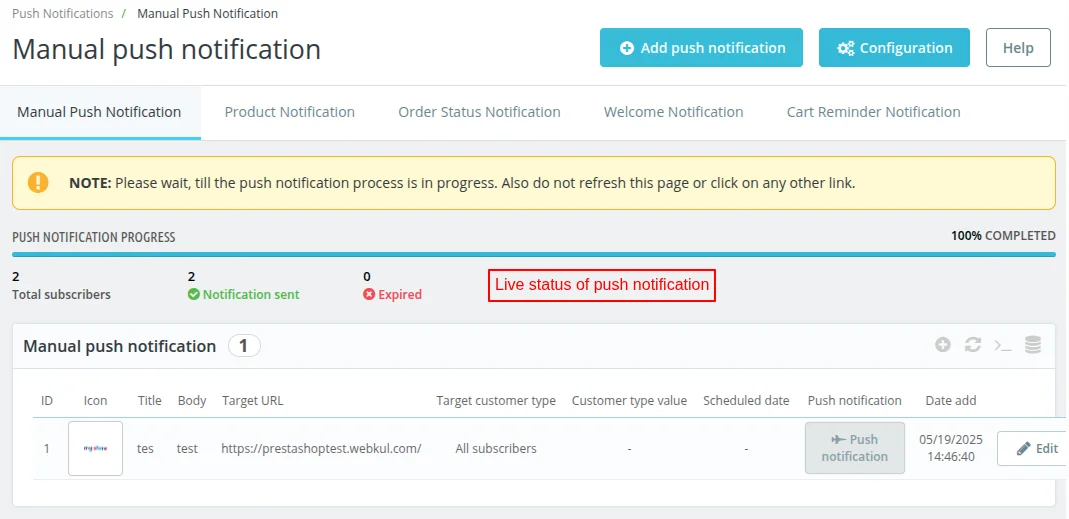
Click on ‘add push notification’ button to add a new push notification.
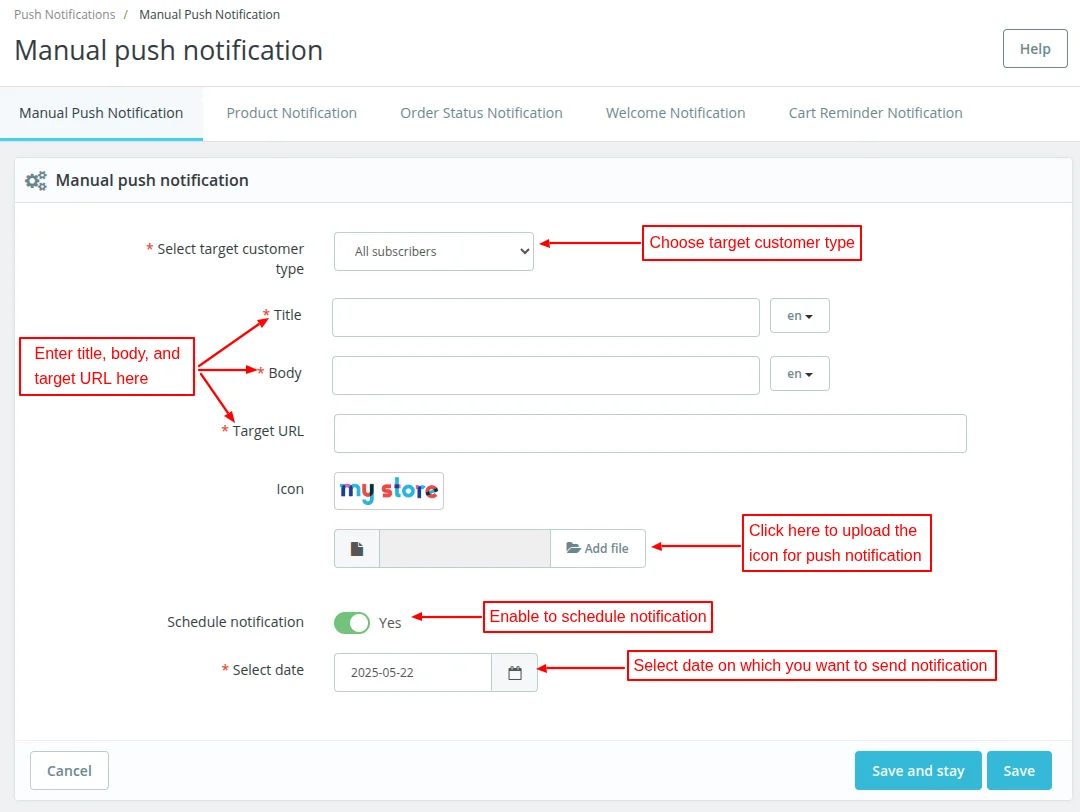
On clicking the button, a form appears on the page with following options:
- Select target customer type: The admin can choose to send push notification to all the subscribers, subscribers of a specific customer group, or particular subscriber.
- Title, body, target URL: Specify the title, body and target URL for a push notification.
- Icon: Upload the push notification icon.
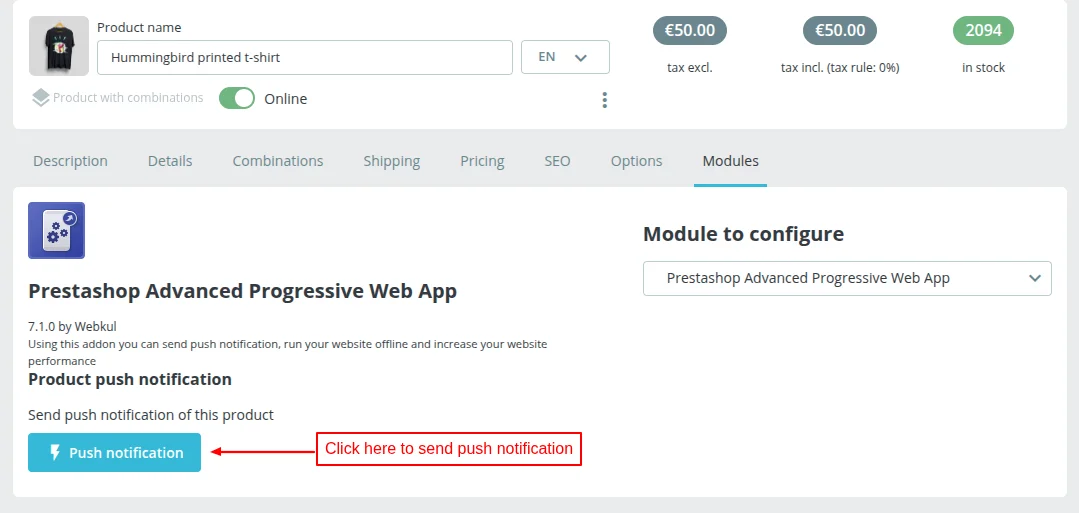
Product Notification
Under this tab, the admin can add product notification.
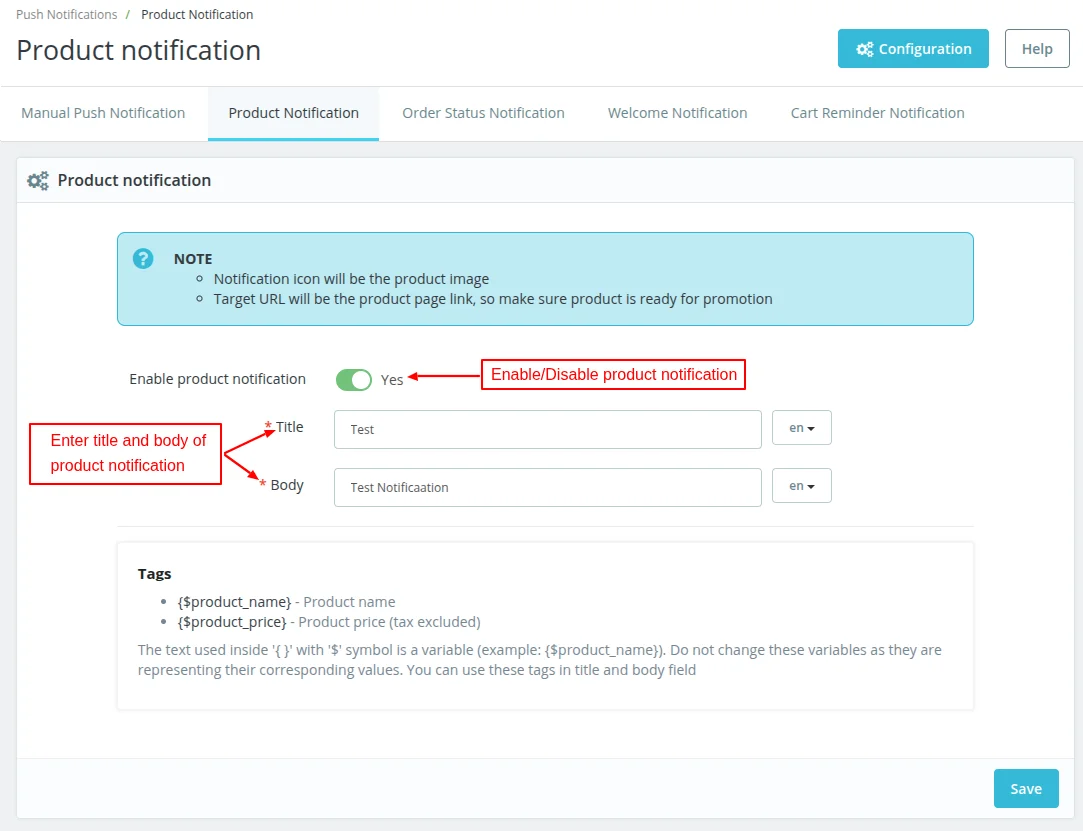
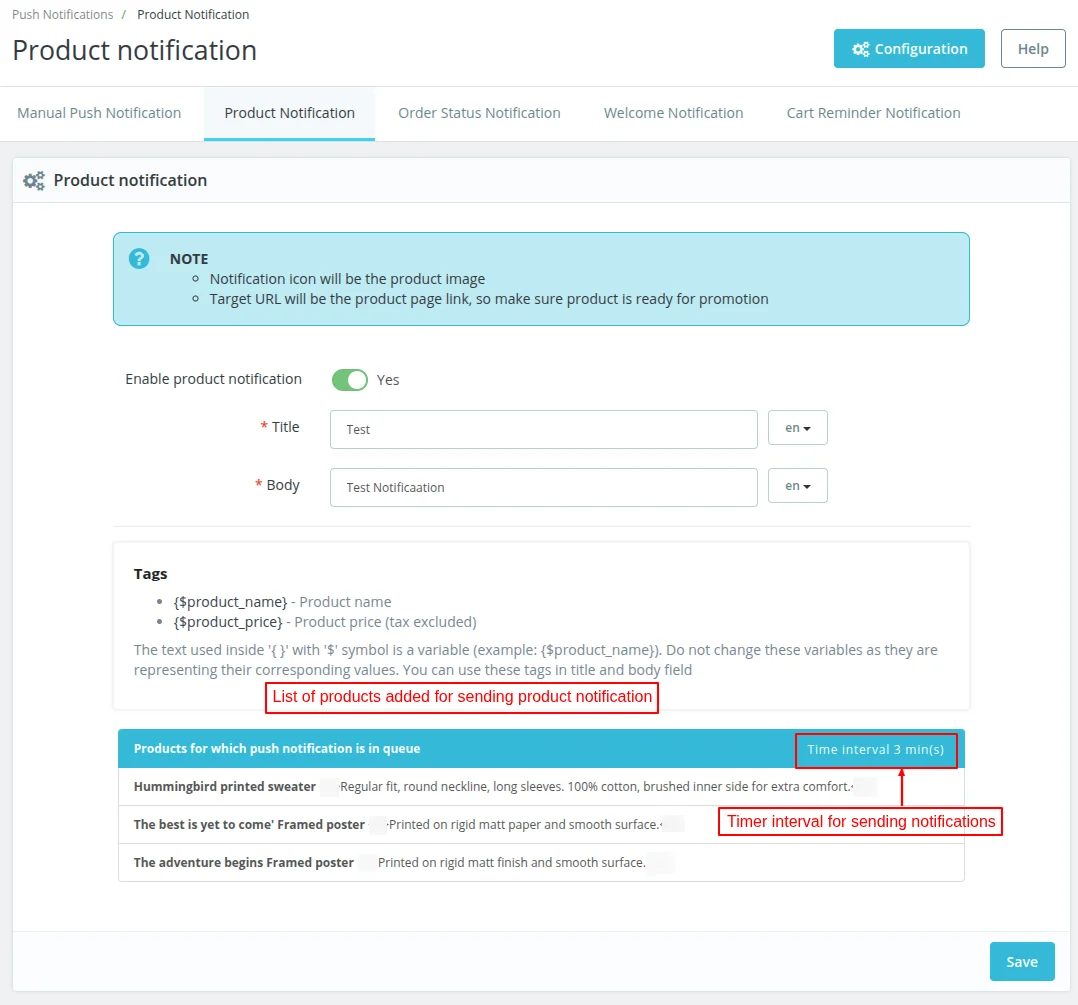
Once the admin has saved notification title and body, he can select the products for which he wants to send notification.

Admin can choose existing products to send Product notifications for. If the interval is set to 0, product notification will be send for all the selected products in real time.
If the time interval is set, then the notifications will be sent accordingly.
In order to send product push notifications, go to catalog -> products -> edit product -> modules.
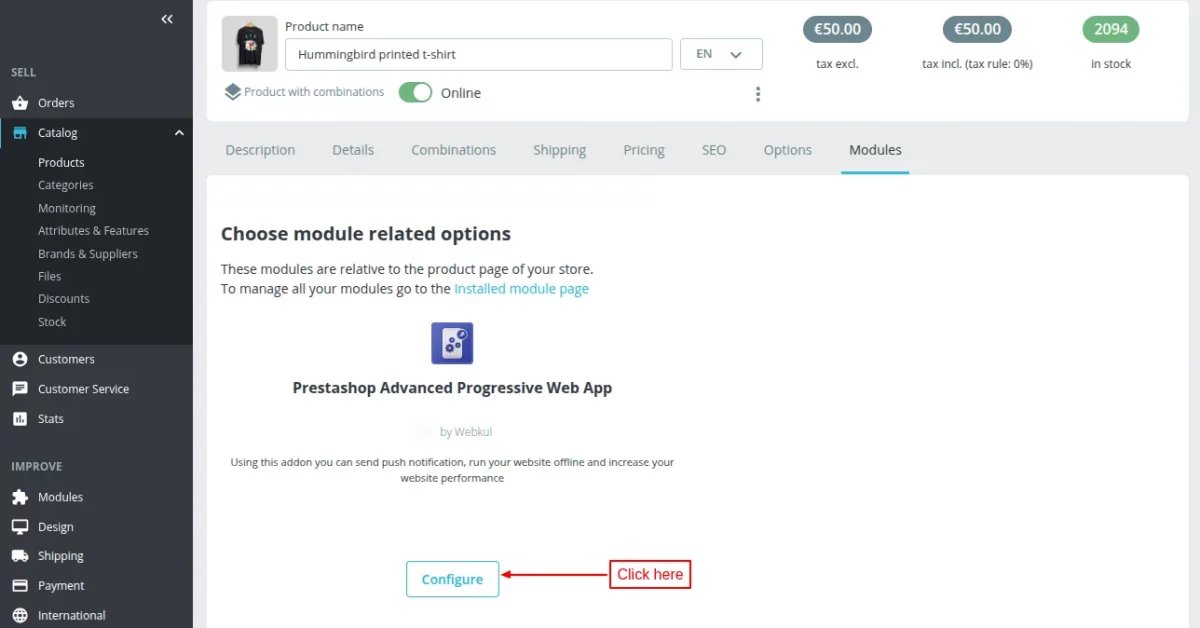
Click on ‘configure’ button.

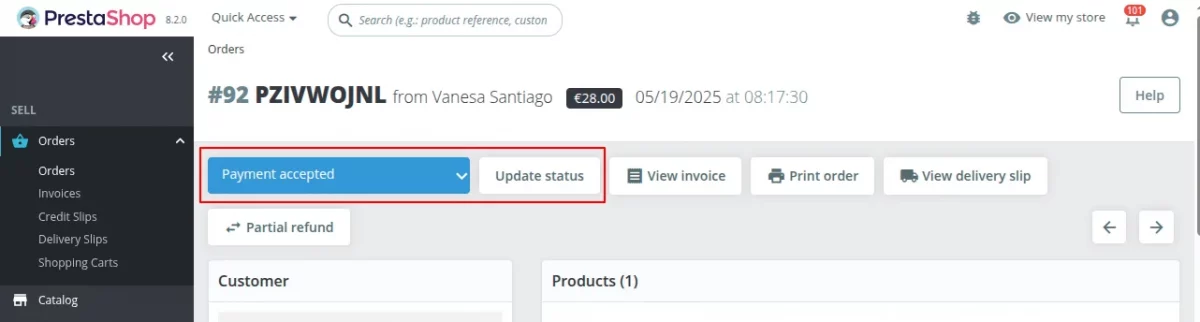
Order Status Notification
Under this tab, the admin can add order status notification. Also, the admin can choose to add different push notifications for different order statuses.
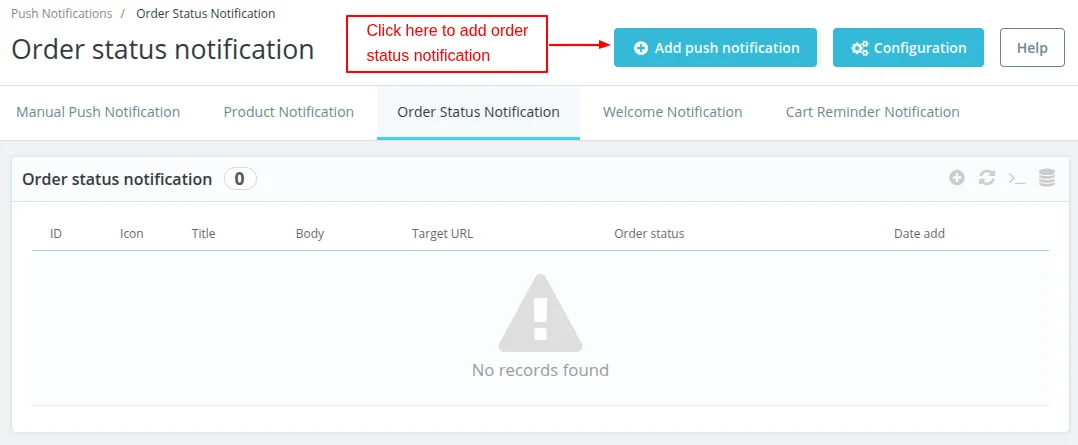
Click on the ‘Add push notification’ button.
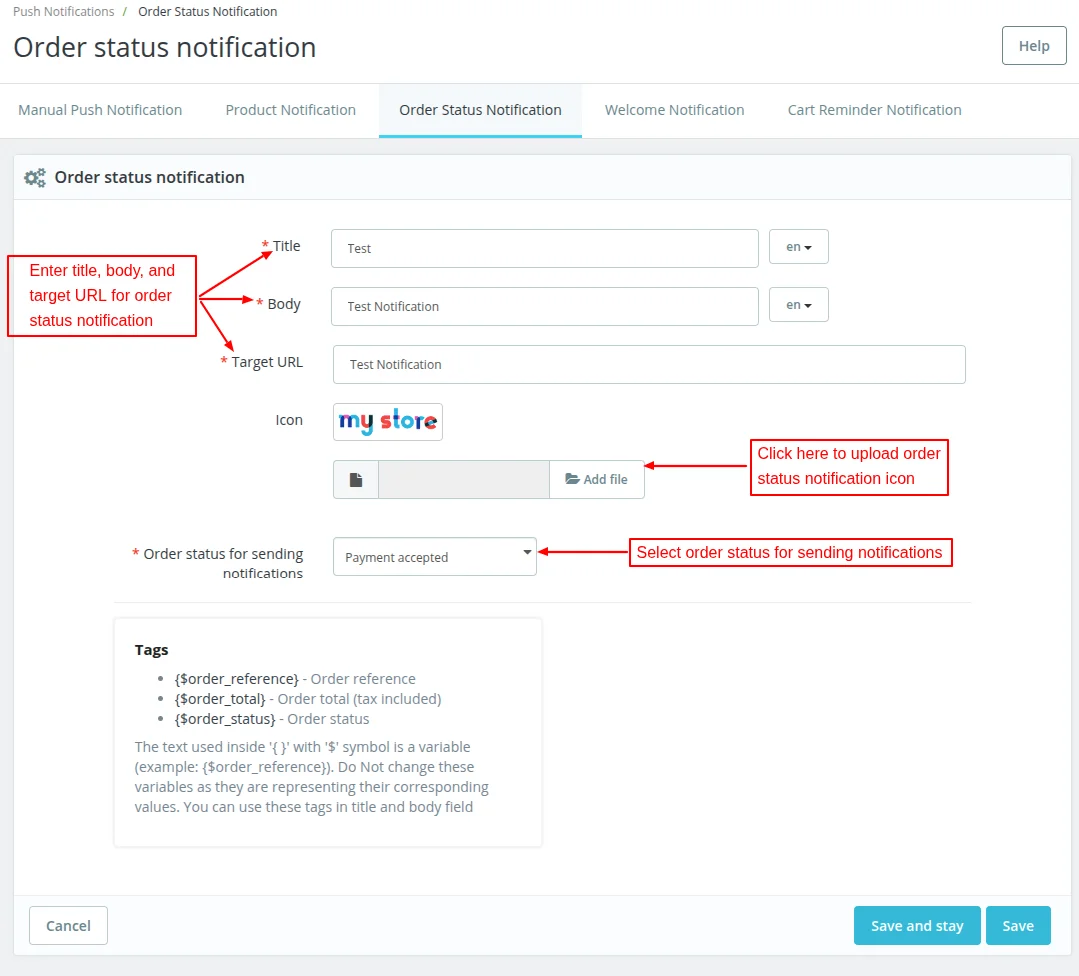
On clicking the button, a form appears with following options:
Title, body, target URL: Enter the title, body, and target URL of order status notification.
Icon: Upload order status notification icon.
Order status for sending notification: Here, the admin has to select the order status for which notifications will be sent.
If the admin changes the order status, then push notification be sent to the customer.

Welcome Notificatio
Under this tab, the admin can add welcome notification.

Cart Reminder Notification

f the Customer left any product in the cart, then the cart reminder notification will be sent in the set number of days.
Subscribers
Under this tab, the admin can view a list of users who have subscribed to the notifications.
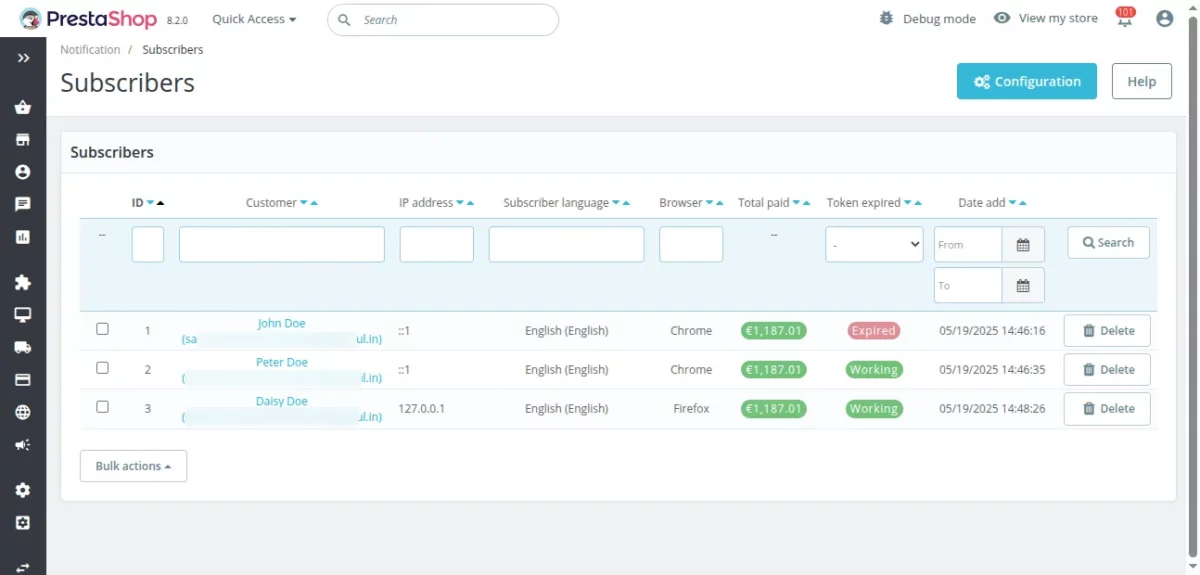
Please note that the old subscribers won’t work with updated APIs.
Push Notification on APP
Once an admin triggers the push notification, the user will receive the push notification on the phone.

Now, notification to show whether the app is online or offline also displays in the footer of the web page.

In order to send product push notifications, go to catalog–>products–> edit page of any particular product.
So, this was all about the PrestaShop Advanced Progressive Web App Module. I hope this document will help you in checking the functionality of the module in a better way.
Also, do let us know about your views in the comments.
In case, if you are also looking for a module with similar functionality for your marketplace, then do check out the blog.
Support
For any kind of technical assistance or query, please raise a ticket at http://webkul.uvdesk.com or send us a mail at [email protected]
Also, please explore our vast range of featureful PrestaShop Addons.
Current Product Version - 7.1.1
Supported Framework Version - 9.x.x, 8.x.x, 1.7.x.x

4 comments
Hope you are doing good.
Regarding this query, we have already replied to you on your ticket. Kindly check our response there and get back to us on the same.
Regards.
Greetings from Webkul!
Thank you for showing interest in our module.
You can check the complete module feature from our Live demo link.
Please go through the live demo once and if you will have any query then, please raise a ticket at our support ticket system https://webkul.com/ticket/ or you can mail us at [email protected].
Thanks & Regards,
Amit