OpenCart Marketplace Multi Vendor Module will convert your Opencart site into Marketplace within your store with a separate seller product collection and feedback report and rating system.
Also, This module contains the custom shipping feature, where the seller can add their own shipping rate according to the shipping region and weight of the product.
Above all, the admin/seller can add Event-Based Shipping and Priority Based Shipping for the order of their own product.
Admin/Seller can add cross-sell, upsell, price alert, Google analytics.
The admin can enable the superbar to display the up-sell and cross-sell icons.
In Price alert, the seller can check all the low price requests of the customers and accept or reject them.
For each accepted request, a unique discount code is emailed to the customer which can be applied to the shopping cart.
Google Analytics is a free application that allows you to analyse data for your company in order to analyse traffic and improve your marketing strategies.
Both the admin and sellers of the store can configure the Google Analytics feature for their profile and products.
The customer can even view the details of the seller profile and add their feedback to the seller based on their product.
Above all, the Marketplace extension works very fine with all languages (including LTR and RTL ) Marketplace module has multilingual support.
For the new updates o
To use the new updates of the Opencart Marketplace module, the admin needs to edit and save the configuration.
This will make the changes appear in the updated module.
Note:
- Marketplace Supports All templates and themes including Journal theme.
- Opencart Multi Vendor module supports the Multi-Store feature of default Opencart.
Watch the below video tutorials to understand the module workflow:
Module Configurations settings Part – 1
Module Configurations settings Part – 2
Marketplace Options #1
Marketplace Options #2
Seller Marketplace Account Options
Upsell, Cross-sell, & Price Alert Latest Features
Features
-
- Opencart Multi-vendor Marketplace supports the Multi-Lingual feature.
- PayPal email ID is verified through PayPal API.
Admin
- The admin can add commission based on category.
- Also, Automatic approval of products and sellers setting on the admin side.
- Admin can restrict the account menu options and sequence.
- Here, the admin can select the order status for the seller.
- Also, The admin can create template-based emails for Marketplace which will be used, according to Admin selection.
- Admin can find total sale by each seller and the admin income from any particular seller under “Marketplace Income”.
- Here, the admin can track the seller’s income, total order, total buyers, and latest order using the dashboard field under the edit sellers page.
- Also, The admin/Seller can change the order status of each product. The admin can assign specific product categories to sellers.
- Admin can map product attributes with the categories for the sellers.
- Above all, the admin can pay to all sellers at once using Mass Payout and print invoice.
- The admin and the sellers can preview the product on the front-end.
- Restrict the purchase quantity of the products which have any discount or special price.
- Also, the admin can set the minimum cart amount for the checkout.
- Here, the admin can manage the seller review fields.
- The admin and the sellers can view notifications for orders, products, and reviews.
- Option mapping features are available.
- Also, The admin can set offers on the top searched items.
- Here, the admin can make use of the price Alert feature for his products.
- The admin can enable the superbar to display the up-sell and cross-sell icons.
- Admin can enable the total cross-sell, only after which the discount will be applicable on the cross-sell products.
- Also, the admin can set Event-based shipping and Priority-based shipping for the order of his own products.
- Both the admin and sellers of the store can configure the Google Analytics feature for their profile and products.
Seller
- Each seller has a separate seller profile page & can edit their profile page on their own.
- The seller can add banner, shop logo custom HTML text and also customize store as per any color theme.
- Also, Feedback and review system with an interactive star rating.
- The seller will have own dashboard to manage orders.
- Also, the Sellers can add Simple and Downloadable product.
- Custom Field – Seller can add the custom field by Marketplace Multi-vendor module and these custom fields will show on the product detail page.
- The sellers can add tax information from the front-end.
- Also, the sellers can use Seller-Customer Switcher to hide the Marketplace menu.
- Only selected order status will be used by the seller for changing their product order status.
- Seller Based filtering at category layout.
- The sellers can use the price alert feature for their products.
- Here, sellers can upload a PDF file(like: Achievement/Certification) and is visible on the seller’s profile page.
- The sellers can set the product price and quantity restrictions for the customers.
- Sellers can add cross-sell and up-sell products under their account panel.
- Also, the sellers can create and manage the reasons which are to be selected while adding or updating a product.
- Products can be searched on the collection tab of the sellers.
- The seller can add Priority-based shipping and Event-based shipping for the order of his own products.
- Sellers can generate shipping label, if allowed by admin from the backend.
- Also, the seller can also use his company logo on the shipping label, if allowed by the admin.
- In the seller panel, the seller can view the listing of incomes along with the seller and admin amount.
- Also, the seller can add new orders on behalf of the customers in the seller panel itself.
Customer
- The customer can checkout with multiple sellers products at the same time.
- Customers can search the products on the seller’s collection page.
- Also, the customers can subscribe to the price alerts.
- Customers can view the estimated date of the delivery on the product page.
- The customer can select the priority for the delivery of the order.
- Also, the Priority-based shipping is optional.
Video Guide – Module Installation & Other Settings
How to Install Opencart Marketplace Module?
Opencart Marketplace Admin Catalog Setting
Opencart Marketplace- General Setting Configuration
Landing Page Setting- Opencart Marketplace
Installation
Visit other webkul opencart extensions.
Installation Process –
Customers will get a zip folder for installing the module.
They will unzip this folder on their system and choose their version according to the Opencart version that you want to install.
For example:
- If the customer wants to install the Opencart Marketplace Version 2.3.x.x.
- There are four folders inside this folder version 2.3.x.x namely- admin, catalog, ocmod & theme patch.
- To install this module version first, you need to transfer the admin & catalog folders into the Opencart root folder on the server.
- Similarly, if you are installing the OpenCart Marketplace version 3.x.x.x then there are 5 folders inside it and that is – admin, catalog, image, system, and theme patch.
- After that, the admin will have to transfer the admin, catalog, image, and the system folders into the Opencart root folder on the server.

Post Transfering Files
Also, After transferring the folders, use extension installer for uploading the ZIP files – marketplace1.ocmod.zip, marketplace2.ocmod.zip, and Marketplaceforseo.ocmod.zip which you will find in ocmod folder.
Also, If you are using a custom theme like Journal then we provide a Journal theme patch (directory) in the module zip.
While installing the module, navigate through Theme Patch->and click on the Journal folder and you will get the “Catalog” folder.
Just upload the “Catalog” folder into your Opencart Root Directory for the proper functioning of the Module with the Journal Theme.

Extension Installation
After transferring the folders, use the extension installer to install the ZIP files which is situated inside the ocmod folder (marketplace1.ocmod.zip, marketplace2.ocmod.zip, and Marketplaceforseo.ocmod.zip).
Note: If you are using a custom theme(Like Journal2 / Journal3) then you need to navigate through ocmod folder>Journal2/ Journal3 and select the files to present there – marketplace1.ocmod.zip, marketplace2.ocmod.zip, and Marketplaceforseo.ocmod.zip only.
After uploading the file go to the Extensions -> Modification and click on the refresh field.

Thereafter that in Admin panel go to System -> Users -> User Group and edit ‘Administrator’ and choose to select all for both Access and Modify Permission and save it.

Now, navigate through Extensions -> Extensions->Modules->Marketplace and install the Marketplace module by tapping the Install button on the right-hand side.

Note :
- For Opencart 2.2.x.x & below versions – You need to navigate to Extension > Modules
- For Opencart 2.3.x.x & above versions – You need to navigate to Extensions ->Extensions -> Modules
Layout Settings
To set the layout, the admin will navigate to Design ->Layout.
For Account Layout Marketplace
Here, edit the Account layout by tapping the edit button in front of the Account layout under the Action column.

Tapping the edit button brings up the section to set the layout for the marketplace account menu. Under the Column Right select Marketplace and Account as shown below in the snapshot.

For Product Layout Marketplace
Navigate through Design ->Layout and tap the edit for the Product layout.

Tapping the edit button brings up the section to set the layout for the Price Alert and Superbar menu.
Under the Content Bottom section, select Price Alert and superbar.

Translation – Module
As this Multi-Vendor Marketplace module supports multiple languages.
So, this section will describe how to make the module work in different languages. Please check this link for language translation.
Translation – Arabic
Step 1: Download the free Arabic language pack from the Opencart extension directory.
Any language pack that isn’t English needs to be uploaded to Opencart,after Opencart Installation, using an FTP client like FileZilla.
Step 2: Open the downloaded zip file and unzip it on your system.
Now upload the admin and catalog folders into the Opencart root folder on the server.
Step 3: Now login to your Opencart admin panel with your admin credentials.
For adding a new language navigate to System->Localization->languages and click on the “Add” button.
Here you will see the below-shown page where you will have to fill all the mandatory fields with the language(Arabic) information.

In order to get all language information please check the readme.txt file included in the language pack archive you have downloaded.
After entering all the mandatory fields, click the save button to save the language.
To change language for Backend and Frontend
Step 4: Now to change the language for the backend panel and the Frontend, navigate to System -> Settings ->Local.
Under the local menu tab, set the language(this changes the frontend language) as Arabic and set the administration language(this changes the backend admin panel language) to Arabic.
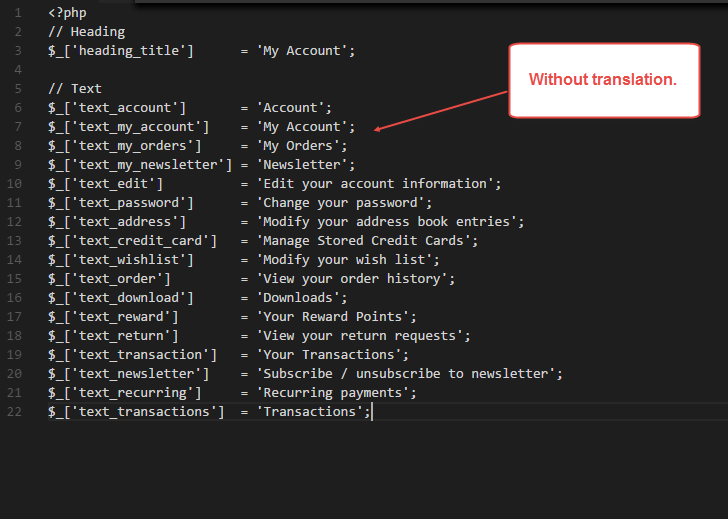
Step 5: Also, the next major issue is, how to translate a module that is built on the multi-language paradigm.
If the module is following a language pattern for any module then it must have language files.
If the module has language files for English and you want to translate them into Arabic.
Then at the very first copy all the language files from English language directory and paste all of them into the Arabic directory in the same structure as it was in the English language.
For example, there is a file in the module directory for the English language called foo.php then copy this into the module directory of the Arabic language.
Suppose the English file has these keywords to be translated as the below screenshot.
Without Translation:

After doing the above changes, when you’ll change the language from the front end then.
The page will be translated into Arabic language only for those keywords that exist in the language file only.
Landing page
The landing page can be accessed by tapping on the sell menu in the header.
Here a user who wants to become a seller can see the option to register and the details regarding the marketplace itself.

On the landing page, sellers can see the top 5 long-term vendors of the marketplace, also their location, and the number of products they are selling.

Apart from that, they can also see the latest products of the marketplace that vendors have uploaded.

Marketplace – Configuration Settings
The admin can edit the Marketplace configuration setting by clicking on the edit option and the below page will be open.
Here, the admin can set the Marketplace Module status Enable or disable.
Then, select for which OpenCart store, the admin wants to do the marketplace configuration from Marketplace Store option.
General

 Admin/Default Mail:
The admin/default mail will use to send the emails if the admin wants privacy for your store. Also, the Admin can receive all notification on this Email-Id.
Upload Default Image:
Moreover, If the seller will not upload any image then this default image will appear in profile or other places.
Sellers at Registration Page:
Also, the admin can enable the “Become Seller” option for a customer at the registration page.
Approve Sellers Automatic:
Using this option admin don’t have to approve sellers manually.
Above all, If Admin will enable this option, the customer will become the sellers automatically.
To Approve Product Automatic:
If the admin will enable this option, the product will be approved automatically and vice versa.
Approve Category Automatic:
Also, When the admin will enable this option, product categories will be approved automatically and vice versa.
Additional Settings:
To Approve Information Automatic:
Likewise, If the admin will enable this option, the information will be approved automatically and vice versa.
Seller can edit/delete Review:
When the admin will enable this option, the seller will be able to edit/delete the review and vice versa.
Customer can contact Seller:
Also, If the admin will enable this option, the Customer can contact the seller.
Seller Name In The Cart:
When the admin will enable this option, then the customer will be able to see the seller’s name with the product in the cart.
Mail to Admin if customer contact seller:
Also, when the customer will contact the seller, the same mail will be sent to the admin.
Notification Filter:
The admin can select the order status for the notification filter. Only selected order status will be available to filter the notification.
Commission
Under the commission tab, the admin will be able to configure the settings for commission.
The admin can manage here how the commission will be charged to the seller’s products. the admin has the option to select –
- Fixed commission
- Commission on Category
- The Commission on sub Category
In case, the admin has selected all the commission type then only one commission is applied to purchase according to the priority set selected by the admin.
Commission Applied on Unit Price –

Here, the admin will be able to –
- Seller fixed Commission(Default)
Set the Default Commission rates for the admin, when a customer becomes a seller at that time this is the default commission in percentage. - Commission Applied on Unit Price
- Select Enabled to charge a commission on the product price. Eg. If the product price is $100 and the commission is 10%, the customer will pay $110.
- The admin will get $10 and the seller will get $100.
- Here, Select Disabled, to charge commission within the product price. Eg. If the product price is $100 and the commission is 10%, the customer will pay $100.
- The admin will get $10 and the seller will get $90.
-
Calculate commission on Tax
-
Enable this option so that the admin’s commission will be calculated on the product’s unit price.
- Commission Worked on All Category
Check this option, then the commission will be the sum of all category commission related to a particular product. - Category Commission Based on Here, select the categories for the category commission.
- Select Commission PrioritySet the commission priority and according to this priority, the commission will be applicable.
Product

Under the Product tab, the admin can –
- Select the store option for the seller to add the products.
- If this option is enabled then SKU will be the products Model and meta description will be the product’s name if the seller does not add these fields at the time of adding the products.
- When this option is enabled then notification mail will be sent to the seller for low stock.
- Set the product quantity, which when equals to or less than the set product quantity a low stock notification goes to the seller.
- Select the product fields that are available to the seller while adding or editing a product.
- Here, select the tabs you want to enable for the seller.
- Select this option as Enabled so as to make the seller select/add category while adding/editing a product.
- Select the default categories for the sellers that will be used while adding the products.
- Also, Set the allowed number of images that can be uploaded.
- Enter the allowed extensions for images separated by comma.
- Set the Maximum Image Size that can be uploaded by a seller.
- The admin can set the allowed extensions for download separated by comma.
- Set the Max Downloadable File Size
- Enable this option to receive an email notification when a seller adds a product.
- When this option is Enabled and then the seller edits his/her product when the auto-approval is disabled then the product will get disabled from the store.
- Also, after Enabling this option when a seller deletes a product from his store, the product is also removed from the admin store as well.
- If this option is enabled then all the products will be deleted after a seller is deleted otherwise if Disabled then all the products of the seller will be admin’s products.
- When Enabled then all the products of the disabled seller will show at the store frontend otherwise the products will not show at the frontend.
- Enable this option to allow the sellers to buy their own products else select this option as Disabled to not allow.
Advanced
Under the Advanced tab, there are a number of settings that includes –
- Quantity Restriction
- Price Restriction
- Set Restriction Priority

Quantity Restriction
- Quantity Restriction Involved
Enable/Disable this option to allow the sellers to manage quantity restrictions for their products - Set Purchase limit Type
The admin can set the purchase limit type for the sellers as – Product Quantity or Number of Products within the cart. - Set Purchase Limit
The admin can set the purchase limit value in numerical value.
Price Restriction
- Price Restriction Allowed
Enable this option to allow the sellers to manage price restriction for their own products else select it as Disabled. - Default Price Restriction Value
Also, Whatever value is set here by the seller for the price restriction, the same will apply to the seller’s products.
Set Restriction Priority
- To Set Restriction Priority
Here, the selected restriction will be treated as high priority if both – Quantity and Price restriction are applicable to any order/product.
Order
Here, the admin can setup different options of the order settings for the marketplace sellers.


Here, the admin will –
- However, If this option is Enabled then the seller can see his orders and can manage his orders after the order is placed otherwise the admin needs to approve the order first for the seller to see and manage the order.
- If the admin configures Seller can create orders field as Enabled, then sellers can create orders on behalf of the customers.
- Here, if you Enable this option then the seller can change the status of the order related to his/her products.
- If this option is Enabled then the seller will receive a mail when a customer purchases the seller’s product.
- Also, if this option is Enabled the admin will be notified when a seller changes his order status.
Other Order Settings
- Select the order statuses for the sellers that sellers can change for their orders.
- Here, set the order status only in that sequence in which the seller should change their order status.
- Select the order status that will be considered as completion of the product and it will be used to the transaction.
- The admin can select the order status that will be considered as processing.
- The admin can select the order status that will be considered as the cancel of the product and will be used to cancel the product.
- Select the shipping method for which the shipping amount will be transferred to the seller’s account.
- Set the minimum cart value for the customer to proceed to the checkout.
- Also, the admin can set the maximum product quantity that can be purchased by each customer for each product.
SEO Settings
Under this tab, the admin can manually Add SEF URLs for Site URLs.
The admin just needs to select a URL link under the column and then type its SEF keyword for the store pages.
Create SEF Links –

Product SEF Settings –
Here, the admin will be able to –
- Here, select the display format for the SEF as – Only Product, Vendor-name/Product.
- Set the Admin Product Prefix that will be used only for the admin products, this prefix will be added before the product SEO name ex: prefix/product-name. This will be depended on ( Display Format ) setting.
- Check this option to use the product name if the SEO keyword is not available for the product.
- Also, Enter the extension if the admin wants to show that extension with SEO URL initial with the period(.).

Sell
Under this section, the admin can manage the Sell Page.
The admin can display information to the customers/sellers in the form of tabs. Here, there are 2 tabs –
General
Here the admin will –
- Set the Sell header text that will be visible on the sell page
- Also, set the Sell button Title visible on the sell page
- Enable the option to show the sellers on the sell page
- Also, Enable the option to show the products on the sell page
- Set the limit of seller list on the sell page by entering a numeric value
- The admin can set the limit of seller products on the sell page

Sell Tabs
Under the sell tabs, the admin will set the Terms & Conditions and the Welcome to Marketplace page.
Terms & Conditions

Welcome To Marketplace

Profile Settings
Under the profile settings, the admin can globally enable/disable Sellers Profile details, which will be visible to the customers. Here, the admin will –
- Allowed Profile Fields:
Check the profile fields that you want to display for the seller that is visible to the customers at the frontend. - To Allow Public Profile Fields:
Check the public profile fields that you want to display for the seller that is visible to the customers at the frontend. - Customer can see Seller’s email Id:
Enable this option to allow the customers to see the seller’s email id. - The Customer can see seller’s telephone number:
Enable this option to allow the customers to see the seller’s telephone number. - Make a Seller Review On Only Order Purchase:
If this option is enabled then only the buyers who have purchased the seller’s product can give the review to the sellers. - Hide Seller Information:
Also, When this information is enabled then the seller’s information will not be shown anywhere on the frontend.

Catalog Module Configuration
The admin can configure the catalog setting under this tab.
The admin can select the options which they want to show at the front end Account Menu and can also toggle the Account Menu sequence as required.
Account
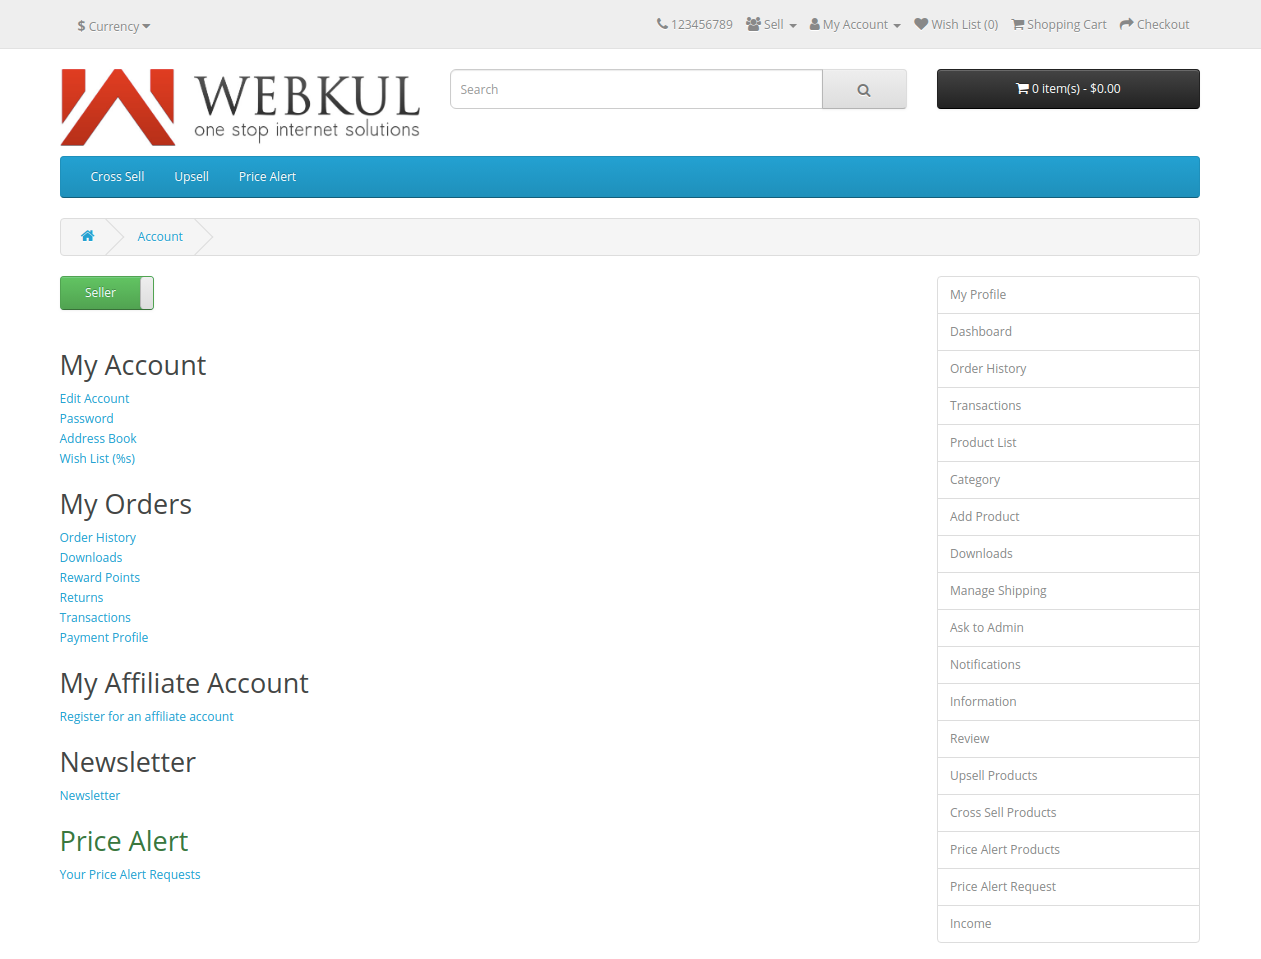
Under the account tab, the admin will select the account options which the admin wants to show at the frontend. To do so the admin will –
- Allowed Account Menu: Select those options which you want to show at the frontend account menu.
- The Allowed Menu Sequence: Also, The admin can toggle the account menu sequence according to the requirement.

Product
Under the product tab, the admin will –
- Name Display: Also, the admin will select one out of the 3 options that should be displayed on the module when it is set to a product page.
- Display Image: Set the image that should be displayed along with the module.
- Seller’s Information at Product Page by Module: If this option is enabled then the seller’s information will be shown through the marketplace module otherwise seller/(s) information shows above the add to cart button.

Under the mail tab, the admin can set the mail for different conditions that will occur in the marketplace.


Here, the admin will –
- Mail Keywords:
The admin can make use of these mail keywords within the email templates to send in the required information. - Request for Sellership:
Also, Select the mail that will be sent to the admin after the customer applies for the sellers. - Mail to Admin After Customer request:
Here, Select the mail that will be sent to the admin after a customer applies for the sellers. - The Mail After Approve Seller(manually):
Also, Select the mail that will be sent to the seller after the admin approves the sellers manually. - Product Add:
Here, Select the mail that will be sent to the seller after the seller adds the product. - Mail to Admin After Product Add:
Also, Select the mail that will be sent to the admin after the seller adds a product.
Other Mail Settings:
- To Mail After Approve product(manually):
Here, Select the mail that will be sent to the seller after the admin approves the seller’s product manually. - Transaction Add:
Select the mail that will be sent to the seller after the transaction has been added. - Order Mail:
Select the mail that will be sent to the seller with order details when a customer purchases the seller’s product. - Mail to admin after order status change:
Also, Select the mail that will be sent to the admin after the seller order changes the status of the order. - Customer Contact Seller Mail :
Here, Select the mail that will be sent to the seller after the customer contacts the seller. - Seller Contact Admin Mail:
Select the mail that will be sent to the admin after the customer contacts the seller. - Edit Product Mail To Admin:
Here, Select the mail that will be sent to the admin when the seller will edit any product, and ‘Disapprove on Edit‘ is enabled. - Edit Product Mail to Seller:
Also, Select the mail that will be sent to the seller when the seller will edit any product, and ‘Disapprove on Edit‘ is enabled. - Low Stock Mail To Seller:
Also, Select the mail that will be sent to the seller when the seller product stock will be low.
PayPal

Under the PayPal tab, the admin will –
- Select the Sandbox mode as Yes for using the Test mode else select as Yes to make use of the Live mode
- Also, Enter the PayPal API Username for the account at PayPal
- Here, enter the PayPal API Password
- Enter the Client ID.
- Enter the Client secret ID.
- Here, enter the PayPal App ID
- Set the PayPal Email Subject line
While on any of the configuration tabs, the admin can save the configuration of a particular tab by tapping the Save button.
PayPal Credentials:
How to get the credentials for the PayPal section:
1: Log in to the PayPal Sandbox using a Sandbox Business Account.
2: Also, In the Profile menu on the top right, click Profile and Settings.
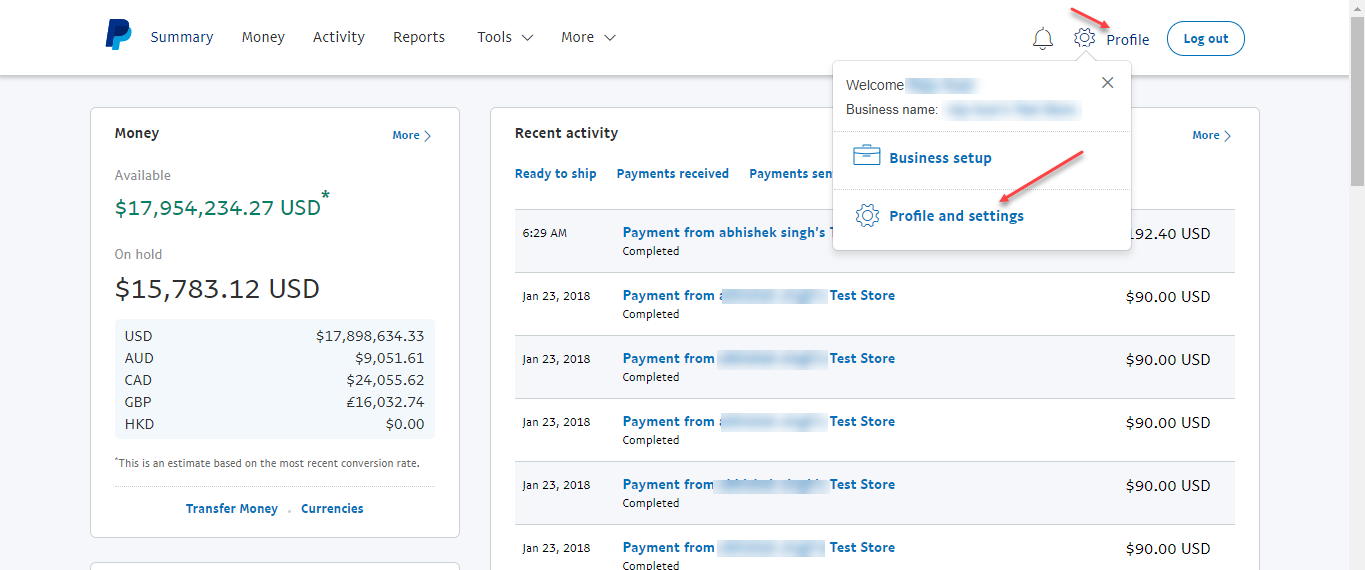
3: Now, from the left menu click My Selling Tools. Under the Selling online section, click the Update link for the API access item.
Step 4: Clicking the Update link will open another page.
Here, Under the Option 1 – PayPal API select the point number second -“Set up PayPal API credentials and permissions“.
Step 5: Now, the page that comes up, under Custom Checkout select – Manage API Credentials as shown below in the snapshot.

Step 6: After clicking Manage API Credentials, now you will be redirected to the View or Remove API Signature page.
Here, you will find all the required credentials as shown below.

Google Analytics
What is Google Analytics: it?
The Google Analytics is a free tool that facilitates you to analyze data for your business for traffic analysis and optimizing your marketing techniques.
It designed to function with Google’s an advertising and publisher products so that use your analytics insights to reach the right customer traffic.
Google Analytics Tab
Under the Google Analytics tab, the admin will have to configure fields such as
Allow Seller to add Google Analytics, Google Analytics Id, Google Analytics Allowed Pages as shown in the image below.

The admin needs to configure the following fields-
Allow Seller to add Google Analytic: The admin can set this field as Enabled or Disabled.
Google Analytic Id: The admin needs to add the Google Analytics Id.
Google Analytics Allowed Pages: The admin needs to select the pages such as Seller Profile, Seller Collection, or Seller Product, where Google Analytics functionality will work.
- If Allow Seller to add Google Analytic field is set as Enabled, in the seller panel, under My Profile, a Google Analytics Tab will be visible as shown in the image below.

Retrieving Google Analytrics Id
1:
- Initially, the admin needs to login to https://analytics.google.com/
2:
- Thereafter, navigate to Admin > Tracking Info > Tracking Code.

Step 3:
- On clicking the Tracking Code, it redirects to the following page-

Marketplace Menu -Admin Configurations
After the successful installation of the Webkul’s Multi-Vendor Marketplace extension,
the admin will have the Marketplace menu with different sub-menu options as shown below in the snapshot below.

Now, let’s go through each of them one by one.
Configurations
The configurations menu option allows the admin to quickly navigate to the marketplace configuration settings.
Here, The admin just needs to tap it and the configuration settings will open up.
Also, The admin can also go to the same marketplace configuration settings by navigating through Extensions->Extensions->Modules->Marketplace.

Catalog
Under this catalog we have 4 sub-menu options:
- Seller
- Commission
- Products
- Category
- Assign Categories
- Seller Categories
Let’s go through each of the options one by one:
Seller
Under the seller menu option, the admin can manage all the sellers like – Approve/Disapprove them.
The admin can also view/edit their profile and also view their latest order, payment details, add more products for the seller.
Also, The admin can filter the sellers using Customer name, Email-id, Group, status and customer type. The admin can also add new sellers from here.

Commission
Also, Under this section, the admin can setup the commission on the various categories. The admin can set the commission as fixed or percentage or both as required.

To set up a new commission rule for a category tap the Add button on the top right-hand side.

This brings up a section and here the admin will –
- Select a category on which to apply the commission
- Also, Set the commission as Fixed or Percentage or both as required
Lastly, tap the save button. After this, the admin can see a success message for the same.
The admin can edit the created commission for the categories by tapping the edit button under the Action column.

Products
Under this sub-section, the admin will be able to assign the store products to the seller’s account as required. Here, the admin can see all of the store products as well.
Also, To assign a product under the column Seller Name select the seller to whom you want to assign the product.
Here, the admin can also add new products to the store and can assign them as well to the marketplace sellers as required.
To add a new product tap the Add button at the top right-hand side and this brings up the section to add new products.

Category
Under the category menu option, we have 2 sub-category menu options –
- Assign Categories
Under the assigned categories, the admin
- Seller Categories
Under the seller categories, the admin will have all the seller categories listed.
Pro Features
Under the Pro Features, the admin has 6 sub-menu options –
- Top-Search Items
- Reasons
- Cross-Sell
- Up-Sell
- Super Bar
- Total cross Sell
- Price Alert
- Alert Products
- Requests

Let’s go through each of the options under the Pro-features menu option –
Top-Search Items
Here, the admin can check the keywords that have been searched by the customers for the various products along with the number of times the keywords were obtained in the search result.

Reasons
Under this section, the admin will be able to create all the reasons that are required to be selected whilst adding/updating the products.
Also, a reason is required to be selected while updating a product. These reasons are also available at the seller’s end for use.

To add a new reason tap the Add button at the top right-hand side. This brings up the section to add a new reason.

Here, the admin will –
- Enable/Disable the Status of the update reason as required
- Also, enter the Reason Title
- Here, Enter the Description for the Reason Title
Lastly, tap the Save button to save the new product update reason. After which, the admin can see a success message for the same as well.

Also, the admin can edit the created product update reason by tapping the Edit button under the Actions column.
This brings up the section to edit the respective product update reason.
The admin can edit the reason title, description, and can change the status of the respective product update reason.
After making the edit tap the Save button to save the changes made.

Cross-Sell
The admin will navigate through Extensions->Extensions->Modules. Here, the admin will install –
- MarketPlace CROSS SELL

Under the cross-sell section, the admin has 3 tabs to configure various settings –
- Control Panel
- Settings
- Cross Selling Widget
- The Cross Selling Listing
- Statistics and Tracking

Control Panel
Under this tab, the admin will configure the settings for the cross-sell products.
- Cross-Sell
- Cross-selling status
Enable or Disable the Cross-selling. - Cross-selling applicable for
Manage the allowed vendors to use the service. Here, the admin can select from two options – Except for and No One.
- Cross-selling status
- Tax
- Tax value for the Cross-selling
Enable this option if the admin wants to show the Cross-selling total to be shown with the applied tax.
- Tax value for the Cross-selling
- Count Down
- Activate Count Down
Enable or Disable the countdown - Count Down applicable for
Manage the allowed vendors to use the service - Count Down Syntax
Also, provide the syntax for the countdown timer. Like – Days, hours, and minutes. - The Count Down Syntax For 0 Days
Also, Provide the syntax for the countdown timer if no days are available. Like – Hours, minutes, and seconds.
- Activate Count Down
- Units Available
- Activate Sales Available
Enable or Disable the sales units. - Sales Units applicable for
Manage the allowed vendors to use the service. Here, the admin can select from – Except For and No One. - Sales Units Syntax
Provide the syntax for the sales unit.
- Activate Sales Available
Settings
Under the settings tab, the admin has two sub-options to choose from –
- Cross-Selling Widget
- The Cross-Selling Listing

Cross-Selling Widget
For the Cross Selling Widget we have a number of settings to configure.

Here, the admin will –
- Set the Title for the widgets
- Also, Enable or Disable the widget status as required
- Define how many cross-selling products to show
- Choose Display Type for the cross-selling products – Random(Shows the cross-selling as random) or Default(Shows the cross-selling as chronologically)
- Also, Set the Picture width and height values in Pixels
- Above all, enter the cross-selling details to configure the type of text, point, etc., within the cross-selling widget.
Lastly, tap the Save button to save the configuration.
Cross-Selling listing
For the Cross-Selling Listing we have a number of settings to configure.

From the Listing URL link – “Cross-Selling Listing” the admin can navigate to the page where all the cross-selling products are listed in a slider as shown below in the snapshot.

Here, the admin will –
- Add the link to the listing in the main menu – Enable or Disable this option as required
- Menu Link Title
- Bundles per page
- Picture width and height
- Cross-selling Details
Statistics and Tracking
Under this section, the admin will be able to check all the statistics for the cross-sell products.
Also, The admin can also export all the records by selecting the from and to dates and then tapping the Export button.
Here, the admin can find the details like – who the vendor is, the parent products, child products, added-on, start date, end date, condition(cross-sell), action(delete the cross-sell entry), countdown enabled or not, and a number of units.
![]()
Up-Sell
The admin will navigate through Extensions->Extensions->Modules. Here, the admin will install –
- MarketPlace UPSELL
Under the Upsell section, the admin has 3 tabs to configure various settings –
- Control Panel
- Settings
- Upselling Widget
- Upselling Listing
- Statistics and Tracking

Control Panel
Under this tab, the admin will configure the settings for the Upsell products.
- UpSell
- Upselling status
Enable or Disable the Cross-selling. - Upselling applicable for
Also, Manage the allowed vendors to use the service. Here, the admin can select from two options – Except for and No One.
- Upselling status
- Tax
- Tax value for the Cross selling
Also, Enable this option if the admin wants to show the Cross-selling total to be shown with the applied tax.
- Tax value for the Cross selling
- Count Down
- Activate Count Down
Likewise, enable or Disable the countdown - Count Down applicable for
Also, manage the allowed vendors to use the service - The Count Down Syntax
Provide the syntax for the countdown timer. Like – Days, hours, and minutes. - Count Down Syntax For 0 Days
Also, Provide the syntax for the countdown timer if no days are available. Like – Hours, minutes, and seconds.
- Activate Count Down
- Units Available
- Activate Sales Available
Enable or Disable the sales units. - Sales Units applicable for
Also, manage the allowed vendors to use the service. Here, the admin can select from – Except For and No One. - Sales Units Syntax
Provide the syntax for the sales unit.
- Activate Sales Available
Settings
Under the settings tab, the admin has two sub-options to choose from –
- UpSelling Widget
- The UpSelling Listing

Up-Selling Widget
For the Upselling Widget we have a number of settings to configure.

Here, the admin will –
- Set the Title for the widgets
- Also, Enable or Disable the widget status as required
- Likewise, Define how many cross selling products to show
- Also, Choose Display Type for the cross selling products – Random(Shows the cross selling as random) or Default(Shows the cross selling as chronologically)
- Also, set the Picture width and height values in Pixels
- Above all, enter the cross selling details to configure the type of text, point, etc., within the cross selling widget.
Lastly, tap the Save button to save the configuration.
Upselling listing
For the Upselling Listing we have a number of settings to configure.

Here, the admin will –
- Add link to the listing in the main menu – Also, Enable or Disable this option as required
- Set the Menu Link Title
- Bundles per page
- Picture width and height
- Upselling selling Details
Super bar
Navigate through Extensions->Extension->Modules and install –
-
Super Bar

A super bar is floating section that displays the icons for the Up Sell and Cross Sell on the product pages.

Here, the admin will –
- Also, Enable or Disable the Status of the module
- Likewise, Set the superbar width
- Here, Set the superbar color
- Also, Set the superbar layout
- Also, Set the superbar Border Color
- Likewise, Set the superbar Border Style
- Here, Set the superbar Button color
- Set the superbar Position
- Also, Set the superbar Visibility Time on the product page
- Likewise, Set the super bar Content Refresh time
- Here, Set the superbar Struck Time
- Set the Icon Width
- Also, set the Icon height
- Likewise, set the superbar Upsell Icon
- Also, set the Upsell Tooltip
- Likewise, set the superbar Cross Sell Icon
- Above all, set the Cross Sell Tooltip
Total Cross-Sell
Here, the admin can enable the cross sell by selecting the status as Enabled else to keep it as disabled select the option as Disabled.
Also, the admin can set the sort order for the cross sell. Lastly, tap the save button to save the configuration.
After adding a cross sell product into the cart, the discount will be applicable only when this total cross sell discount option is Enabled.

Price Alert
Now, Navigate through Extensions->Extension->Modules and install –
- Price Alert
After installing the Price Alert, tap the edit button to configure the settings.

This brings up the configuration settings for price alert with 4 tabs –

Settings
Under the settings tab the admin will be able to –
- Also, Enable the module for using the functionality otherwise keep it disabled.
- Here, Enable the option to allow the Guest Users to make use of the Price Alert feature else keep it as Disabled.
- Also, Set the seller limit to add the product for the seller on monthly basis.
- Here, limit to add alert product for the seller based on Monthly
- Likewise, Allow the seller to manage alert set on their own products.
- Also, Allow to Notify the admin of the for the seller products alert.
Manage Mails
The Manage Mails tab we have 2 sub tabs –
-
Templates
Under the template tab, the admin will be able to create mail for –
- Alert Mail for Price Change
The admin will enter the Subject of the mail to send to the vendor along with the email text. - Price Accepted Mail format
Also, The admin can enter the Subject of the mail to customer along with the email text. - The Price Rejected Mail format
The admin will enter the subject of the mail to send to customer along with the email text.

-
Info
Under the Info. tab, the admin can save message for the default conditions for the price alert.
Also, the admin can make use of the keywords within the mail messages.

Price Alerts Restrictions
Under this tab, the admin will be able to
- Set the limit of total number of product price alerts a customer and a guest are allowed on monthly basis.

Coupons
Under this tab, the admin will be able to –
- Set the number of days the Coupon will be valid after being received
- Also, Enter the name for the coupon

How to add Price Alert to Products
To add a price alert to the product the admin will navigate to catalog ->Products.
Also, the admin can create a new product or edit and an existing one to add the price alert.
Now, go to the Price Alert tab and enable the price alert and that’s it.

Alert Products
Under this section, the admin can easily check the products for which the price alerts have been enabled.
Also, the admin can remove the products from here by checking the product and then tapping the delete button.
Here, the admin can also enable or disable the price alert for the products by tapping the respective button under the Alert Status column.
Tapping the Enabled button will disabled the price alert(if already enabled) and if the button says disabled tapping it Enables the product’s price alert.

Applying to the Price Alert by Customers
After the admin has enabled the price alert, the customers can send in the price alert by tapping the Price Alert icon on the product page.
Also, the icon gets visible only after enabling the price alert for the product.

This brings up a pop-up where the customer can provide his suggested price. Tap the Submit your price to send in the price alert to the admin.

Requests
Under this section, the admin of the webstore can check the list of customers who have requested for the price alert.
Also, to view a particular price alert request, the admin will tap the Actions button under the action column.

Here, the admin can accept the price alert request of the customer. To accept, for the Set Response Status option select Accepted and tap the Update Status button thereafter.

After this, the customer will receive an email(Containing a coupon code).

Price Alert Requests
Also, customers can also check the Your Price Alert Requests section under their account panel for the status of their request.

Tap the view button to check the details of the sent price alert.

The coupon code can be used on the same product for which the price alert was requested. Enter the coupon code under the Use Coupon Code section at the checkout.
After applying the coupon, the price at which the customer had sent the price alert, the customer can purchase the product for that price only.

Mapping
Attribute Mapping
Under here, the admin can map product attributes with the categories for the marketplace sellers. So, whenever a seller adds a category in the product, the mapped attributes will appear.

Also, to add a new category + attribute mapping tap the Add button.
Select the categories and their corresponding Attributes to map. Lastly, tap the Save button to save the mapping.

Also, After saving the mapping, you can see a success message for the same.
Option Mapping
Under here, the admin can do a category and product option mapping.
Also, apart from that, the admin can add, delete, and edit the created mappings.

To add a new mapping tap the Add button. This brings up the section where the admin will –
- Select the Categories to map with the options
- Also, Select the Options to map with the categories and tap the Save button to save the mapping.

After saving the mapping, the admin can see a success message for the same.

Sales
Under the sales menu, we have 3 sub-menu options –
Order
Under this section, the admin can see the orders made for marketplace products. From here, the admin can view orders, change order status for each product, add tracking number for each product and add comments.

Also, after clicking on the View button, the admin will be able to see the order details of a particular order and can make changes to order as well.

Income
Under the Income section, the admin can check the income of the marketplace sellers and can pay them as well.
Also, there is a filter option by which admin can filter the income details.
Here, the admin can pay to all the sellers at once by tapping the Mass Pay By PayPal button.
Above all, the sellers will receive the payments in their PayPal account immediately.
The admin can also print an invoice for this transaction.
Also, The admin for the seller’s income can see the –
- Total Amount – Total amount
- Seller Amount – The seller’s share
- Admin Amount – Admin’s share
- Paid To Seller – Amount paid to the seller
- Remaining Amount – The remaining amount to be paid
If a seller does not have a PayPal account, the admin can still click the Pay button and make the payment manually.
Also, this transaction will be helpful in maintaining the marketplace records for payments.

Transaction
Under the transactions section, the admin will be able to check the transactions of all the marketplace sellers to maintain a record.

Also, If payment is done through PayPal then the admin has the option to print the invoice by clicking on print invoice button.
Below find the sample transaction invoice. It will show the transaction invoice number, date added, transaction ID, method, and amount.

Reviews
Seller Review
Under here, the admin can view the reviews of sellers. Apart from that, the admin can edit, delete and add reviews for sellers as well.

Also, After clicking on the add button, the admin can select the customer name(auto complete), seller name(auto complete).enter Text for the review, select the values for the seller review fields, set the status as Enabled, and tap the save button to save the seller review.

Seller Review Fields
Under here, the admin can manage the marketplace seller review fields.
Here, the admin can add/delete the seller review fields. There are already two default seller review fields – Value and Price.

Also, to create a new field, tap the Add button at the top right-hand side. Here, enter the Field Name, set the Status as Enabled, and tap the Save button.

Lastly, you can see the created Seller Review Field.

Also, you can see the created Seller Review Field.
Shipping
Under here, the admin can view the marketplace seller’s shipping information.
The admin can also filter the shipping details using the customer name, shipping country, weight and much more.

The default shipping method that comes with Marketplace is Marketplace Custom Shipping.
In this shipping method, the admin can choose any one of the three shipping method types namely – Flat, Matrix based and Mixed shipping.
Custom Shippings
The sellers can set –
- The flat rate for their products or
- Choose CSV file to set matrix/table rate for their products Or the sellers can choose mixed shipping where in the rates will apply if present first for the flat rate and then the matrix/table rates.
- Also, Event Based Shipping and Priority Based Shipping options are available to the seller/admin.
You can get complete detail of this shipping method by visiting Marketplace Custom Shipping blog.
Also, we have added more shipping modules for our Opencart Marketplace so that sellers can manage shipping from their end.
Generate shipping labels, you can check the complete list of Shipping Modules.
Under the mail section, the admin can create/delete the Mail messages for the default conditions of the Marketplace.

To add a new mail, tap the Add button a the top right-hand corner. This brings up the section to –
- Add the Name that is displayed at the time of selection
- Also, Add a Mail Subject for the email
- Likewise, Add a Mail Message and tap the save button to create the mail.

Here, you can make use of the Info. section to get the sort codes to be used within your mails. Using the sort codes you can add additional details within the Mail.
Also, the additional information might include -Order details, product name, product quantity purchased, etc.

Notifications
The admin can click the notifications icon to view the marketplace notifications about the recent orders, products, and Sellers.Order
After tapping the Order tab, the admin check all of the combined notifications for the orders.

To check each respective notification like – for the Completed Orders, first check the Complete option and then the results will display the Completed order notifications in all.

Product
Similarly, for the products the admin can check the respective notifications. The admin will see the notifications for seller products approved, product reviews received, and products that are out of stock.

Seller
Here, the admin can check the notifications regarding the marketplace sellers.
Also, The admin can check the recent seller reviews submitted by the customers.
Also, the admin can check all of the notifications by tapping the bell icon on the top right-hand side. Here, the admin can see categorized order, product, and seller notifications for the various events within the marketplace.

Information
Under this section, the admin can check the marketplace seller’s information. When any seller of the marketplace adds the information under their own account panel, only then that seller gets listed here and the admin can check and edit the seller’s information.

Custom Fields
Here, under the custom fields, the admin will be able to add and delete the custom fields. The admin can add more information fields at the product page for the customers.
Also, this may include – Product Condition – New/Old, Shipping estimation for seller end – 2 Day or 1 Week and like that.

To add a new custom field the admin will tap the add button at the top right-hand corner. This brings up the section to add a new custom field.
Here, the admin will enter the Field Name, it’s Description, select Is Required as Yes or No, For Seller option select as Yes or No, select the Field Type for the custom field, enter the Option Values and lastly, tap the save button to save the custom field.

After clicking on the Edit button under the Action column for the created custom field, the admin can edit the Field Name and the Description.
Here, the admin can also make this custom field as required for the sellers by selecting the option Is Required as “Yes“.
Also, the admin can make the custom field as enable or disable for the seller.

Marketplace-featured Sellers
The admin will navigate through Extensions->Extensions->Modules.
Here, the admin will install –

By clicking on the plus icon in-front of Marketplace featured sellers you can install the module.

After that admin will click on the inline edit button, then it will redirect to the Marketplace featured seller configuration.

Here, first admin will set the status as Enabled.
Then admin add a title for this module.
Now, admin will add the sellers to the sellers list.
For Marketplace Featured Seller Home Layout
Here, edit the Home layout by tapping the edit button in front of the Home layout under the Action column.

Tapping the edit button brings up the section to set the layout for the Home menu.

Now, we will see the marketplace featured Seller Layout on Home page.

Here, we can see the marketplace featured seller is visible, as the per the backend settings.
Marketplace Menu – Seller/Customer Login
A user can register himself as a customer or a seller. To do so the user taps on the Account drop-down option to select Register.

This brings up the registration page where the user can register as a customer or a seller.
Also, to register as a seller, the user needs to select the option Become a Seller ? as ‘Yes‘ else to become a customer keep the option selected as ‘No‘.

If the user is already a customer or a seller, then the user can select Login to check into his account panel.
Marketplace – Seller Panel
The seller can enter his credentials to login to his account panel.

After login, the seller will see a pop-up window displaying the most viewed products along with the total number of views and their model number.

If the user has been approved as a seller then the marketplace block will get display in the account section of the user.
Seller Switch to Customer Panel
The seller can switch to only the customer panel by hiding the marketplace block. To do so, the seller will tap the Seller tab.

This switches off the marketplace block and the seller can see the customer block only.
Also, to switch on the marketplace block tap the Customer tab.

Marketplace Menu – Seller My Profile
Seller Marketplace Block
After login, the seller will have the marketplace block/marketplace account panel with various menu options.

Let’s go through each of the menu options within the seller’s marketplace account panel.
My Profile Under this section, the seller can see 3 tabs –
- Profile Details
- Payment Mode
- Achievement
Profile Details
The seller can add the details about himself and his shop under the profile details tab.

Payment Mode
Under this tab, the seller can add their bank account or PayPal ID.
Also, the seller can add additional information about the tax.
The PayPal email ID will be validated through PayPal API. If an incorrect PayPal ID is entered, an error will appear.

Achievement
Also, Under this section, the seller can easily upload the achievements of their company by uploading a PDF document.
After uploading the file, the seller can view the uploaded file by tapping the View button under the action column.
Also, to update, replace the last file that was uploaded with a new one.

After adding an achievement, the seller can tap the View button under the Action column to view the achievements.

The uploaded achievements can be accessed by the customers via the seller’s profile page.
Just below the section where the customers can see the seller’s profile details like – name, phone number, and the email address, the Achievement button is seen.

Tapping the Achievement button, opens the achievement PDF file that was uploaded by the seller and the customer can go through the achievements that the seller’s company has achieved.

Here, on the profile page the customers will be able to search for a particular seller’s products easily.
The customer can type in the product name and the search result will populate the searched product if it exists for the respective seller.

Google Analytics
The Google Analytics tab includes the Google Analytics Id option as shown in the image below.

Configurations
Under this section, the sellers gets the options that were only available to the admin earlier.
Now, the seller can check all these options by navigating to his My Profile menu option and then tapping the configuration button.
Here, the seller will be able to check the allowed configurations –
- General

-
Commission

- Product

- Images

- Order

Seller Public Profile
After entering all the details under the Profile Details tab, the seller’s profile page appears as shown below in the snapshot.
Dashboard
The vendors can make use of their dashboard to quickly have a track of their total orders, sales, buyers, sales analytics, low stock products, world map with total sales matrix.
Also, the sellers will be able to track their latest orders.


Order History
Under the order history, the sellers can check and see their product order history. Here, the sellers can also filter the orders to view the order history of the individual customers.
The sellers can filter the results using the order id, date added, status of the order, and customer.

After clicking on View button, the complete order information appears. Here, the seller will be able to –
- Change order status for each product separately.
- Add tracking number for every product.
- Add a comment to the order.
- Print invoice for the order.

After clicking on the Print Invoice button, the below page opens up.

The buyers will receive the order information as shown below in the snapshot.

Adding New Orders
The sellers can add new orders on the customer’s behalf.
For that, the seller must navigate to Order History > Plus Button in the seller panel.
Customer Details:
Under the Customer Details tab, the seller needs to add details of the fields such as Currency, Customer, First Name, Last Name, Email, and Telephone as shown in the image below.

Products:
In the Products section, the admin will add the product details such as Choose Product, Quantity, Size and Color.
Then the seller must click on Add Product and click on Continue.

Payment and Shipping Details tab:
This navigates to the Payment Details tab, where the admin needs to Choose the Address, First Name, Last Name, Address, Post Code, etc. as shown in the image below.

Totals:
Under the Totals tab, the seller can view the complete details and fill in the Shipping and Payment method, add Order Status, add Vouchers, Coupons, or Rewards, if any, as shown below.


Transactions
Under this section, the marketplace seller can check their transactions.
The sellers can also filter the transactions using transaction id, transaction details, transaction amount, and transaction date.
The sellers can see the transaction amount sent details if any and the date of transaction.

Product List
Under this section, the sellers will find all the added products under their account panel.

Here, the sellers will be able to –
- Manage Restriction on Purchase
- Manage Reasons
- Top Searched Items
- Add Products
- Delete the products
Let’s go through each of the above options one by one:
Manage Restriction On the Purchase
Under this section, the seller can manage the restriction on purchases for the customers.
Also, to reach the configuration settings tap the restriction icon on the Product list page.
This section pops up. Here, the seller can restrict –
- Restrict Price – The buyer will not be allowed to make order with having total cart value more than the set value.
- To Restrict Quantity – Here, the buyer will not be allowed to make order with having total quantity in the cart more than the set value.

Manage Reasons
The button to the next to the restriction button is the ‘Manage Reasons‘ button.
 Tapping the button brings up the section to that displays the list of created product reasons.

To add more reasons tap the Add button. This brings up the section to add a new reason that can be used while updating or adding the products under the seller account panel.

Here, to create a reason the seller will –
- Enable the Status of the reason.
- Set the Reason Title
- Also, set the Reason Description
Lastly, tap the Save button to save the created reason for product update.
The reasons can be selected whilst updating or adding a new product by navigating to the Reasons tab and selecting the appropriate reason while adding or updating the product.

Top Searched Items
Next to the Reasons button is the Top Searched Items button.

Tapping the button brings up the section displaying the top searched items list within the store.

Here, the seller can check the keywords that have been searched by the customers for the various products along with the number of times the keywords were obtained in the search.
For the respective item name(product), the seller can add the offers by tapping the Offer button for the respective product.
After tapping the Offer button, the seller can add offer for the various customer groups available.

Add Products
Tapping this button redirects the sellers to their Add New Product page as shown below in the snapshot.
Delete products
For deleting products, the seller will check the products to delete and then tap the Delete button to delete the products in bulk. On the confirmation dialog box select OK to delete the checked products.

Category
Under the category section, the seller will be able to –
- Add their own categories as required
- Find a list of categories that the seller has created
- Delete categories as required
- Edit the created categories

To add a new category tap the Add button and this brings up a section to enter the details for the category.

Here, we have 4 tabs –
- General
Enter the required information for the category like name, description, meta tag title. - Data
Also, select the appropriate parent for this category, apply filters if any, select the availability in store, add an image, and other details are to be completed.
- SEO
Here enter the SEO keyword for the category for the default store. The seller can set up for other languages as well.
- Design
Apply any design if any for the category layout.
Lastly, save the configuration by tapping the save button.
Add Product
Under this section, the sellers can add their products.
To add a new product tap the Add button which brings up the Add New Product page. Here, add the product details under the General tab.

Now, the seller will add the info under the Data tab like – Model ,Tax Class, Minimum Quantity, and others.

Similarly, the seller will enter the product details for the rest of the tabs as well.

lastly, save the Opencart Marketplacee product by tapping the Save button.
Also, the seller can add a tax class for the product from the Data tab. Also, the tax class is initially created by the admin from the admin backend panel.
To create a tax class, the admin will navigate through System->Localization->Taxes->Tax Rates. Now, to create a tax rate tap the Add button at the top right-hand side.

Also, this brings up a section to create the tax rate as shown below in the snapshot.

Here, the admin will –
- Here, enter the Tax Name
- Also, enter the Tax Rate
- Likewise, select the type of tax rate Percentage or Fixed
- Also, select the Customer Group for which it should apply
- At last, Select the Geo Zone for the same
Lastly, tap the save button to save the new tax rate. The admin can see a success message as well.

To create a tax class navigate through System->Localization->Taxes-> Tax Classes. Here, the admin will tap on the Add button to the top right-hand corner of the page and create a tax class.

After that, enter the required information for creating a tax class. Lastly, tap the Save button to Save the new tax class.

Downloads
Under this section, the sellers can add their Downloadable items. Apart from adding the downloadable items, the sellers can also edit and delete the downloadable files.

To add a new downloadable file tap the ‘+’ button. Now, the section that comes up enter the Download Name and upload the file by tapping the Upload File button. Lastly, tap the Save button to save file.

Manage Shipping
Under this section, the sellers will be able to manage the marketplace shipping. These shipping details will be used at the time of Marketplace Custom Shipping method.
To see the complete details of the custom shipping and also shipping methods, you can visit the link.

Here the seller can add the shipping details by tapping the Add button at the top and this brings up a section for the same as General.

Here, download the Demo file from the link provided on the Shipping – Step 1 page.
Also, the file has the CSV file format and after opening up looks like below snapshot.

Now, the seller will –
- Enable the Status
- Also, set the Flat Rate
- Likewise, Upload the Edited CSV file with your respective values for the shipping
- Also, select the Comma separator for the CSV file.
- In CSV file if you add * then it applies for zip codes and all the cities cities.
Shippings
After general settings there is another tab for shippings under which there are two type of shipping methods are present as:
- Event Based Shipping 2. Priority Based Shipping
Note: For better information about these two methods you can go through the similar link.

Then, tap the Next button on the top right-hand side to proceed further.

Also, the section that comes up, here matches the left values with the right values and then tap the Save button.

Ask To Admin
The seller can ask any question or doubt to admin under this section. Tapping the menu option Ask To Admin brings up this pop-up.

Here, the seller will enter –
- Subject of the message
- Ask question to the admin within the ASK section.
Lastly, tap the Send button to ask the admin a question or doubt and a mail is sent to the admin for the same.
Notifications
There are three notification types for which the seller is notified about –
- Order
The seller will see the notifications for new orders, order returns, and order status change.
- Product
Also, the seller will see the product notifications for approved products, reviews received, and out of stock products.
-
Seller
The sellers will see the notification about the recent seller reviews submitted by the customers.

Apart from that, the seller can navigate to the Sell menu and selecting the Notifications option.

Tapping the Notifications menu option brings up this pop-up box displaying the various notifications.

Here, if the seller taps the View All Notifications button then the seller will be redirected to the Notifications section as shown below in the snapshot.
Information
Under this section, the seller can view their different section information sections.
To add more information, tap the Add button on the top. This brings up the section to add new information under 4 tabs –
- General

- Data

- SEO

- Design

After filling up the required information save the information by tapping the Save button.
Reviews
Under this section, the seller will be able to check all the reviews submitted by the customers. The seller can delete the reviews and can edit them as well.

To edit a review tap the Edit button for the respective review and the edit review page opens up.
Also, After editing the review tap the Save button to save the changes.

Upsell Products
Under this section, the seller will be able to find all of their added up-sell products.
Here, the seller will be able to add and delete the upsell products to his products. To add upselling products, tap the add button.


Here, the seller will configure –
Product Upselling – The seller will select the Upselling product
Display Position – Also, The seller will select the Product where the Upselling product should get displayed
Count Down – Likewise, the seller can choose to display the countdown timer on the upselling product
Units Available – Also, The seller can opt to display the units available for the product
Lastly, save the configuration.
On the frontend, the upselling products are visible on the superbar as shown below in the snapshot.
Also, the left icon is the Upselling and the right one is the cross selling icon.

Tapping the Upselling icon brings up the upselling product for the actual product. Here, the customers can see the upselling products with the countdown timer and the units available.

Cross Sell Products
Under this section, the seller will be able to add their Cross Sell products.
Here, the seller will be able to add and delete the cross selling products to his products. To add cross selling products, tap the add button.


Here, the seller will configure –
Display Position – The seller will select the Product where the Cross selling product should get displayed
Product Cross selling– Also, the seller will select the Cross selling product(set the price as well)
Count Down – Likewise, the seller can choose to display the countdown timer on the Cross selling product
Units Available – Also, the seller can opt to display the units available for the product
Lastly, save the configuration.
On the frontend, the Cross selling products are visible on the superbar as shown below in the snapshot.
Also, the left icon is the upselling icon and the right one is the cross selling icon.
Tapping the Cross selling icon brings up the Cross selling product for the actual product. Here, the customers can see the Cross selling products with the countdown timer and the units available and can grab the discount offer to add the products to the cart as well.

Price Alert Products
Under this section the seller will be able to check his price alert products.

Price Alert Request
Under this section, the seller can check the price alert requests.

Customer
Under the customer tab, the seller can view the list of customer, that has been placed order from seller’s store.

Total Sale
Under the Total Sale Tab, seller can view the total sales, total income,admin commission and paid balance and remaining balance.

Income
Under the Income tab, the seller can view the listing of Incomes as shown in the image below.

How a Customer Purchases the Products
The customer can go to the product page to view the product and it’s details.
From here, they customers can see the available seller for the product and the seller’s rating as well.
Also, the customer can add multiple sellers product to the cart and able to see their company name.
A customer can add products of multiple sellers in the cart and process checkout.

The customer can check out with the products of multiple sellers at the same time.
Also, the customer can select shipping and payment method and process checkout.

Note: Also, the seller’s default address is required to calculate the custom shipping rate according to the seller’s custom shipping rate.
The shipping rate will be calculated by the admin shipping rates.
Now, the customer can see the order details on the order history as per the snapshot below.

Seller Separate Panel
If the admin has set the configuration setting – Separate Panel For Seller as Enabled,
then the OpenCart Marketplace sellers will be able to have a separate vendor panel/Separate Seller View.
Also, after the seller does a login to his account panel, the seller can change the seller view by-
clicking on the Sell menu option and then selecting the Separate Seller View Sell menu option.
Now, the seller can see the Separate Seller View. To close the separate seller panel view, click the Default Seller View button the very top.
Also, the seller can navigate under his account panel using the new seller view. For the Product menu option, you will have 2 sub-option to choose from – Product List and Add product.

Clicking any of the Account Menu options will redirect you to the respective page. Below is an example, after the seller clicks the My Profile button he’s redirected to the respective page.

Note:
1. The seller’s view will be like the admin’s.
2. If the view in the OpenCart version 3.x.x.x is different, then the seller’s view will be in accordance with it.
Google Analytics: Allowed Pages View
Google Analytics functionality can be viewed at the developer tool by using the Google Analytics Debugger (Google Chrome extension).
For Seller Profile-
The image below depicts the Admin tracker for Seller Profile.
![]()
Further in the image below, one can view Seller Tracker for Seller Profile.
![]()
For Marketplace Collection-
The given image displays the Admin tracker for Marketplace Collection.
![]()
Furthermore, the image that is shown below displays Seller Tracker for Marketplace Collection.
![]()
For Seller Product-
The given image depicts the Admin tracker for Seller Product.
![]()
Further, the image below displays the Seller tracker for Seller Product.
![]()
Google Analytics Data: for All Sites
Google Analytics: Homepage View
On logging in to Google Analytics page, one can navigate to Home section and have a look at Google Analytics Home as shown in the image below.

After that, another section of the Google Analytics Home is shown in the image below that displays details such as When do your users visit? Where are your users etc.

All Pages Site Content
Thereafter navigate to Behaviour > Site Content > All Pages and view the details and analysis of all pages site content as shown in the image below.

Support
That’s all for the Webkul’s OpenCart Multi Vendor Marketplace module. For any doubts or suggestions get back to us at [email protected]
Current Product Version - 5.0.0.1
Supported Framework Version - 3.x.x.x

I saw that for “Seller Product Store” there are 3 types: Own Store, Choose Store, Multi Store. Which are the differences between them?