Magento 2 Order Attachment extension (Adobe Commerce) helps customers to upload file attachments to their orders.
Order attachments have the best use in real-time such as while uploading attachments for medicines, orders for guns or heavy machinery that require a license, or other types of drug products, etc.
Magento 2 Order Attachments extension can be used for various use cases. The admin can set whether any file upload is required or not required in the product.
After placing the order, the customer can upload the file from the order page. Supporting the format as selected by the admin – PDF, DOC, DOCX, JPEG, JPG, PNG.
Also, add multiple files to products to increase the information provided on the product page using the Magento 2 Product Attachment extension.
Features
- The customer can upload attachments at the time of ordering or after the order.
- The customer can see the uploaded attachment’s file status.
- The admin can view the uploaded attachment.
- The number and size of the attachment file can be set by the admin.
- The admin can enable or disable the order attachment feature for specific customer groups.
- The admin can select supported extensions for the attachment file.
- The customer can upload new attachments if the admin disapproves of the older ones.
- The admin can approve or disapprove the uploaded attachment.
- The admin can even delete the attachment.
- This module works for both logged-in and guest customers.
- The extension works with the virtual product types as well.
Note –This module does not support Downloadable product types. Also, for the Grouped and Bundled Products, the requirement of order attachment will depend on their specific associated products.
You can check the overview of Magento 2 Order Attachment –
Install Extension from Webkul Store
The installation is quite simple just like the standard Magento 2 extensions.
#1 Download Module
Firstly, you need to log in to Webkul Store, go to My Account>My Purchased Products section, verify and then download and extract the contents of this zip folder on the system.
#2 Upload Folder
Once the module zip is extracted, follow path src>app and then copy the app folder into the Magento 2 root directory on the server as shown below:

#3 Run Commands
After uploading the module folder, you need to run the following commands in the Magento 2 root directory:
php bin/magento setup:upgrade
php bin/magento setup:di:compile
php bin/magento setup:static-content:deploy
php bin/magento indexer:reindex
php bin/magento cache:flush
Install Extension from Magento Marketplace
If you have purchased this extension from the Magento Marketplace then please follow the below process or visit this link.
#1 Get Access Keys
You need to get access keys, navigate to My Profile in Magento Marketplace, then choose Access Keys in the My Products section.

Go to Magento 2 and then you need to copy both the Access Keys – Public Key and Private Key. These access keys will be needed in the next steps for authentication.

If access keys are not created earlier, click Create A New Access Key, enter any name and click OK.

#2 Update composer.json File
To know the component name and version number, go to your Magento Marketplace account section, My Profile>My Purchases, then find this extension to view the details.
Please note – Below is an example image, every extension will have its unique component name and version.

After that, navigate to your Magento project directory and update your composer.json file in the following format.
composer require <component-name>:<version>
For example, to install version 4.0.0 of this extension you need to run the following command:
composer require webkul/order-attachments:4.0.0
#3 Enter Access Keys
Now you will need to enter the Access Keys that you obtained as explained in the first step #1 Get Access Keys.
Wait for Composer to finish updating your project dependencies and make sure there aren’t any errors.
#4 Run Command
You need to run the following commands:
php bin/magento setup:upgrade
php bin/magento setup:di:compile
php bin/magento setup:static-content:deploy
php bin/magento indexer:reindex
php bin/magento cache:flush
Multi-Lingual Configuration
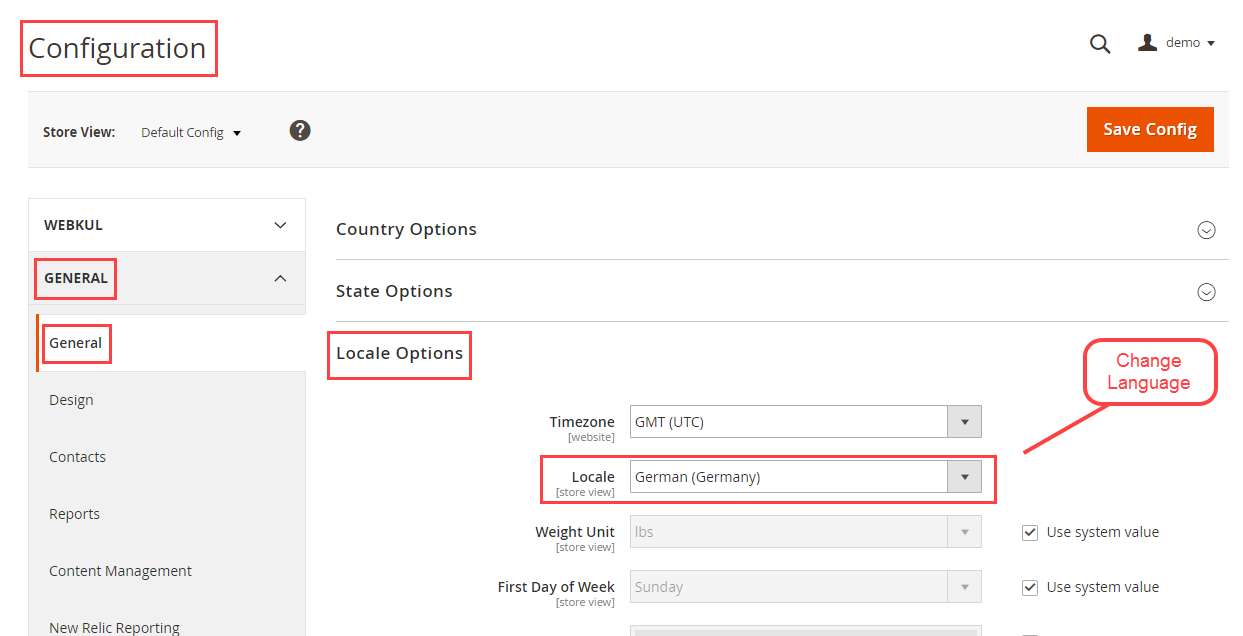
For Multilingual support, please navigate to Store > Configuration > General > Locale Options. And select your desired language from the Locale option.
Module Translation
For translating the module language, navigate through
app/code/Webkul/OrderAttachments/i18n, and edit the en_US.csv file.
Thereafter, rename the CSV as “en_SA.csv” and translate all right side content after the comma in the Arabic language.
After editing the CSV, save it.
Then upload it to the path app/code/Webkul/OrderAttachments/i18n where the Magento2 is installed on the server.
The module gets translated into the Arabic Language. It supports both RTL and LTR languages.

Module Configuration
After the successful installation of the module, the admin can configure this module under Store > Configuration > Webkul > Order Attachments as shown below snapshot.
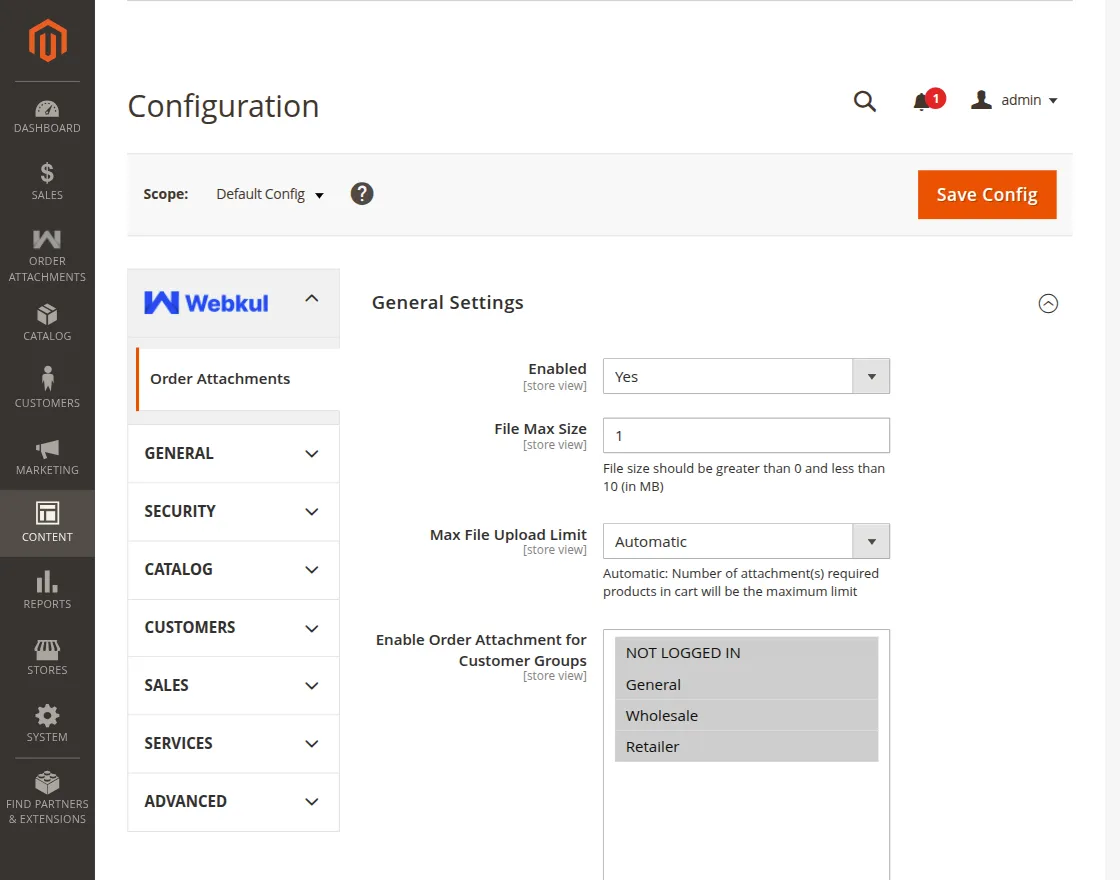
Enabled -Here, the admin can choose between “Yes” to enable the module or “No” to disable the module.
File Max Size – The admin can set attachment file size in MB (File size greater than 0 and less than 10 MB).
Max File Upload Limit – The admin can select the max file upload limit as manual, or automatic.
When selected as manual, the admin can set the max number of attachment files that the customer can upload (Maximum files can be uploaded 30 and minimum 1 )
When selected as automatic, customers will be able to upload the files as per the products they have in their cart for which order attachments are required.
Enable Order Attachment for Customer Groups – Choose the customer groups that are allowed to upload attachments with their orders.
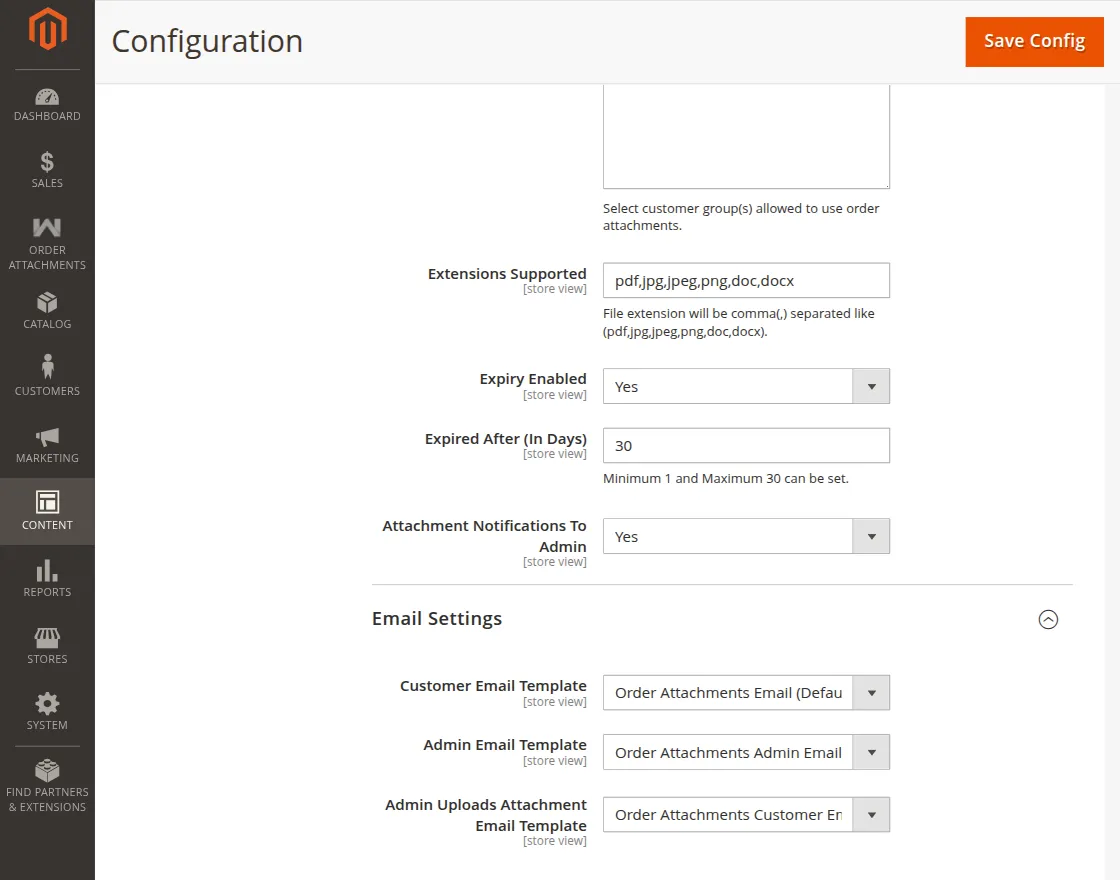
Extension Supported – The admin can select file extensions/formats (PDF, JPG, JPEG, PNG, DOC, DOCX) only those formats of files, and the customer can add/attach them along with orders.
Expiry Enabled – If the admin can select Yes, then set/remove the expiry details. But if the admin selects No then the feature to set expired details gets disabled.
Expired After(In Days) – The admin can enter 1 to 30 days to set the expiry days.
Attachment Notifications To Admin – The admin can select yes if the admin wants to receive notifications when a customer attaches the file with the order else select no.
Email Setting – The admin can select the customer email template and admin email template as per their needs.
Enable Attachment For Product
On adding a New Product or on Editing a product, the admin can configure ‘Yes’ or ‘No’ against the “Attachment Required” field as shown in the image below.
If required then the admin can choose the field ” Yes” or else as “No”, as shown below.

Admin End
Once the customer places the order, the admin can navigate through Sales > Orders > View to view order attachment files as shown in the image below.

Then, the admin can view attachment files under the “Order Attachments” tab as shown in the image below.

The admin can view the ‘Status’ and ‘Uploaded At’ for the respective attachment.
The admin needs to click on “Attachment” under the ‘Attachment’ column in order to view the file.
Attachment Status –
After adding the attachment, the admin will have three attachment statuses (approve, disapprove, and delete).
The admin can select the attachment and change the status of the attachment as shown in the image below.

Note: The admin can upload attachments too after these settings.
Four Attachment Status: –
Approve – if the admin accepts the attachment, customers will get a notification as shown in the image below –

Disapprove – If the admin does not accept the attachment. (The customer can upload a new attachment if the admin disapproves of the old one).
The admin can enter the reason why the attachment was disapproved and notify the customers.

For example– If the admin sets a maximum number of the attachment file is one, then the customer can upload only one attachment file.
Further, if the admin disapproves the old attachment then the customer can upload a new attachment file.
Delete – If the admin wants to delete the attachment file.
Pending Order Attachments –
By navigating to Pending Order Attachments from the Order Attachments menu in the admin panel the admin can view all the pending attachments of pending orders as shown in the image below –

Customer End
If the admin sets the “Attachments Required” as ‘Yes‘ in the backend,
then the customer will be able to see the Attachment Required in the cart of that particular product which required the attachment as shown in the image below –

The customer needs to select “Yes, I will add now” so as to add an attachment file with the order as shown in the image below.

If the customers want to add an attachment after placing the order then they must select ” No, I will add later”.
If the customer selects ” Yes, I will add now” then the customer will have to add the attachment before placing the order.
The customer will have to click on the “plus” sign so as to add the attachment files and place the order in the usual way as shown in the image below.

Customers can also add attachments through external URLs as shown below screenshot.

If the customer selects
” No, I will add later” then the customer can add attachment files after placing the order. For an order,
the customers can also add the attachments under the “My Orders” section as shown in the image below.

Admin will also get the notification,
if the customers attach the prescription after placing the order as shown in the image below –

Two products in the cart (Attachment required for a product )
If two products are present in the cart and the attachment needs to be added for only one product,
the customer will get the option of Order Attachments on the checkout page.
Under Order Attachments, the customer can upload the required attachment file.

Moreover, the guest users can also upload the Order Attachments as shown in the image below –

That’s all for the Order Attachments for Magento 2 plugin. Still, have any issues, feel free to add a ticket and let us know your views at webkul.uvdesk.com
Current Product Version - 4.0.5
Supported Framework Version - Magento 2.0.x, 2.1.x, 2.2.x,2.3.x, 2.4.x

I want upload image or prescription button on the different page either on home page or new page but not on checkout page. Is it possible?
If yes, kindly suggest me.