Magento 2 Amazon S3 Extension module helps store media files (like downloadable products,catalog images, videos, docs, content files etc) and static files (HTML, CSS, JS) on Amazon S3 servers.
Moreover, the extension enables the admin to upload media files of different product types from its local disk to the Amazon server.
Further, this module uses Amazon S3 for storing the files and uses CloudFront for serving the content CloudFront URL.
Therefore, will experience faster site loads or page loads due to unnecessary pause elimination and cater to heavy traffic.
You can optimize server storage by uploading product and CMS media content using the Magento 2 DigitalOcean storage extension.
This allows media to be fetched directly from DigitalOcean servers.
(Amazon Simple Storage Service) is a cloud storage service offered by AWS(Amazon Web Service).
Amazon S3 is based on CDN(Content Delivery Network) which stores multiple copies of content on strategically distributed servers.
And dynamically measures which server is nearest to the requesting client and accordingly delivers the fast content.
Note:
- To use the Amazon S3 and CloudFront service, the user needs to have an Amazon AWS account. Users will register themselves from here.
- The users will click here to understand how to get started with Amazon S3.
Watch the video tutorial below to know the extension workflow:
Features of Magento 2 Amazon S3 Extension
- Support all Adobe Commerce product types.
- Also, all media files of all types of products (like product images, media in the product description, short description, editing images, etc) are stored and retrieved from the Amazon Simple Storage Service (Amazon S3) bucket.
- One can save Static files on the Amazon S3 server ie (HTML, CSS, JS).
- Moreover, flexible settings to configure the module settings.
- Further, set the server(Local/Amazon) on which file upload will happen.
- Store and download the files from Amazon S3 Server.
- Check the bucket availability in just a click.
- The CloudFront feature is also available.
- Customers can download the files from the Amazon Server irrespective of time and place.
- Additionally, the extension is fully open source and easy to use.
- Now serving of cache images will be from Amazon s3 Server and CloudFront as well.
- Admin can export media using the message queue.
- Host and synchronize all downloadable products.
- Integrated support for Fastly CDN.
Installation of Magento 2 Amazon S3 Extension
Customers will get a zip folder and they have to extract the contents of this zip folder on their system.
The extracted folder has an src folder, inside the src folder you have the app folder.
After that, you need to transfer this app folder into the Magento2 root directory on the server as shown below.

After the successful installation of the Adobe Commerce Amazon S3 module, you have to run these commands in the Magento2 root directory.
First Command –
composer require aws/aws-sdk-php
Second Command –
php bin/magento setup:upgrade
Third Command –
php bin/magento setup:di:compile
Fourth Command –
php bin/magento setup:static-content:deploy
Moreover, after running the commands, you have to flush the cache from the Adobe Commerce admin panel
You need to navigate through->System->Cache management as shown below.
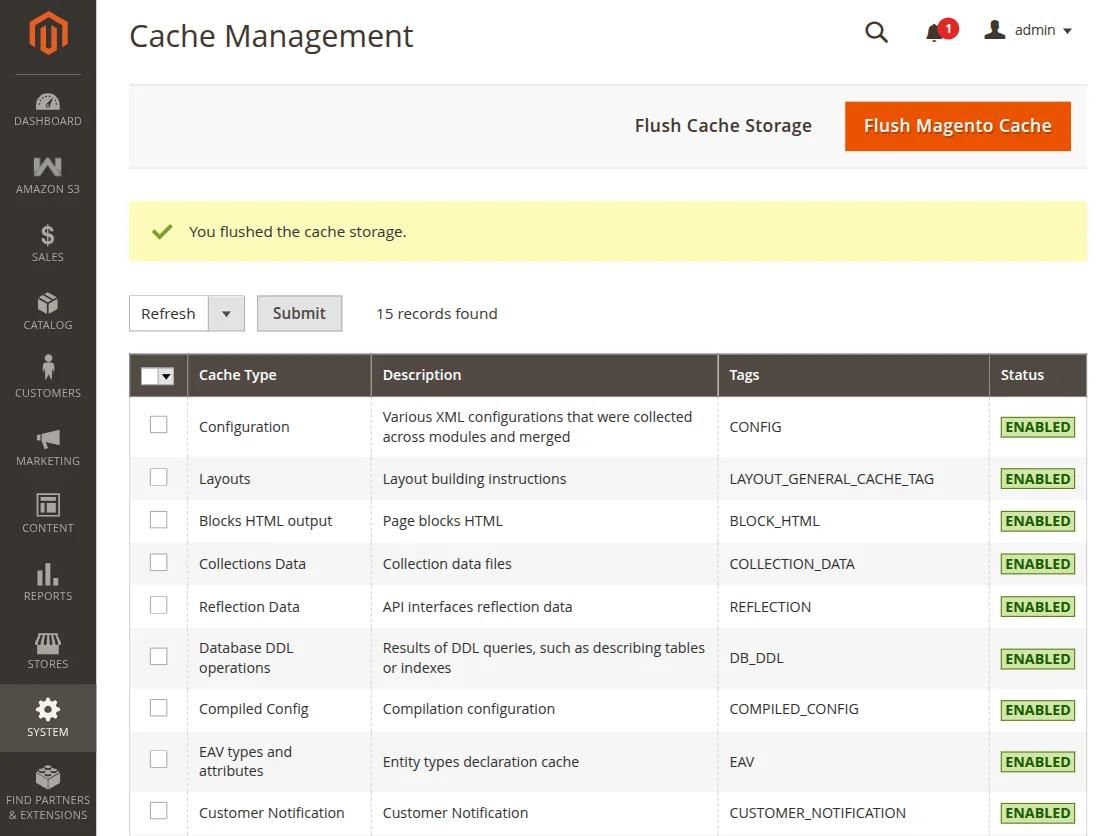
Thus, in this way, you can install the module.
Multi-Lingual Configuration for Magento 2 Amazon S3 Extension
Therefore, for Multilingual support, please navigate to Store>Configuration>General >Locale Options.
Also, select your desired language from the Locale option.
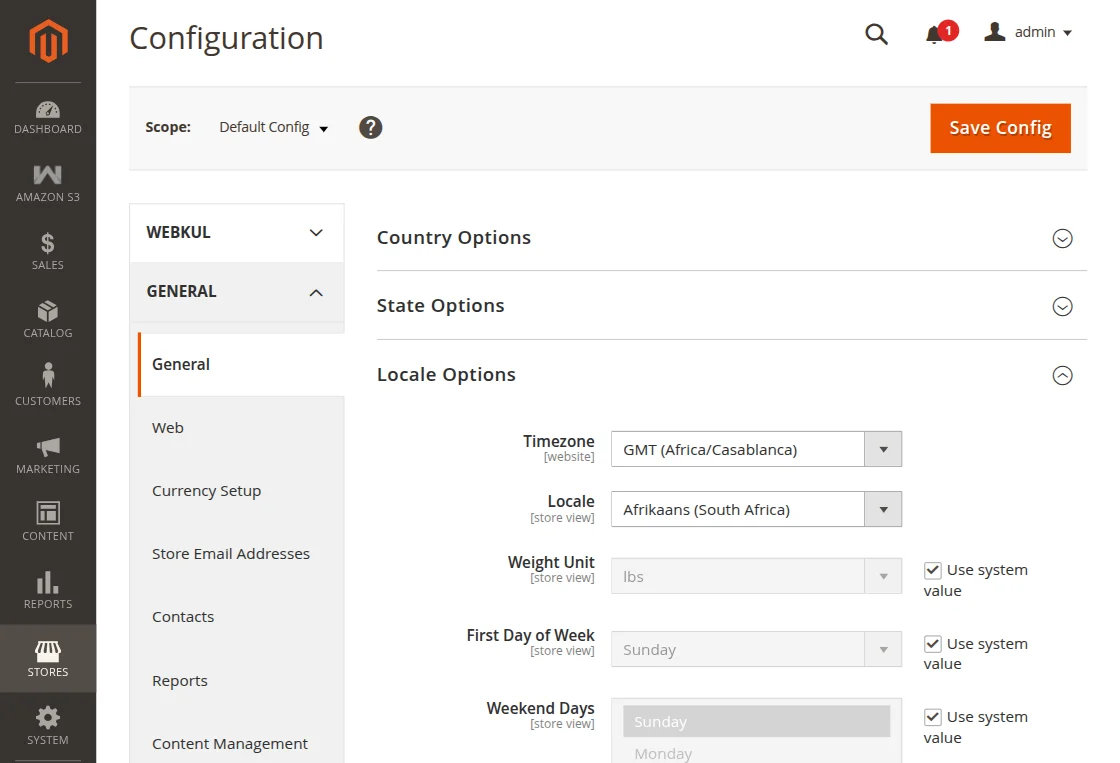
Thus, in this way, a multi-lingual configuration can be done.
Language Translation
For module translation, navigate to the following path in your system app/code/Webkul/S3amazon/i18n/en_US.csv.
Open the file named en_US.CSV for editing as shown in the below screenshot.

Then replace the words after the comma(,) on the right in the file with your translated words.

After editing and translating the CSV file, you need to save the translated file name according to your region language and country code such as – de_DE.CSV.
Followed by uploading the translated file to the same folder from where you have obtained it. Now your module translation is complete.
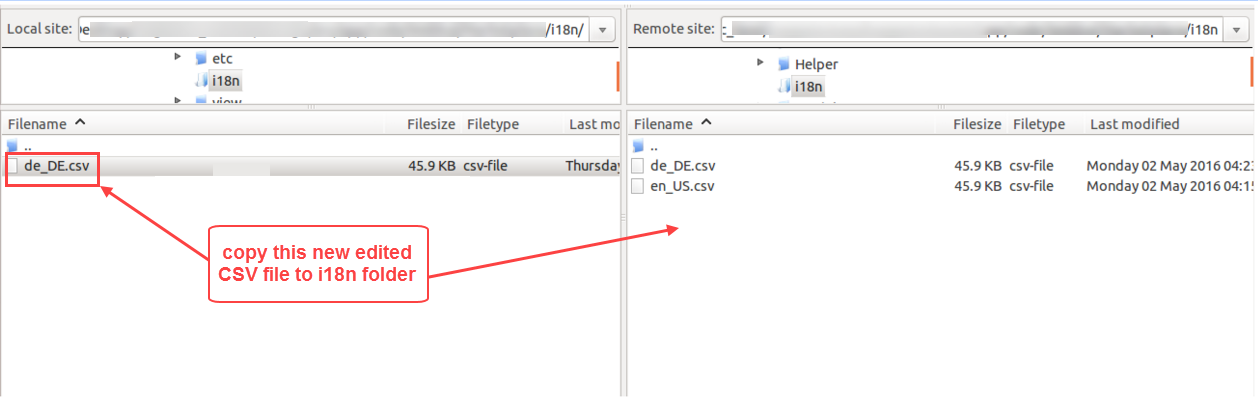
Thus, in this way, language translation can be done.
Setting Up Credentials in Amazon S3 Server
Follow the steps mentioned below to create Amazon S3 Credentials-
- Now, go to https://aws.amazon.com/ and click on Create an AWS Account.

- After that, you will get two options Create an AWS account for the new users and Sign in to an existing AWS account for the already registered users.


So, when that user logs in he only has access to that particular dashboard.

- After that, your Amazon server will look like this. Here you need to click on the All services – > S3.
- Alternatively, you can also search the S3 in the search box given at the top.

This will direct you to a page where you can see the list of the buckets that you have created or you can create a new one. Click on the Create bucket button to create a new bucket.

- After clicking on the Create bucket button this Create bucket page will come up where you need to fill in all the details to create a new bucket. Then click Create bucket at the bottom.
Note:- Make sure to uncheck the “Block all public access”.

- Here you can upload the files and create a folder to save the data. Also, you can view the saved data.

- For creating access key ID and secret access key click on IAM under Security, Identity & Compliance

In the IAM dashboard click on Users to view and to delete the existing users and to add the new user.

- After that, a new page will open up where you have options to Add, View and Delete users.

- Click on the Security Credentials to create a new access key.
- Now you have to go for Access keys – > Create Access Key.
- Now you can see your Access Key ID and Secret access key generated as depicted below.

- Also, if you want to add a new user as explained above.
- You will get a success message page for the newly created user with your security credentials.

Note:
- Now, you have to make sure that putObject,putObjectAcl, and putObjectCors permissions are given to access keys provided in Amazon AWS.
- You can check it from IAm>Groups>group
How to give an IAM user a specific Bucket Access
If an IAM user is loggin in and you(root user) just want to provide that IAM user with only a specific bucket permission, then you can give the bucket with that user’s permission.
Let’s see how.
The root user will log in to the AWS Console and navigate Access Management->Users.

Click on the respective IAM user and tap Add permissions drop-down. Here, choose Create inline policy option.

After that, the root user will build permission statement using JSON.

In the policy editor, paste the below JSON code, make changes as per your bucket name for which the root user wants to provide specific access to this IAM user.
{
"Version": "2012-10-17",
"Statement": [
{
"Sid": "Stmt1717341940730",
"Action": "s3:*",
"Effect": "Allow",
"Resource": "arn:aws:s3:::addyourparticularbucketname"
},
{
"Sid": "Stmt1717341953716",
"Action": "s3:*",
"Effect": "Allow",
"Resource": "arn:aws:s3:::addyourparticularbucketname/*"
}
]
}
Sid -> should be unique
addyourparticularbucketname/* -> add the bucket name. This is the bucket that you want to provide the only access for the IAM user.
This is how the code will look like.

After that, tap next to Save the policy.

Now, give a name to the policy and review it.

After that, scroll down and create the policy.

After that, navigate to your bucket for which you want to give access to the IAM user, and copy it’s URL from the address bar and share the URL with the IAM user.
Now, the IAM user will only be able to access this particular bucket.
Sync Issue:
If you are not able to sync data from Magento store to AWS bucket then check below steps –
For transferring data from Magento 2 store to AWS bucket, the bucket should be Publicly accessible.
First of all, for the created bucket, navigate through – >
Bucket – Permissions – Block all Public Access(Switch this option off if turned On).

After that, add a policy to the bucket(on the same page as above, scroll down to find the option):
Bucket Policy to add –
{
"Version": "2012-10-17",
"Statement": [
{
"Sid": "PublicReadGetObject",
"Effect": "Allow",
"Principal": {
"AWS": "arn:aws:iam::add your IAM user ARN here"
},
"Action": [
"s3:PutObject",
"s3:GetObjectAcl",
"s3:GetObject",
"s3:ListBucket",
"s3:DeleteObject",
"s3:GetBucketAcl",
"s3:PutObjectAcl"
],
"Resource": [
"arn:aws:s3:::addyourparticularbucketname/*",
"arn:aws:s3:::addyourparticularbucketname"
]
}
]
}
You can find the IAM user ARN –

Also, if you are using CORS(Cross-Origin Resource Sharing) then add the below mentioned policy(for the bucket).
[
{
"AllowedHeaders": [
"*"
],
"AllowedMethods": [
"POST",
"GET",
"HEAD",
"PUT",
"DELETE"
],
"AllowedOrigins": [
"*"
],
"ExposeHeaders": [],
"MaxAgeSeconds": 3000
}
]
Magento 2 Amazon S3 Extension Configuration
After the extension installation, the admin will configure the module settings by navigating to the Stores > Configuration > Amazon S3 as per the below image:
General Settings:
CloudFront Settings:
Setting Up Credentials in Fastly CDN
To securely access and manage Fastly services, you must generate an API token through the Fastly web interface.
These credentials enable authenticated API interactions, such as configuring services or purging the cache.
Tokens should be configured with appropriate roles, scopes, and expiration settings, following the principle of least privilege.
Once created, store them securely, as they will not be retrievable later.
For complete instructions, refer to Fastly’s official documentation, Fastly – Getting Started Guide.
Fastly Configuration:
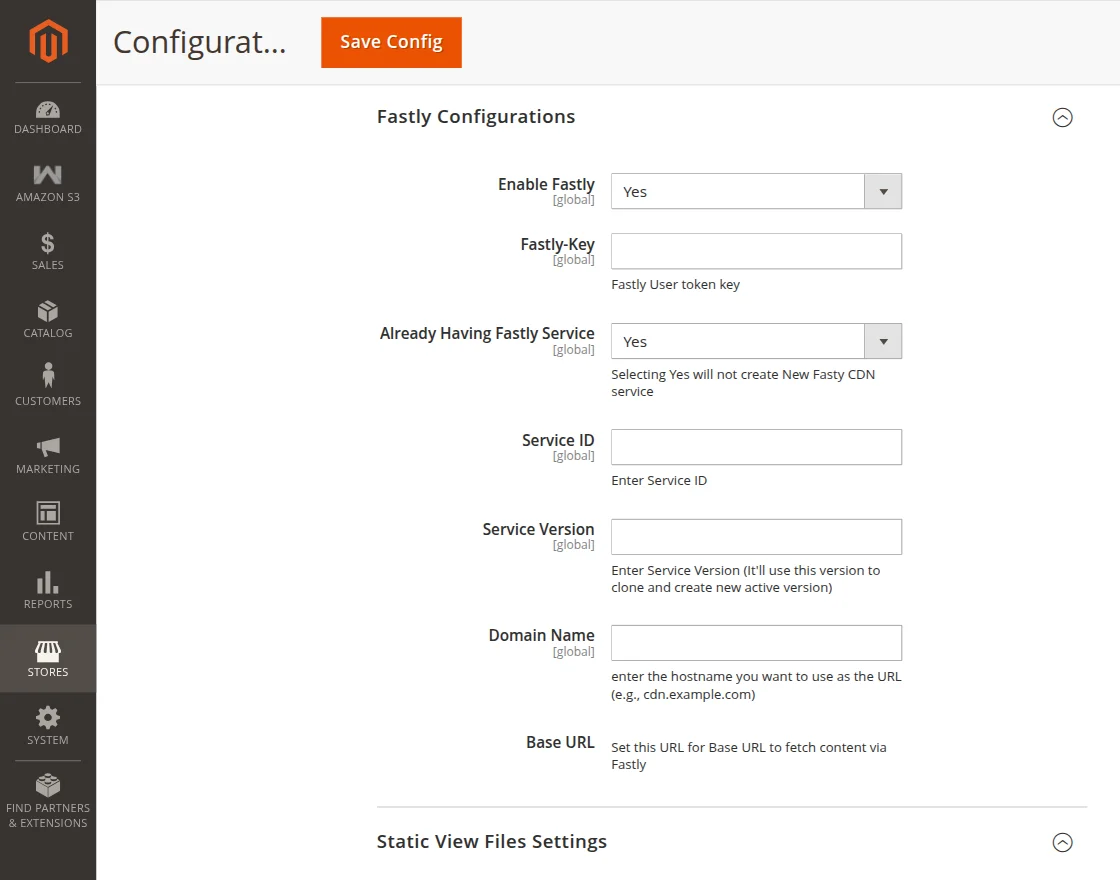
Here, the admin will first select the option ‘Enable Fastly’ to YES and then proceed with following:
- Fastly Key – The admin needs to enter the fastly user token key here.
- Already Having Fastly Service – Select ‘Yes’ or ‘No’ accordingly
- Enter Service ID – If the admin already has fastly service and selects the ‘YES’ option then he will need to enter the service ID for the same.
- Service Version – Admin will also be required to enter the Service Version (It’ll use this version to clone and create new active version)
- Service Name – If the admin selects ‘NO’ for already having fastly service, then he will need to enter the service name for creating Fasty CDN.
- Domain Name – Here the admin will enter the hostname that he wants to use as the URL (e.g., cdn.example.com)
Static View Files Settings:
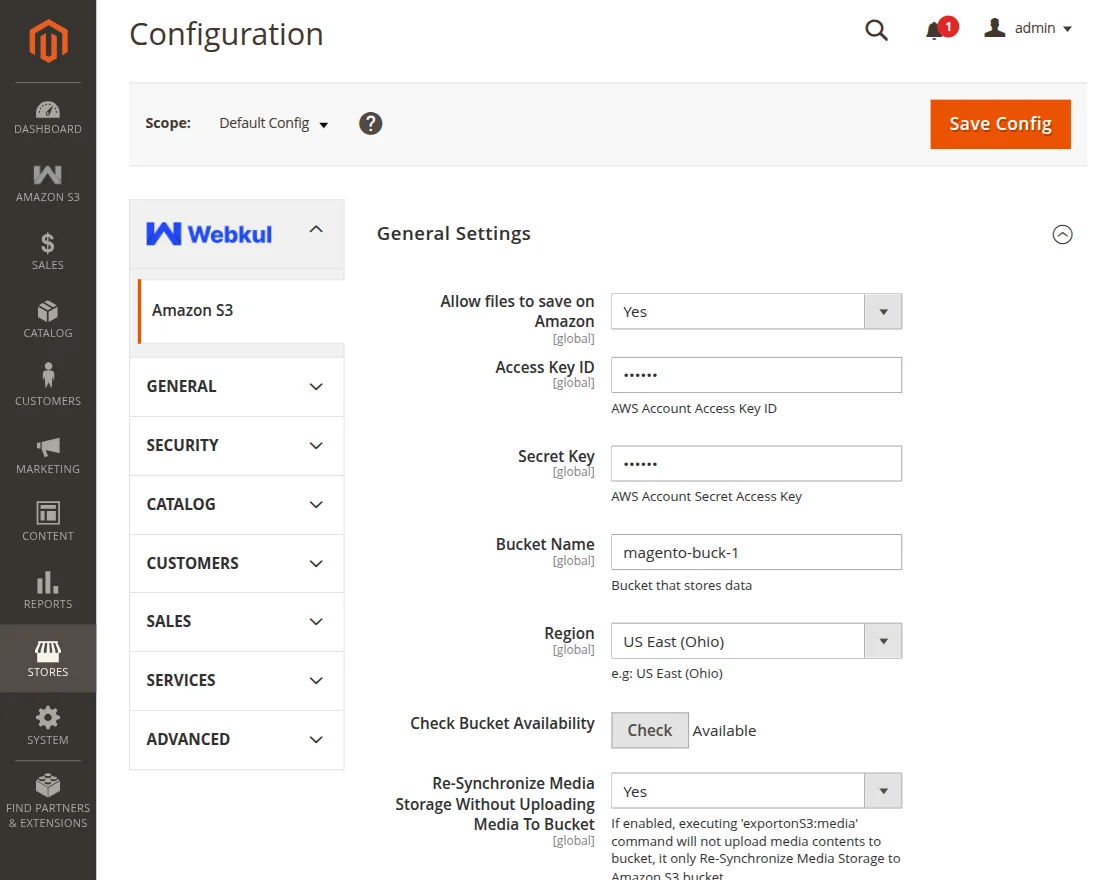
General Settings of Magento 2 Amazon S3 Extension:
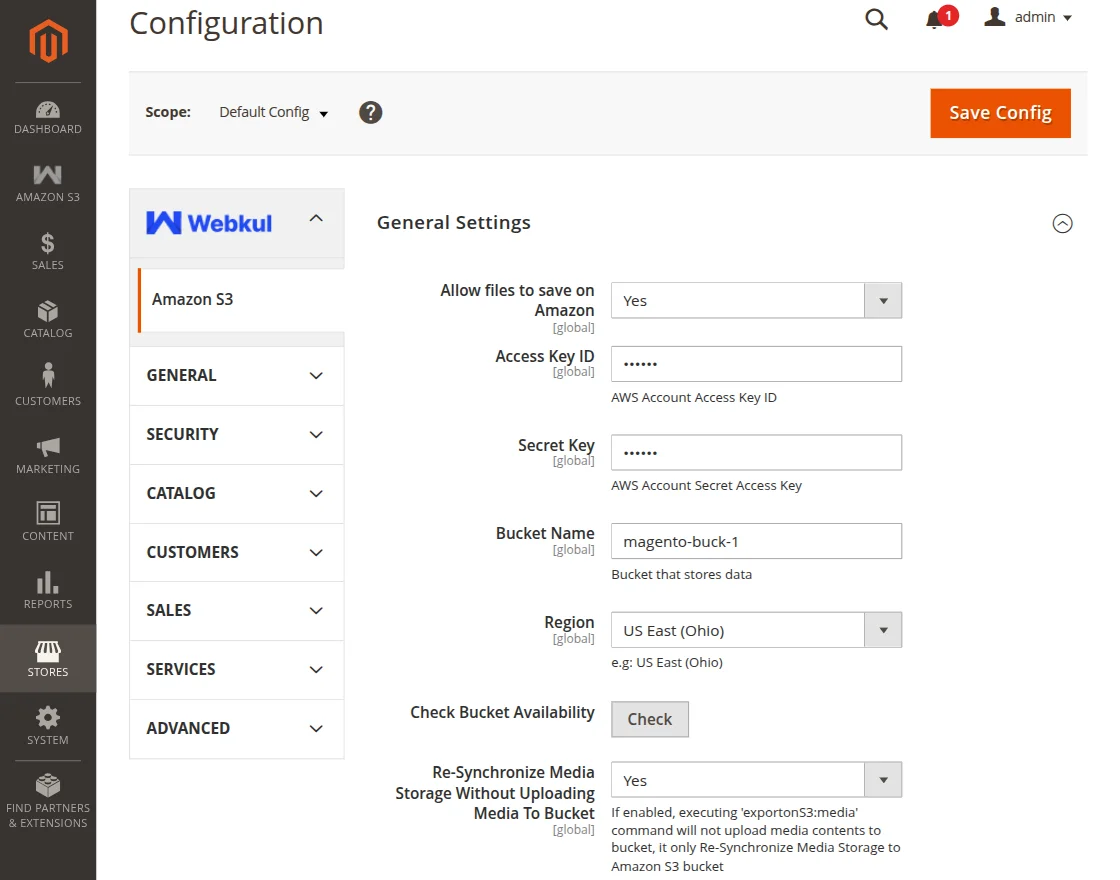
Here, the admin under general settings will:
- Allow files to save on Amazon – to save the file on the Amazon server set this as YES else set it as NO.
- Access Key ID – enter the Amazon server access key which you will get after creating the account on Amazon S3.
- Secret Key – Fill the Amazon server secret key which you will get after creating the account on Amazon S3.
- Bucket Name – Put the Amazon bucket name which you have created in the Amazon S3 account.
- Region – Enter the region of the bucket where you want the bucket to reside. Mention the same region same as me.
- The region name should be as you have mentioned the region while creating the bucket in the Amazon S3 account.
- Check Bucket Availability – Click the “check” button to check the bucket availability.
- If it would be available and exists in the Amazon S3, it shows the message “Available” as shown below:
Else, it will show an error message that ‘The specified bucket does not exist’
- Re-Synchronize Media Storage Without Uploading Media To Bucket – If enabled, executing ‘exportonS3:media’ command will not upload media contents to bucket.
- It only Re-Synchronize Media Storage to the Amazon S3 bucket.
Commands to Configure the Module Settings through Command Line Interface
You can check the command line below for configuring the credentials in Adobe Commerce Amazon S3 Extension:
Active –
php bin/magento config:set s3_amazon/general_settings/active
Access Key –
php bin/magento config:set s3_amazon/general_settings/access_key
Secret Key –
php bin/magento config:set s3_amazon/general_settings/secret_key
Bucket –
php bin/magento config:set s3_amazon/general_settings/bucket
Region –
php bin/magento config:set s3_amazon/general_settings/region
Distribution ID –
php bin/magento config:set s3_amazon/cloudfront_settings/distribution_id
You need to provide the value after each command.
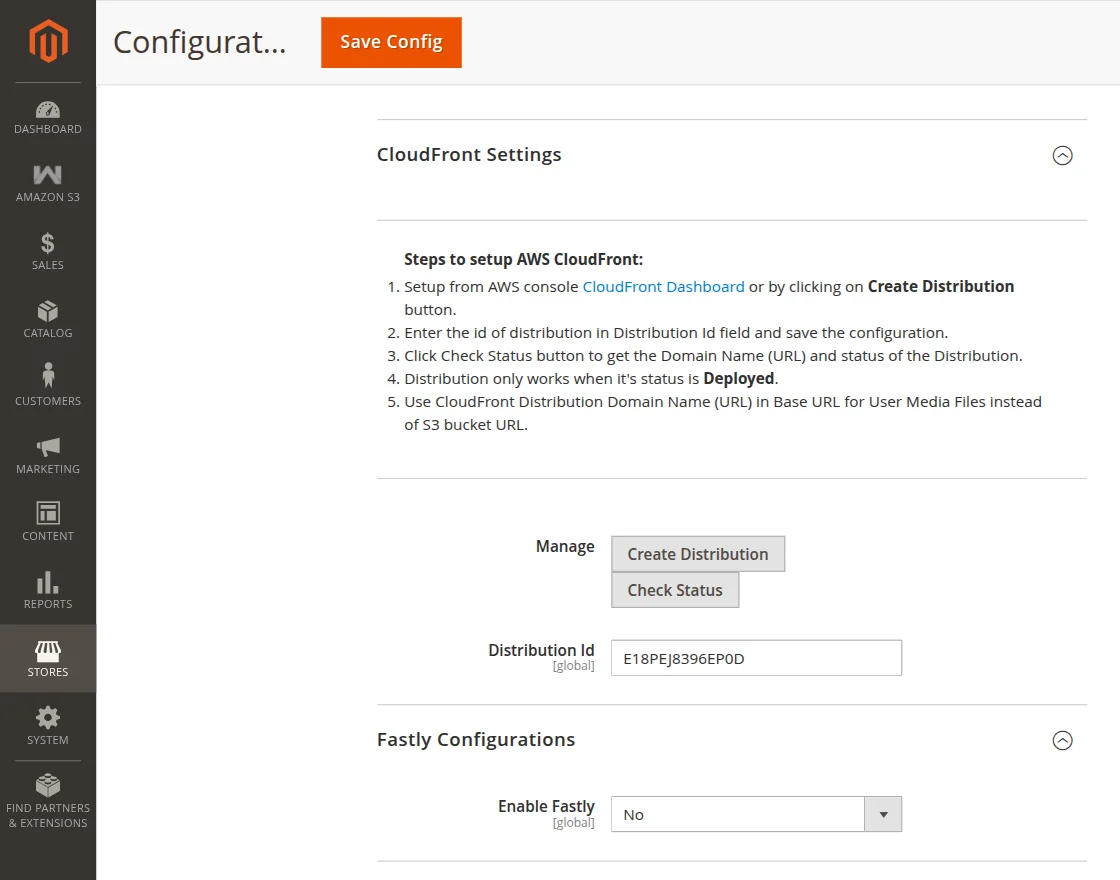
CloudFront Settings:
Manage:
Create Distribution – Click on the Create Distribution button to create a Distribution Id for AWS CloudFront else you can click here.
Check Status – Click on the Check Status button to get the Domain Name (URL) and Status of the Distribution
Distribution Id – Here, the distribution id will get visible after saving the configuration.
In your AWS account you can check the created distribution ID or can create a new one as per the below snapshot:

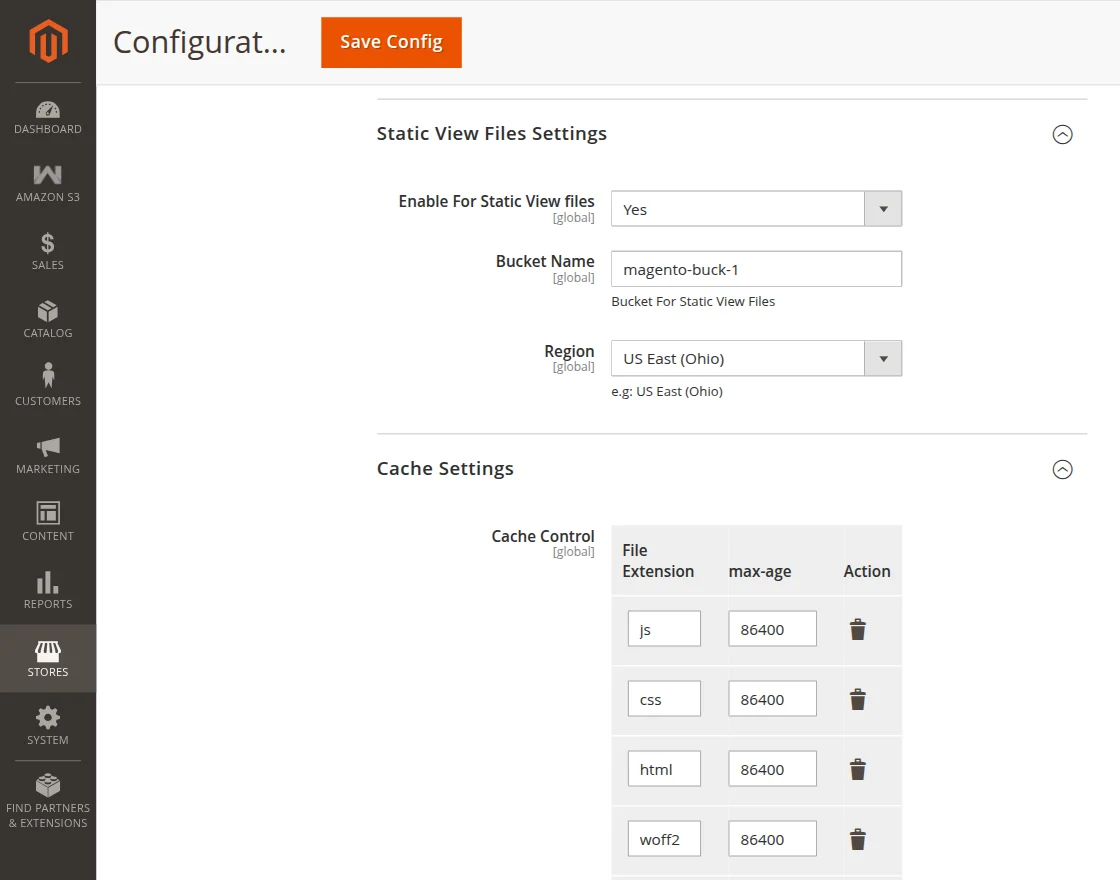
Static View File Settings
Another section of the admin configuration is the Static View File Settings where the admin needs to configure fields such as Enable for Static View Files, Bucket Name, Region, and Cache-Control as shown in the image below.
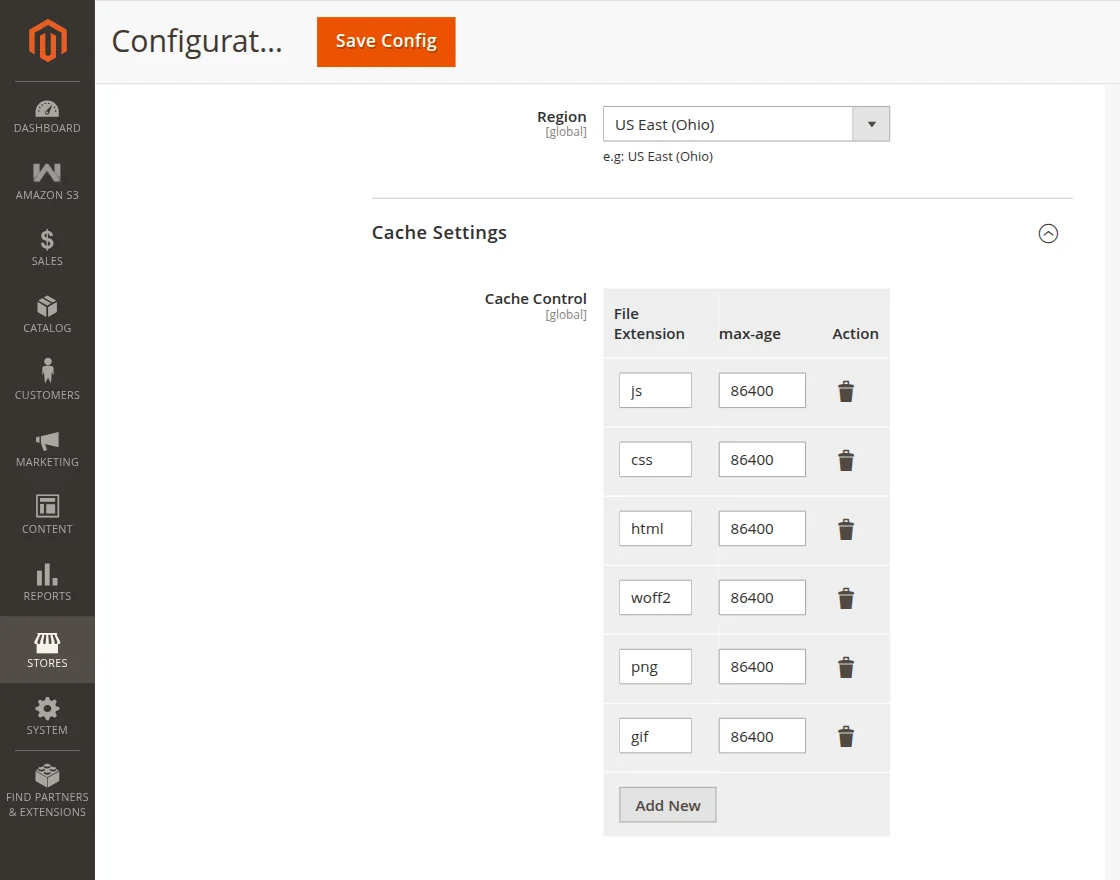
The admin can configure the following fields under Static View Files Settings-
Enable for Static View Files- The admin can set this field as Yes or No.
Bucket Name- Now, the admin needs to add a name for the bucket.
Region- Further, the admin can select a region from the list.
Cache-Control- Furthermore, under the Cache-Control field, the admin will the file extension, max-age, and action columns. After the max-age exceeds, the file will refresh on its own.
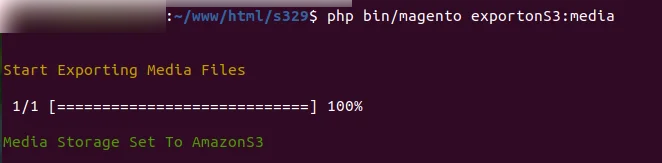
Storage Configuration for Media in Cloud Commerce Amazon S3
Firstly, the admin can run the command in the Adobe Commerce root directory:
php bin/magento exportonS3:media
Therefore, just after running this command, the Media Storage field will get set to the Amazon S3 automatically and all media will get synchronized with the Amazon S3 server.
Secondly, this can be done manually by moving to the Advanced > System menu option under the configuration setting.
With specific folder and without message queue
php bin/magento exportonS3:media --folder=xyz --isqueue=0

With specific folder and with message queue
php bin/magento exportonS3:media --folder=xyz --isqueue=1

Note – Below-mentioned commands are mandatory after the above commands to export media with message queue.
Message queue command for folder wise upload
php bin/magento queue:consumers:start s3amazon.export.folder &
Message queue command for media files upload
php bin/magento queue:consumers:start s3amazon.export.media &
For setting up the Storage Configuration for Media.
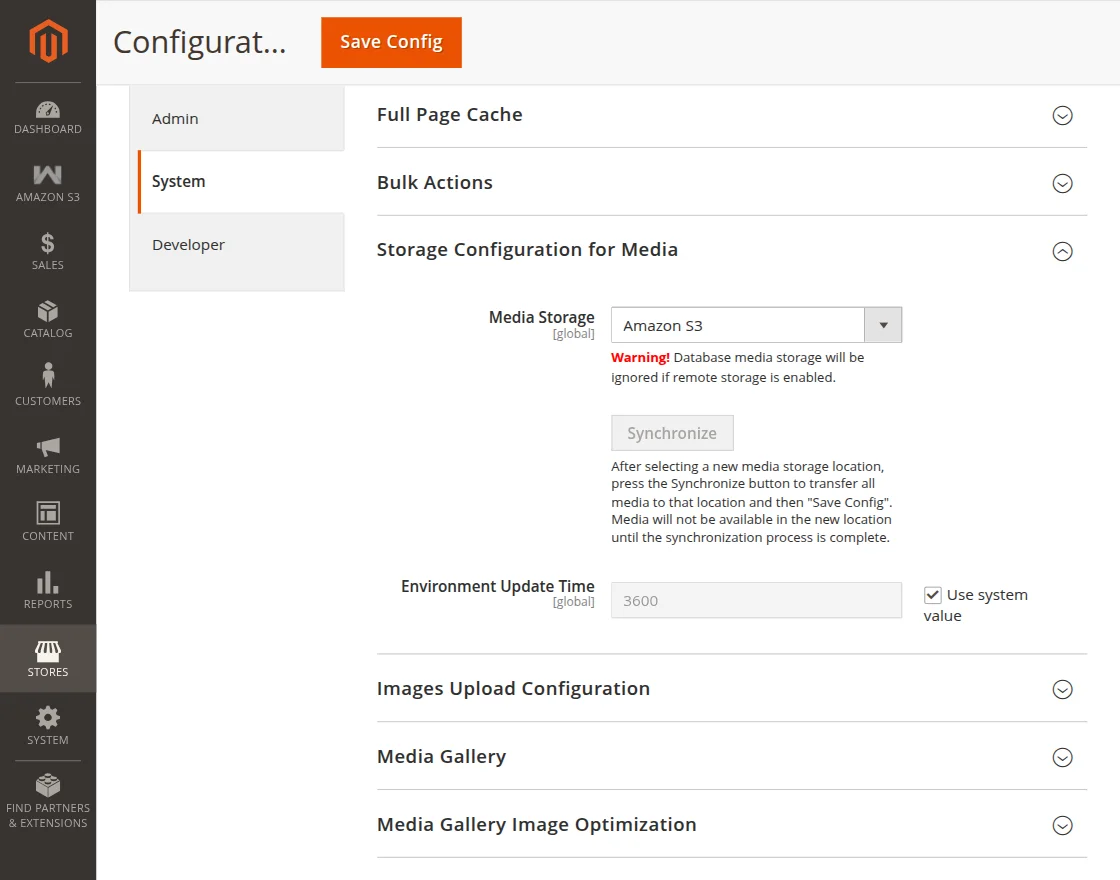
Under the Media Storage field, the admin will select the media storage location where all the website media will get the store.
After selecting the Amazon S3 from the list, the admin needs to click on the Synchronize button to synchronize all media with the Amazon S3 server and then “Save Config“.
Note:- Media will not be available in the new location until the synchronization process is complete.
Setting Up Base Url in Adobe Commerce Amazon S3 for user media files
The admin needs to now navigate to the web sub-menu option under the general setting option, to configure the Base URLs settings.

Further, in the Base URL for User Media Files option, the admin will enter the Amazon S3 bucket URL that saves and retrieves the media files.
Moreover, if the CloudFront setup is complete, then need to enter the CloudFront URL at the place of the bucket URL to serve the files from CloudFront.
For Example:-
In the below screenshot, you can see that the media files of the website are served from the Amazon CloudFront instead of the system or database storage.

Setting Up Base Url in Adobe Commerce Amazon S3 for Static files
Initially, the admin needs to run the following command-
php bin/magento exportonS3:static-content
Once the above-mentioned command is run, all the static files will be imported to the server as shown in the image below.

Also, we can set the base URL for the static file running the following command-
php bin/magento config:set web/unsecure/base_static_url
*Above-mentioned command will be followed by the Amazon S3 bucket URL.
Note:
- One must always run “php bin/magento import:static-content” command, just after “php bin/magento setup:static-content:deploy” command.
- It is better to use the static files feature in the production mode.
Message queue command for static files upload
php bin/magento queue:consumers:start s3amazon.export.static &
The Amazon S3 bucket URL is responsible for saving and retrieving the static files.
Uploading Downloadable Product
After the successful module configuration by the admin, the admin can now upload the media files concerning the products on the Amazon S3 and on the CloudFront.
For this, the admin will navigate to the Products -> Catalog -> Add Product as per the below image.
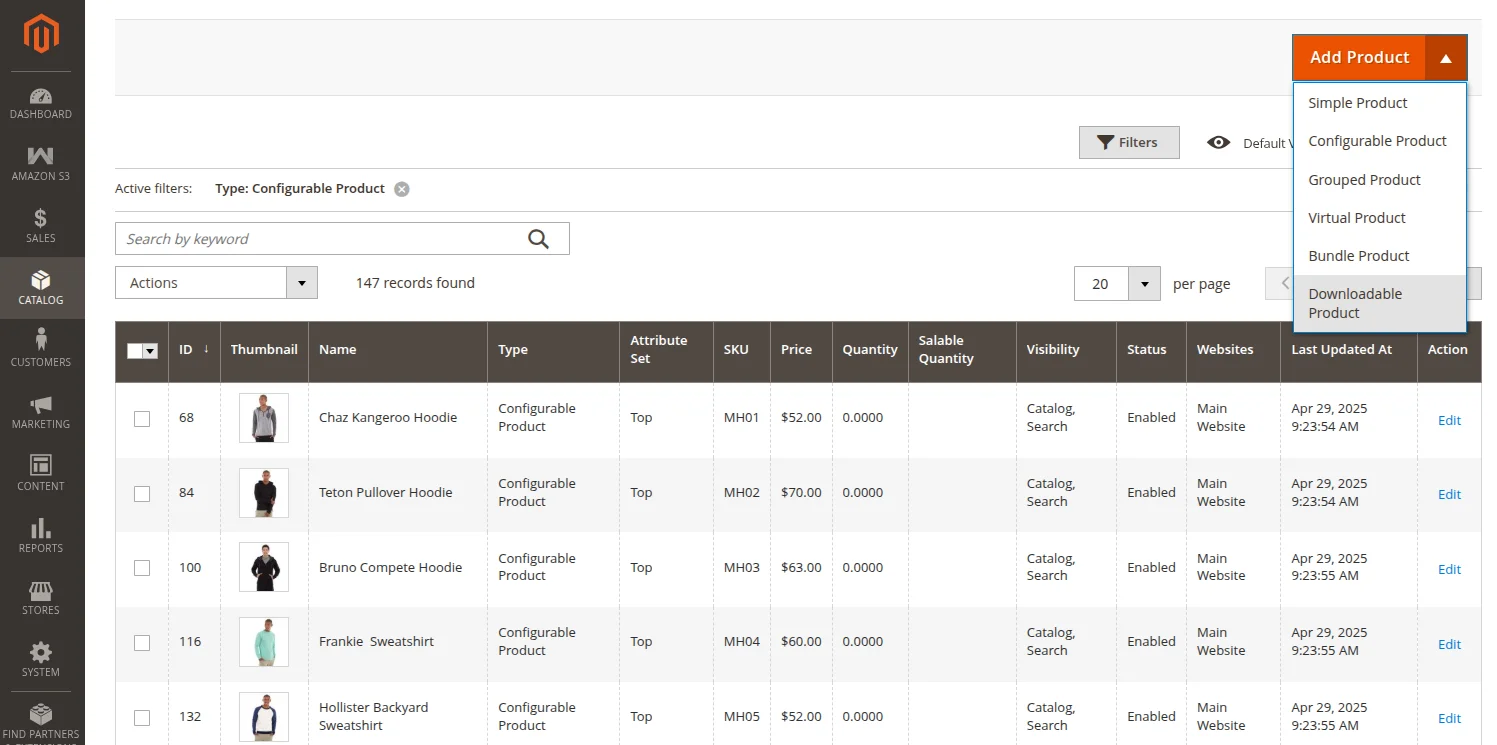
Select Downloadable Product from the Add Product drop-down list. This will navigate you to the New Product page.
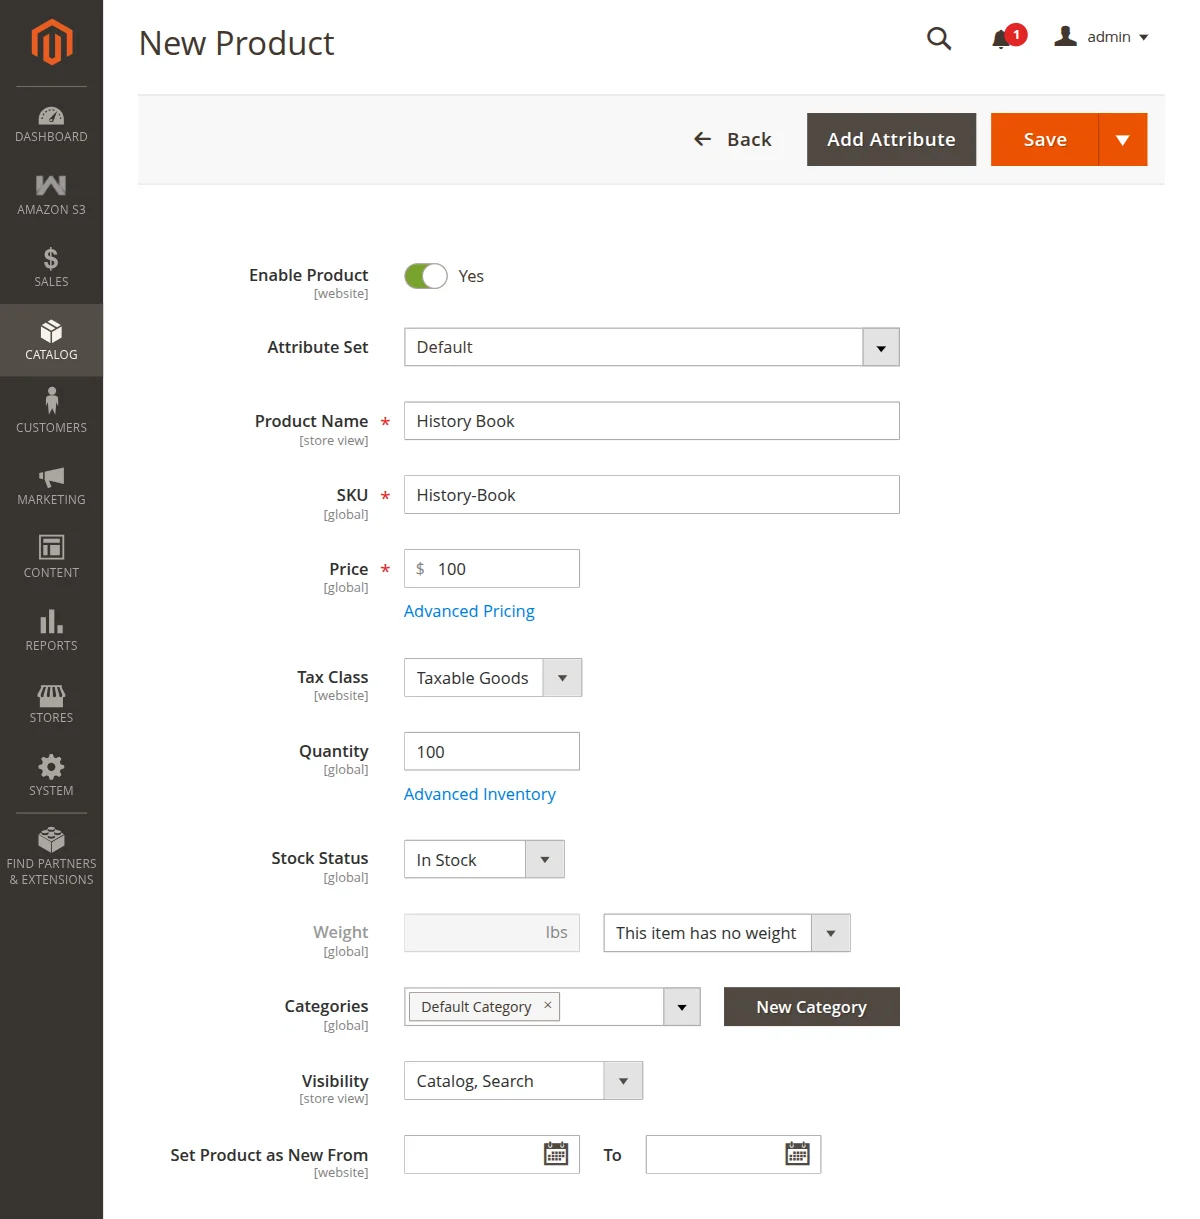

Here, the admin will fill in all the required details of the downloadable product and upload the downloadable file and hit the Save button.
After saving the downloadable product, the file gets saved on the Amazon Server and therefore, will get the Amazon S3 link.
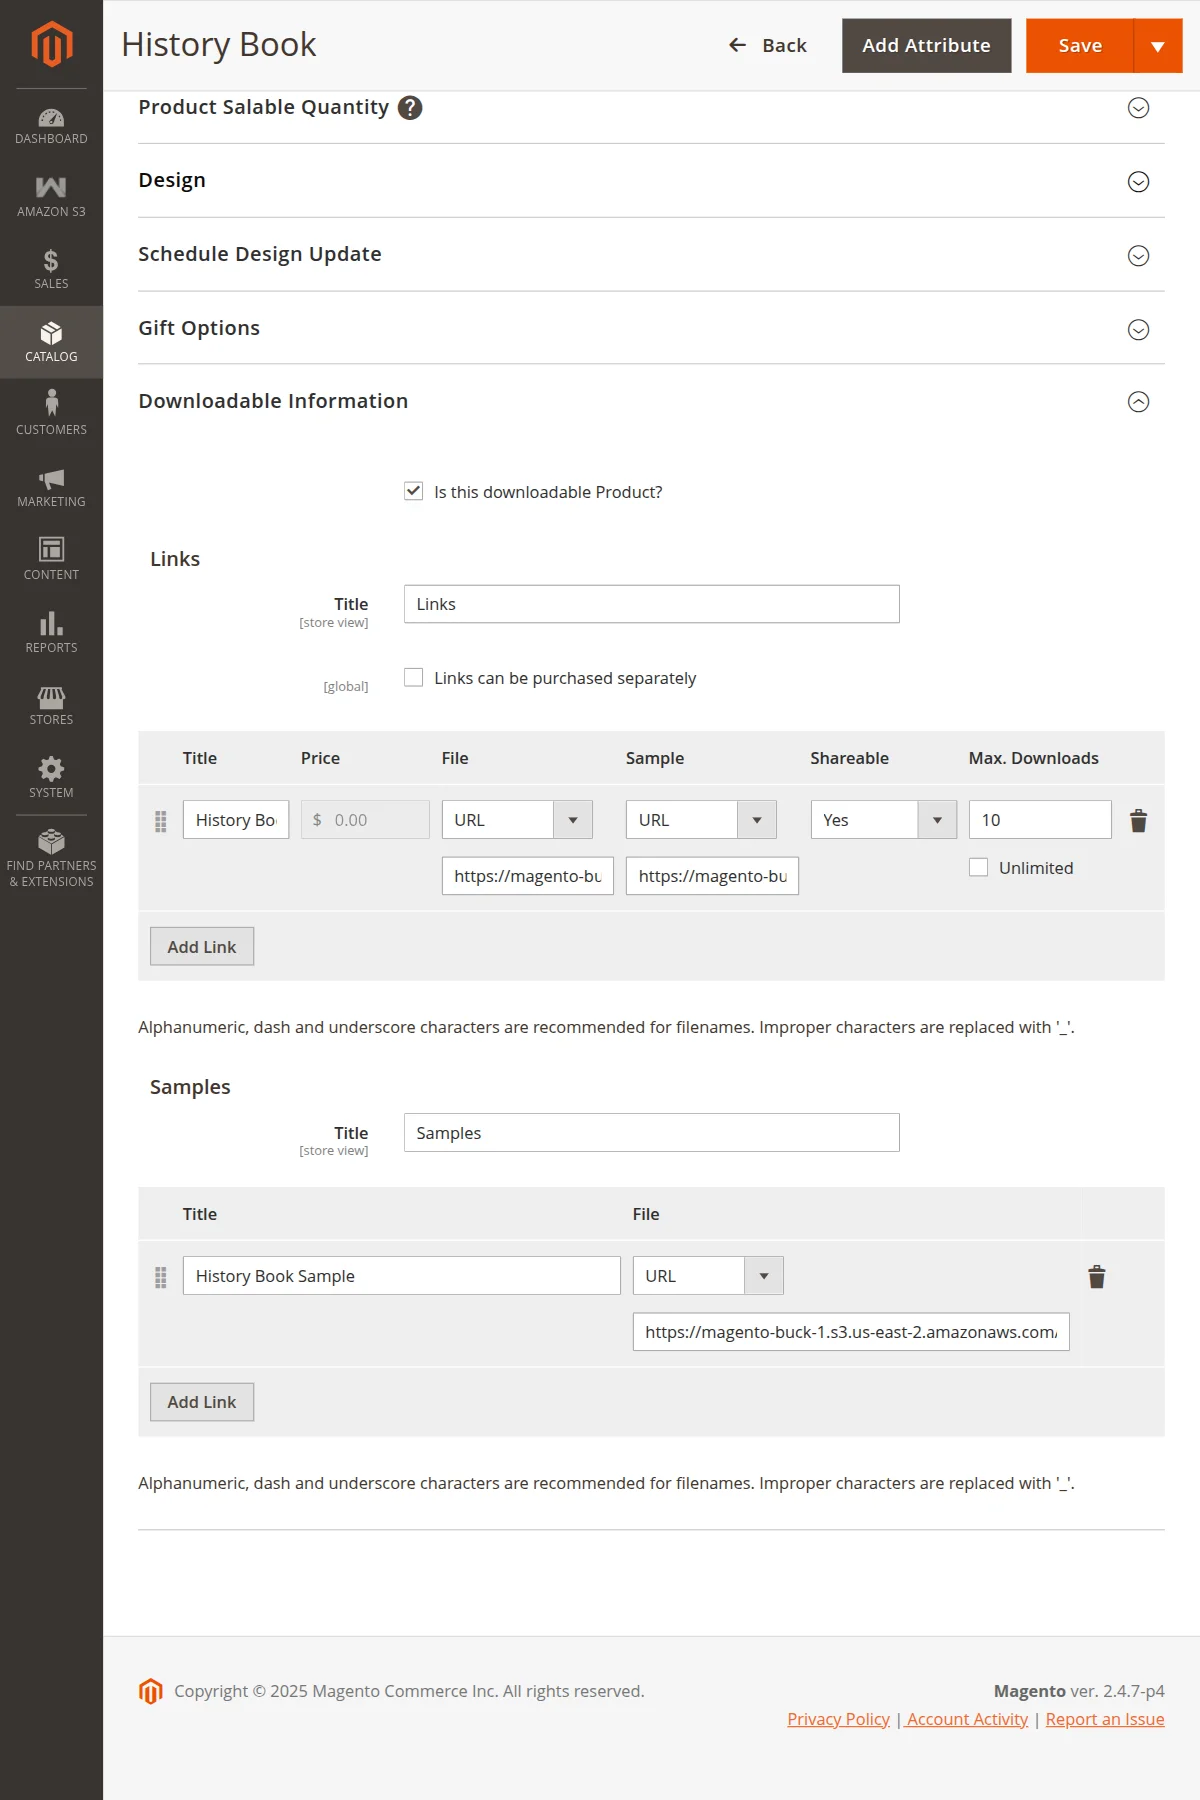
Note: The admin will get the Amazon S3 link only after saving the product successfully.
The customer will download the product from the Amazon Server just like any other product from the local Server.
However, if we are talking regarding the downloadable product, the customer can download the product only after the admin has created the order invoice.
Media Files
Further, in this module, the data will get stored in Amazon S3 and CloudFront for all types of products. The data includes media files.
Media files are the images/ videos associated with the products. Even, these images and videos are generally used to show the product details and give a better description of the same.
For example, the product’s main image, configurable images, demo product video, description image, GIFs, audio node, etc all fall under the category of media files.
So, either it is any of the simple, virtual, configurable, grouped, bundle, and downloadable products, the media files will get a store to the Amazon S3 buckets.
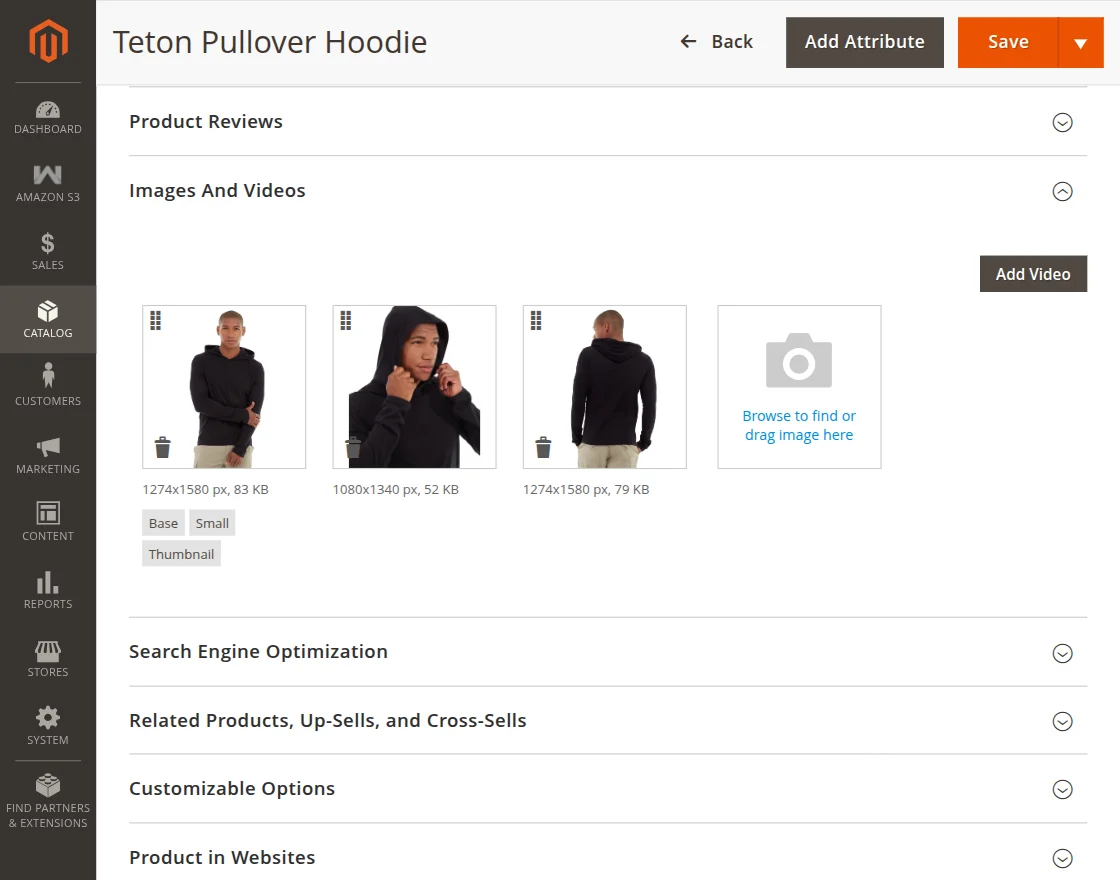
Further, when the customers will view the product they will get to see the product image will appear quickly. Also, the upload and retrieval rates are pretty quick for media files.
Frontend Product Page View
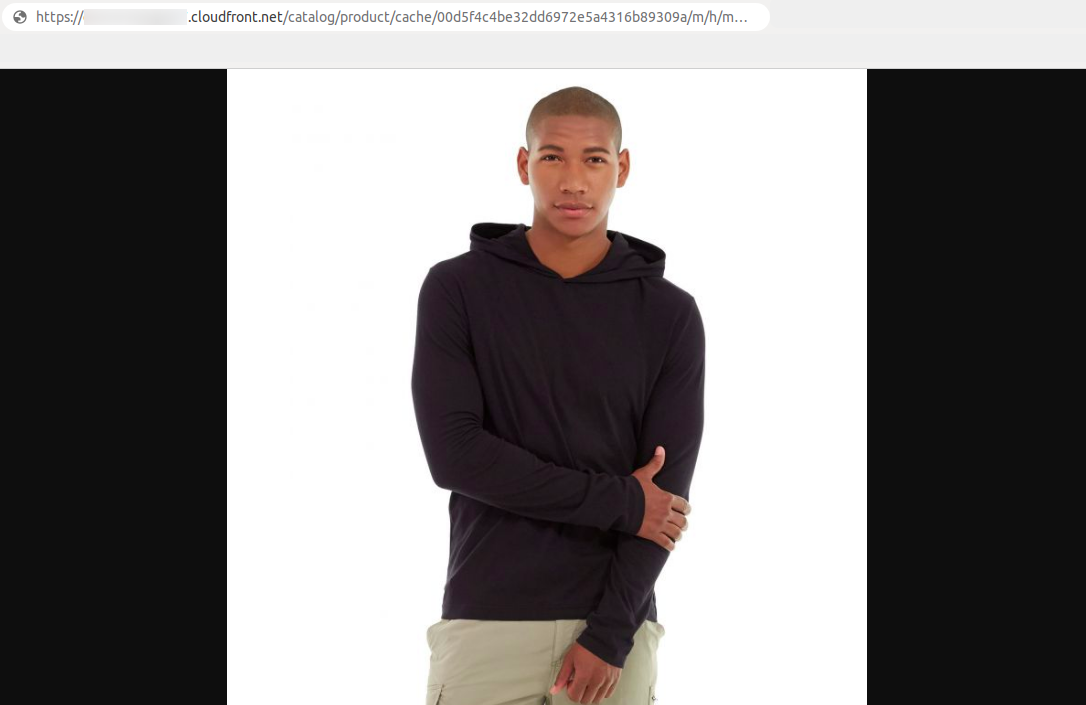
Hence, the appearance of the same product in the store front-end will be the same as shown in the image below.

Moreover, if the customer will view the image in the new tab, the source includes CloudFront in the URL as shown in the image below.
CMS Page View
The images or media files are present anywhere in the store. Therefore take an example of the CMS pages.
This CMS page contains regular images, these will also be fetched from the Amazon CloudFront also.

Furthermore, the same will happen with the images in CMS pages too.

Now, wrapping this up, this shows that all the images get retrieved from the Amazon CloudFront if the same will be used as the storage area.
Thus, that’s all for the Adobe Commerce Amazon S3 Extension module. Furthermore, if you still, have any issues, feel free to add a ticket at webkul.uvdesk.com.
Also, if you want to upload your media and static files on Cloudflare R2 Storage then you can check out our Magento 2 Cloudflare R2 Storage.
Current Product Version - 4.1.4
Supported Framework Version - Magento 2.0.x, 2.1.x, 2.2.x,2.3.x, 2.4.x

However, newly added images, although saved to S3, are still present in my local directory, is this suppose to happen? Media storage is already pointing to Amazon S3.
May I know is this a bug or it is suppose to still stay in local, thank you.