Magento 2 Amazon Affiliate extension seamlessly integrates the Amazon Associates program into your storefront.
This module allows merchants to import products from Amazon’s catalog directly into their store, leveraging Amazon’s trust while earning referral commissions.
Instead of maintaining a traditional inventory, this module synchronizes product data, pricing, and availability in real-time.
Customers can discover products on your site and redirect to Amazon for checkout, or use an on-site “Amazon Mini Cart” for an integrated experience.
Check the brief working of the plugin in the video below –
Features
-
Connect with Amazon’s PA-API 5.0 for high-fidelity product data and earn referral commissions.
-
Import products from various Amazon locales and redirect buyers to their local marketplace using GeoIP.
-
Run automated Magento Cron updates to sync live pricing, variations, and stock availability in real-time.
-
Bulk-add entire categories or keyword-based searches using a high-speed, recursive Insane Import engine.
-
Ingest products via spreadsheet CSV uploads or use the No-API Scraper Fallback when keys are throttled.
-
Allow users to build an on-site “Amazon Mini Cart” to support the official 90-day cookie structure.
-
Apply custom profit margins and rounding rules to incoming Amazon retail prices automatically.
-
Rotate multiple Amazon developer keys simultaneously to balance request traffic and prevent throttling.
-
Track product views, cart additions, outbound referral clicks, and estimated revenue from one dashboard.
Installation
Follow the below steps for installing the Magento 2 modules –
Step 1:
Unzip the respective extension zip and and then move “app” folder (inside “src” folder) into magento root directory on the server.

Step 2:
Now, run the below-mentioned commands in Magento 2 root directory via terminal.
composer require geoip2/geoip2:^2.13
php bin/magento setup:upgrade
php bin/magento setup:di:compile
php bin/magento setup:static-content:deploy
php bin/magento indexer:reindex
php bin/magento cache:flush
Module Translation
For translating the module language, please go to app>code>Webkul>AmazonAffiliate>i18n and edit the en_US.csv file. Now, translate the words on the right and upload the modified file to the same location. The filename of the translated file should be according to the language and region code like de_DE.csv.

How to Register for Affiliate Program?
To register navigate to — https://affiliate-program.amazon.in
Step 1:
Tap on the Join Now for Free button.

Step 2:
Click on Create your Amazon account button.

Step 3: Enter the required information and click Create your Amazon account.

4: Now, enter your account information and then tap the Next button.
Step 5: On the page that comes up, enter the details regarding your Websites and Mobile Apps as required. To add your website, after entering the web address hit the Add button.

This adds the website as shown below in the snapshot.

Step 6: Enter the required details on the Profile page then check the Contract Terms check-box and then click the Finish button. Check the instruction given at the page top before filling in the details.

Step 7: Now, you have created your Amazon Associates Account.

Step 8: Your Store ID/Associate Tag is — mytestwebsite-21 on the top right-hand corner.

Get the Access & Secret Key
To get the Access & Secret key:
#1: Navigate to menu option Tools->Product Advertising API as shown below in the snapshot.

#2: Click on the Join button.

#3: Tap the Add Credentials button.

Step 4: Here, find the Access and the Secret key. You can also Download Credentials to keep them saved.

Step 5: After clicking the Manage Your Credentials in the above step, you will be redirected to the section displayed below.

Module Configuration
For module configuration navigate through Stores>Configuration>Webkul>Amazon Affiliate.
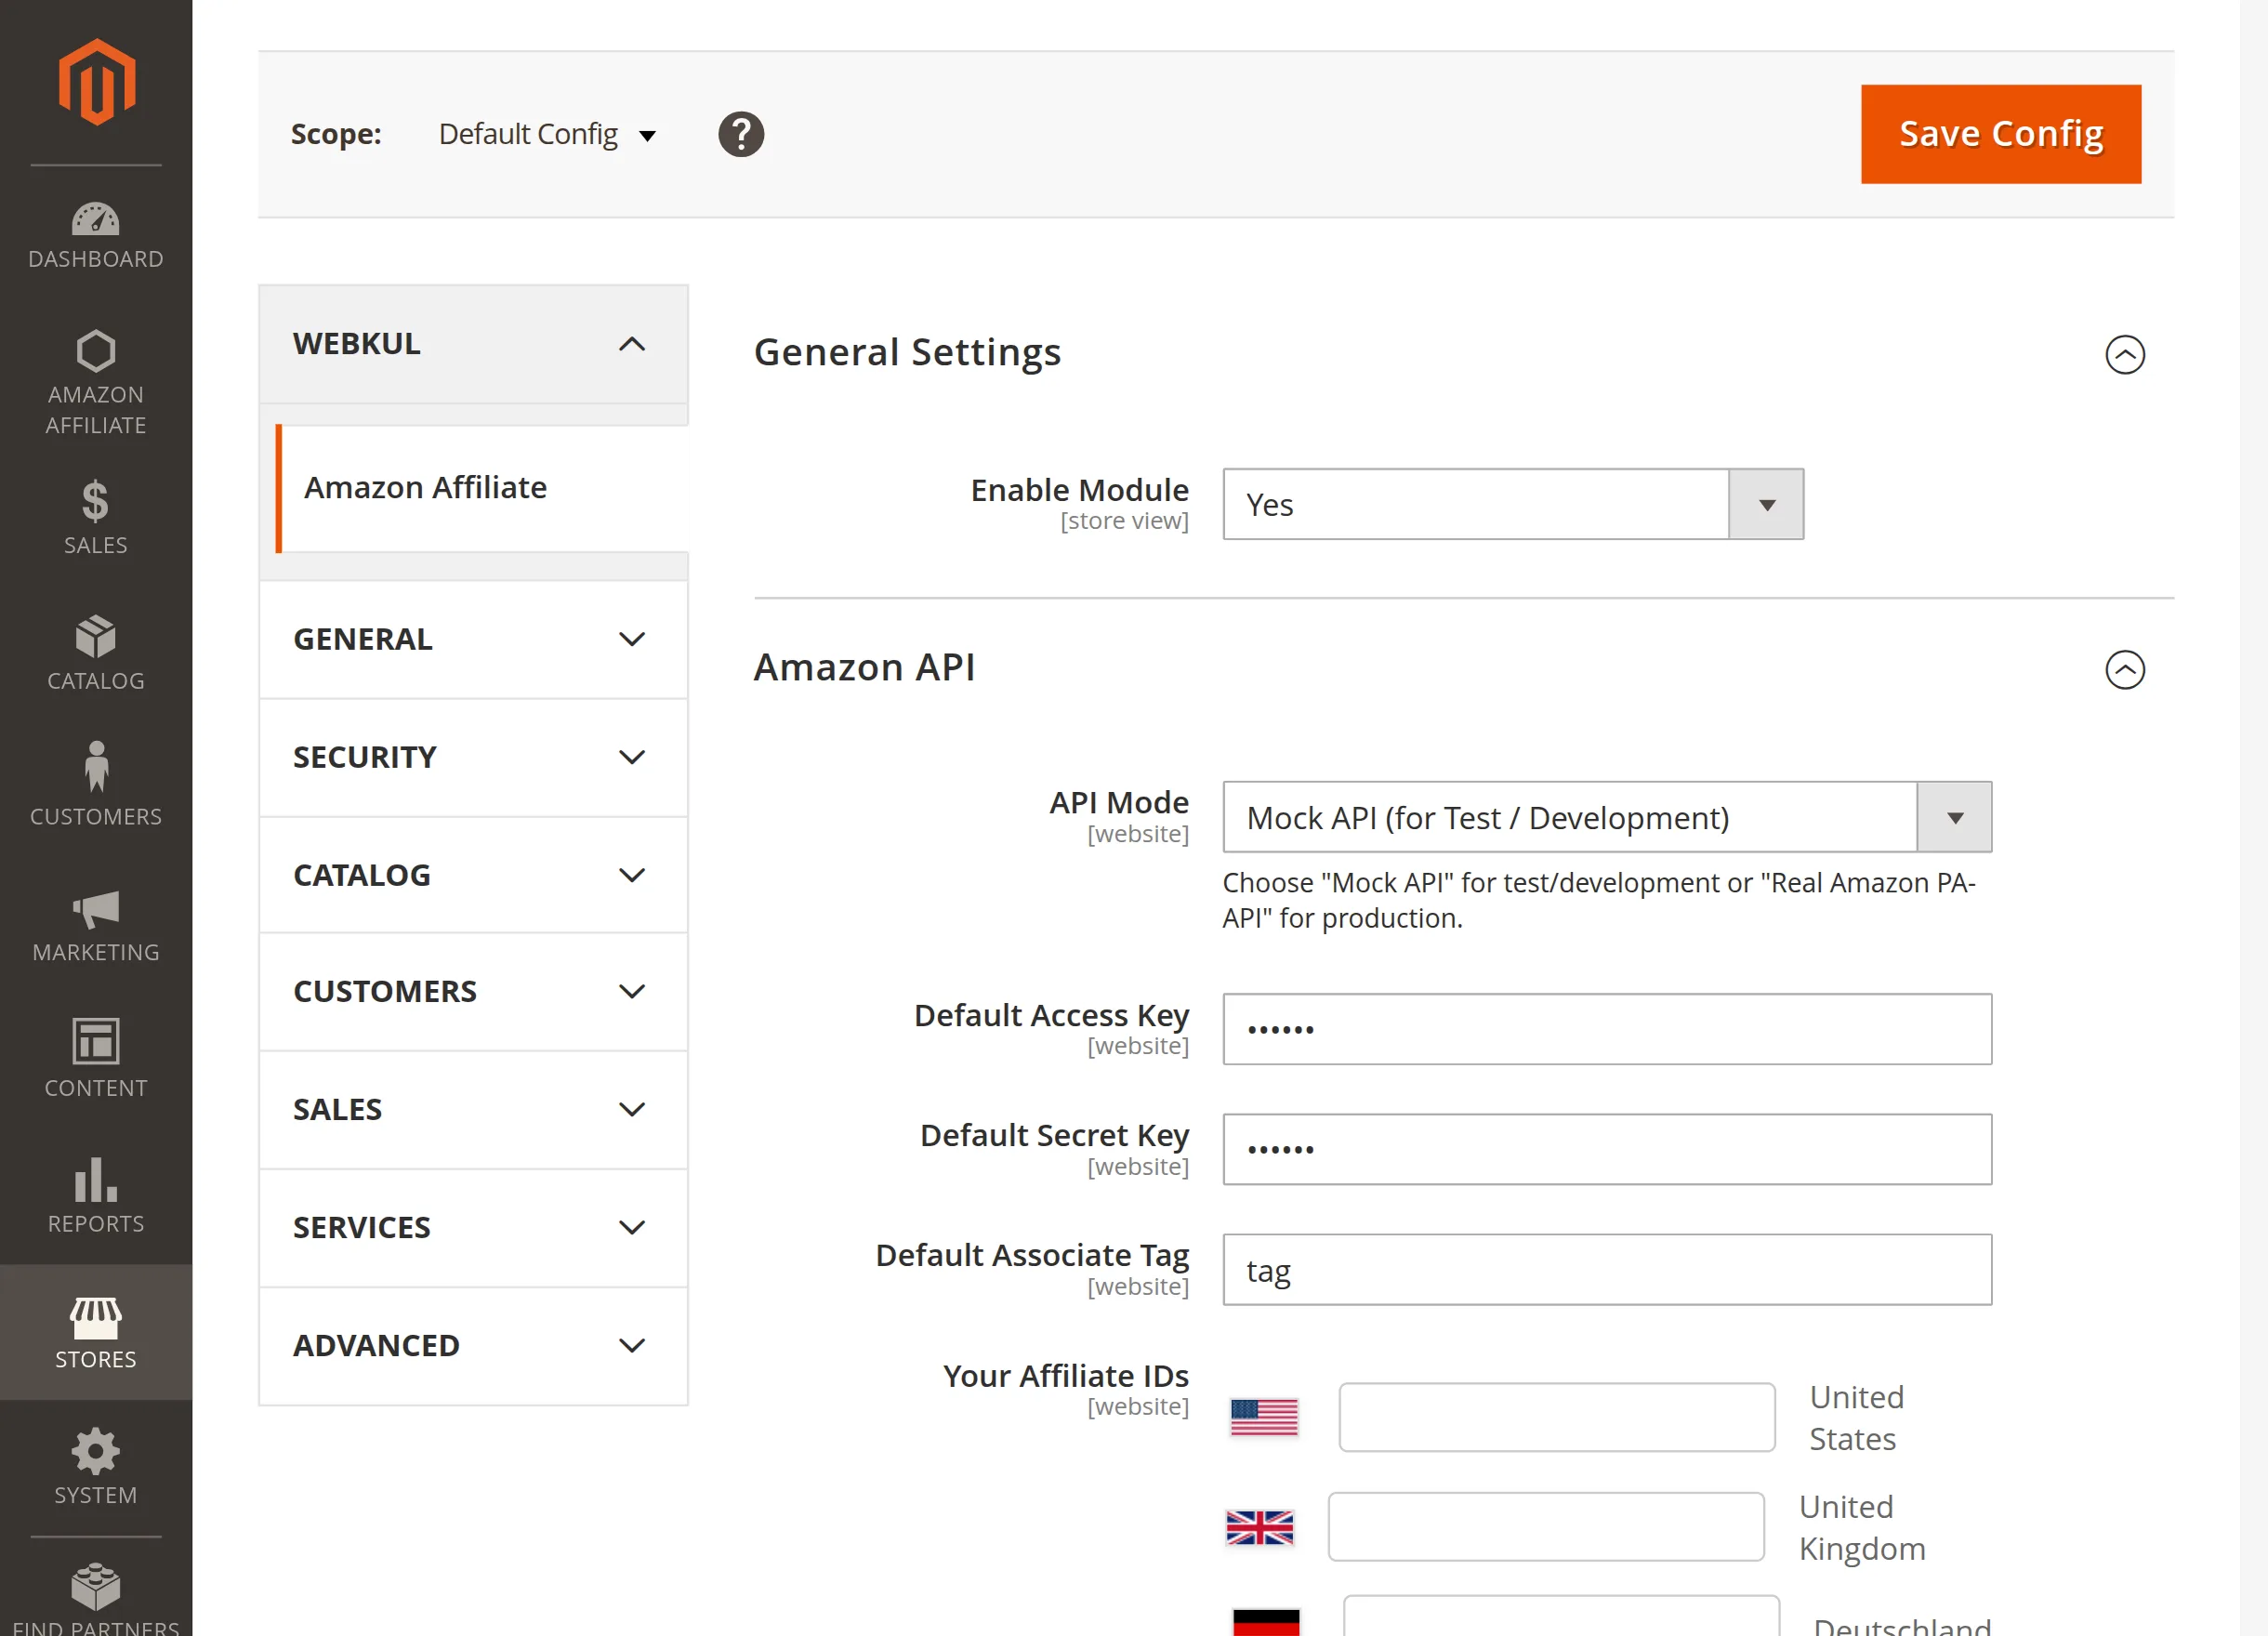
General Settings
This section manages the core activation and global status of the extension across your store view.
Enable Module: Select Yes or No from the dropdown menu to activate or deactivate the Amazon Affiliate extension on your storefront.
Amazon API
Set up your Amazon credentials, marketplace locations, and developer access here to connect your Magento store with Amazon.
API Mode: Select Mock API for test environments to safely check product setups and sync logs. Alternatively, switch to Real Amazon PA-API for your live store.
Default Access Key: Enter your primary Access Key provided by your Amazon Developer console. Consequently, this authorizes secure API communication.
Default Secret Key: Input the corresponding Secret Key from your developer account. Therefore, Magento can validate your store credentials properly.
Default Associate Tag: Provide your primary Amazon tracking ID. As a result, this key identifier ensures Amazon credits all referral traffic to your account.
Your Affiliate IDs: Add country-specific tracking IDs next to each flag. Finally, this routes international visitors to their local marketplaces.

Default Marketplace: Select your primary target region from the dropdown menu.
Consequently, this fallback store handles any visitors whose locations do not match your geotargeting rules.
API Cache TTL (seconds): Define the duration for storing retrieved product data locally.
Therefore, a proper time-to-live limit reduces external requests and optimizes your server performance significantly.
API Timeout (seconds): Set the maximum waiting time for server responses from Amazon.
As a result, this threshold prevents your Magento store from freezing during unexpected network delays.
Scheduled Search
This feature automates product discovery using targeted keywords. Consequently, your store populates bulk items without manual work.
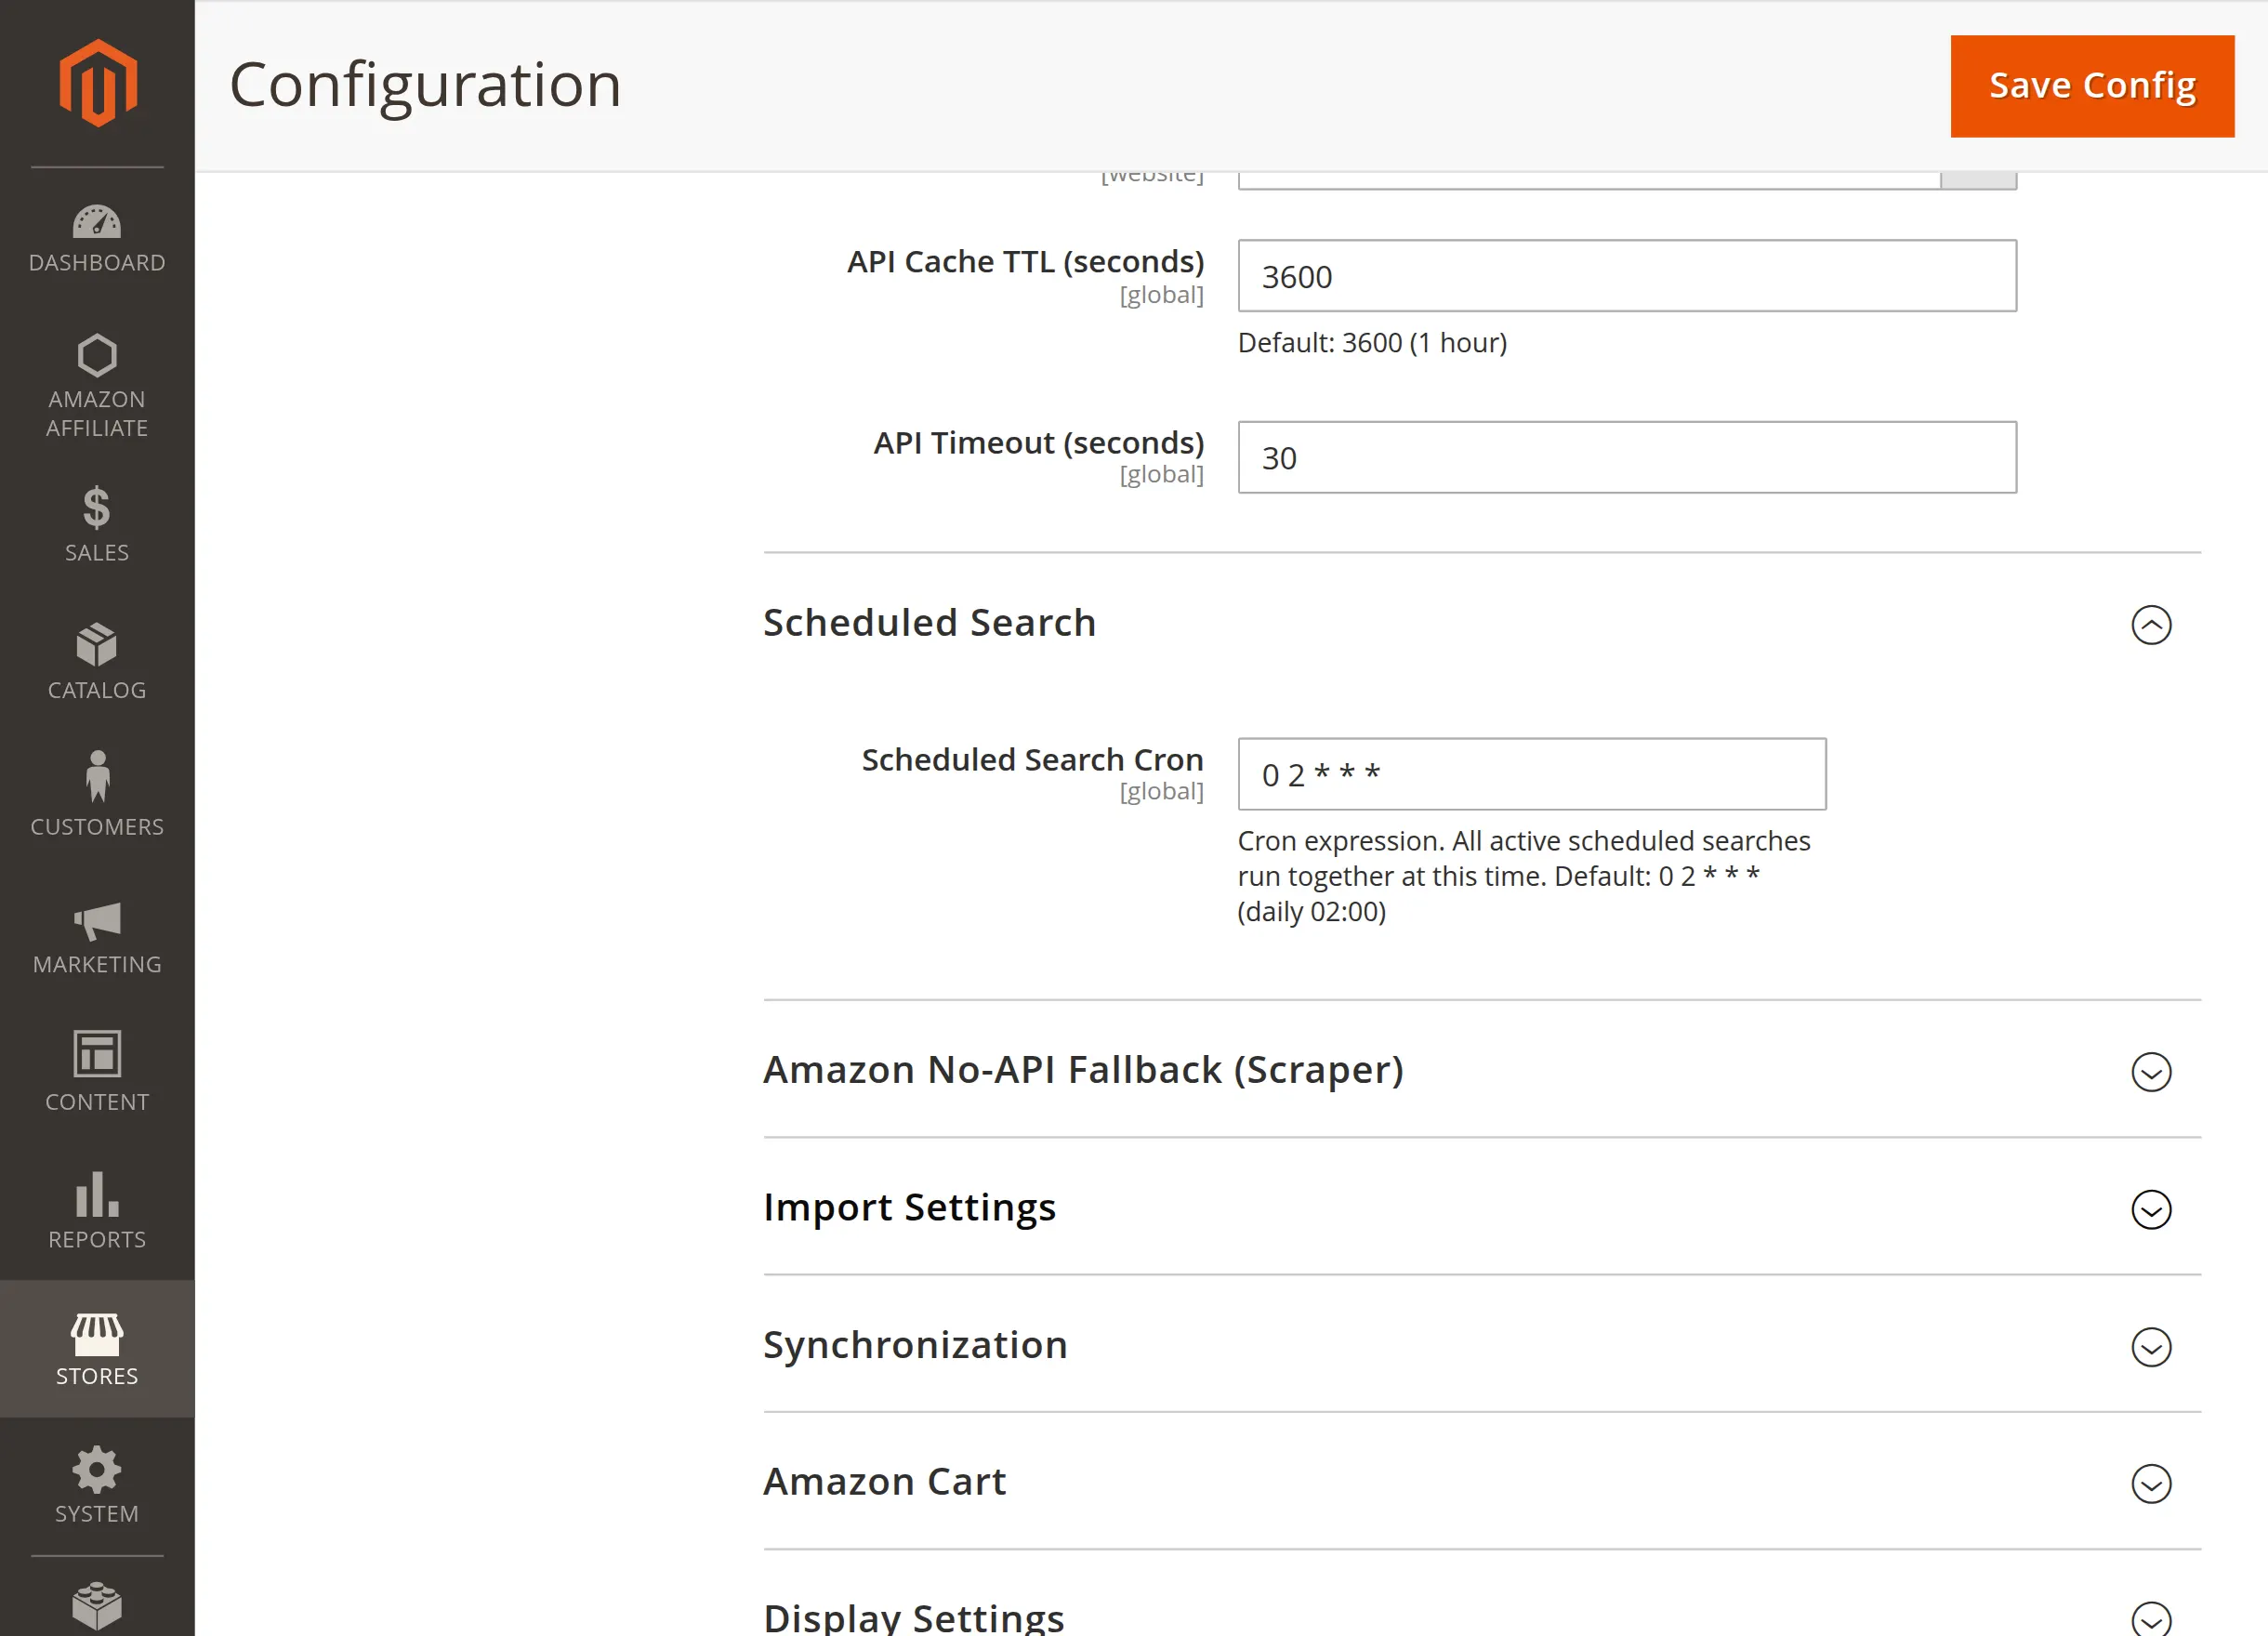
Scheduled Search Cron: Enter a standard cron expression. Consequently, Magento runs all active scheduled searches together exactly at this designated time.
Amazon No-API Fallback (Scraper)
This configuration provides a vital alternative data retrieval method. Consequently, your store remains functional even when your keys are throttled.
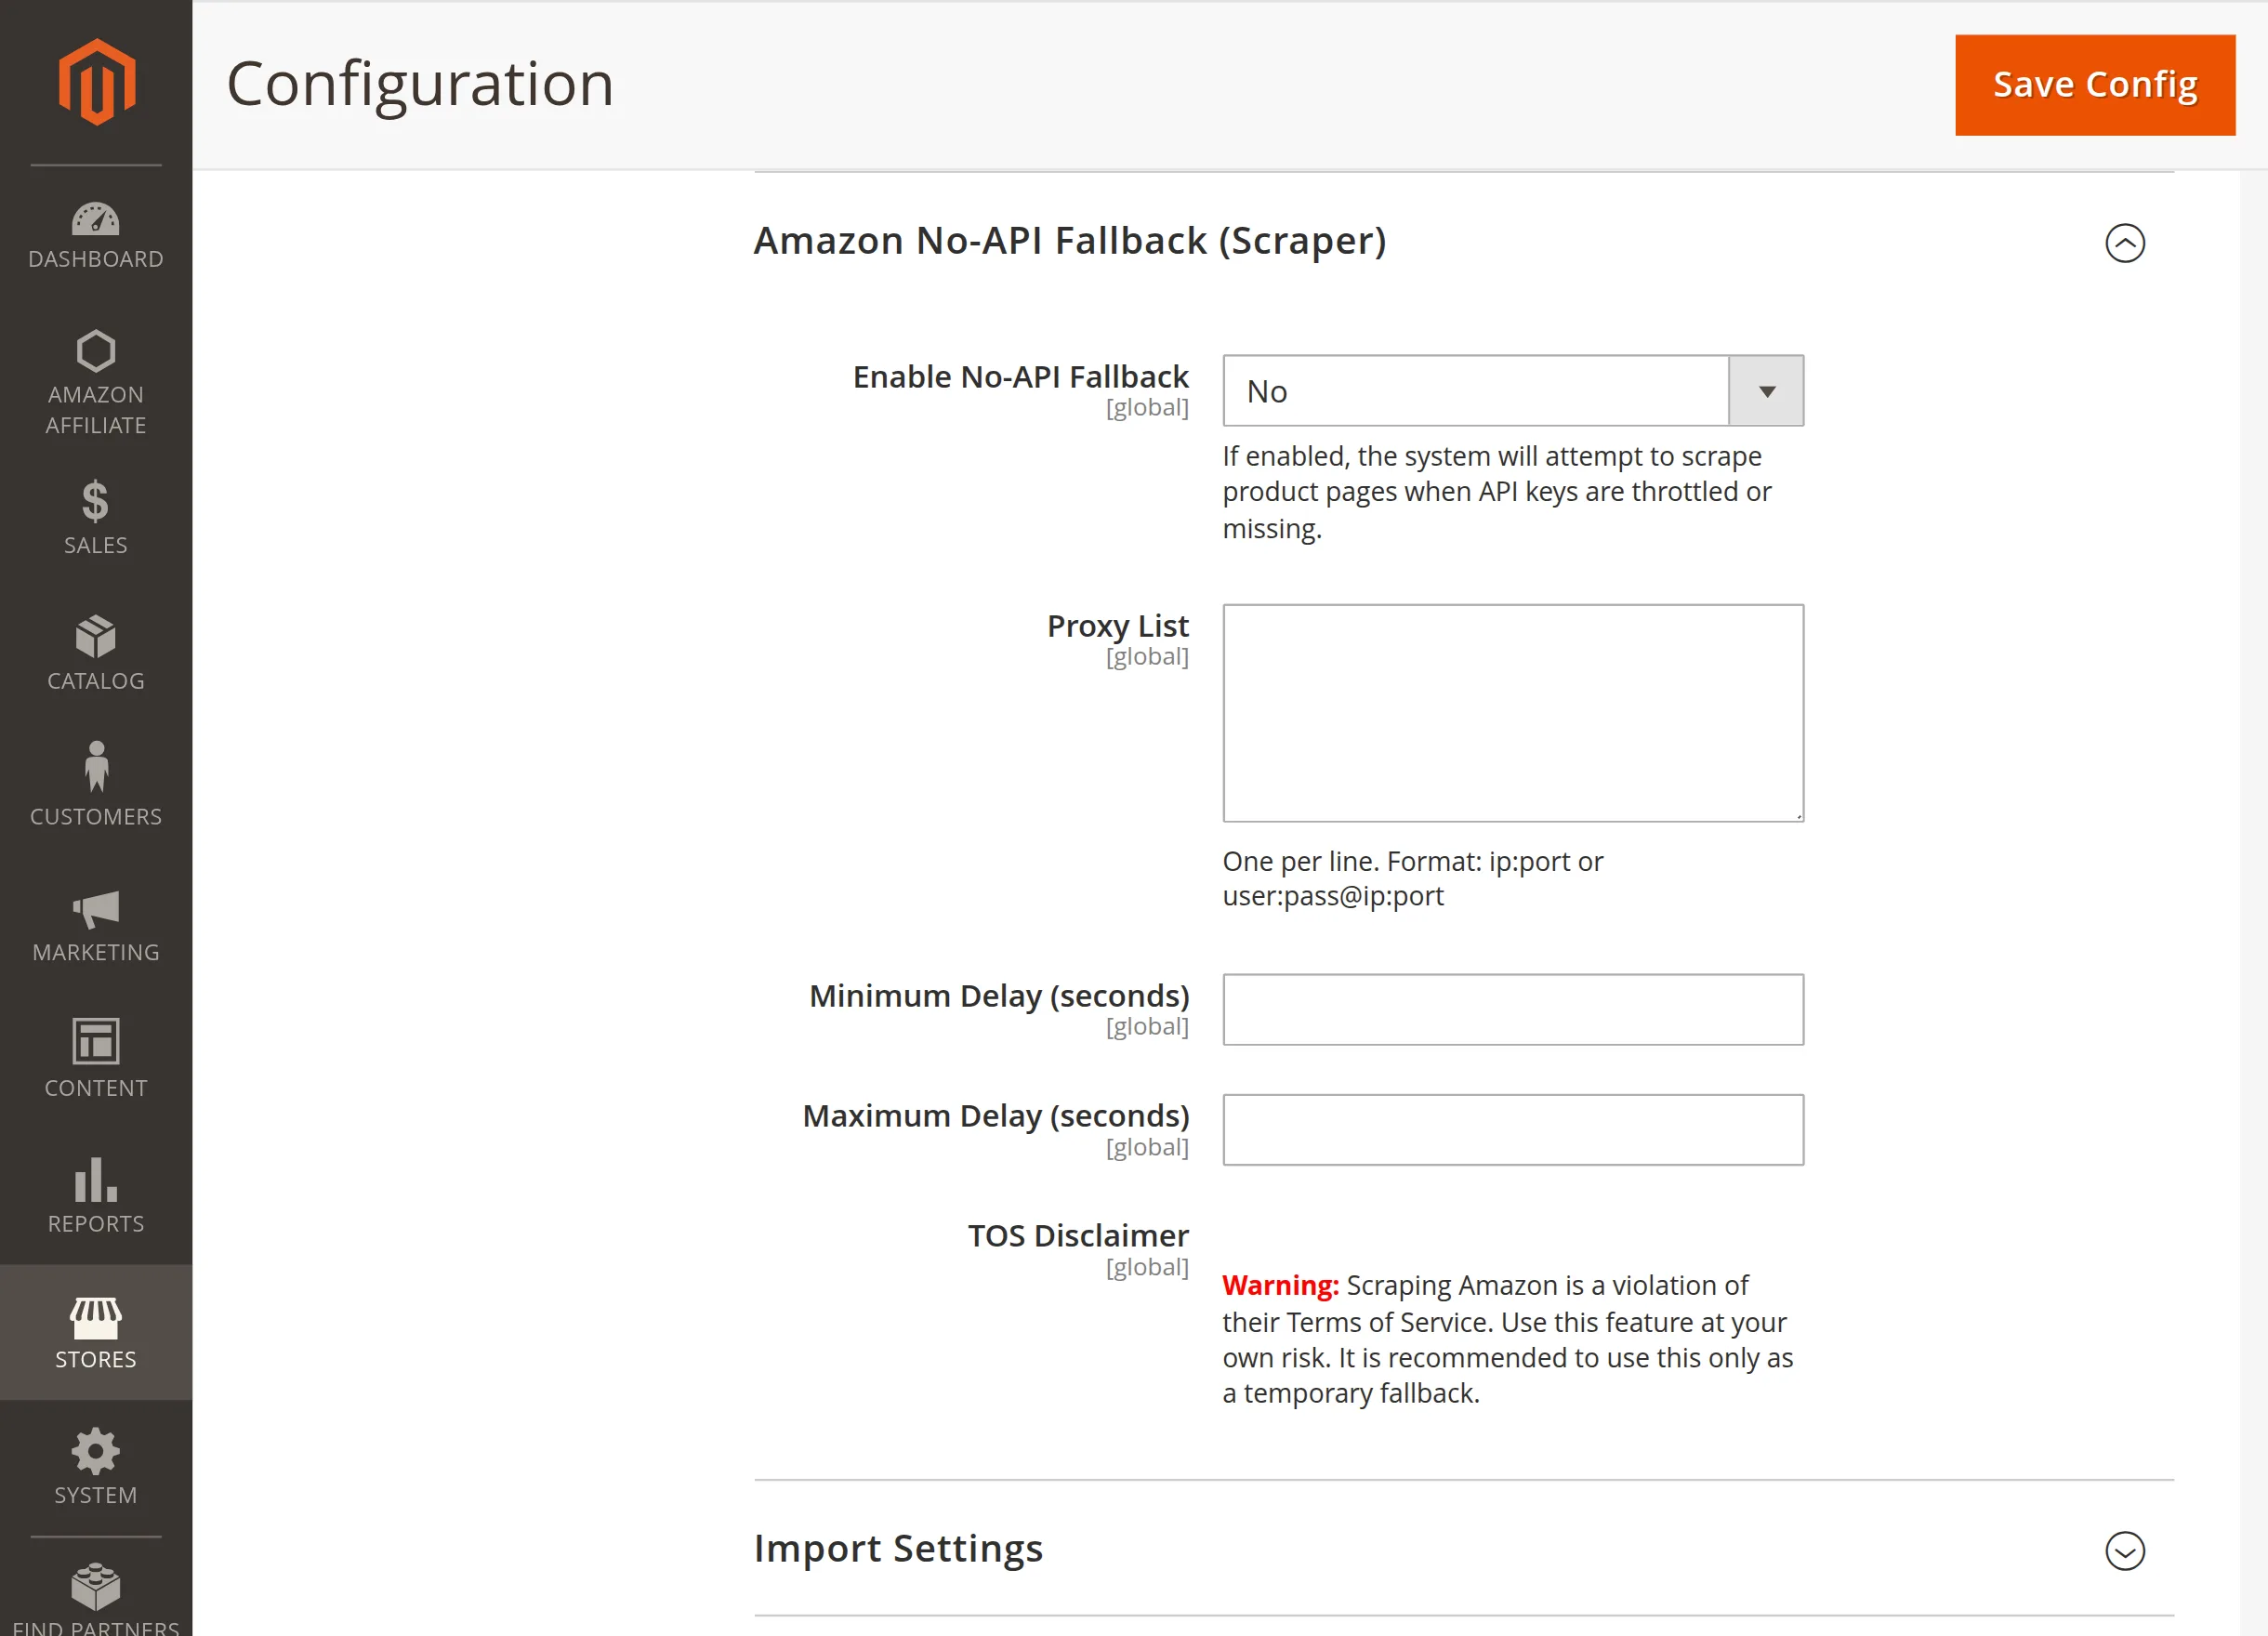
Enable No-API Fallback: Choose Yes to let the extension scrape product pages. Therefore, the system bypasses API limitations during downtime.
Proxy List: Input your proxies using one line per entry. As a result, this prevents IP blocking by rotating your connection addresses cleanly.
Minimum Delay (seconds): Define the shortest wait time between scraper requests. Consequently, this random timing pattern effectively mimics natural human browsing behavior.
Maximum Delay (seconds): Set the longest wait time for your scraper cycles. Therefore, this threshold helps maintain a steady import pace securely.
TOS Disclaimer: Read the provided warning message closely. Ultimately, you must use this specific feature at your own risk.
Import Settings
This panel configures how incoming items populate your Magento catalog database. Consequently, this keeps your structured data organized automatically.
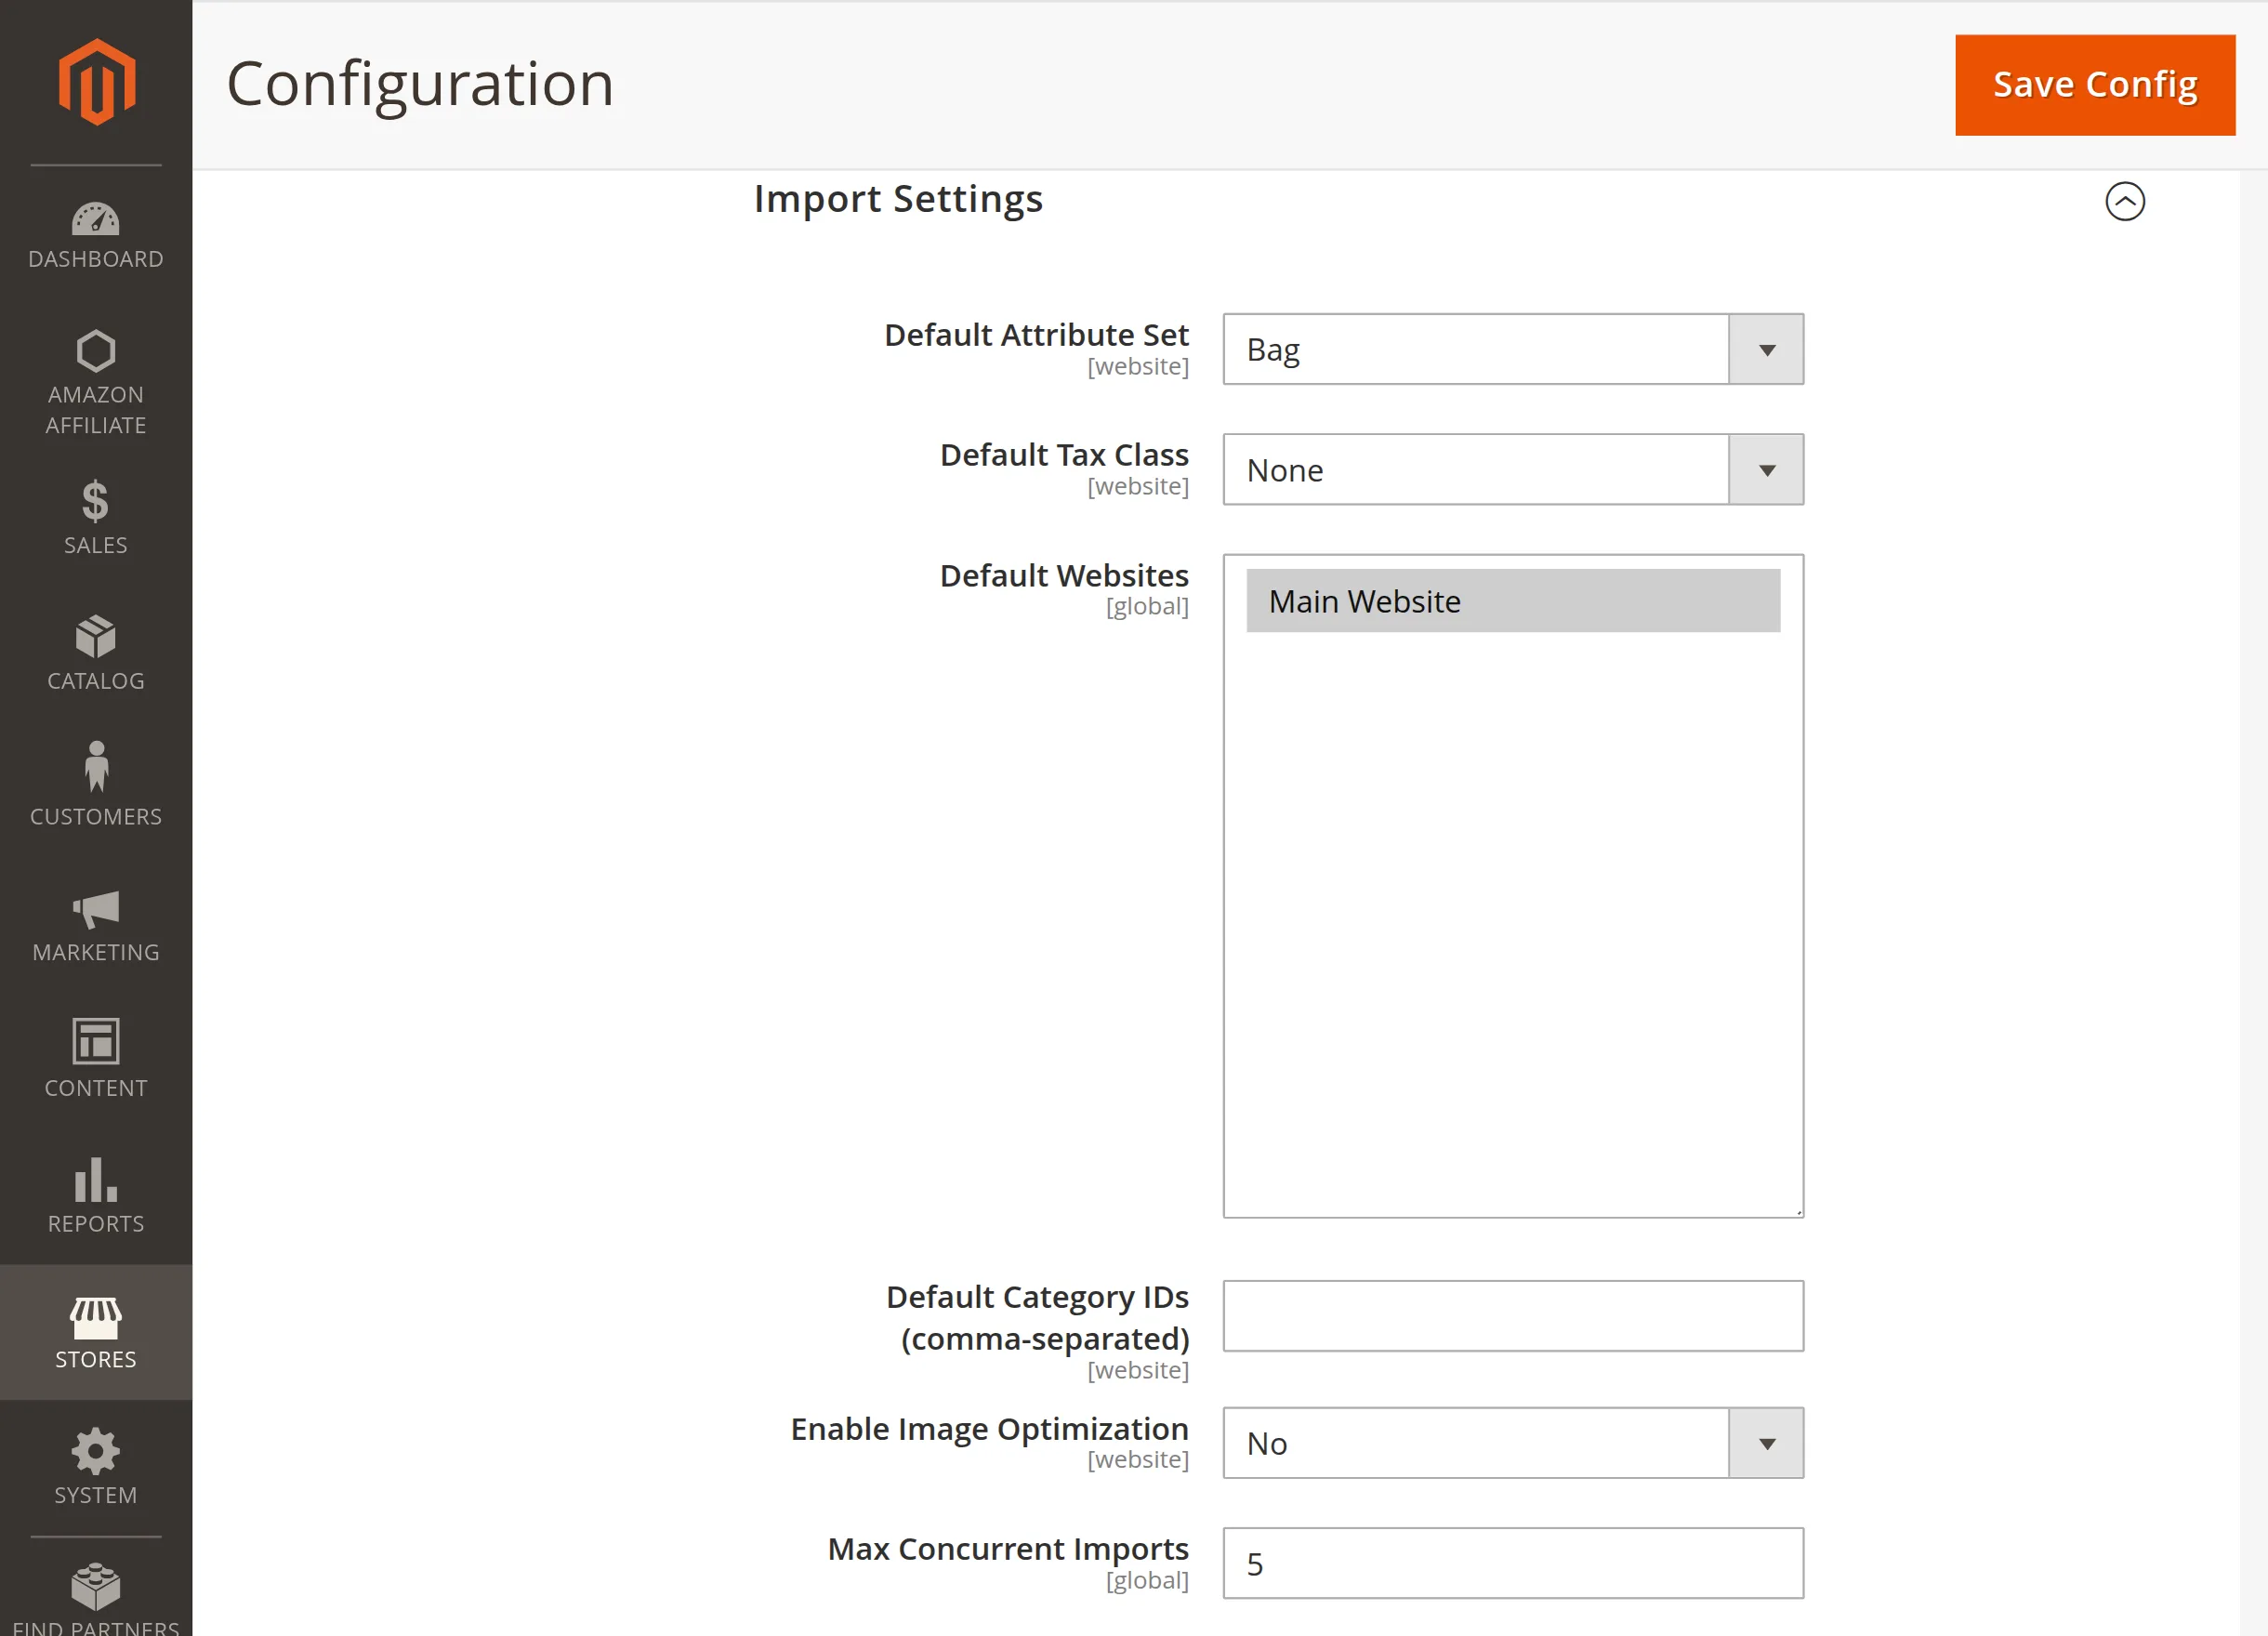
Default Attribute Set: Select the target template group from the dropdown list. Therefore, this assigns proper template values to every new Amazon product entry.
Default Tax Class: Choose the corresponding tax rating for incoming items. As a result, your cart calculates localized customer checkout totals accurately.
Default Websites: Highlight your chosen store destinations from the multi-select box. Consequently, this publishes imported catalogs to active frontends instantly.
Default Category IDs (comma-separated): Input specific numeric identifiers separated by commas. Therefore, the system files incoming Amazon items into the right sections.
Enable Image Optimization: Select Yes to compress catalog media files automatically. As a result, this process preserves valuable server storage space efficiently.
Max Concurrent Imports: Set your maximum concurrent background processing limit. Finally, this constraint protects your server from performance degradation.
Synchronization
This section controls the automated backend tasks that keep your catalog aligned with Amazon. Consequently, your data remains accurate without manual updates.
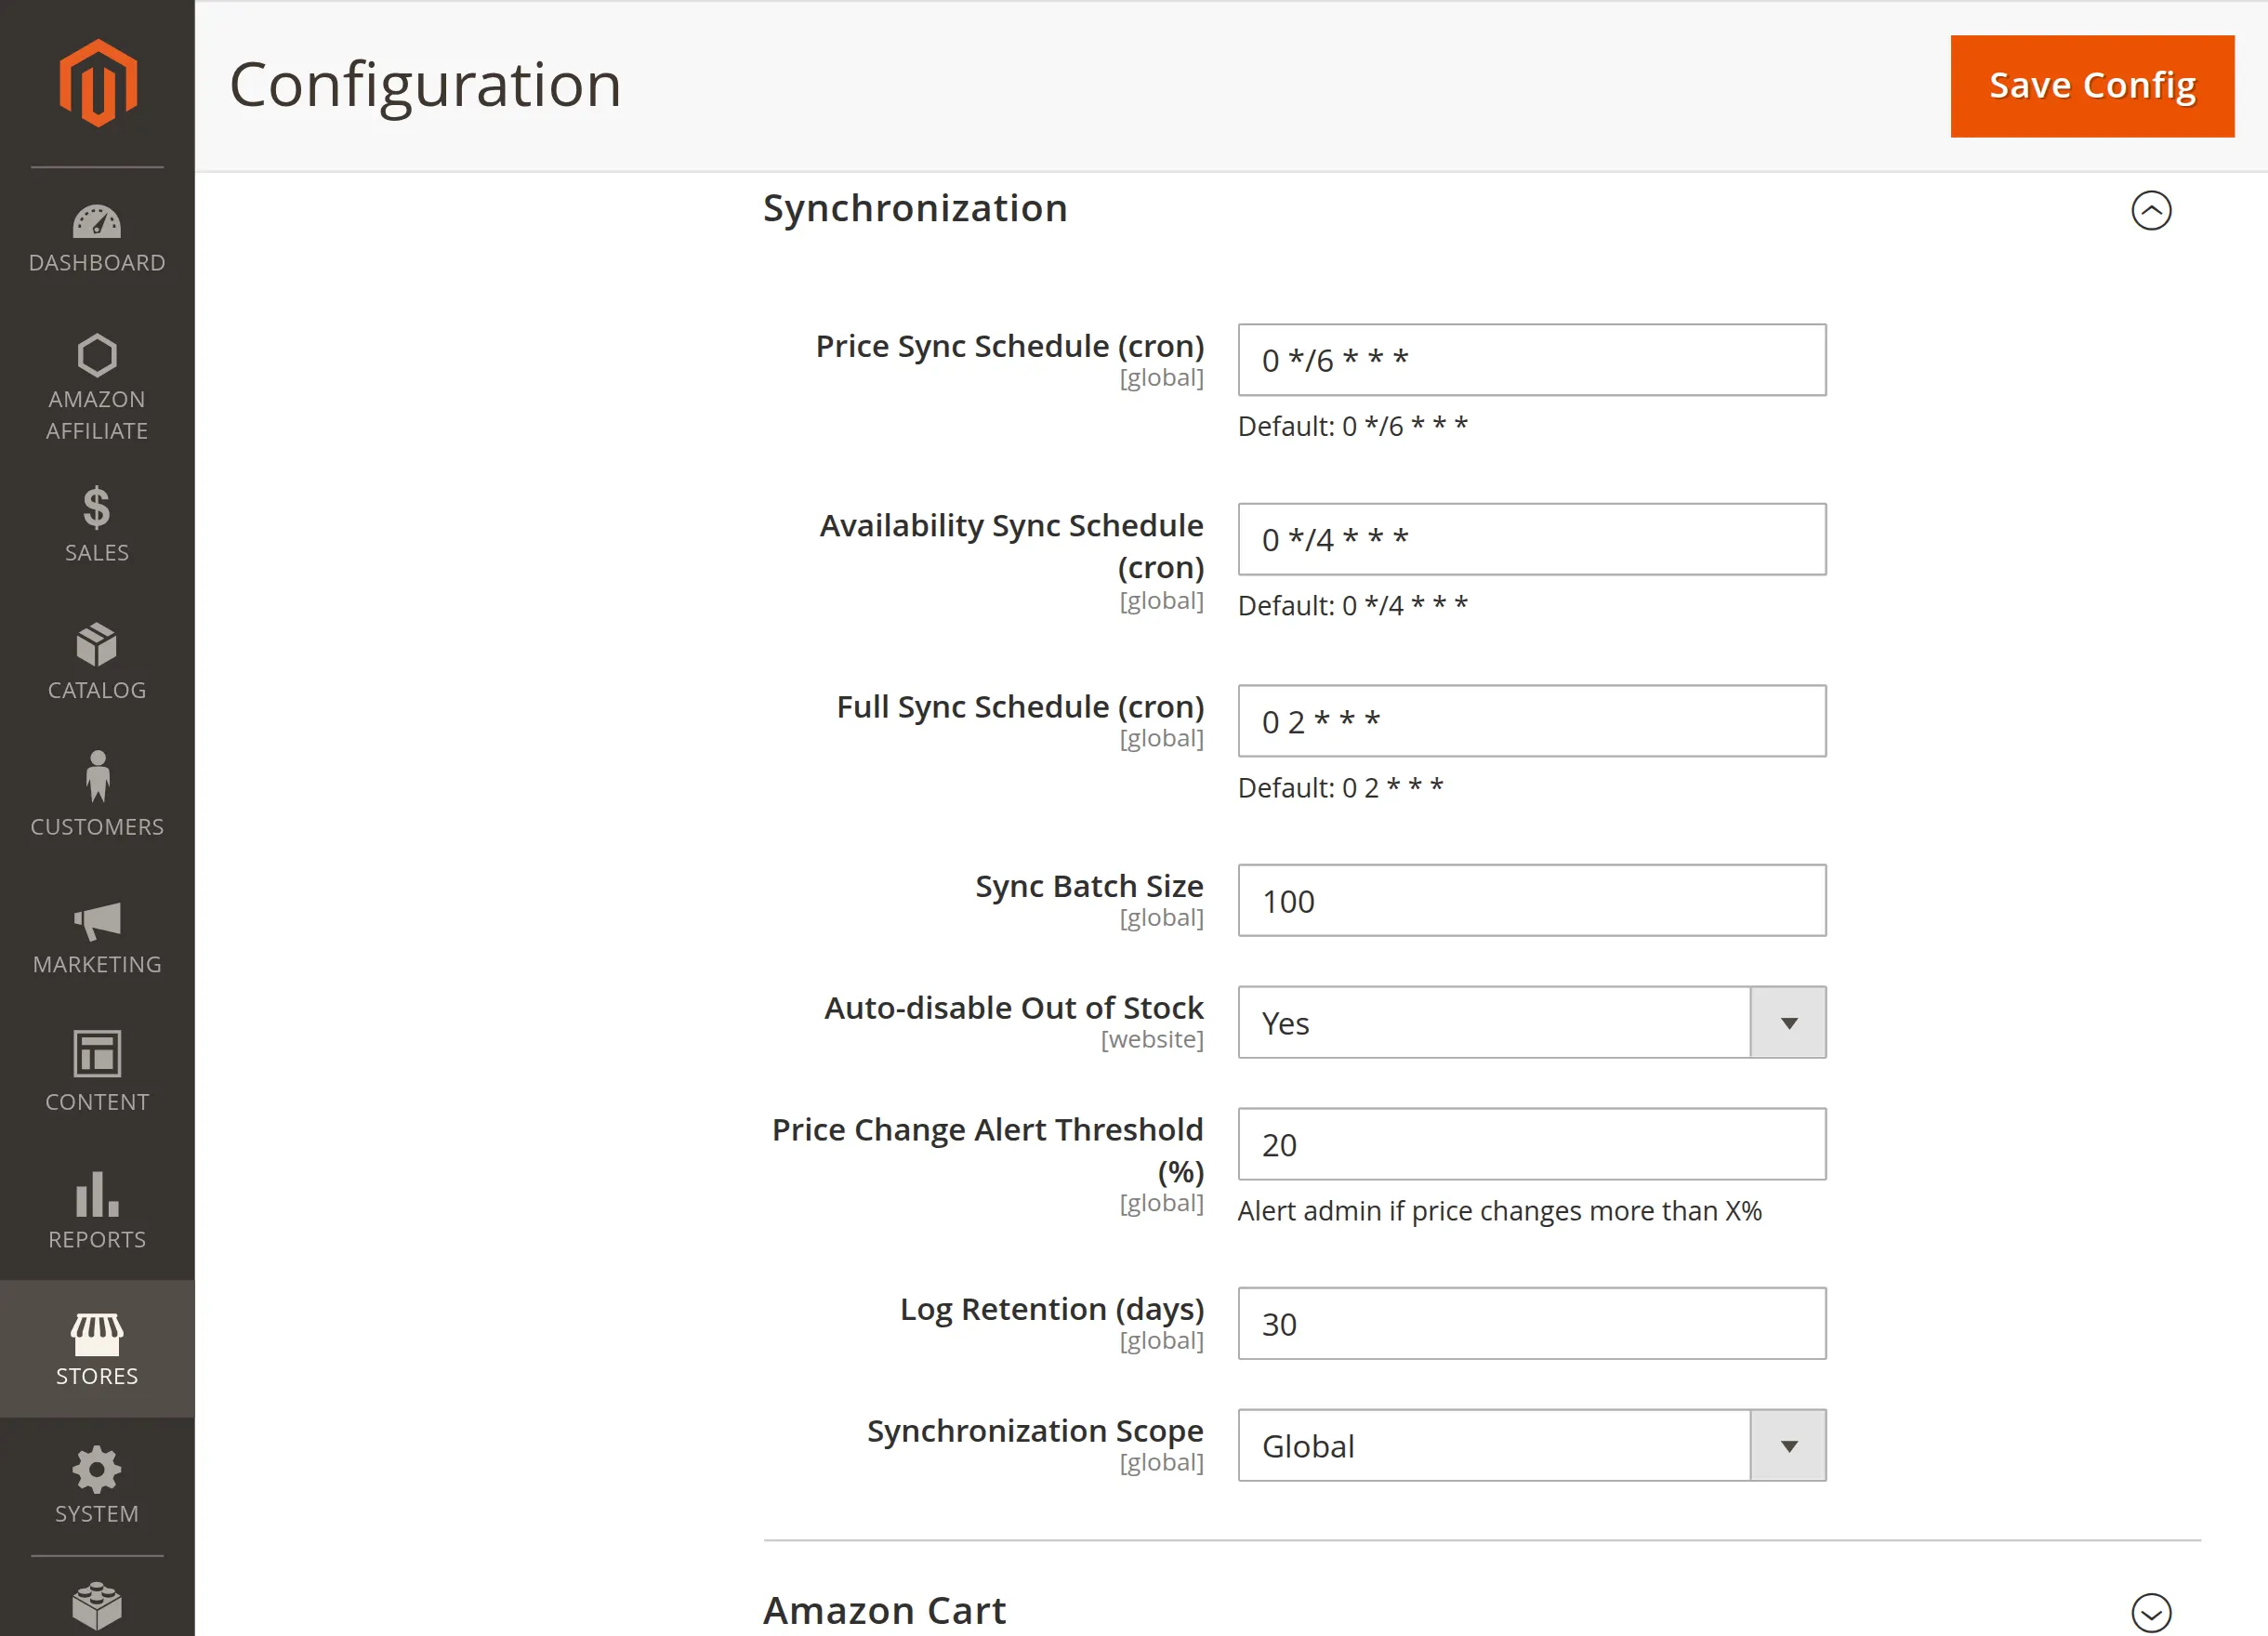
Price Sync Schedule (cron): Enter a cron expression to automate pricing updates. Therefore, Magento fetches fresh price data from Amazon precisely on this timing schedule.
Availability Sync Schedule (cron): Input a cron frequency string to refresh stock status. As a result, the engine checks item availability at set intervals regularly.
Full Sync Schedule (cron): Define the master timetable for comprehensive data updates. Consequently, this deep background process refreshes entire product structures completely.
Sync Batch Size: Input the maximum number of items processed per cron run. Therefore, this grouping strategy distributes server resource consumption evenly.
Auto-disable Out of Stock: Select Yes to hide unavailable items automatically. As a result, this prevents frustrated store visitors from clicking broken purchase items.
Price Change Alert Threshold (%): Define the minimum variance percentage to trigger system flags. Consequently, you receive instant administrative notices when costs fluctuate significantly.
Log Retention (days): Enter a numeric value to preserve communication tracking files. Therefore, the system automatically purges older log history files efficiently.
Synchronization Scope: Set your preferred data application boundaries from the dropdown. Finally, this choice determines whether updates affect individual websites or global views.
Amazon Cart
This section controls the behavior of the integrated checkout tracking mechanism. Consequently, this helps secure your conversion revenue over an extended timeline.
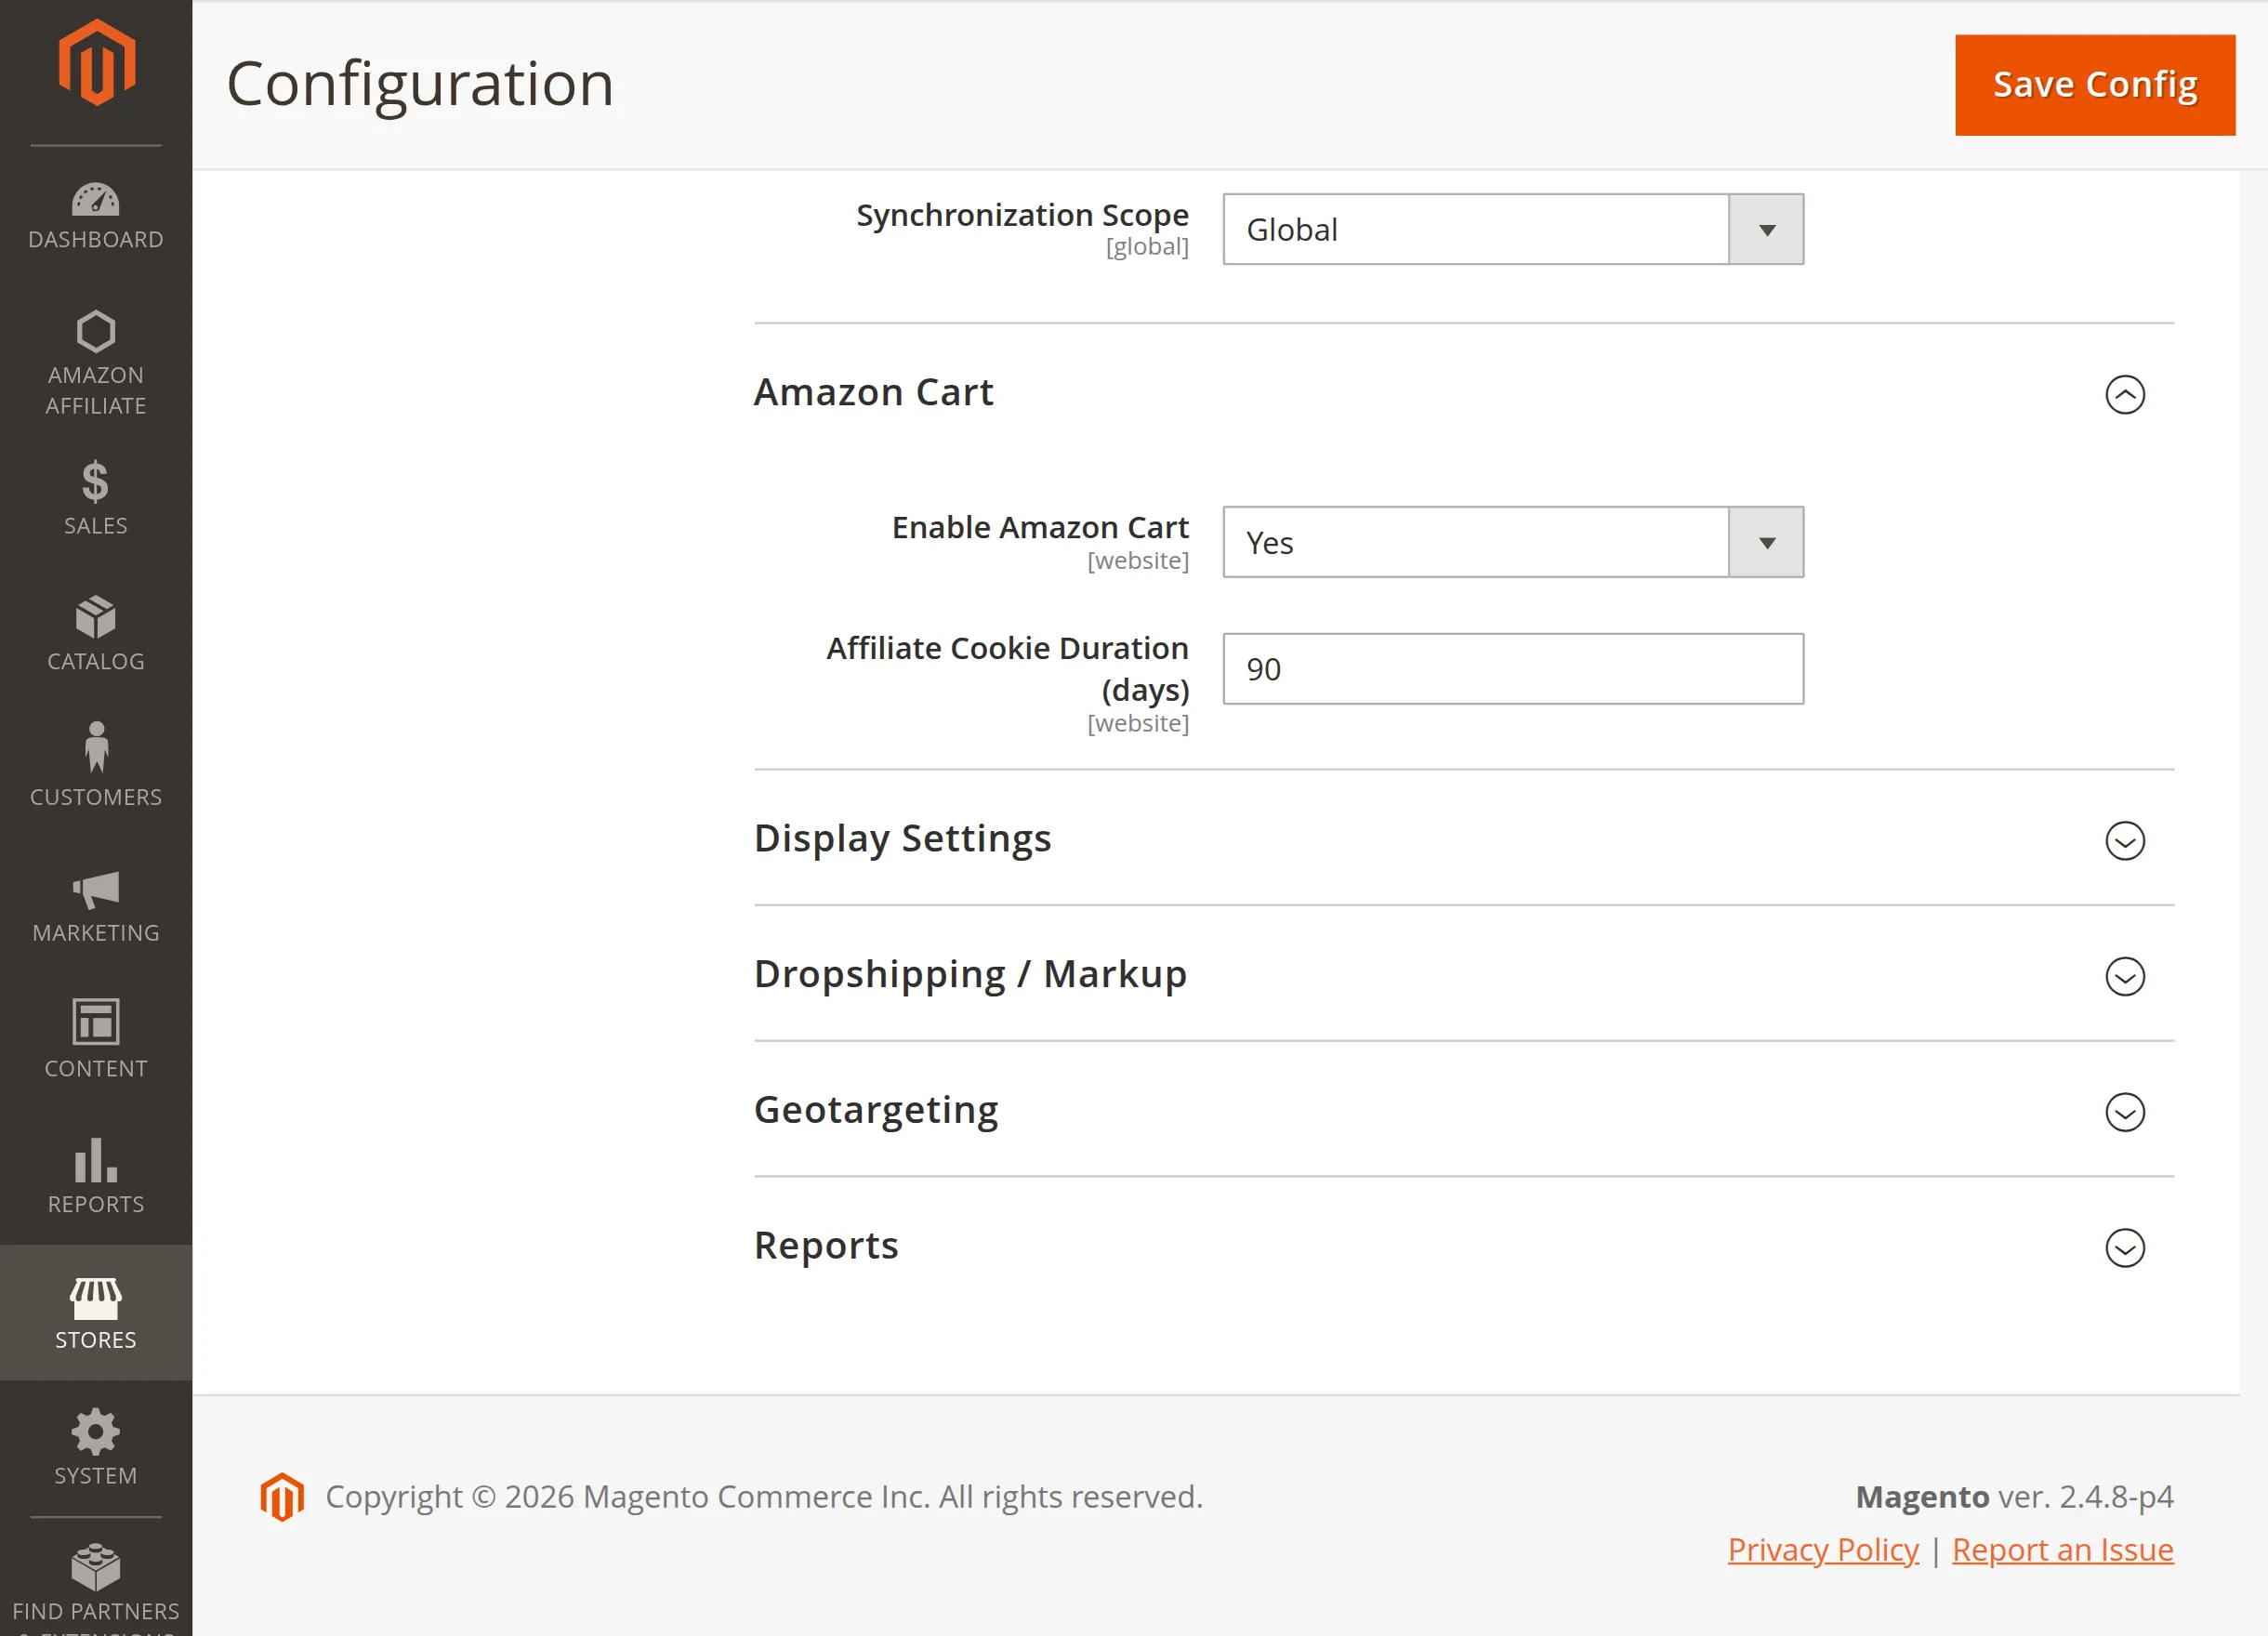
Enable Amazon Cart: Select Yes from the dropdown to activate an on-site shopping cart experience. Therefore, customers can group multiple items together before completing their final redirect.
Affiliate Cookie Duration (days): Define the lifespan of your referral cookie tracking parameters. As a result, setting this to 90 days maximizes your overall earning opportunities effectively.
Display Settings
This section configures how Amazon information appears to your customers. Consequently, you can style elements seamlessly across all catalog pages.
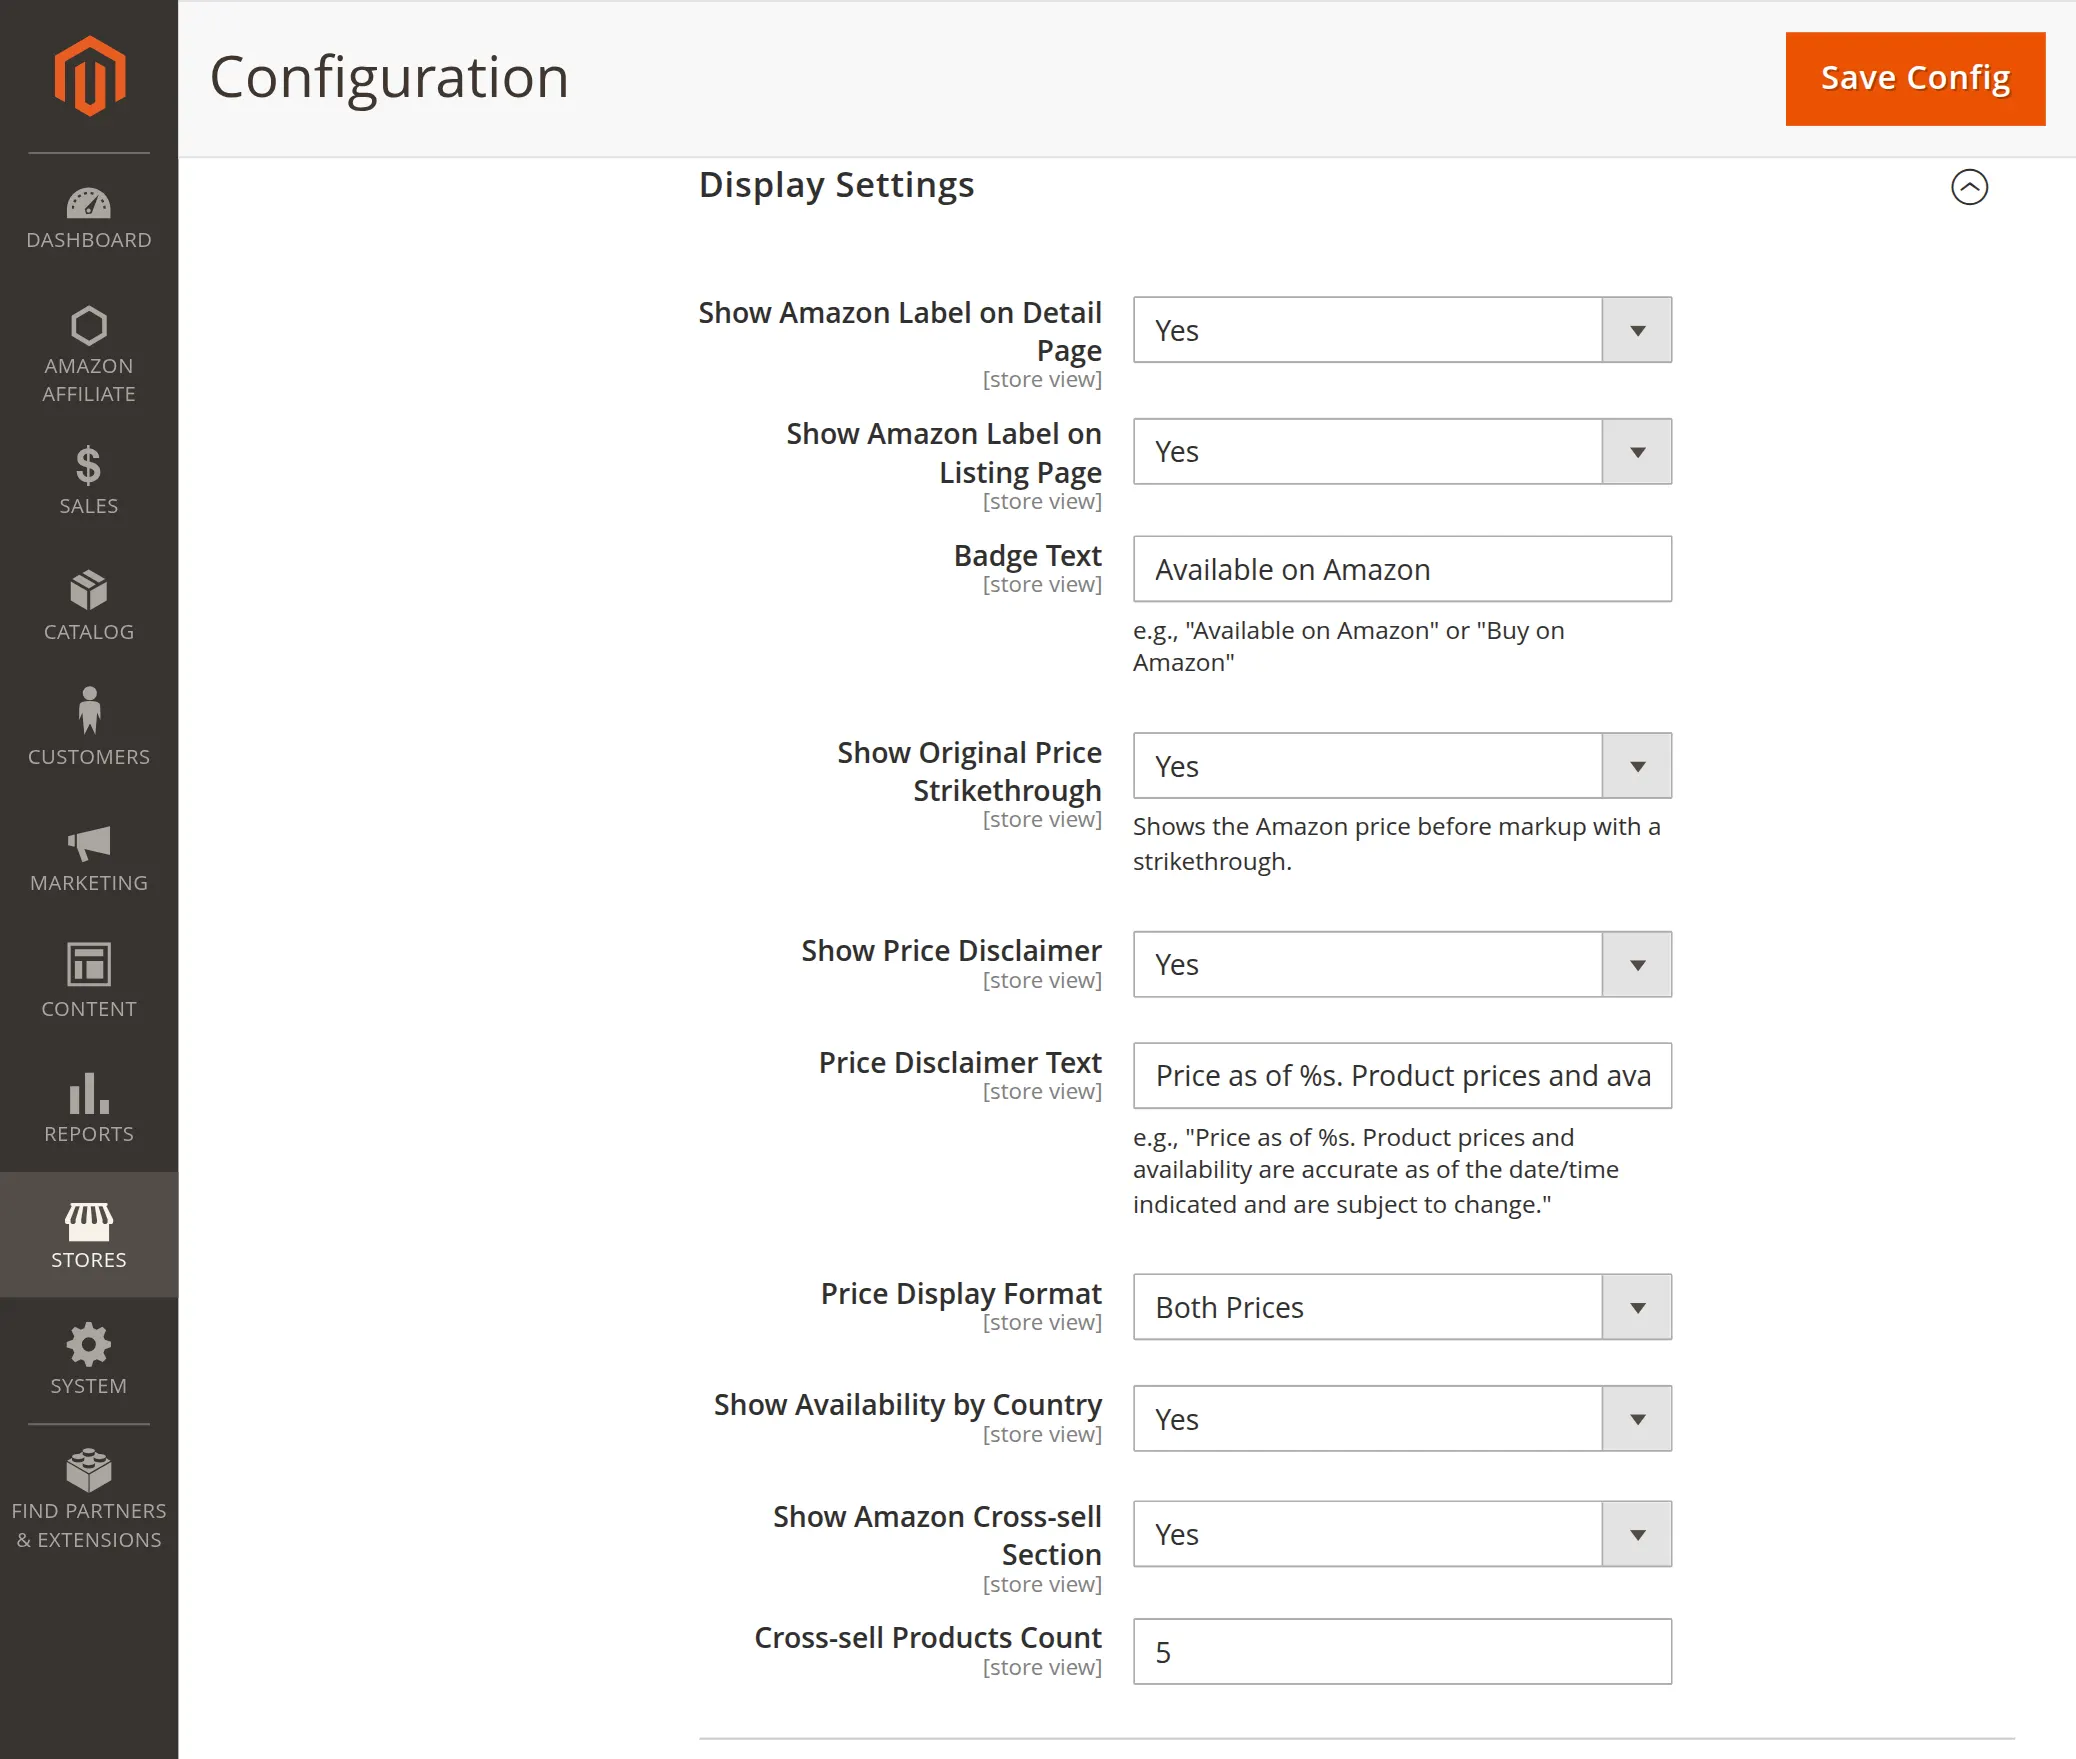
Show Amazon Label on Detail Page: Select Yes from the dropdown to display a branded label on single item descriptions. Therefore, this informs buyers about the product sourcing clearly.
Show Amazon Label on Listing Page: Choose Yes to display the origin indicator directly within grid results. As a result, users can identify affiliate items quickly during browsing.
Badge Text: Input your preferred call-to-action message into the text field. Consequently, custom phrasing helps capture consumer attention and increases click-through rates.
Show Original Price Strikethrough: Select Yes to show initial costs with a visual slash line. Therefore, this layout lets users identify product price markups easily.
Show Price Disclaimer: Choose Yes to present mandatory structural information notices on your frontend. As a result, your store remains compliant with affiliate program rules.
Price Disclaimer Text: Enter your specific compliance phrasing into the provided data text box. Consequently, this message communicates automated updates transparently to visitors.
Price Display Format: Select your preferred monetary visualization style from the dropdown. Therefore, this setting dictates how the final customer observes product values.
Show Availability by Country: Choose Yes to highlight stock situations based on target regions. As a result, international buyers see accurate fulfillment availability directly.
Show Amazon Cross-sell Section: Select Yes to show related item blocks on your layout template views. Consequently, this strategy boosts overall basket sizes automatically.
Cross-sell Products Count: Enter the maximum number of accessory suggestions to load simultaneously. Finally, this limit maintains layout cleanliness across device views.
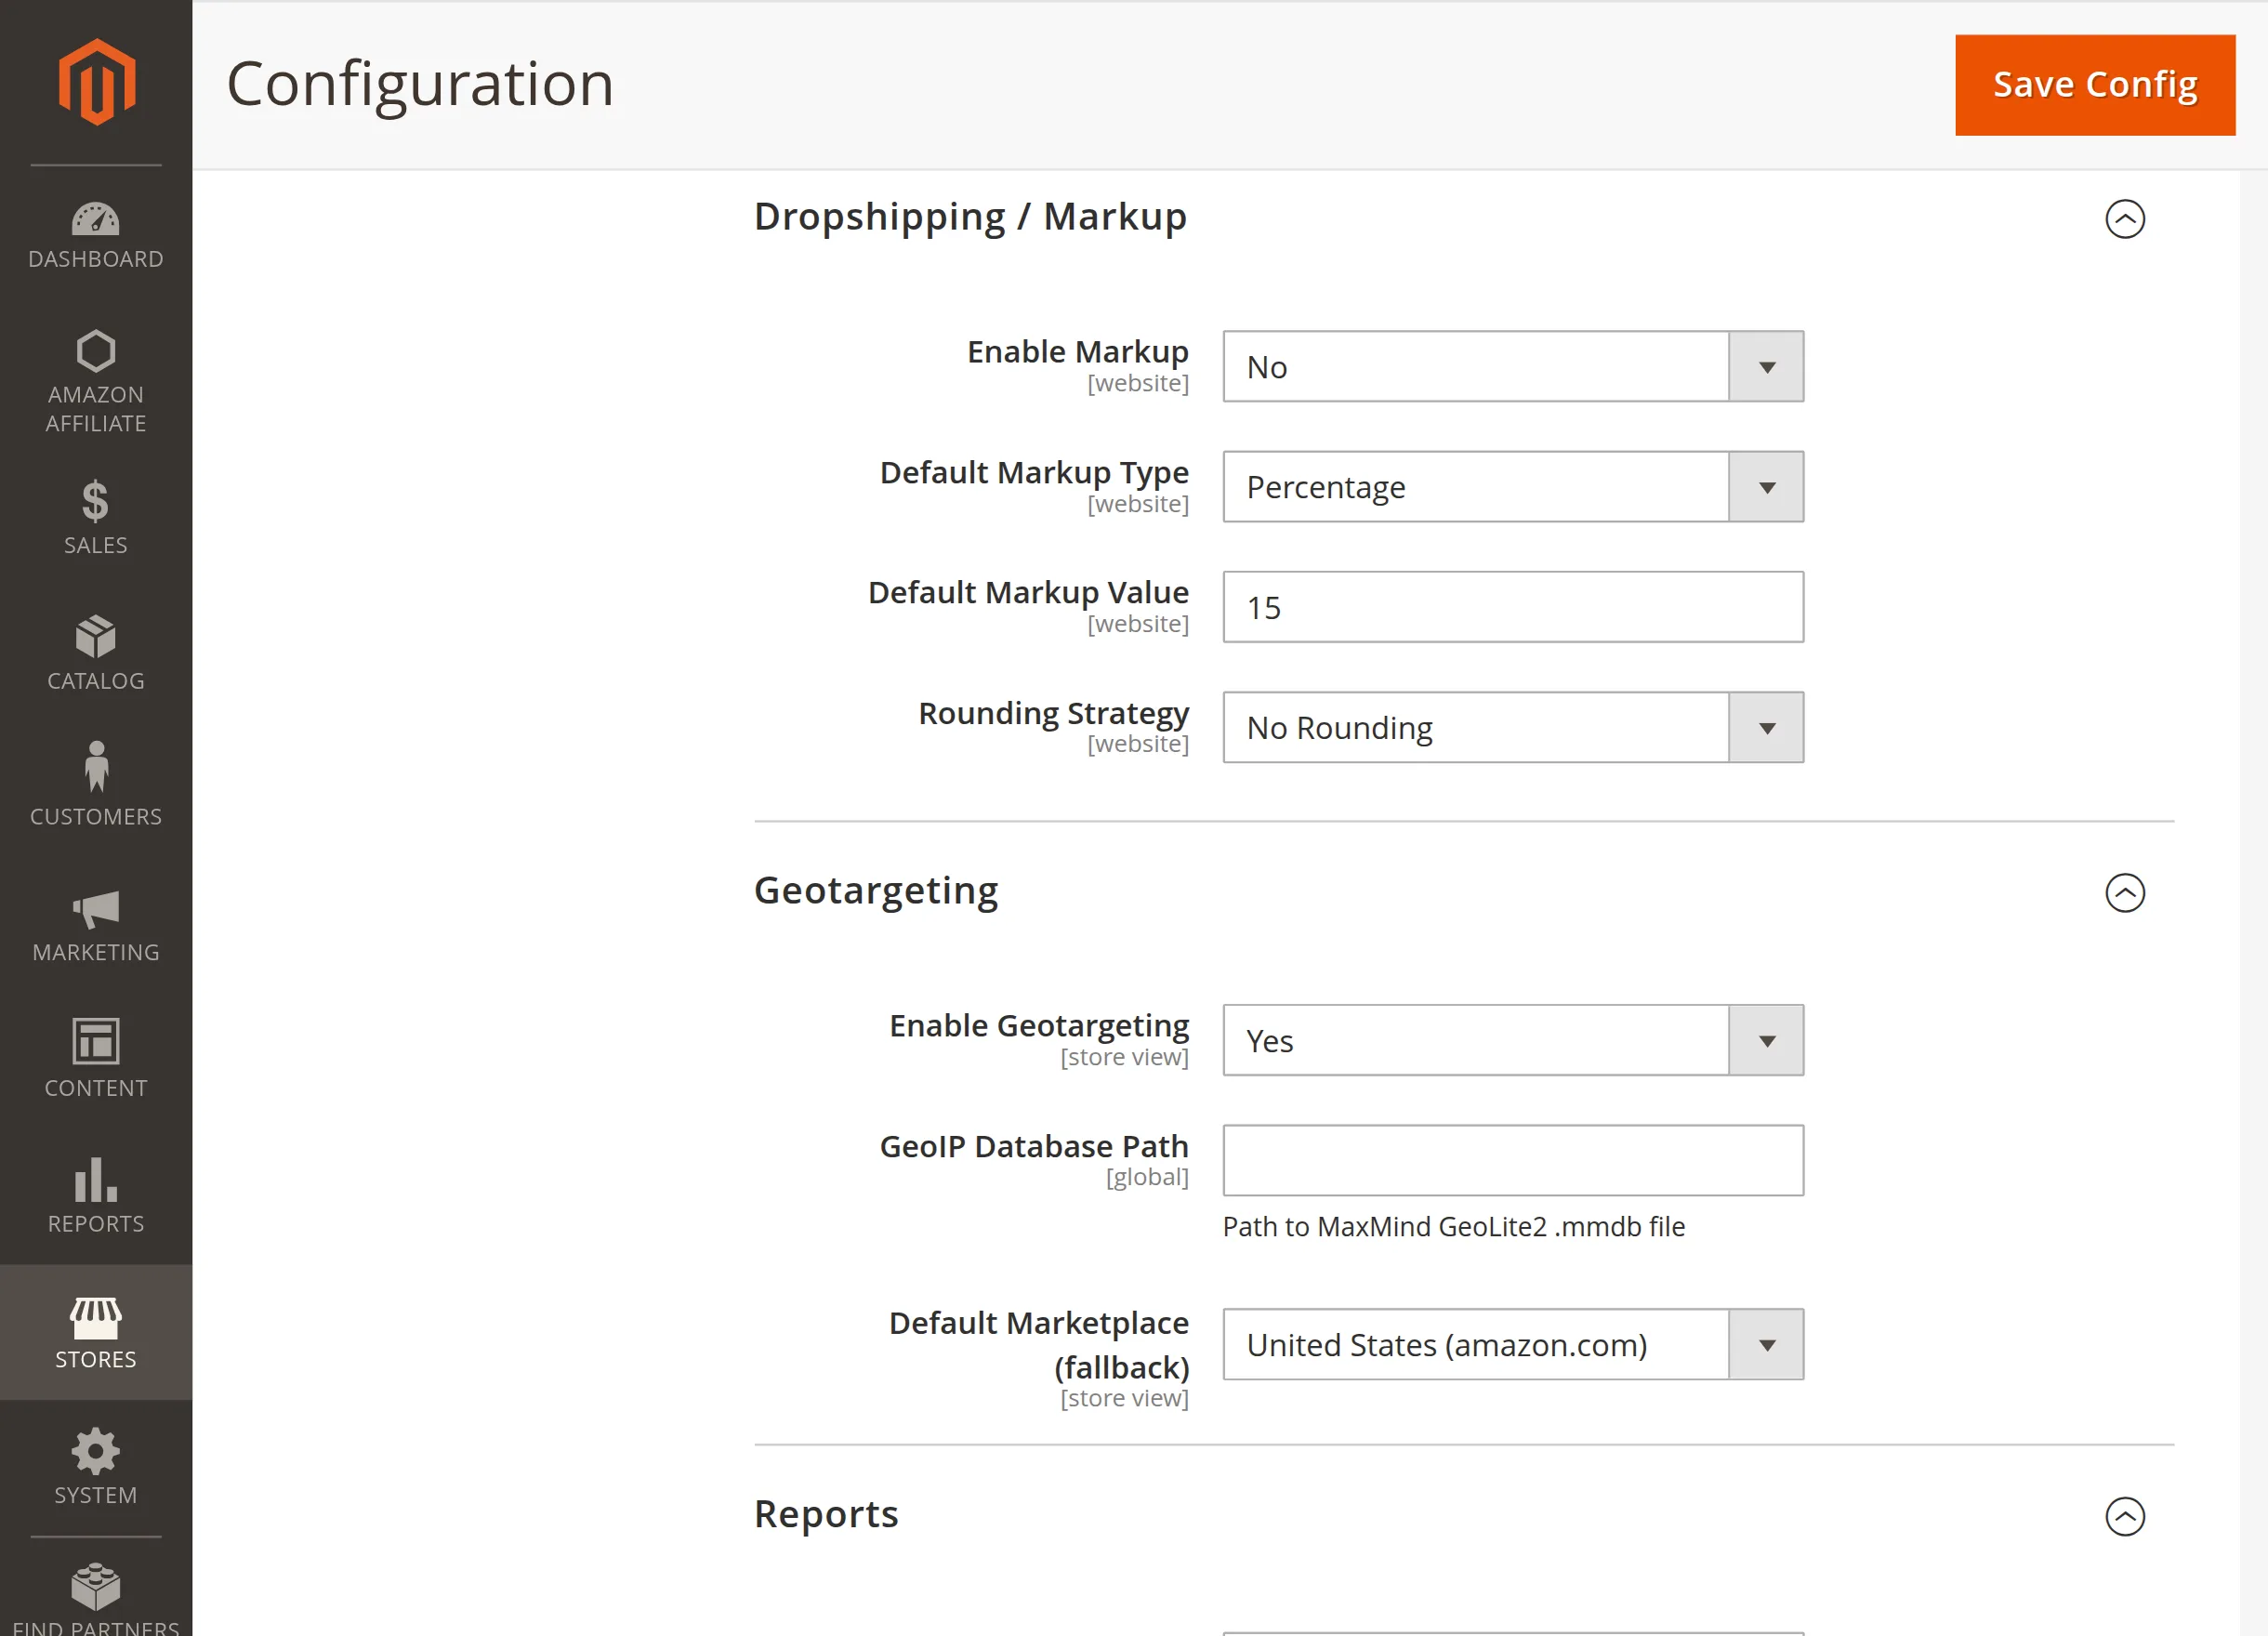
Dropshipping / Markup
This section configures your automated profitability calculations and profit margins.
Consequently, you can optimize your pricing strategy effortlessly across all imported products.
Enable Markup: Select Yes to activate rule-based adjustments on imported product values. Therefore, your store modifies standard Amazon catalog prices automatically upon ingestion.
Markup Type: Choose between Fixed or Percentage-based increases from the dropdown menu.
As a result, this selection determines exactly how the engine scales your final pricing matrix.
Markup Value: Enter your numeric markup value into the specified input field. Consequently, this amount dynamically elevates base rates to generate consistent auxiliary store revenue.
Price Rounding Strategy: Select your preferred rounding calculation style from the options.
Finally, this design feature ensures your final catalog listings display polished, professional retail numbers.
Dropshipping Sync / Logging
This matrix tracks pricing update integrity and backend transaction records.
Therefore, administrators can evaluate system tasks and background performance with absolute clarity.
Enable Operational Logs: Choose Yes from the dropdown to record every background pricing task continuously.
As a result, your system stores granular synchronization details for seamless routine audits.
Error Notice Email: Input your administrative contact email address into the text box.
Consequently, the extension dispatches instant warning alerts if communication interruptions occur during live operations.
Debug Mode: Select Yes to preserve comprehensive system telemetry files within your backend database.
Finally, this diagnostics tool helps engineering teams resolve synchronization bottlenecks quickly.
Reports
This section manages the automated delivery of performance metrics and click tracking overviews. Consequently, you can review your affiliate store data continuously right from your email inbox.
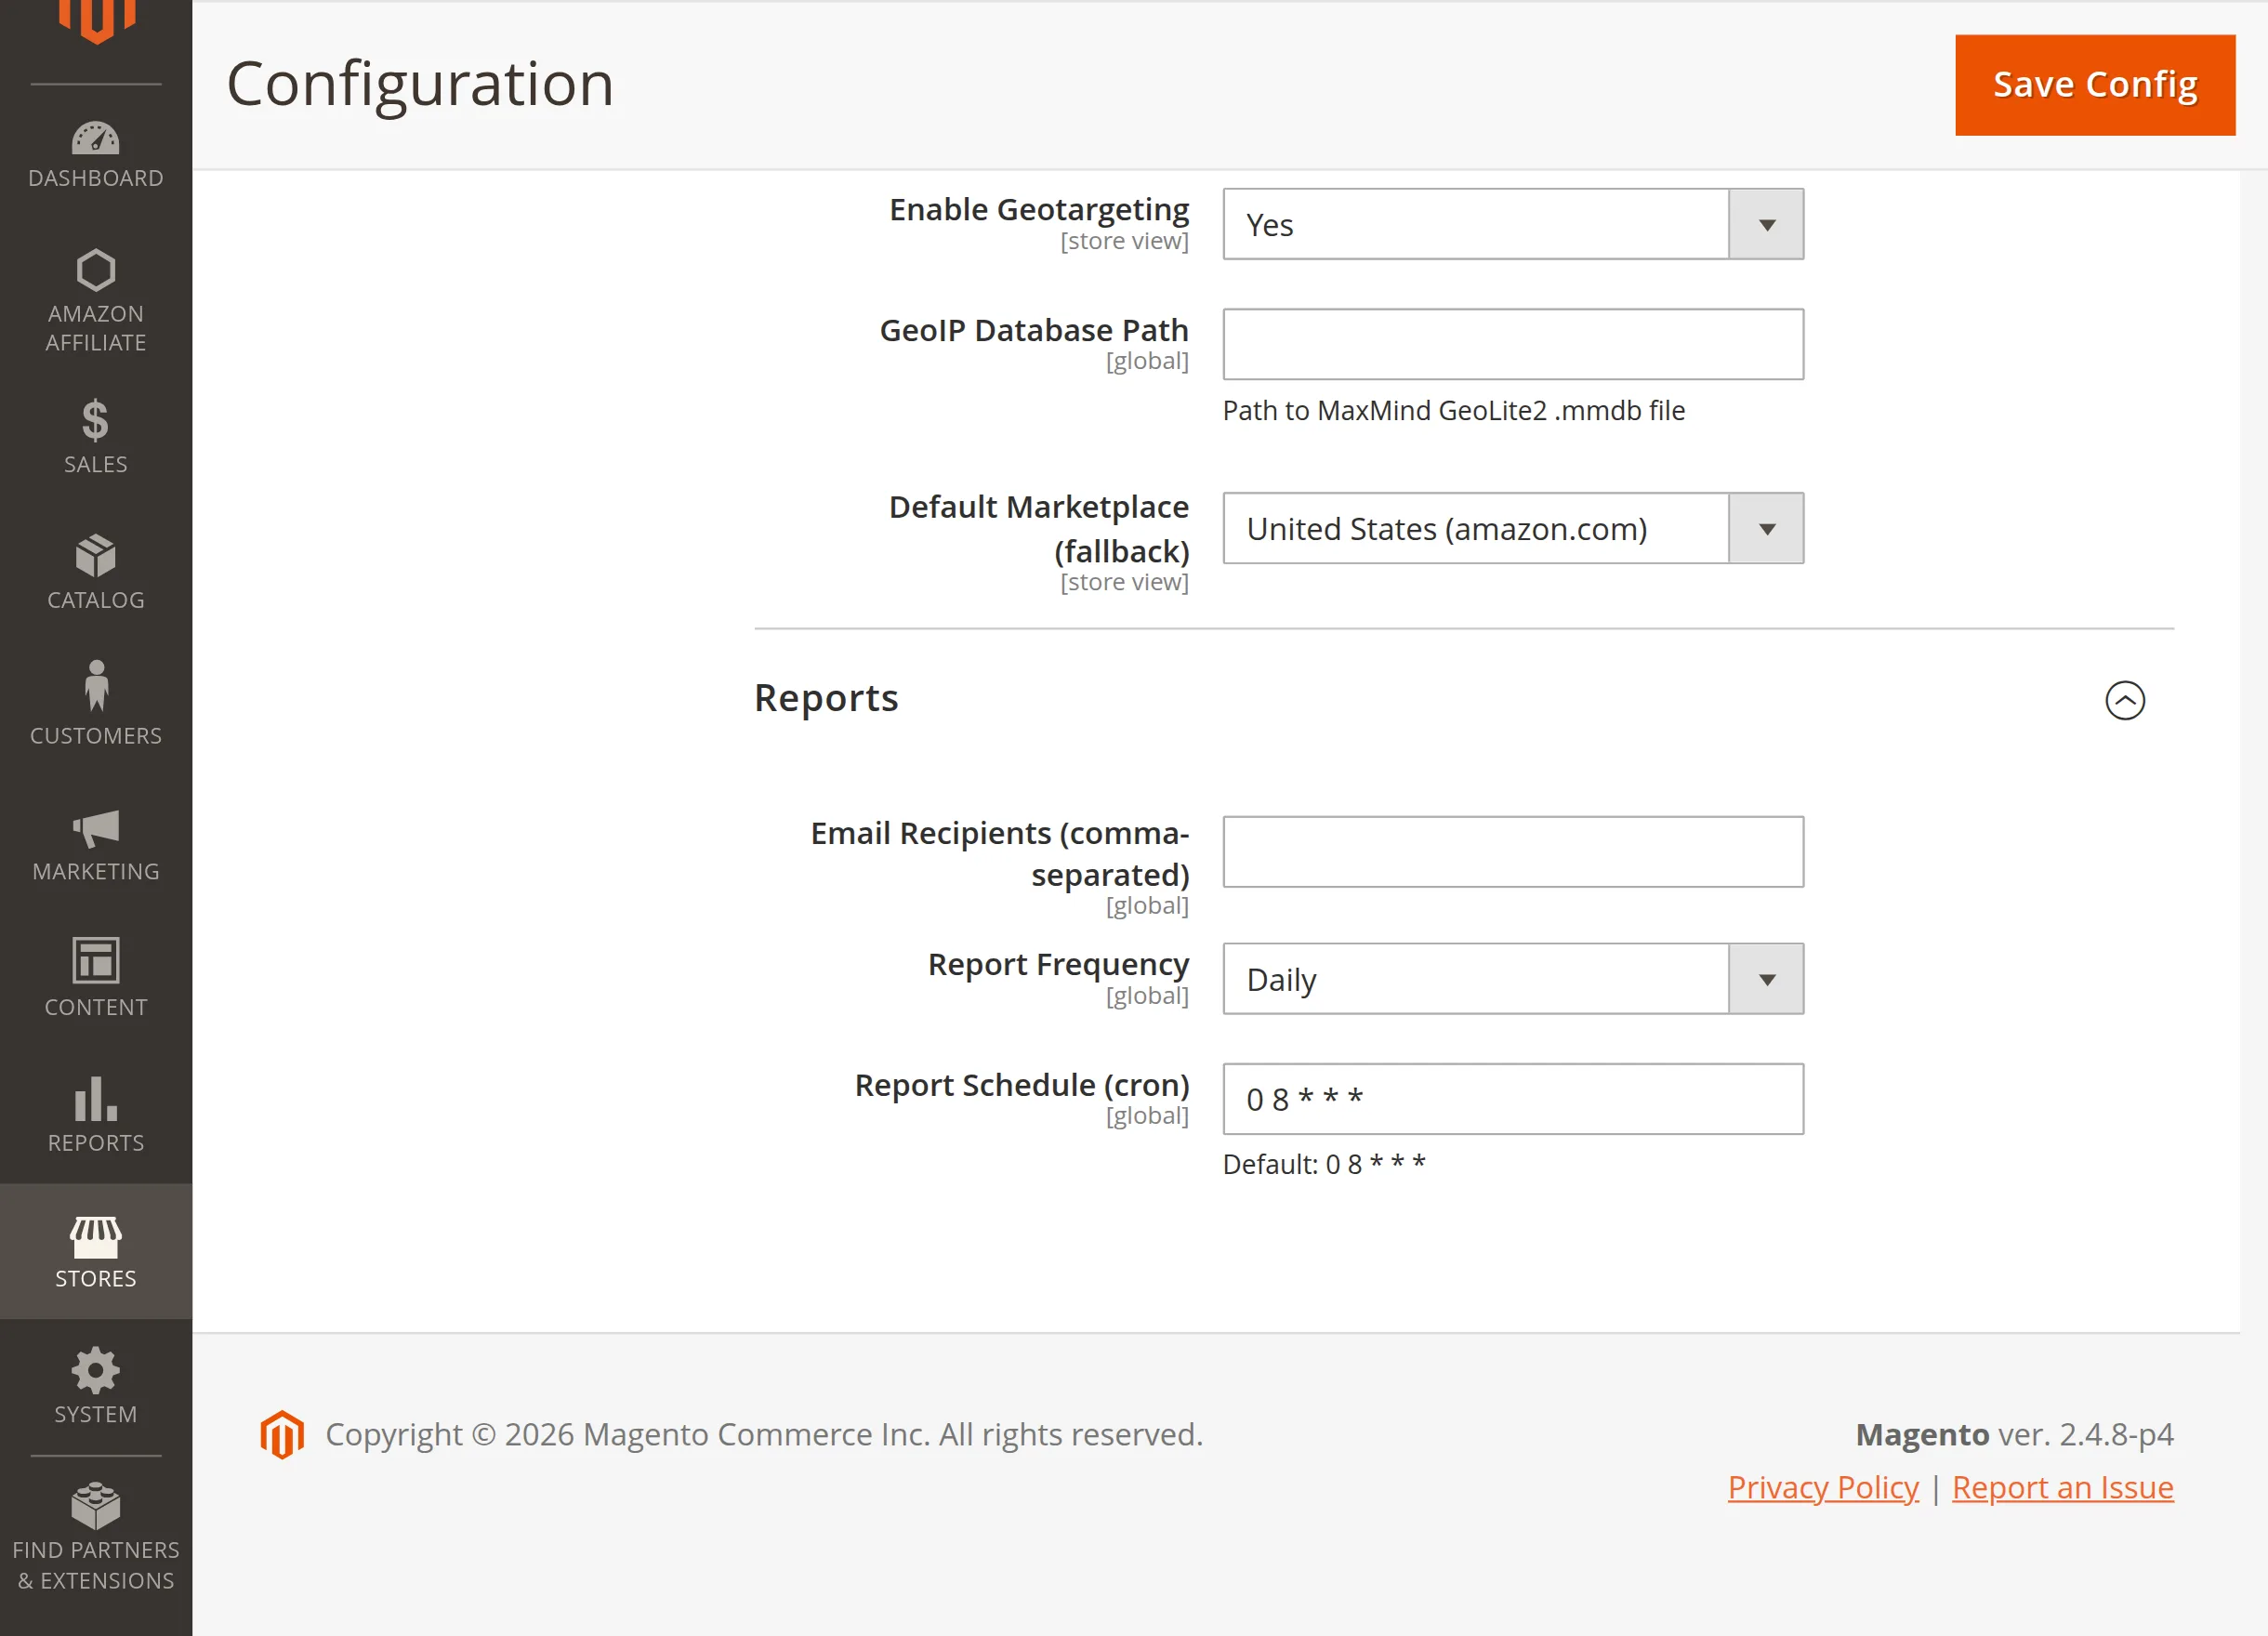
Email Recipients (comma-separated): Input your administrative email addresses separated by commas. Therefore, the extension automatically dispatches fresh performance notifications to multiple stakeholders at once.
Report Frequency: Select your preferred update cycle interval from the dropdown options. As a result, this setting determines exactly how often the backend system compiles your summary files.
Report Schedule (cron): Enter a standard cron expression to automate your dashboard reporting routines. Finally, Magento executes the metric compilation delivery exactly at this designated time.
Amazon Affiliate
After the successful installation and configuration, the Amazon Affiliate menu option is visible to the admin.
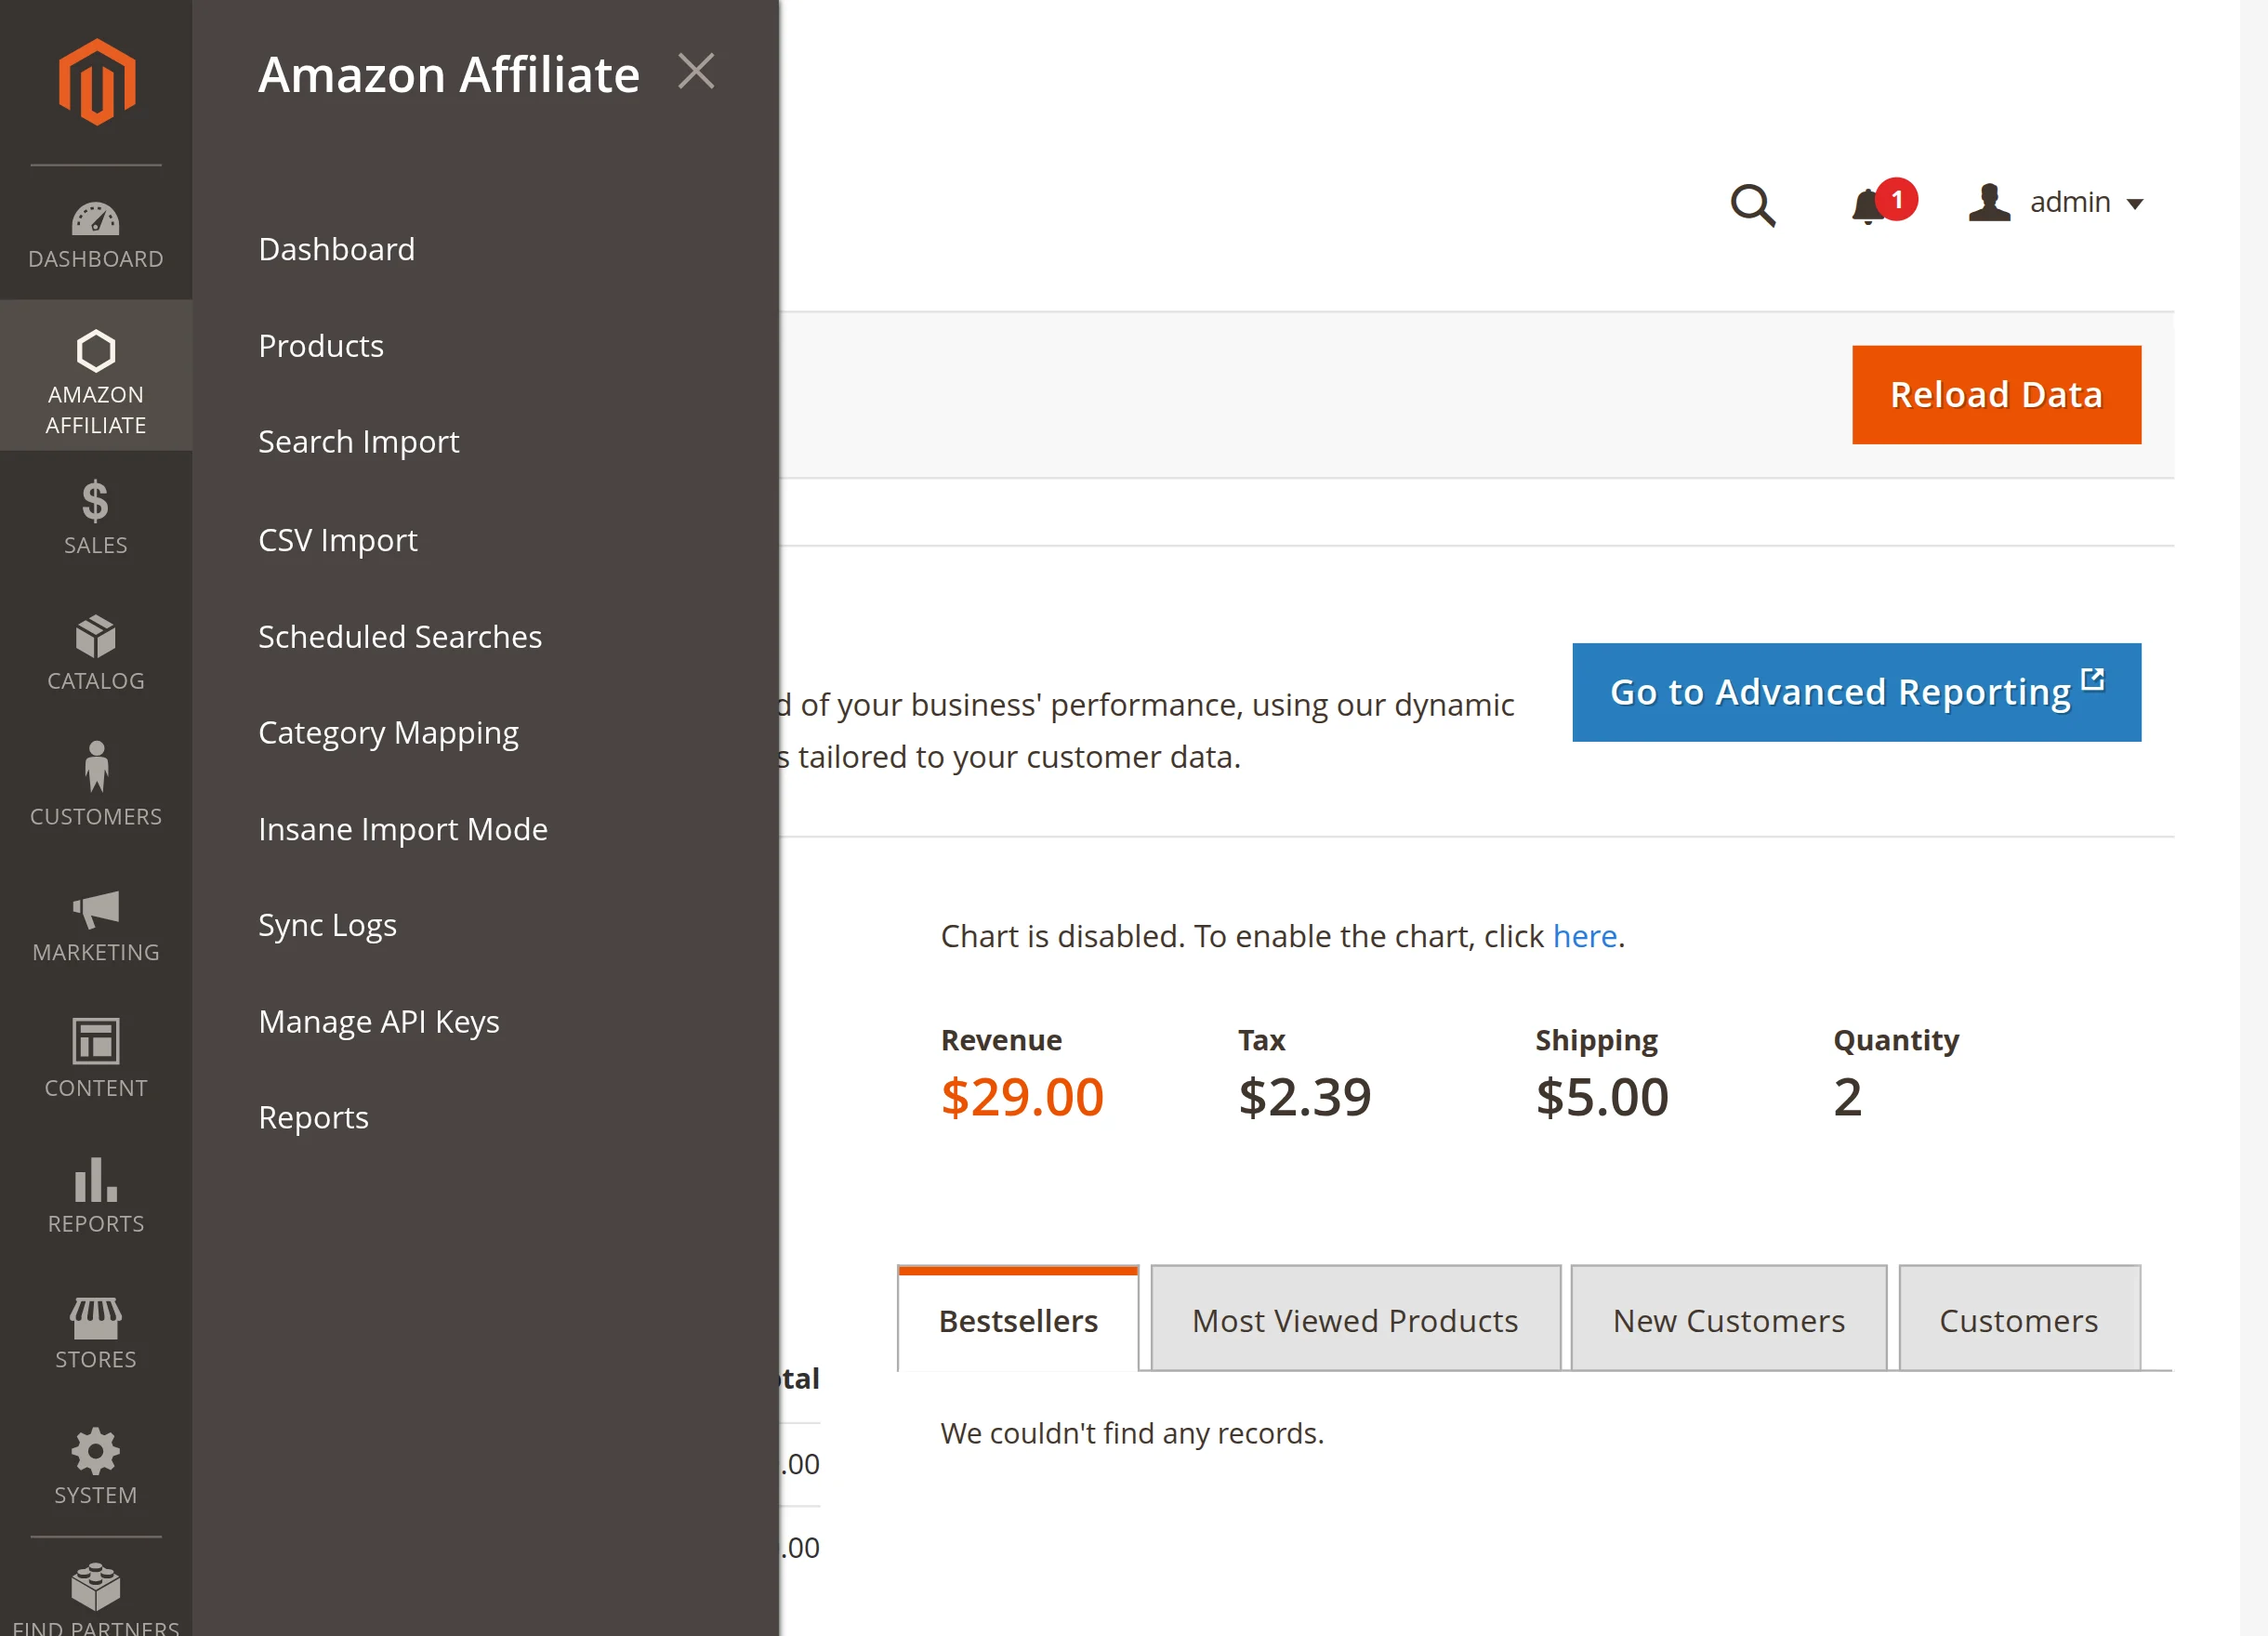
Here, the admin has the following options to configure and manage Amazon Affiliate operations across the store –
- Dashboard
- Products
- Search Import
- CSV Import
- Scheduled Searches
- Category Mapping
- Insane Import Mode
- Sync Logs
- Manage API Keys
- Reports
Dashboard
This section provides a visual summary of your background ingestion tasks, helping you monitor import pipelines continuously at a glance.
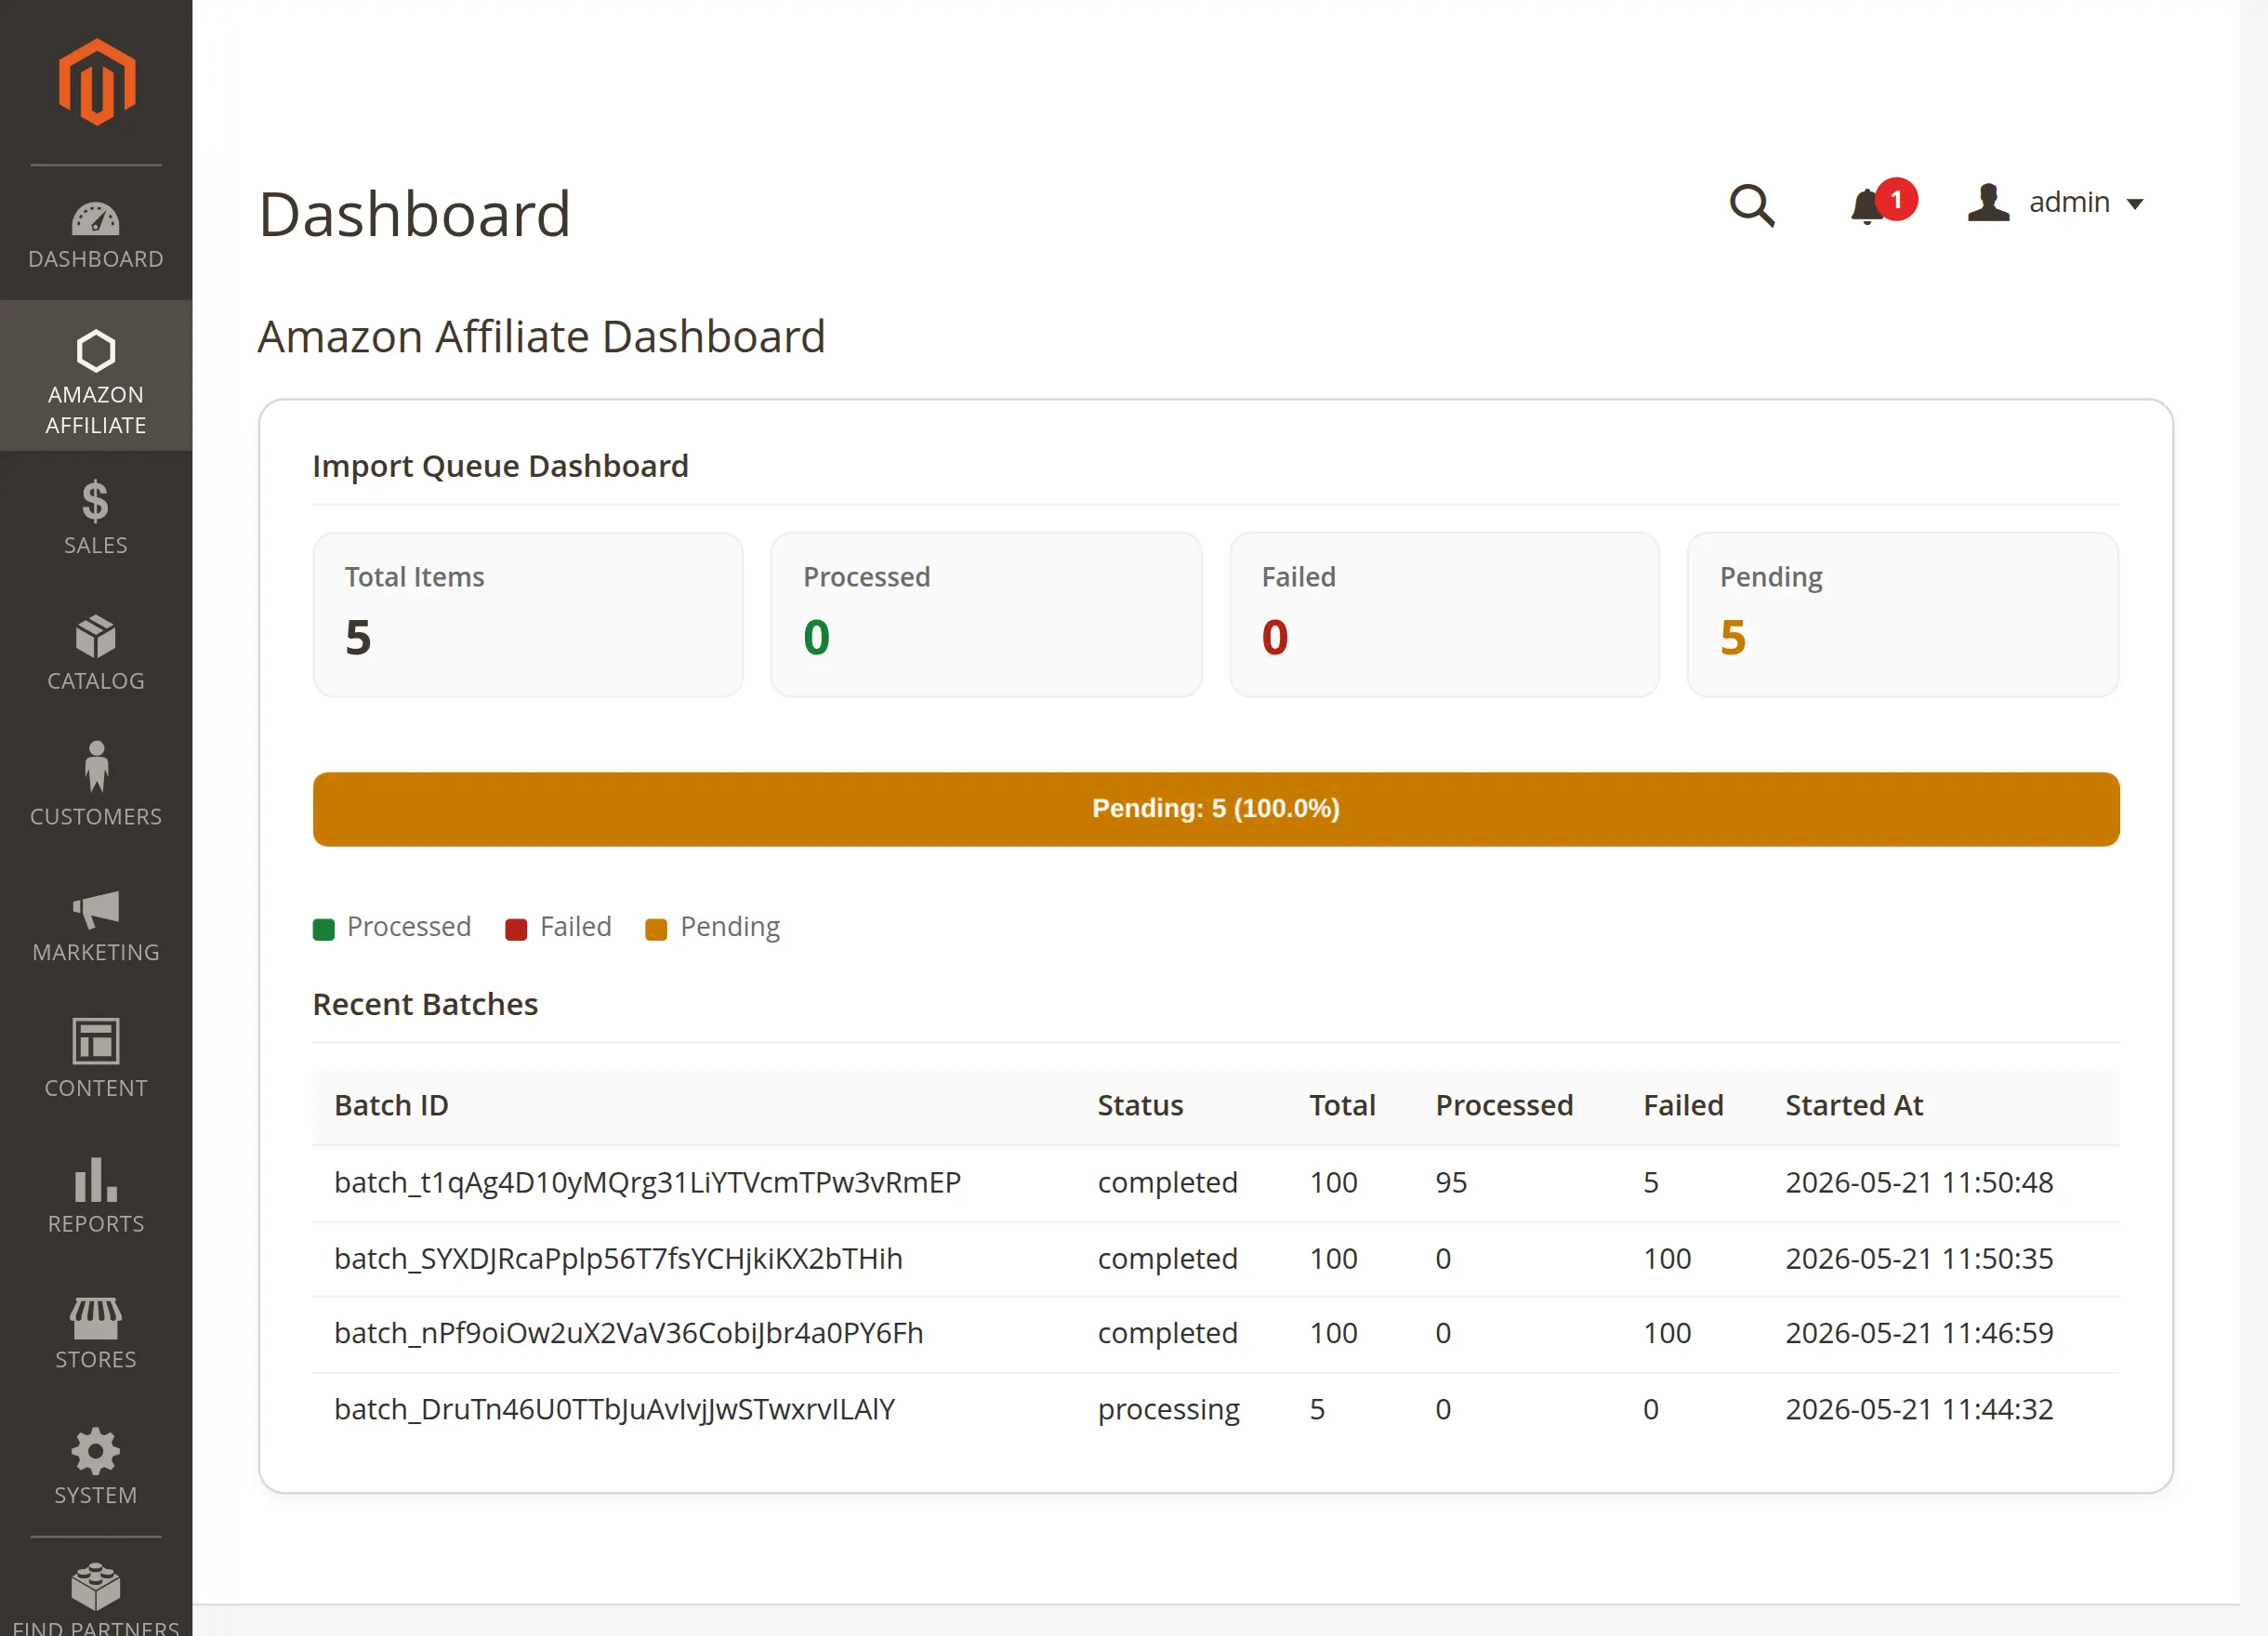
Import Queue Dashboard: Monitor counters for total items, processed entries, failures, and remaining jobs. This overview helps you identify ongoing background performance instantly.
Recent Batches: Review specific tracking IDs, execution timetables, and overall completion statuses. As a result, administrators can isolate ingestion errors or success ratios quickly.
Products
This section displays all the items you have fetched from Amazon. The main grid makes it easy to track stock status, pricing records, and sync histories across your store setup.
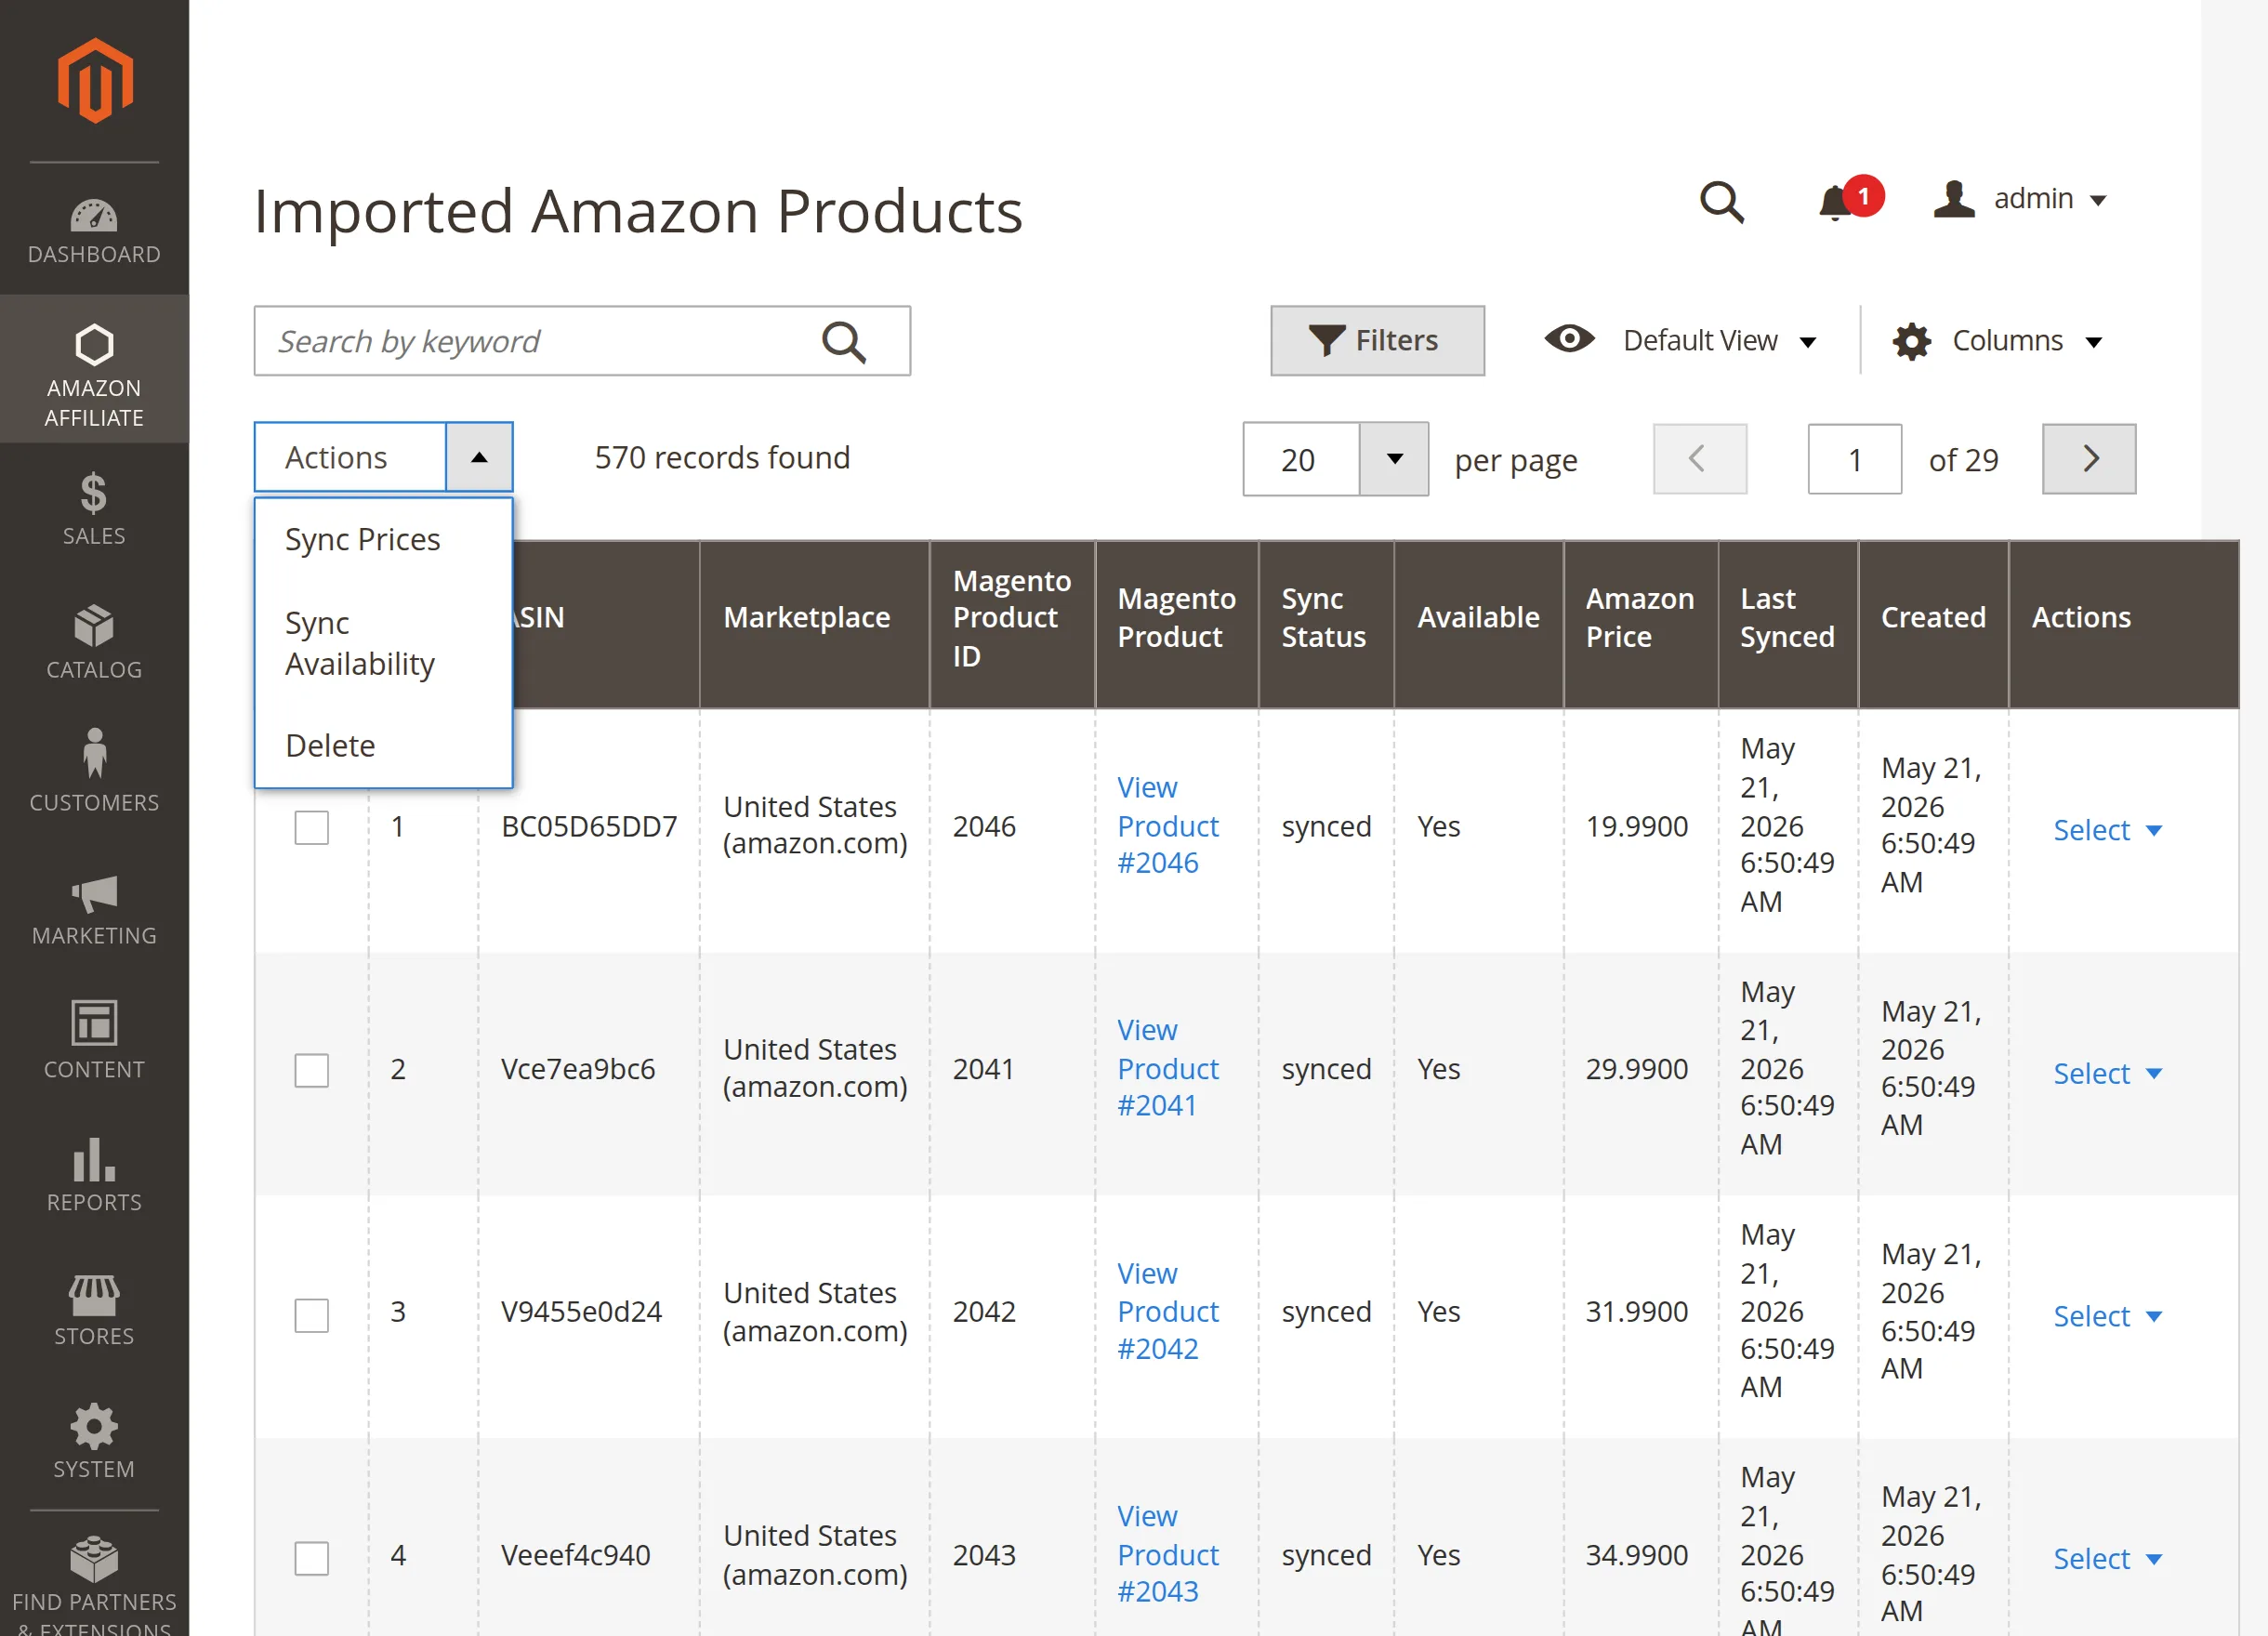
Product Data Grid: View critical database details like ASIN, source marketplace, internal Magento product ID, and real-time synchronization status. This matrix ensures your front-end listings match live Amazon details.
Actions: Click the Select link next to any item to view the native Magento product page or delete the asset entirely. This tool lets you edit details or purge unwanted listings in seconds.
Mass Actions Menu: Select multiple items using the left checkboxes to perform bulk updates. This option saves time when managing a large affiliate catalog.
-
Sync Prices: Update the costs of all selected items simultaneously. This action forces an immediate pricing check against live Amazon data to maintain compliance.
-
Sync Availability: Refresh the stock status for multiple listings at once. This ensures your store hides or updates out-of-stock items before customers attempt a redirect.
-
Delete: Remove the selected product assets from your database completely. This bulk option lets you purge unwanted listings from your Magento backend instantly.
Search Import
This tool enables you to find and fetch live items directly from Amazon’s marketplace. The interface lets you refine your product queries and process bulk additions from a single view.
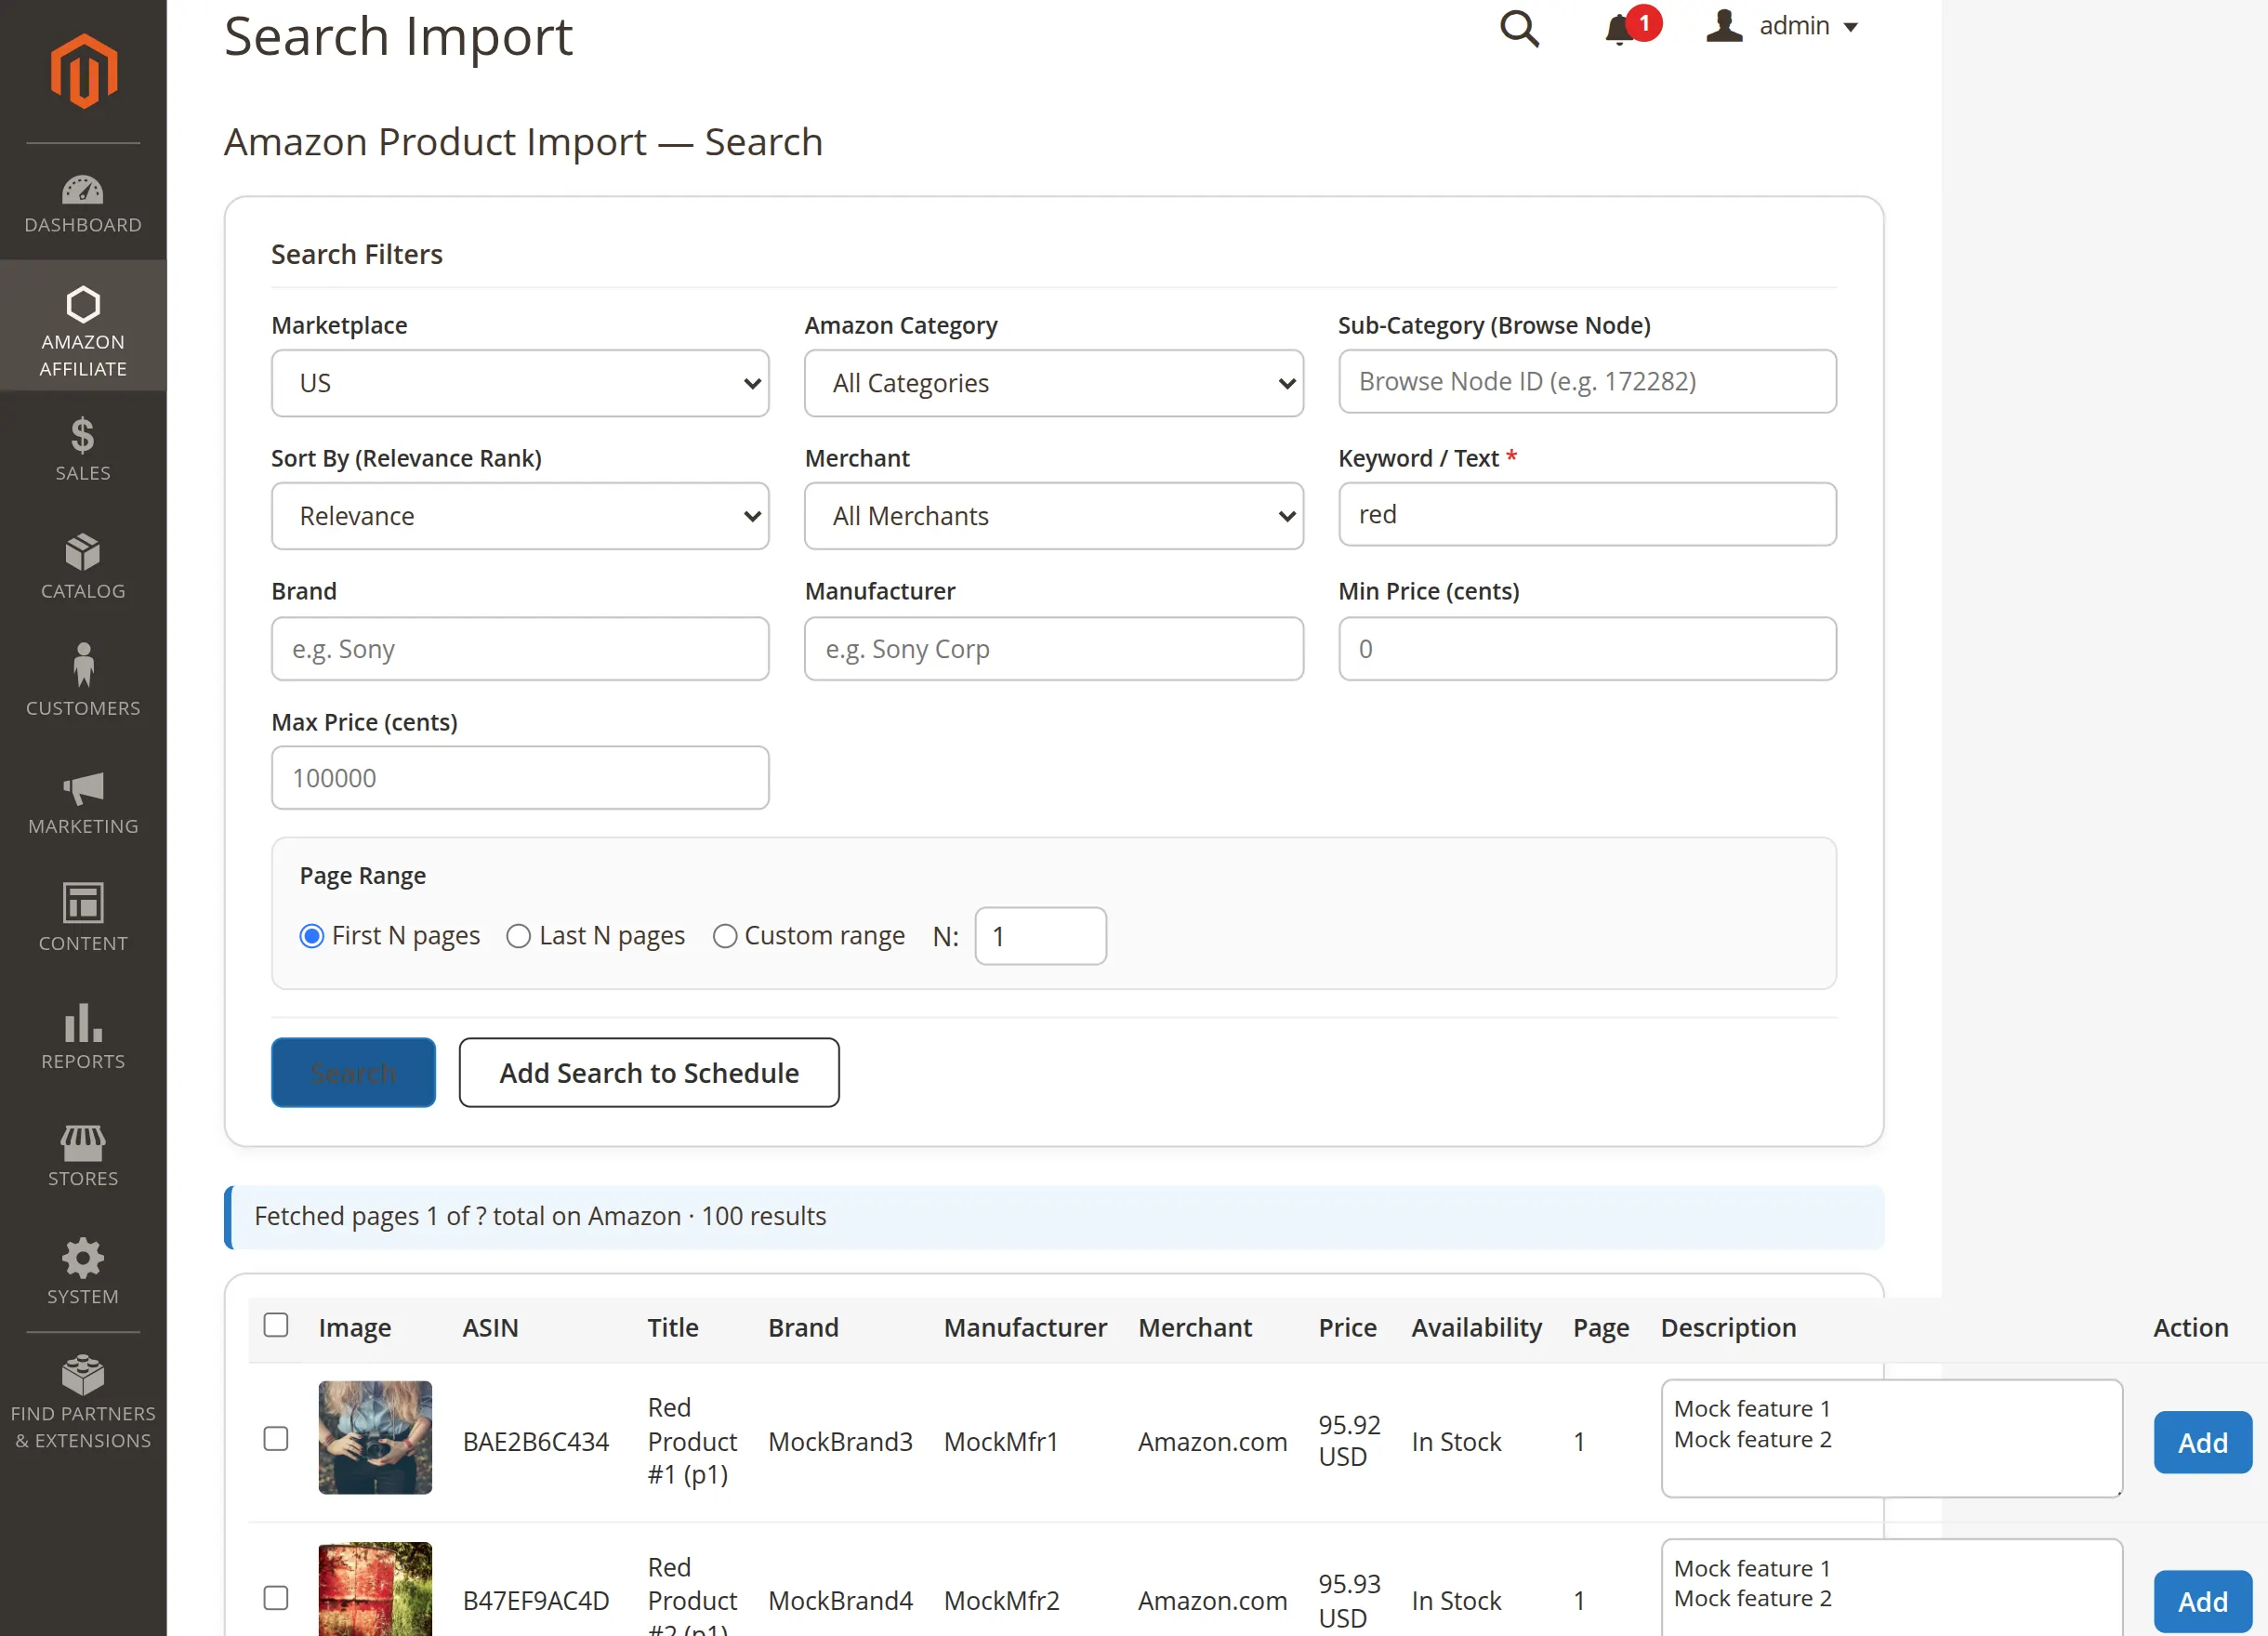
Search Filters: Use advanced criteria like marketplace, category browse nodes, brands, and price ranges. You must provide a valid string in the Keyword / Text field to initiate the lookup.
Page Range Configuration: Define the exact scope of your ingestion cycle by choosing specific page ranges. This boundary management prevents server memory strain during large query cycles.
Execution Actions: Click Search to view matching live listings in the lower data grid instantly. Alternatively, use Add Search to Schedule to convert your active filters into an automated background routine.
Fetched Results Grid: Review real-time Amazon product rows showing details like images, ASIN tags, pricing, and stock availability.
-
Add Button: Click this action next to any row item to import that specific single asset into your Magento store immediately.
-
Import Selected: Check multiple items using the selection boxes and click the main button at the bottom to trigger a batch import task.
CSV Import
This tool enables you to upload data files to process bulk Amazon product ingestions. The panel maps spreadsheet indicators into organized data sets efficiently.
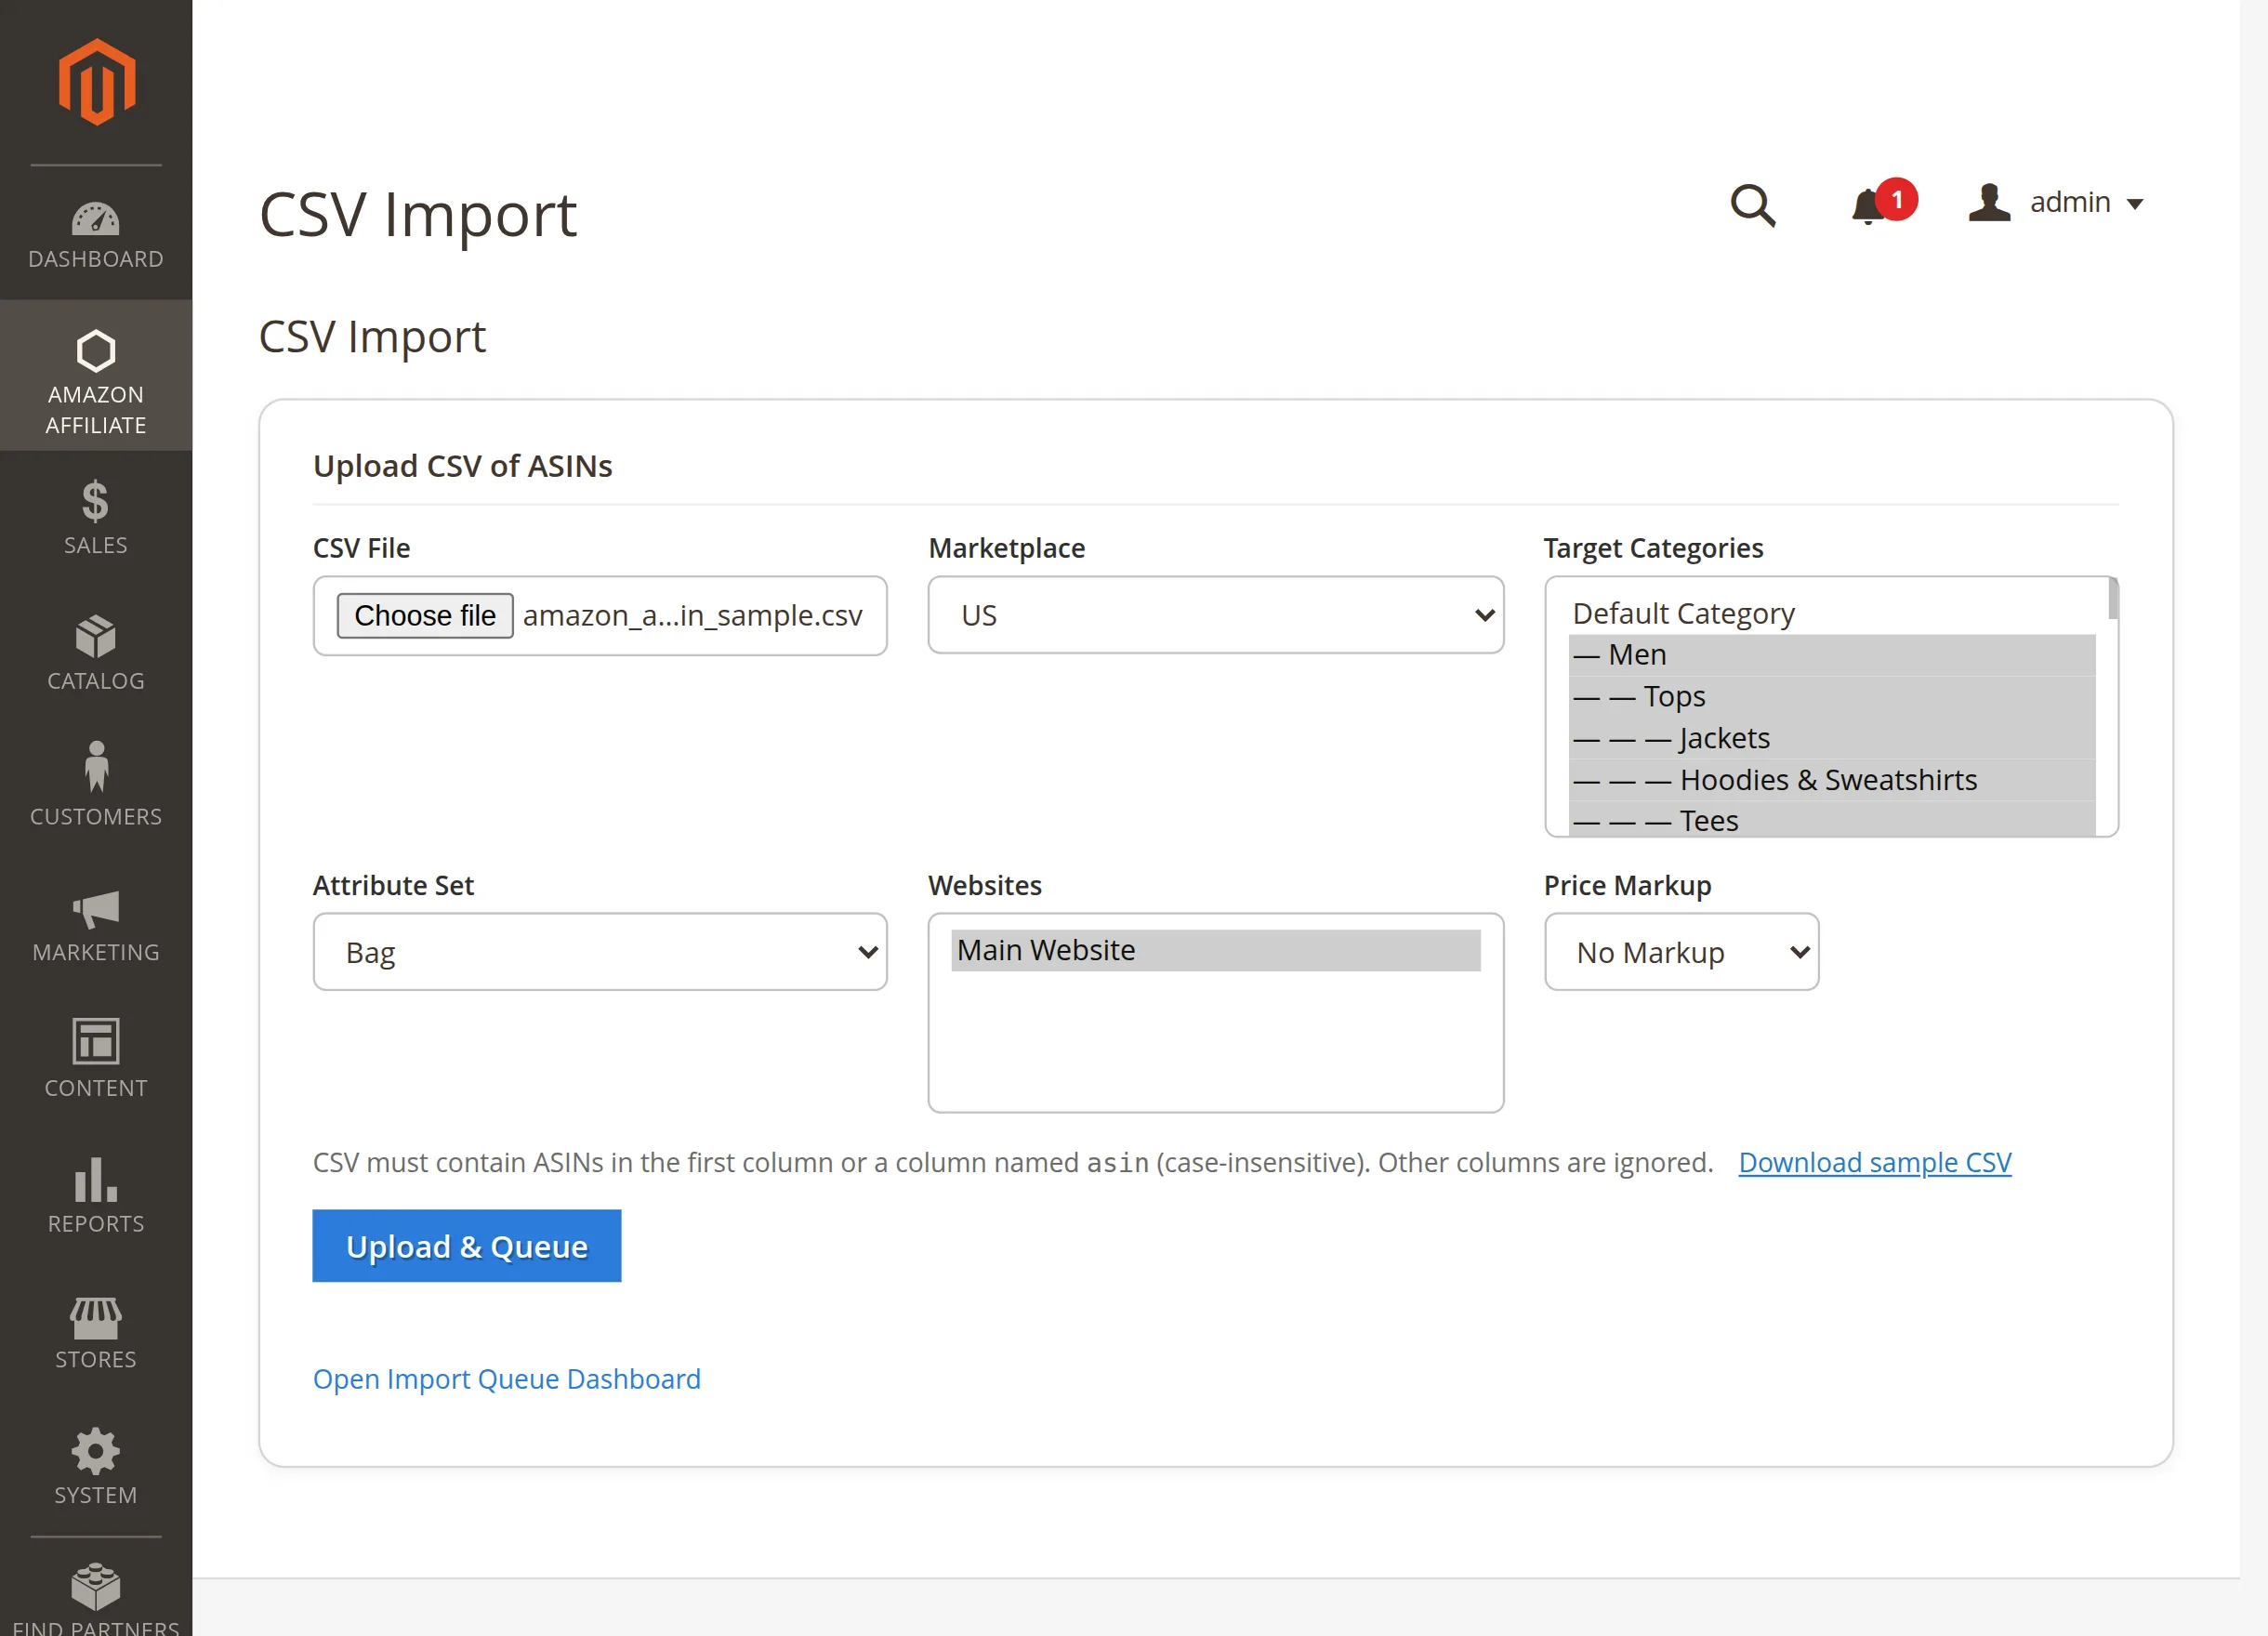
CSV File: Click the file finder box to choose your data spreadsheet. The file must contain a clear list of target ASIN values in its primary data column.
Marketplace: Select your target destination locale from the dropdown menu options. This configuration ensures the import engine pulls from the correct regional Amazon database.
Target Categories: Highlight specific store folders from the multi-select category tree view. This layout places all incoming spreadsheet items into your designated locations.
Attribute Set & Websites: Choose the database template group and target store storefront views. This metadata mapping ensures correct visualization patterns on your frontend.
Price Markup: Select your preferred markup formula modifier directly from the dropdown. This option applies automated profit calculations to your incoming spreadsheet items.
Upload & Queue: Click this primary action button to process your prepared data spreadsheet. The tool sends entries to your background ingestion tasks instantly.
Scheduled Searches
This section manages your saved automated search configurations. The workspace allows you to audit ongoing background discoveries and check future execution timetables easily.
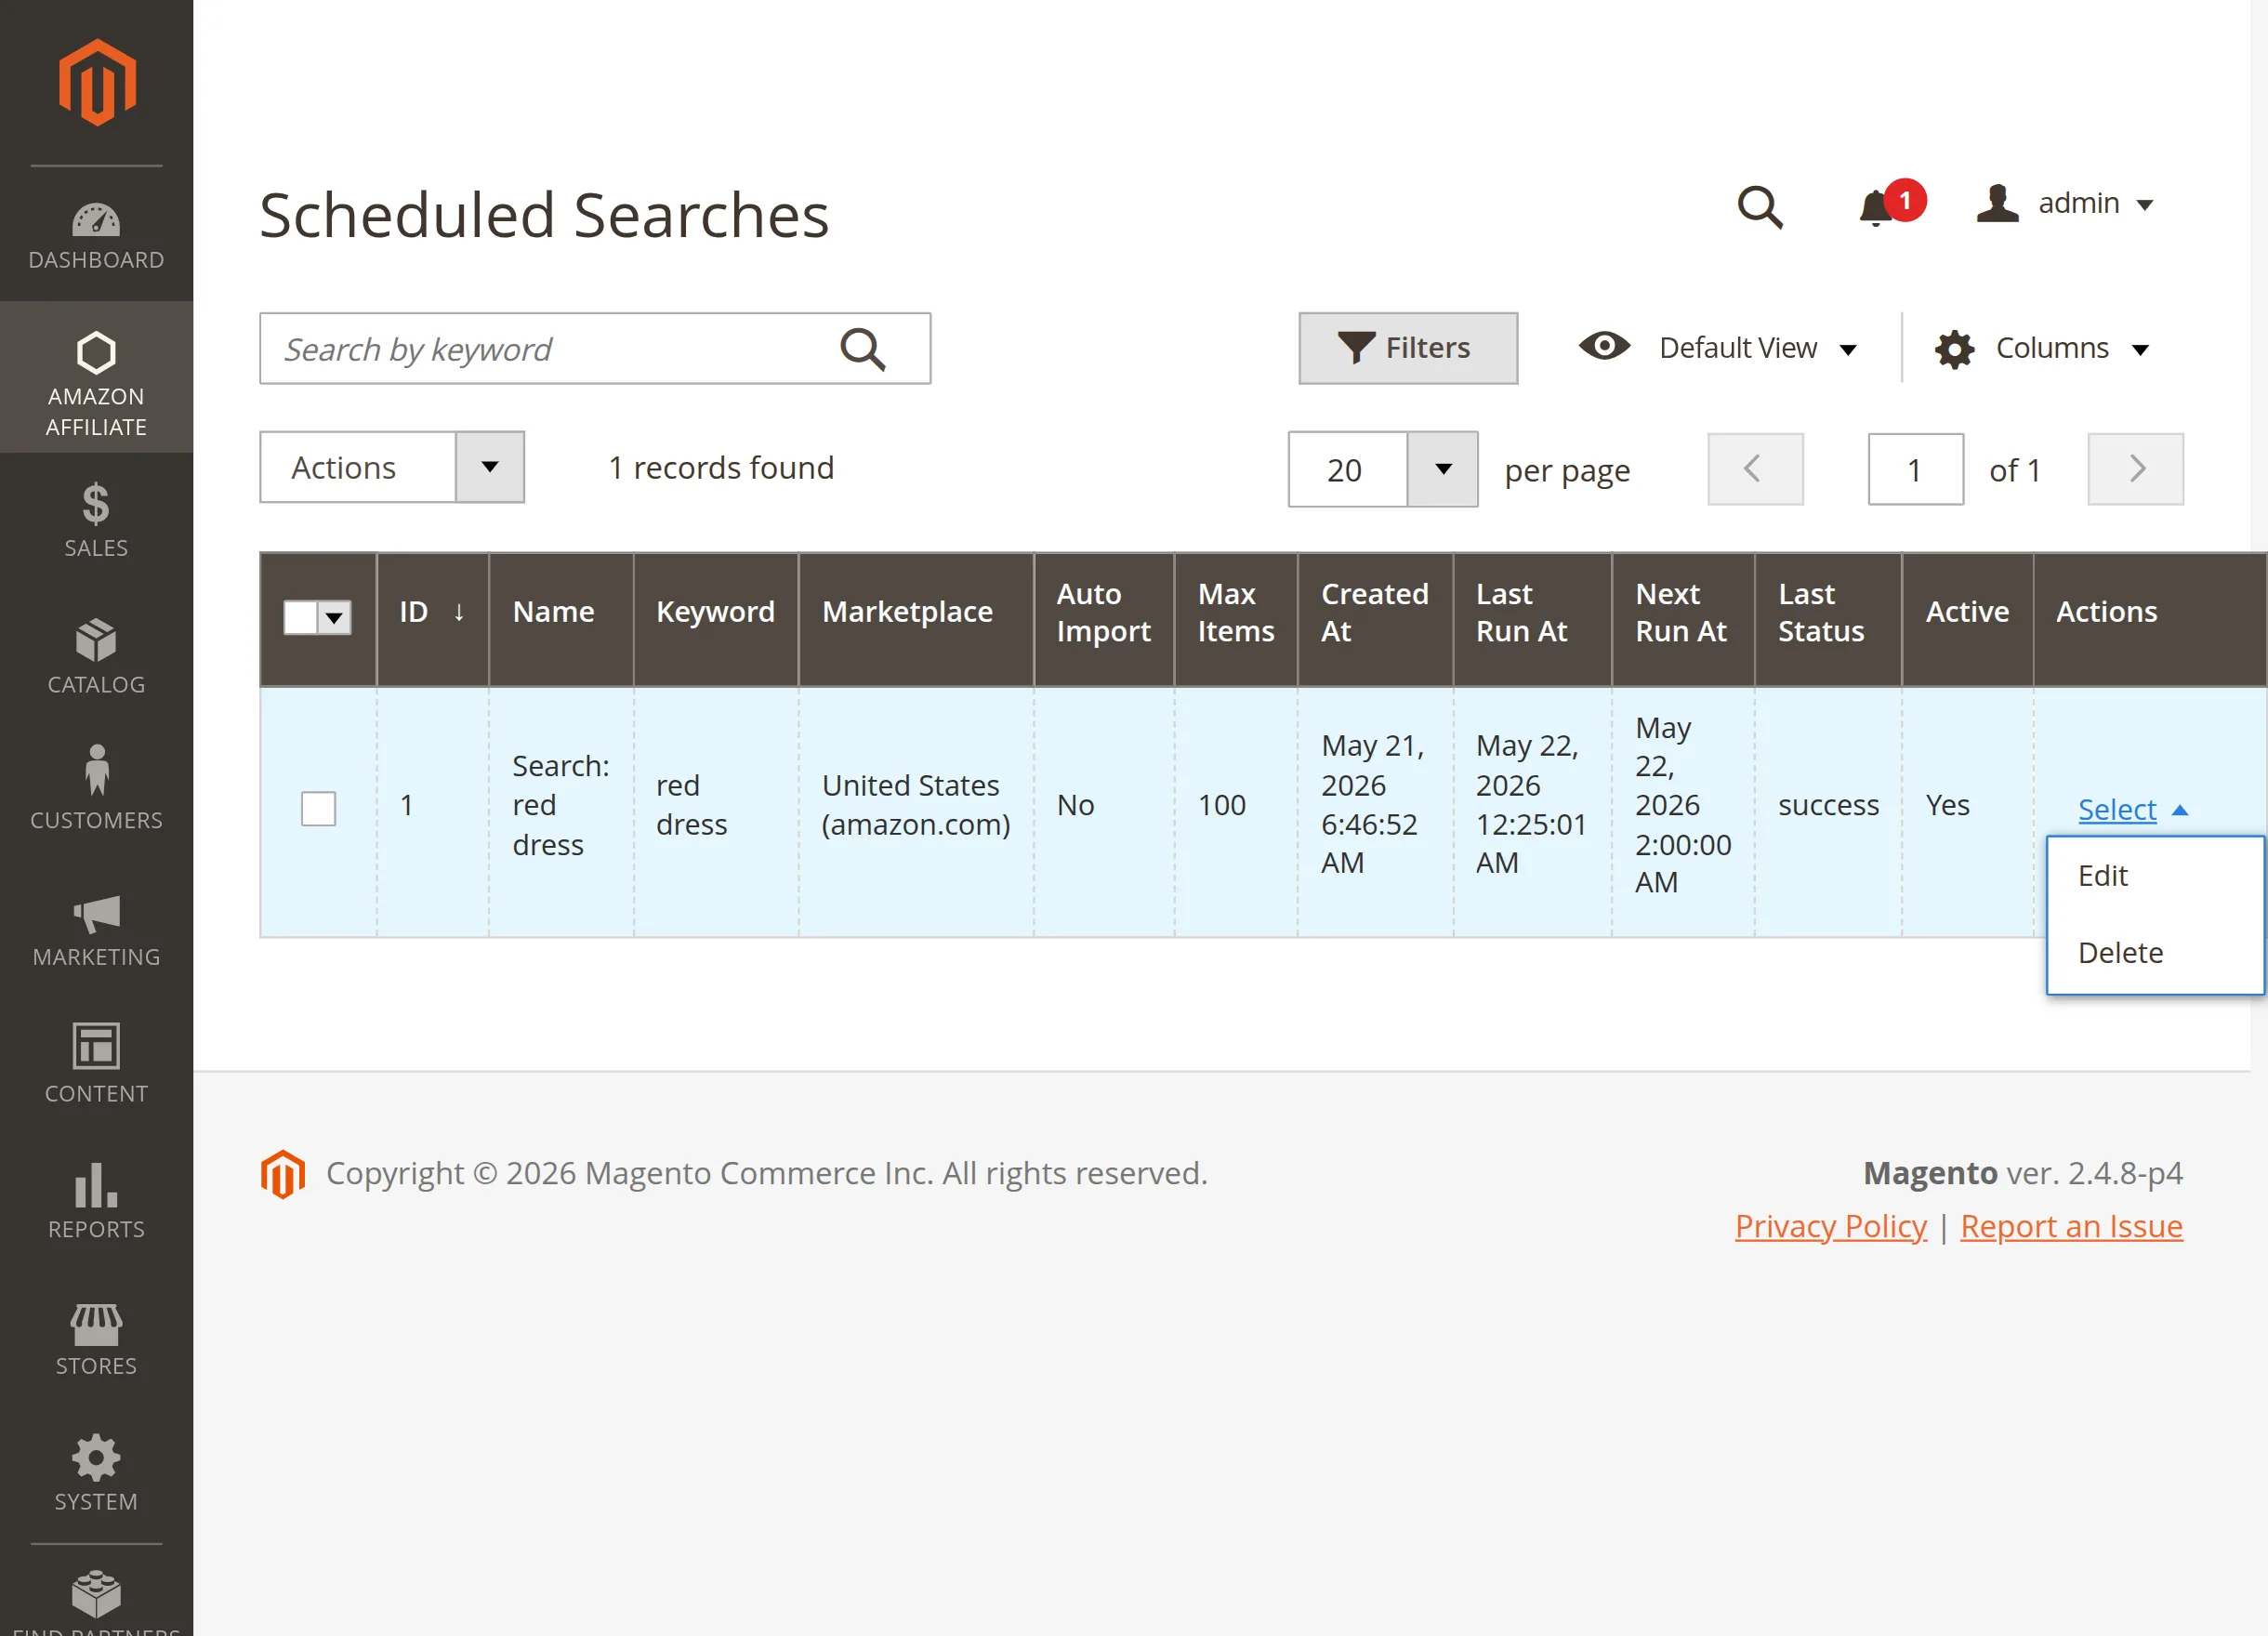
Search Data Grid: Track specific parameters like keywords, destination marketplaces, maximum item counters, and execution histories. The table helps you keep tabs on active background tasks at a glance.
Runtime Status Matrix: Monitor previous run completions alongside your next upcoming cron execution milestones. This timeline transparency ensures your data discovery pipelines run reliably on time.
Actions Dropdown: Click the Select link next to any row entry to configure specific properties.
-
Edit: Modify active keywords, change target category locations, or adjust item maximum caps.
-
Delete: Remove the automated configuration permanently to halt future background queries instantly.
Mass Actions Menu: Select multiple automated searches using the left checkboxes to apply group changes quickly across your system profiles.
-
Delete: Purge all selected search rules from your configuration library simultaneously to clean up old discovery parameters.
-
Enable: Activate multiple scheduled workflows at once, allowing the background cron system to resume queries on the next loop.
-
Disable: Pause operations for all selected rules instantly, stopping future automatic data collection without losing your setup details.
Amazon Category Mapping
Under this section, the admin can create and manage category destination rules for the store as shown in the snapshot. This layout pairs your source item streams with the correct storefront locations.
Here, the admin can add new mappings, edit existing rules, apply grid filters, and verify specific database paths as required.
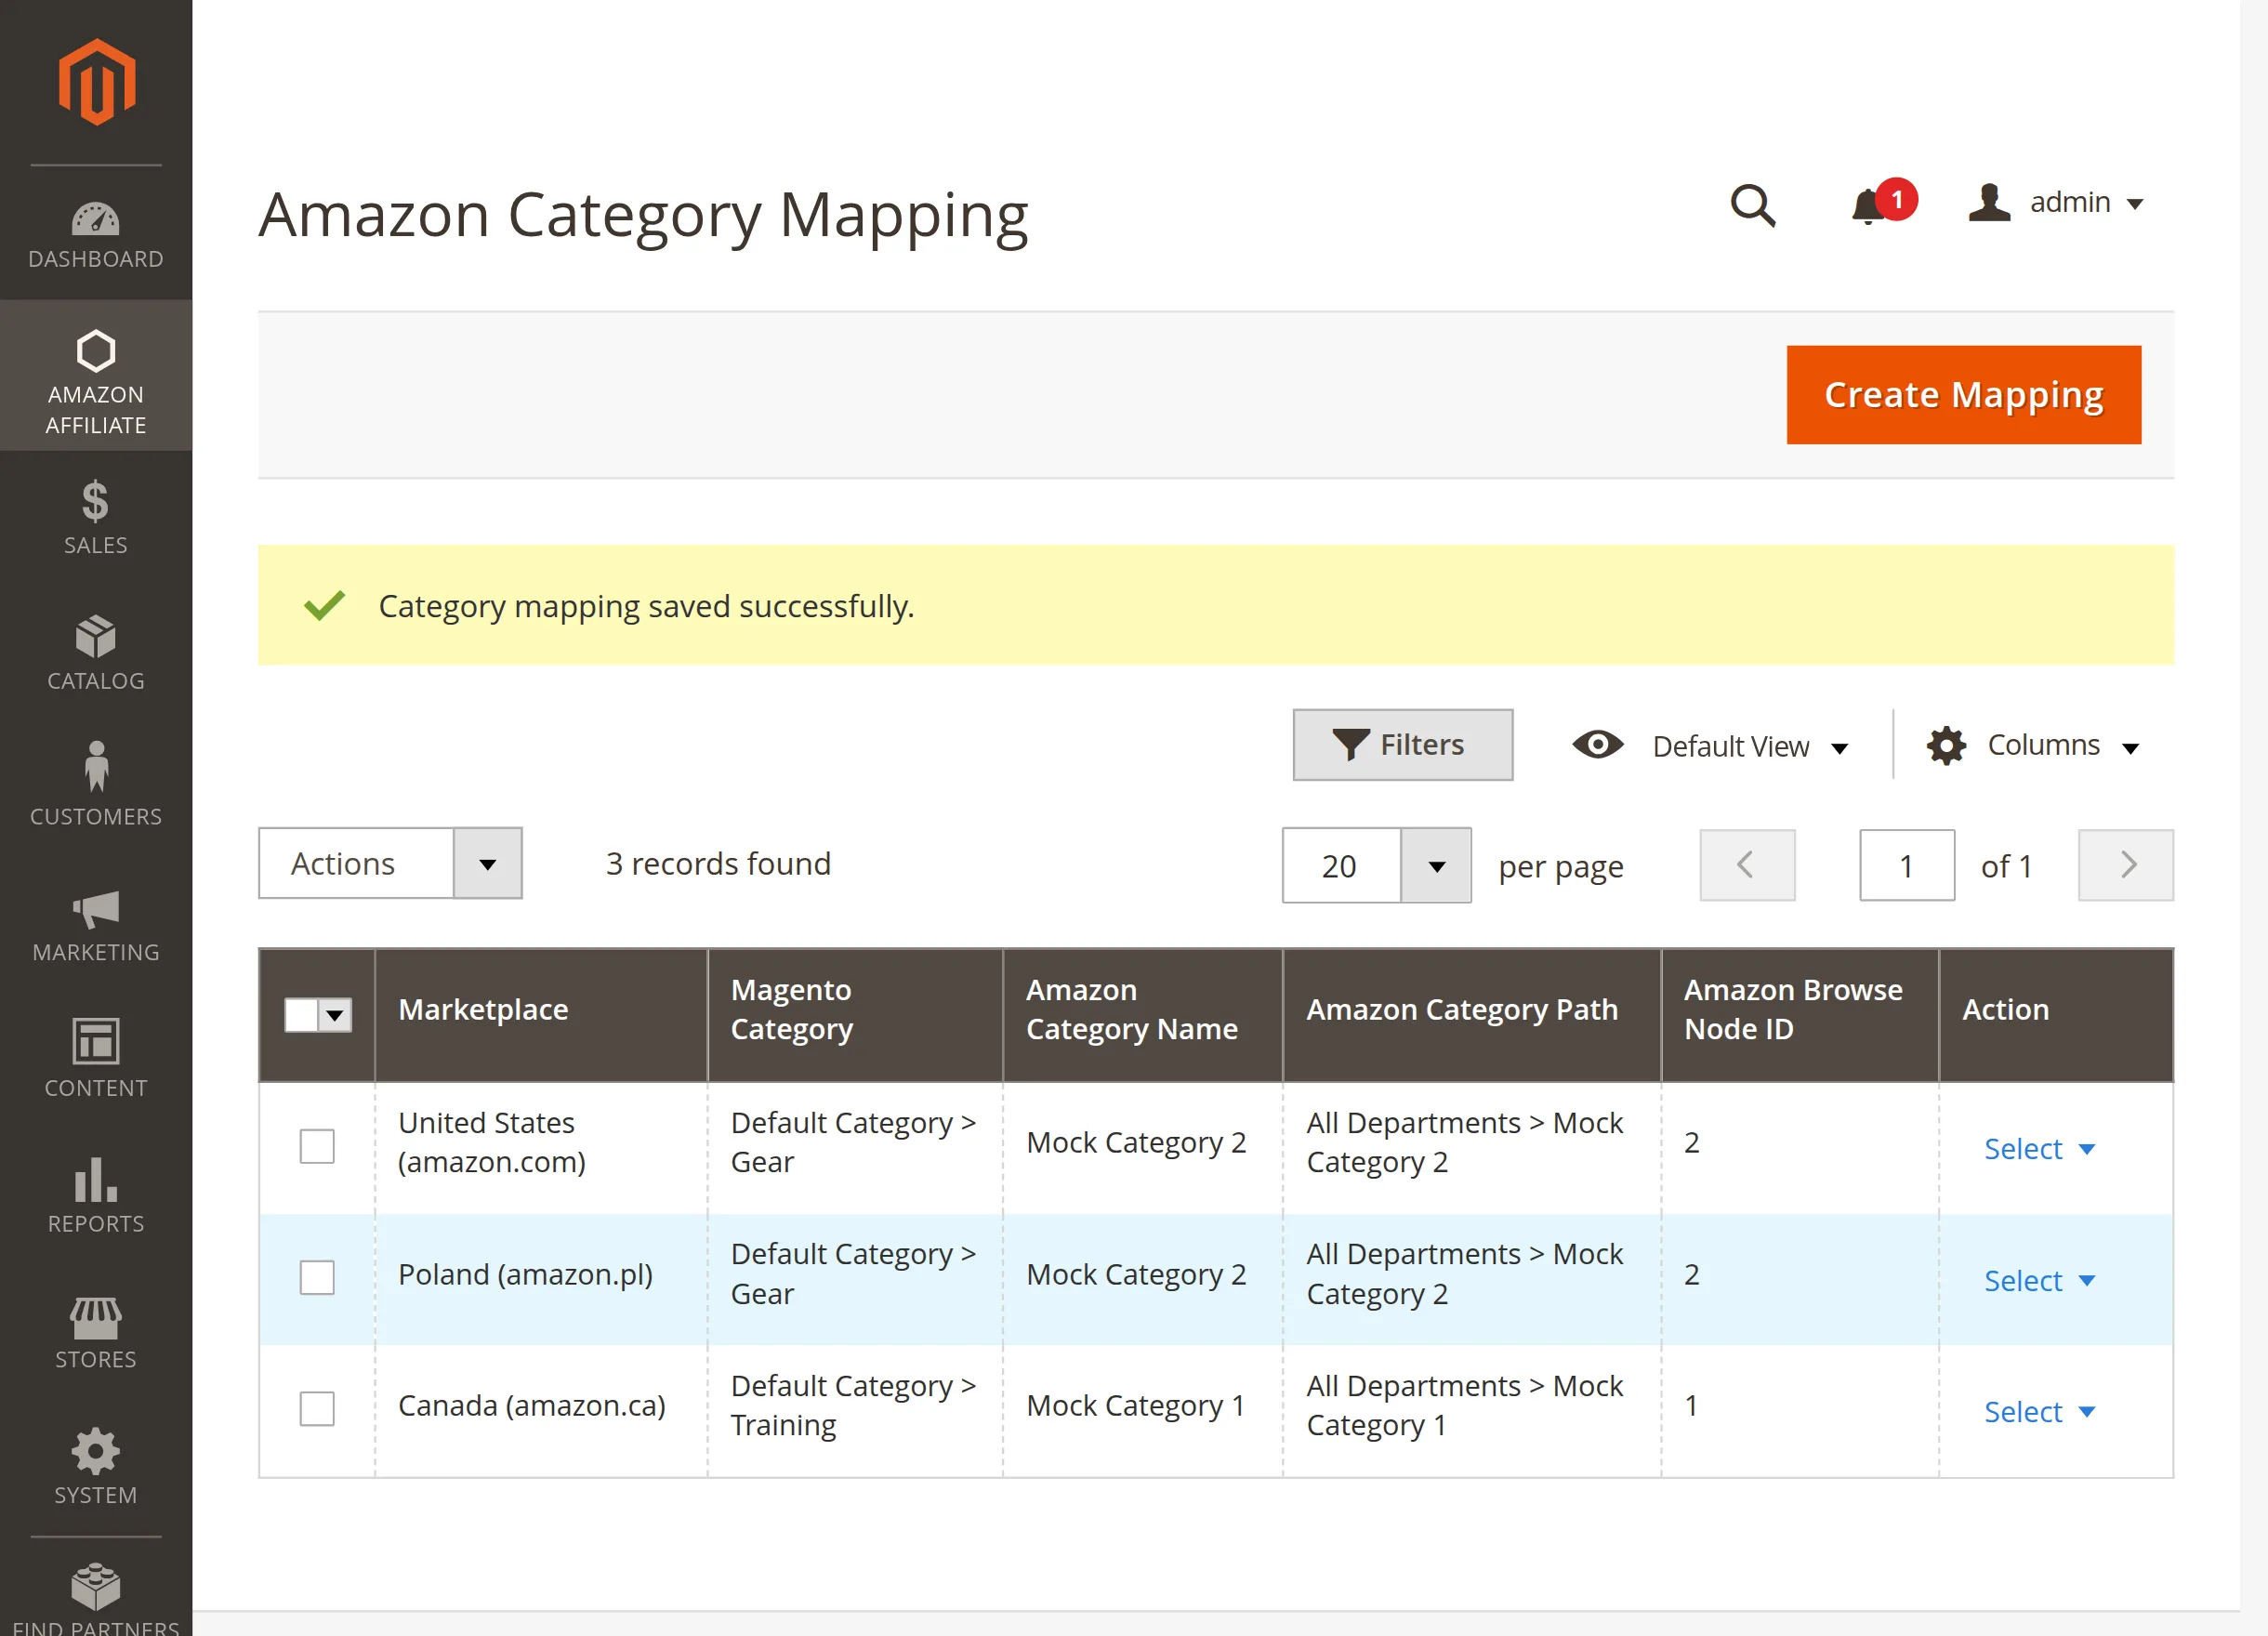
To create a new rule, the admin needs to click on the Create Mapping button, which opens the general configuration form shown below.
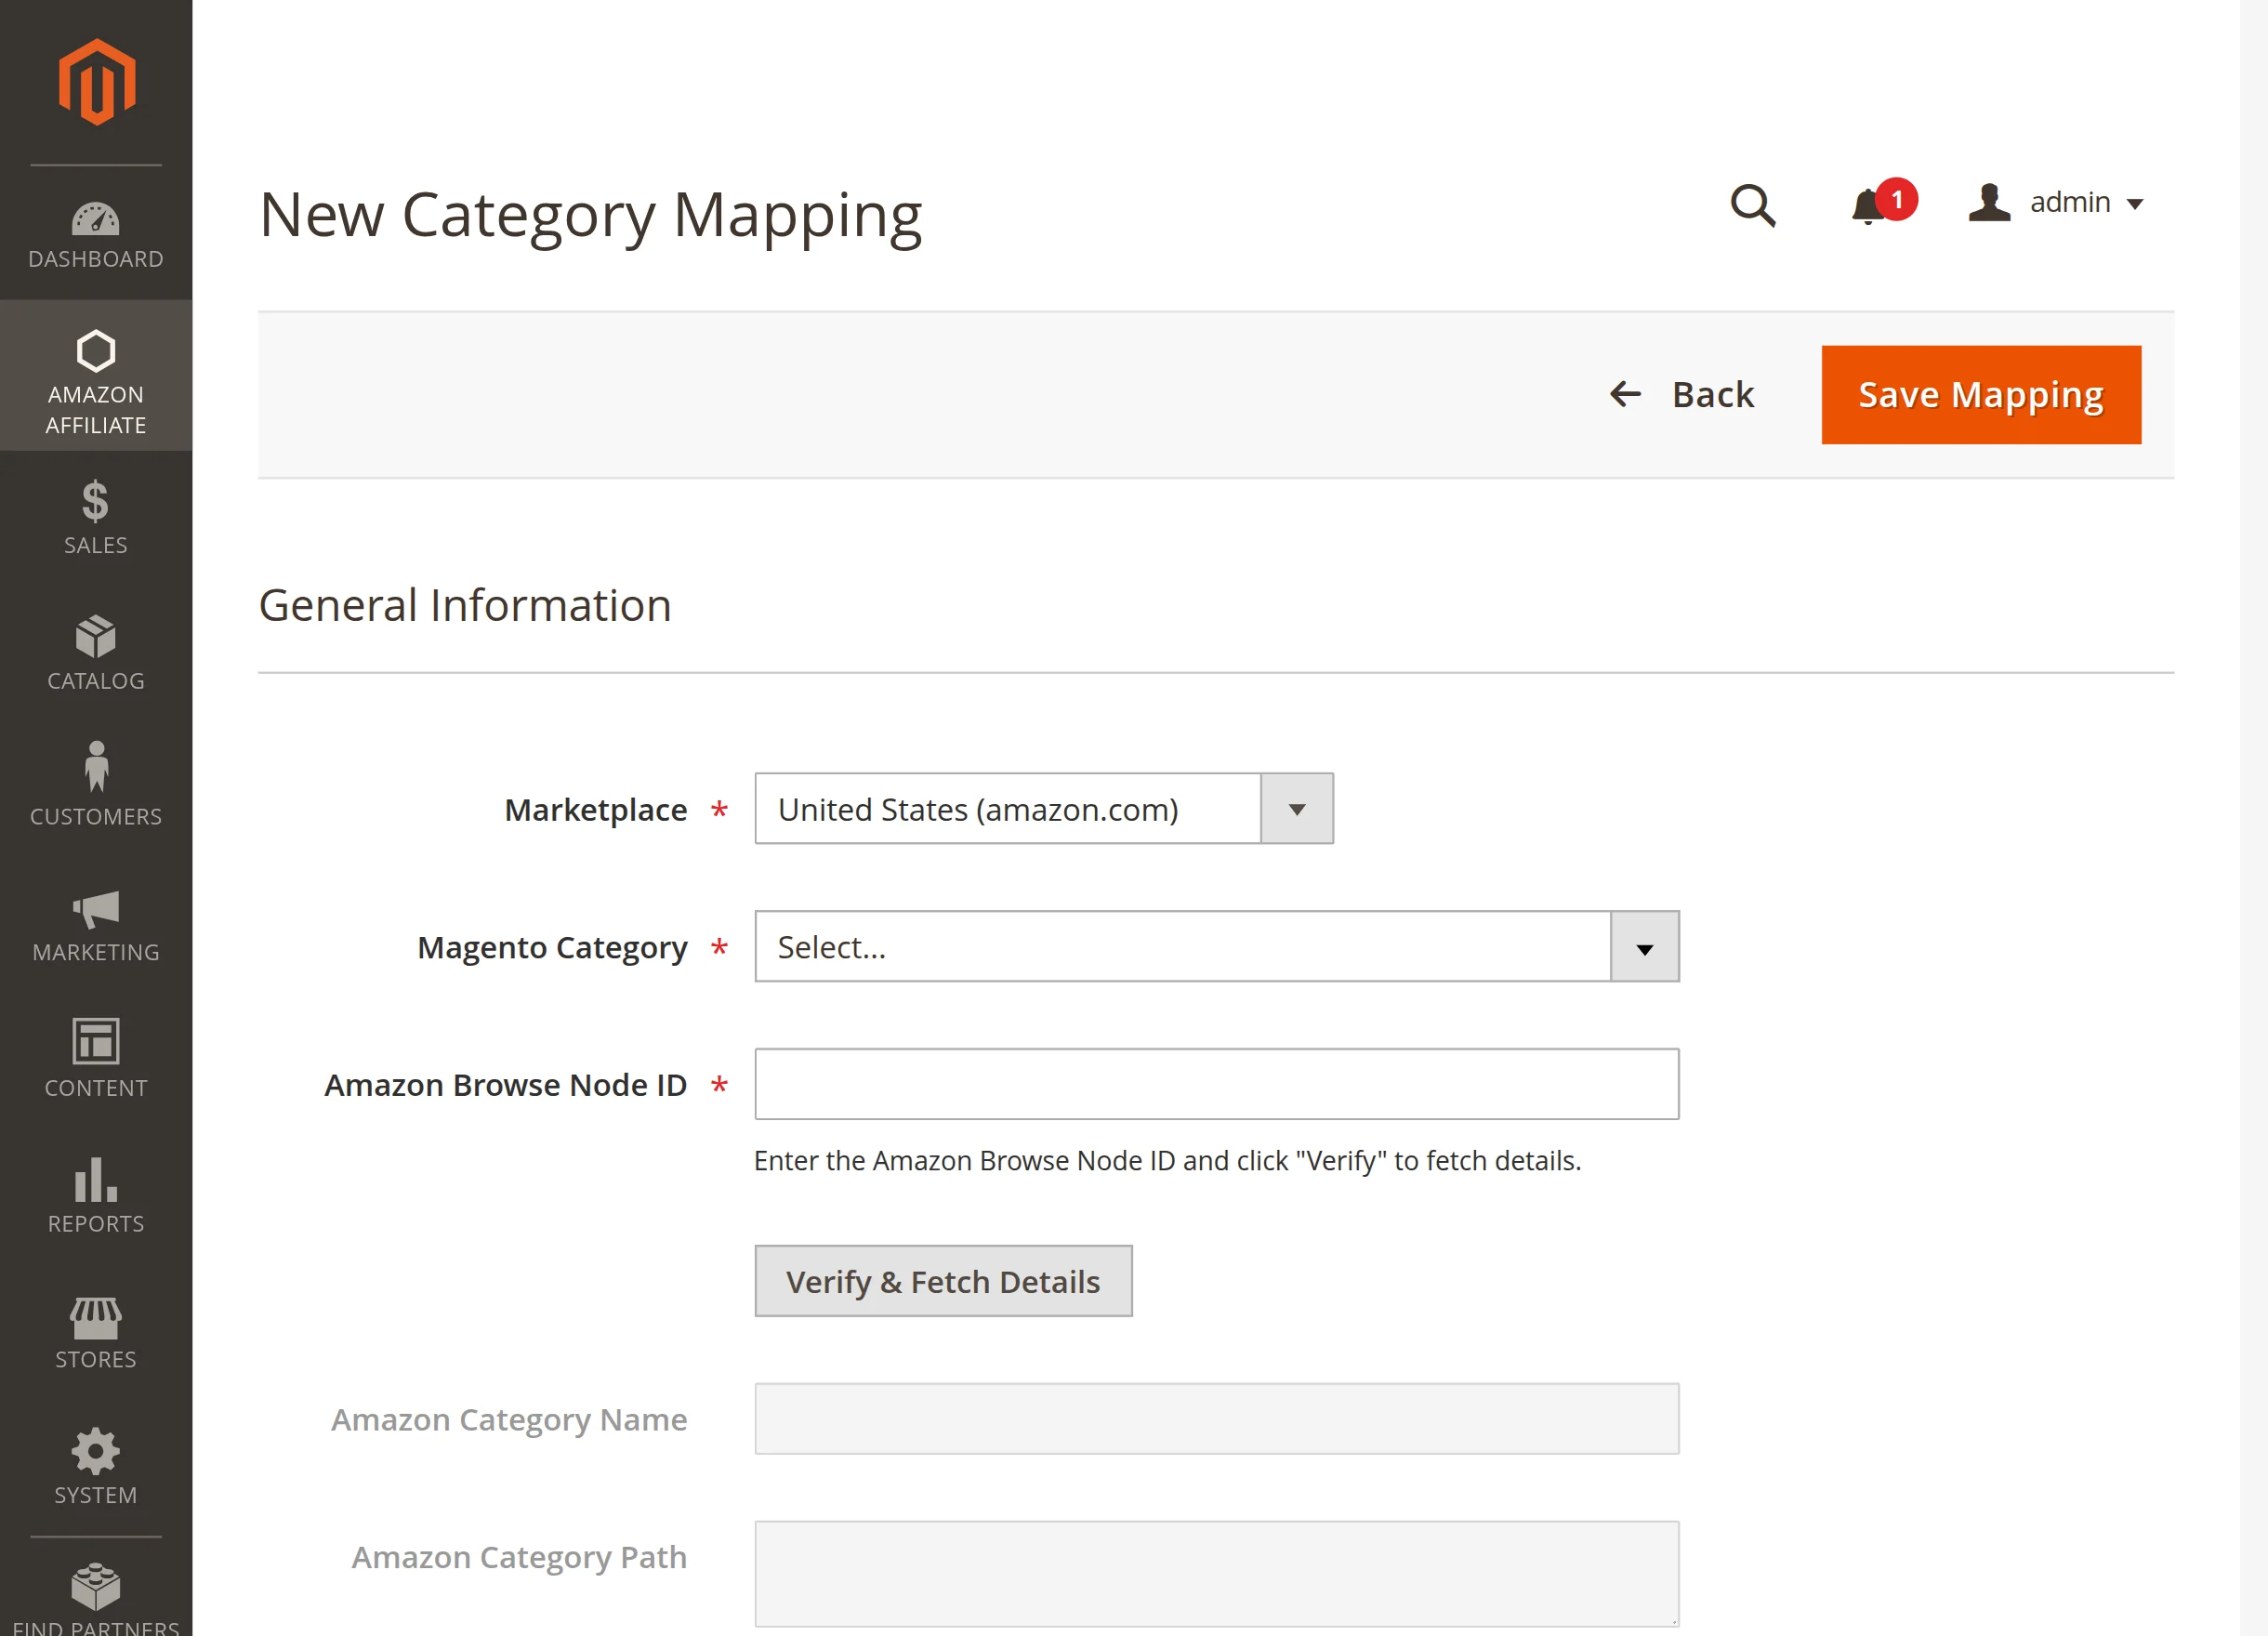
Marketplace: Select your target Amazon marketplace locale from the options dropdown list.
Magento Category: Select the native store folder destination where your imported products will be placed.
Amazon Browse Node ID: Input the specific numeric category identifier from your target Amazon marketplace source.
Verify & Fetch Details: Click this action button to load the official category name and taxonomy path parameters automatically.
Amazon Category Name: This read-only field displays the confirmed title retrieved directly from Amazon servers.
Amazon Category Path: This text block displays the complete breakdown path structure for your verified node.
After configuring the form details, click the Save Mapping button to register and store your active category layout.
Once saved, a confirmation message is displayed indicating that your mapping rule has been successfully created or updated.
Insane Import
Under this row section, the admin can inspect found catalog items inside a dynamic image gallery row after clicking Launch Search as shown in the snapshot.
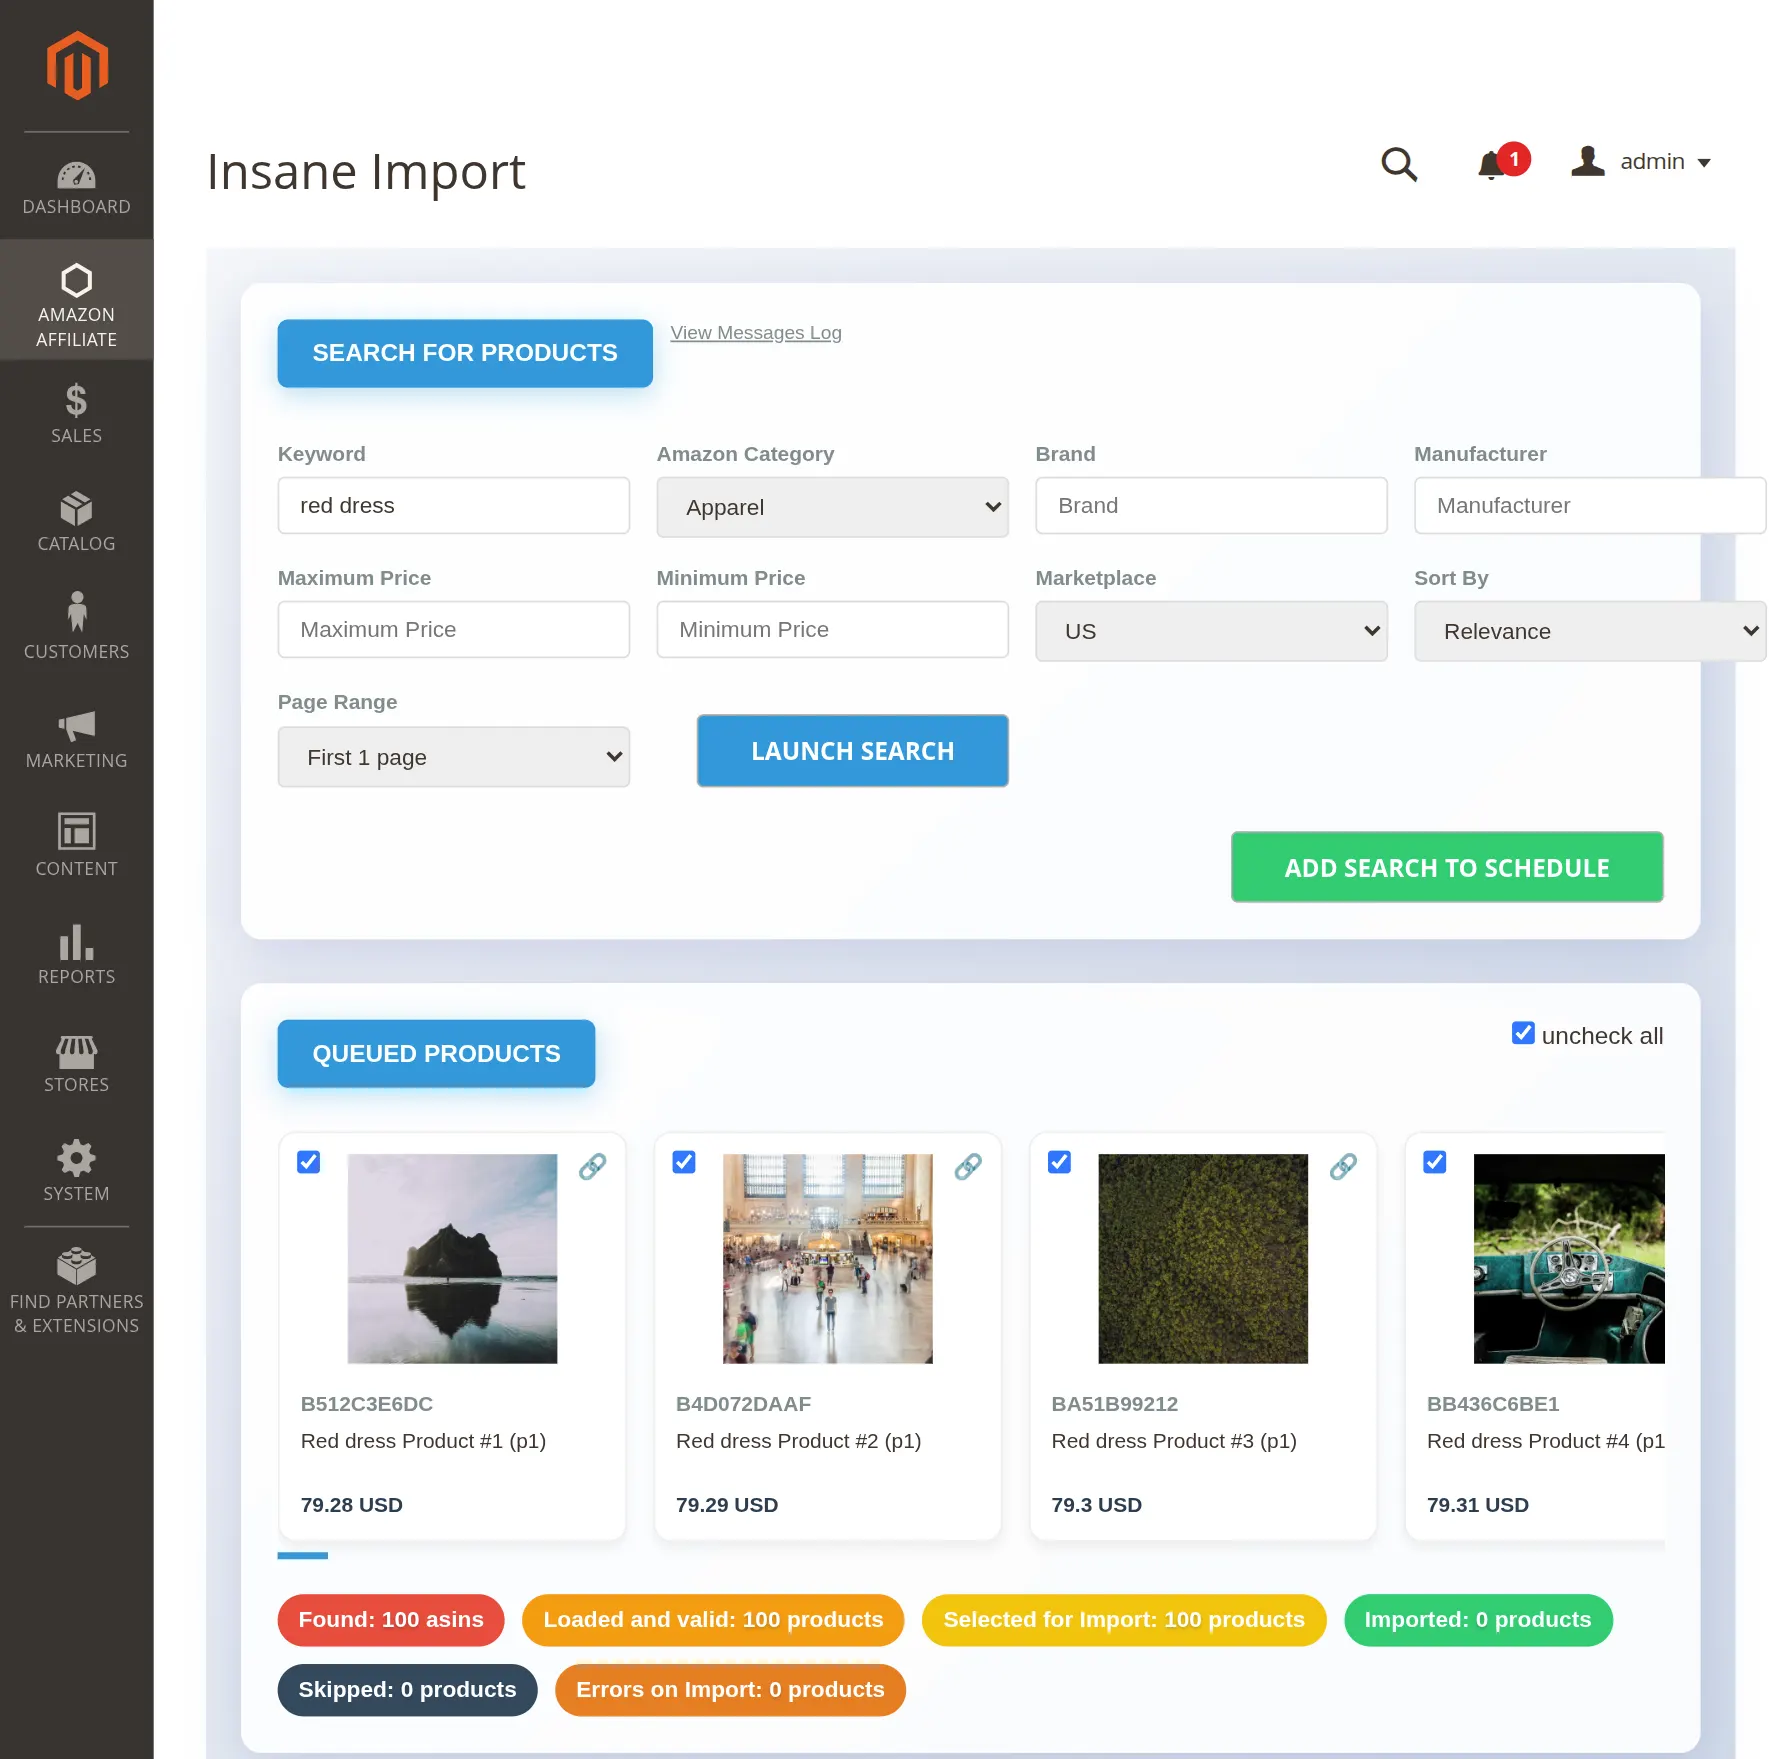
Here, the admin can review individual product thumbnails, modify target titles, and check item variations before pushing assets into the live Magento store view.
Product Cards: View high-resolution item imagery, direct retail price tags, and descriptive title identifiers in a horizontal scroll strip container layout.
Selection Boxes: Toggle single or multi-select options directly above each preview tile card to refine your batch selection parameters accurately.
Live Status Badges: Track pipeline metrics using color-coded counts:
-
Found: Displays the absolute number of unique ASIN identifiers scraped from your custom product query results.
-
Loaded and valid: Shows verified data entries that have passed background system layout structures and are prepared for final ingestion.
-
Selected for Import: Quantifies the precise number of items checked by the admin for immediate backend catalog creation.
-
Imported: Reflects successfully completed item injections currently operating inside your active website catalog database.
-
Skipped: Highlights matching rows bypassed automatically due to structural duplicates or previous database collection records.
-
Errors on Import: Tracks communication failures or connection blocks encountered during active high-speed server parsing tasks.
Insane Mode Import Fine Tuning
Under this section, the admin can adjust deep scraping parameters and operational behaviors for high-speed catalog creation as shown in the snapshot.
Here, you can control asset volume boundaries, select target categories, choose background execution types, and monitor scraping velocities in real time.
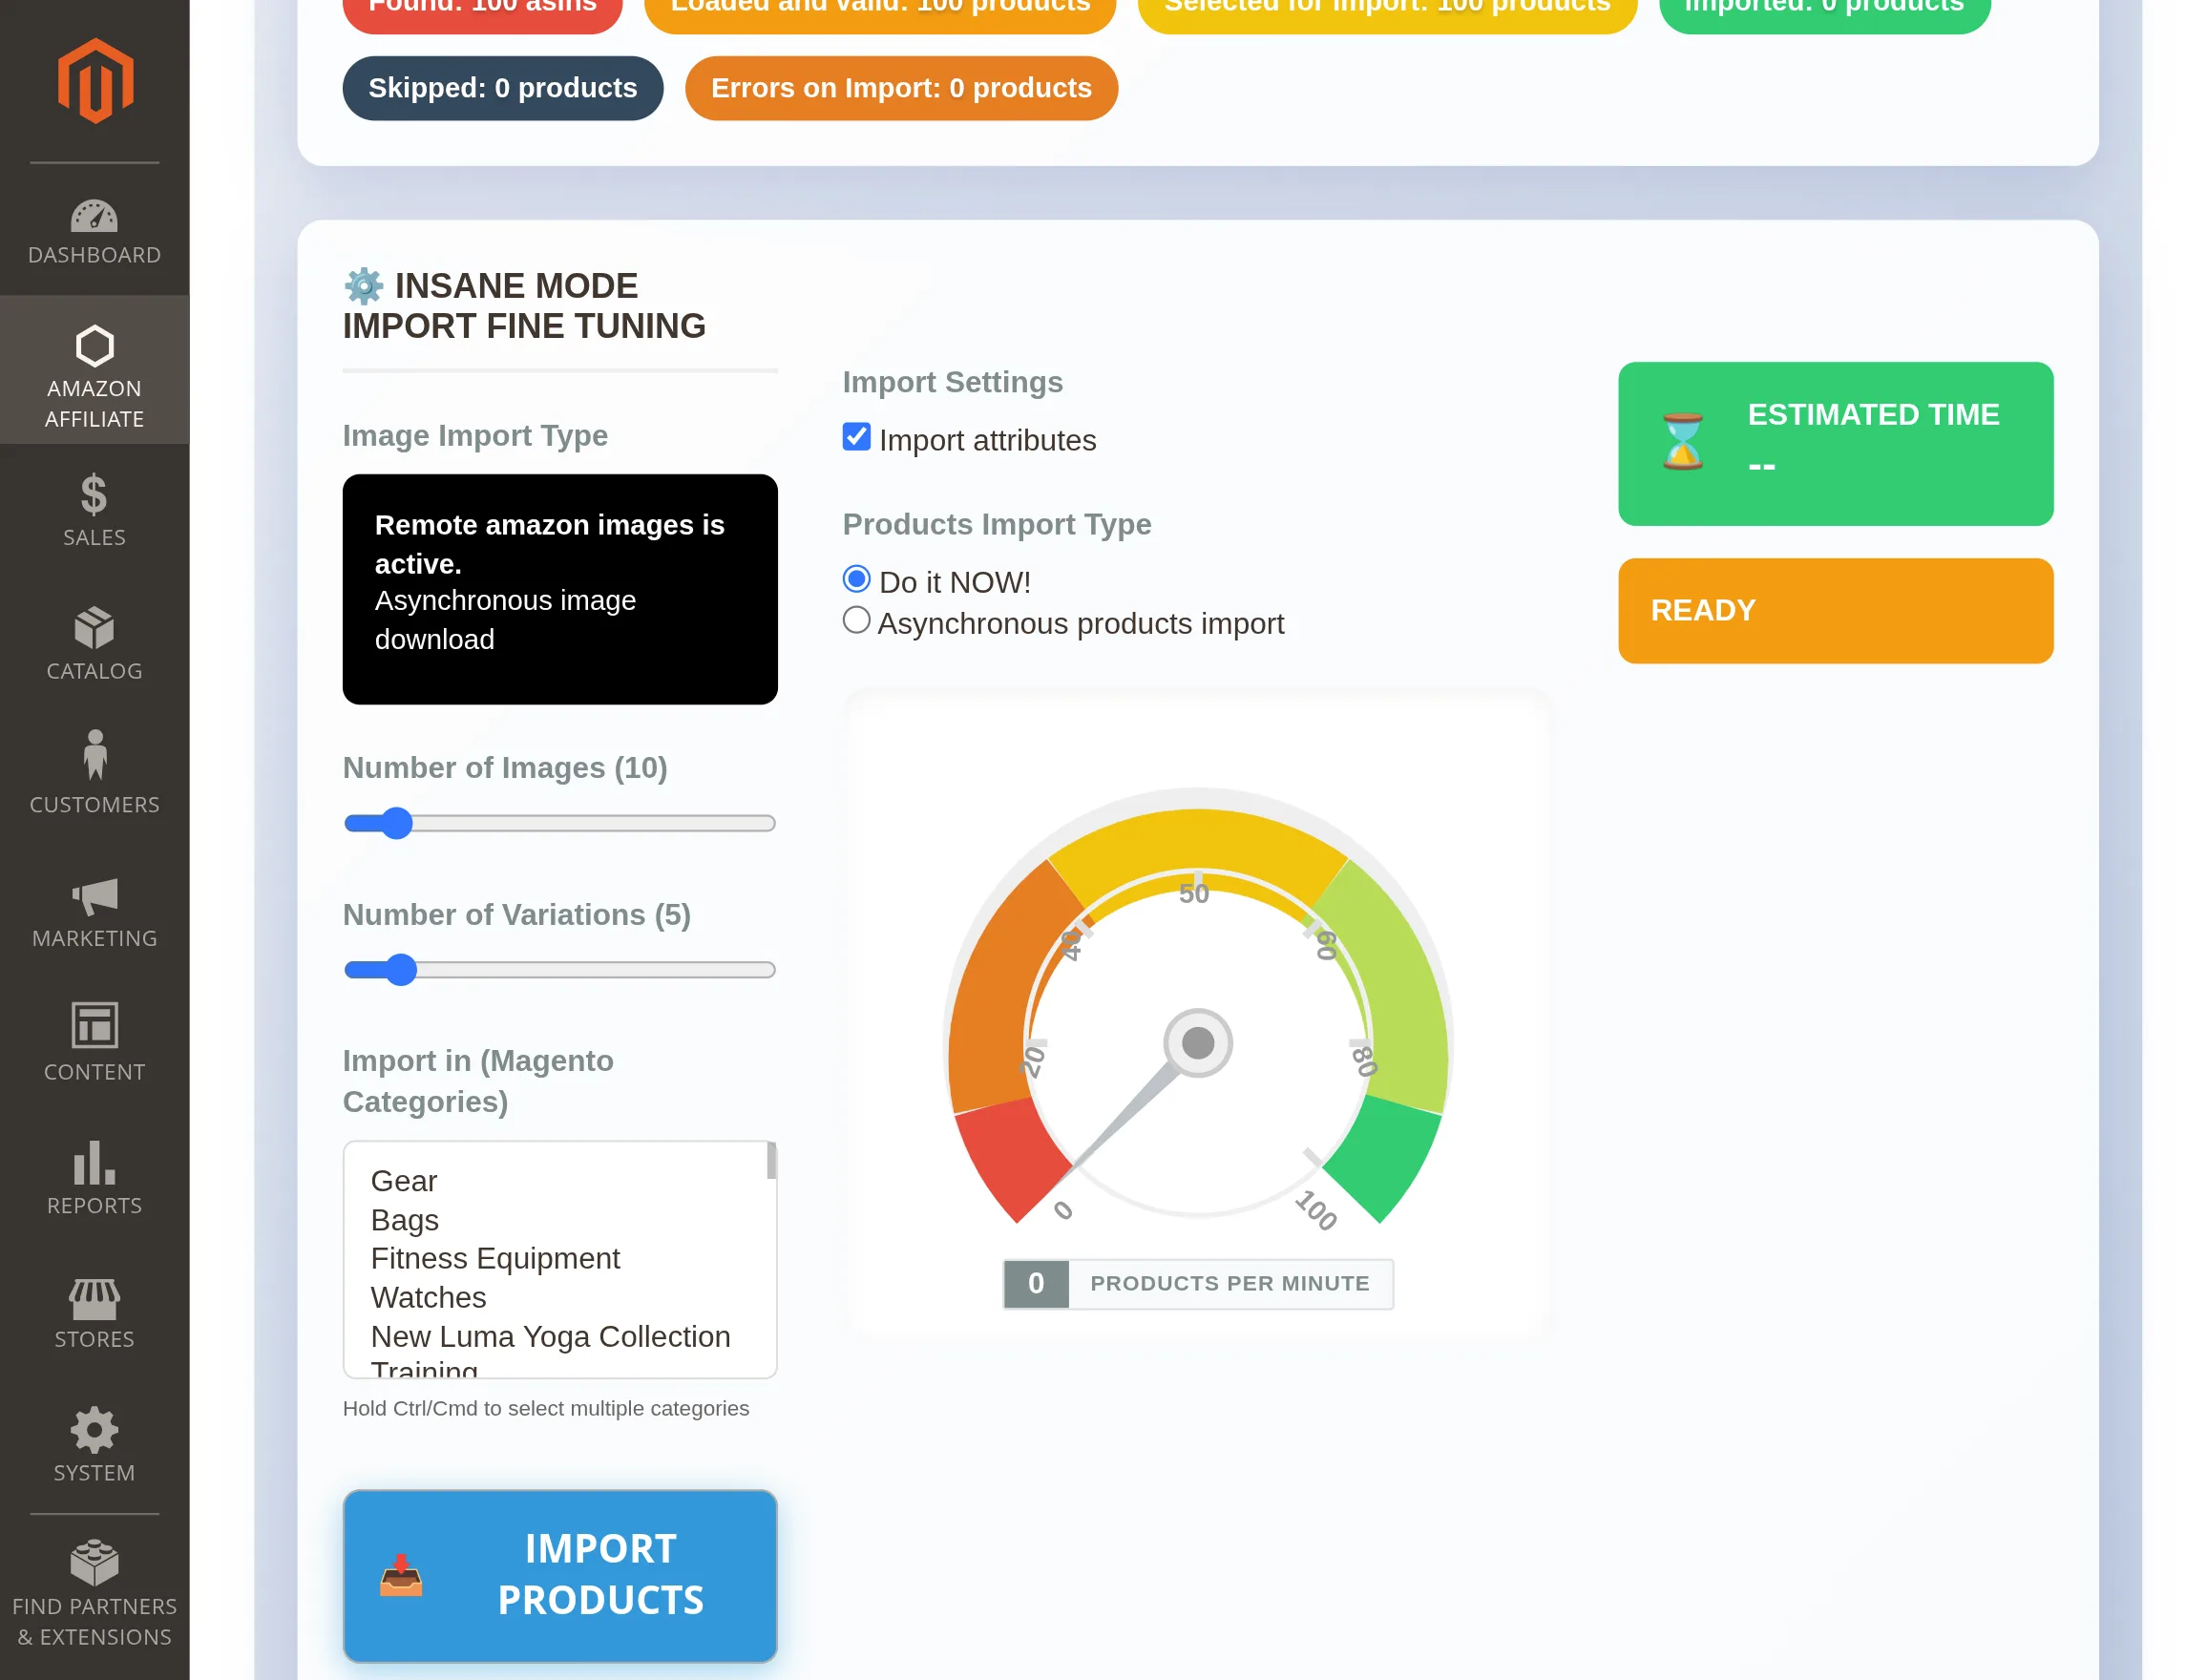
Image Import Type: Displays media routing status. Asynchronous mode caches photos in the background without slowing text data ingestion.
Number of Images & Variations: Use the sliders to cap maximum photos and child variants (sizes/colors) per product. This saves storage and prevents database strain.
Import in (Magento Categories): Hold Ctrl/Cmd to select multiple local store folders. This maps the entire incoming product batch to those specific locations.
Import Settings & Type: Choose to include raw product attributes, then pick your processing speed: Do it NOW! for instant foreground scraping, or Asynchronous for background cron queueing.
Live Metrics & Execution: Monitor the speedometer (Products Per Minute), estimated remaining time, and status blocks. Click Import Products to lock settings and start migration.
Sync Logs
Under this section, the admin can track and audit automated stock and price background synchronization routines as shown in the snapshot.
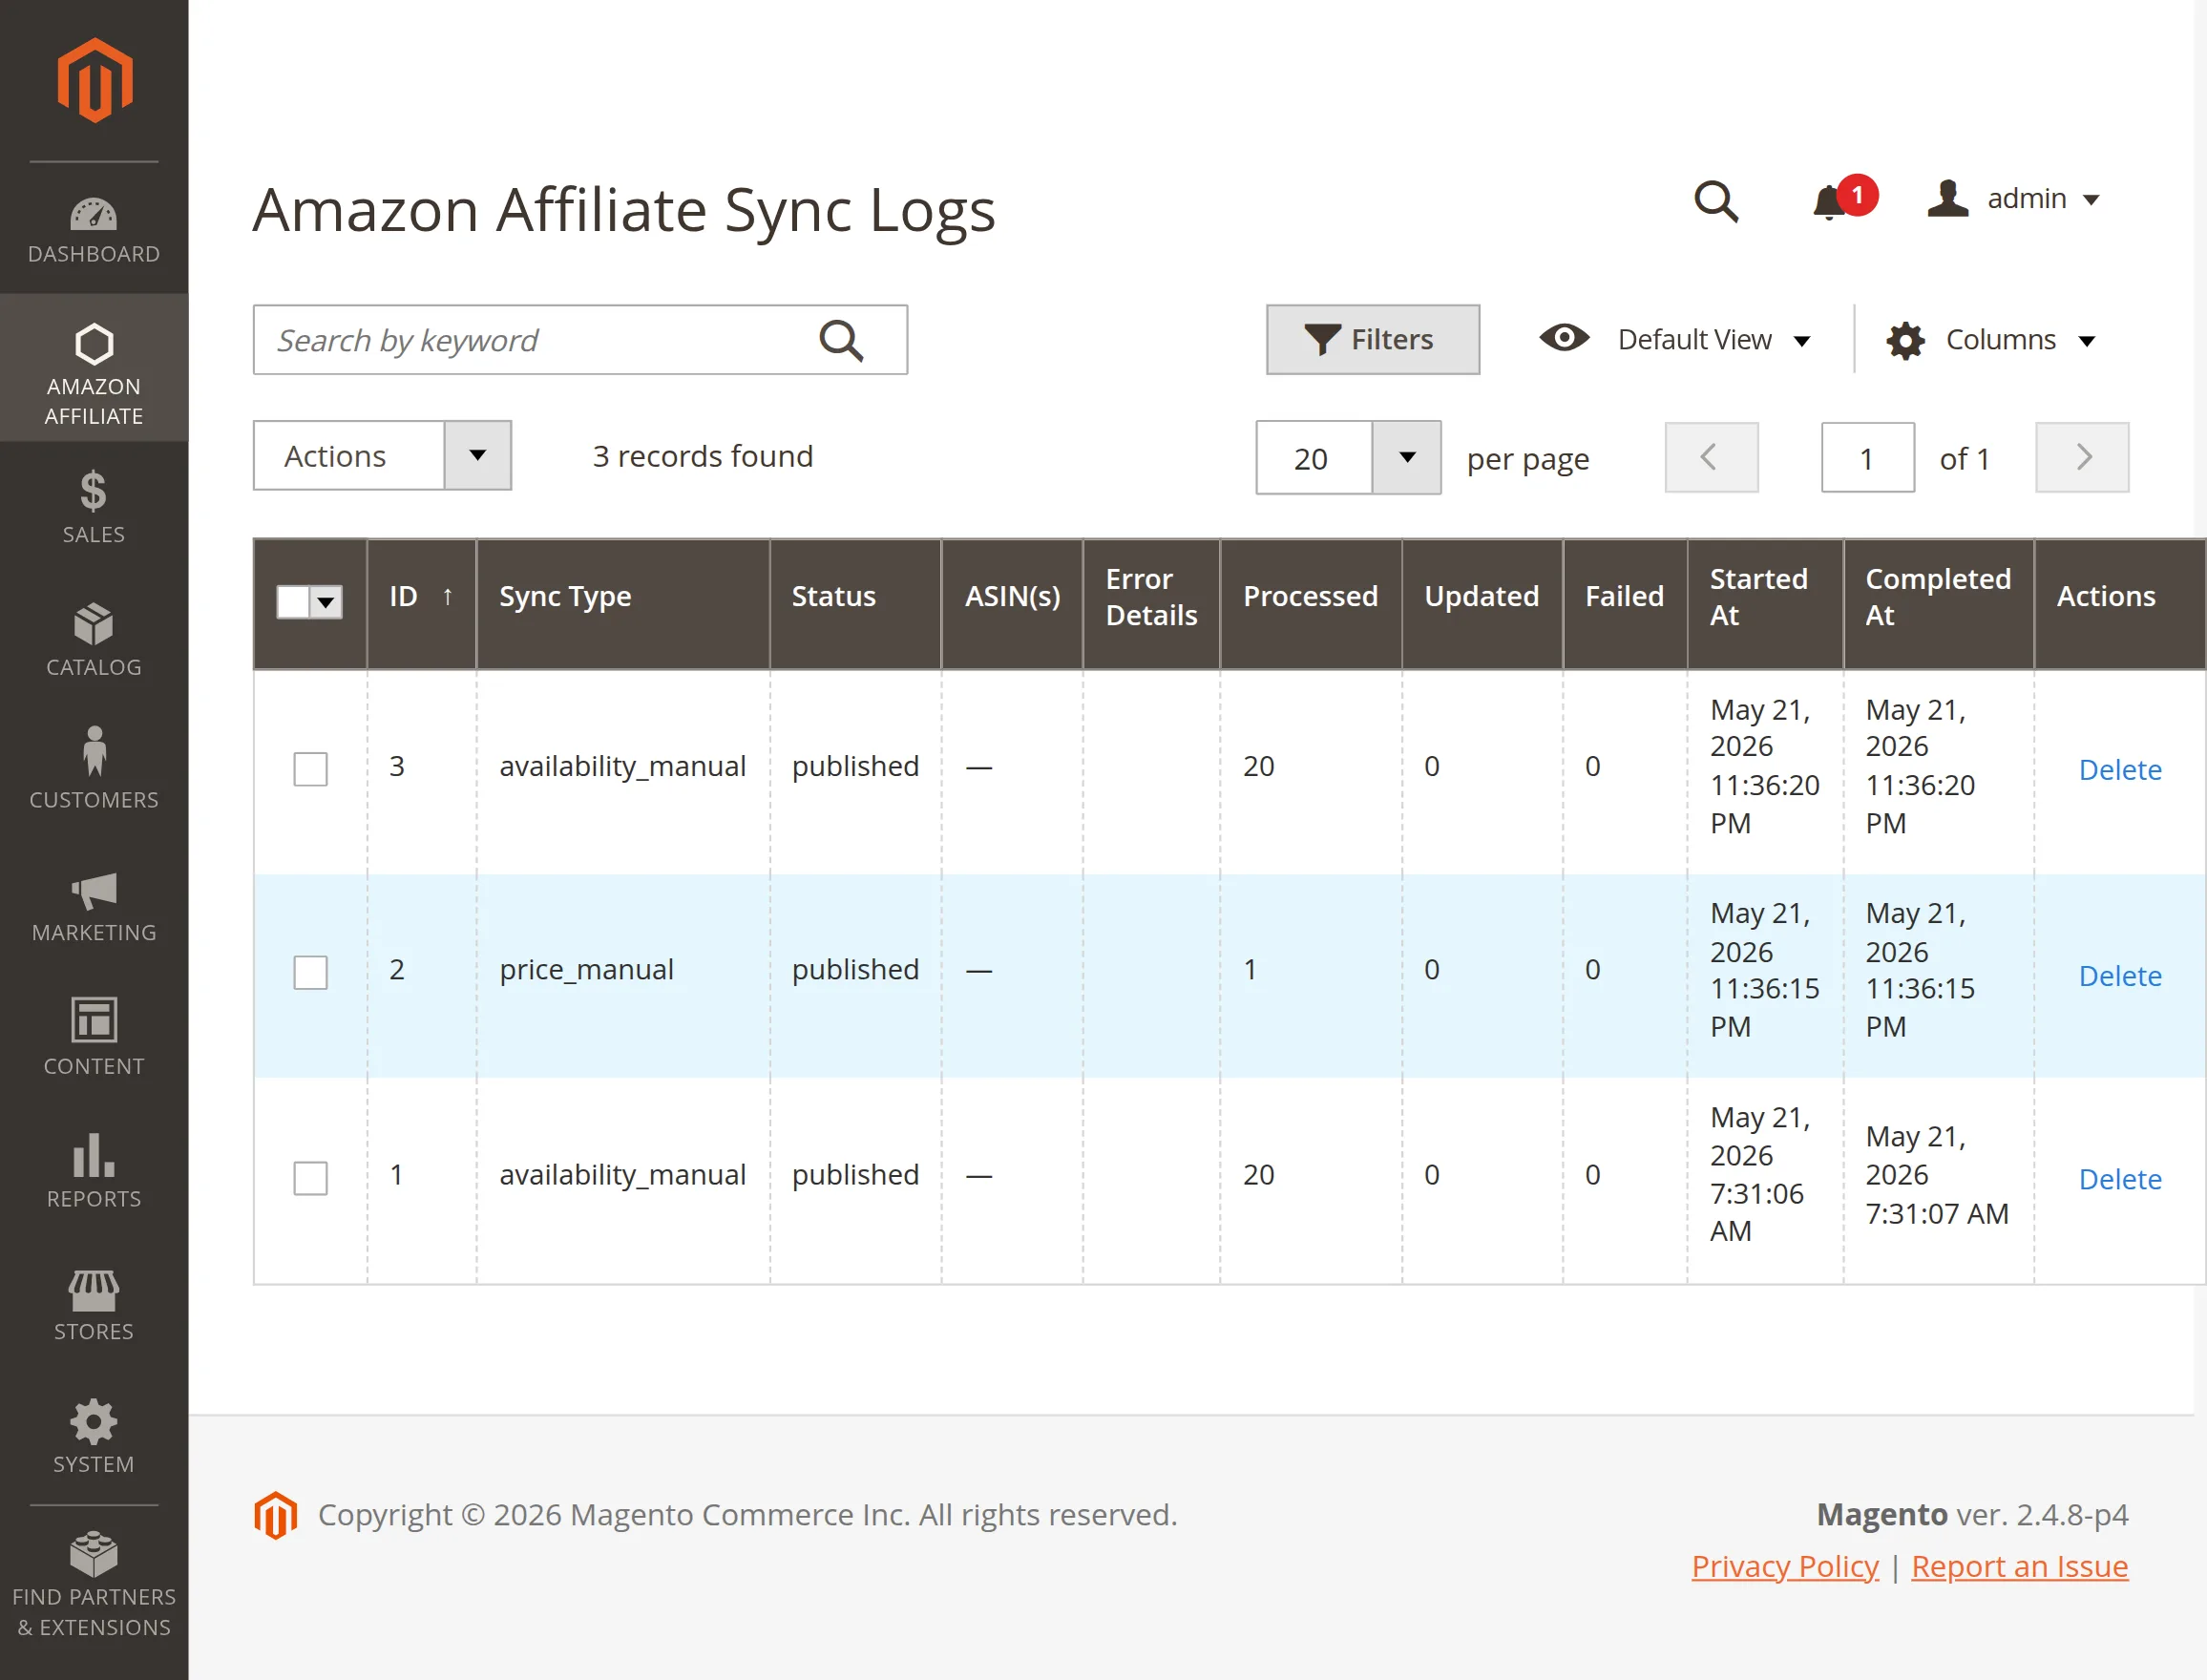
Sync Logs Grid: Monitor entry IDs, synchronization types (like manual price or availability updates), completion statuses, item counters, and execution timetables.
Error Details: Review this column block to diagnose communication failures or connection drops with Amazon API endpoints instantly.
Actions: Click Delete next to any row to remove that specific log record, or check multiple entries on the left to purge them in bulk.
Manage API Keys
Under this section, the admin can configure and maintain Amazon developer credentials for the store as shown in the snapshot.
This pool architecture balances API requests to prevent server traffic throttling.
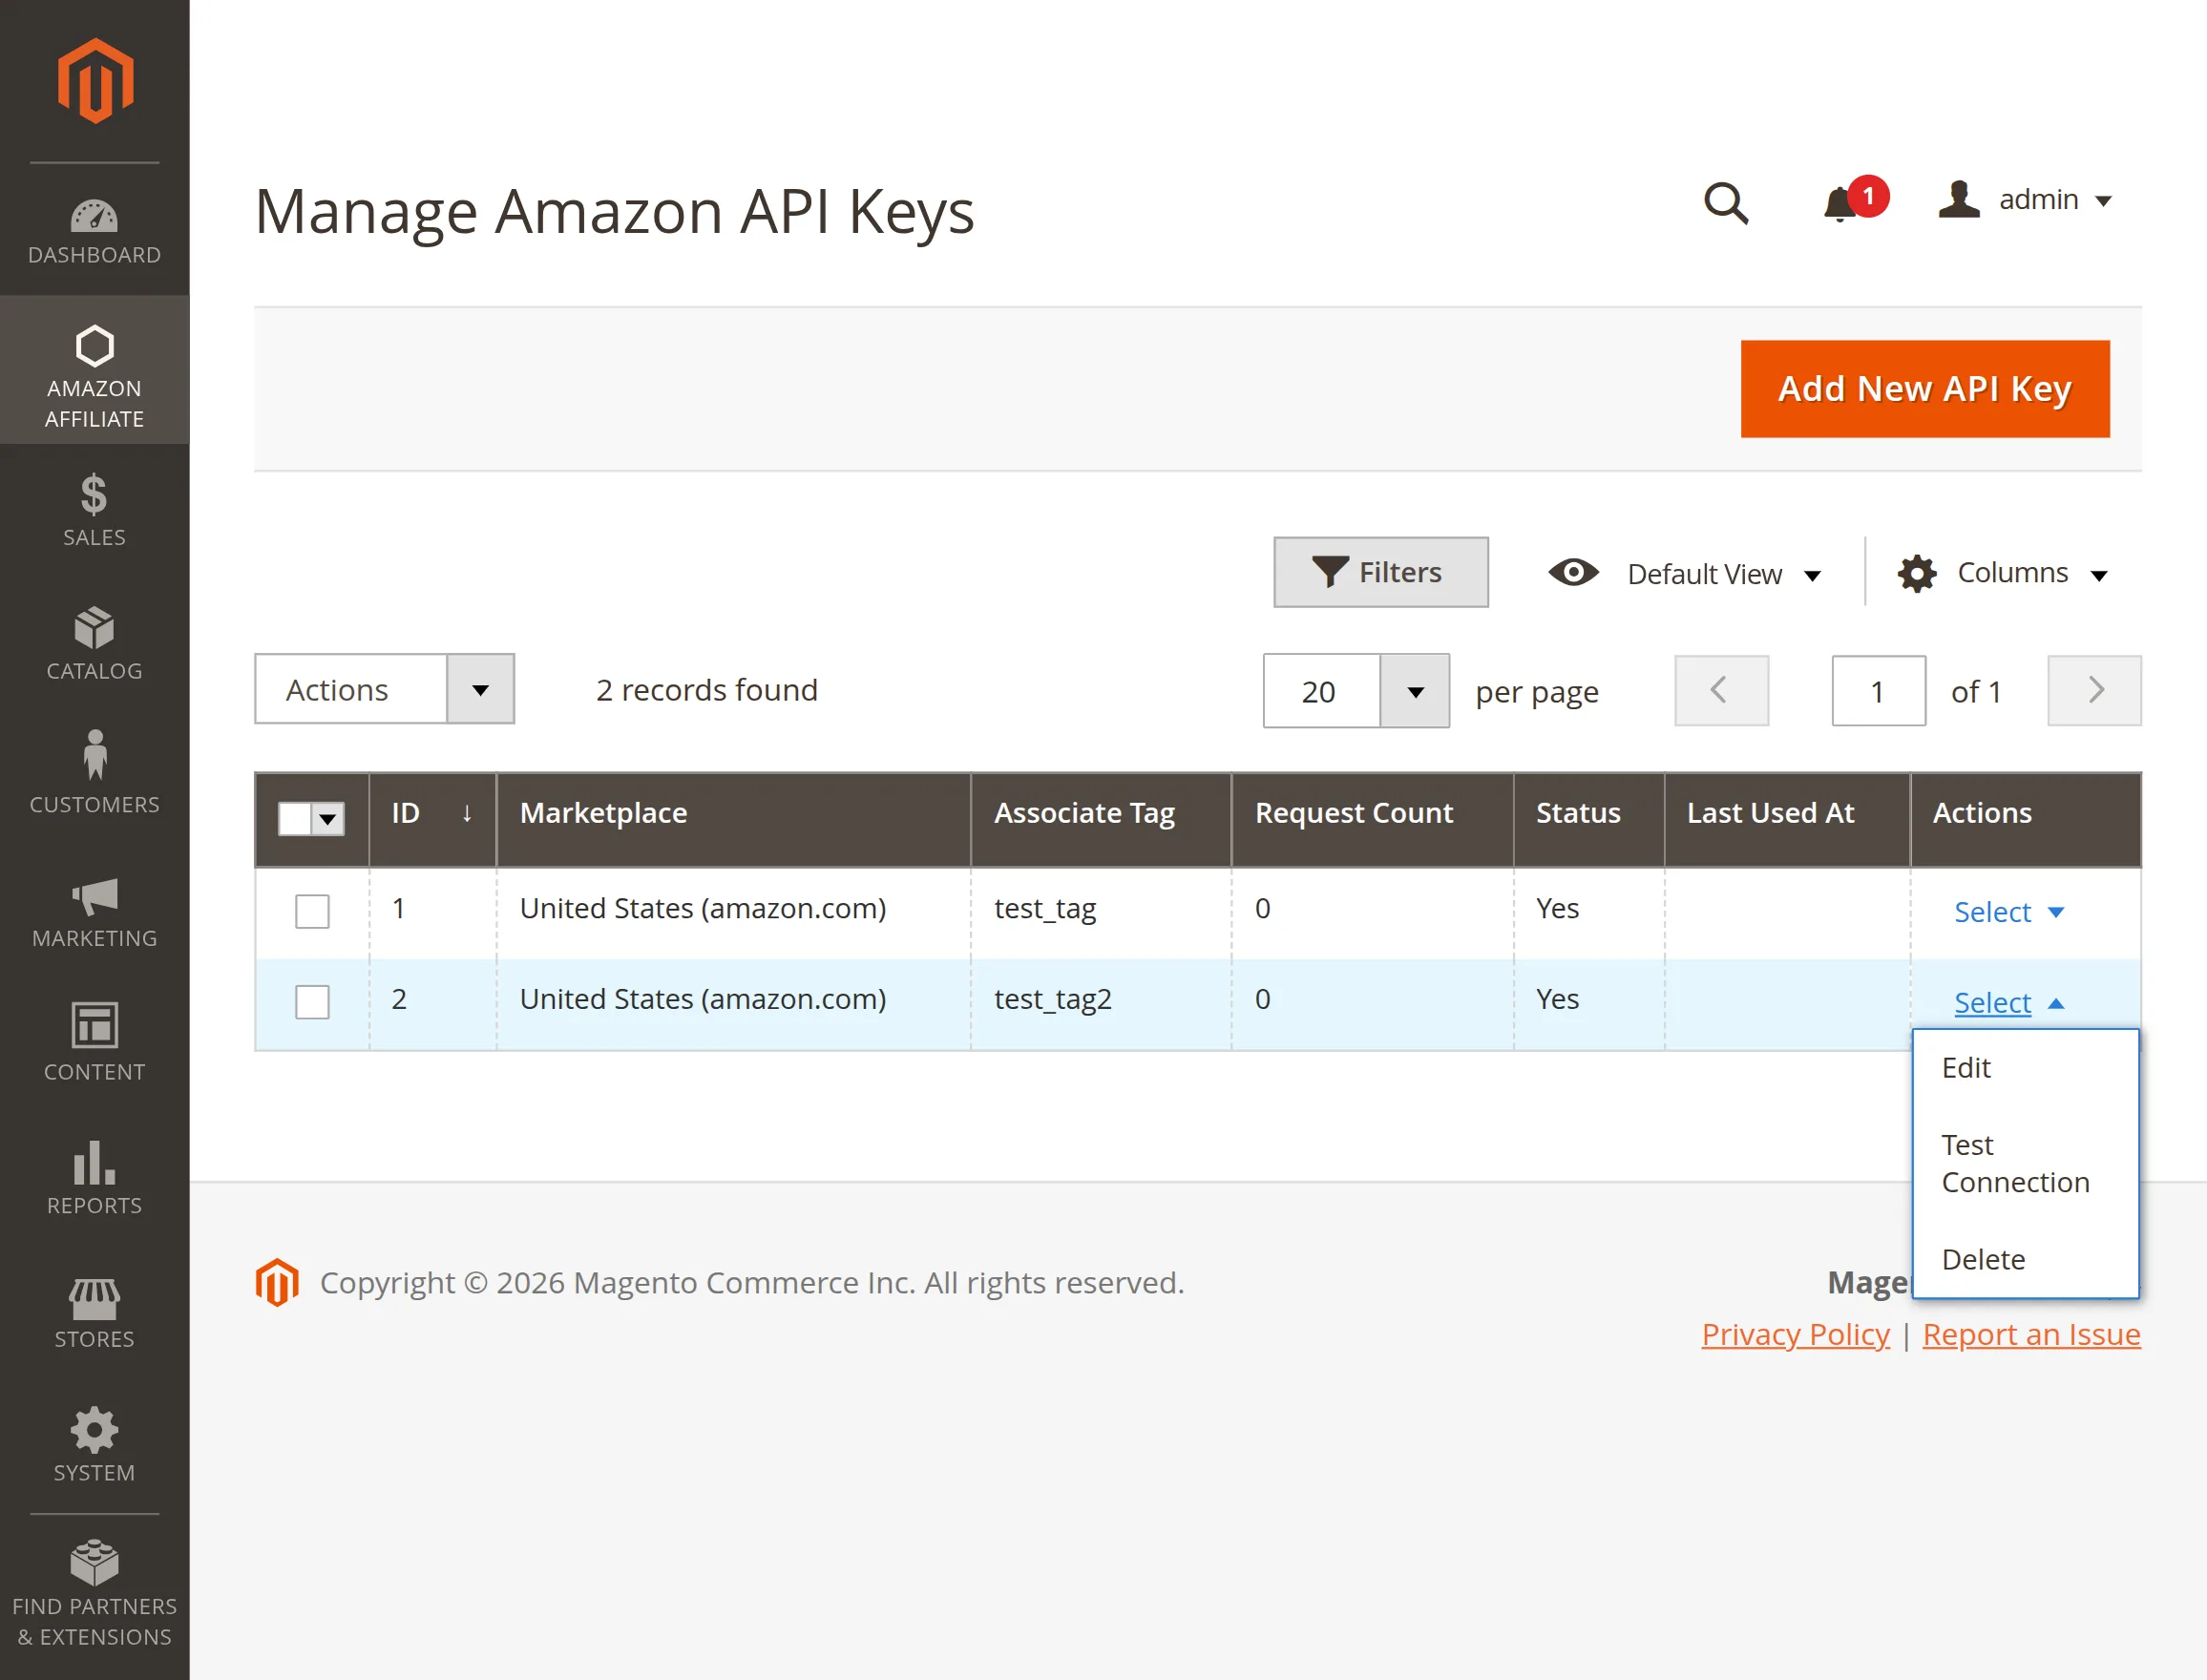
To register a new credential set, click the Add New API Key button to open the configuration form.
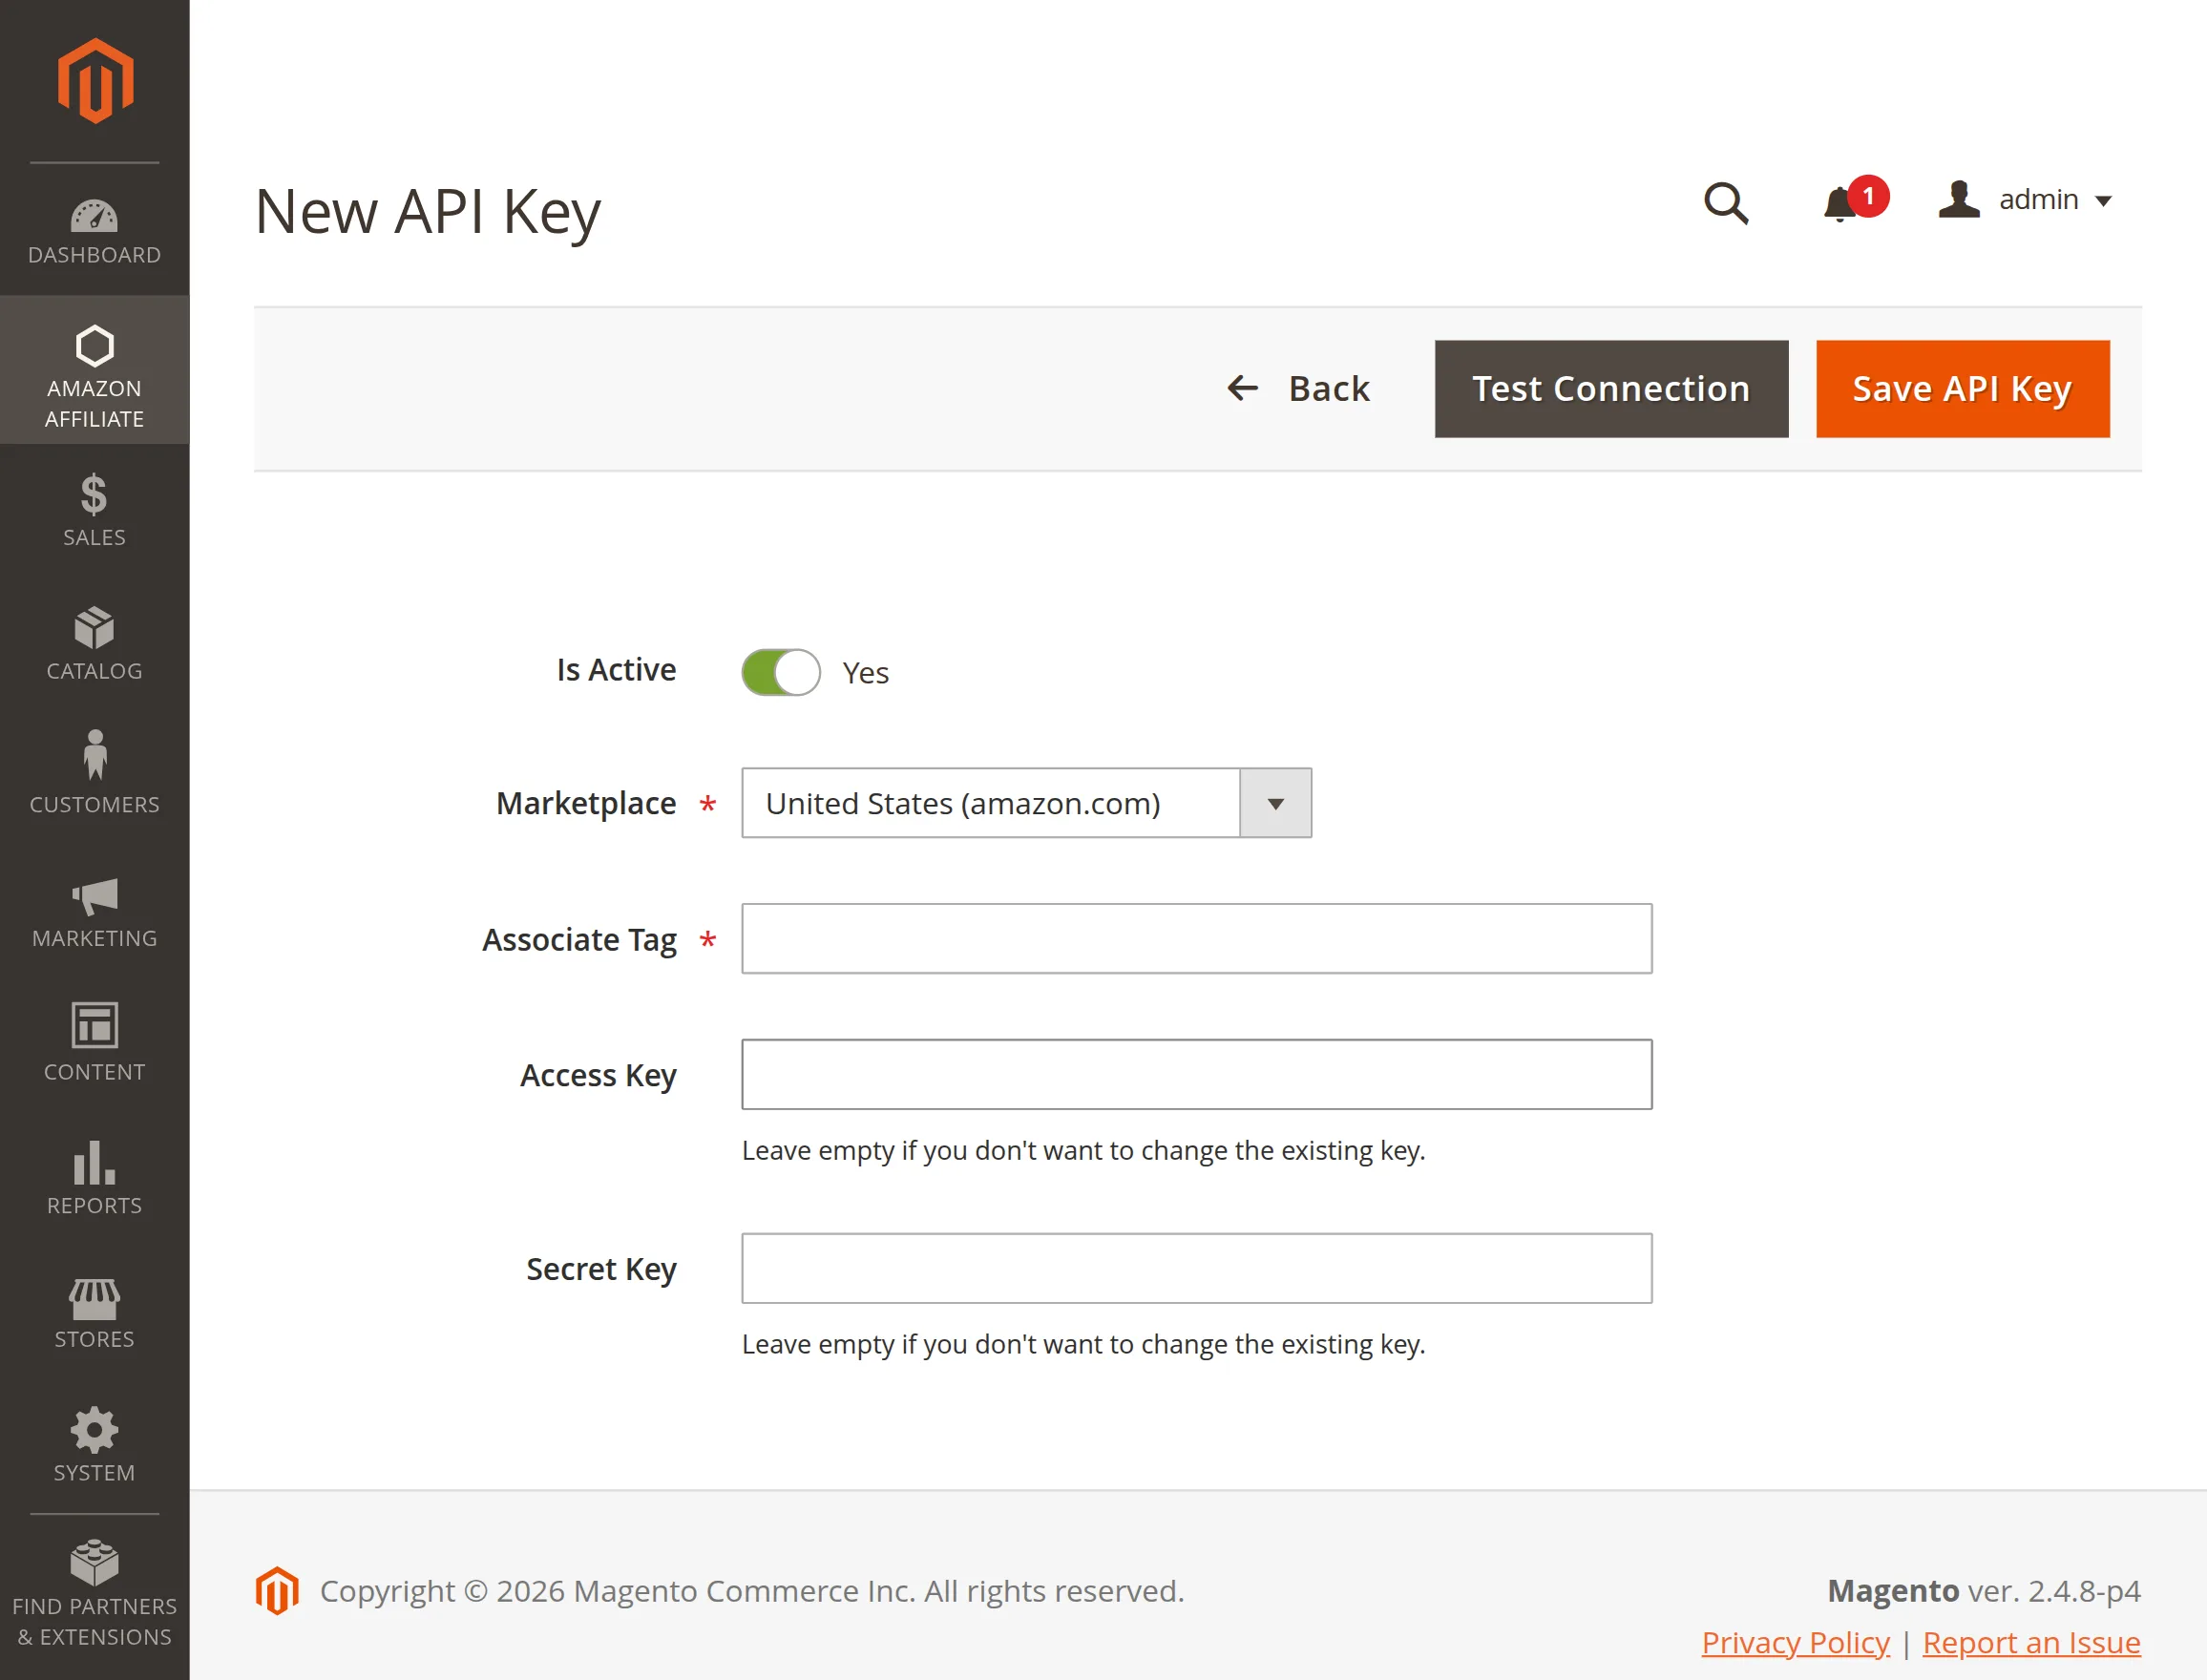
Is Active: Toggle this switch to enable or disable the specific key within the active rotation pool.
Marketplace: Select your target destination locale to match your regional developer credentials.
Associate Tag: Enter your official tracking identifier string assigned by the Amazon Associates portal.
Access Key & Secret Key: Input your unique Product Advertising API developer credentials into these fields.
Test Connection: Click this button to verify your live credentials against Amazon servers before saving.
After configuring the form details, click the Save API Key button to register and store your active connector parameters.
Once saved, the key appears in the grid where the admin can use the Select actions menu to Edit, Test Connection, or Delete entries.
Reports
Under this section, the admin can monitor real-time tracking performance and user interaction analytics for imported items as shown in the snapshot.
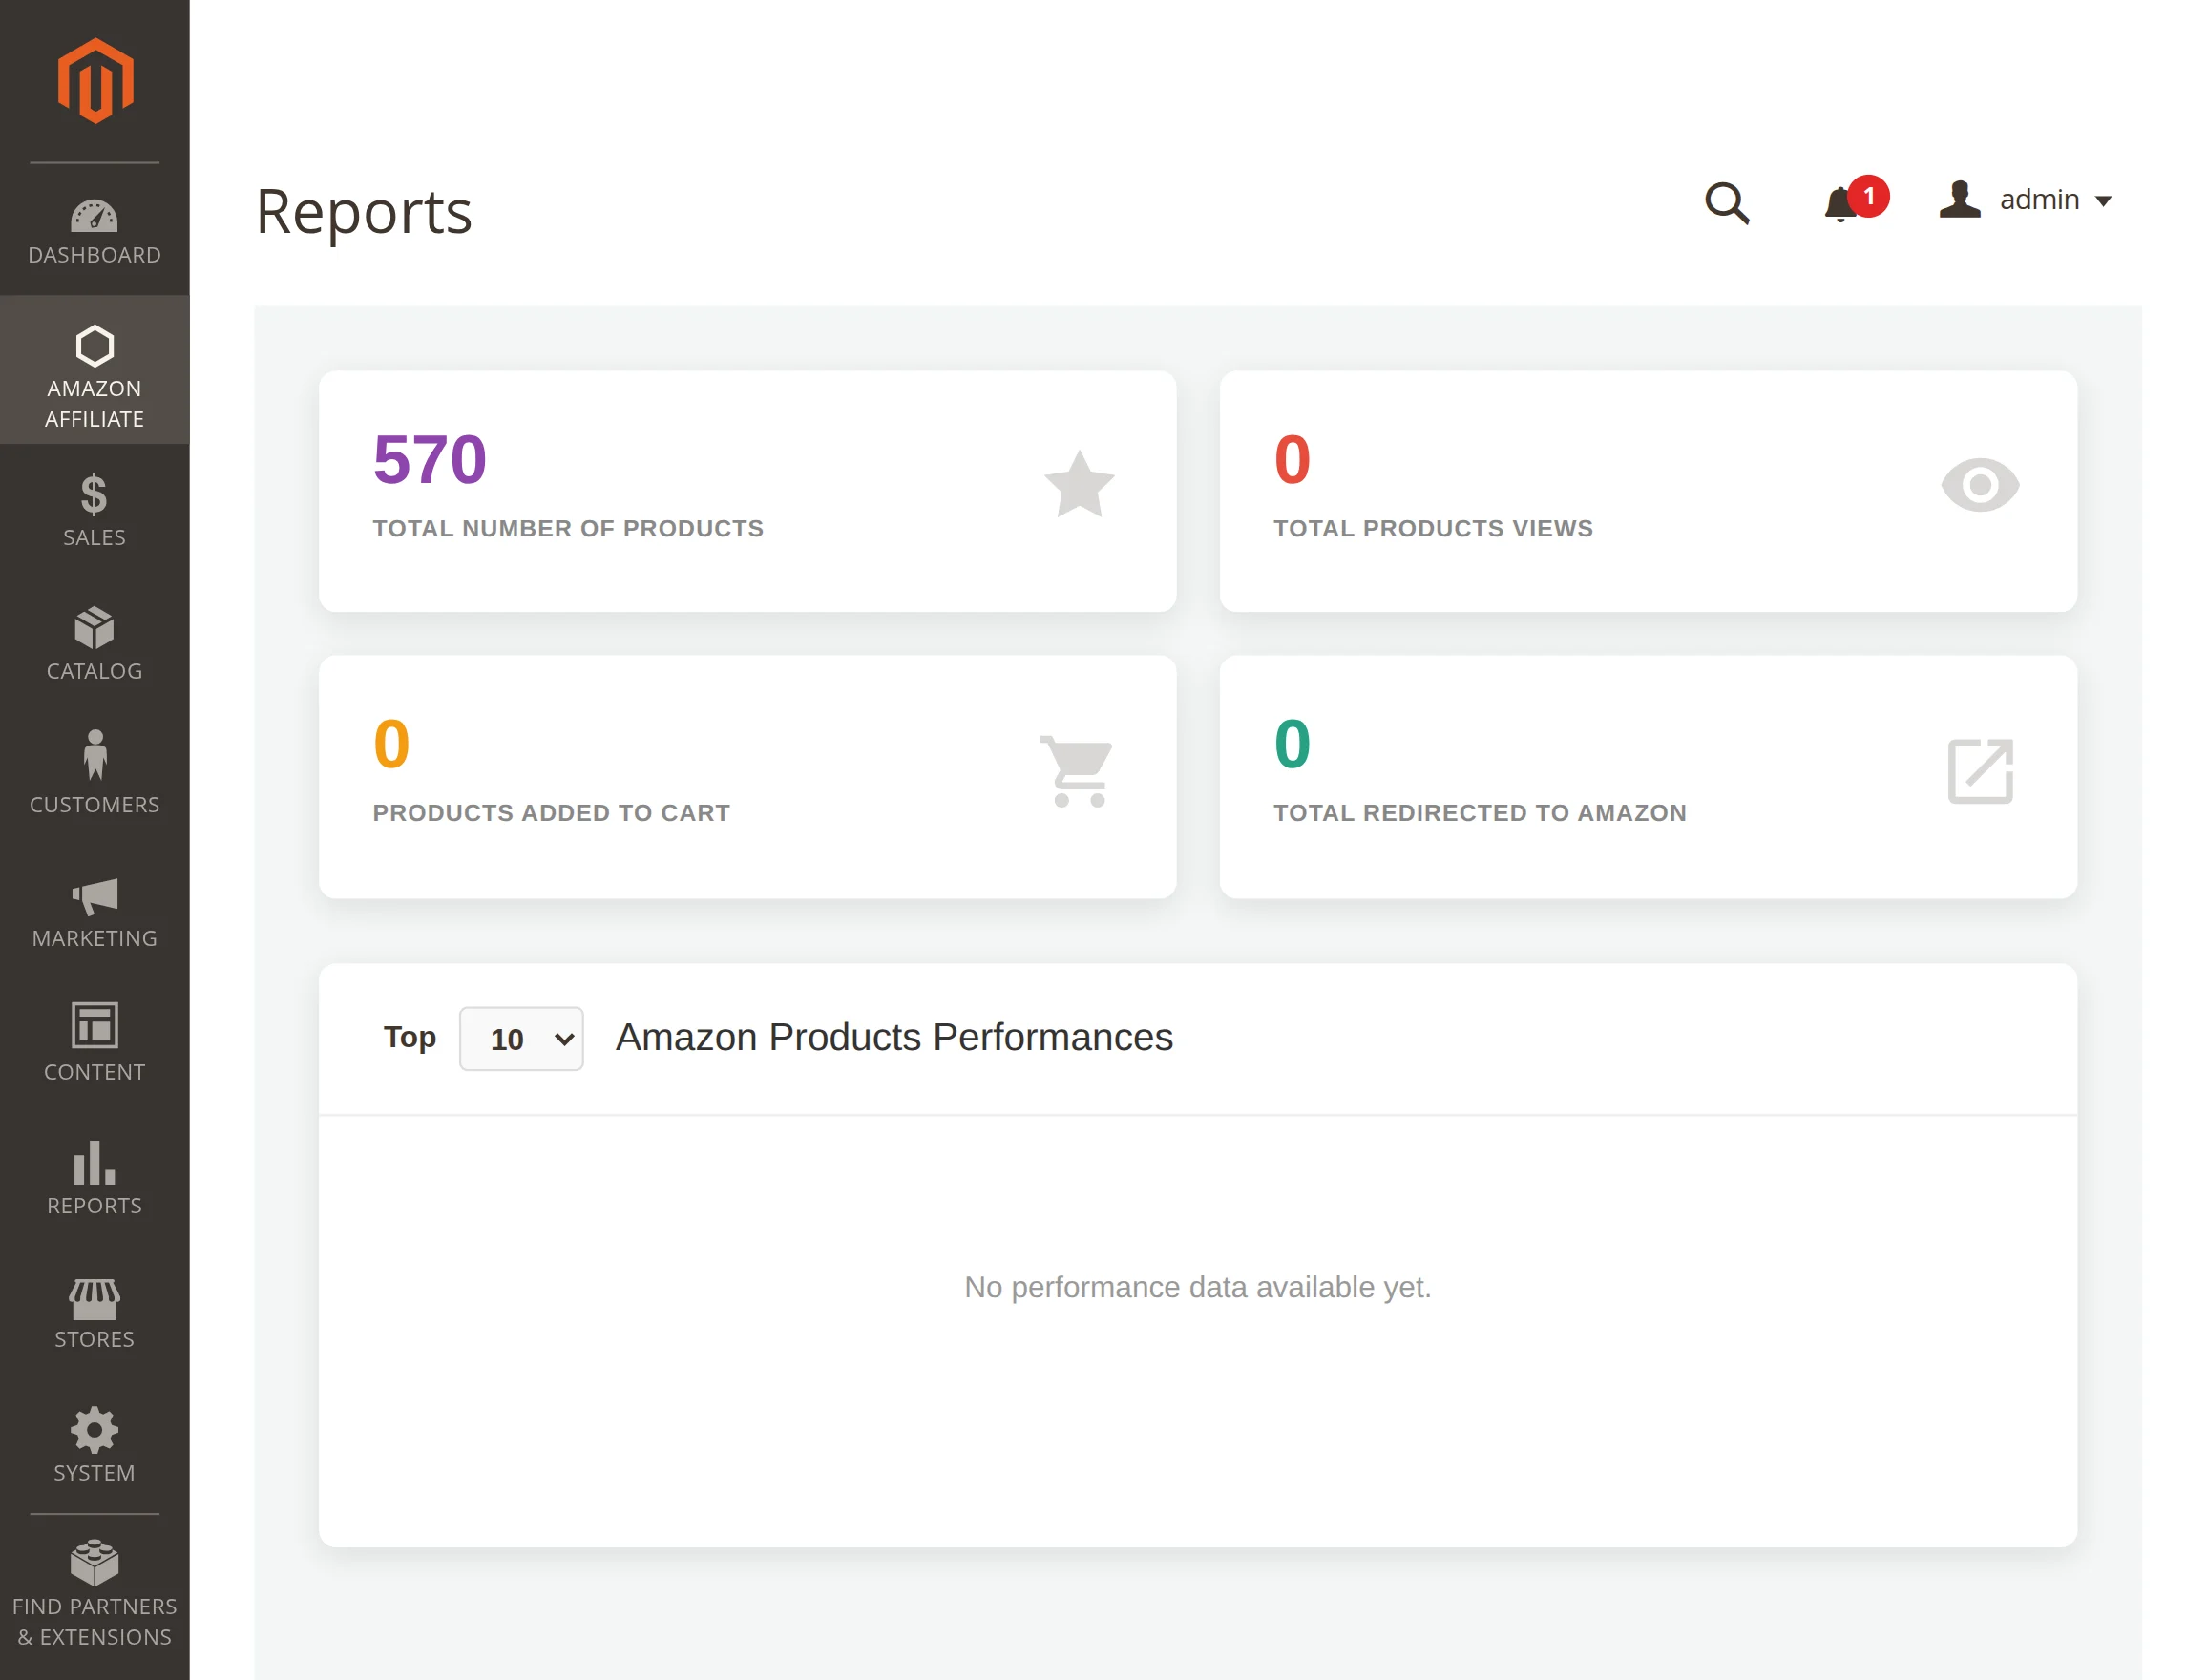
Total Number of Products: Displays the absolute count of active Amazon affiliate items currently stored inside your Magento database catalog.
Total Products Views: Tracks how many times your customers have opened and viewed the individual product detail pages across your digital storefront views.
Products Added to Cart: Monitors customer intent statistics by calculating how often users click your store buttons to place affiliate items into local shopping bags.
Total Redirected to Amazon: Counts the exact volume of referral traffic out-clicks that successfully send buyers to complete checkouts directly on external Amazon pages.
Amazon Products Performances: Review your top-performing listings using the dropdown selection filter to organize structural trends, views, or conversion rankings dynamically.
Customer Workflow
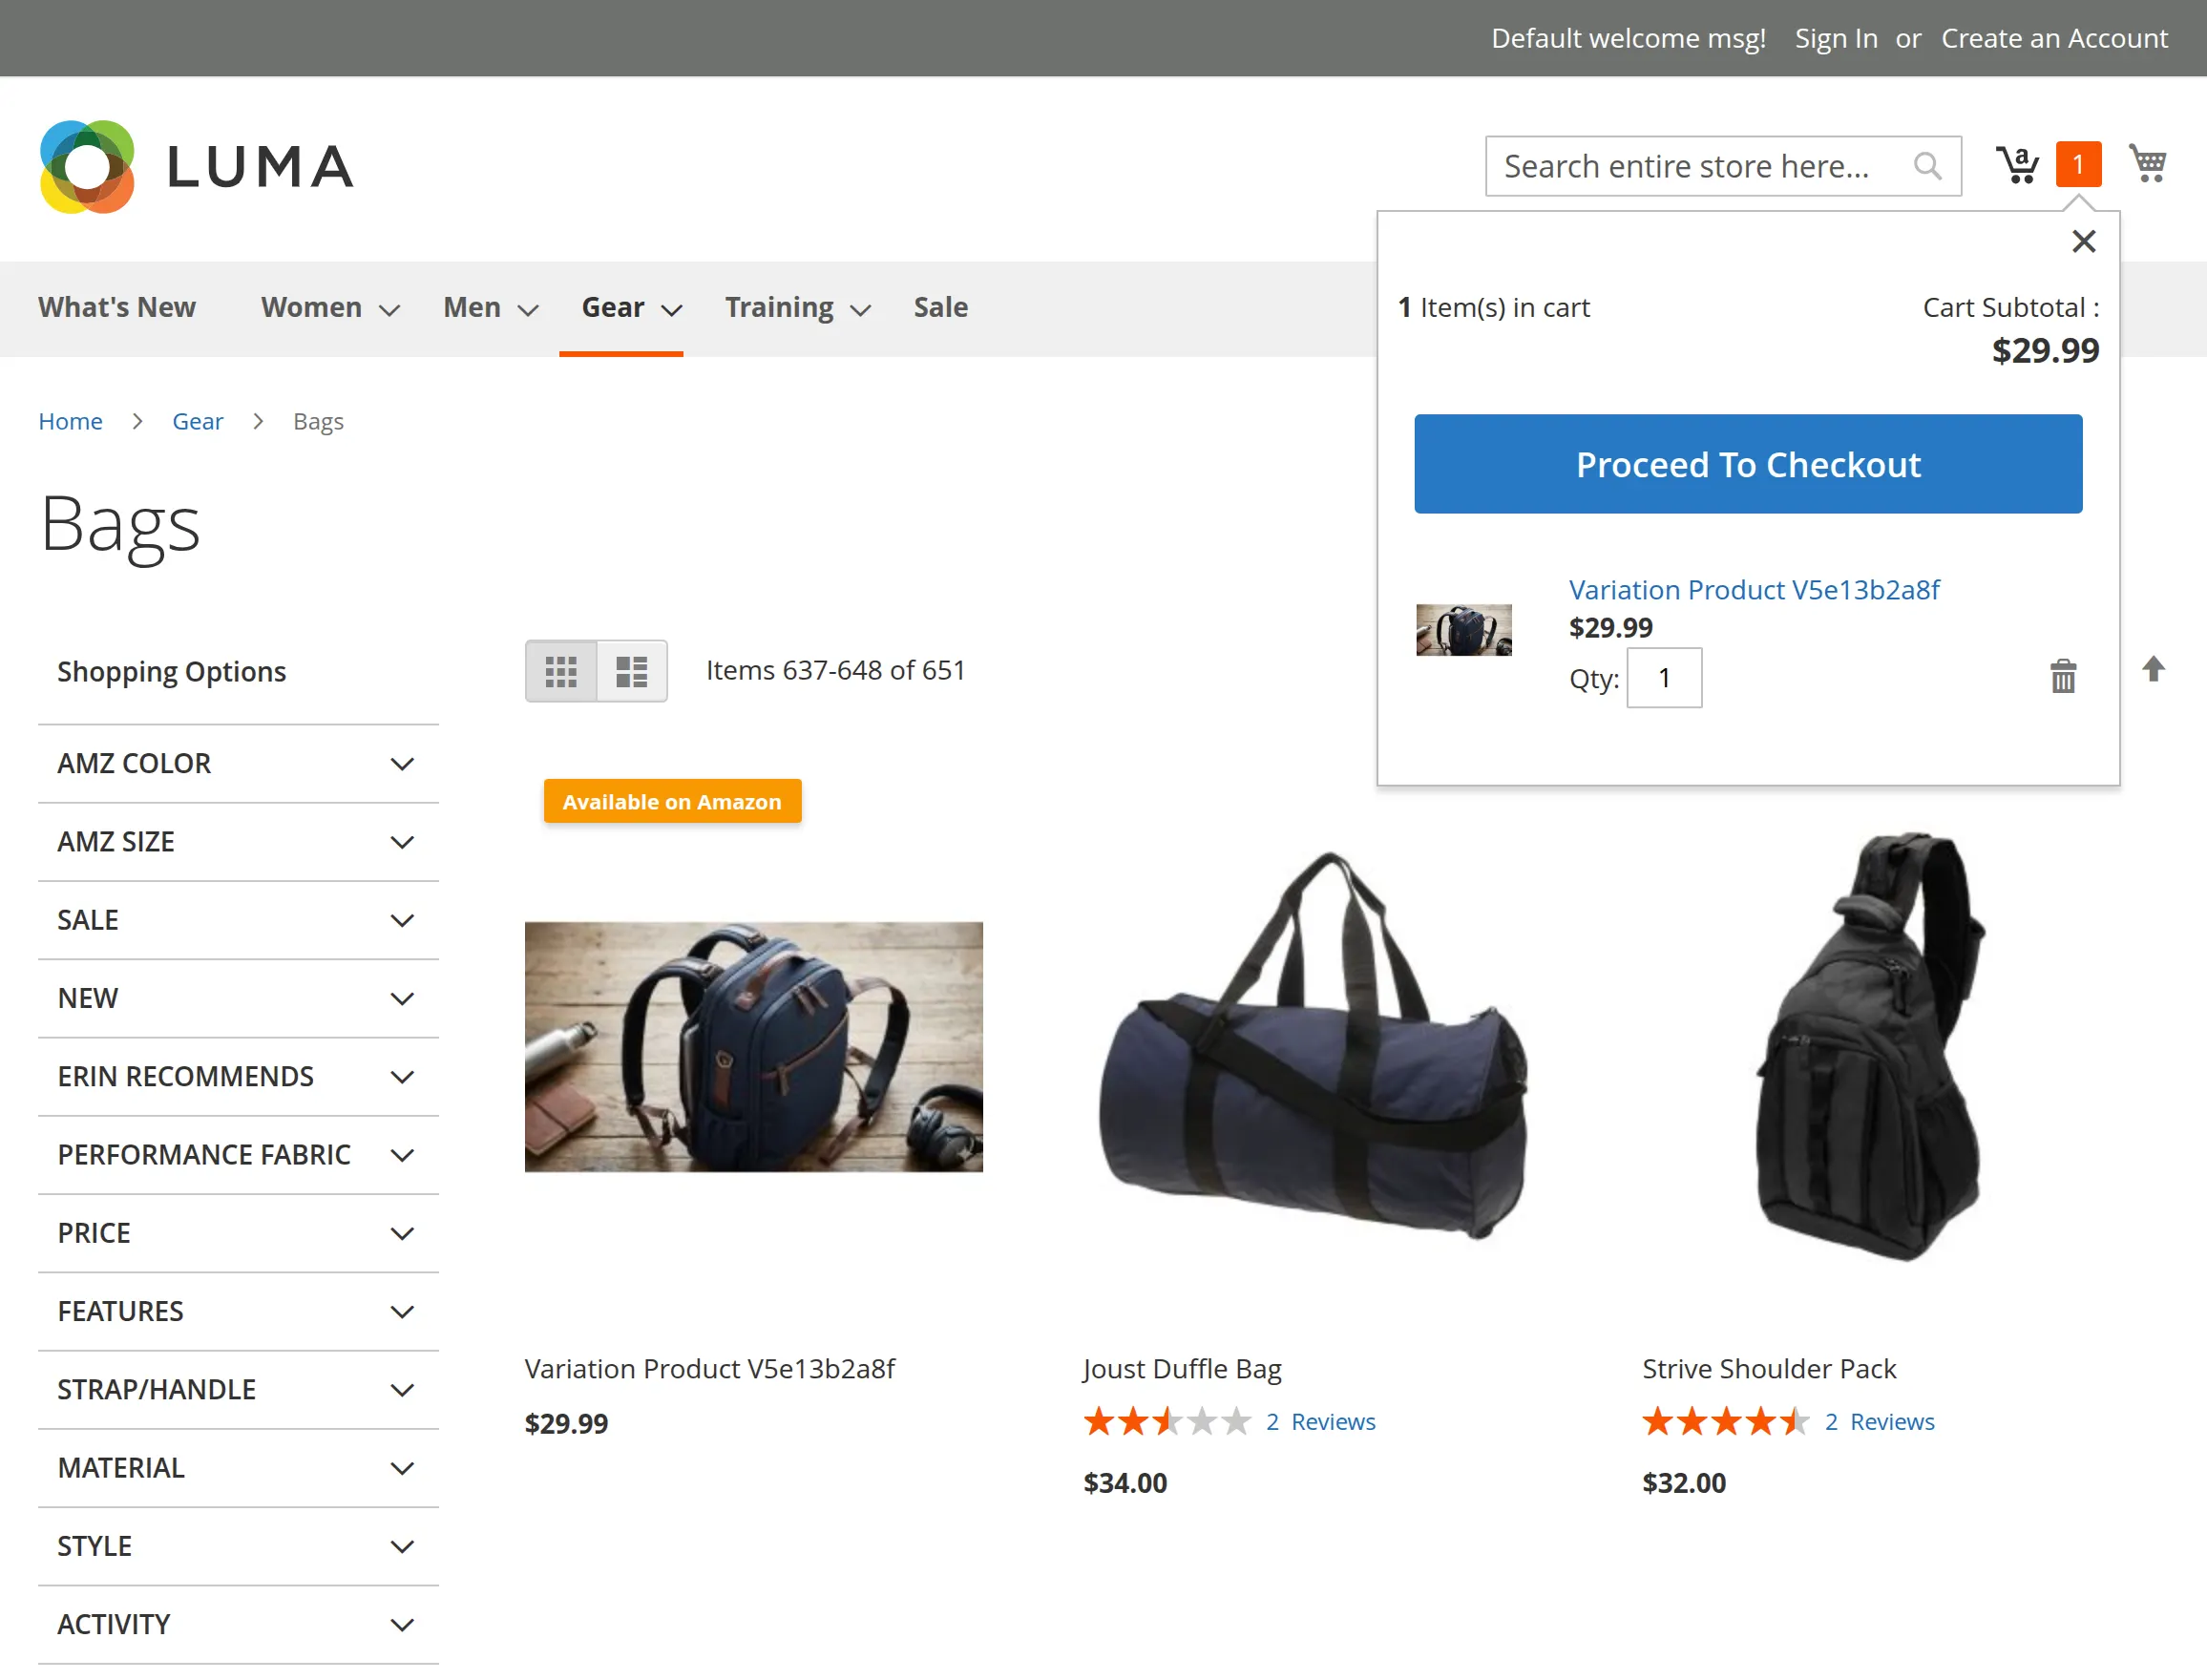
Customers can find the products from Amazon Affiliate in Magento 2 store with a Amazon Label .
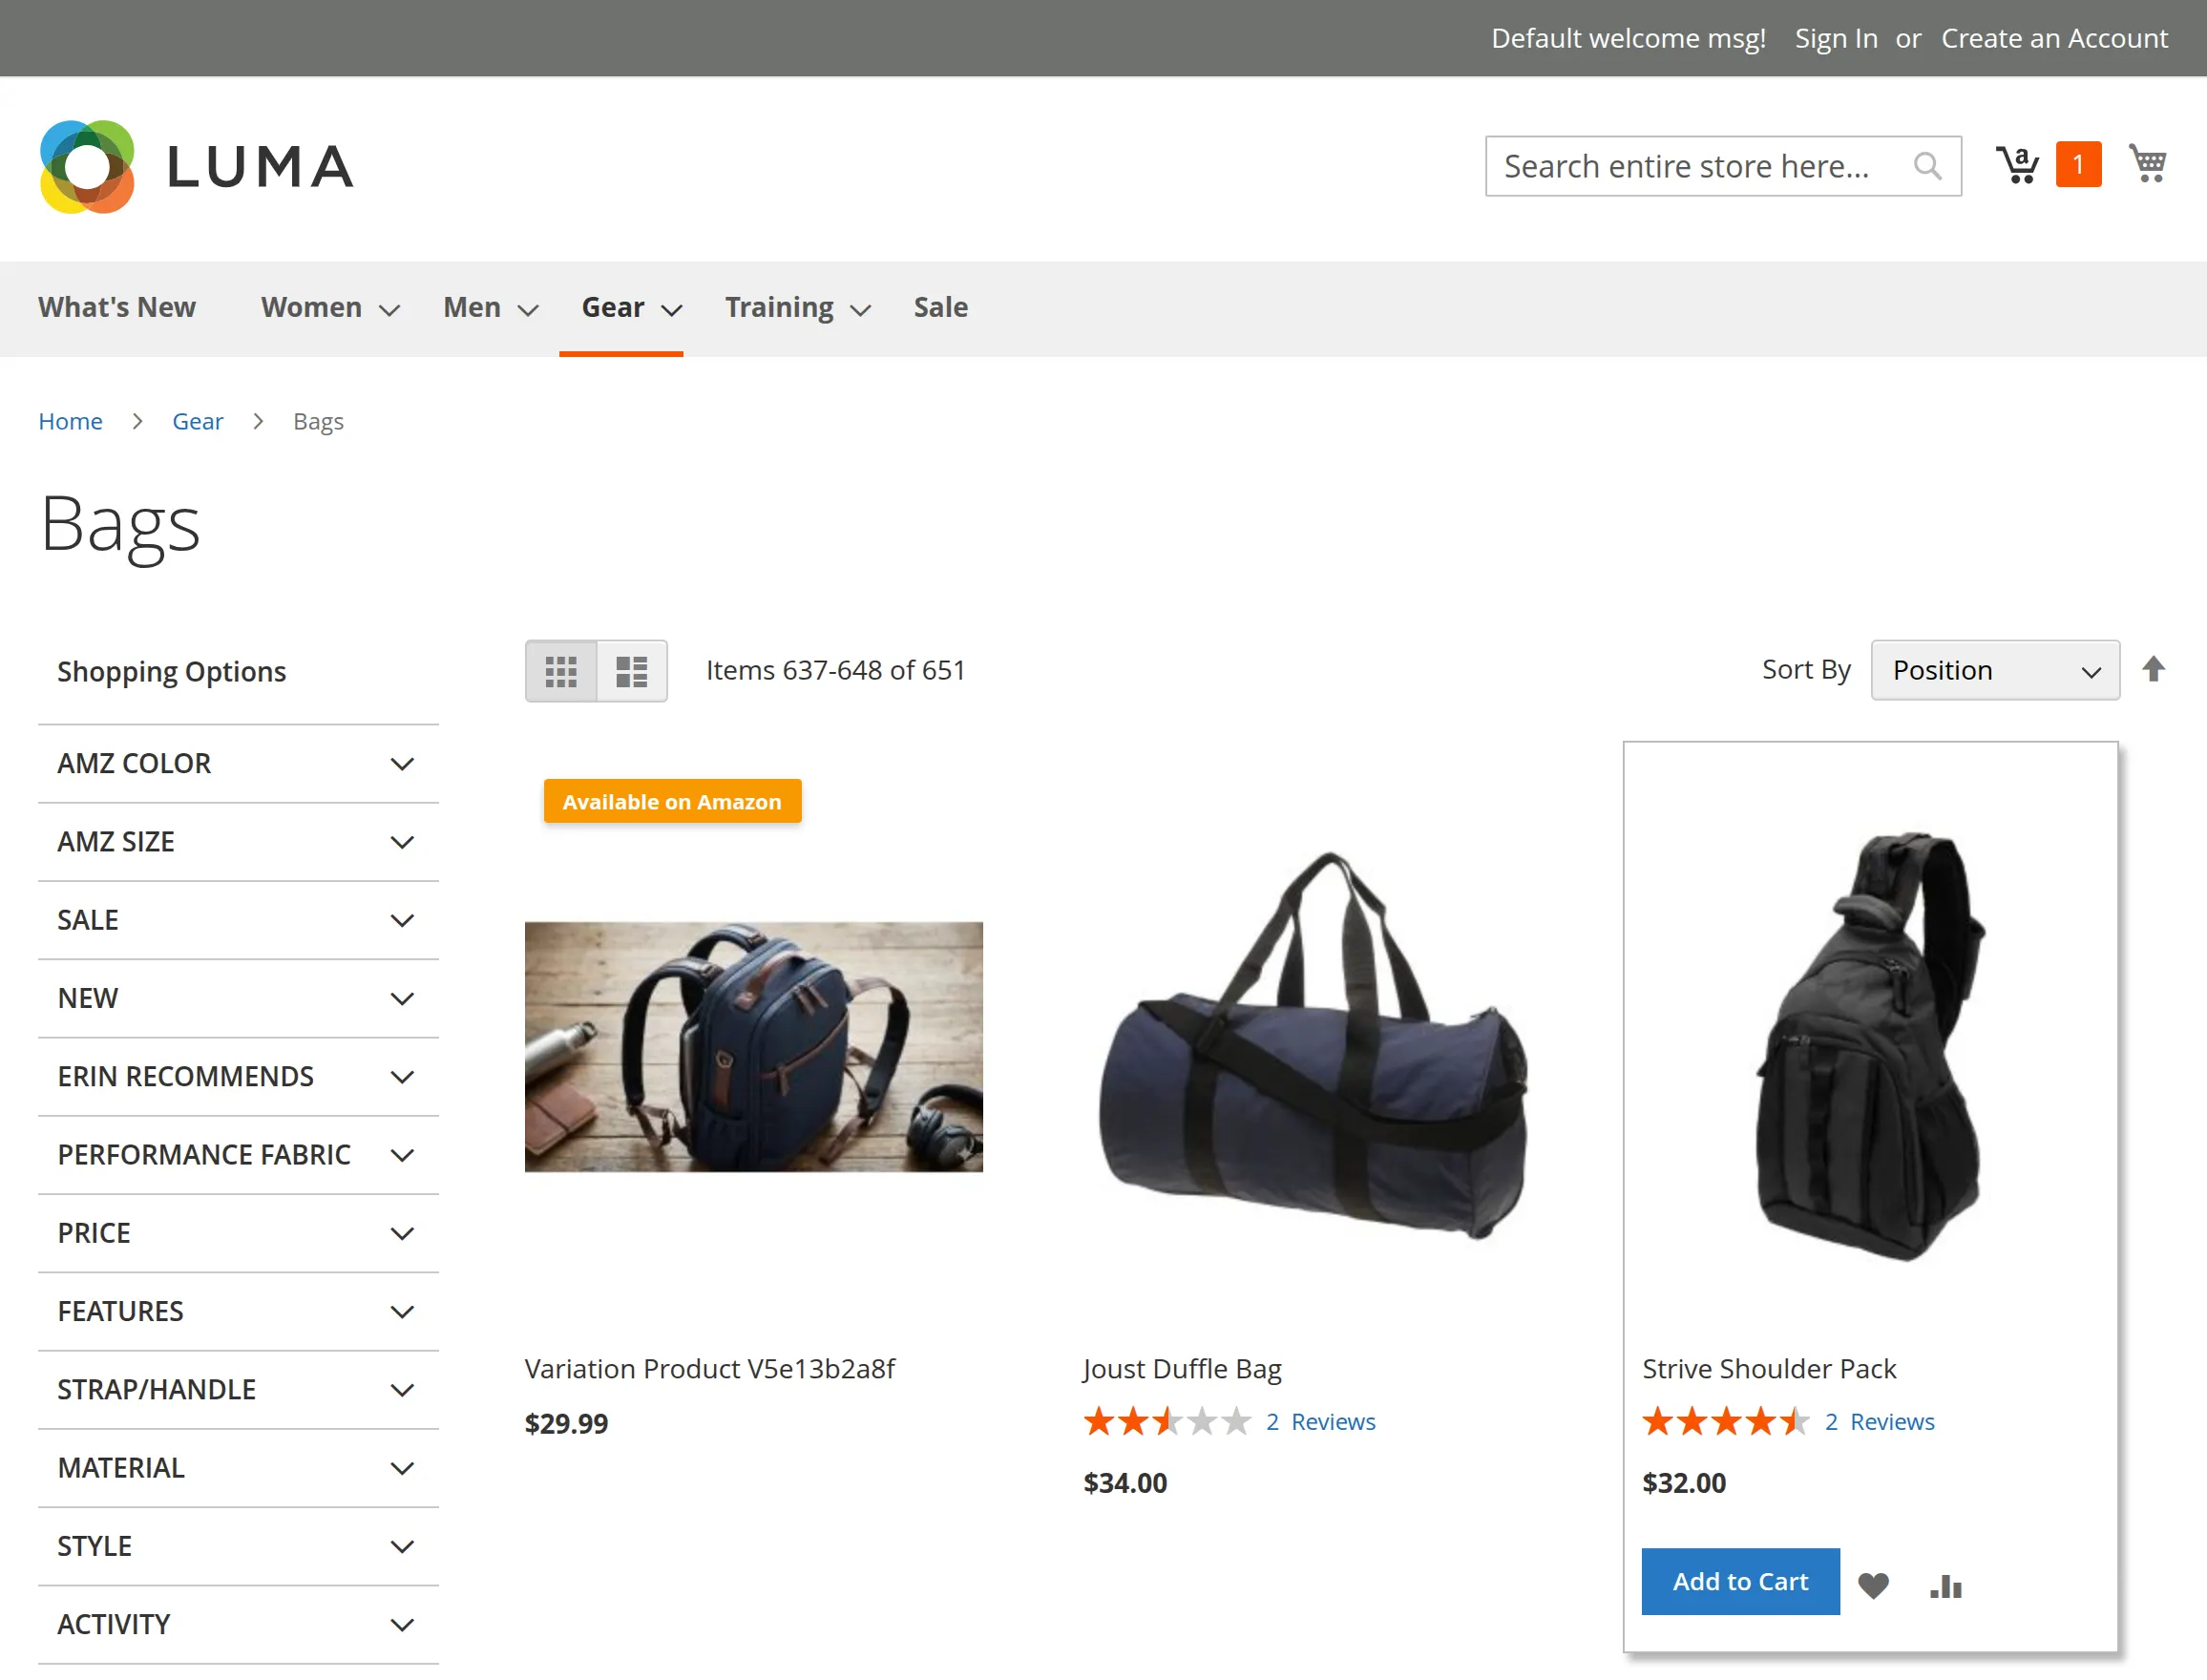
To add the product to the cart, just add it like usual by taping the Add to Cart button. This adds the product into the Amazon cart as shown below in the snapshot.
To proceed further, tap the Proceed to Checkout button.
The customer will be redirected to the Amazon website wherein he has to first login to place the order. After login, you have to click on the Continue button.
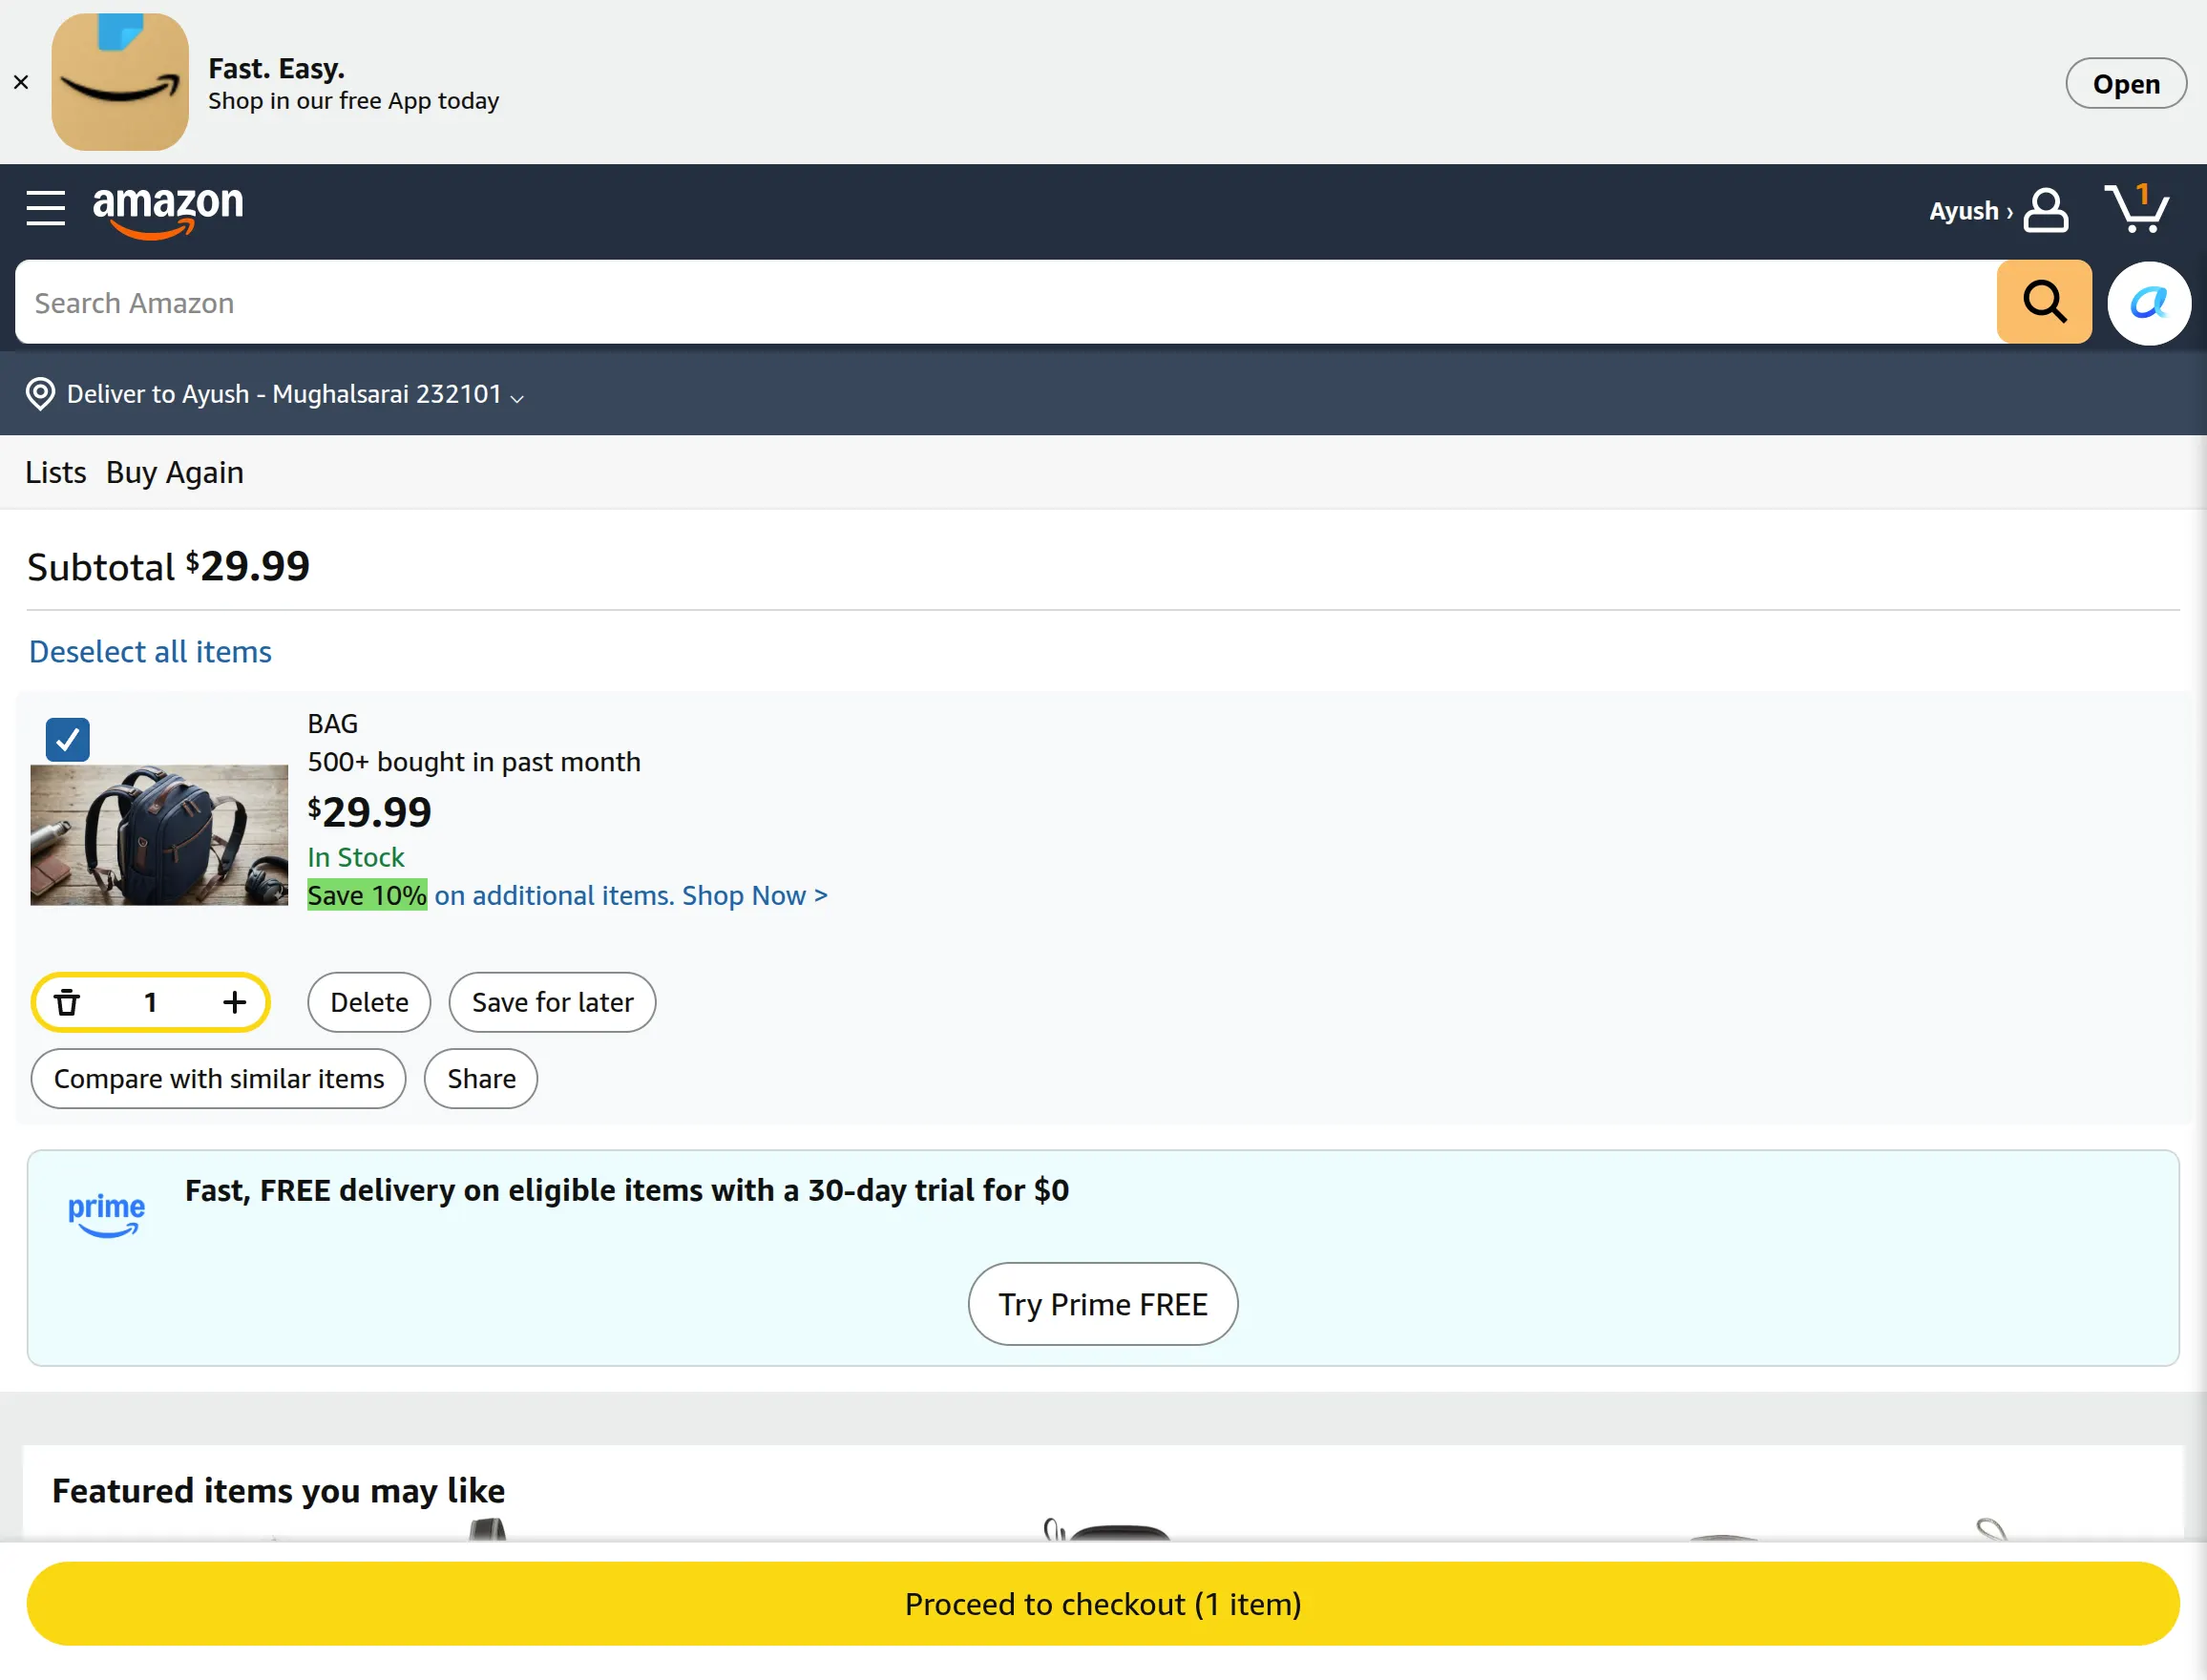
Lastly, the customer will click on the Proceed to Checkout button to make a payment for the product at Amazon.
Support
That’s all for Magento 2 Amazon Affiliate.
If you have any questions, suggestions, or customization requests, feel free to contact us at [email protected] or submit a ticket at webkul.uvdesk.com.
Please explore our Magento Development Services and Quality Magento 2 Extensions.
Current Product Version - 5.0.3
Supported Framework Version - Magento 2.0.x, 2.1.x, 2.2.x,2.3.x, 2.4.x

Be the first to comment.