Magento 2 Telr Payment Gateway Extension provides seamless integration between your Magento 2 store and the Telr payment platform.
With this module, you can securely process payments via Telr, manage transactions within your Magento 2 store, and get real-time payment updates.
Once a customer completes a payment, the extension automatically records the transaction in your Magento 2 store via Telr.
Telr then processes the payment, and the real-time transaction status is synced back to your Magento 2 store.
All payments are instantly processed and reflected in the store, making this extension ideal for automating and managing Magento 2 transactions.
Apart from this, if you want an extension that streamlines the checkout process into a single step, you can check the Magento 2 MangoPay Payment Gateway Extension.
Features
- Set minimum and maximum order amounts for Telr payments.
- Select transaction type and order status for payments.
- Refund invoiced amounts directly from the admin panel.
- Enable or disable the Telr payment method from the admin panel.
- Process payments securely via the Telr gateway.
Installation
The installation is quite simple, just like the standard Magento 2 extensions.
#Download Module
Firstly, you need to log in to the Webkul Store, go to My Account>My Purchased Products section, verify, and then download and extract the contents of this zip folder on the system.
#Upload Folder
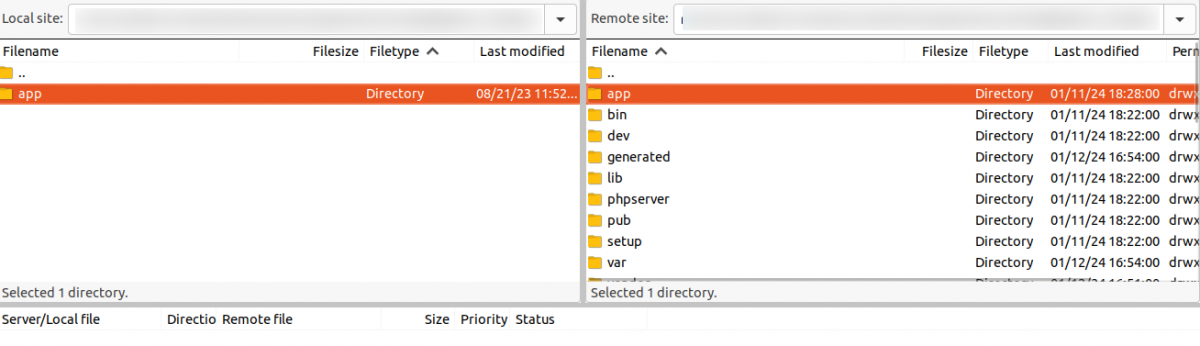
Once the module zip extracts, follow the path src>app and copy the app folder into the Magento 2 root directory on the server as shown below:
#Run Commands
php bin/magento setup:upgrade
php bin/magento setup:di:compile
php bin/magento setup:static-content:deploy
php bin/magento indexer:reindex
php bin/magento cache:flush
Language Translation
For translating the module language, navigate through the app/code/Webkul/TelrPayment /i18n and edit the en_US.csv file.
Thereafter, rename the CSV as “en_SA.csv” and translate all right-side content after the comma in the Arabic language. After editing the CSV, save it.

Now, upload it to the path app/code/Webkul/TelrPayment /i18n where the installation of Magento 2 is on the server.
Magento 2 Telr Payment Gateway extension will be translated into Arabic and support RTL and LTR languages.
The user can edit the CSV like the image below.

Engage and hire Magento developers to solely concentrate on your personalized e-commerce projects for a unique experience
Configuration – Telr Payment Gateway
After installing the Telr Payment Gateway for Magento 2, the admin will configure the module.
Magento admin will navigate to Webkul Telr Payment > Configuration Settings to navigate its settings page.

Admin can configure the Webkul Telr Payment settings of the module by navigating to Stores > Configuration > General > Webkul Telr Payment Settings.

Enabled: Activate or deactivate the Telr payment method for the selected website scope.
Title: Define the payment method name that customers see at checkout for the selected store view.
Telr Iframe Mode: Choose whether to display the payment page within an iframe on your site.
Sandbox Mode: Switch between test (Yes) and live (No) transaction processing.
Telr Store ID: Enter your unique Store ID provided in the Telr Merchant Dashboard.
Telr Authentication Key: Enter the Authentication Key from your Telr Dashboard (Payment Page V2 settings).
Remote Authentication Key: Enter the Remote Authentication Key from Telr, required for processing refunds via Magento Credit Memos.
New Order Status: Set the default order status after a successful payment.
Transaction Description: Define the description displayed to customers on the Telr Hosted Payment Page.

Payment from Applicable Countries: Choose the scope for country restrictions.
Payment from Specific Countries: Select this option to manually choose allowed countries.
All allowed Countries: Choose to allow the payment method in all countries available in your store’s configuration.
Allowed Countries: Manually select the specific countries where this payment method will be available to customers.
Allowed Currencies: Select the specific currencies that are accepted by this payment gateway.

Minimum Order Amount: Specify the minimum order value required to enable this payment method.
Maximum Order Amount: Specify the maximum order value allowed for this payment method.
Select Language: Choose the language for the payment interface.
Select Transaction Type: Choose the transaction processing type.
Enable Vault: Activate or deactivate the saved payment method feature.
Debug Mode: Enable or disable detailed logging for troubleshooting purposes.
Workflow – Customer End
After successful installation and configuration of the Telr Payment Gateway for Magento 2, customers can visit your store.
Customers can add products to their cart and then proceed to checkout; finally, they can complete their order using Telr’s secure payment processing.
The customer can first select the size, color, and quantity of the product; then, they can proceed to add it to the cart.

Review the items in your cart to ensure everything is correct, then click Proceed to Checkout to continue.

Enter your Shipping Address Details to ensure your order is delivered to the correct location.

Choose your preferred Shipping Method to determine how your product will be delivered.

Customers can select a payment method as Webkul Telr Payment, for the payment of the product.

Customer can easily check their order details by heading to My Orders, a convenient way to stay updated on their purchases

Managing Orders in the Magento 2 Store
Navigate to Sales > Orders in the Magento Admin to manage orders, invoices, shipments, and credit
memos.

To view the details of a desired order, simply click on the ‘View‘ option associated with that order.

Order & Account Information displays the order metadata and customer details, while Address Details shows the complete billing and shipping information with editing options.

Payment & Shipping Method section displays the payment gateway used (Webkul Telr Payment); furthermore, it outlines the selected shipping method along with its associated cost.
Items Ordered section provides a detailed overview of the purchased products, including their prices and quantities.
Additionally, it presents the calculated subtotal along with the applicable tax details.

Order Totals displays the complete financial summary, including subtotal, shipping costs, total, and amounts paid, refunded, or canceled.

Support
So that is all for the User Guide for Magento 2 Telr Payment Gateway extension guide.
For any further queries or assistance, you can drop us an email at [email protected].
Furthermore, there is no need to search elsewhere; seize the chance to initiate your projects with the accredited Magento 2 development company.
For a personalized touch, engage and hire Magento developers who are focused on delivering exceptional results for your custom e-commerce projects.
Current Product Version - 4.0.0
Supported Framework Version - Magento 2.0.x, 2.1.x, 2.2.x,2.3.x, 2.4.x

Be the first to comment.