Laravel E-commerce B2B Marketplace extension Convert your Bagisto store into B2B Marketplace like Alibaba, or Indiamart.
Bagisto B2B Marketplace will create an online platform where business buyers and suppliers around the globe can connect and do business transactions with each other.
B2B Marketplace extension offers features like Supplier Microsites, RFQs, Quick Orders, Reviews, Feedback, Product Collections, and Order Management.
Feature
- Each supplier will also have a separate microsite.
- Buying leads option work only if the Suppliers have selected categories prior to the Supplier settings.
- Supplier verification process
- Social channels of suppliers also.
- Supplier Policies.
- The supplier can add also banners, shop logos custom HTML text.
- Customers can create a quick order.
- Separate supplier’s product collection.
- Feedback and review system with interactive star rating.
- Contact to Supplier support.
- Supplier dashboard for analyzing sales, reviews, and customers.
- Interactive Supplier Dashboard.
- Send quotation requests to the supplier.
- Featured products section.
- supplier / Vendor Enable disable from the admin of the store.
- This module also provides an attractive landing page with top 4 Supplier with their top 5 products.
- Allow to Supplier to edit the shop URL for the Profile page, collection page, review page, and location page.
- Admin can also do the Landing page setting.
- Product Edit and Delete option on Supplier panel.
- Latest order at Supplier dashboard and order management.
- Supplier/Vendor transaction report at supplier panel.
- All currencies Supported.
Requirement
- Bagisto: v2.2.2
Installation
Unzip the respective extension zip and then merge “packages” and ” public” into the project root directory.
Goto config/app.php file and add following line under ‘providers’
Webkul\B2BMarketplace\Providers\B2BMarketplaceServiceProvider::class,
Go to composer.json file and add the following line under ‘psr-4’
Webkul\\B2BMarketplace\\": "packages/Webkul/B2BMarketplace/src
In the config/bagisto-vite.php file, add the following line under the ‘viters’ section:
        'b2b_marketplace' => [
            'hot_file'                 => 'b2b-vite.hot',
            'build_directory'          => 'themes/b2b_marketplace/build',
            'package_assets_directory' => 'src/Resources/assets',
        ],
Another entry inside file app/Http/Kernel.php:
Add the below in ‘middleware’ array.
<code>\Webkul\B2BMarketplace\Http\Middleware\ValidateSellerProfile::class,</code>
Create Wild Card entry in you Server VirtualHost file For Subdomaining (Example:)
ServerName - example.com
ServerAlias - supplier1.example.com, *.example.com
Restart your server
Assign Your Domain Name to APP_URL in .env file
Run these commands below to complete the setup
composer dump-autoload
php artisan b2b-marketplace:install
<code>php artisan optimize:clear</code>
That’s it, now just execute the project on your specified domain.
Module Configuration
After the successful installation of the module login to the admin panel, and navigate to the Configure -> B2B Marketplace.
General Settings
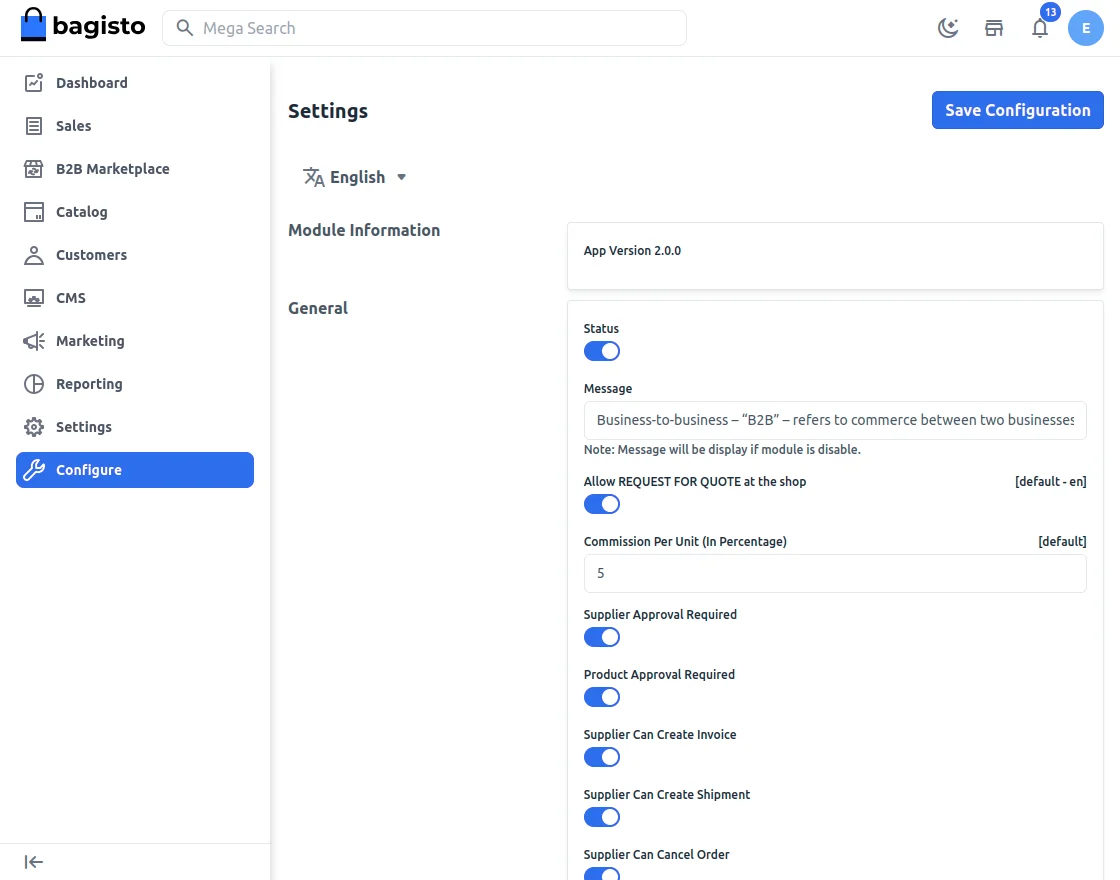
Status
Admin can Enable/Disable the B2B marketplace module.
Allow RFQ at the shop
Admin can allow REQUEST FOR QUOTE at the shop.
Commission Per Unit (In Percentage)
Here the admin defines to set the global commission % for suppliers that will be applicable to all.
If the admin has set global commission 10% for every supplier in the marketplace, thus when a product is purchased admin will be earning 10% of the product cost as commission.
Supplier Approval Required
Select Yes in this setting if approval is required whenever a new supplier has been registered in the B2B marketplace.
Product Approval Required
Select Yes in this setting if approval is required whenever a new product has been added by the supplier on the marketplace.
Supplier Can Create Invoice
Choose Yes in the setting if you also want to give the supplier permission to create an invoice.
Supplier Can Create Shipment
Choose Yes in the setting if you want to give the supplier also the permission to ship the product that has been ordered.
Supplier Can Cancel Order
Choose Yes in the setting if you want to give the supplier permission to cancel order.
Send Chat Notification
The admin can enable or disable this toggle button so that suppliers and customers can get message notifications in their emails.
Allow Categories for Suppliers
Admin can allow the All or Specific Categories for Supplier’s.
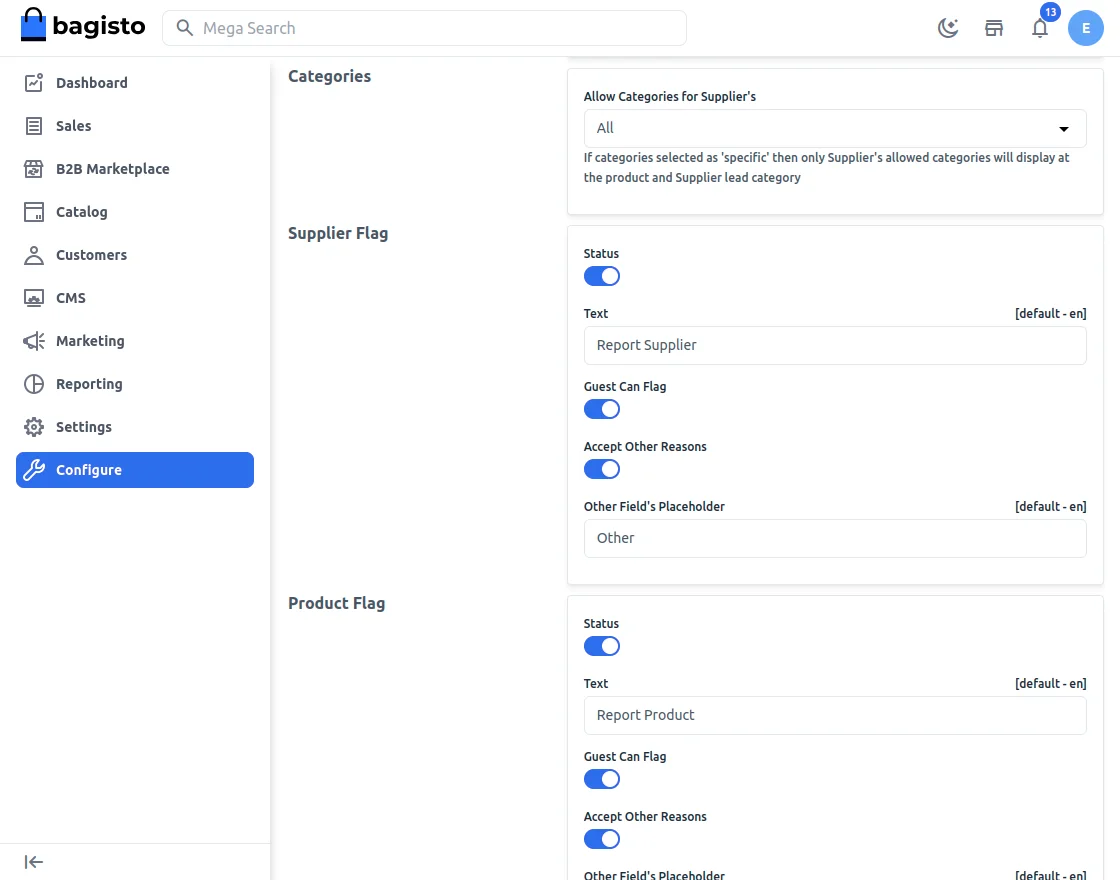
Supplier Flag
Admin can enable/disable the Supplier Flag options and can also add a custom text button label.
Enable/ disable the guest user to report the flag and allow other reasons for the Supplier Flag.
Product Flag
Admin can enable/disable the Product Flag options and can also add a custom text button label.
Enable/ disable the guest user to report the flag and allow other reasons for the Product Flag.
Supplier Profile Page
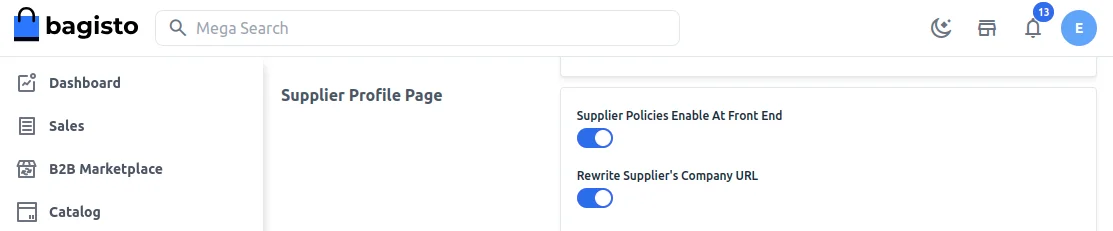
Supplier Policies Enable At Front End
Select Yes to display supplier shipping and refund policies information on supplier profile page.
Rewrite Supplier’s Company URL
Select Yes to enable suppliers to edit their shop URL.
Email Verification
Enable this toggle button for email verification.

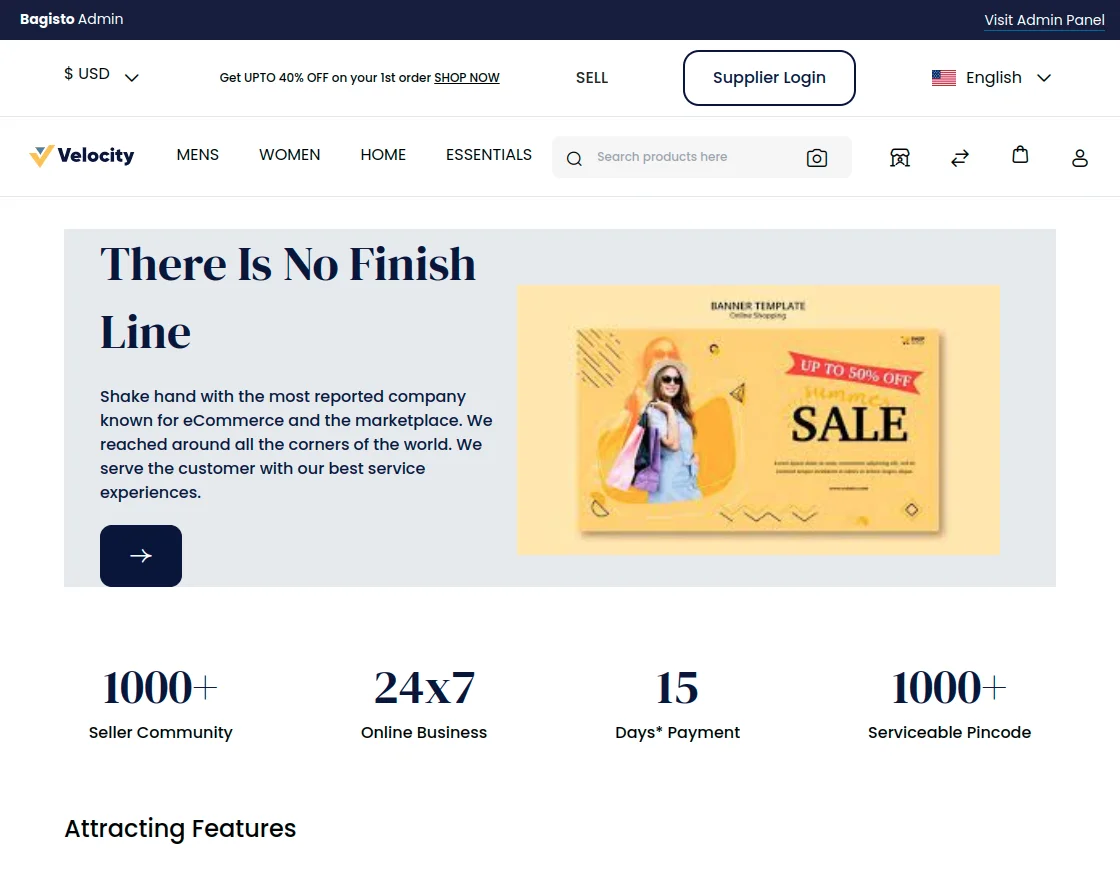
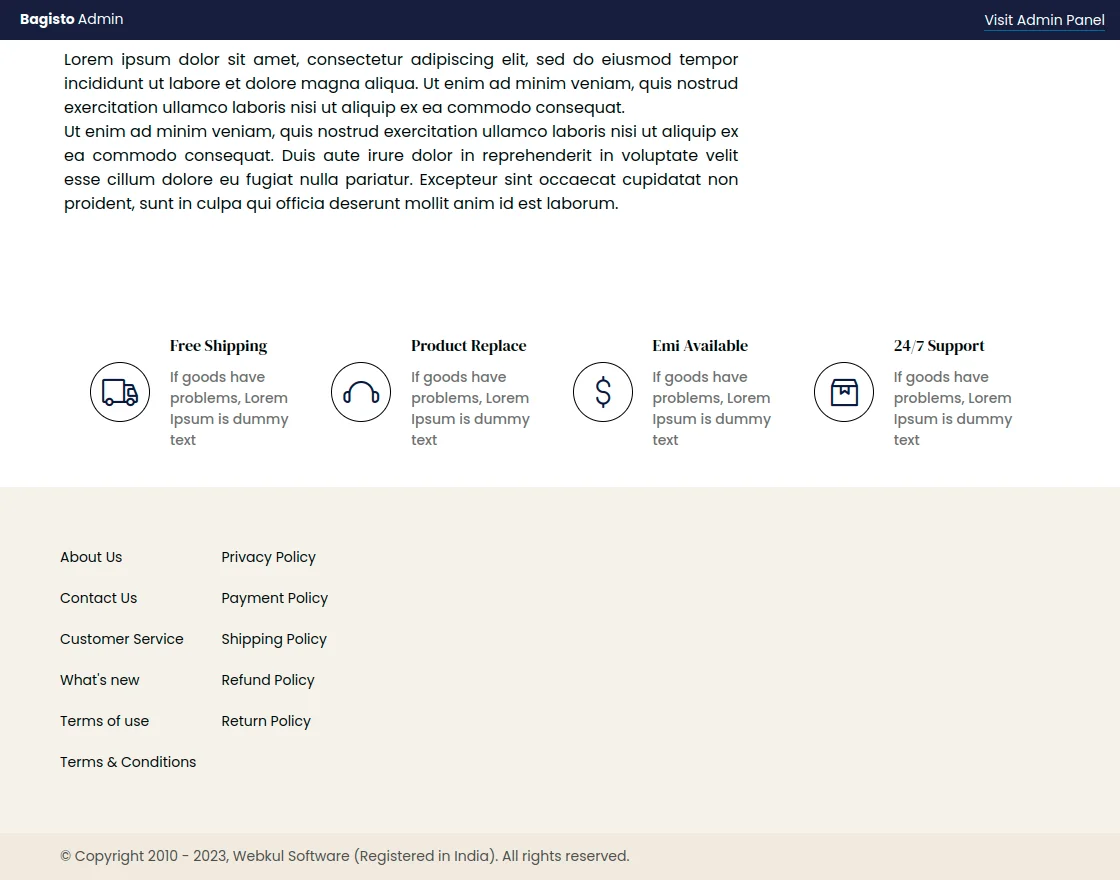
Landing Page
Here are the settings for your Landing Page, where you can provide descriptive information and attract suppliers to sell on your marketplace.
The landing page appears when you click Sell on your Front end.
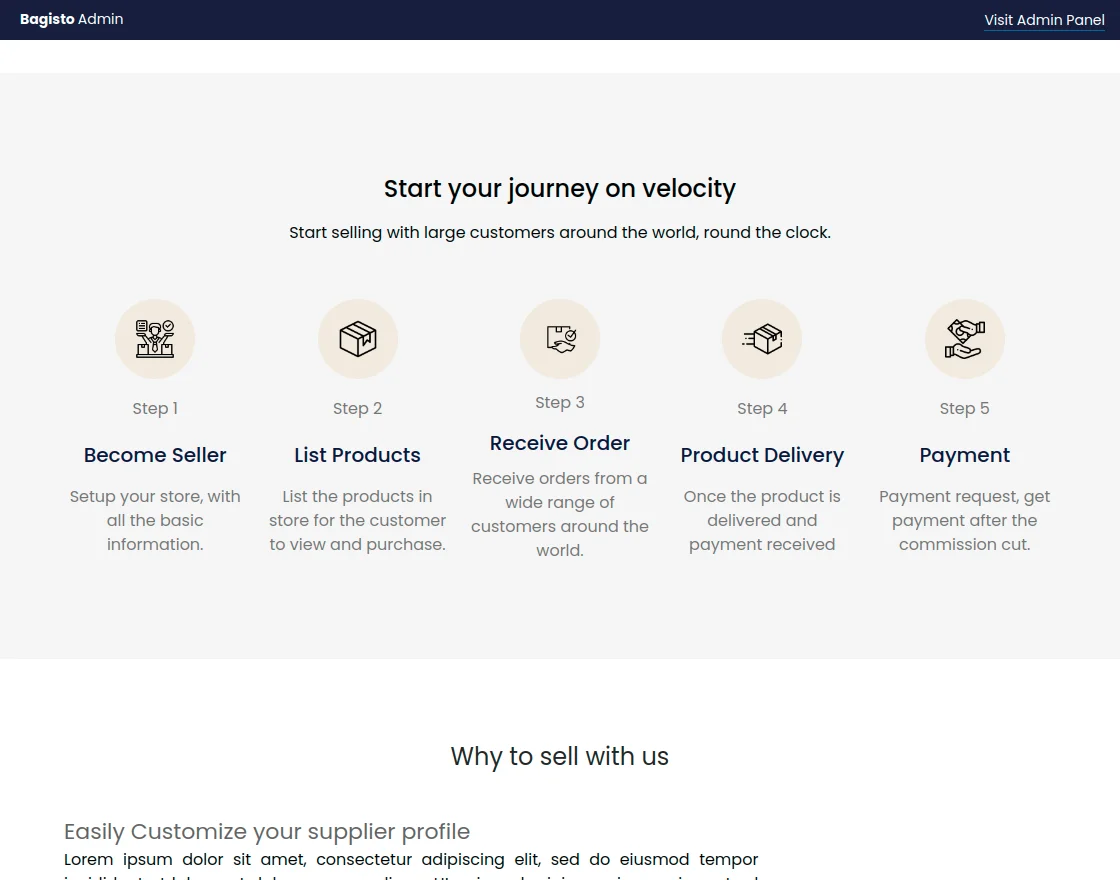
Let’s move on with each functionality.
Page Title
Here you can give the main title to your landing page that will act as the main attraction for your supplier.
Show Banner
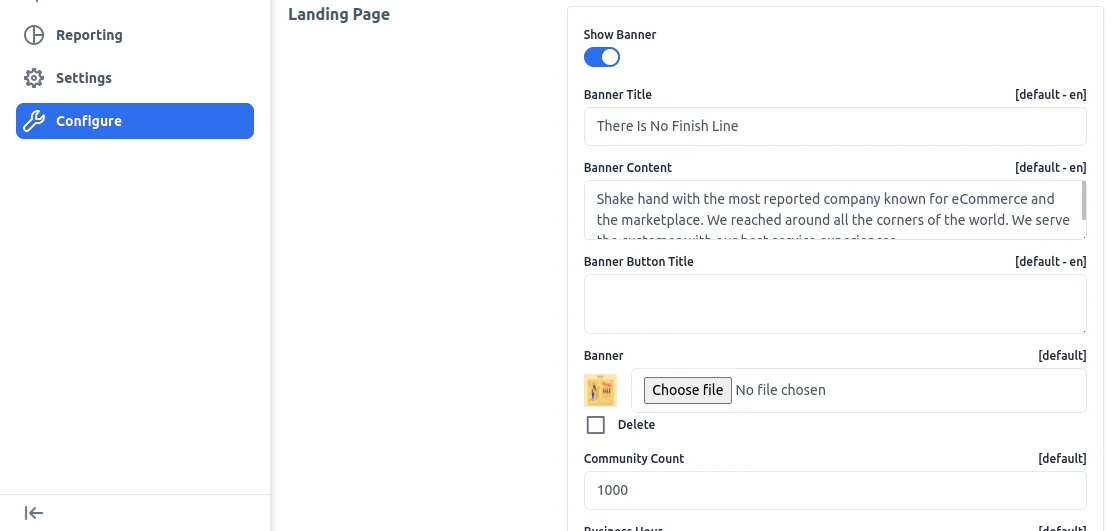
You can select Yes in the option if you want to show the banner on the landing page, following which you need to provide the banner image.
Banner Content
Here you can provide the banner content that will appear on the banner image as provided.
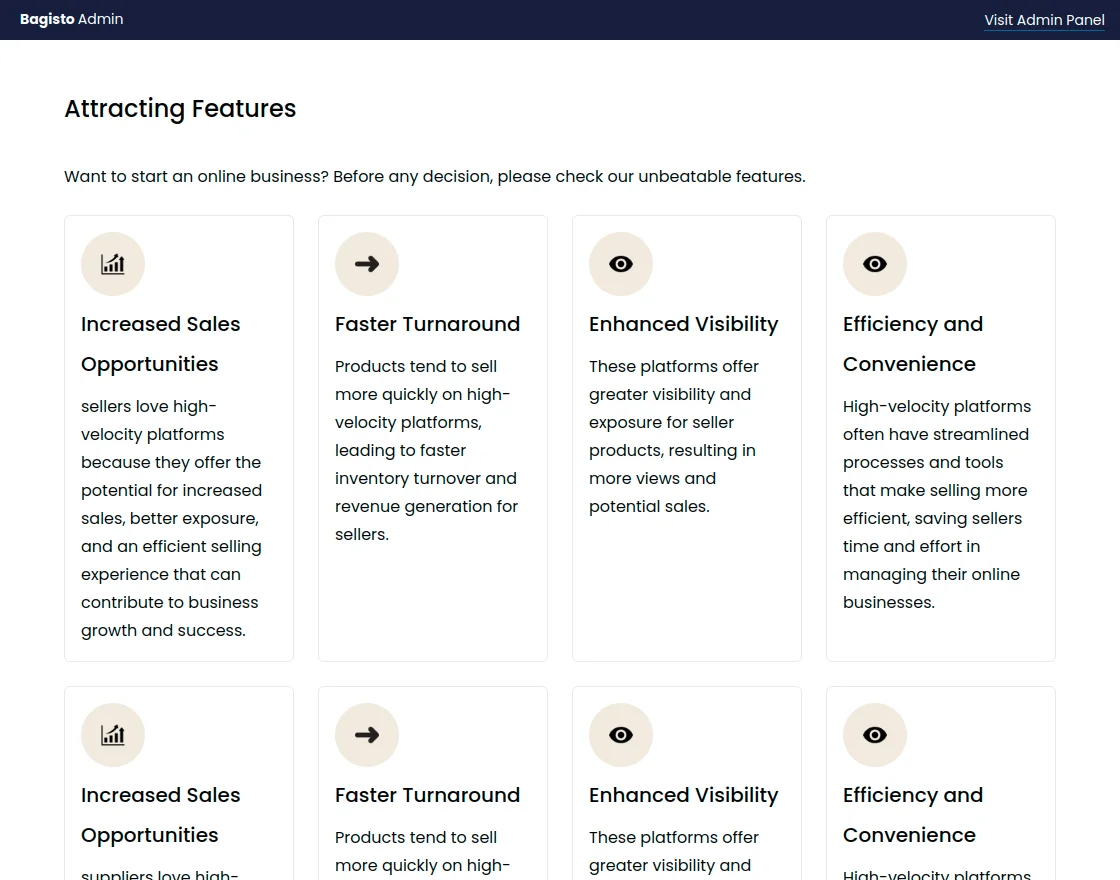
Show Features
You can select the option as Yes if you are looking to showcase features of the marketplace. After selecting Yes, below you can provide the Feature heading, information, and icon.
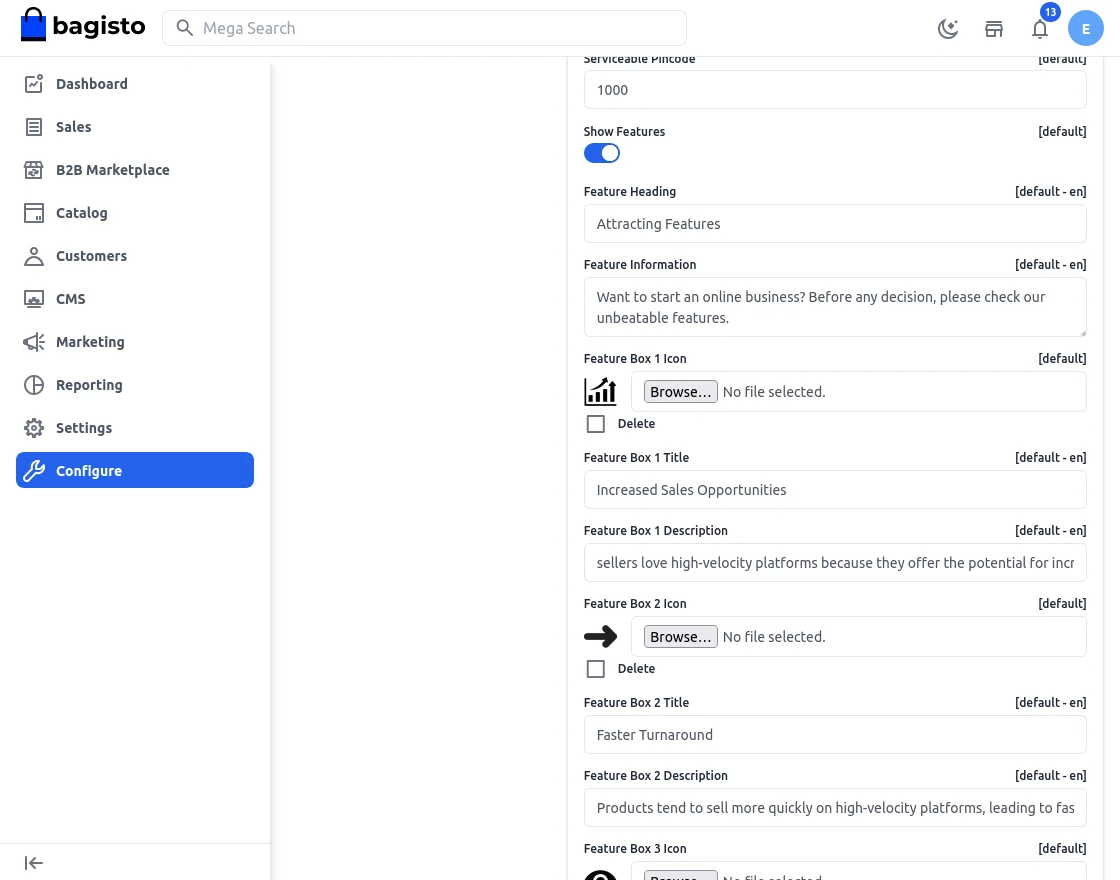
Feature Heading
Enter the feature heading in this field.
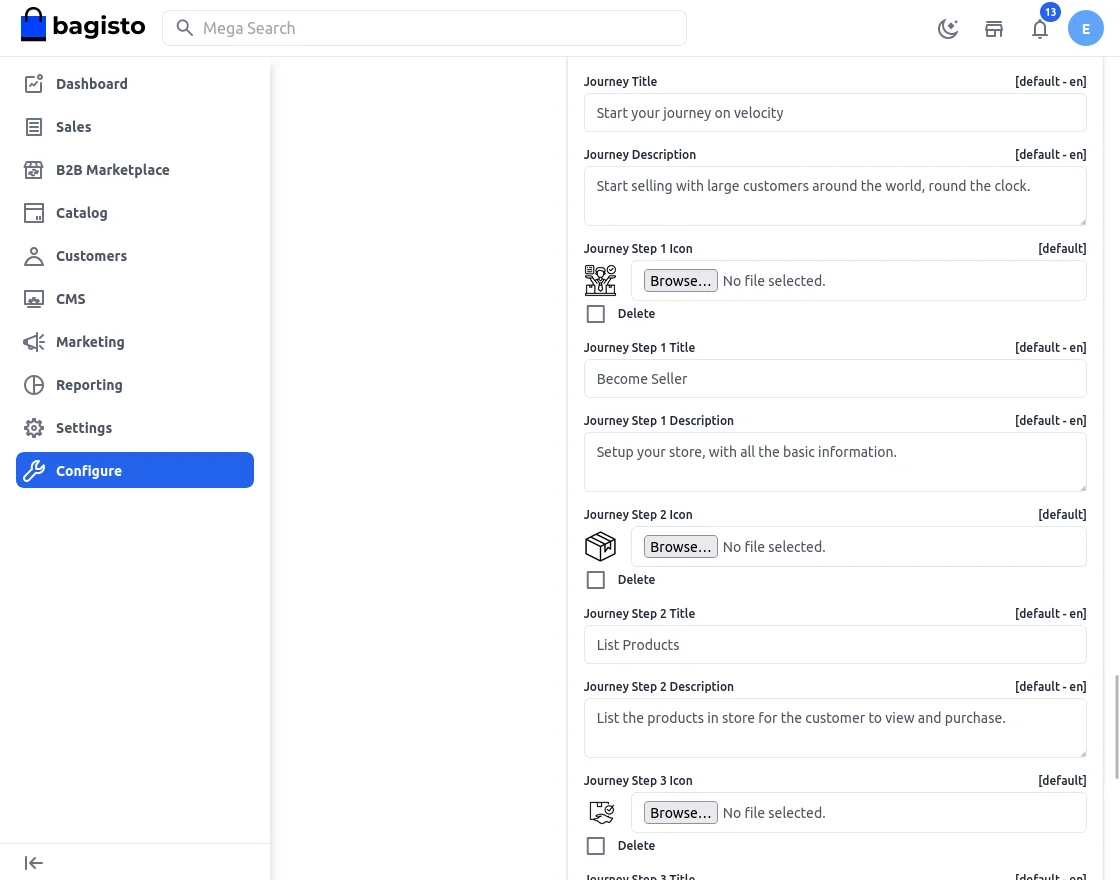
Feature Information
Admin can add the feature information in this field that will appear under the Feature Heading.
Feature Icon 1
The admin can add the feature icon on the landing page.
Feature Icon Label 1
The admin can add the Feature icon label in this field.
Note**:- The admin can set 9 feature icons with the 9 icon labels on the landing page.

Show Popular Suppliers
The admin can select between Yes or No from the drop-down menu.
Open Shop Button Label
Enter the button title in this field.
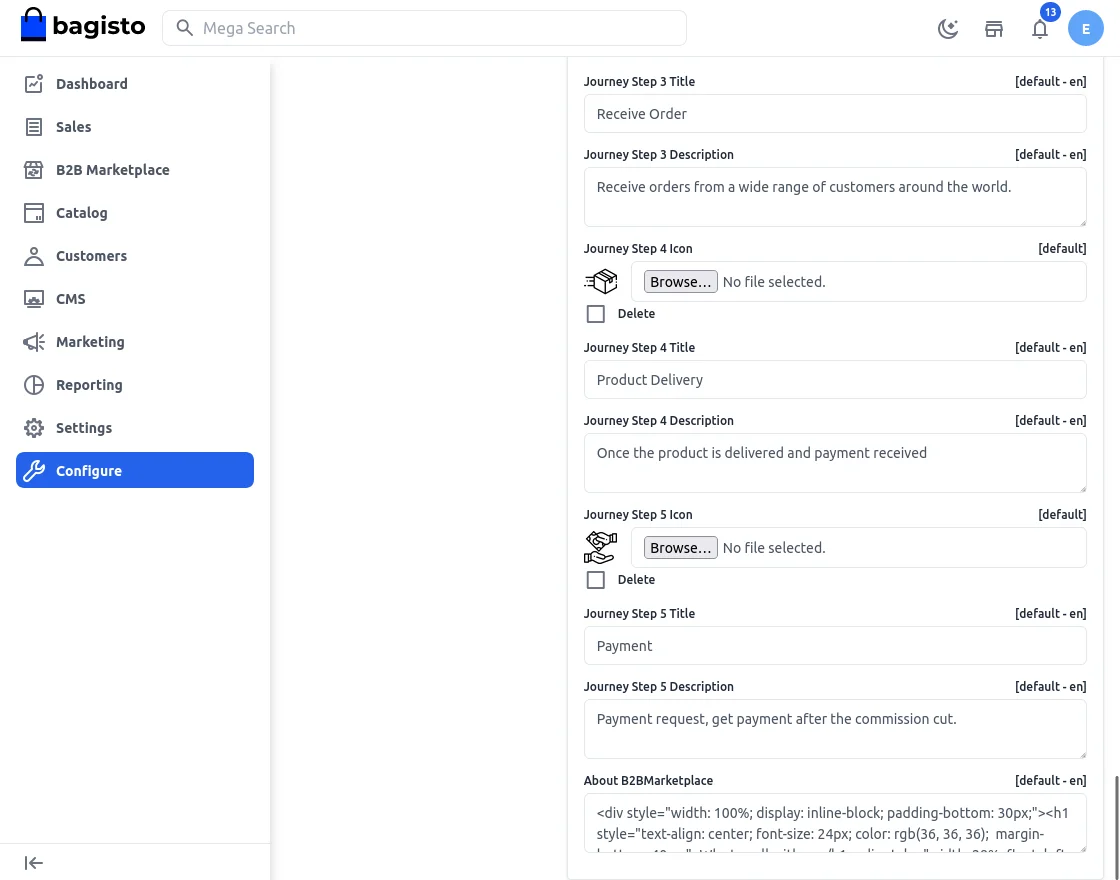
About B2B Marketplace
In this field, the admin can enter all the details regarding the B2B marketplace according to the requirements.
Show Open Shop Block
The admin can enable or disable this block by selecting Yes or No from the drop-down menu.
Open Shop Information
The admin can add more information in this field.
B2b Marketplace Admin End configuration.
Now, the admin will navigate to the B2B Marketplace section at the left side panel of the admin panel.
Here the admin will manage the Laravel B2B Marketplace.
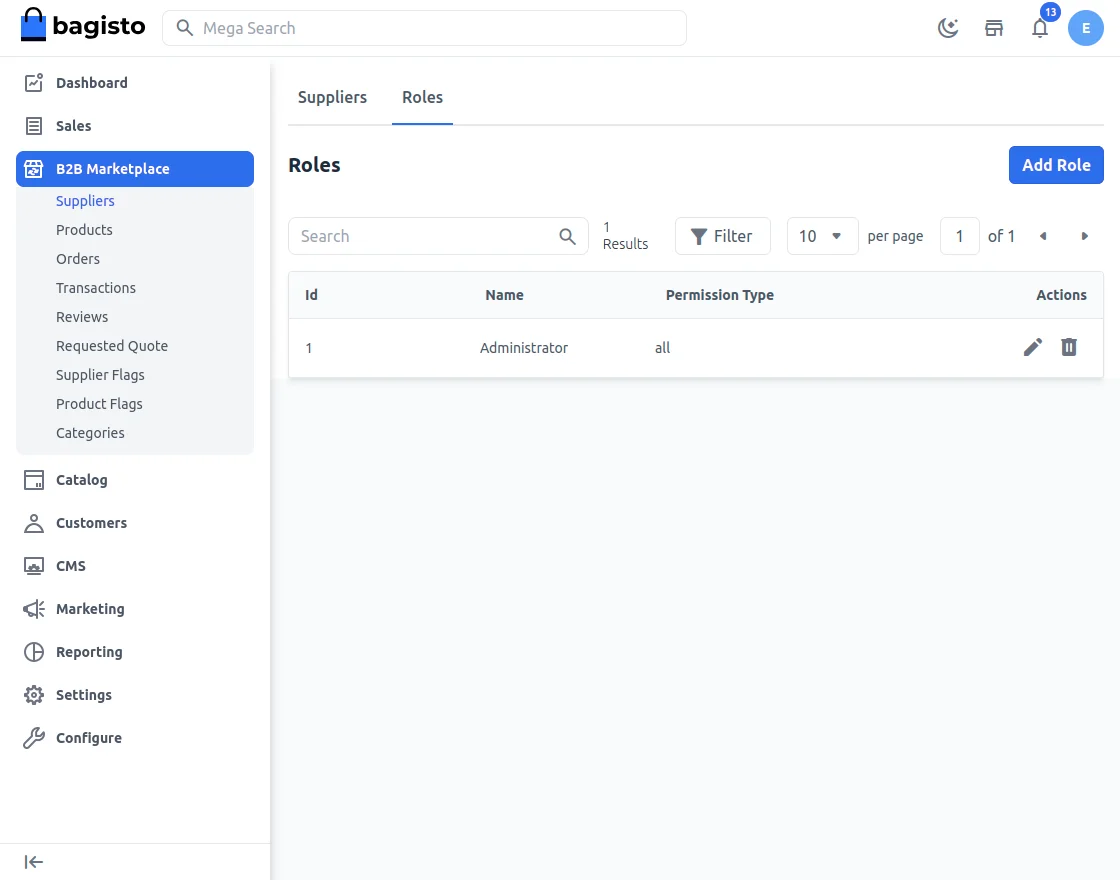
Suppliers
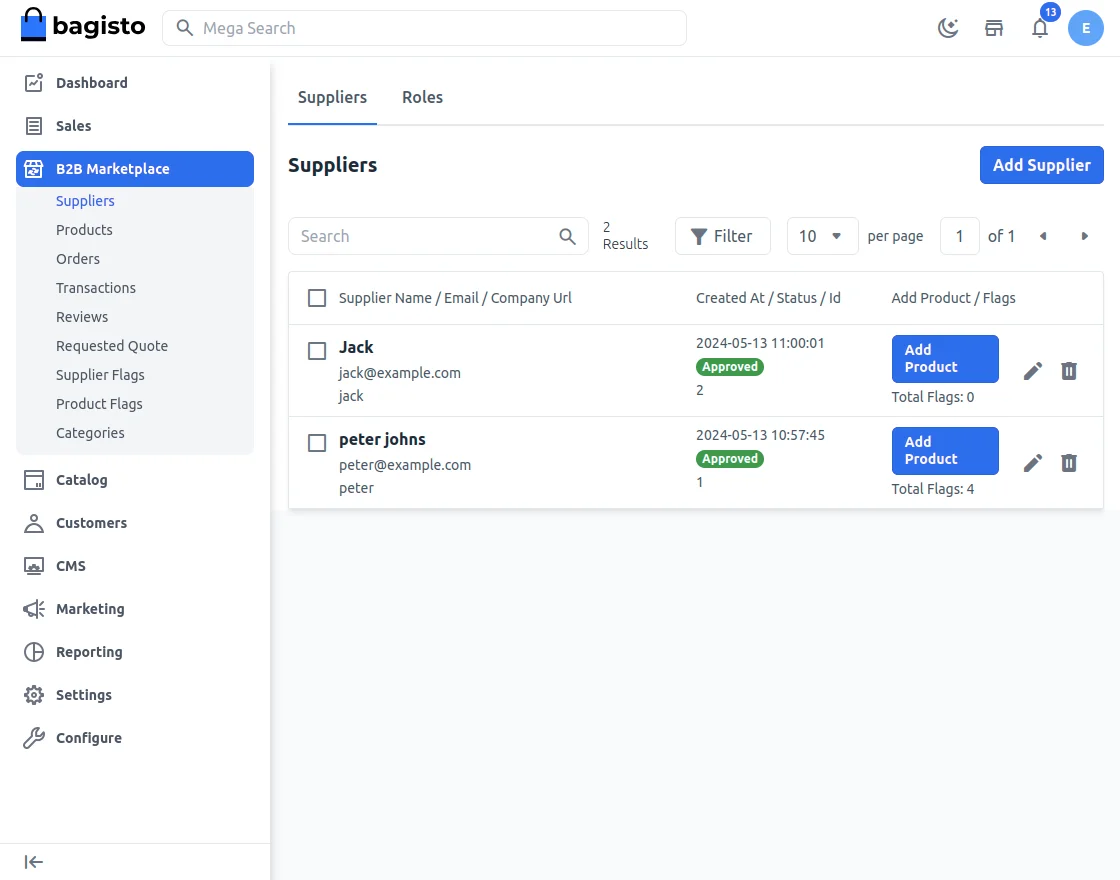
Here, the admin gets the list of all the suppliers in the store.
By tapping on Add Supplier, the admin can add more suppliers from the admin end.
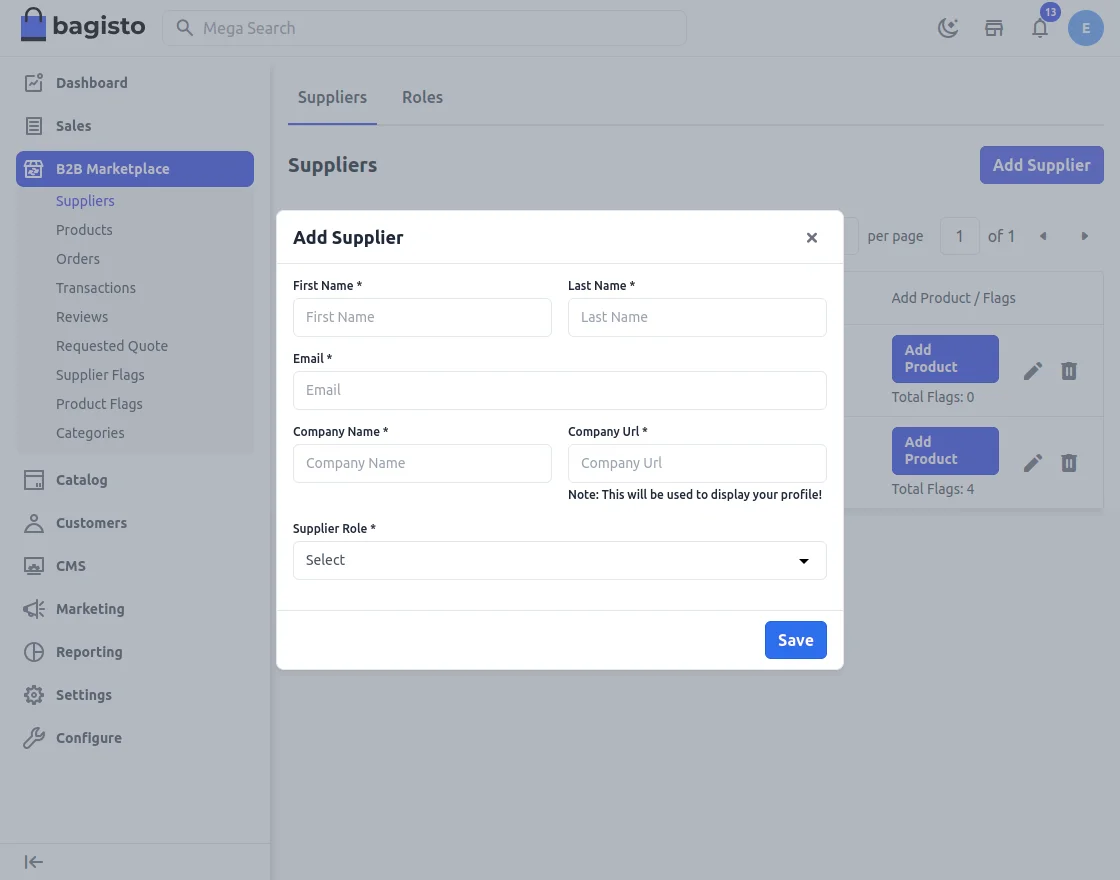
Here the admin will:
- Add supplier First name and Last name.
- Email ID
- Company Name and Company URl.
- Select Supplier Role.
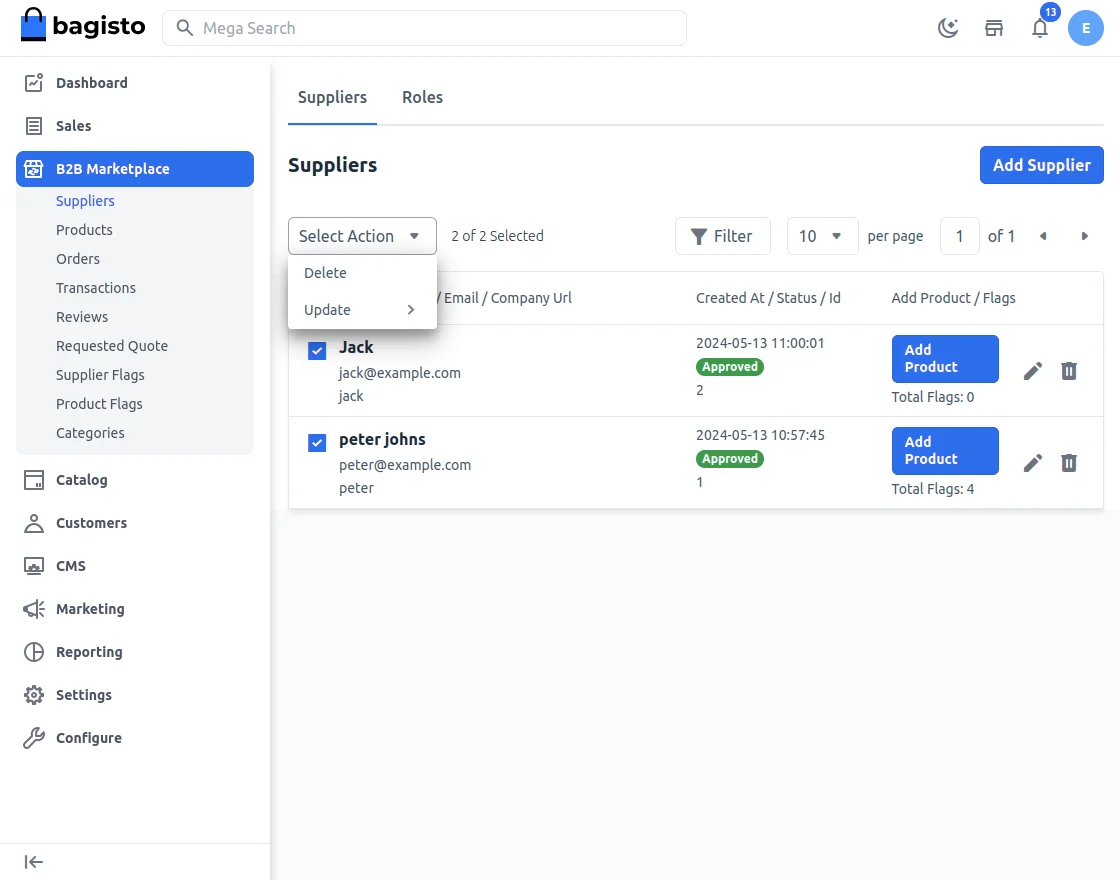
Admin can also task bulk action on the supplier.
Supplier roles.
Here the admin create roles for the suppliers.
Now, the admin will tap on add roles to create roles for the suppliers.
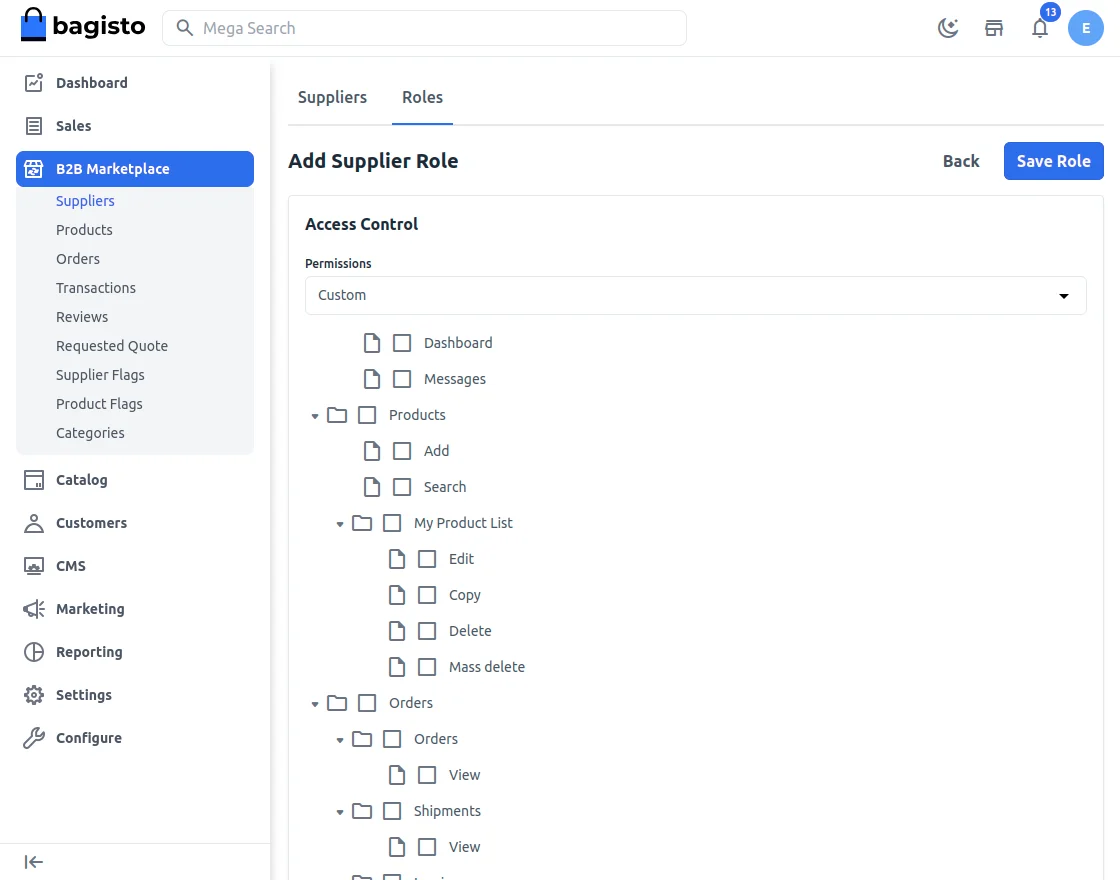
Lastly, click on Save Role.
The new role is successfully created.
Assign products to suppliers
Here the admin will click on the add product button.
After this, a new page will appear.
where the admin will have to search for the product to assign to the supplier in the product list.
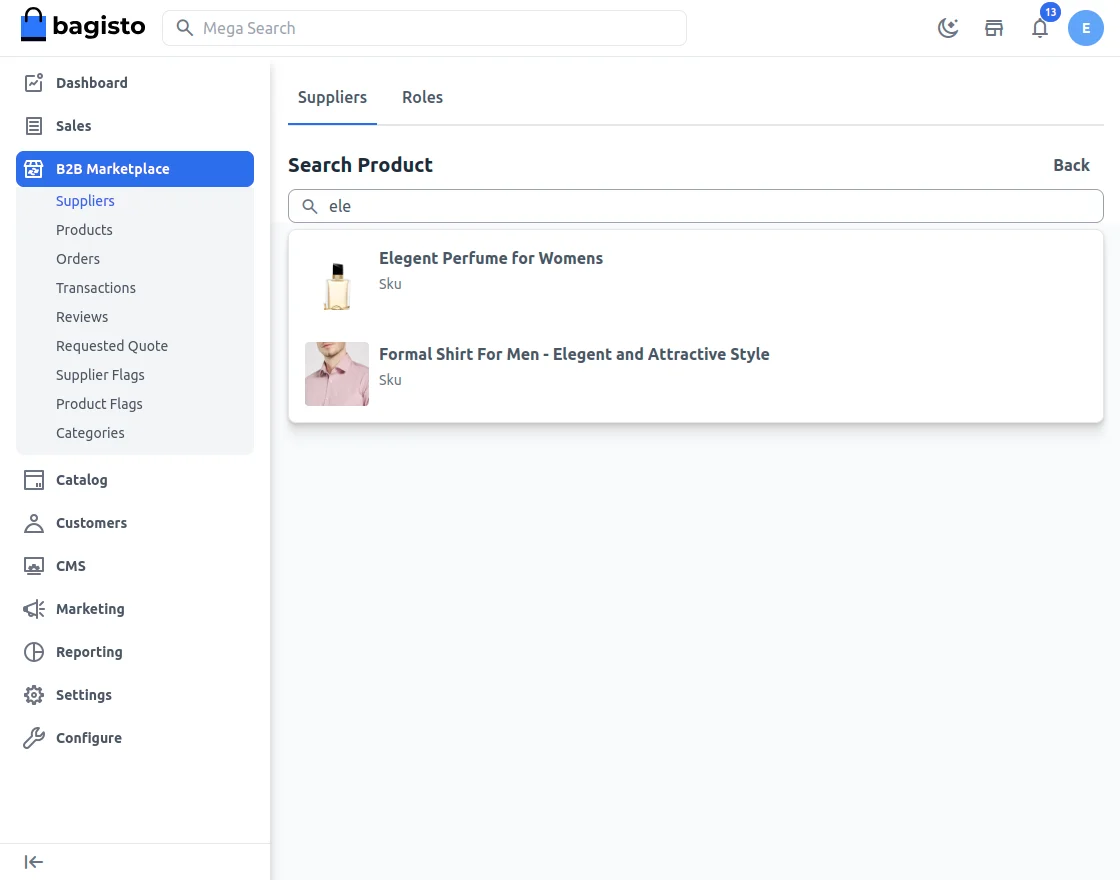
After selecting the product, the admin will fill the details to assign product to supplier.
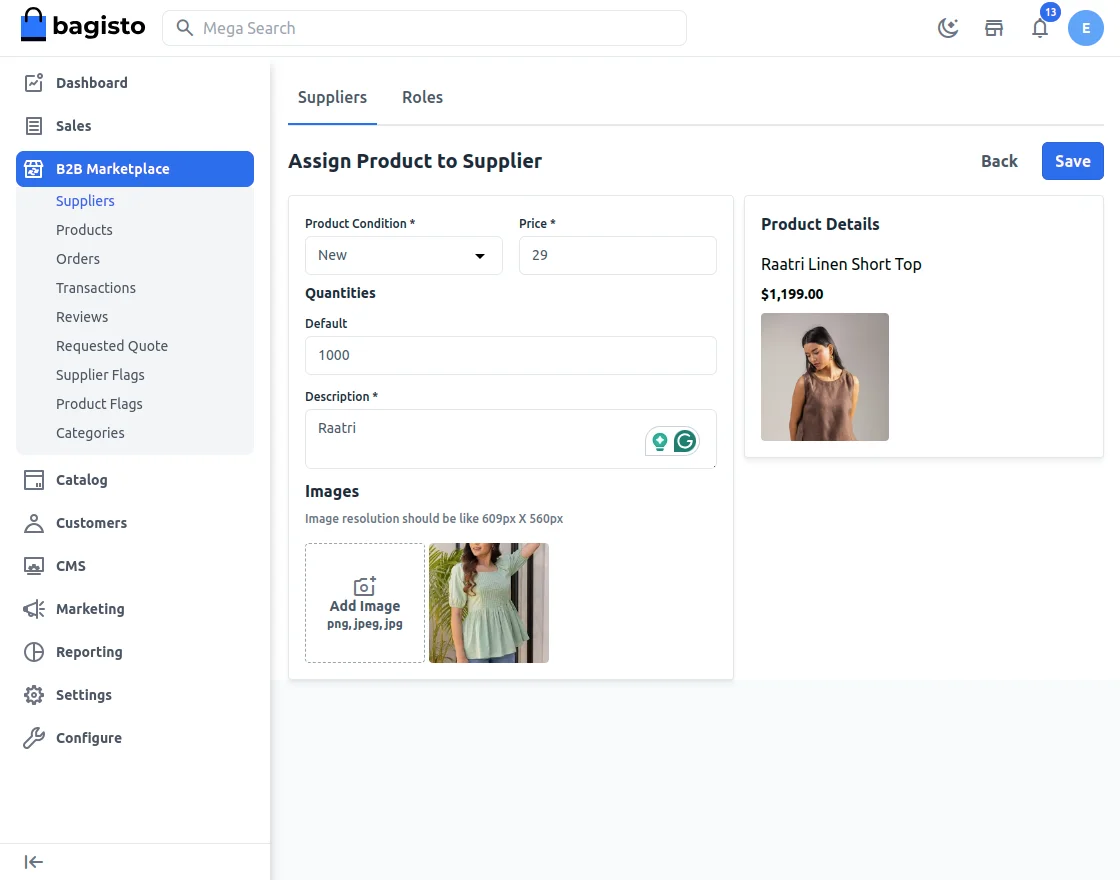
After completing the details, the admin will tap on save. Then, the selected product will be assigned to the particular seller.
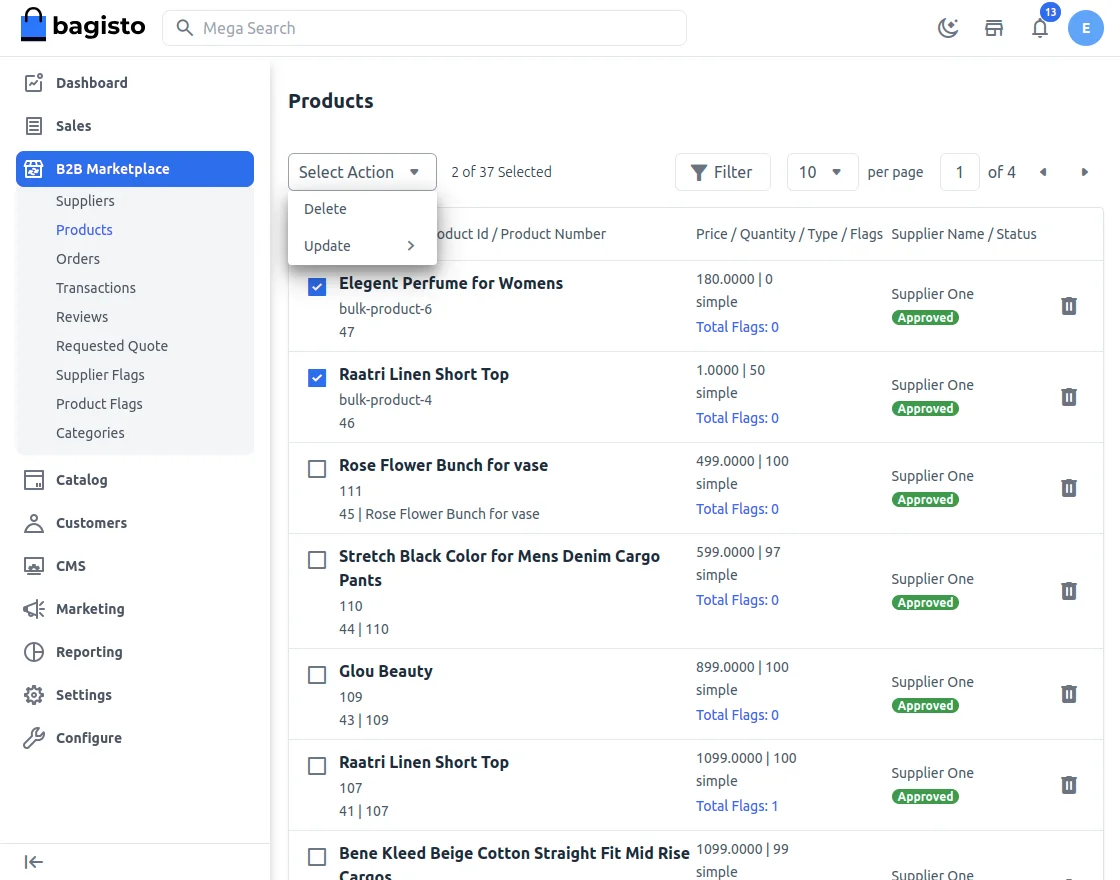
Products
After adding the product to the Laravel Store by the supplier. It needs to be approved by the admin for display on the storefront.
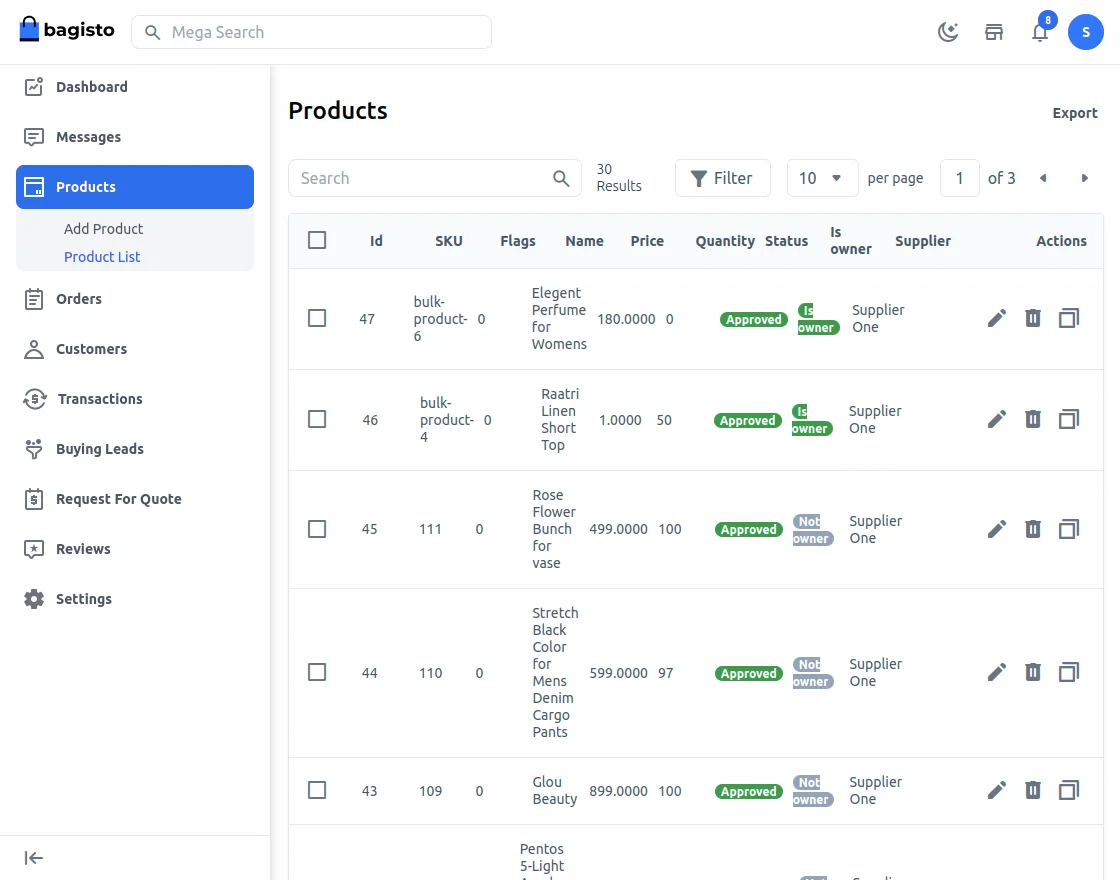
For this, the admin will select the product. Then tap on Select Action.
From here, the admin will approve or disapprove the product.
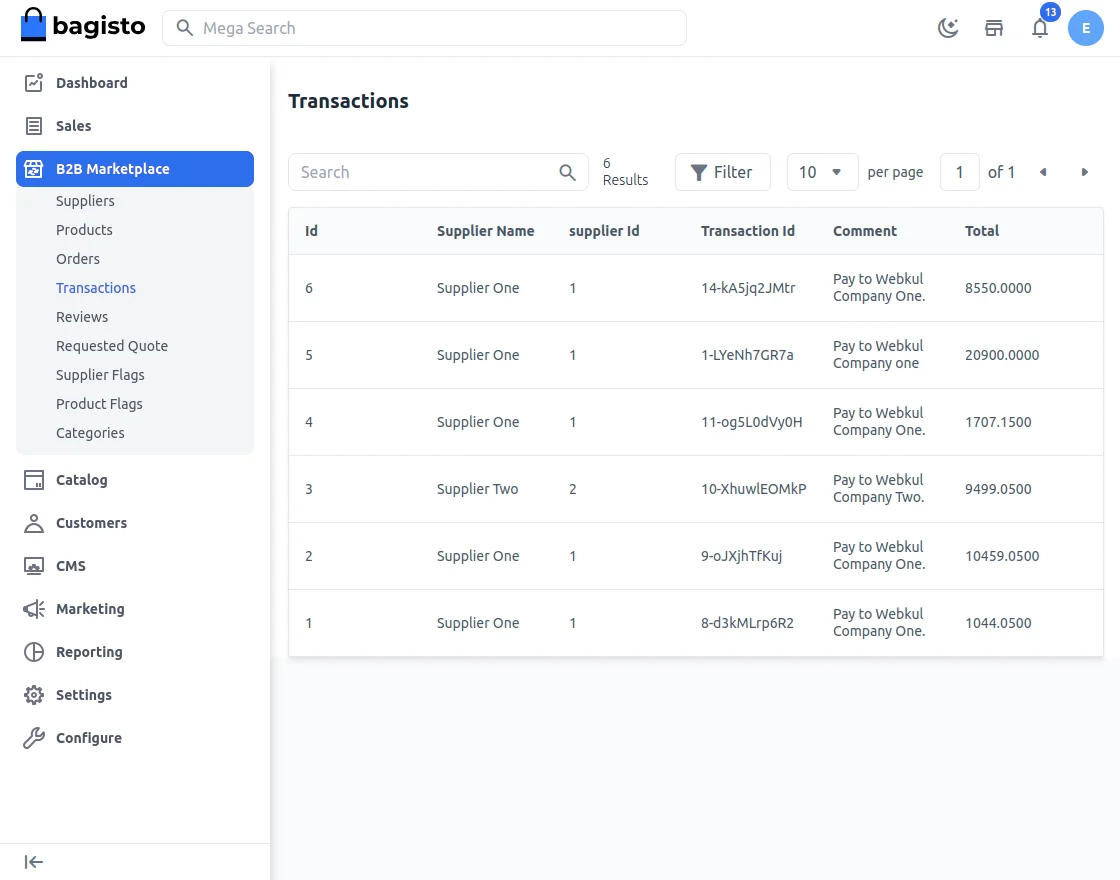
Transactions
Here the admin can check the transactions on their suppliers.
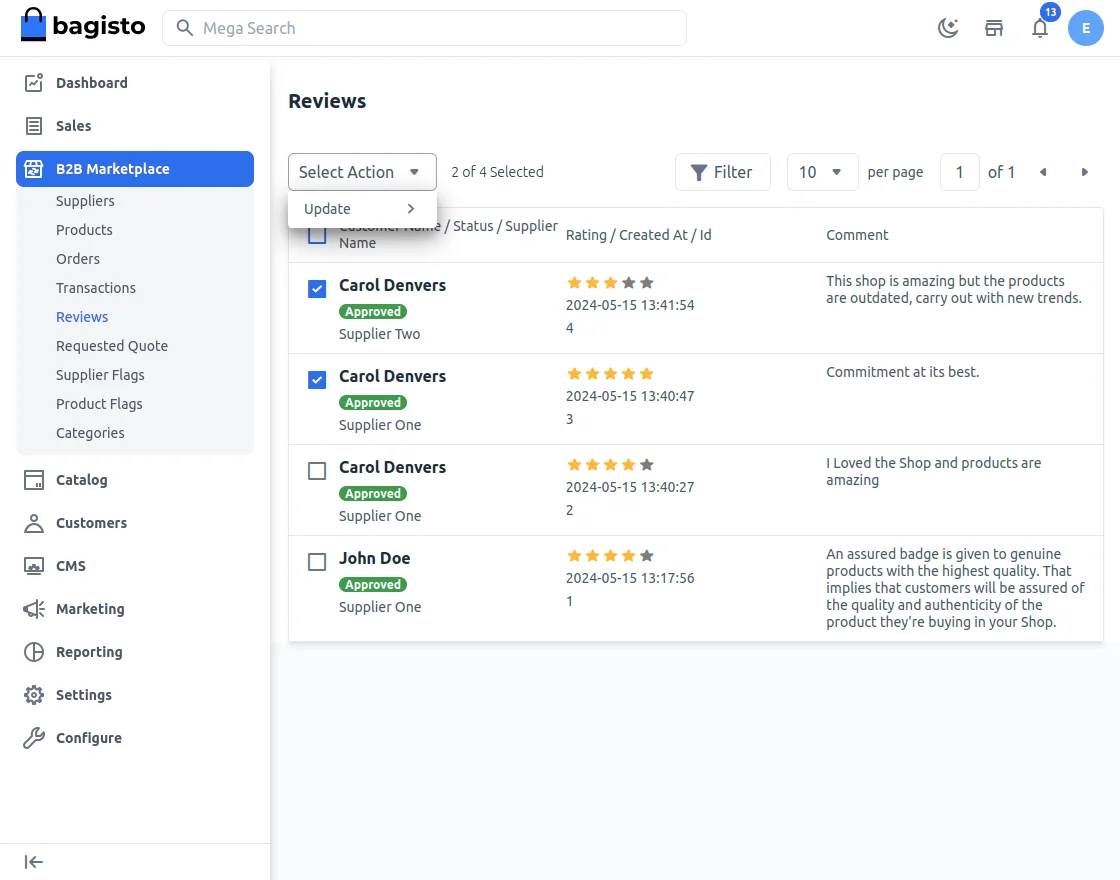
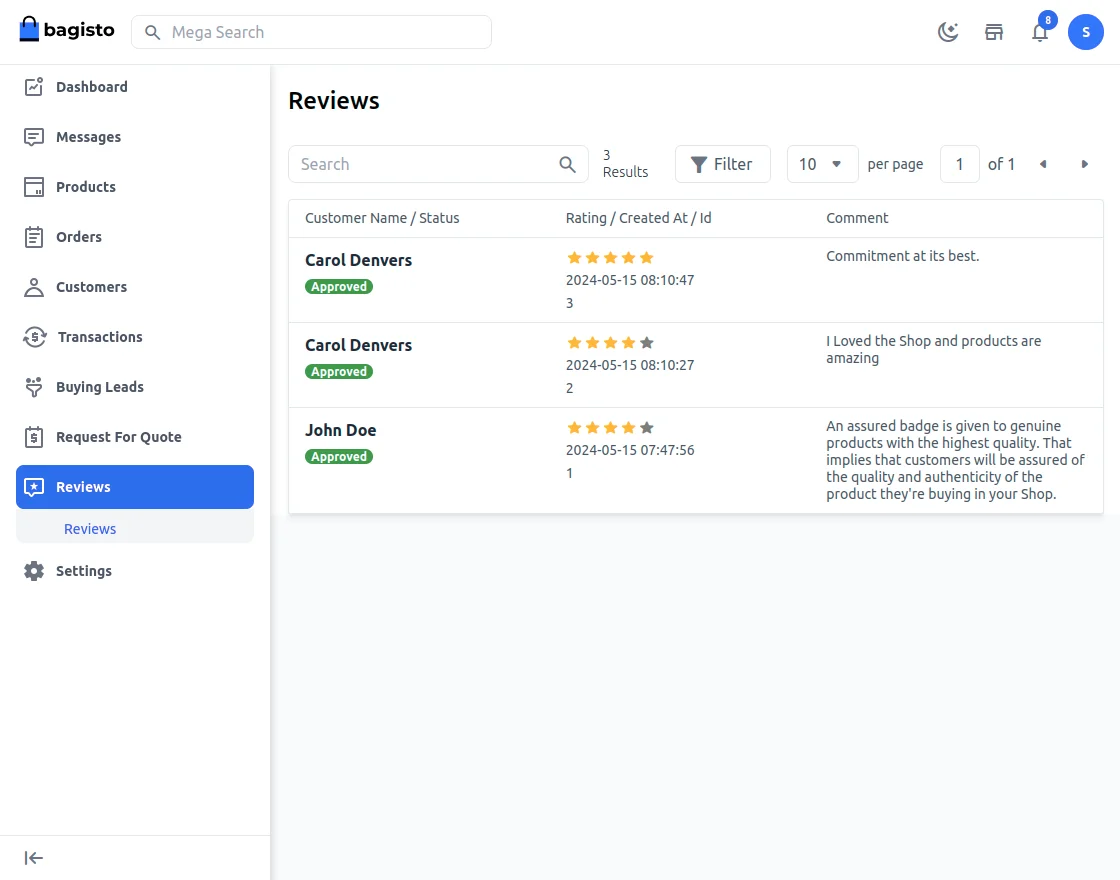
Reviews
Here the admin can see the reviews on the products assigned to the sellers.
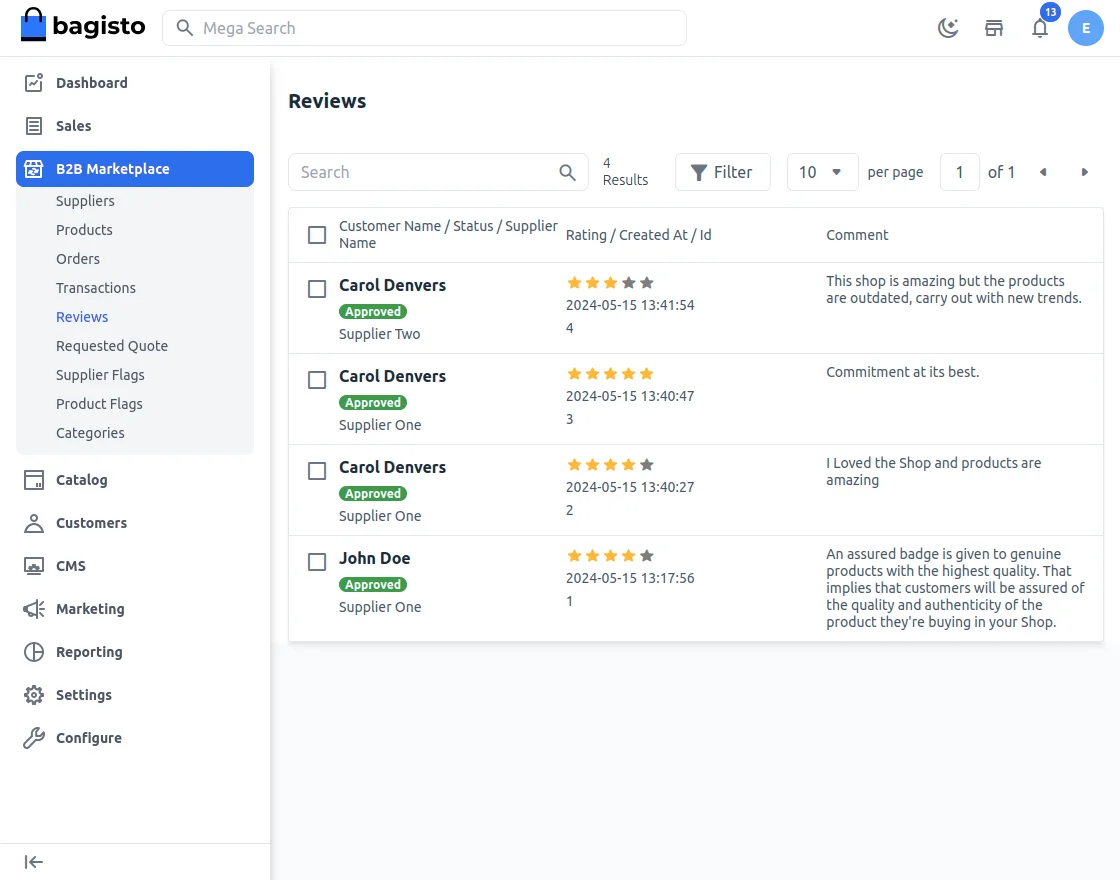
Also, the admin can approve/disapprove the reviews.
Request Quote
Here the admin will see all the requested quotes.

Supplier Flag
Here, the admin can see the list of the supplier’s flag.
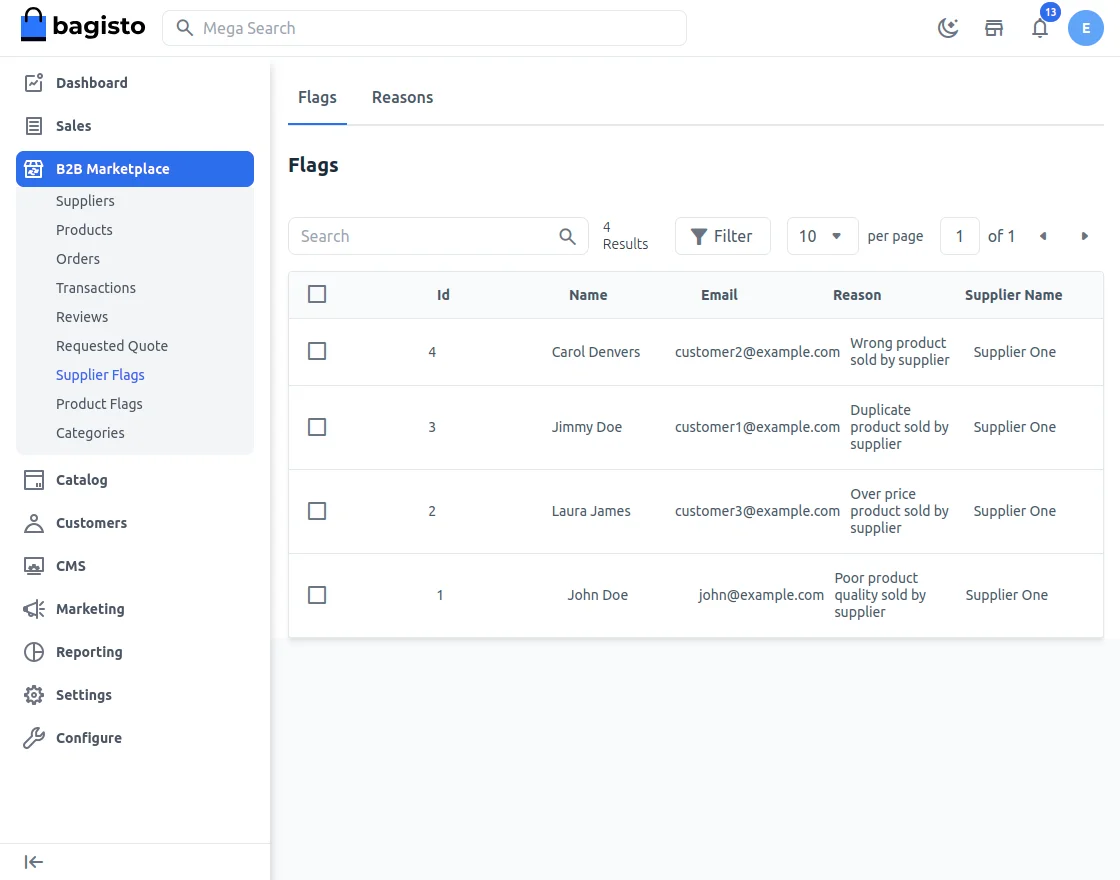
Admin can also delete the flags on the supplier by taping on delete button after selecting one or more supplier flag.

The store admin can check the list of reasons that is used by store user to give flag to the suppliers.

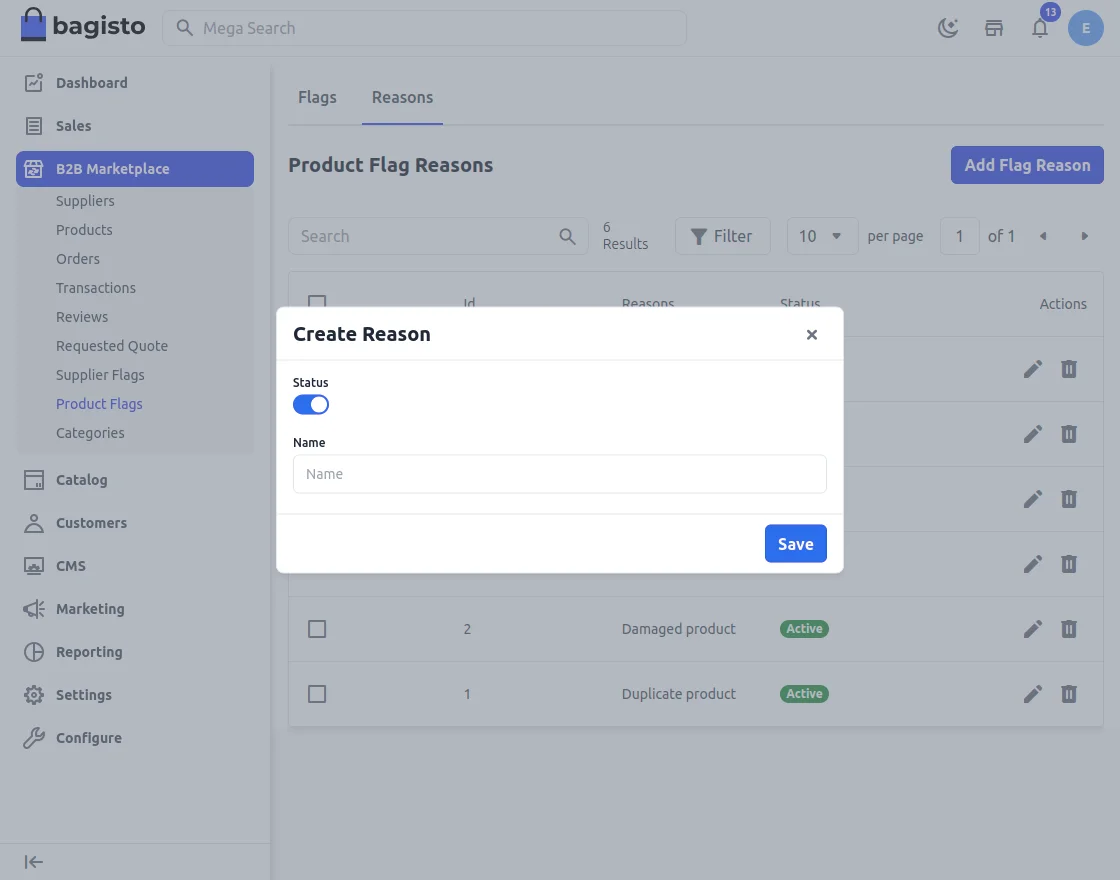
By clicking on Add New button. Admin can create new reasons.

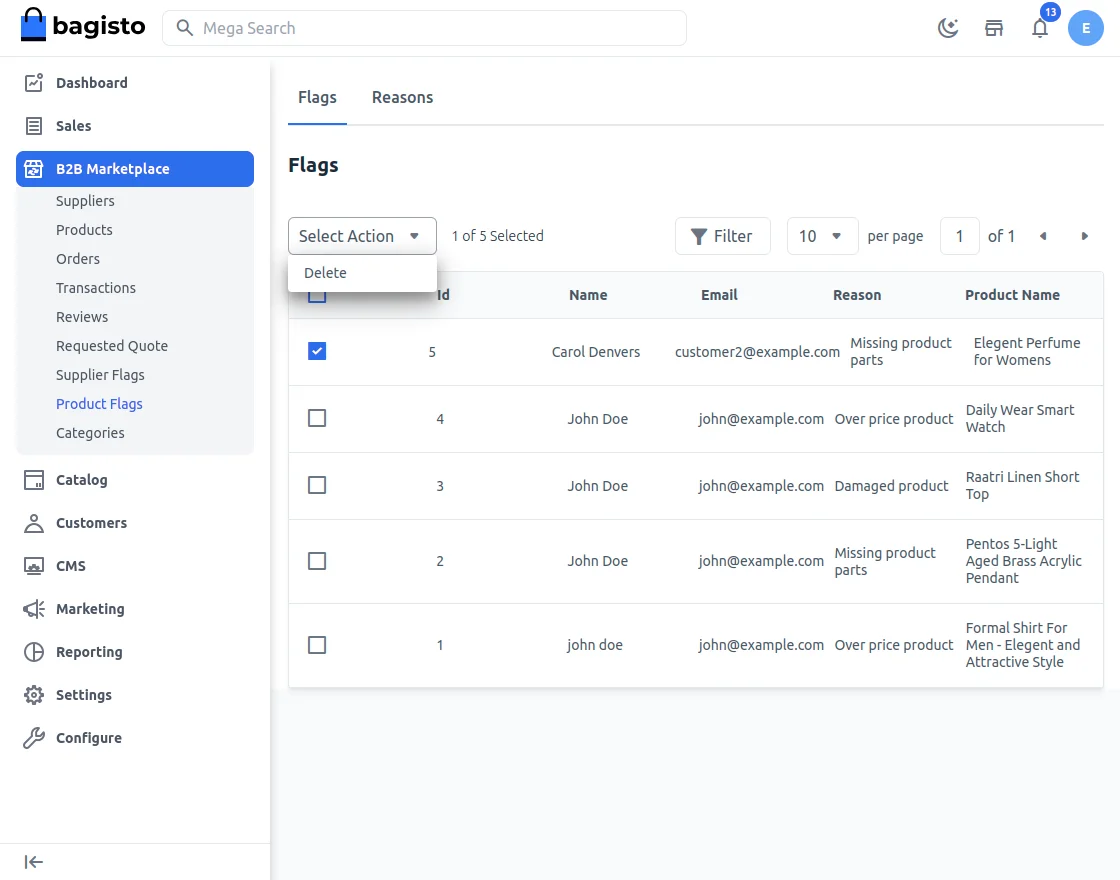
Product Flag
The admin can check all the flags given by the users on the product.
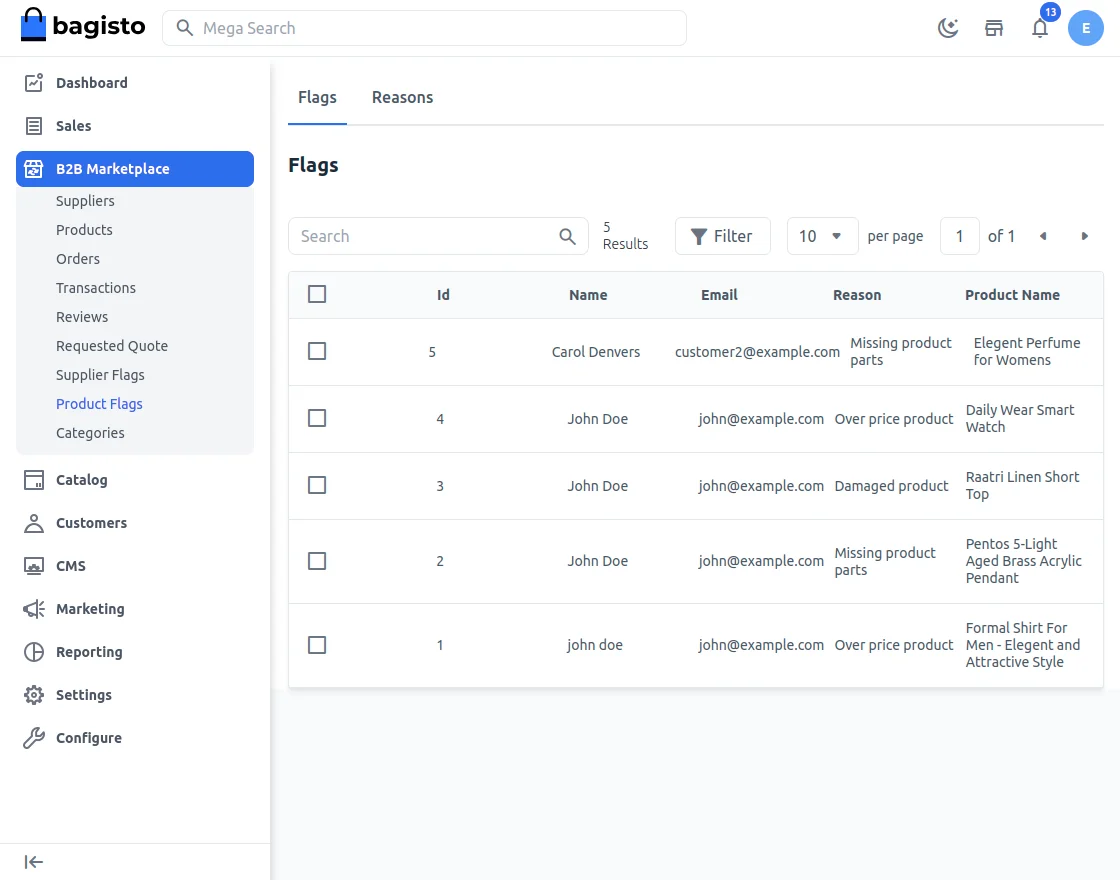
Admin can also delete the flags reported.
Now the Admin can check the reasons list.
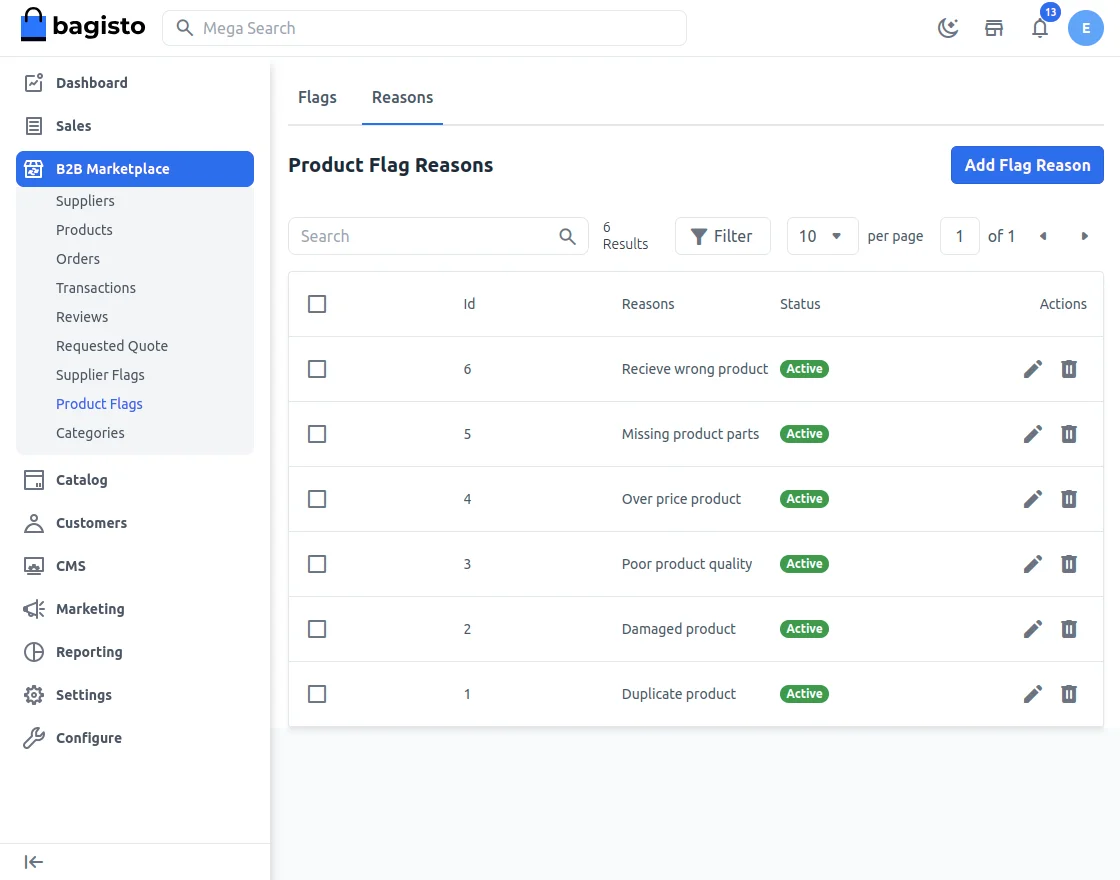
Admin can also add new reasons.
Categories
The admin can assign the product categories to the supplier.
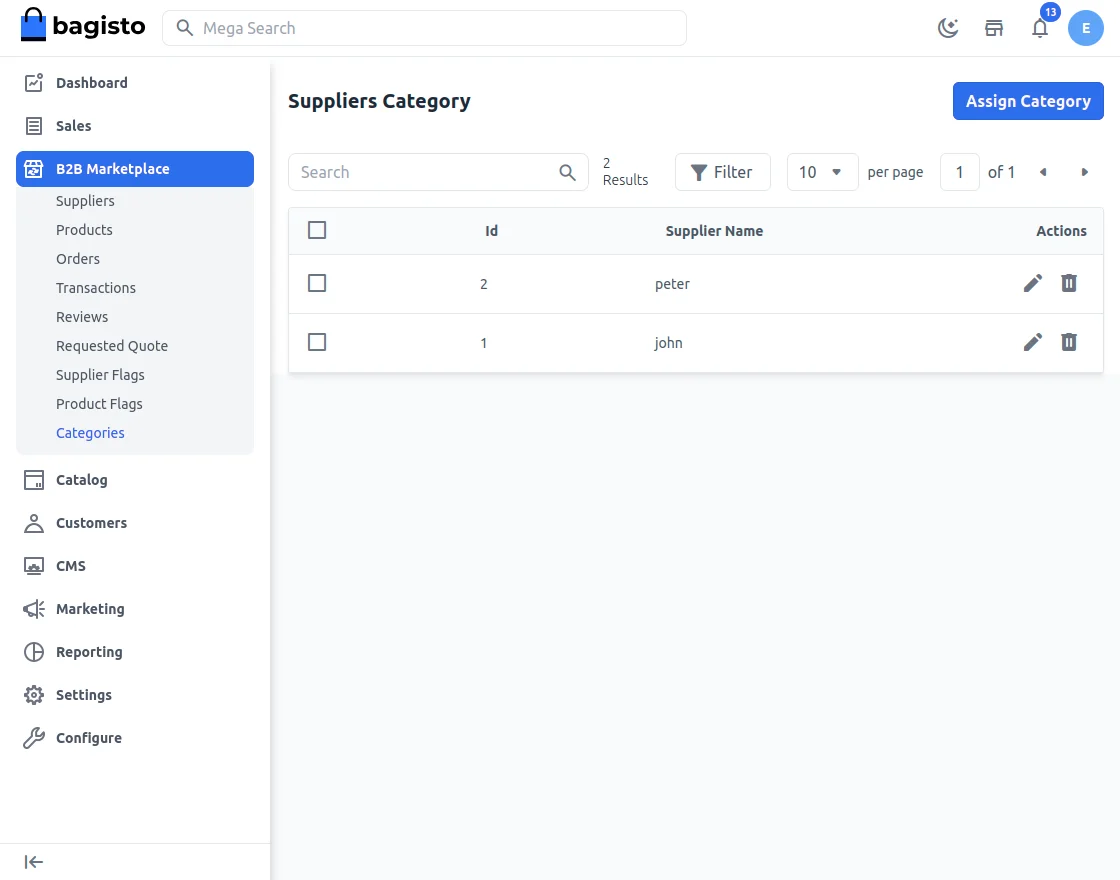
After that the admin will tap on the “Edit” icon to assign the category to the particular seller.
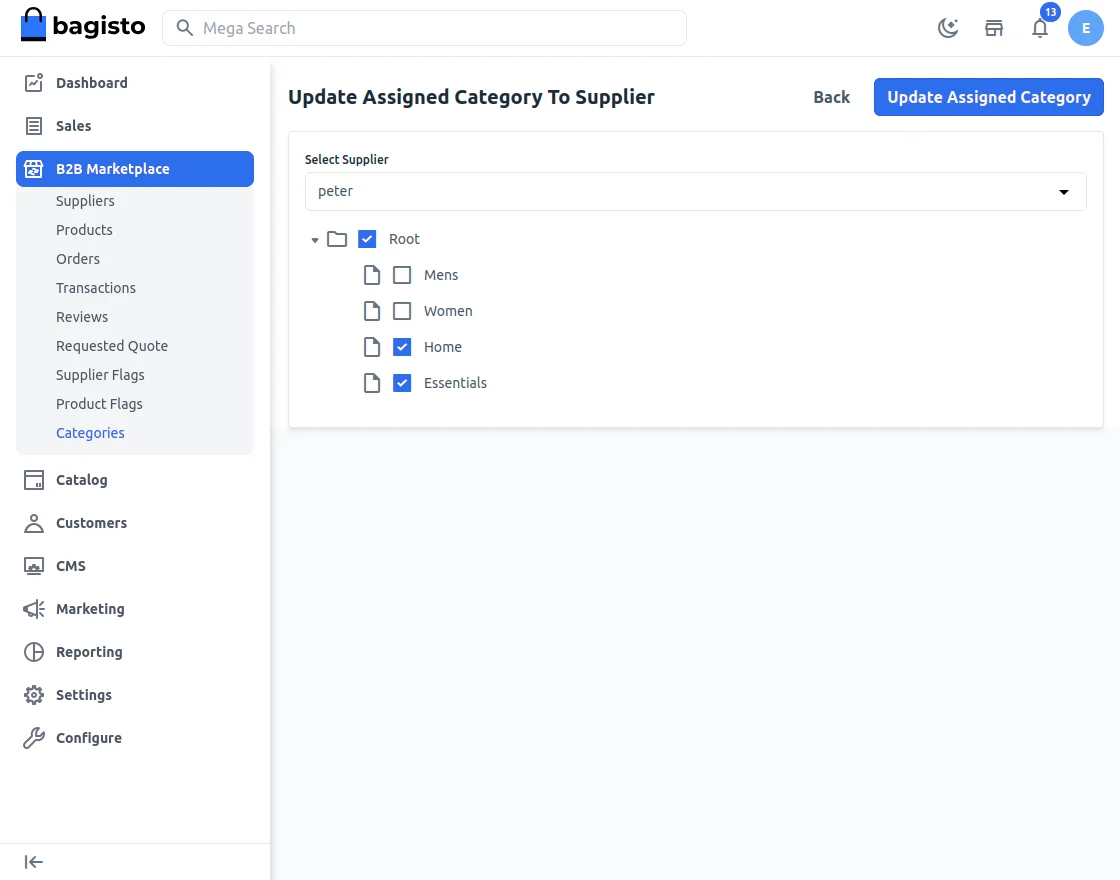
By clicking in the update button selected category will assinged to the respective seller.
Store Frontend – Workflow
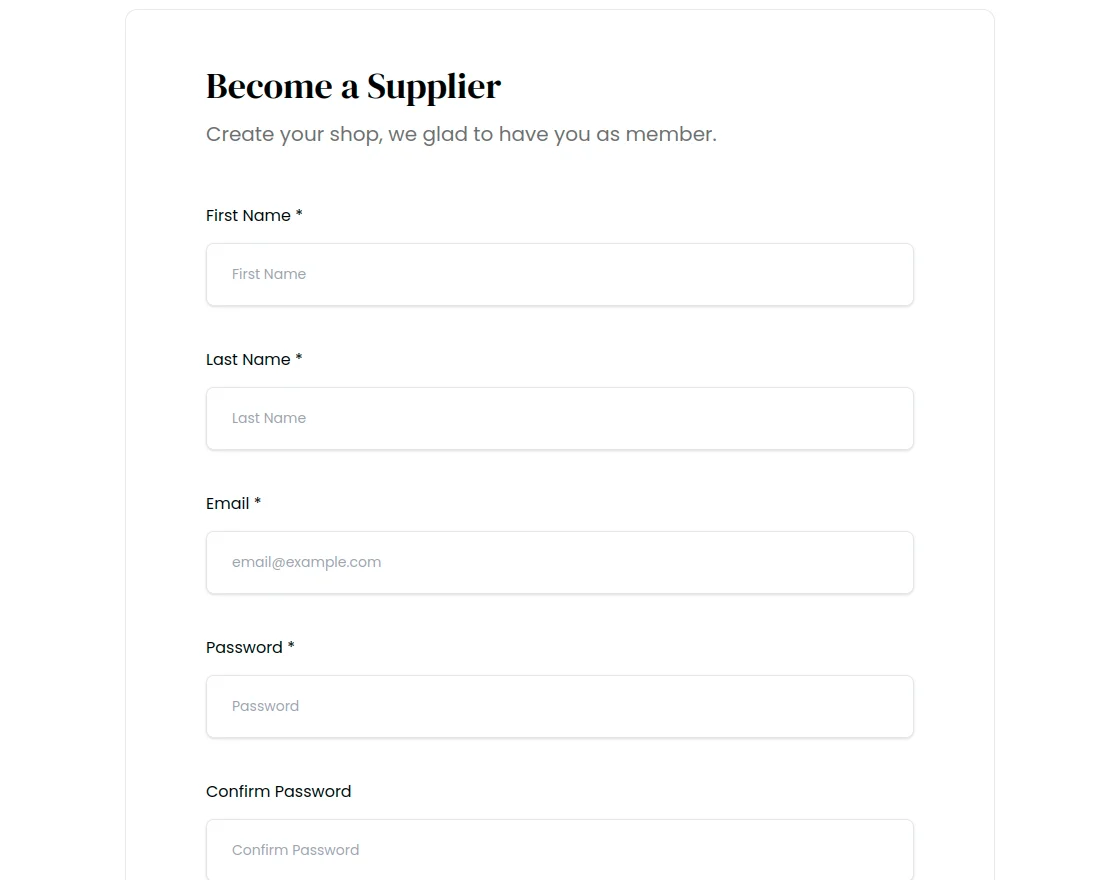
On the front end, a new supplier can register on the website by clicking Supplier. To become a new supplier click on the sign up button.
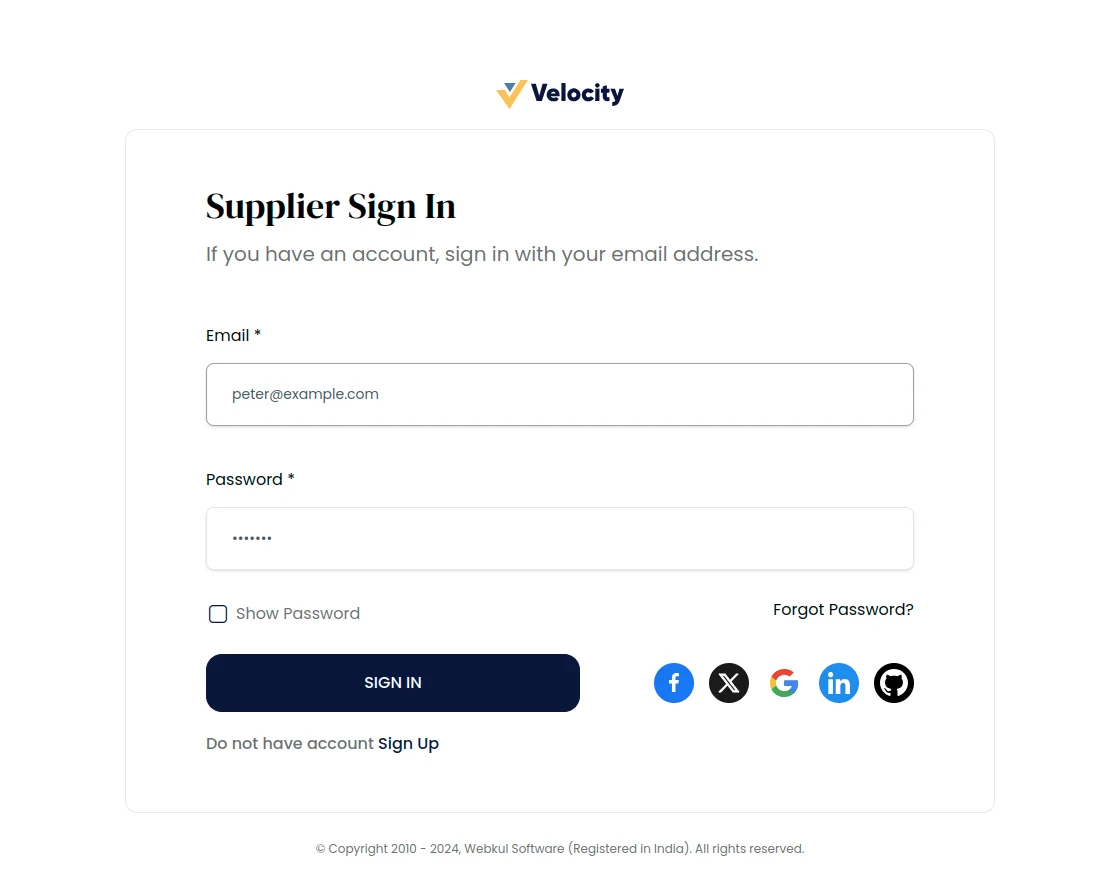
Various information needs to be filled in when a new supplier registers on the website such as first name, last name, company name, company URL
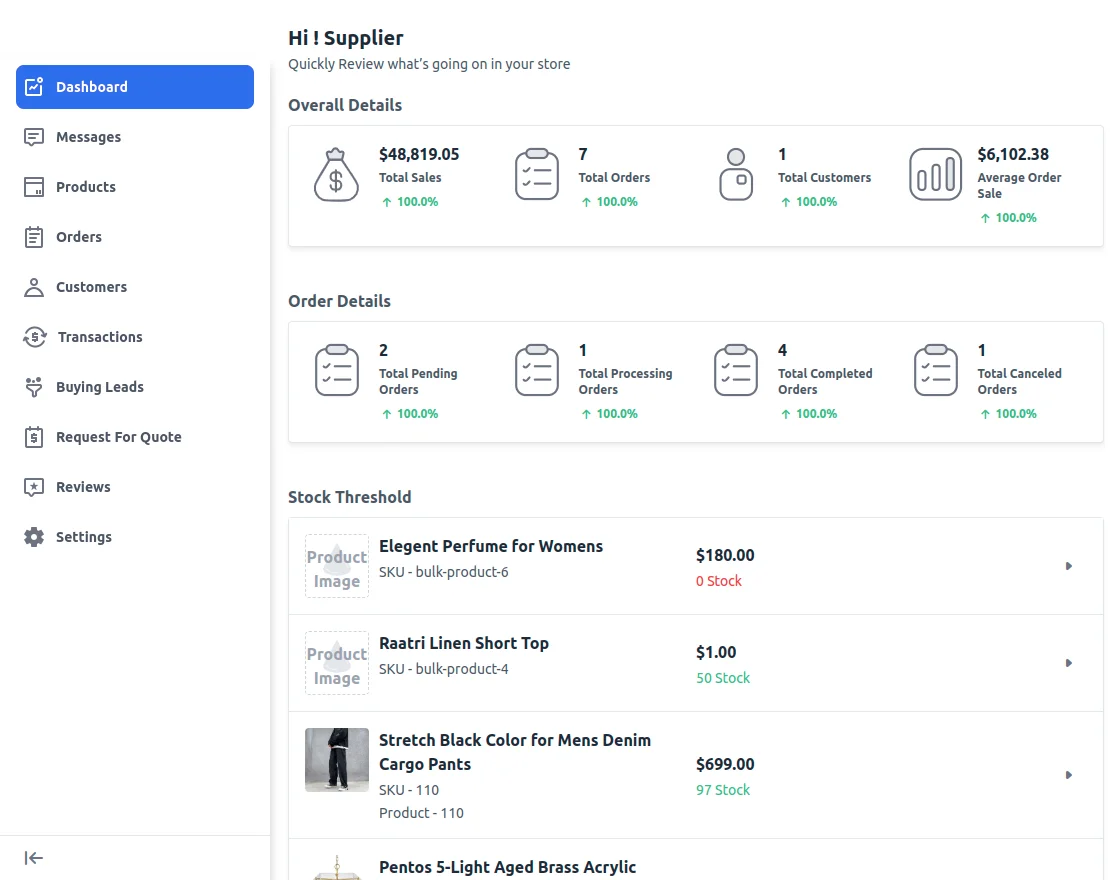
Supplier – Workflow
After filling all the information, the supplier can go to its dashboard and manage the shop that will look like shown below:-
Supplier’s Profile Configuration
Before going with Supplier end details we need to go under the profile section.
A supplier can provide and display detailed information about its shop to its customers. First, log in to the supplier account and then go to Settings>>Profile.
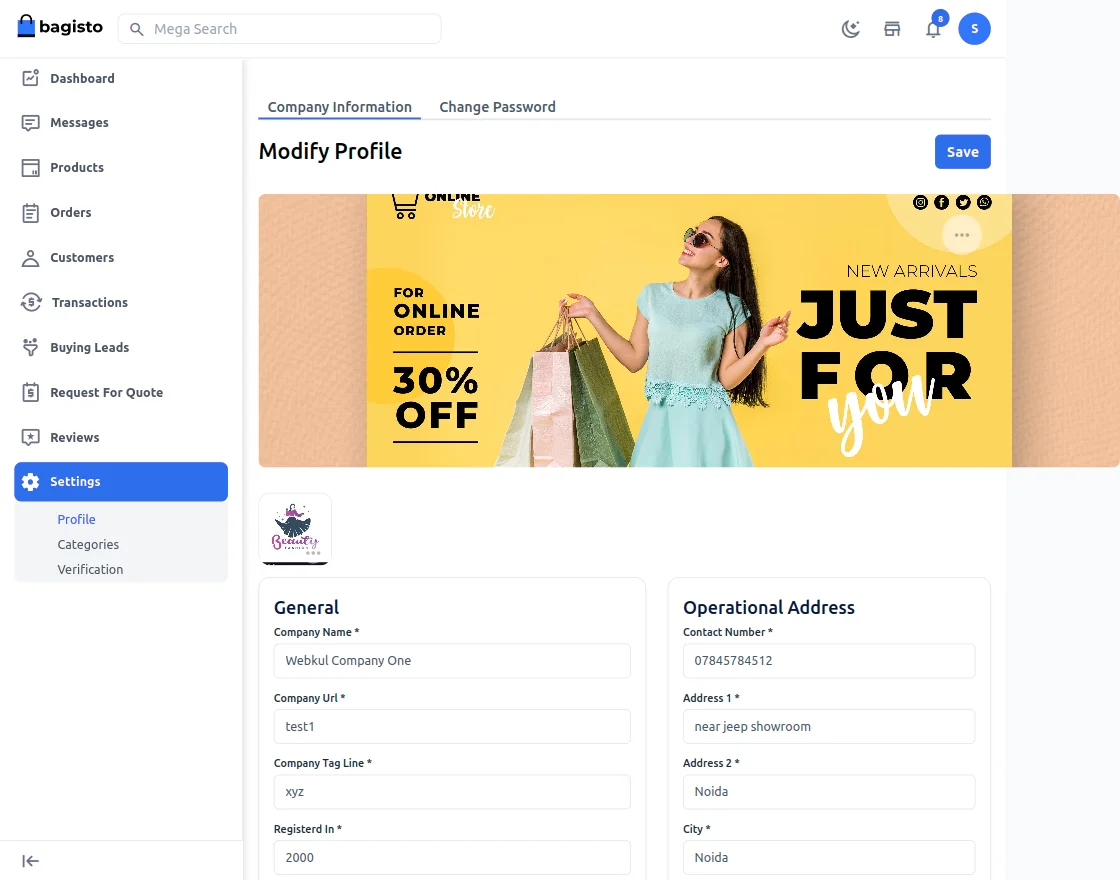
Here the admin:
- Company Name: Provide the Company name in this field.
- Company url: Provide the Company URL in this field.
- Company Tag Line: Supplier will provide the company tag line in this field.
- Registered In: Enter the year on which date the company is registered.
- Designation: Enter the supplier designation in this field.
- Team Size: Enter the team size in this field
- Certification: Enter the company certification number here.
- Response Time: Enter the response time by the supplier in this field.
The Supplier can enter its Operational address and Corporate address in this page.
Media
Under this section, you need to provide a logo and banner for the shop to be displayed at the front end.
Here suppliers can provide a description for their shop, informing customers about the products you sell and other stuff to make it more informative.

Social Links
In this section, you can provide links to your shop social channels like Facebook, Twitter, YouTube, Pinterest, Instagram, Skype, and LinkedIn.
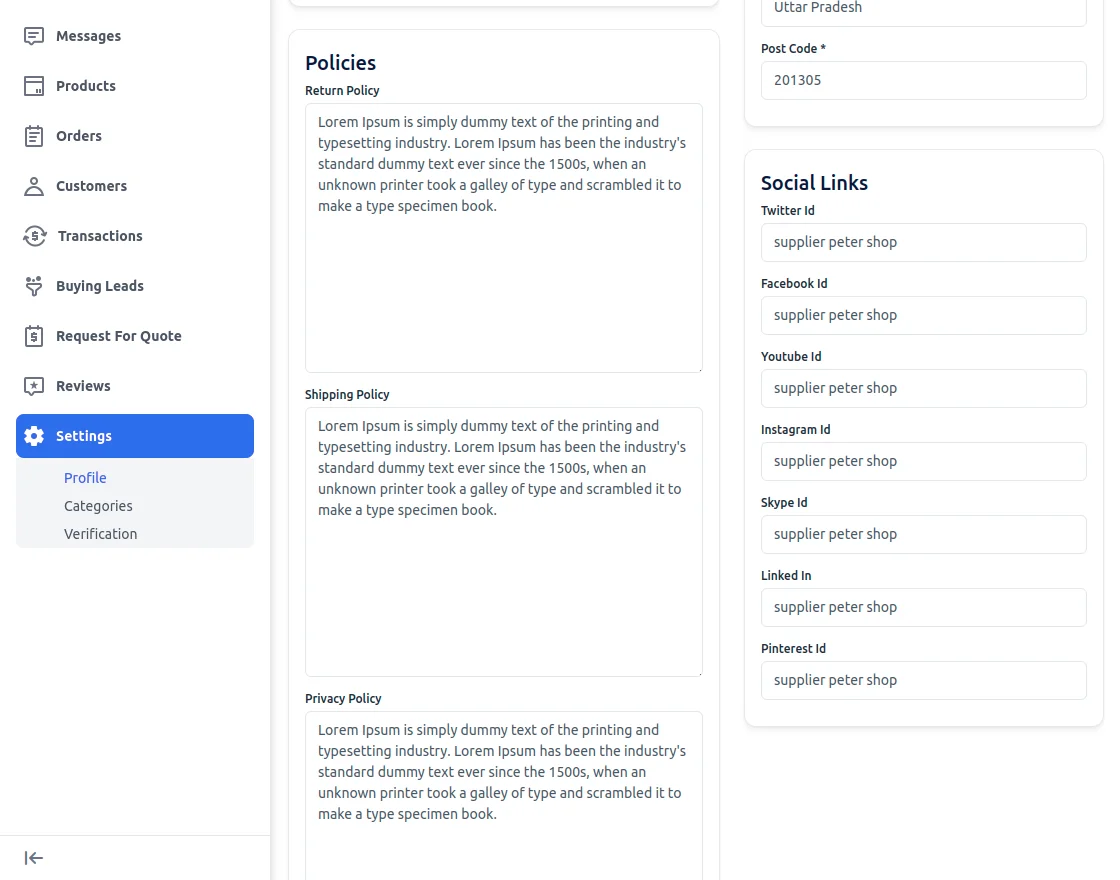
Policies
To keep the purchase transparent between you and your customers, you can provide a Shipping, Return, and also a Privacy policy.
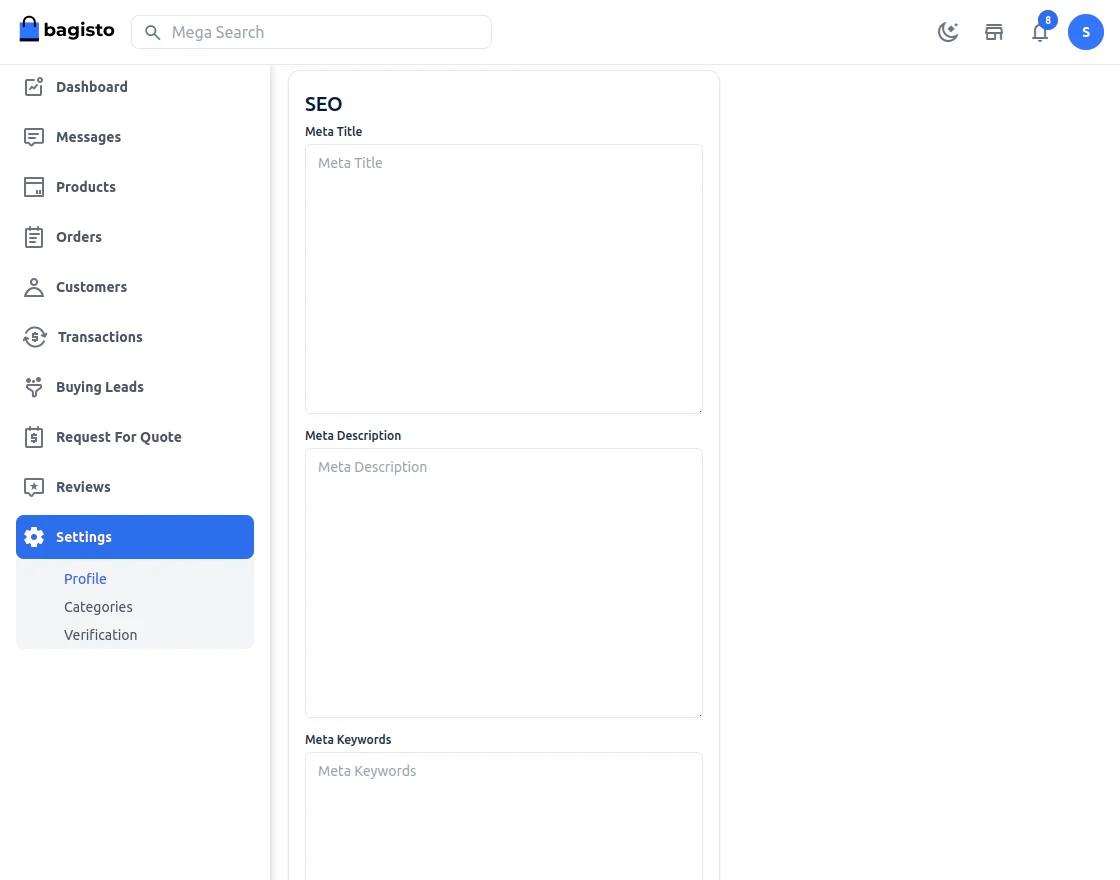
SEO
To improve your shop search ranking on search engines, you can enrich that by providing meta title and description.
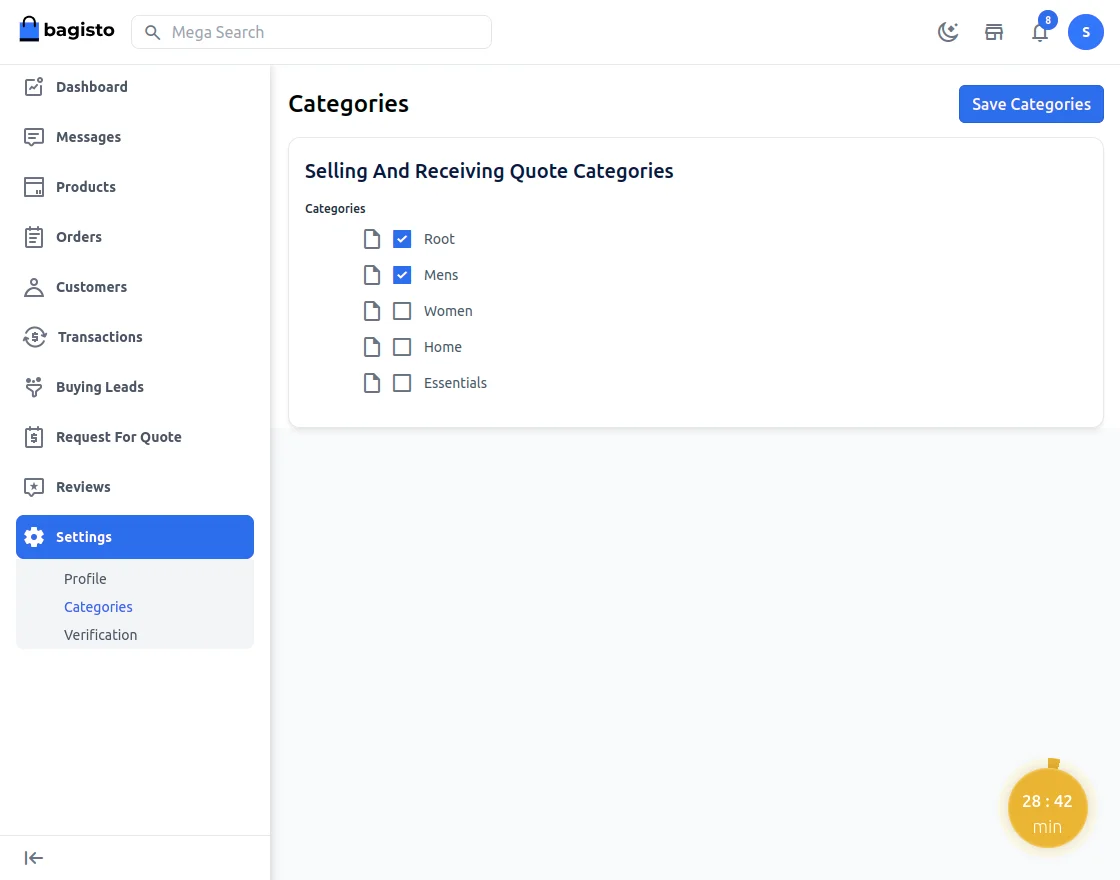
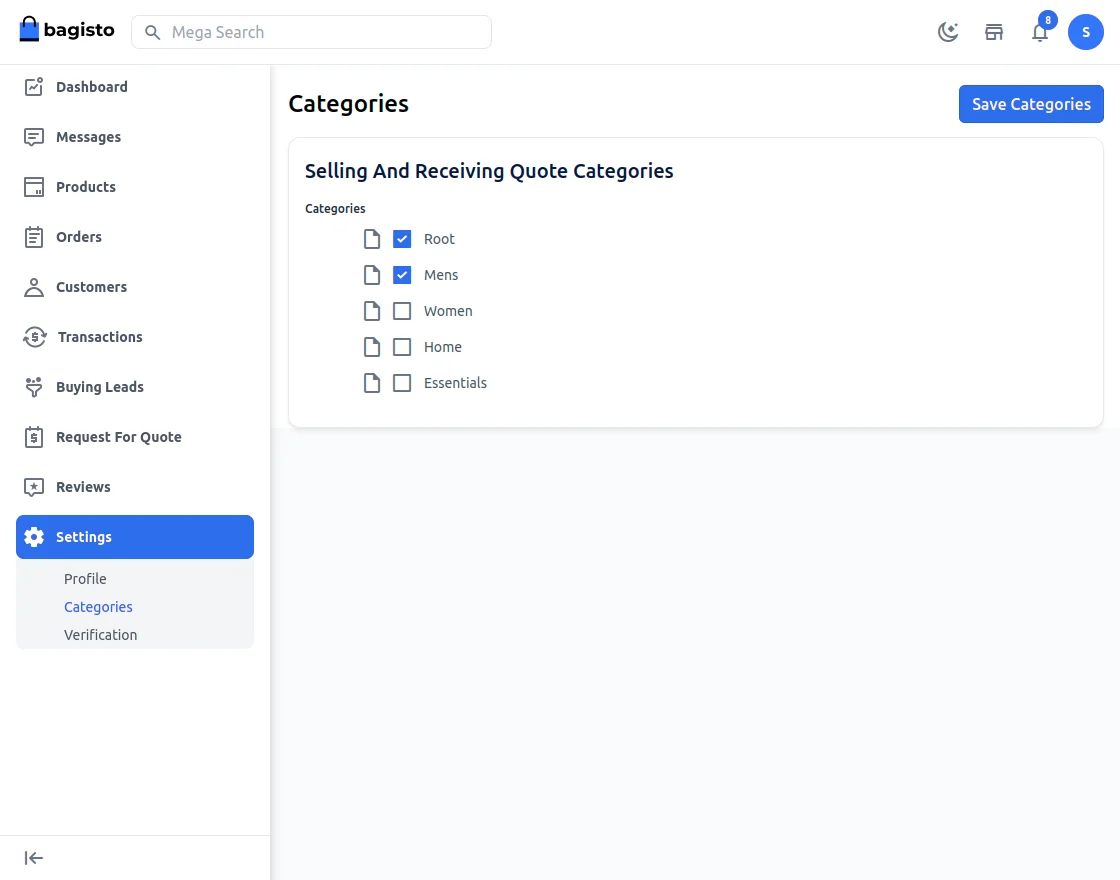
Categories
From here Supplier can select the specific categories whom products are available for the customers to quote.
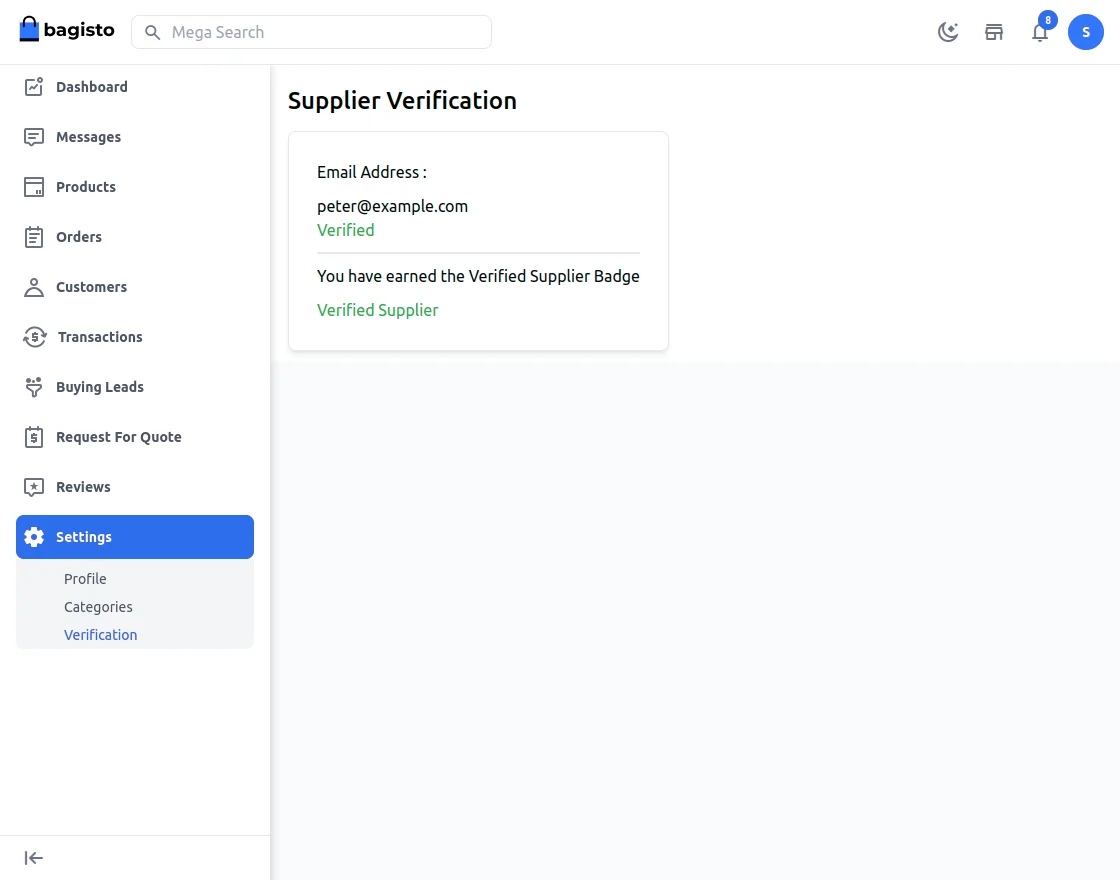
Verification
The Supplier can see the Verification badge by navigating to Settings>>Verification. A supplier needs to verify its email address to display the verified badge that will look like shown below:-
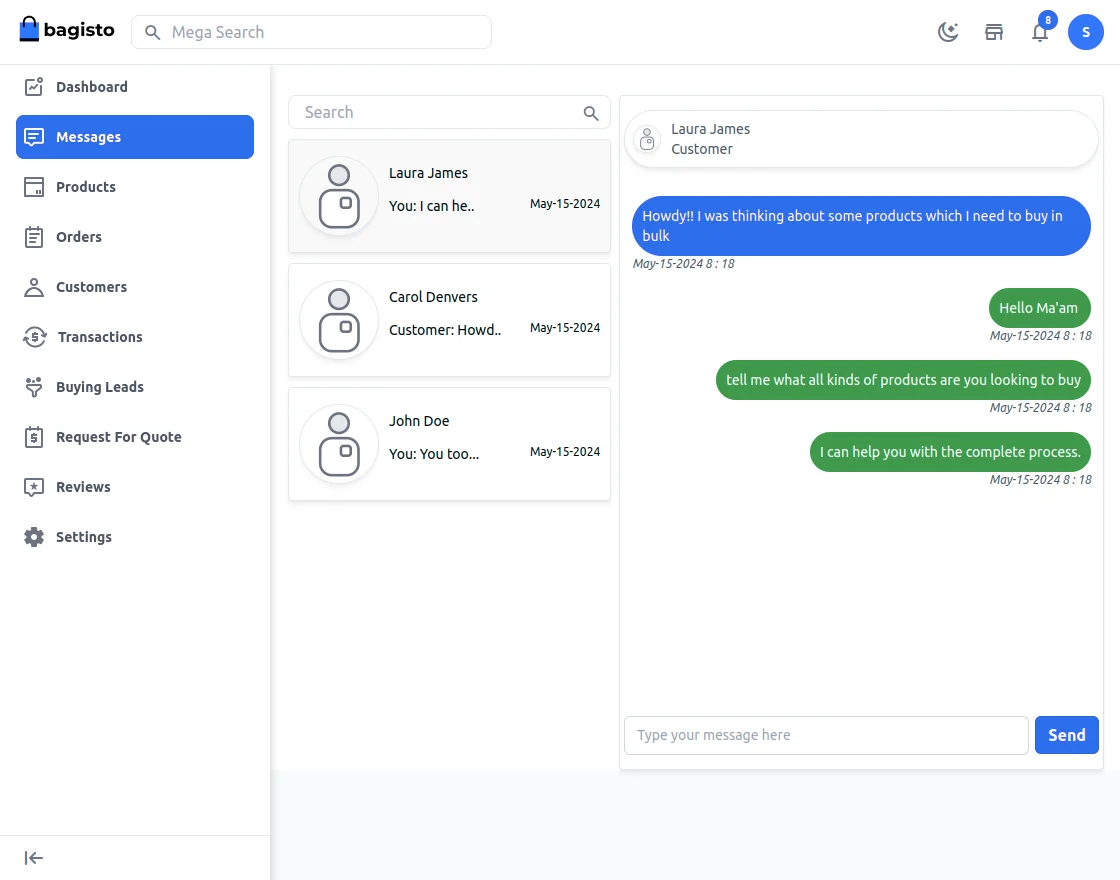
Messages
The supplier can check the messages by logging into the supplier account and navigate to Messages.
After that, the supplier will see all the customer names who have sent messages.
Simply click a customer name, enter a message and hit send button. An email notification will be sent to the customer email.
Adding Product
A supplier can add two types of products – simple, configurable types of product.
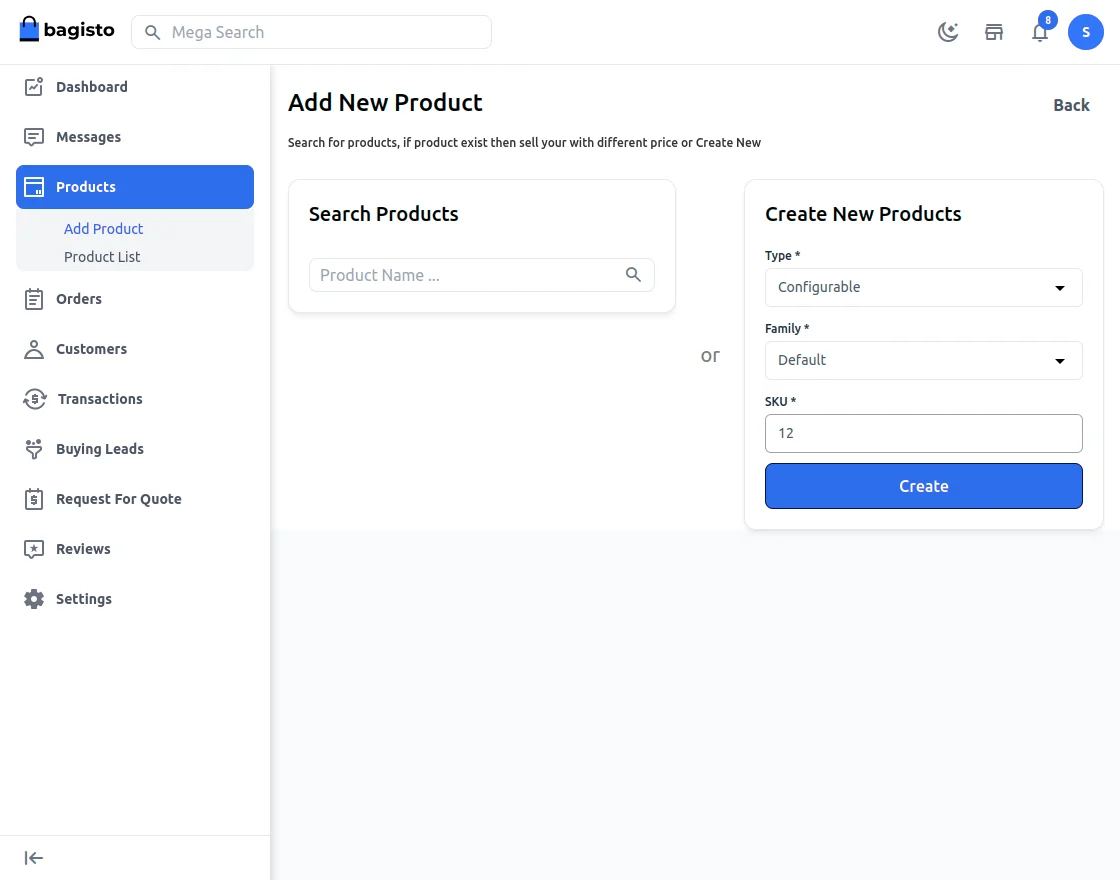
Detailed information about a product can be entered in the product information such as name, price, stock, meta information.
Select category, enter a description, short description etc.

After this admin will enter all the details related to product.
Products List
After adding all the information in the new product, the supplier can see make any further changes by going to Products -> Products List.
Note: The product needs to be approved by the admin for displaying on the storefront
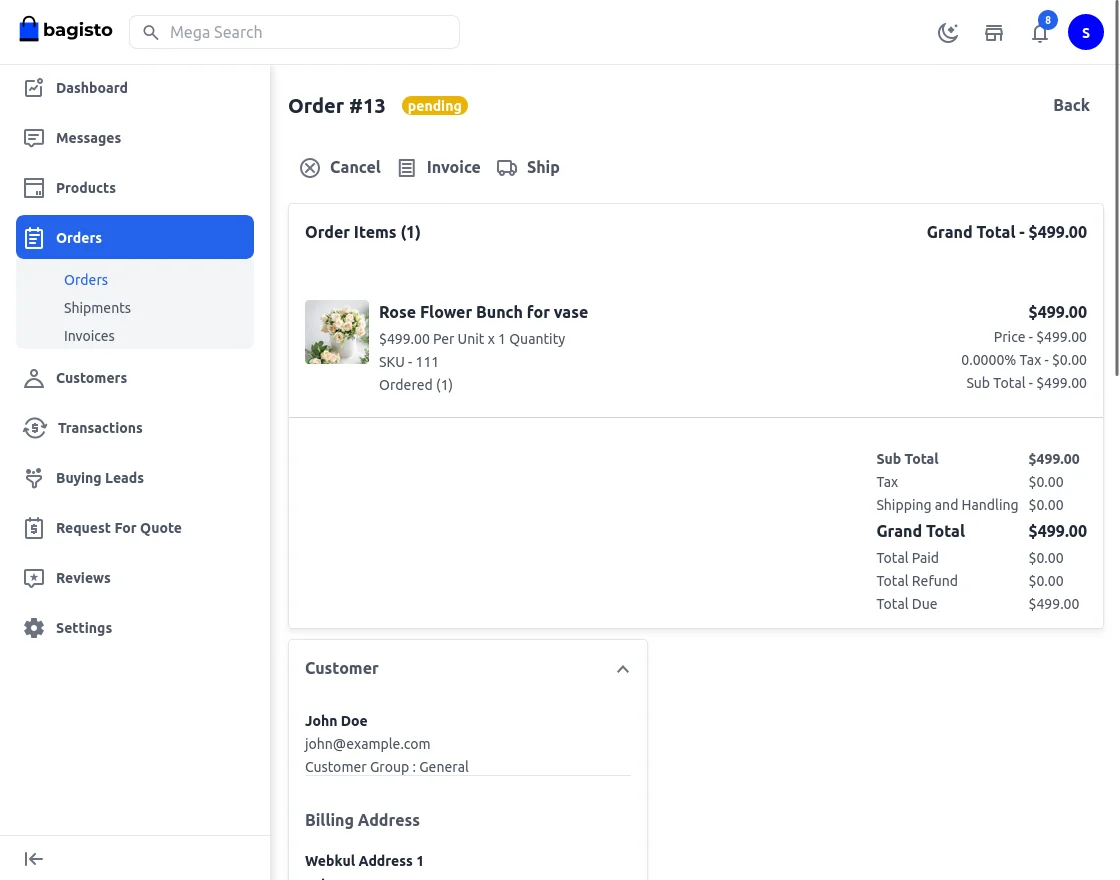
Order History
The admin can also allow the suppliers to manage their customer orders. A supplier can view complete order information, create an invoice, and shipment, add the tracking number, and print document.
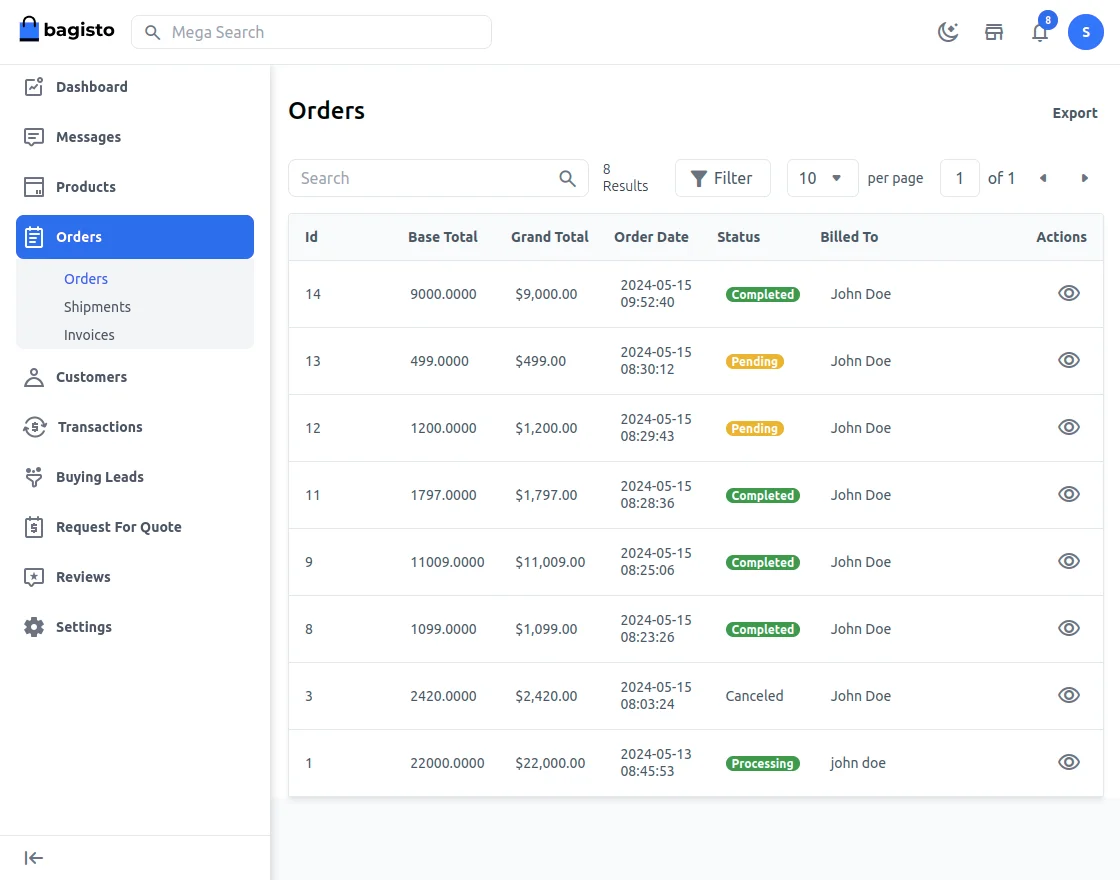
By Clicking on the eye icon the supplier can see all the details regarding the order and can create the invoice or shipment regarding the order. The supplier can also cancel the order.
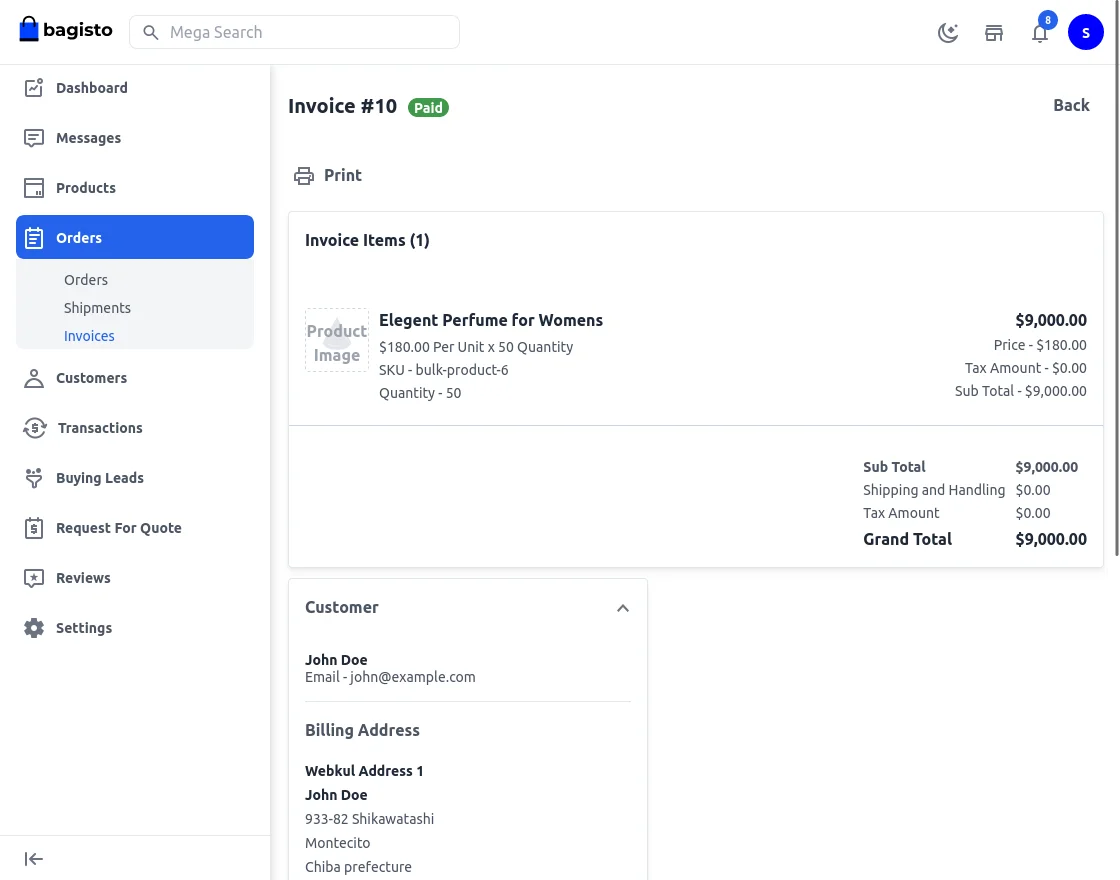
On clicking the Invoices the supplier can see the invoices regarding the order as shown below:-
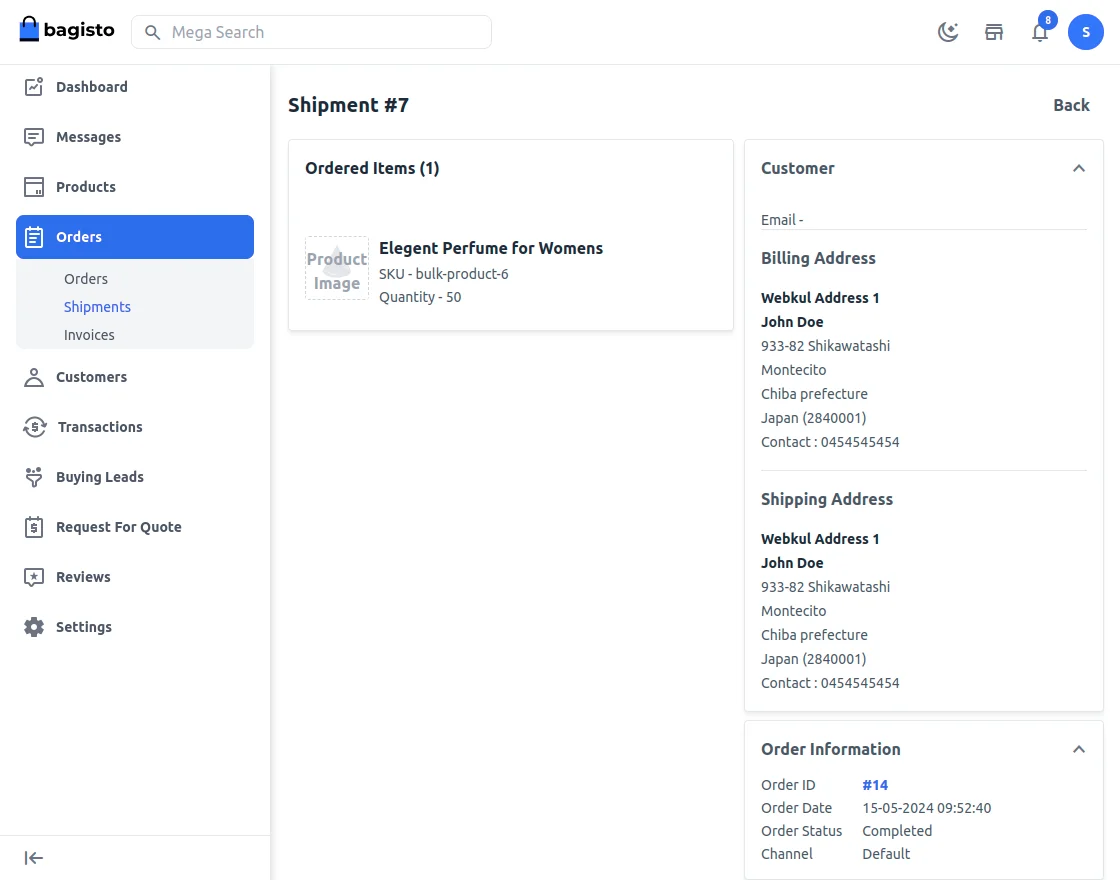
On clicking on the Shipments the supplier can see the shipment.
Customer Information
A supplier can also view and find all the customers who have purchased its products by going to the Customers section.
Here, the supplier can see the name, email, contact number, address, base total, and orders count.

Transactions
Here the supplier see the list of transactions

By clicking on view icon admin can see the dertails of the icon.
Buying Leads
Buying leads functionality helps the customer to raise RFQ for the products that are listed or not listed on the website.
In this, a Request for Quote is sent to multiple suppliers on the website according to the different categories selected.
This above step is a must, to use the buying leads functionality.
On the page header “Request for Quote ” option is available for the Buying Leads.
Now, the customer will fill out the RFQ form.
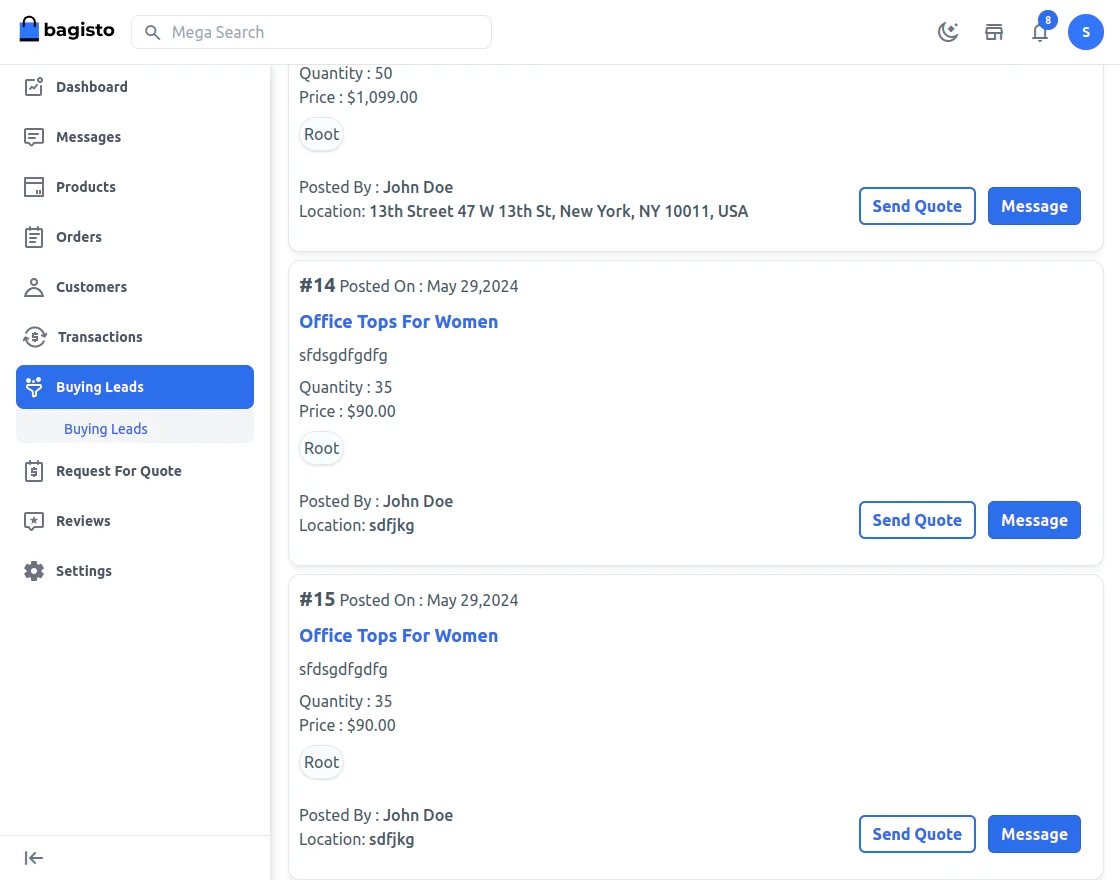
On the Supplier end, the supplier will find the raised quote under Buying Leads.
Here, the supplier can “Message” the customer about the request and directly “Send the quote”.
By clicking on the send quote button.
The supplier will also enter Quote Quantity, Price Per Quantity, provide Sample information – price, availability, unit, shipping time, and also some notes for the customer.
After the supplier sends the quote, the customer can also check the same from the “My Requested Quotes” section.
Request For Quote
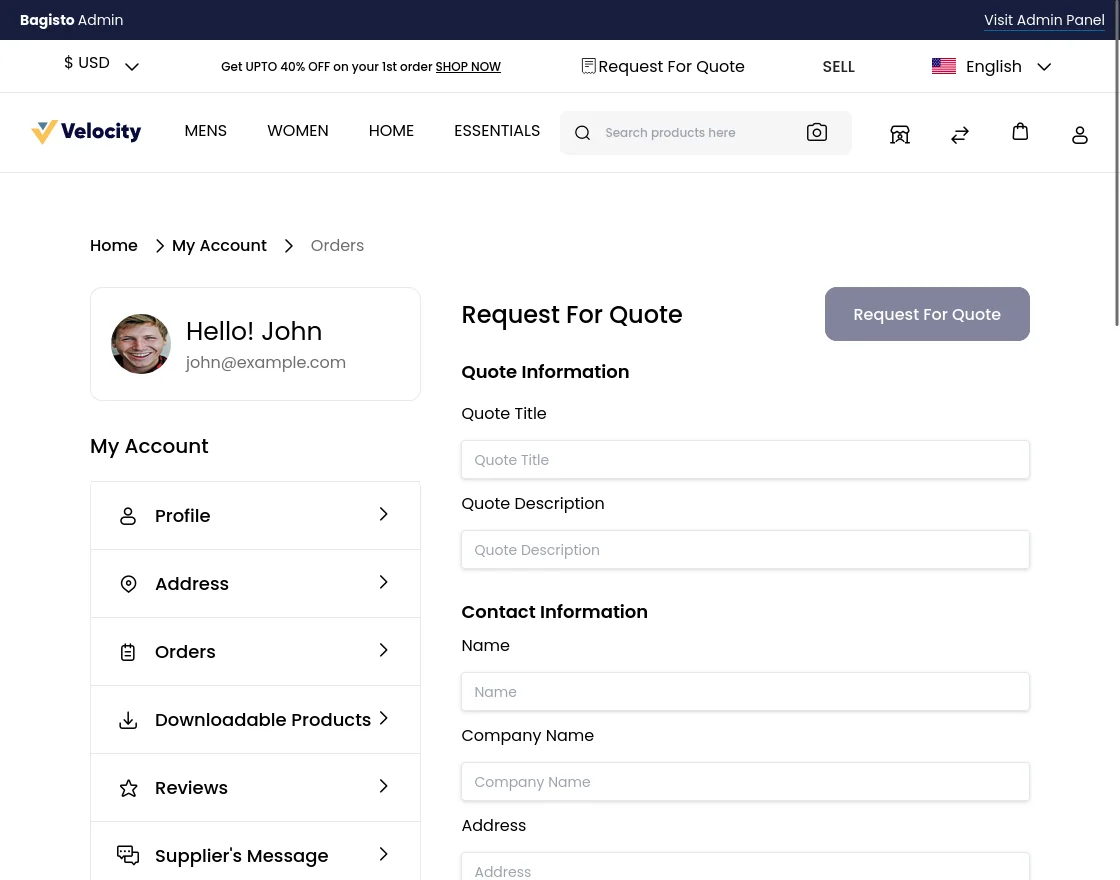
To send a request for a quotation to a supplier, the customer can click on the” Request For Quote ” option on the product page.
Which will redirect the customer to a specific Supplier profile page.
Where the customer needs to first provide details about the quote request – quote title with a description, and contact information as well.
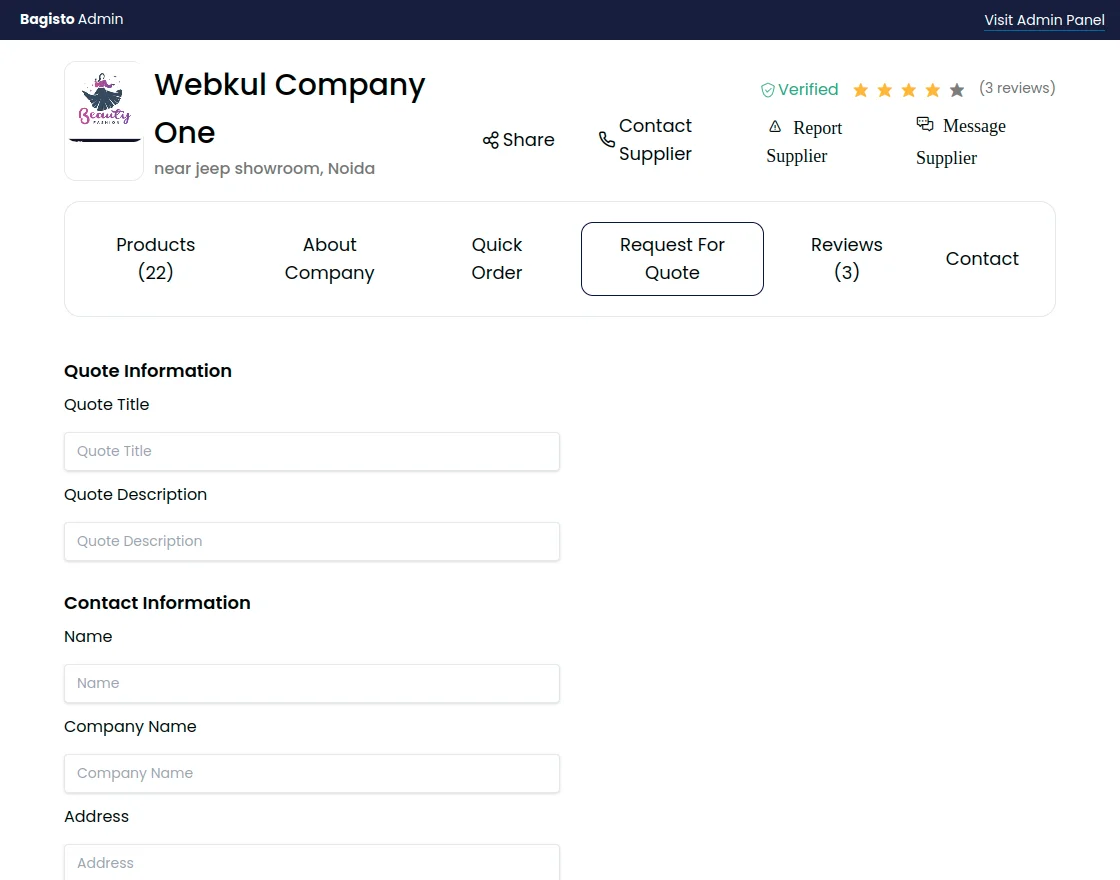

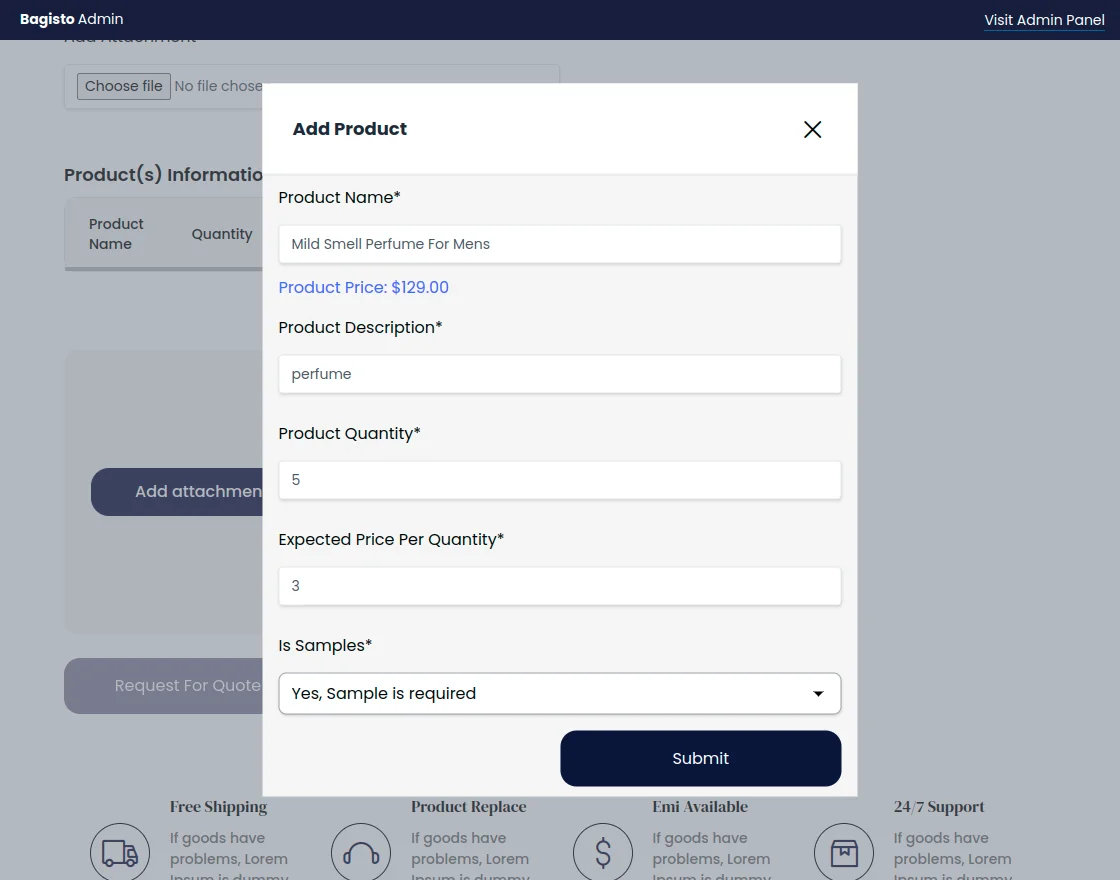
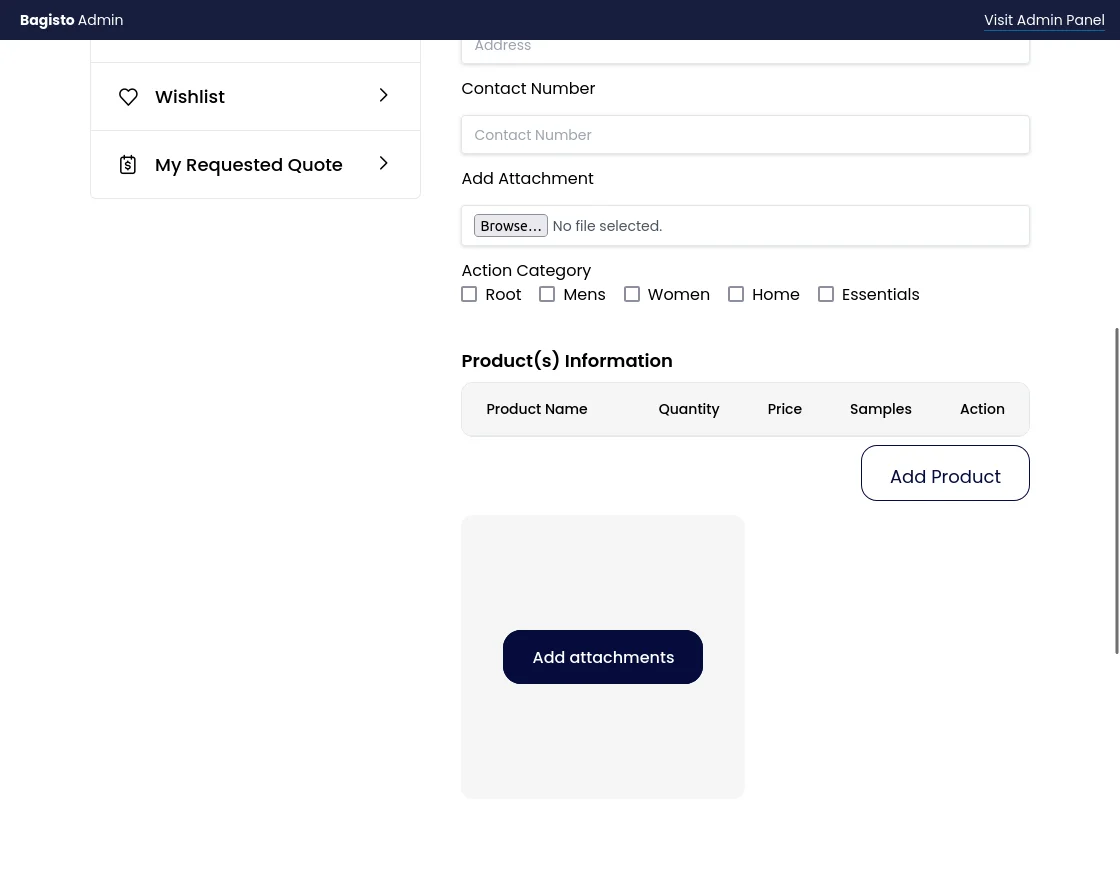
After that, the customer will provide detailed information about the product and click Add Product as shown in the image below:-
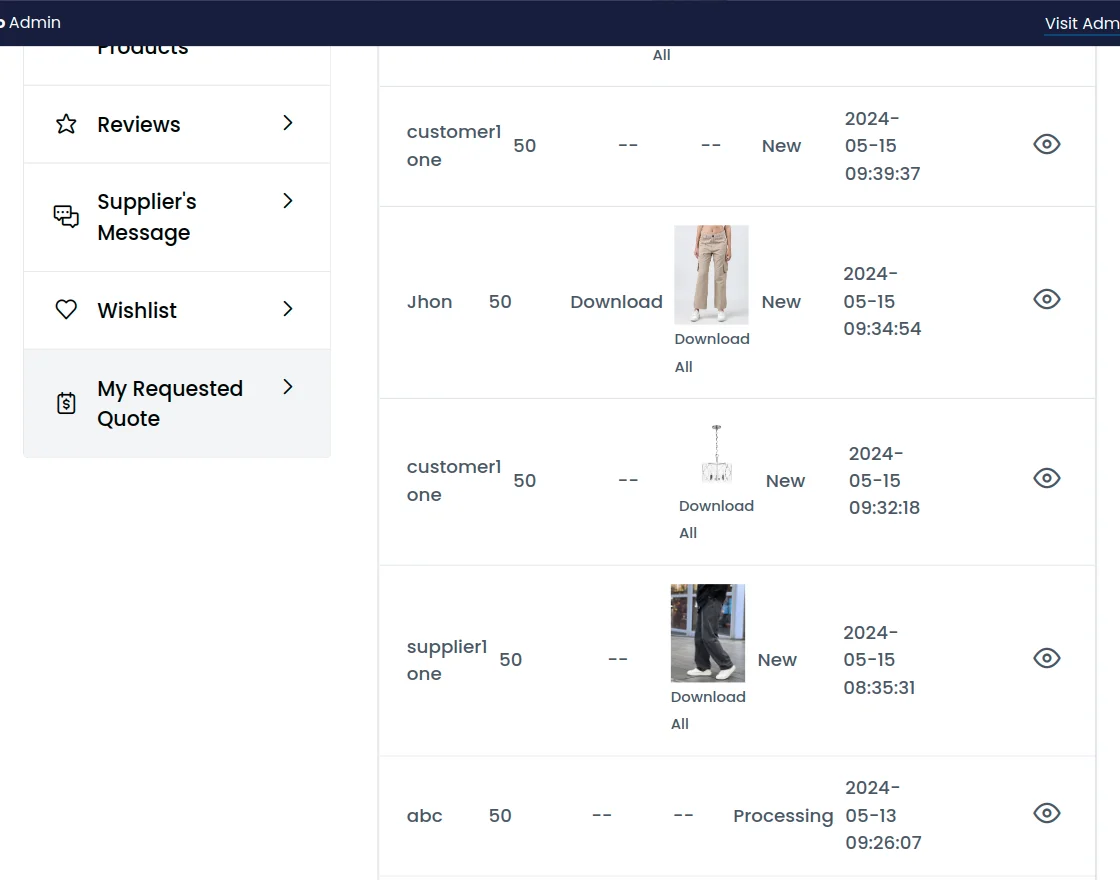
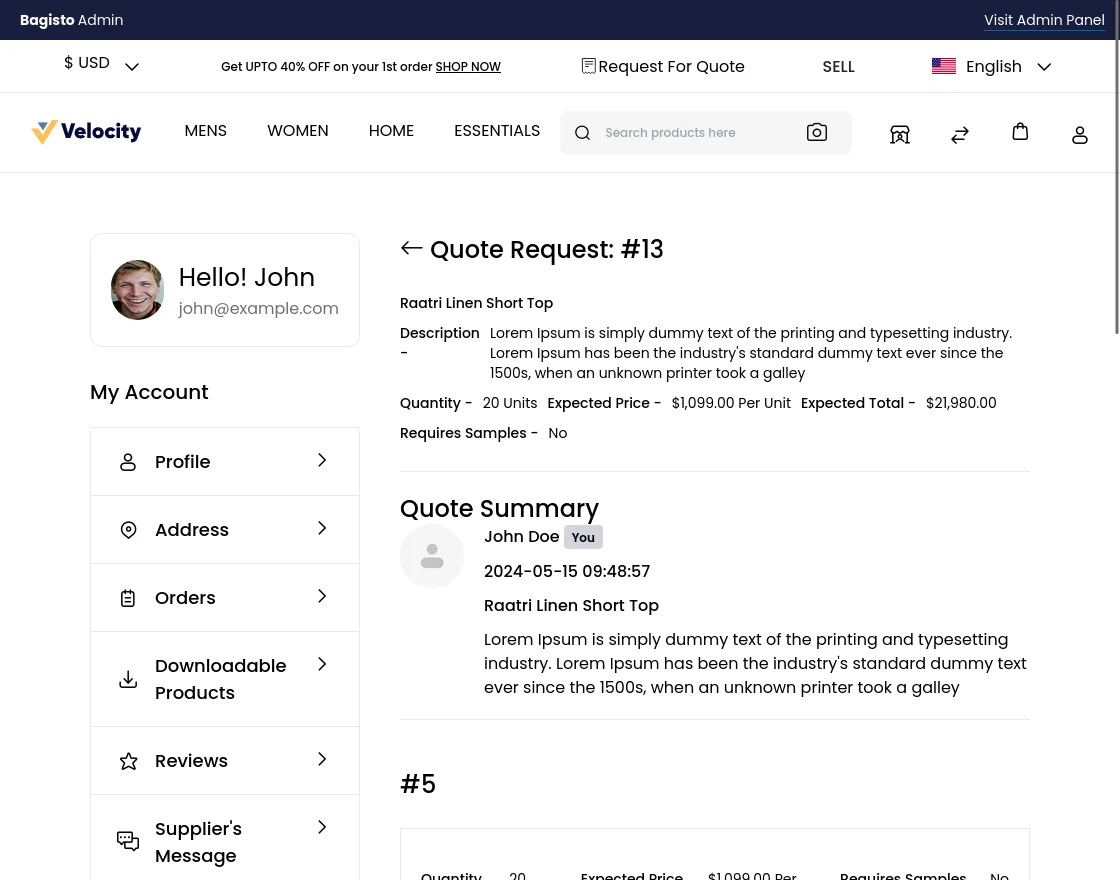
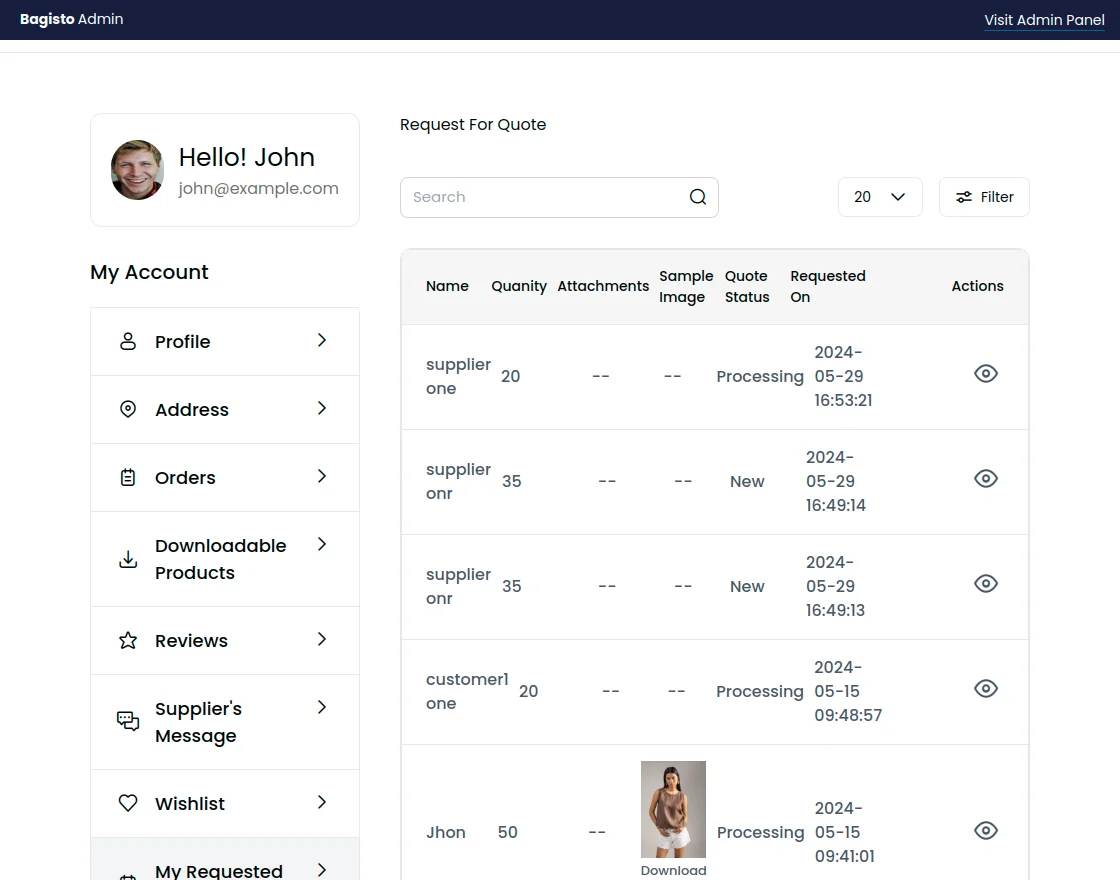
Once the request is submitted, the customer can check quotes in the My Requested Quote section.
After submitting the request, the supplier can check the request by going to the Request For Quote menu option.

After viewing a request, the supplier can see detailed information about the quote by clicking on Edit button.
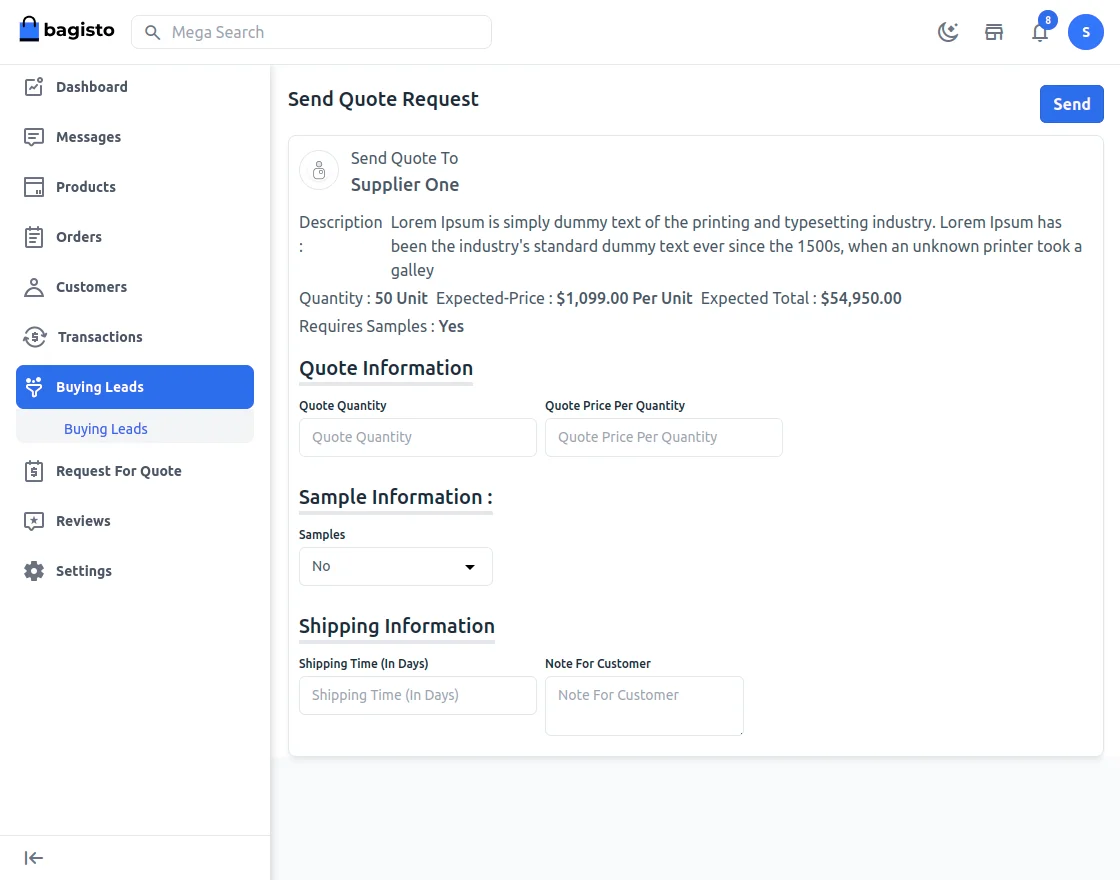
Send Quote
On clicking on the Send Quote Button the following page appears.
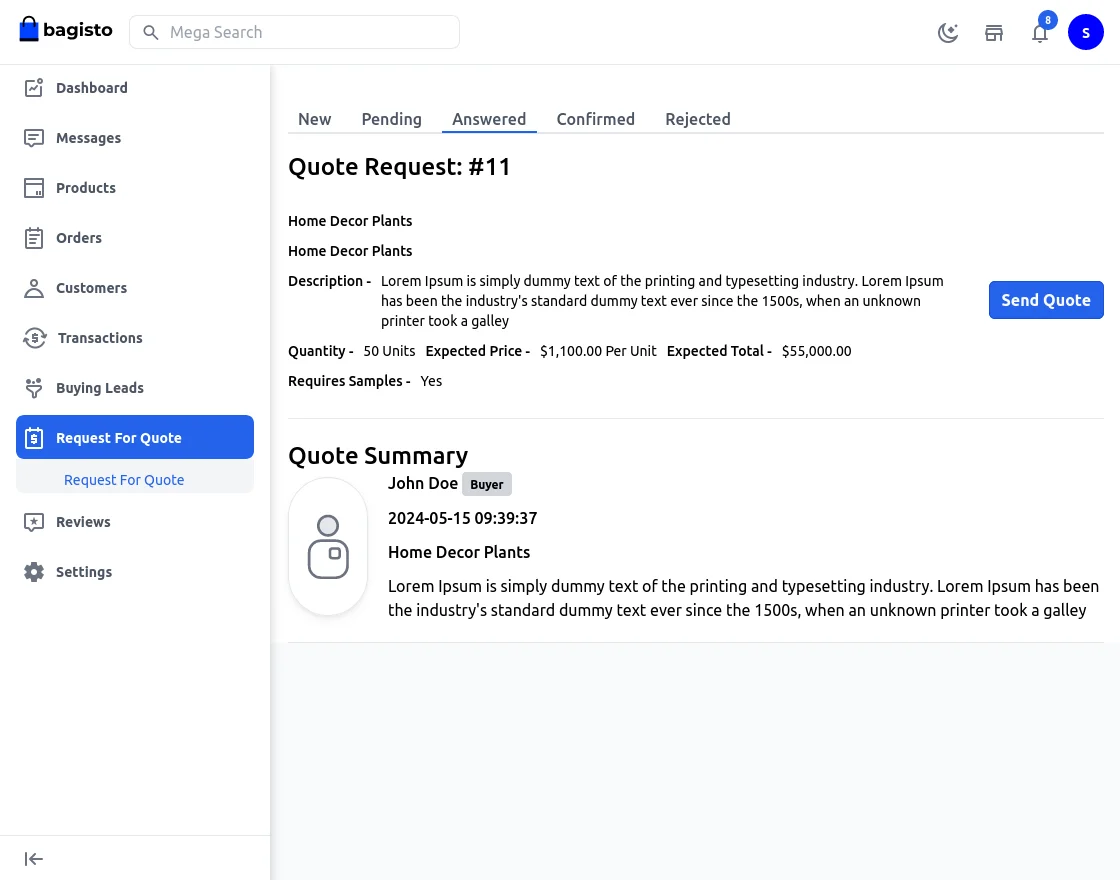
Here, the supplier will enter Quote Quantity, Quote Price Per Quantity, provide Sample information – price, availability, unit, shipping time, and some note for the customer.

After the quote is sent by the supplier, the customer can check the same from My Requested Quote section.

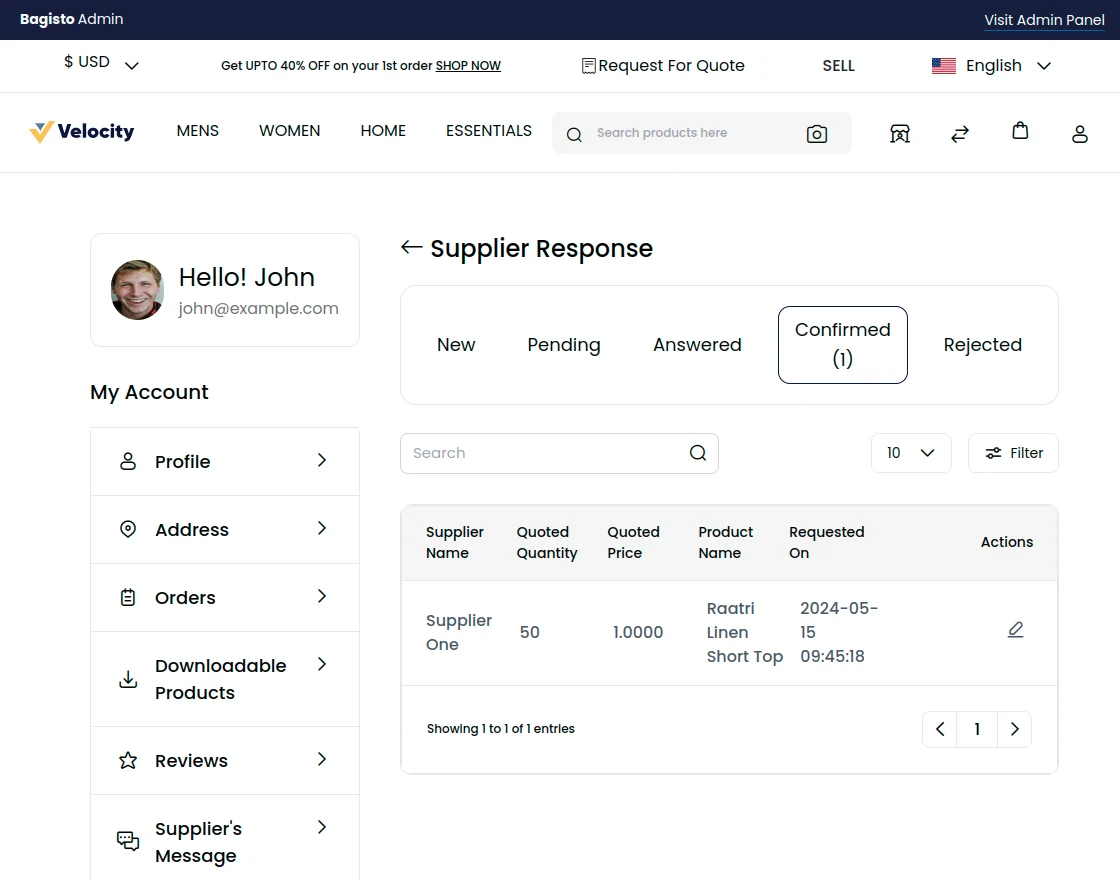
After clicking the eye button, the customer can check the quote and to see details click on the response. The customer can approve, reject or send any message.
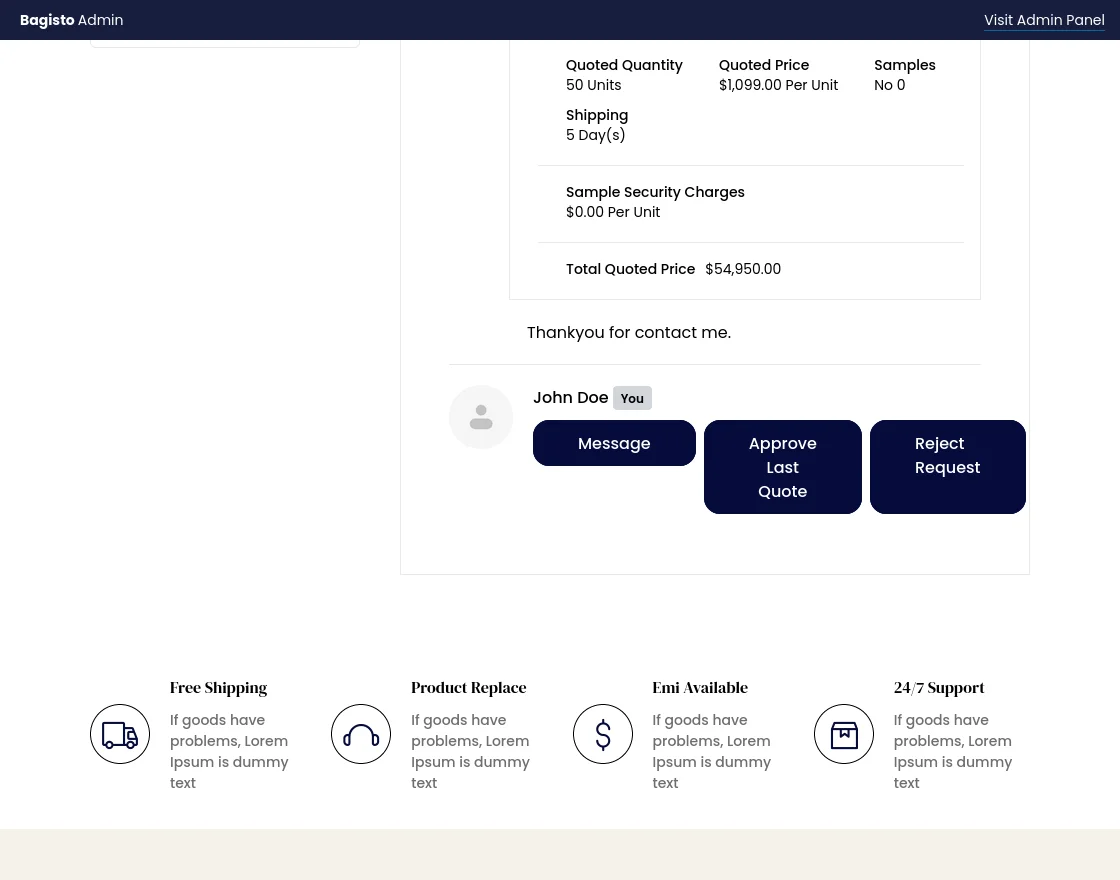
To approve the quote, the customer can click Approve Last Quote and can also enter the message for the supplier.
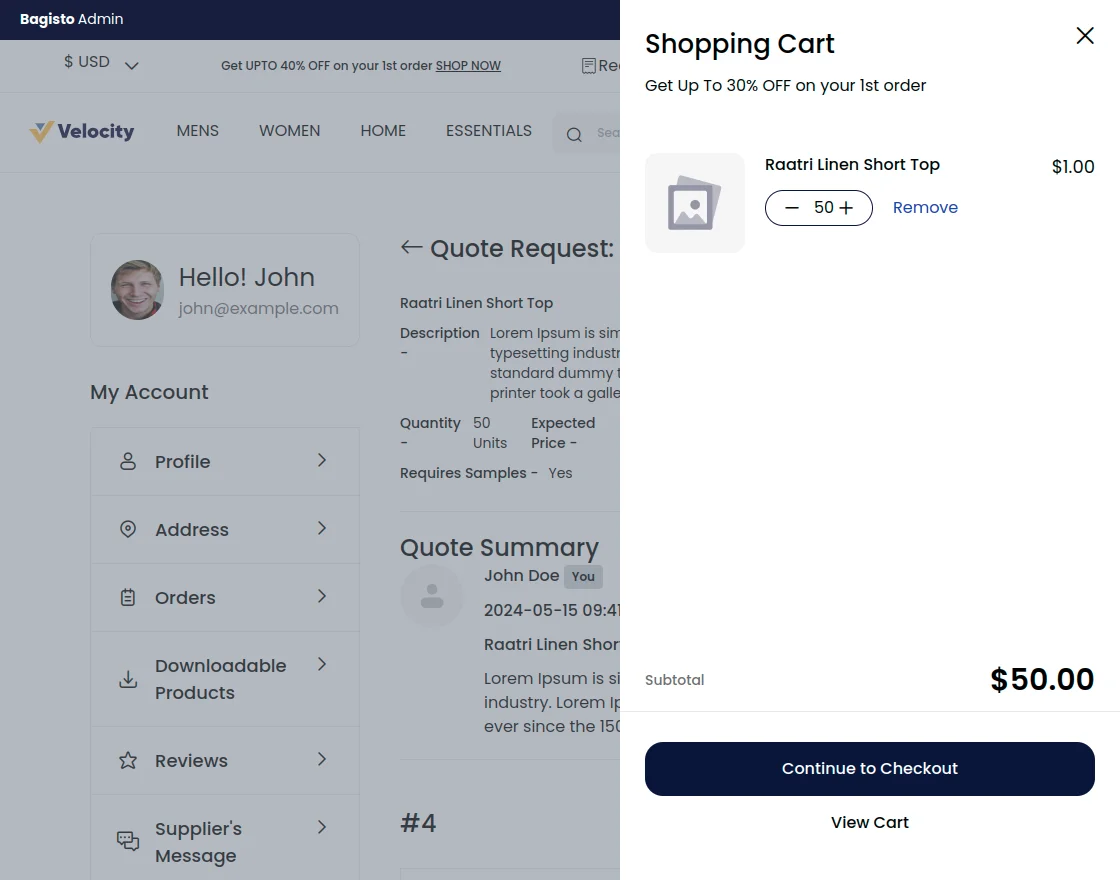
After that, the customer can simply make the payment for the product via Add to Cart button and complete the checkout process like default Bagisto workflow.
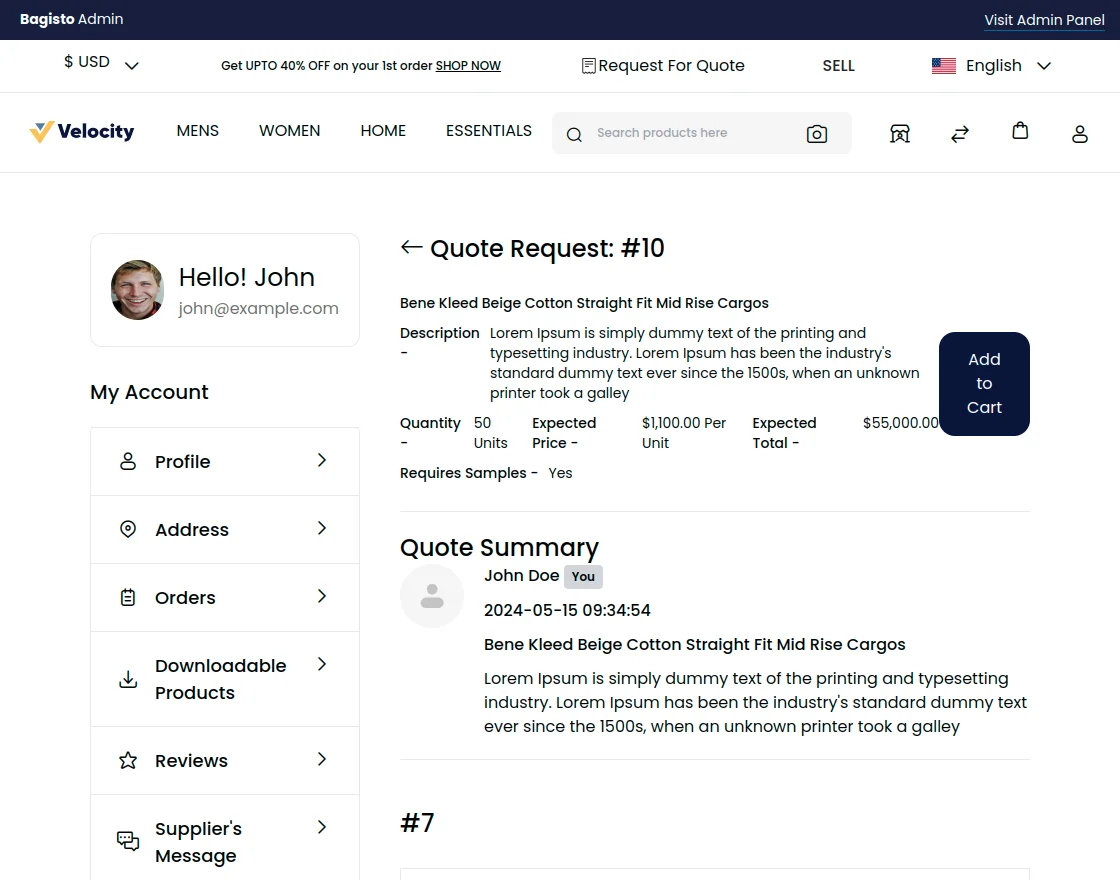
After the customer selects “Add to Cart” the product will be added to the cart as shown below:-
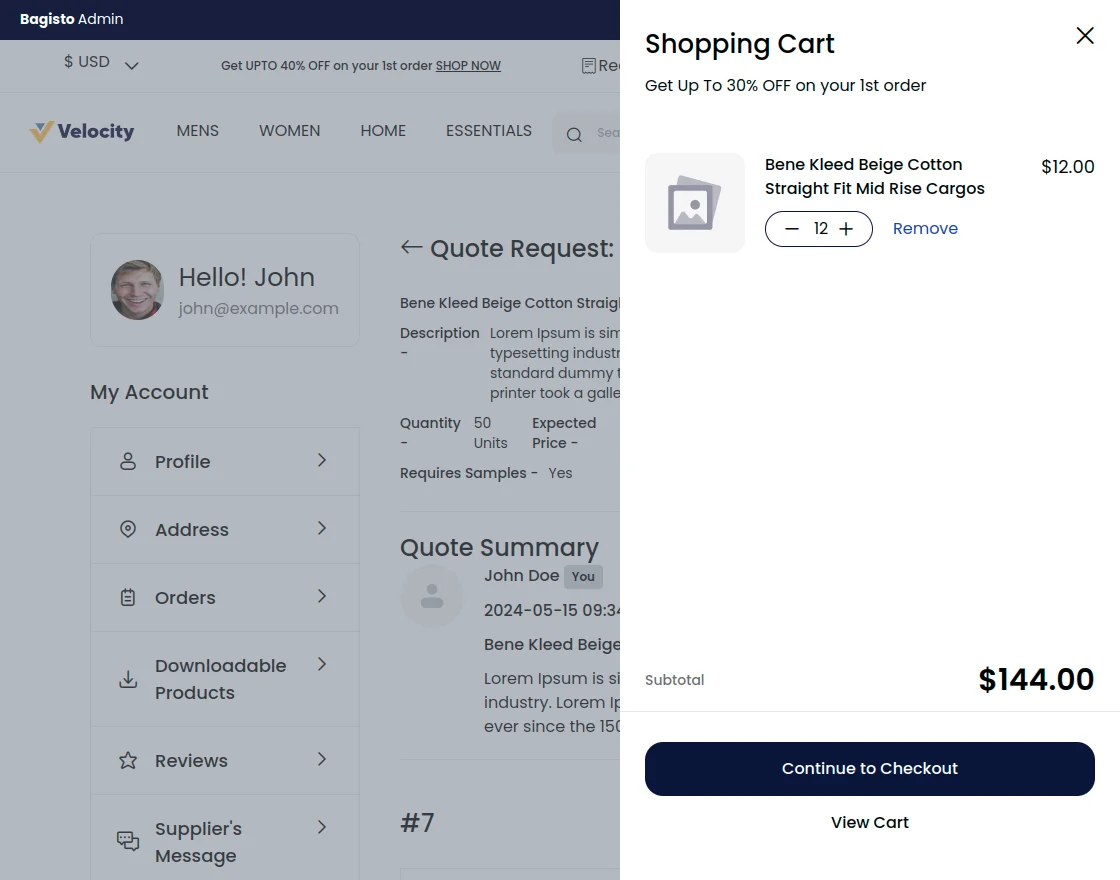
Then, the Customer needs to click on the Proceed to Checkout Process for further process.
Reviews
A supplier can also check the reviews by going to the Reviews section. The list will mention ID, Customer Name, Supplier Name, Rating, Status, Comment, and Created at.
Customer – workflow
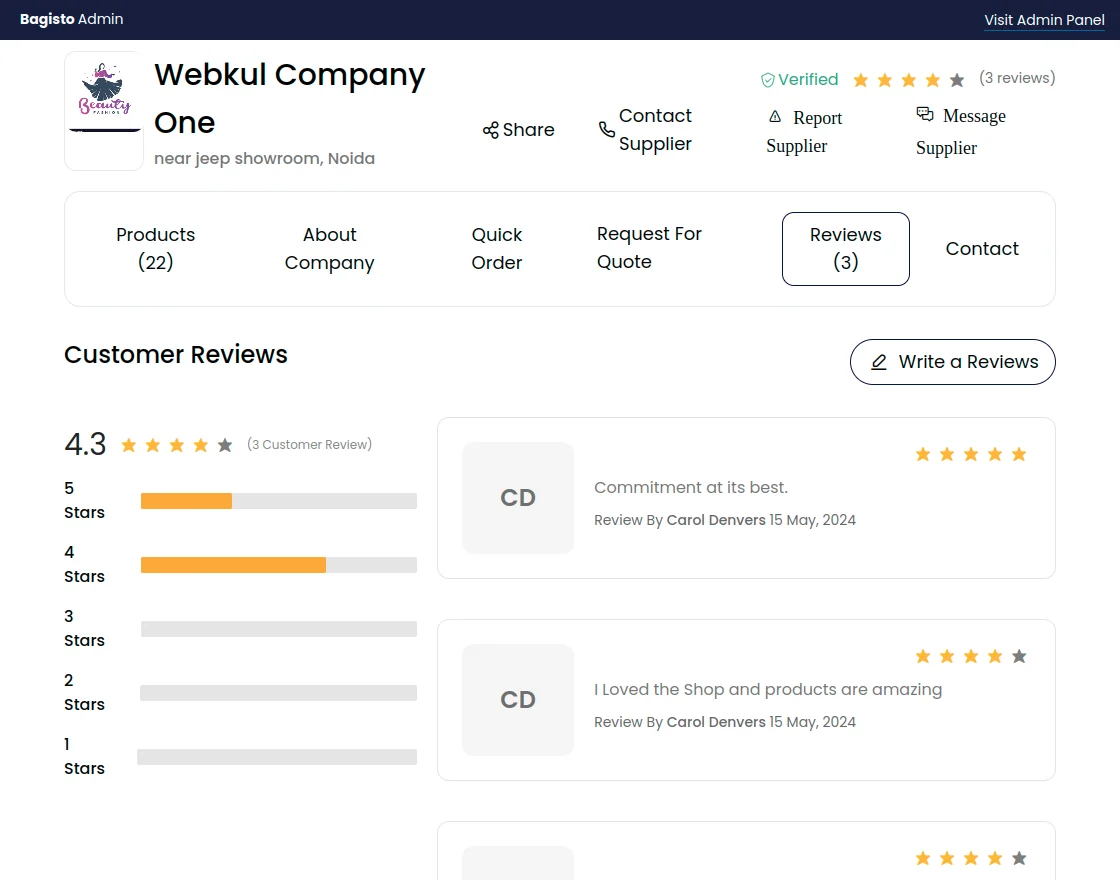
Once the supplier has provided all the information about its shop, the customers can view the same information on the supplier profile page.
Customers can also view banner, company name, ratings, address, contact details, policy information, etc.
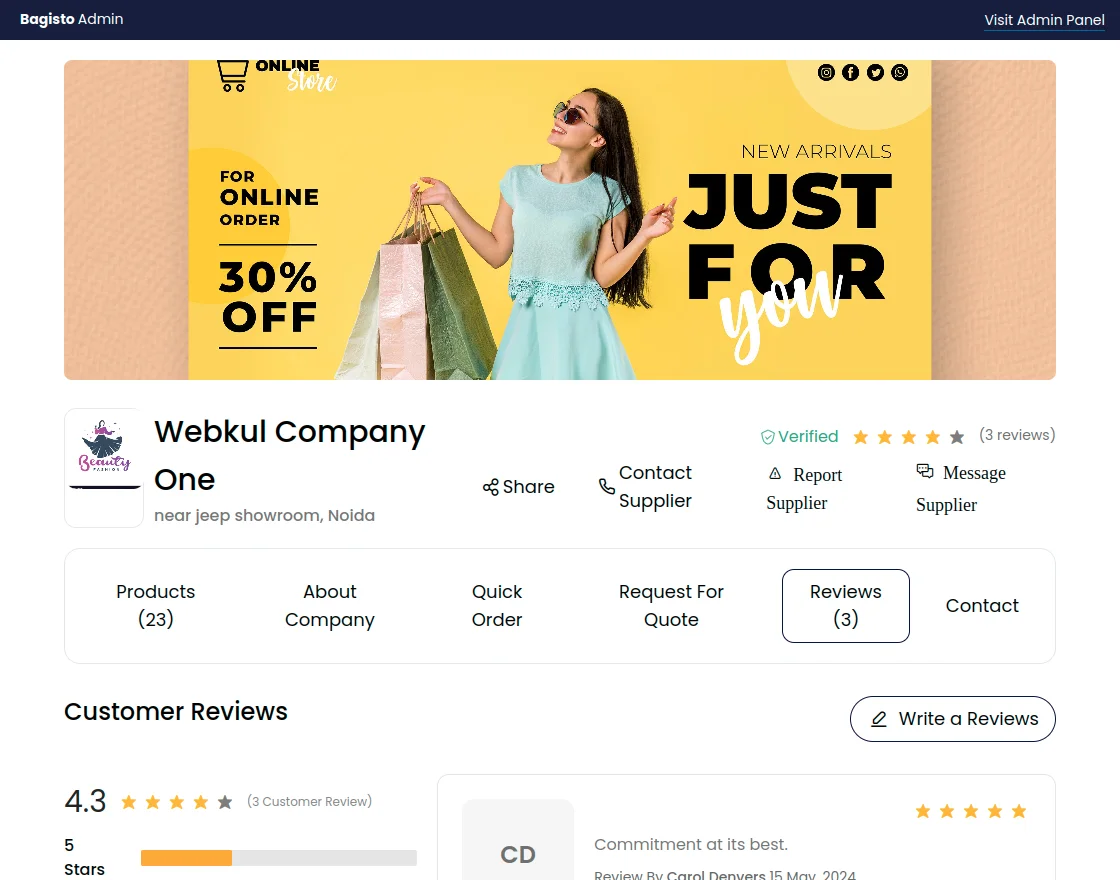
Reviews
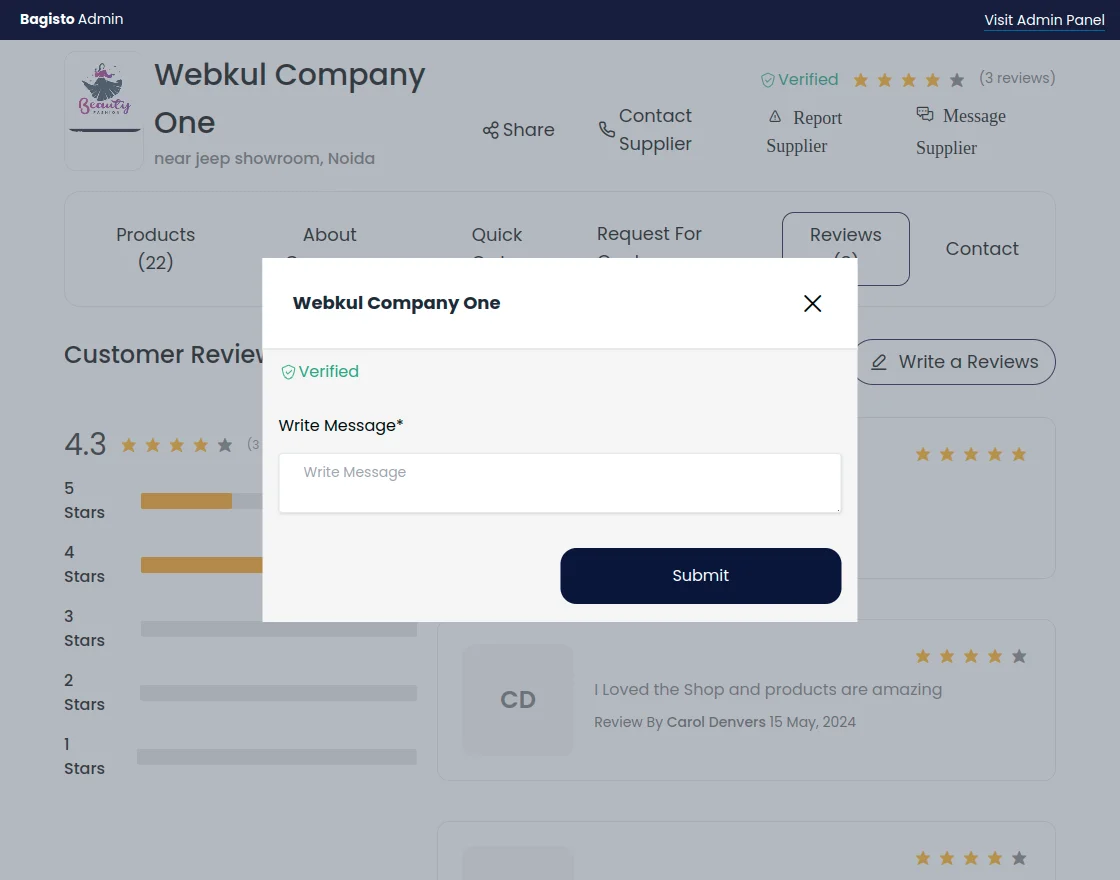
Any customer can also submit a review for a supplier by clicking the Write a Review button.
The customer will redirected to another page.
Feedback will submitted using a rating scale and some description.

Note:
Supplier Reviews
On the same page, the customers can read some reviews & ratings about the supplier and its products.
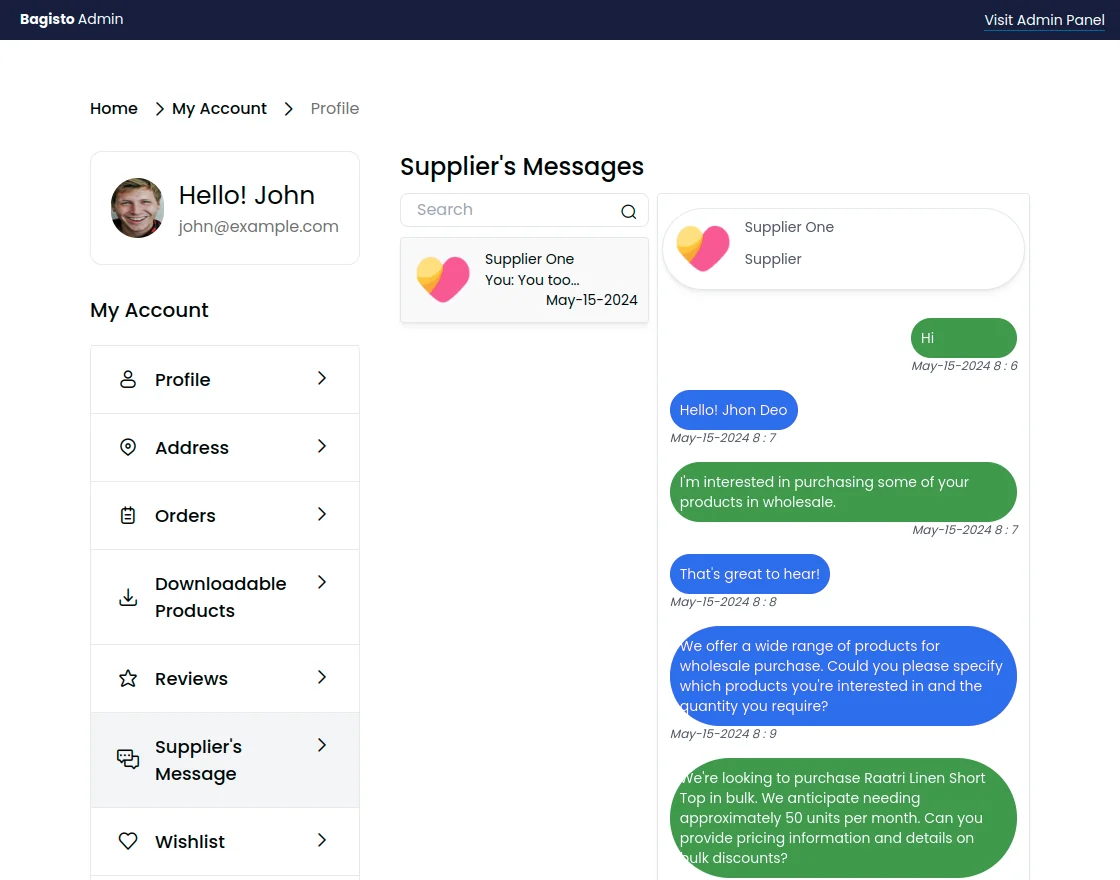
Message Supplier
When a customer clicks Message Supplier button, the following pop-up window will appear. Here the customer can enter or leave the message for the Supplier.
An email notification will be sent to the supplier when any new message is received.
The customer can check the replies from the suppliers by going to My Account>>Supplier’s Message.
Quick Order
A customer can place a quick order on the B2B marketplace for quickly adding and purchasing the products by searching them using a product name.
Customer also needs to enter the quantity for the products.
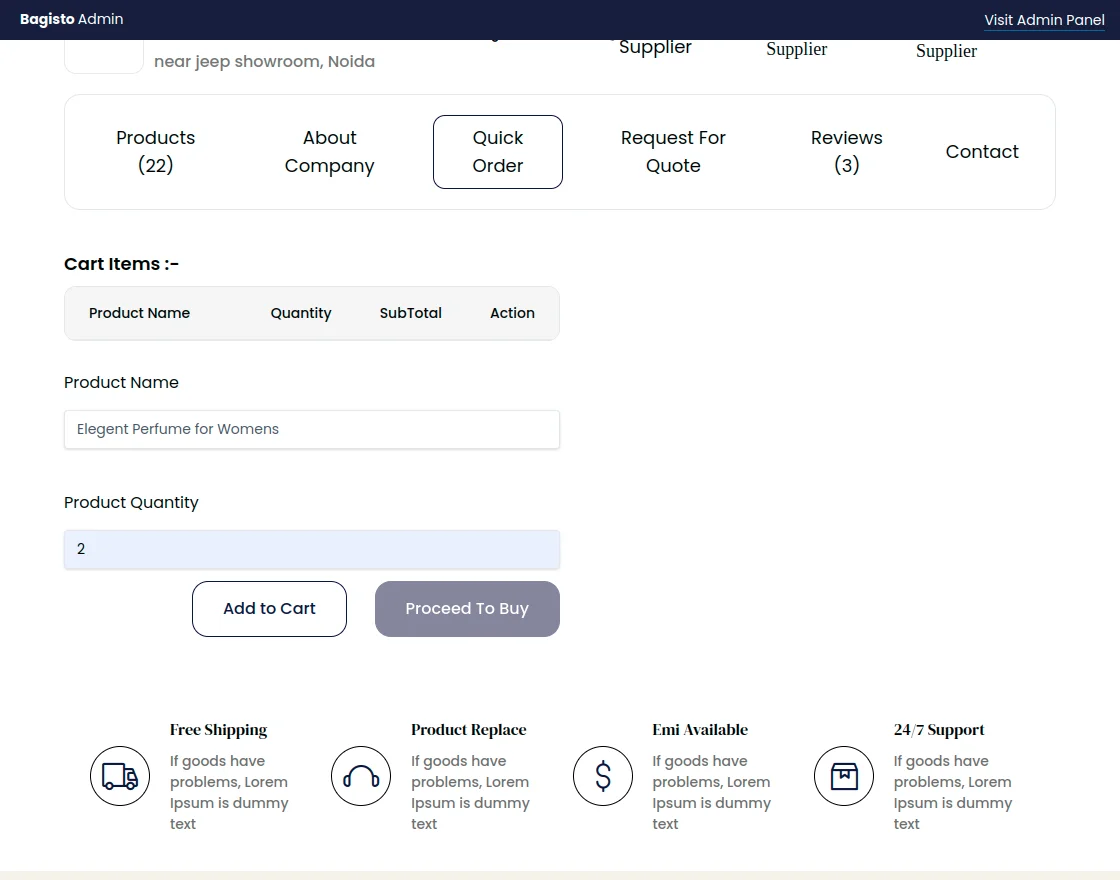
Go to the Quick Order page, find a product by entering a product name, enter a quantity.
Customer can add more products and proceed to checkout. After clicking on Proceed To Buy button the customer can proceed for the checkout process.
Note: Checkout process works same as default Bagisto order.
Buying Leads
Buying leads functionality helps the customer to raise RFQ for the products that are listed or not listed on the website.
After this, the customer will find “Request for Quote” option in the website header.
Now after selecting the Request for Quote option in the header, the customer can quote for the products and these will be listed under the buying leads option at the supplier end.
After raising “Request For Quote” the customer will be directed to the My Requested Quote, where the customer can find all the requests he had done before.
Once the quote is sent by the supplier.
The customer can also check the same from the “My Requested Quotes” section.
Now customer will select the specific request raised by him/her and then direct to the supplier’s response
To approve the quote, the customer can click on “Approve Last Quote” and enter the message for the supplier.
The customer can approve, reject, or send the message by hitting Response.
After that, the customer can simply make the payment for the product via Add to Cart button.
Then, the Customer needs to click on the Continue to Checkout.
Support
So, that was much about the User Guide of Laravel eCommerce B2B Marketplace for any queries or doubts reach out to us at [email protected].
You can also raise a ticket at our HelpDesk System. For assistance related to B2B Marketplace Development, our team is here to help.
Please explore our Laravel Development Services and Quality Bagisto Extensions.
Current Product Version - 2.2.2
Supported Framework Version - Bagisto 2.2.2

2 comments