We will cover the following topic in How to set up GA4 (Google Analytics) in Magneto 2 :
- Why do we need GA4 (Google Analytics 4) in Magento 2
- Flow to set up GA4 in Magento 2 using GTM
- Connect GTM (Google Tag Manager) with Magento 2
- Create GTM Account
- Integrate GTM to Magento 2
- Connect GA4 with GTM
- Create GA4 Account
- Integrate GA4 with GTM
- Check data are fetching from Magento 2 to GA4
Summary – After this, you can be able to set up GA4 for the Magento2 store.
Use Magento 2 GTM Extension for easy setup.
Why do we need GA4 integration in Magento 2?

GA4 integration in Magento 2 provides a more comprehensive and detailed view of customers’ behavior, enabling store owners to make data-driven decisions to grow their e-commerce business.
GA4 is necessary because
- Store owners can get valuable insights into customer behavior.
- The pages visit and how long they stay on a particular page.
- Products view, and which products customer purchase.
Flow to set up GA4 (Google Analytics 4) in Magento 2 using GTM
Google Tag Manager (GTM) is a powerful tool that allows you to manage and deploy tracking tags and scripts on your website without needing to add multiple code snippets to your site’s codebase.
Instead, you can add the GTM container code to your website’s header, and then use the GTM interface to create and manage tags, triggers, and variables.
To set up GA4 in Magento 2, We have to create a tag for GA4 in GTM. Firstly, we have to set up GTM in our Magento 2 store.

Setup can be possible with two ways:
- Direct Setup – We are discussing in this blog.
- Module Setup – For quick and easy setup, check our full Magento 2 GTM Extension guide.
Connect GTM with Magento 2
Create GTM (Google Tag Manager) Account and Container
The account is a kind of superset of containers, which means in an account we have various containers.
A container is a standalone tag management system that allows you to add and manage tags on your website or mobile app.
- Go to https://tagmanager.google.com/ and sign in using your Google account.
- Click on Create Account to create a new GTM account.
- Give your GTM account a name, select the country where you are located, and choose whether you want to share your data with Google.
- Agree to the terms and conditions, and then click Create.

Ignore this step if you already have an account in GTM.
Install Google Tag Manager – Code Snippet
After creating an account you will get an Install Google Tab Manager popup or get it from the right top corner beside the Preview button.
Install Google Tab Manager having a unique id for your GTM in this format GTM-XXXXXXX.
As instructed, Copy the <head> part and paste it into the Magento header section.

Integrate GTM to Magento 2
Log in to the Magento admin panel, Go to Content > Configuration
Select and edit your theme, paste GTM code into HTML Head > Scripts and Style Sheets
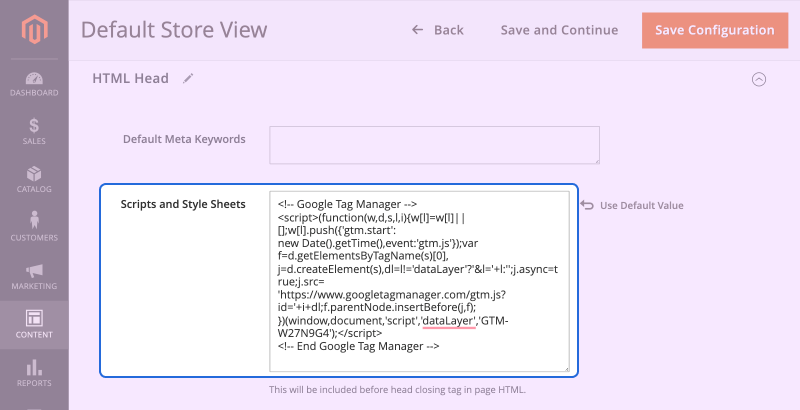
Note: Please go to Cache Management and refresh cache types.
Verify: Go to the source code of the storefront, and find GTM (Optional).
Now, go to GTM, click on the Preview button. Put your website URL and connect. If successfully connected. It means now GTM is integrated into Magento 2.

Connect GA4 with GTM
1. Create GA4 Account
- Create a Google Analytics account or sign in to your existing account.
- Click on the Admin tab at the bottom left of the screen.
- Under the Account column, click on Create Account.
- Fill out the required fields for the account, such as the account name and the website URL.
- Under the Property column, click Create Property and select Google Analytics.
- Fill out the required fields for the property, such as the property name and the time zone.
- Click Create to create your GA4 property.

2. Create a Data Stream
Goto Admin > Account > Property > Data Stream > Select stream iOS, Android, and Web. I choose to stream on the web.

Now you will get the Measurement id followed by G-XXXXXXXXX. Using this measurement Id we will set up a tag in GTM now.

3. Setup GA4 in GTM
- Goto GTM > Account > Property > Create Tag
- Select Tag Configuration > Choose Tag Type > Google Analytics: GA4 Configuration
- Paste Measurement ID
- Select Trigger > Choose Trigger > All Page
- Set Tag Name, eg. Magento Store Tag
- Save Tag
4. Publish GTM changes
In GTM, whatever you have updated or created, it’s good to publish every time. To notify other users that what is going on in GTM.
So, go to the Submit Button, after that, fill the details of your version, then Publish.

Verify (optional): Goto GTM, Select the related account, and click on the Preview button, once GTM is connected you can see the tag is fired. It means everything is working fine.

3. Check data collection is active
Here we check our setup is working properly. There are 2 that I use to check whether data is fetching from the Magento store to GA4
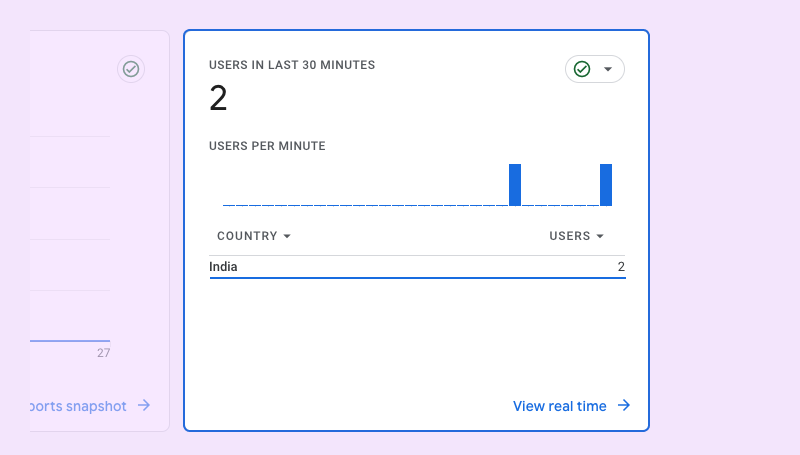
1. Quick Check
Go Home, Check in the real-time card.
You find any User in last 30 minutes is 1 or more. It means the setup is done properly.
2. Best practice
Go to Admin > Account > Property > Debug view
You can find a real-time timeline of how users come to your page and which page they are surfing. Confirmed that your setup is done.

Finally, It’s all set up to collect data in your google analytics.
I hope this blog is helpful for you to set up Google Analytics for Magento 2.
You may also check our quality Magento 2 Extensions.

Be the first to comment.