For WordPress theme development, we need to know where the theme folder and files are stored when building themes.
WordPress Directory Folders
- wp-admin
- wp-content
- wp-includes
The folder that we are most interested in right now is the wp-content folder. Within the wp-content folder is a folder named themes.
You will find three themes by default in themes folder after installed new wordpress.
Now lets start theme creation step by step:-
Step 1: Create a folder to hold your theme files.
Create a folder parallel to other themes folder with a unique and decent name.
Notice: there is a theme folder named mytheme which we have created.

Step 2: Create style.css and index.php in your theme folder
Now create two empty files in theme folder directory. One is called index.php and the other is called style.css.
Style.css
WordPress actually reads the comments that you place in the style.css file. This is where you specify specific information about the theme you are building.
The style.css is a stylesheet (CSS) file required for every WordPress theme. It controls the presentation (visual design and layout) of the website pages.
To know more click on this: Link
Simply assign a Theme Name, the Author, the Author URI, and the Version number of theme.
/*
Theme Name: mytheme
Author: author
Author URI: /https://author.com
Version: 1.0
*/
Index.php
In this file, we just want to output something to the screen to prove that our theme is working.
<h1>My Theme!</h1>
Theme Image
Add a image with name of screenshot.png size of 1200*900 pixels. it will show in Appearance -> Themes section.
Step 3: Activate your theme from the WordPress Dashboard
navigate to Appearance->Themes, you see the new theme you have created.

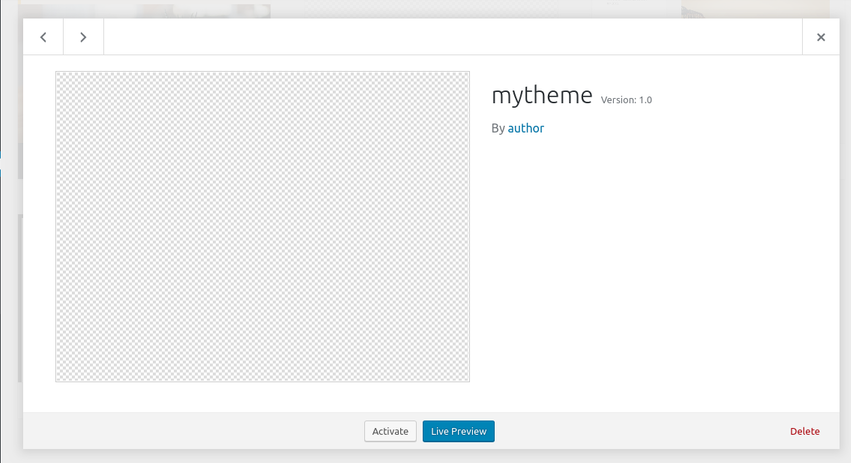
We can click on “Theme Details” to drill down on our custom theme and find that the information that we had entered into the style.css file has worked. We can see the them has a name of mytheme, with Version 1.0, by the author, and a link to the Author URl we had provided.
And now the moment of truth! Go ahead and click “Activate” on the new mytheme and then visit the site.
Step 4: Add Code to Output The Post Title and Post Text
we visit our site no matter how many posts are in the database. Let us now move to fetching some data from the database, and outputting it to the page. Specifically, we want to fetch the Post Title and Post Content of all posts and view them on the homepage.
<?php

if ( have_posts() ) :
	while ( have_posts() ) : the_post(); ?>

        <h2><?php the_title() ?></h2>
		<?php the_content() ?>

	<?php endwhile;

else :
	echo '<p>There are no posts!</p>';

endif;

?>
Step 6: Add a Header and Footer To The Theme
Header.php and Footer.php
The header.php and footer.php file are actually quite important. This is where you include code that all pages on your site will need access to in one way or another. we will make use of special functions provided by WordPress to get the header and footer.
wp_head()
wp_head() is kind of a special function when you are working with WordPress Themes. The purpose of this function is to finalize the output in the <head> section of your header.php file.
<!DOCTYPE html>
<html <?php language_attributes(); ?>>

<head>
    <meta charset="<?php bloginfo( 'charset' ); ?>">
    <title><?php bloginfo( 'name' ); ?></title>
	<?php wp_head() ?>
</head>

<body <?php body_class(); ?>>
<header class="site-header">
    <h1><a href="<?php echo home_url(); ?>"><?php bloginfo( 'name' ); ?></a></h1>
    <h4><?php bloginfo( 'description' ); ?></h4>
</header>
wp_footer()
The same goes for wp_footer() function. add this before the closing </body> tag in footer.php file.
<footer class="site-footer">
    <p><?php bloginfo( 'name' ) ?></p>
</footer>

<?php wp_footer() ?>
</body>
</html>
Know more about get_header() and get_footer() .
<?php

get_header();

if ( have_posts() ) :
	while ( have_posts() ) : the_post(); ?>

        <h2><a href="<?php the_permalink() ?>"><?php the_title() ?></a></h2>
		<?php the_content() ?>

	<?php endwhile;

else :
	echo '<p>There are no posts!</p>';

endif;

get_footer();

?>
Step 7: Add a functions.php file to theme
The functions.php file in WordPress does many things for your theme. It is the file where you place code to modify the default behavior of WordPress. You can almost think of the functions.php as a form of a plugin for WordPress with a few key points to remember:
- Does not require unique Header text
- Stored in the folder that holds your theme files
- Executes only when in the currently activated theme’s directory
- Applies only to the current theme
- Can call PHP functions, WordPress functions, or custom functions
! Let’s create a function in our functions.php file to include the style.css file into our theme.
<?php

function my_theme_assets() {
	wp_enqueue_style( 'style', get_stylesheet_uri() );
}

add_action( 'wp_enqueue_scripts', 'my_theme_assets' );
Finally, we created a theme.
Support
Still have any issue feel free to add a ticket and let us know your views to make the code better https://webkul.uvdesk.com/en/customer/create-ticket/
Thanks for Your Time! Have a Good Day!

Be the first to comment.