Shiprocket Shipping for WooCommerce plugin helps connect Shiprocket’s delivery service with WooCommerce stores for smooth shipping.
It automatically syncs WooCommerce orders with the Shiprocket dashboard, making order handling faster and easier.
Customers see courier options based on their address, so delivery choices are always accurate.
The plugin shows live shipping rates at cart and checkout, helping customers pick the best option.
Store admin can manage pickup location, set default size and weight, and get AWB numbers without extra steps.
They can also create shipping labels and invoices right from the order page for quick and easy shipping.
NOTE: This plugin is now compatible with WooCommerce’s latest High-Performance Order Storage (HPOS) and Cart and Checkout block.
You can also check the below to get to know the functionality,
Features
- Integrates Shiprocket’s shipping services directly into WooCommerce.
- Supports multiple courier partners for flexible order delivery.
- set a default pickup location for accurate shipping charge calculation.
- Automatically lists courier options based on customer address.
- Displays real-time shipping rates at cart and checkout.
- Syncs WooCommerce orders automatically with Shiprocket dashboard.
- Auto-generates AWB numbers for WooCommerce orders.
- Allows admin to set global shipping size and weight settings.
- Lets admin sync and manage Shiprocket pickup locations in one click.
- Enables shipping label creation directly from WooCommerce order page.
- Allows printing of Shiprocket shipping invoices from order page.
- Shows selected courier partner details to admin and customers.
Installation
The user will get a zip file which he has to upload in the “Add New Plugin” menu option in the WordPress admin panel.
For this login to the WordPress Admin Panel and Under the Dashboard hover your mouse over the “Plugins” menu option which brings out a Sub-Menu and then select the “Add New Plugin” option.
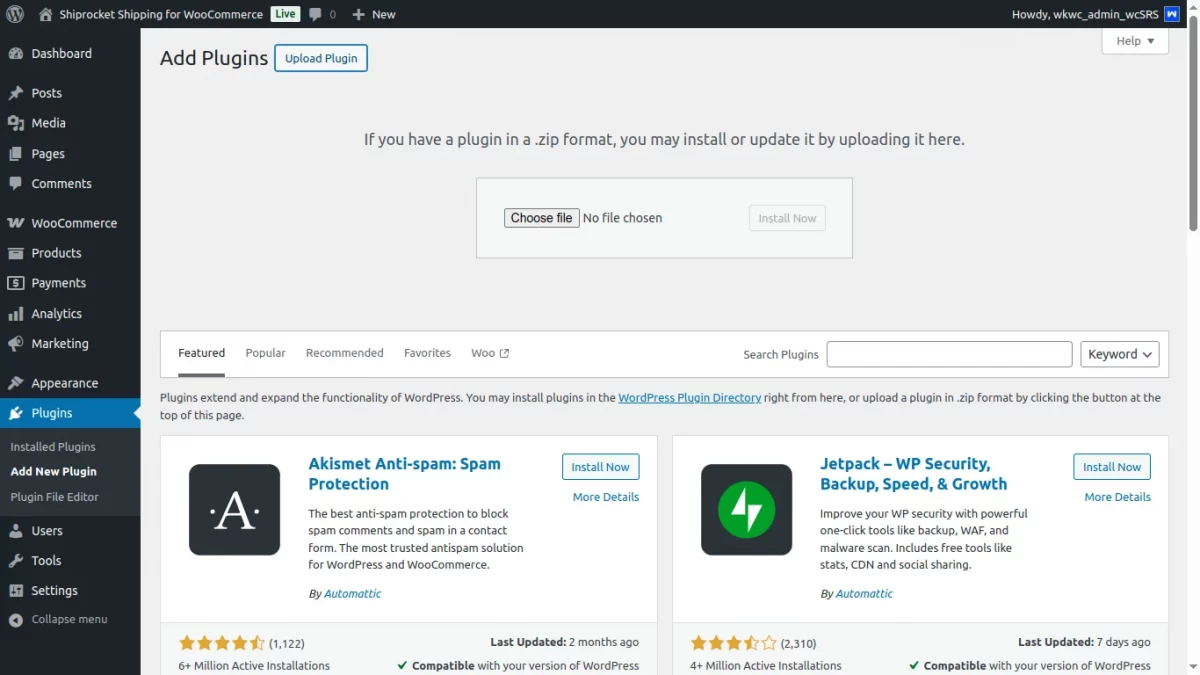
After that, you will see an option on the top of your page that is “Upload Plugin”, click the option to upload the zip file.
After that, click on the “Upload Plugin” option, you will see a button “Choose File” click on the button to browse for the zip file as per the snapshot below.

Therefore, now to browse the file, click the “Install Now” button to install the plugin.
When the plugin is installed correctly, you will see the success message and an option to activate the plugin.

After that, click on “Activate Plugin” to activate the installed plugin.

Thus, in this way, Shiprocket Shipping for WooCommerce plugin installation is completed.
Module Activation and Update
Check how to activate your WooCommerce plugin through the purchase code.
Also check how do you get updates on Webkul modules directly on the Plugins page.
Module Translation
To know how to translate the module, you can click here.
Shipocket Configuration
At Shiprocket end, first you need to configure the shiprocket shipping details such as API user & password and need to add pickup addresses.
You will get all these details once you succesfully create a Shiprocket account.
To create a Shiprocket account, navigate to the Shiprocket login page and click on the ‘Sign Up Now‘ option located at the bottom.

To get started, sign up on the Shiprocket registration page by selecting the ‘I’m a Seller‘ option and completing the required details as shown below.

Once you have successfully completed the registration and created your Shiprocket account, you will be redirected to the Shiprocket dashboard.

Create API User in Shiprocket
To create an API user in Shiprocket, go to Settings > Additional Settings > API Users.

Click the ‘+Add New API User‘ button, enter your email ID and password, then click ‘Create User‘ to complete the process.

Once these details are successfully entered, the newly created API user will appear in the Shiprocket API user list.

NOTE– The Shiprocket API configuration token will be generated automatically once these configurations are saved.
Manage Pick Up Addresses in Shiprocket
To manage the pickup address locations in Shiprocket, go to Settings > Pickup Addresses

This section will display the complete list of pickup addresses currently added in Shiprocket by the user, along with the option to add a new pickup location.

You can add multiple pickup addresses in Shiprocket, using tags like Home, Work, Warehouse, or others to organize them as needed.
To add a new pickup address in Shiprocket, click the ‘+Add Pickup Address‘ button located at the top right corner.

After entering the address and contact details, click on the ‘Verify and Save Address‘ button.
You will then be prompted to verify the OTP sent to your registered phone number.

Once the address details are successfully entered, the pickup location will be saved in Shiprocket.

You can then edit these addresses, enable or disable them, or mark any location as your primary pickup location in Shiprocket.
Module Configuration | Admin
After installing the module, the admin can access the ‘Webkul WC Addons‘ menu to manage the Shiprocket Shipping for WooCommerce addon.
This ‘Webkul WC Addons’ section displays a list of all installed Webkul WooCommerce addons.

After navigating to Shiprocket Shipping for WooCommerce -> Settings, the store admin gets to see the Shiprocket Shipping configurations under the Shipping tab.
The store admin can enable or disable the Shiprocket shipping method within the WooCommerce store.

Also, he can set global shipping configurations for product dimensions and weight if not specified individually in products.
For this, the admin can specify the Length, Width, Height, and Weight for global configuration.
Set a Default Pickup Location
Admin can set a default pickup location to calculate shipping charges accurately during checkout based on the chosen pickup point.
Furthermore, he can sync pickup locations from Shiprocket to WooCommerce with a single click using the ‘Click here to Refresh Locations‘ option.

To configure the plugin, the admin must Create a Shiprocket API User account and enter the API Email and Password in the plugin settings.
The token will be generated automatically. It can also be refreshed manually using the ‘Click here to Refresh Token‘ option or entered manually via the ‘Click here to Enter Manually‘ link.
View Shiprocket Courier Partner | Admin
Once an order is placed by the customer, the store admin can view shiprocket courier partner details within orders for improved tracking.

Under order notes, we can see the AWB number is automatically generated when any order is placed on the WooCommerce store using Shiprocket.
This enables seamless tracking and efficient order processing without manual intervention.
Shiprocket Shipping Labels & Invoice | Admin
The admin can easily generate Shiprocket shipping labels from the WooCommerce order edit page by using the available order actions.
This feature streamlines the shipping workflow, allowing for faster label creation and more efficient order fulfillment directly within the store’s backend.

Also, the admin can print Shiprocket order invoices directly using the order actions dropdown.
Customer Front End
At the time of placing an order, customers fill in their shipping address and contact details required for processing and delivering the order.

Based on the customer address, the plugin automatically displays a list of available Shiprocket courier partners for that location.
The plugin fetches and displays real-time shipping rates from each Shiprocket courier partner on both the cart and checkout pages.
Shipping rates for different couriers are updated at checkout based on COD and non-COD payments.

For example, when a customer enters a shipping address say location-1, the plugin displays courier partners and rates based on that location.
If the address is changed to another location, the courier list and rates update automatically according to the new address as shown below:

They receive standard WooCommerce order confirmation and any shipment updates configured via email or the store’s notification system.
View Shiprocket Courier Partner | Customer
Customers can also view the assigned Shiprocket courier partner by checking the order details in their WooCommerce account.

Moreover, Shiprocket automatically syncs customer orders placed on the WooCommerce store with its dashboard for streamlined shipping management.

This eliminates manual data entry and ensures timely order processing through the Shiprocket platform.
Thus, that’s all for the Shiprocket Shipping for WooCommerce plugin. Still, have any issues, feel free to add a ticket and let us know your views at webkul.uvdesk.com.
Check more such kinds of relevant WooCommerce Plugins.
Current Product Version - 1.1.0
Supported Framework Version - WordPress: 6.8.2 WooCommerce: 10.2

1 comments