CS-Cart Warehouse Management System in the eCommerce store is an important part of your customer’s buying experience.
Making sure products ordered are in stock and customers get what they purchased is crucial to provide good customer service.
A warehouse management system is a software application that supports the day-to-day operations of a warehouse.
Webkul has developed a separate Warehouse Management System for CS-Cart and Multi-vendor platforms viz; CS-Cart Warehouse Management System.
The nearby warehouse will be assigned automatically to the orders received at the stores as per the add-on settings provided at the admin end.
Check a brief overview of the plugin –
Features
Here’s the list of features that the CS-Cart Warehouse Management System provides.
- Well integrated with CS-Cart Multi-Vendor.
- Functionality to create numerous warehouses at Admin end.
- Vendors can manage, edit, and delete assigned warehouses from their panel.
- Functionality to add products & their inventories separately for the separate warehouses.
- Option to add multiple warehouse managers.
- Functionality to provide different privileges to warehouse managers.
- Export/import functionality for the warehouse products.
- Email notification to the concerned warehouse on successful order creation.
- Functionality to assign/allocate warehouse manually to the orders from the order management page at the backend.
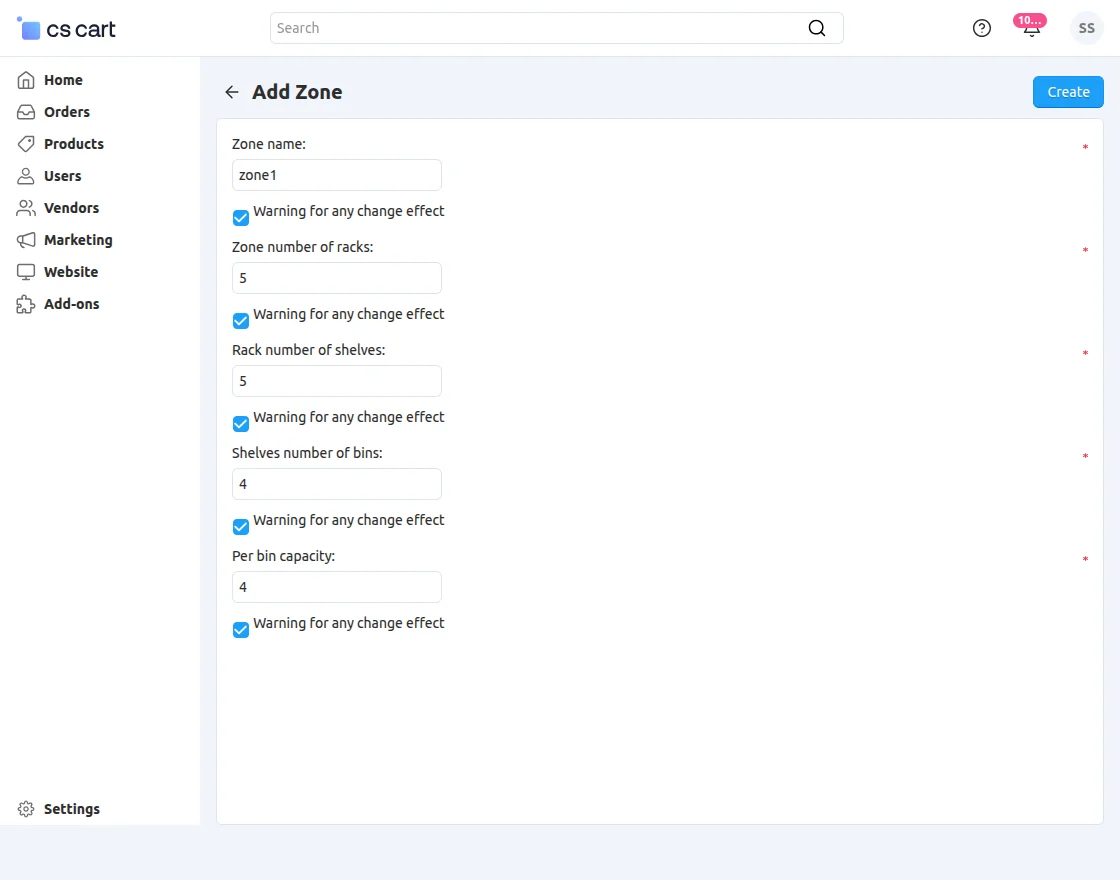
- Now products can be stored to a specific locations (Zone – Rack – Shelf – Bin) within a warehouse .
- A separate view of warehouse orders at the backend.
- Functionality to add warehouse notes for a particular order.
- Unique barcode generation feature for each product on the basis of SKU/Manual both.
- Option to search orders on basis of the warehouse at the backend.
- Own static status on the warehouse order page like started, picked, accepted, Done, etc.
- Admin and vendor can assign the staff product-wise.
CS-Cart Warehouse Management System Installation
To install CS-Cart Warehouse Management System , follow these steps:
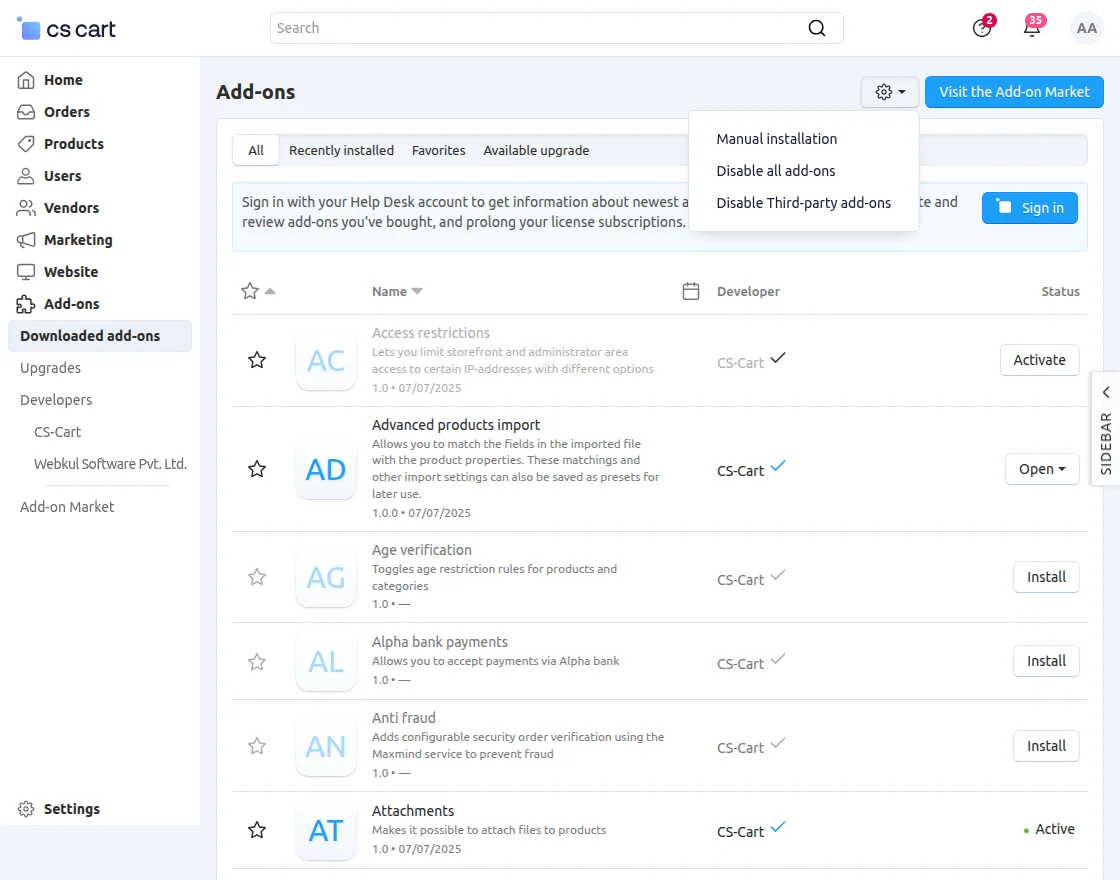
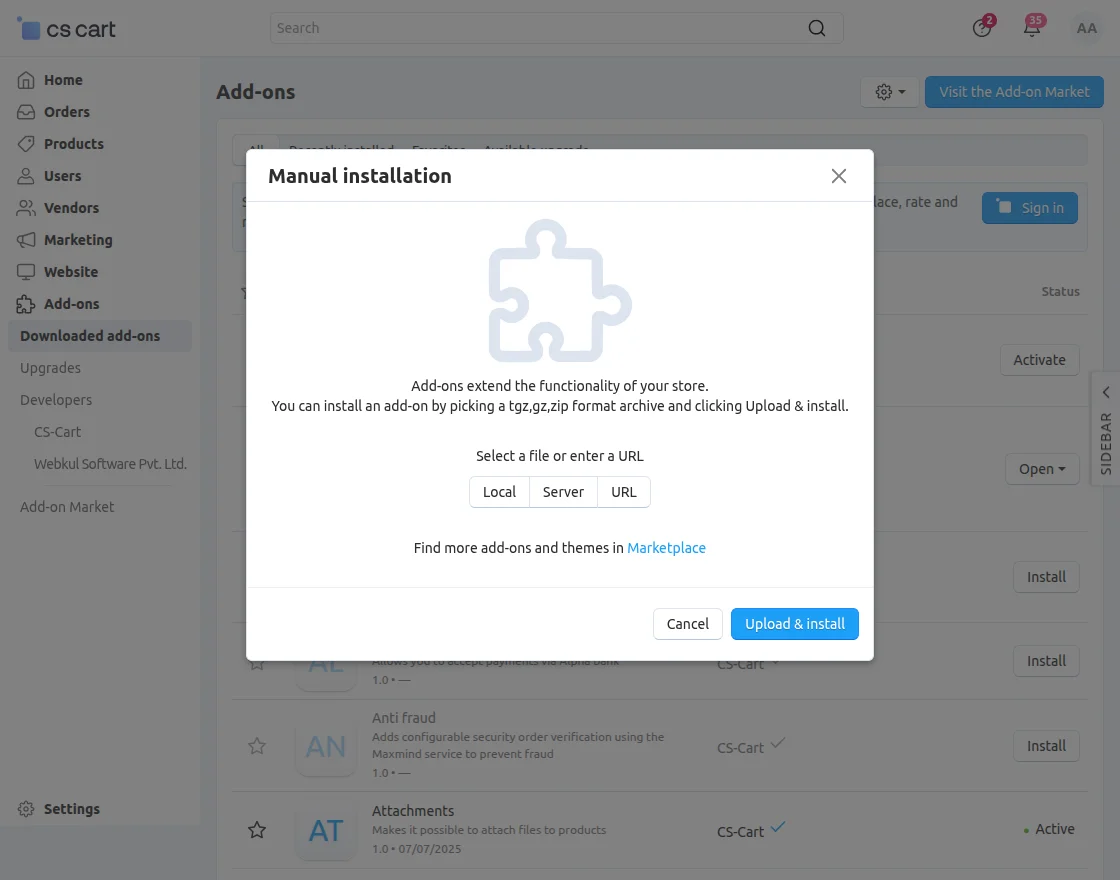
- Go to Manage Add-ons, click on the gear drop-down, and select Manual Installation.
2. Click on Local to select the zip file.
Then click on “Upload & Install” as shown below in the snapshot.
Add-on installed successfully!
CS-Cart Warehouse Management System Configuration
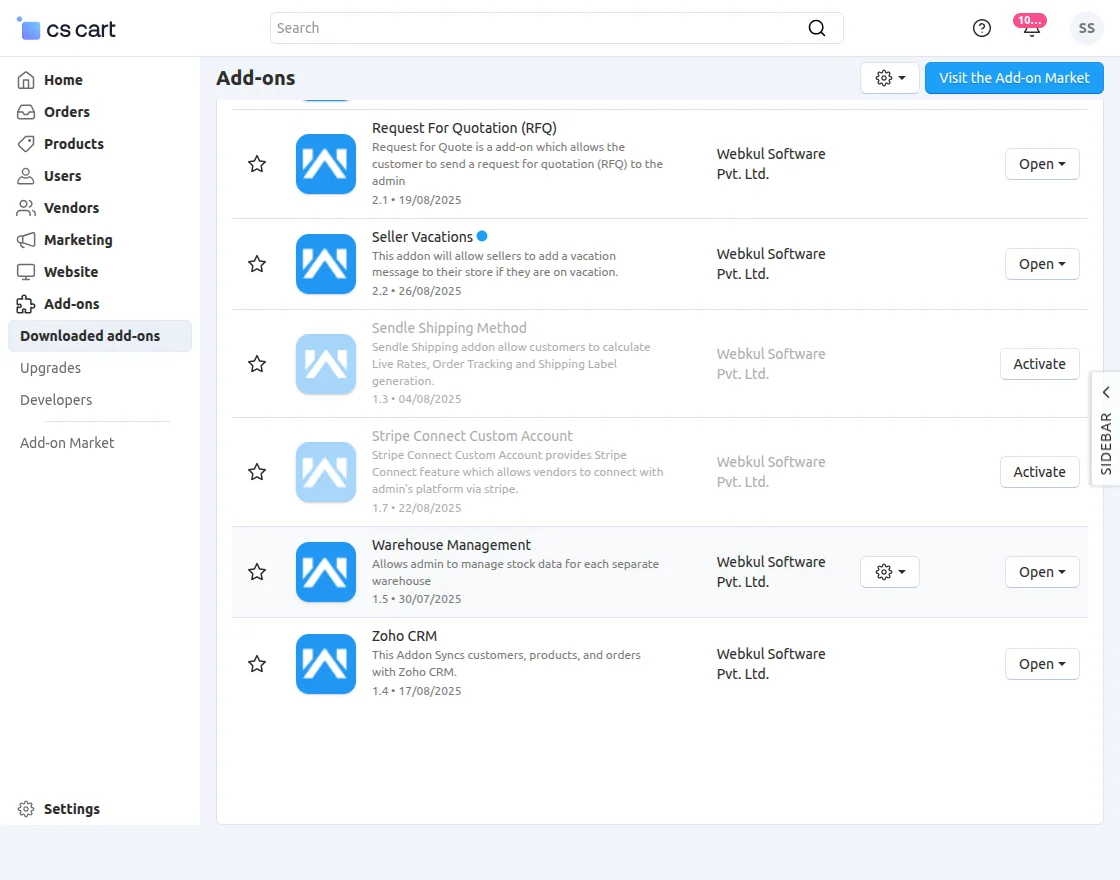
After installation, you can view the Warehouse Management module in the downloaded add-ons.
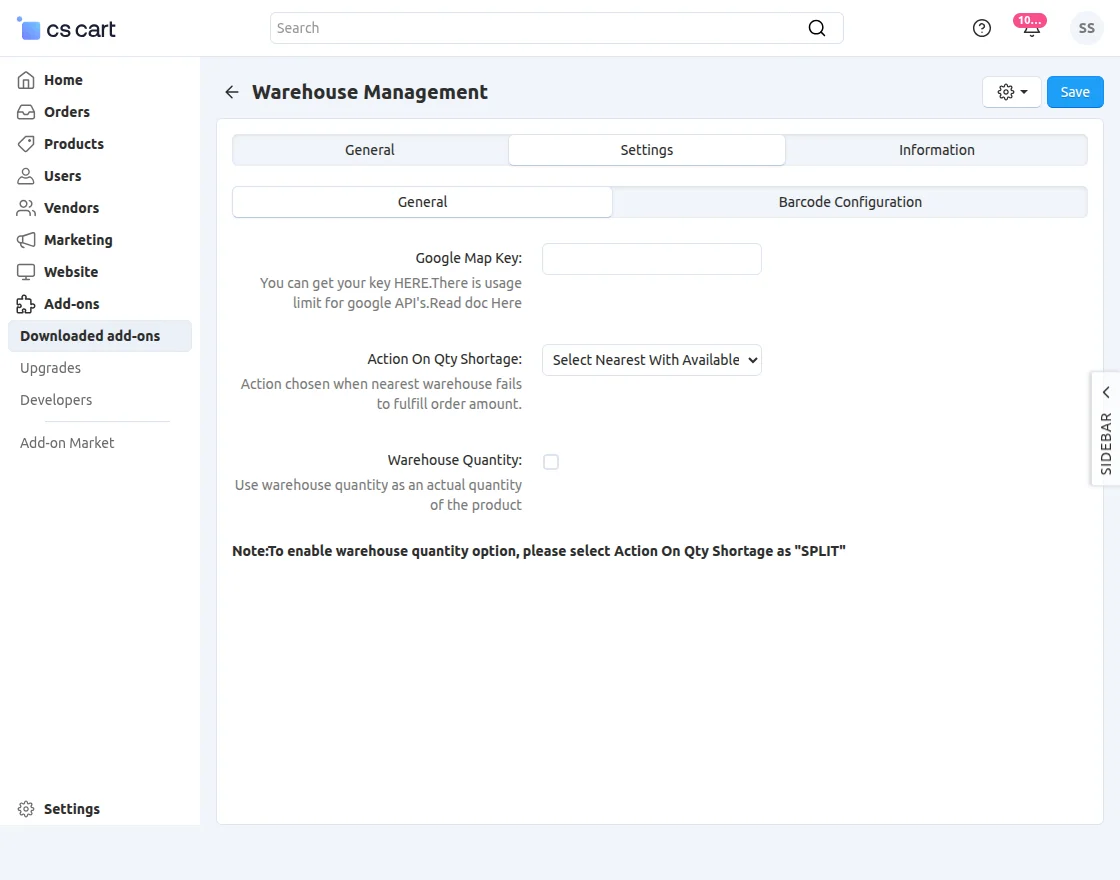
The key settings available under the General tab of the add on:
1. Google Map Key
Enter your Google Maps API key to enable distance-based warehouse allocation.
2. Action on Quantity Shortage
Available options:
-
Split: Fulfill the order by splitting items across multiple warehouses.
-
Select Nearest With Available: Assign the nearest warehouse that has the required quantity available.
-
Select Having Maximum: Assign the warehouse with the highest stock.
3. Warehouse Quantity
Checkbox option to determine how product quantity is calculated:
-
Checked: Use warehouse-specific inventory as the actual product quantity.
-
Unchecked: Manage main product quantity separately from warehouse inventories.
Barcode Configuration:
- Barcode Source – Here you can set
- Type – Choose the code type for the barcode that you want to generate with different combinations of letters, numerics or characters.
- Output – Specifies the file extension/image format .
- Text – We can set we want to display text below the barcode .
- Height – It sets the height of the image (in pixels) that will be used in the barcode.
- Width – It sets the width of the image (in pixels) that will be used in the barcode.
- Barcode Prefix – Here you can set a prefix .
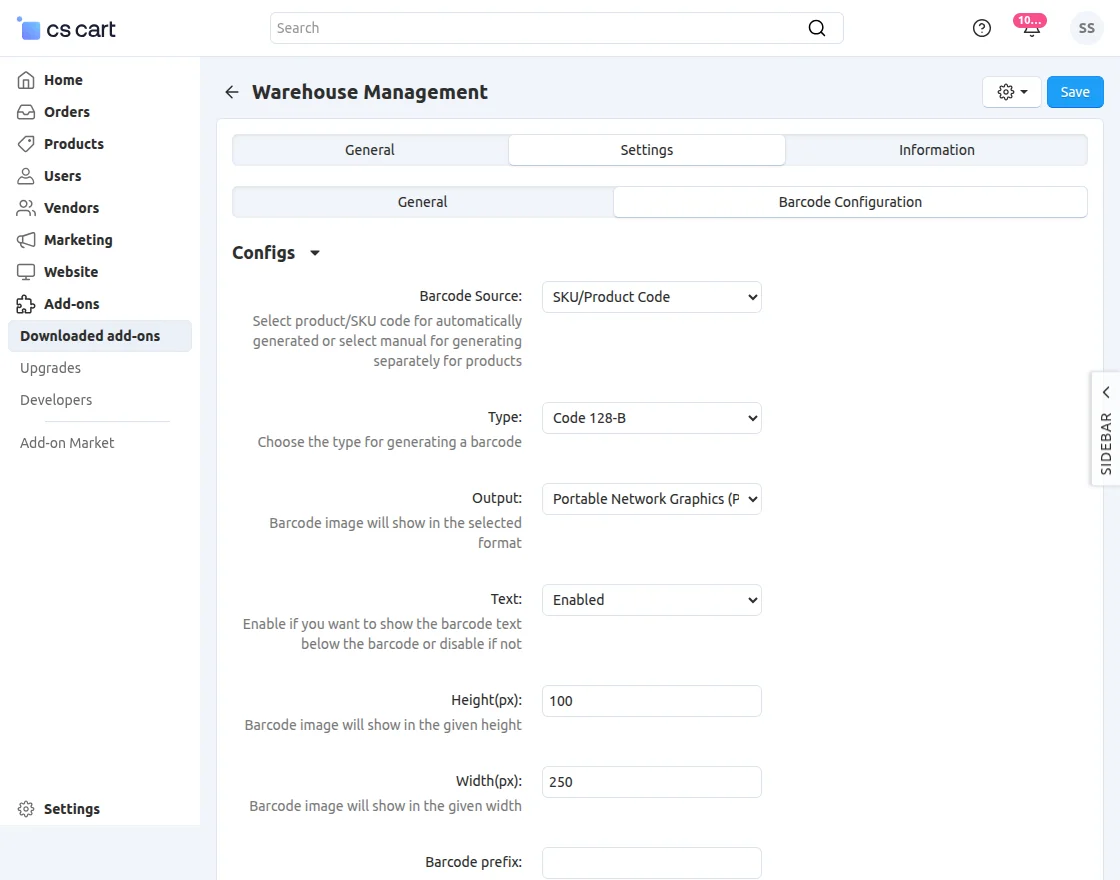
This is all about the configurable settings of the add-on.
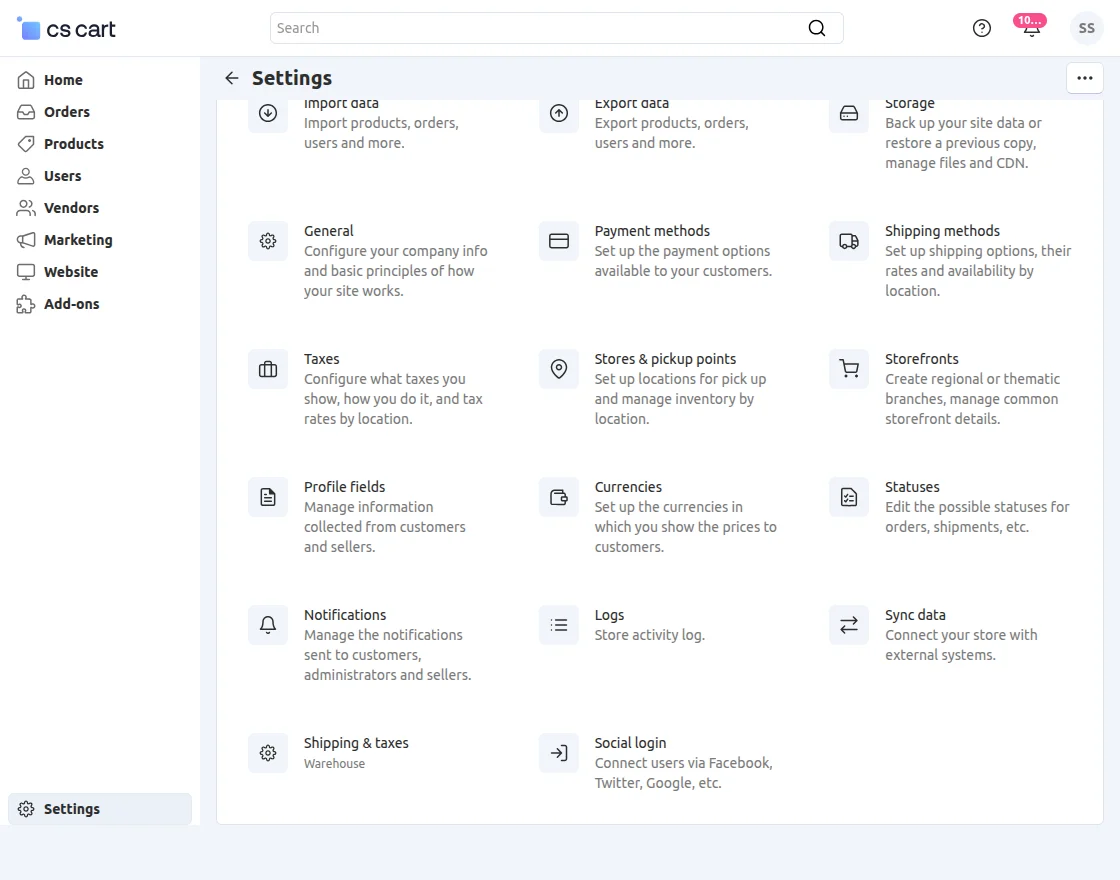
Manage Warehouse
To add and manage the warehouses at Admin/vendor end, just navigate to Administration-> Shipping &Taxes-> Warehouse as shown below.
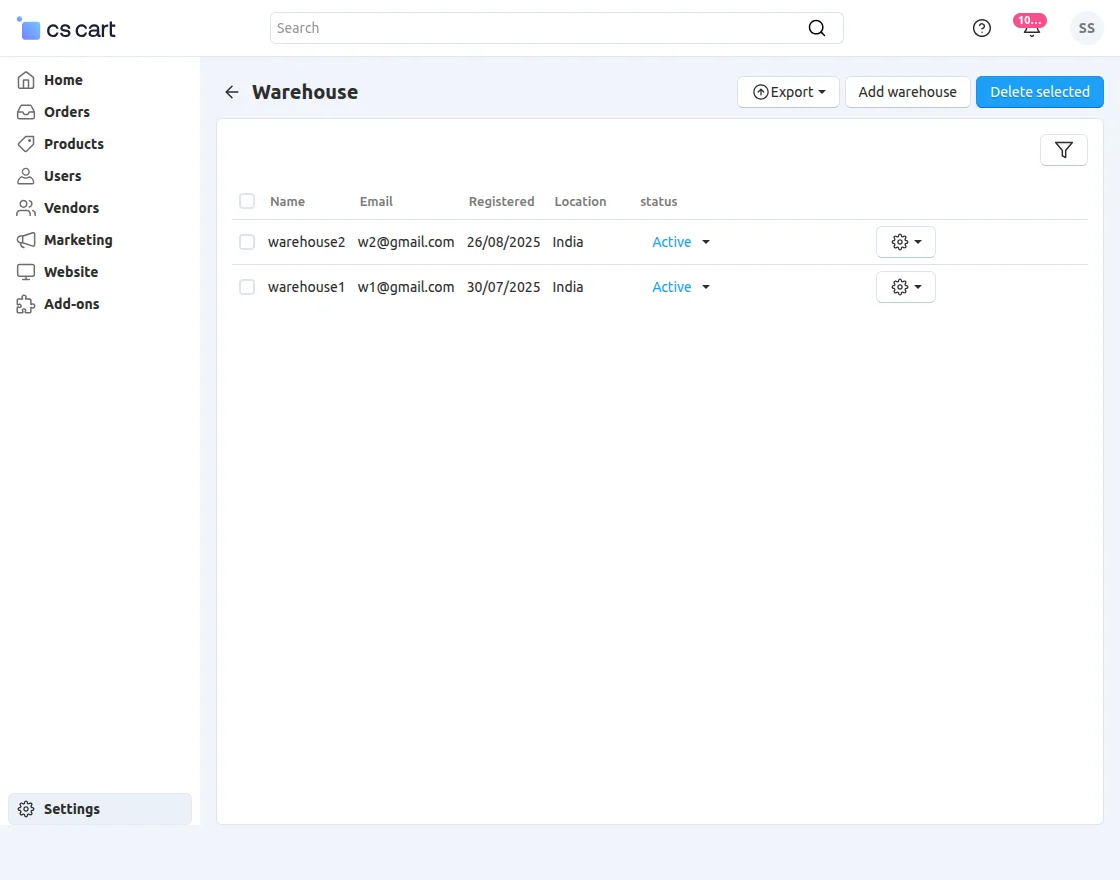
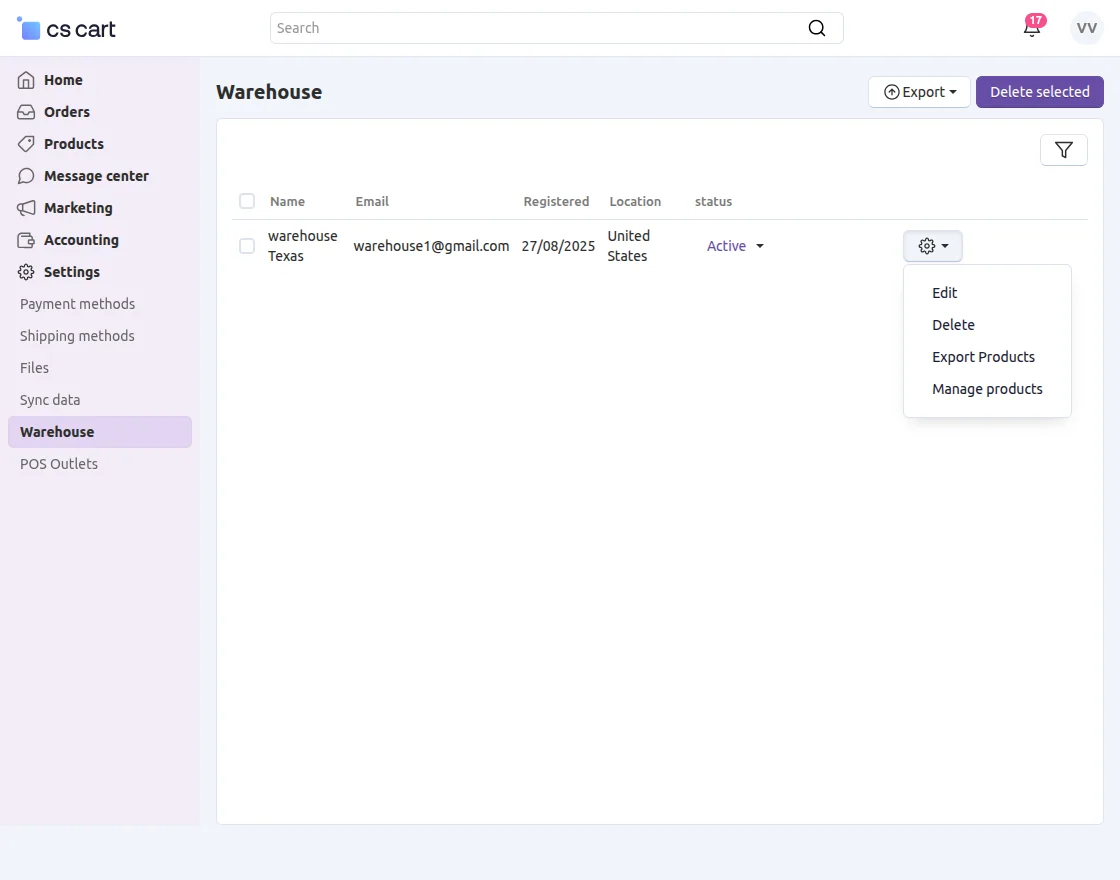
You can view and manage all the added warehouses here.
Just click on the “Add warehouse” button to add a new warehouse.
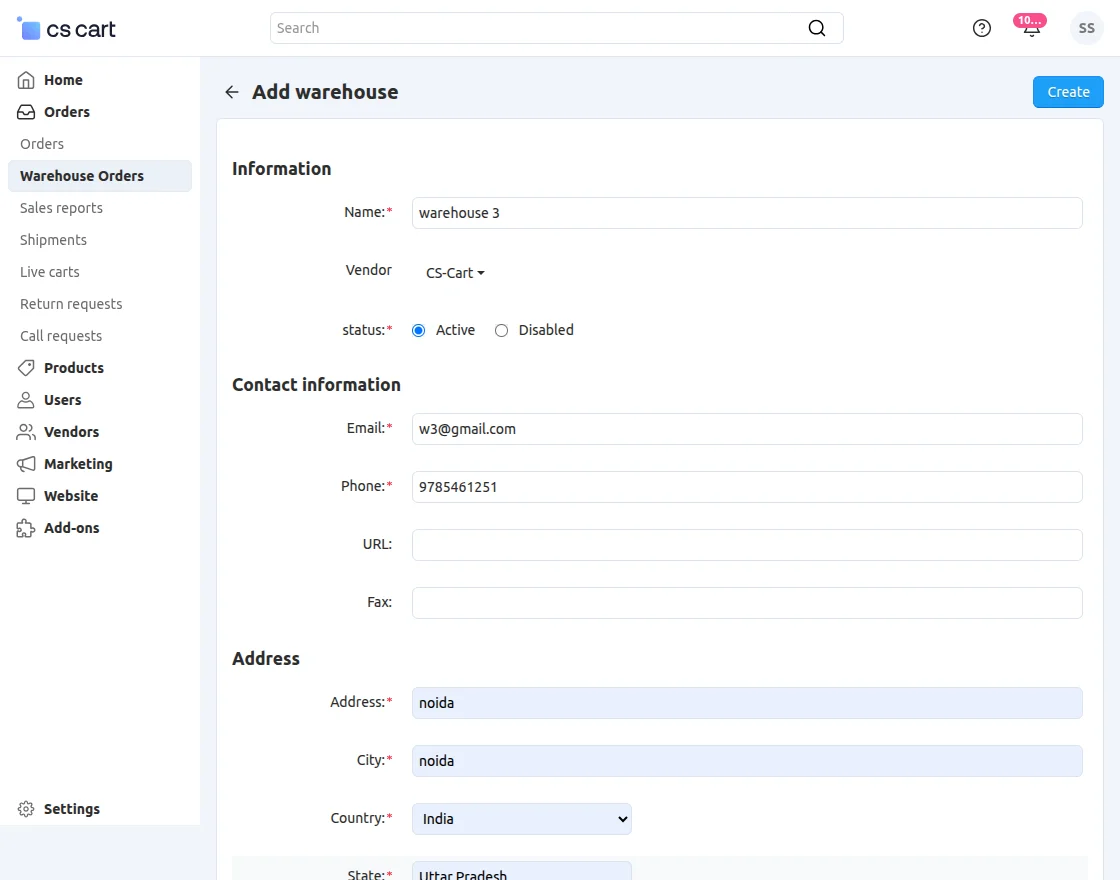
There are 3 different tabs with different fields for adding and managing the warehouses. Check the below screenshot for reference.
The first one is a General tab. The sections/fields provided here include-
Information, Contact information and Address.
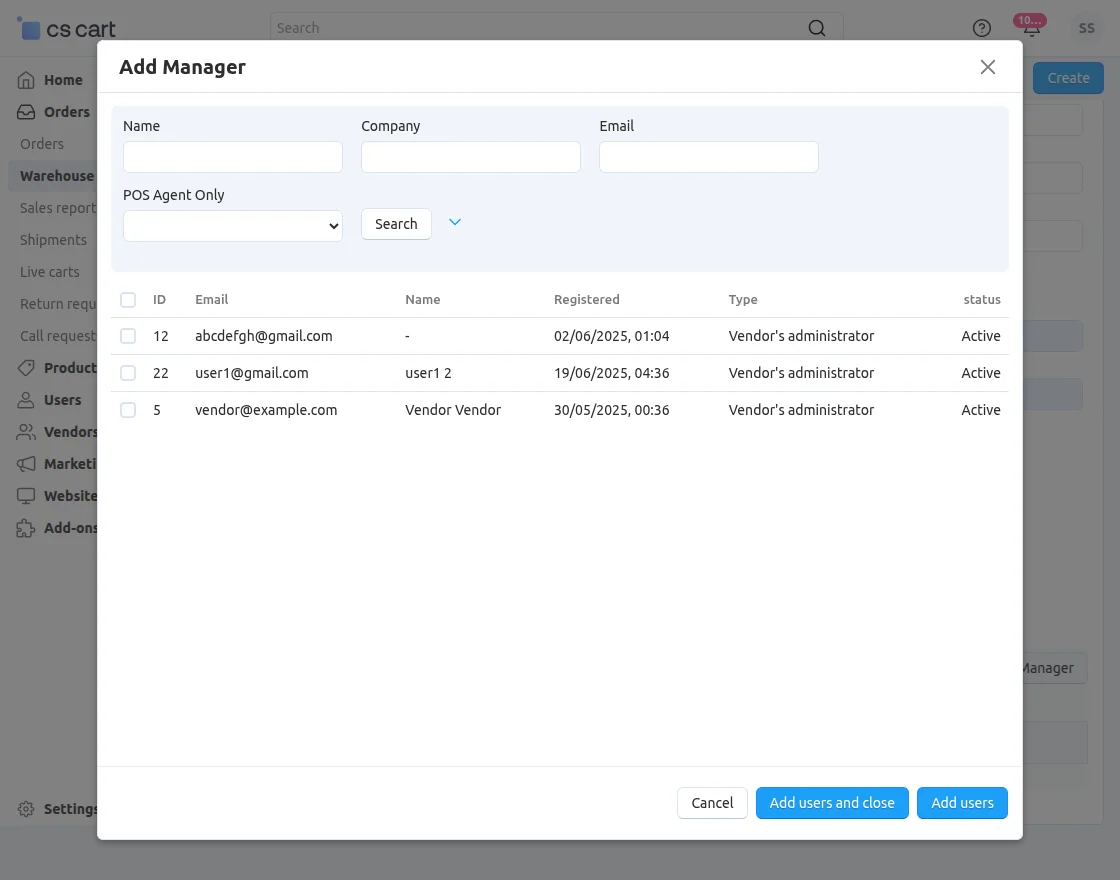
Once you click on the button to add a manager, you will get a list of the vendors’ administrator(s). Just select the user by checking the box and click to “Add users and close” or “Add users“.
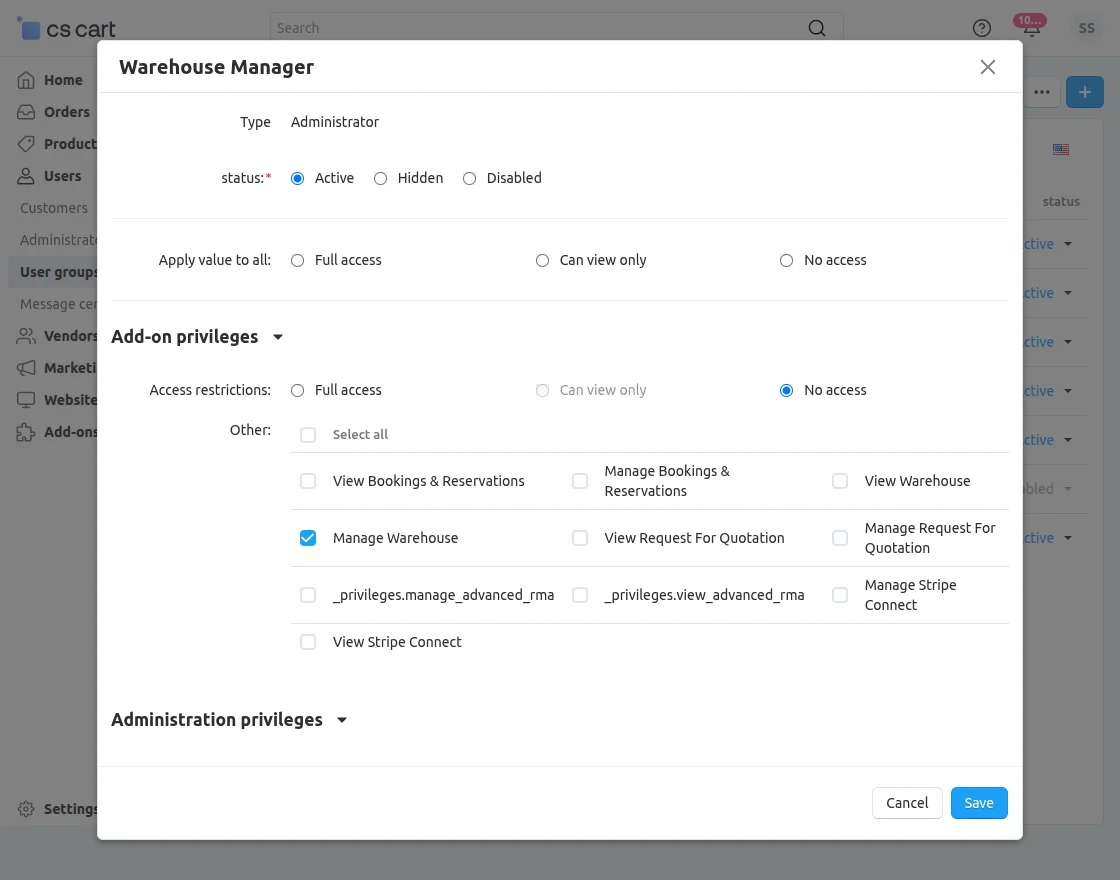
In the User Groups section at backend, privileges to View Warehouse & Manage Warehouse have been provided as shown below.
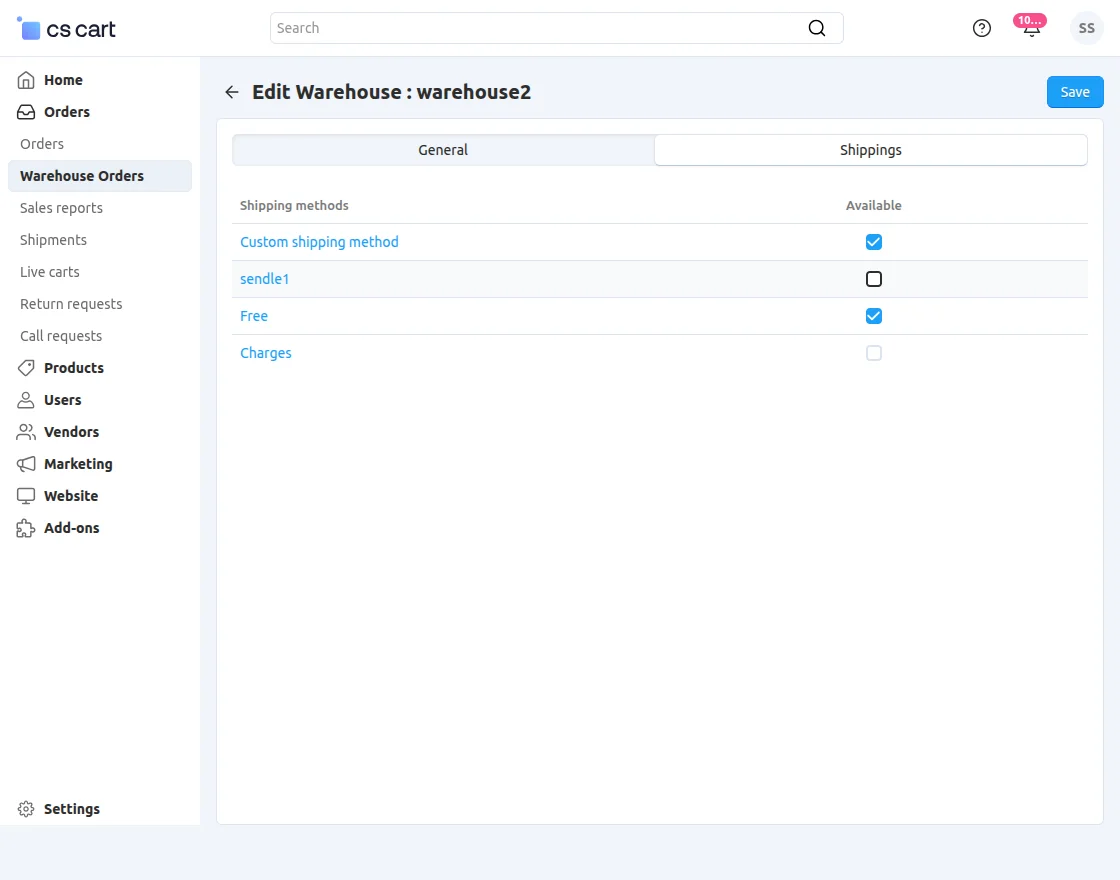
Next tab is for Shipping Management.
Here you can select the shipping methods from the available list which will be applicable to this warehouse.
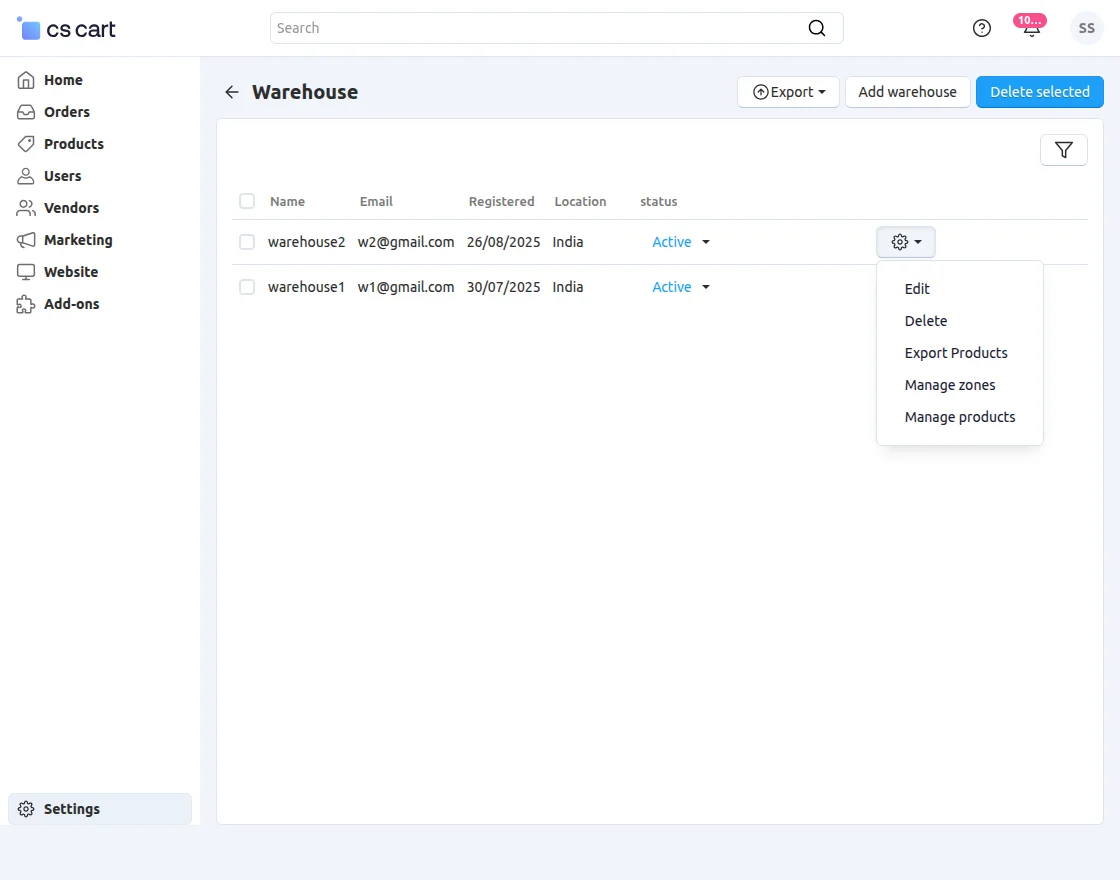
Managing Warehouses and Products
To edit, delete, or manage the products of any warehouse, simply navigate back to the list of warehouses. Next to each warehouse,
-
Edit: Modify the details of the warehouse.
-
Delete: Remove the warehouse from the system.
-
Export Products: Export the products associated with the warehouse.
-
Manage Zones: Configure and manage warehouse zones, racks, shelves, and bins.
-
Manage Products: Add or update products within the selected warehouse.
Under Manage Zones, you have two options:
-
Add Zones: Create new zones in the warehouse, with the ability to define racks, shelves, and bins for precise product storage and faster order picking.
-
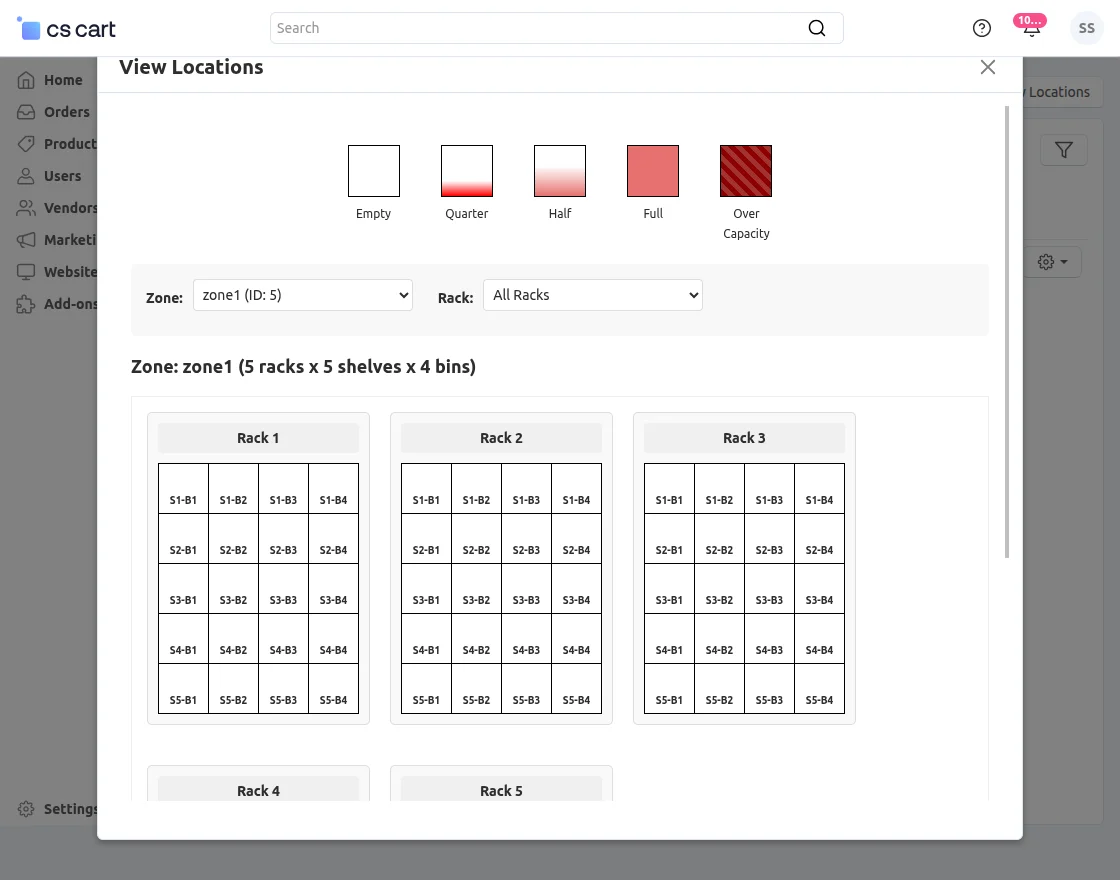
View Locations: Get a visual overview of each zone.
Capacity indicators show the status of each container as shown in below image-
Managing Products in a Warehouse
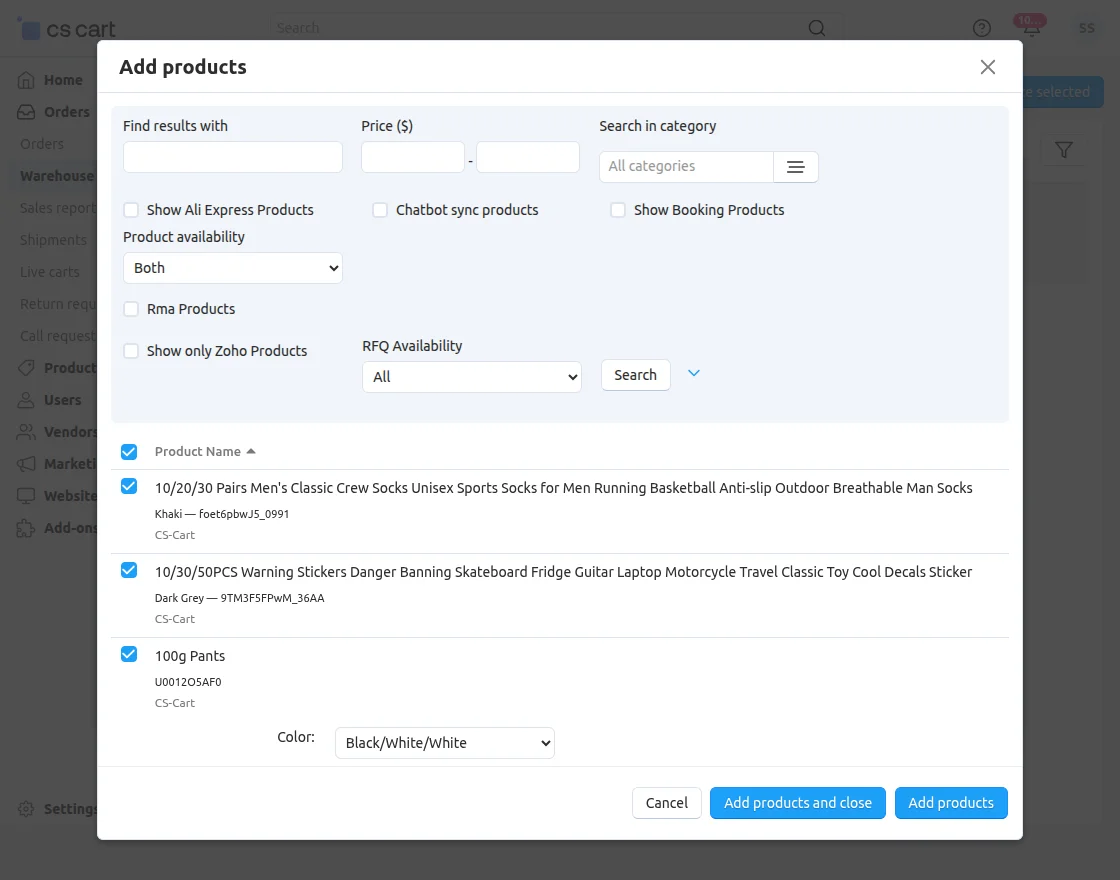
In the Manage Products section, clicking the “+” icon allows you to add products to the selected warehouse.
After clicking “Add Product”, you’ll be directed to the product list page.
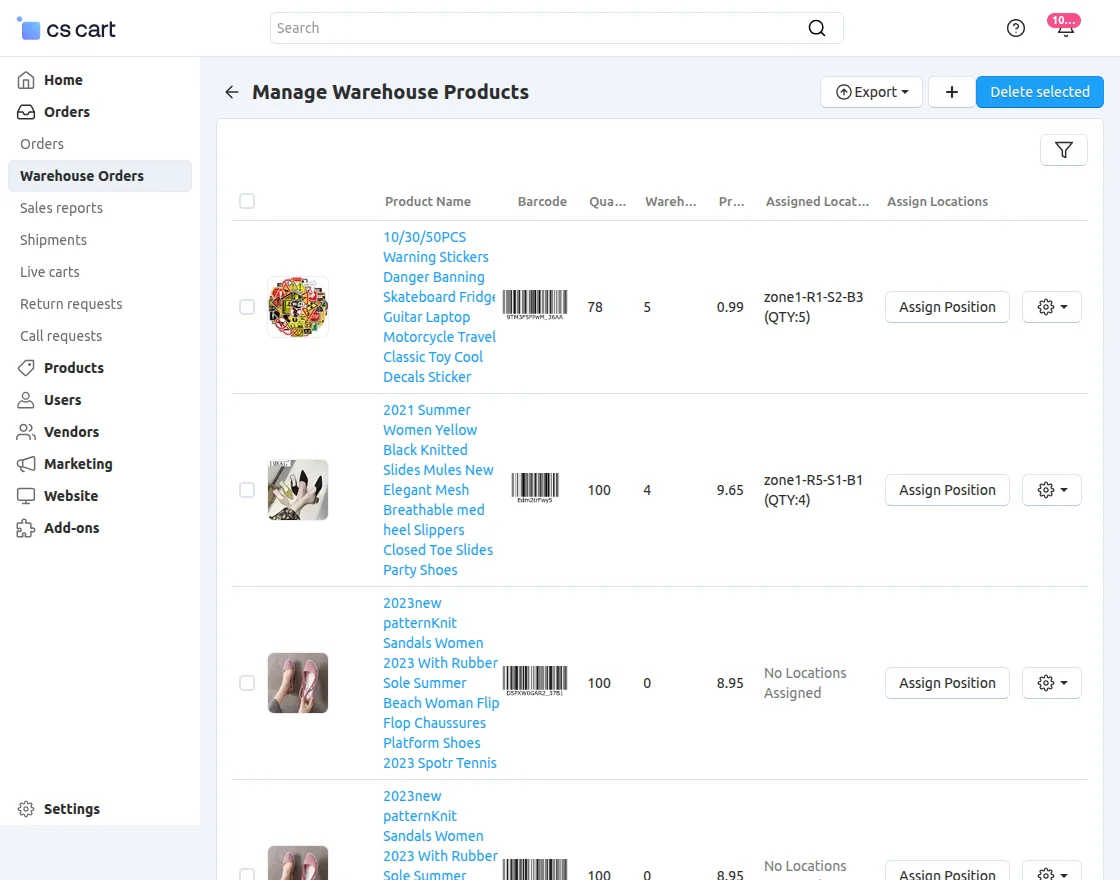
After adding products to the warehouse, the Products page will display as
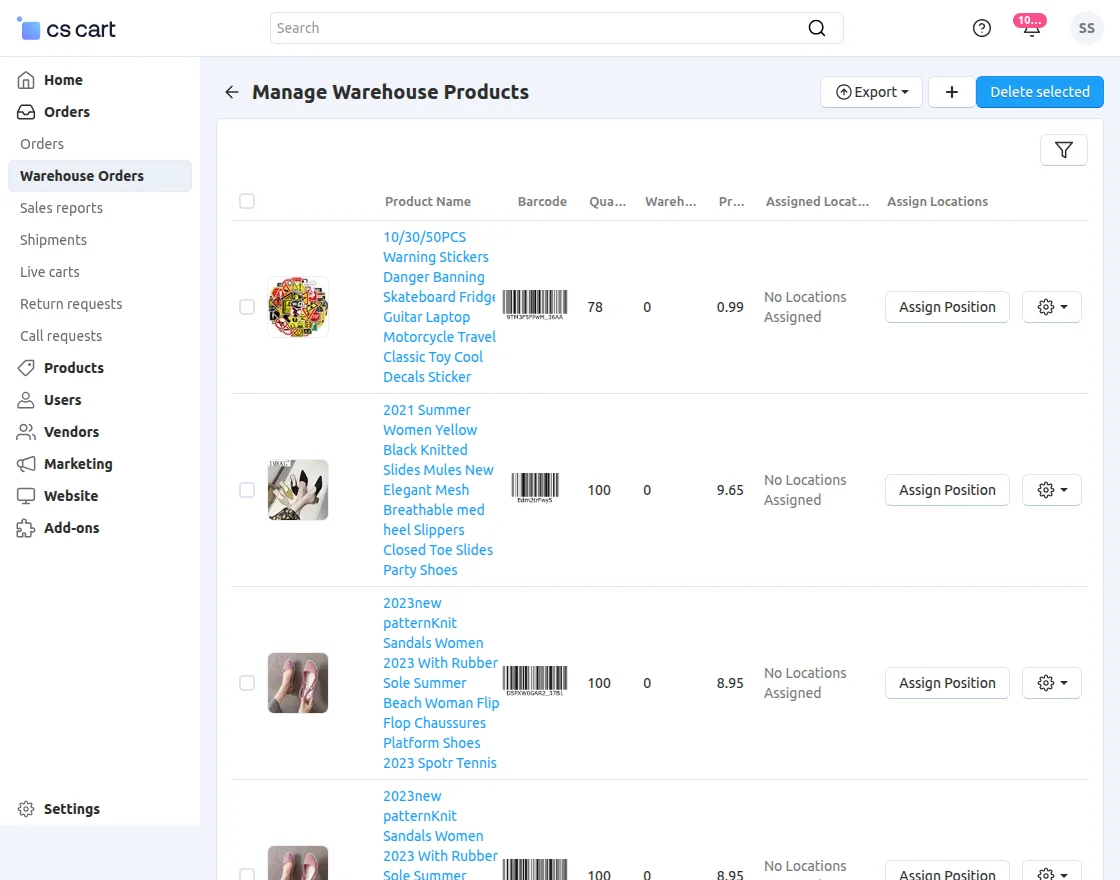
By clicking on the “Assign Position” button in front of the warehouse, you can assign a product to a specific location.
Select the desired bin within the appropriate rack and specify the number of products to be stored there and Click on the “Assign” button, as shown in the image below.
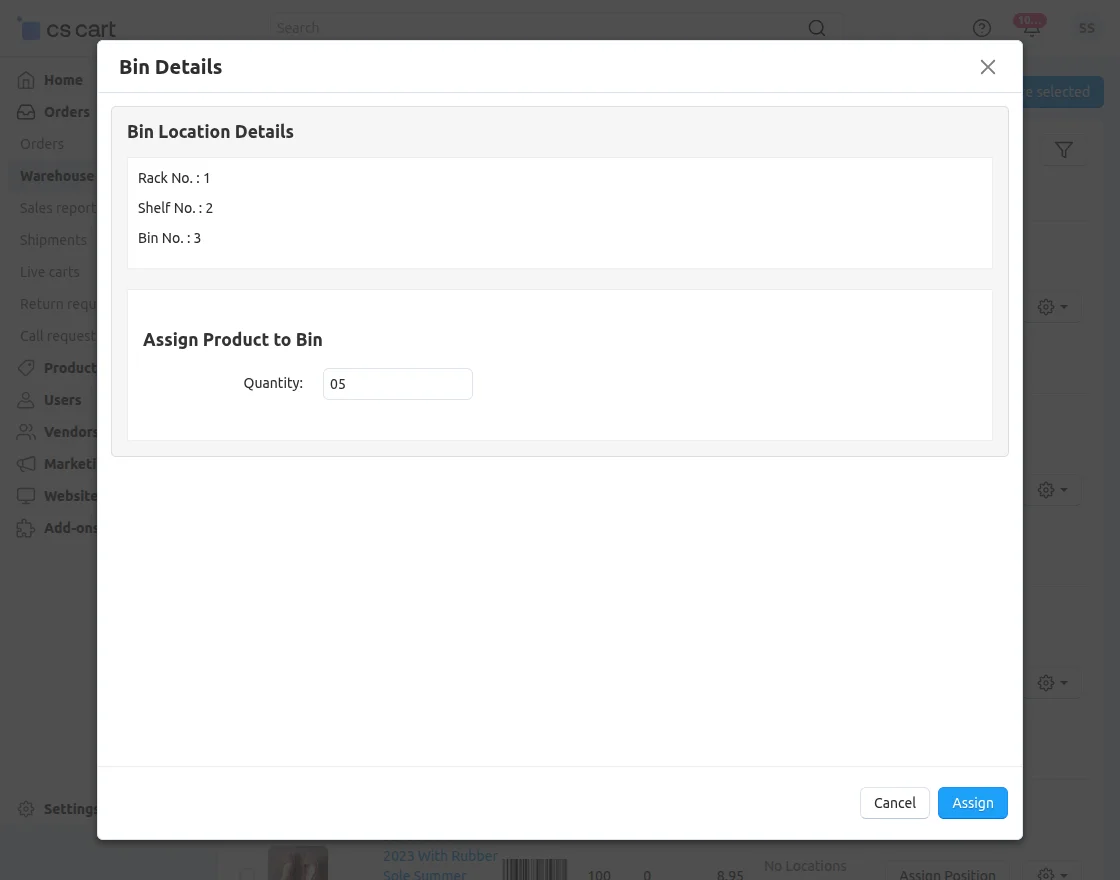
After assigning the location and quantity, the product page will display the assigned location along with the quantity.
And Zone Location in that specific Rack, Shelf and bin, as shown in the image below.
 There is an option to export the warehouse products.
Just navigate to setting sections ->Shipping and taxes then click on gear icon on the warehouse click on Exports Products .
This redirect you the page as shown in the below image-

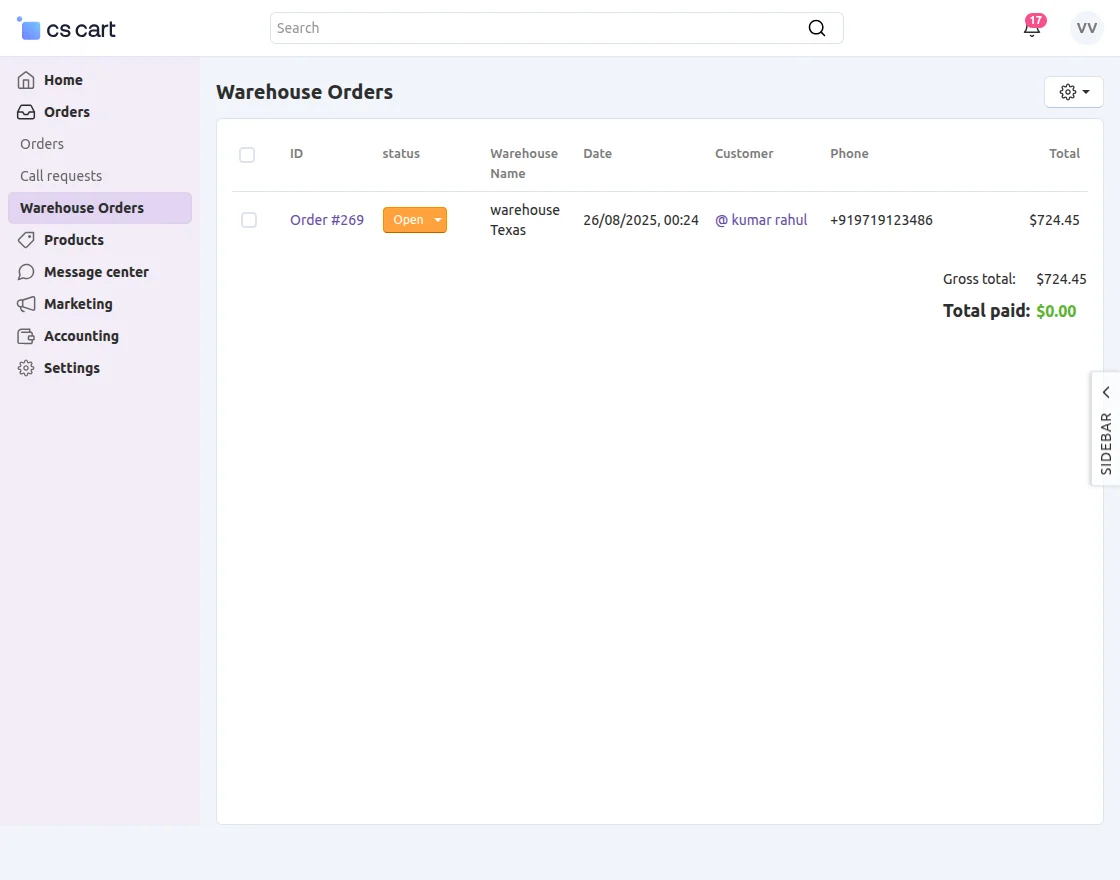
Warehouse Orders At Backend
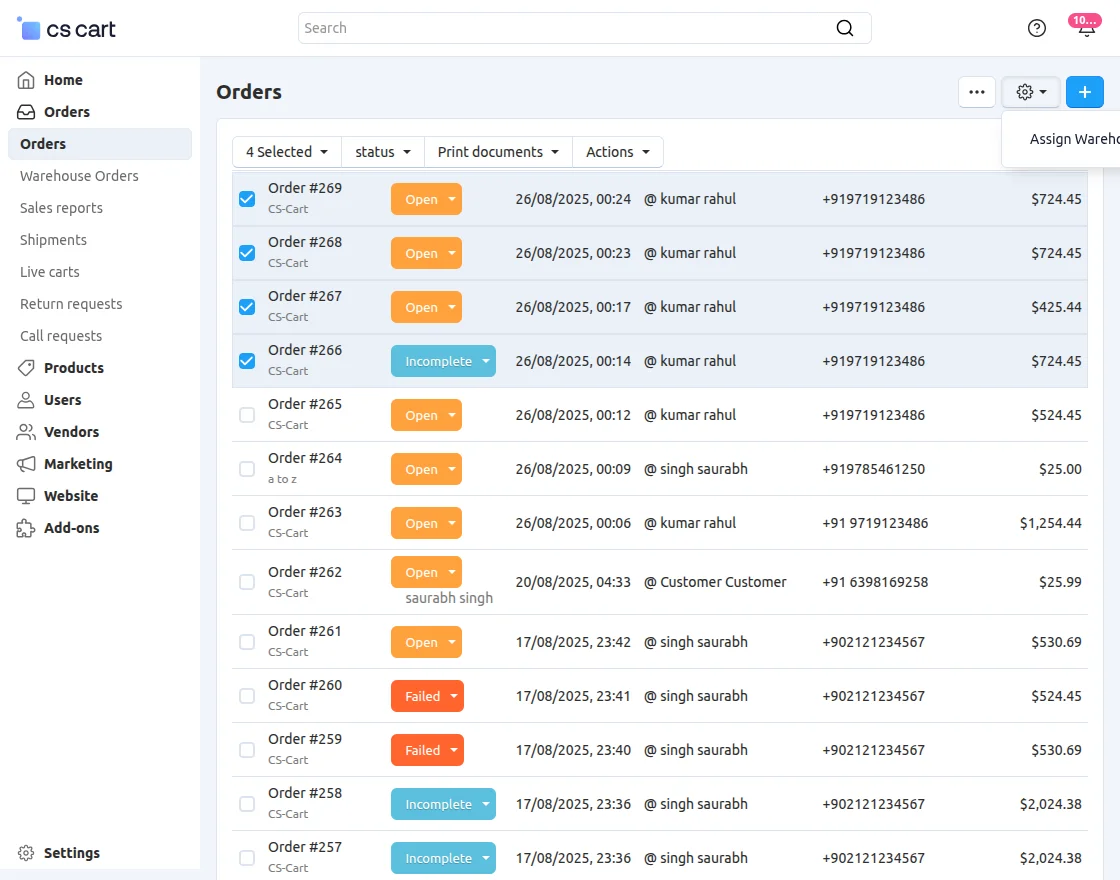
You can add normal orders to warehouse orders by selecting them, clicking the gear icon on the order page, and then choosing Assign Warehouse.
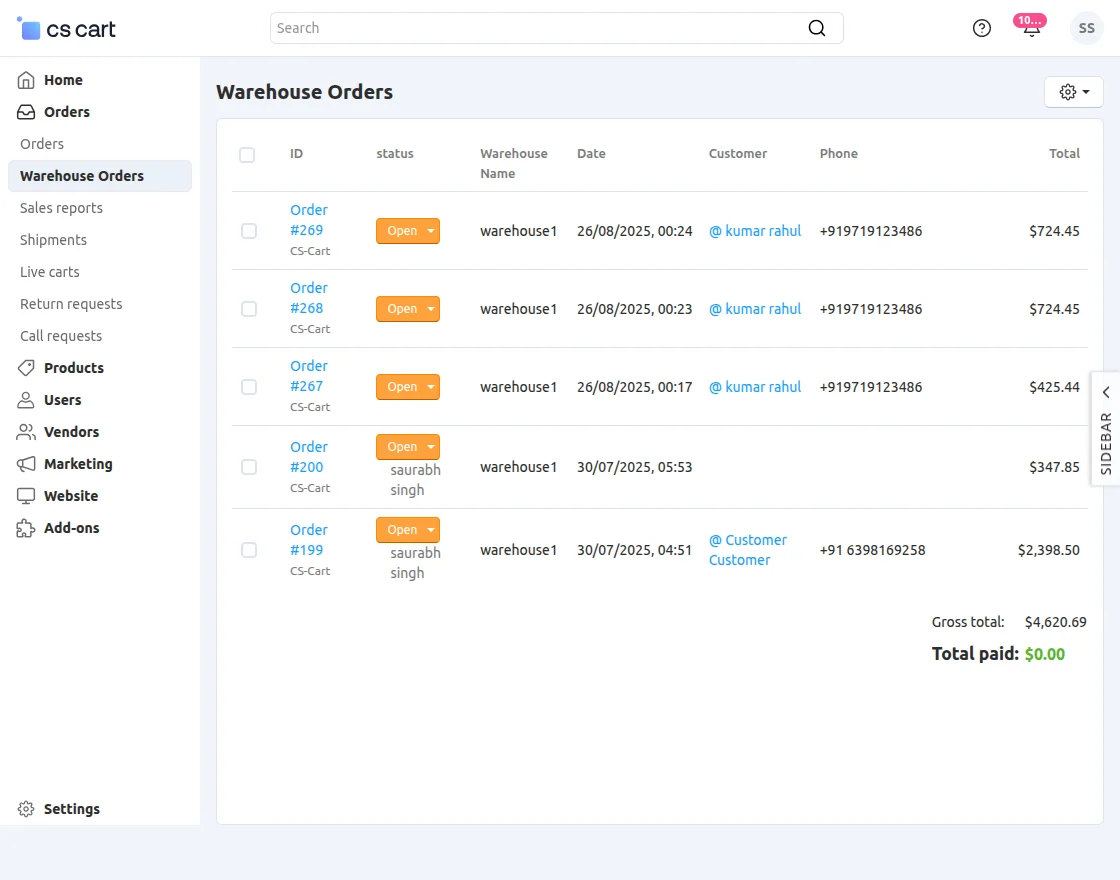
Here, you can see all the orders that the system has forwarded to the respective warehouses.
You can filter out the particular warehouse orders by searching in the search field provided for Warehouse as shown below.
By clicking any order ID in the Warehouse Orders section, you can assign a staff manager, select the product location from where the product will be shipped, and choose the vendor for that order.
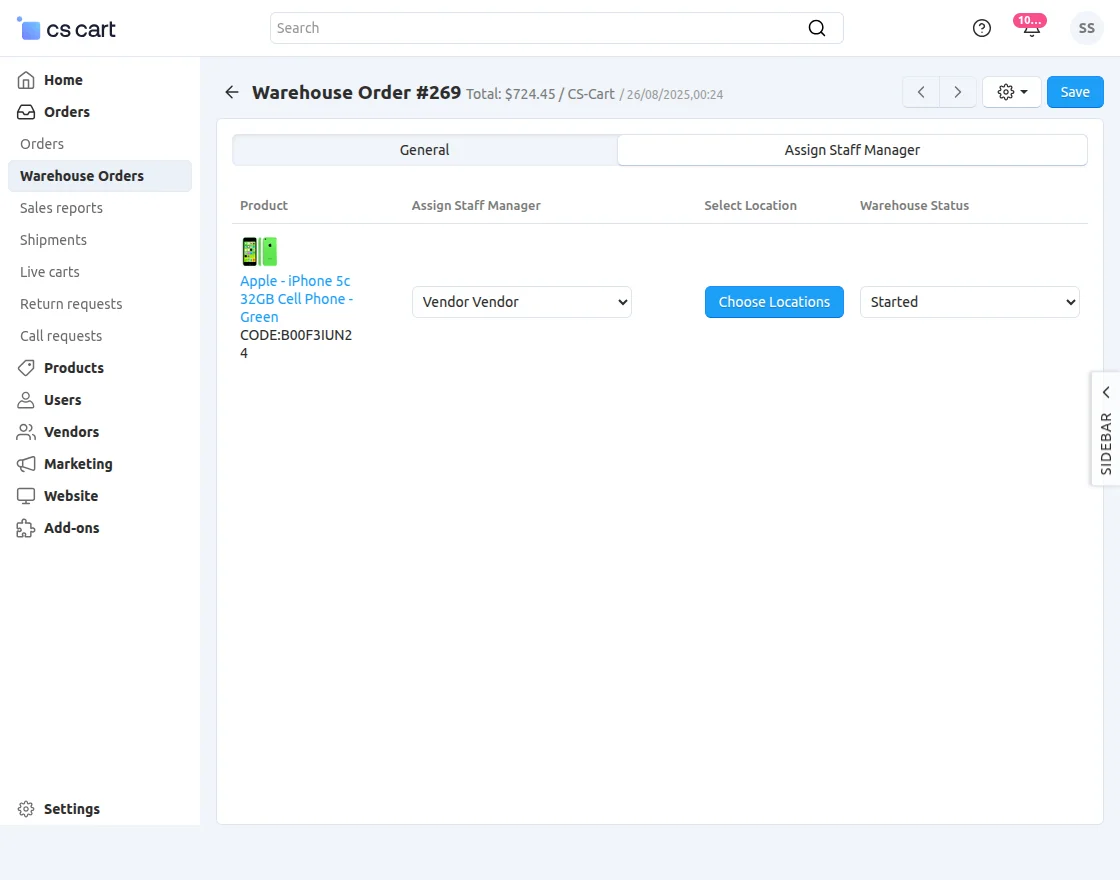
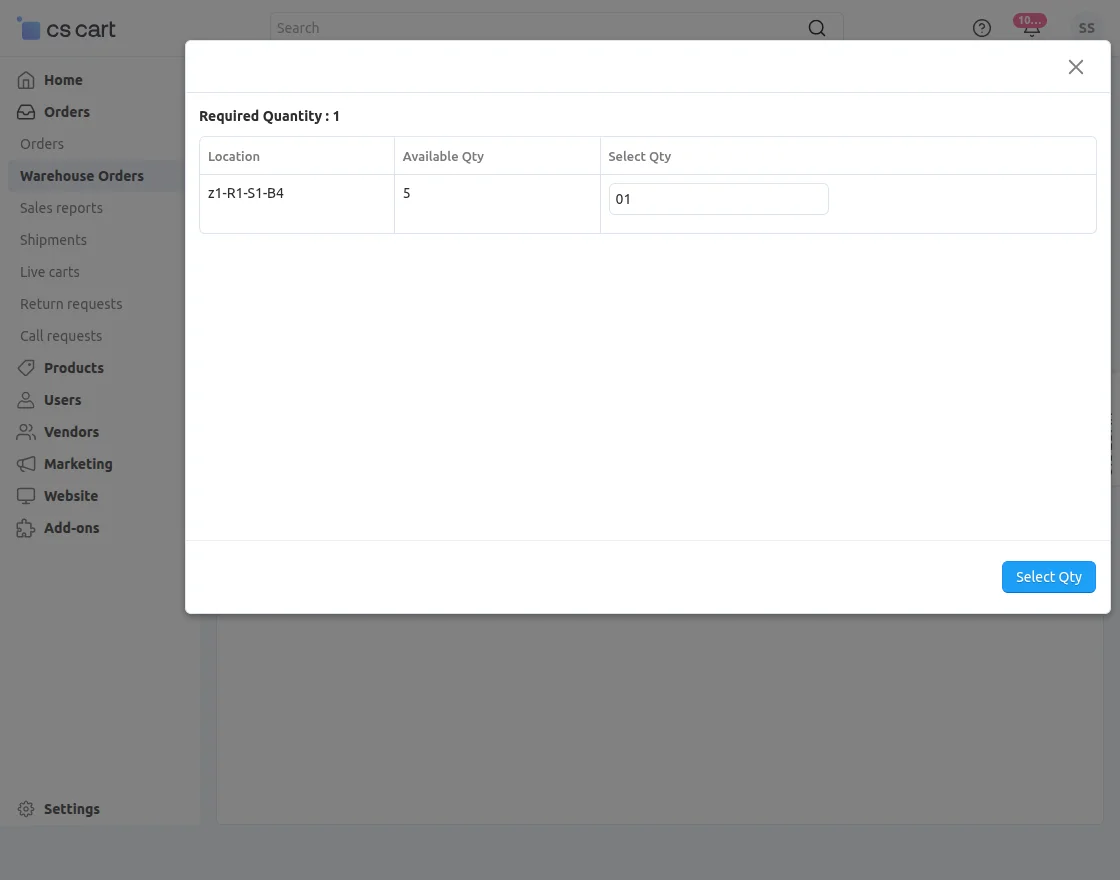
This is how you can select the location and Required quantity, as shown in the snapshot below.
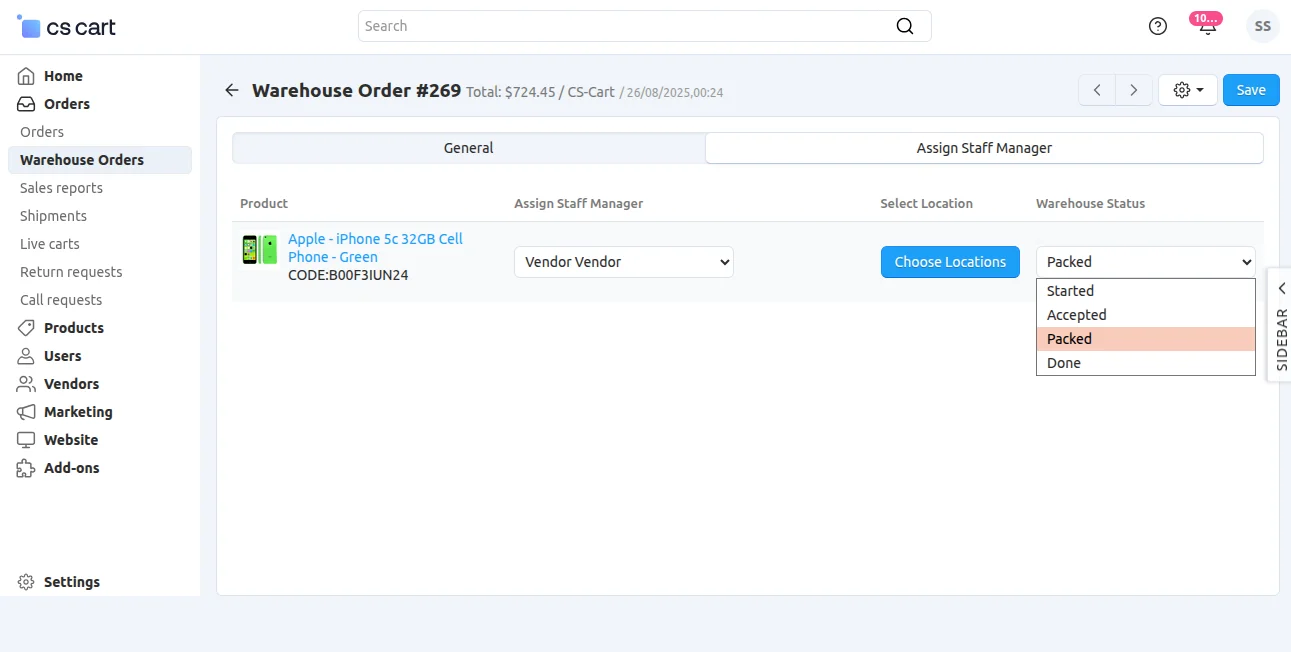
Change the order status from Started to Packed to decrease the warehouse quantity accordingly.
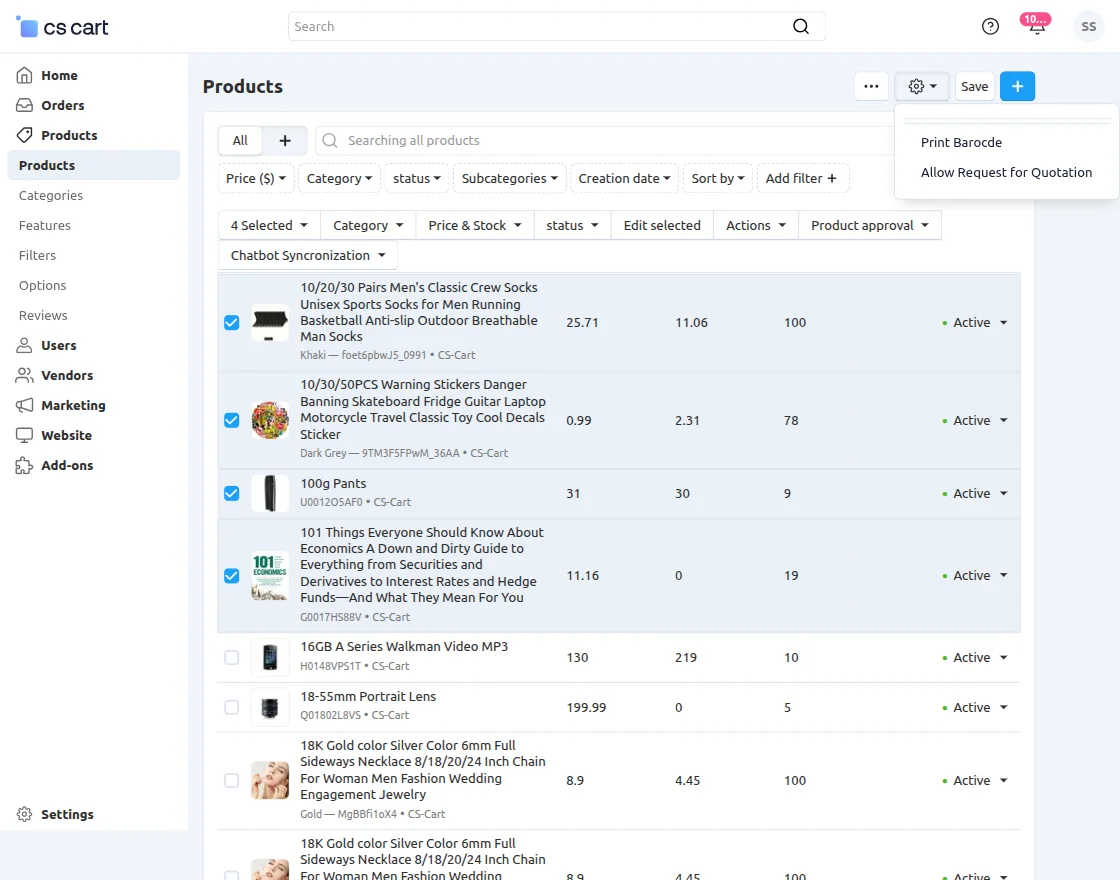
You can print barcodes for multiple products at once.
Simply select the products, choose “Print Barcode” from the dropdown, and the system will display all related barcodes in a new tab for printing.
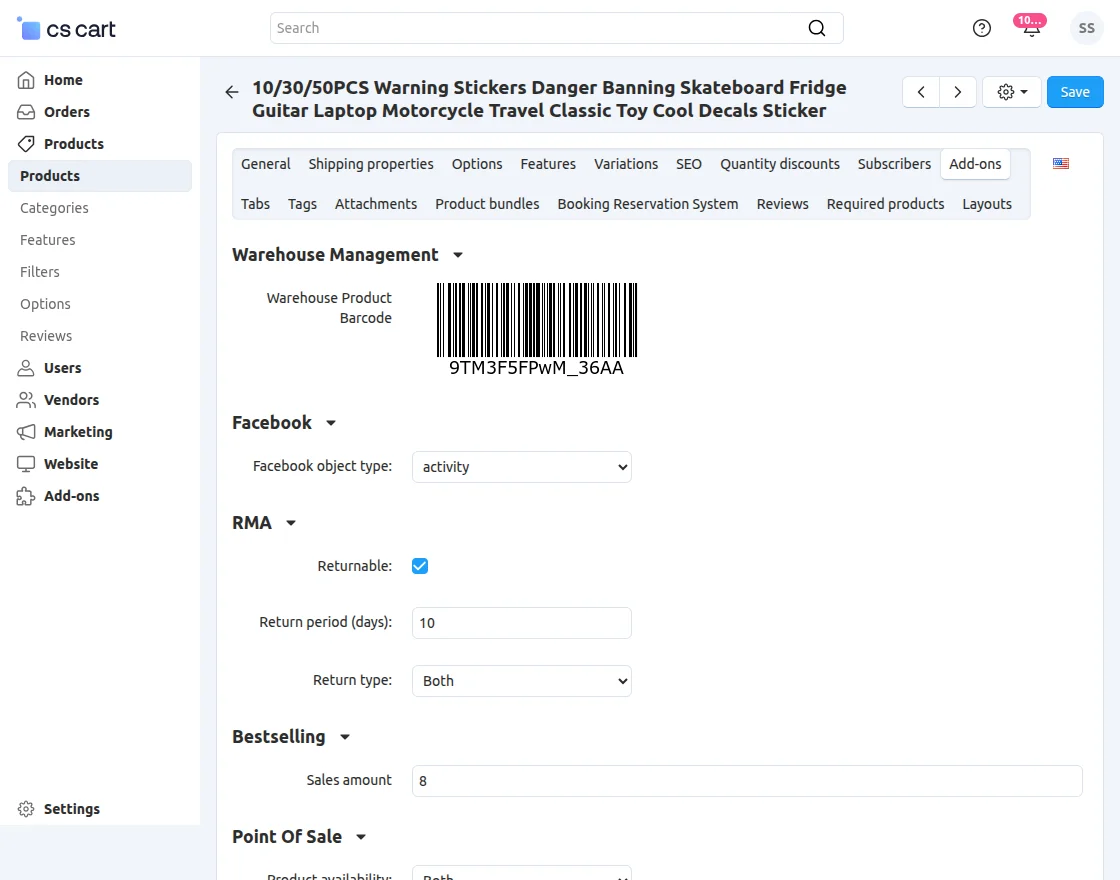
 To check a warehouse product’s barcode, go to the product page and click on Add-on.
Warehouse Management at Vendor panel
On the Vendor Panel, under the Settings section, vendors can click on “Warehouse” to Export product, Manage Peroduct, edit, or delete their assigned warehouses.
In the Order section, vendors can assign warehouses to their orders for efficient order processing.
I hope this guide helped you understand how to manage your warehouses efficiently using the downloaded add-ons.
Support
If you have any questions, suggestions, or customization requests, feel free to contact us at [email protected] or submit a ticket at webkul.uvdesk.com.
Explore our premium-quality CS Cart Extensions to enhance your store functionality.
You can also explore our CS-Cart Development Services and Quality CS-Cart add-ons.
Current Product Version - 1.5
Supported Framework Version - 4.16.x to 4.18.x

Is there Demo sit for Standard CS-Cart