CS-Cart Razorpay Split Payment add-on enhances your marketplace by enabling store owners to use Razorpay to automatically split and transfer payments to vendors directly within the CS-Cart Multi-Vendor platform.
Customers can pay through the Razorpay payment method during checkout. The payment process remains smooth, secure, and user-friendly.
Razorpay is PCI-DSS Level-1 compliant, ensuring top-level security. It protects customer payment data and builds trust during transactions.
This ensures convenience for customers by providing a wide variety of payment options, including credit cards, debit cards, UPI, net banking, and wallets.
With automated payment splitting and secure processing, this add-on reduces manual work. It helps marketplace owners manage vendor payouts faster and more efficiently.
NOTE:
- In order to use this module, you need to have the CS-Cart Razorpay Split Payment add-on installed and active.
- The store’s default currency should be Indian Rupees (INR) to receive payments.
- Razorpay only supports Indian Rupees (INR) transactions.
Features
- Customers can securely pay using Razorpay at checkout.
- Payments are split between marketplace vendors and the admin.
- Moreover, it supports multiple payment methods, including credit cards, debit cards, UPI, net banking, and wallets.
- Vendors can link their bank accounts to Razorpay for direct payment transfers.
- Admin and vendors can quickly process refunds for invoiced orders.
- Admin earns commission and the remaining amount goes to vendor accounts.
- Follows PCI compliance standards to ensure secure and reliable payment processing.
- Vendors can view all Razorpay transactions directly from their vendor dashboard.
Installation
After downloading the CS-Cart Razorpay Split Payment add-on, you’ll get one zip file, one install.txt file, and a relevant User Guide manual doc.
Read it carefully for proper configuration.
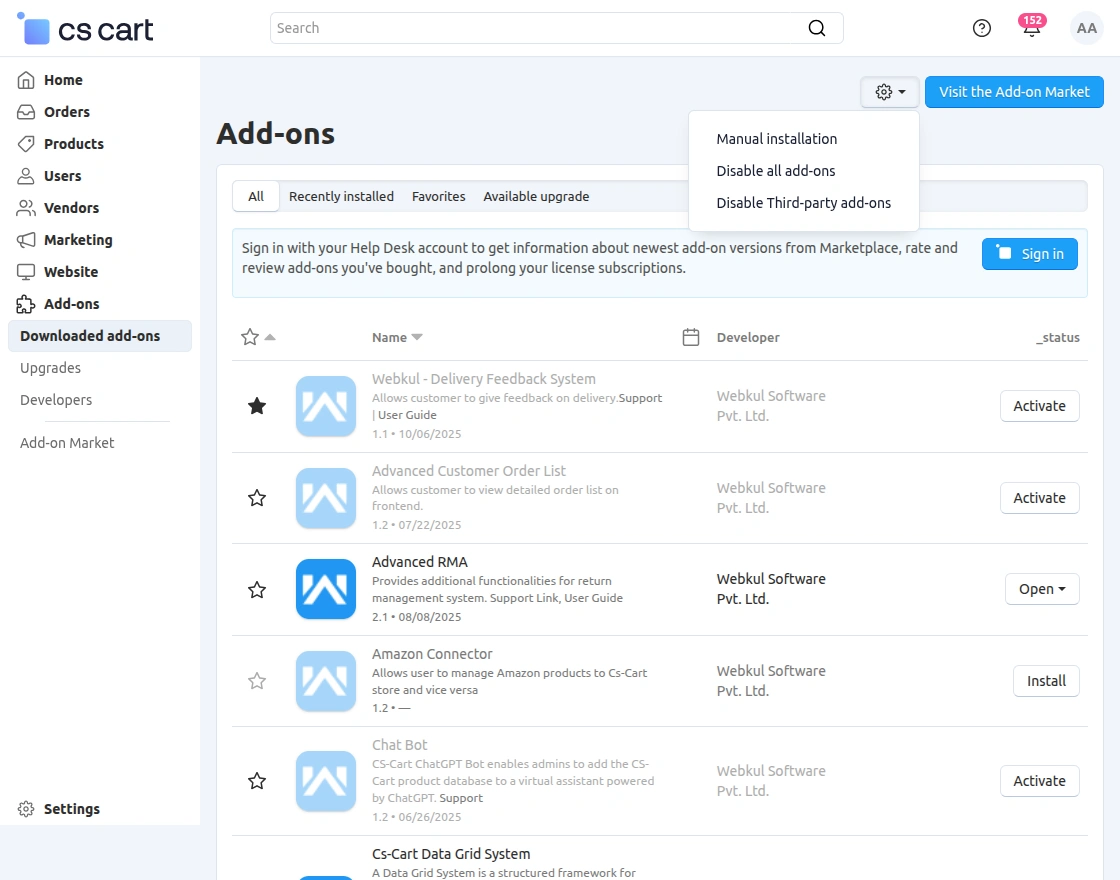
Go to Manage Add-ons, and click on “Manual Installation” as shown below in the snapshot.
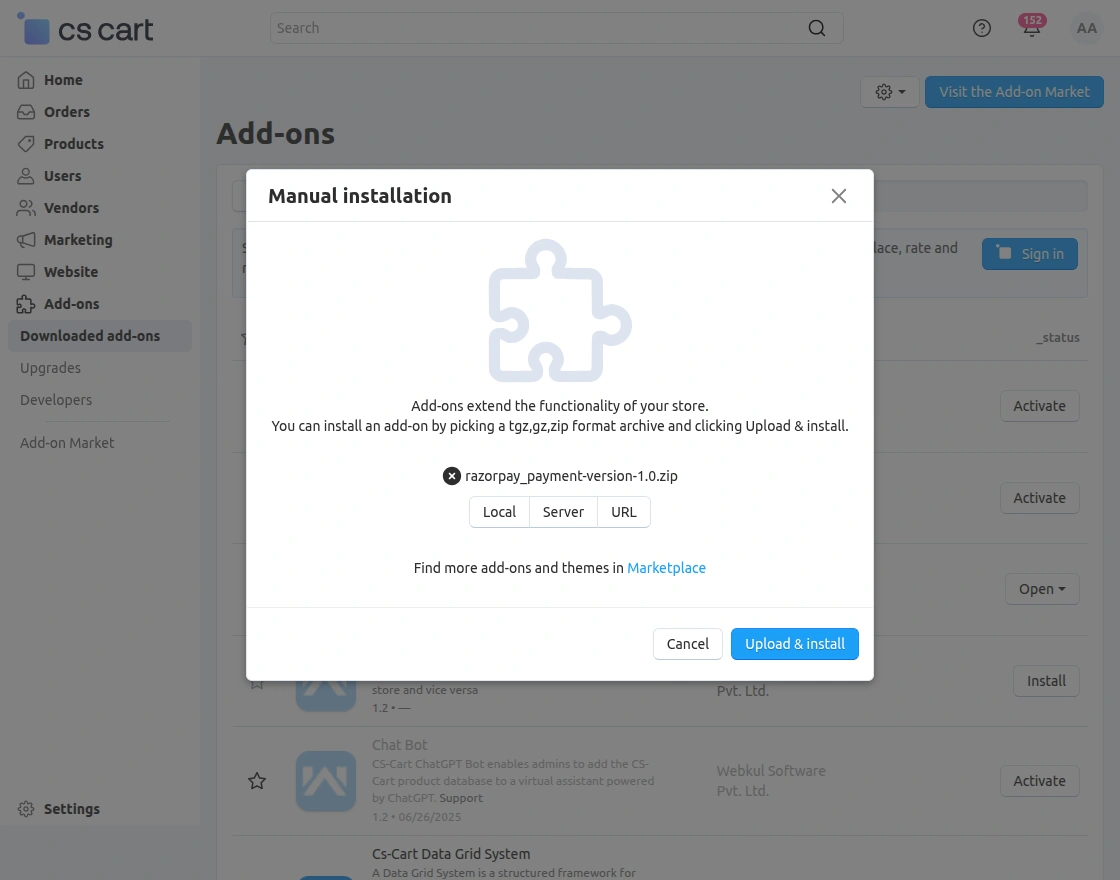
Click on “Local” to browse the zip file, and then click on “Upload & Install” as shown below in the snapshot.
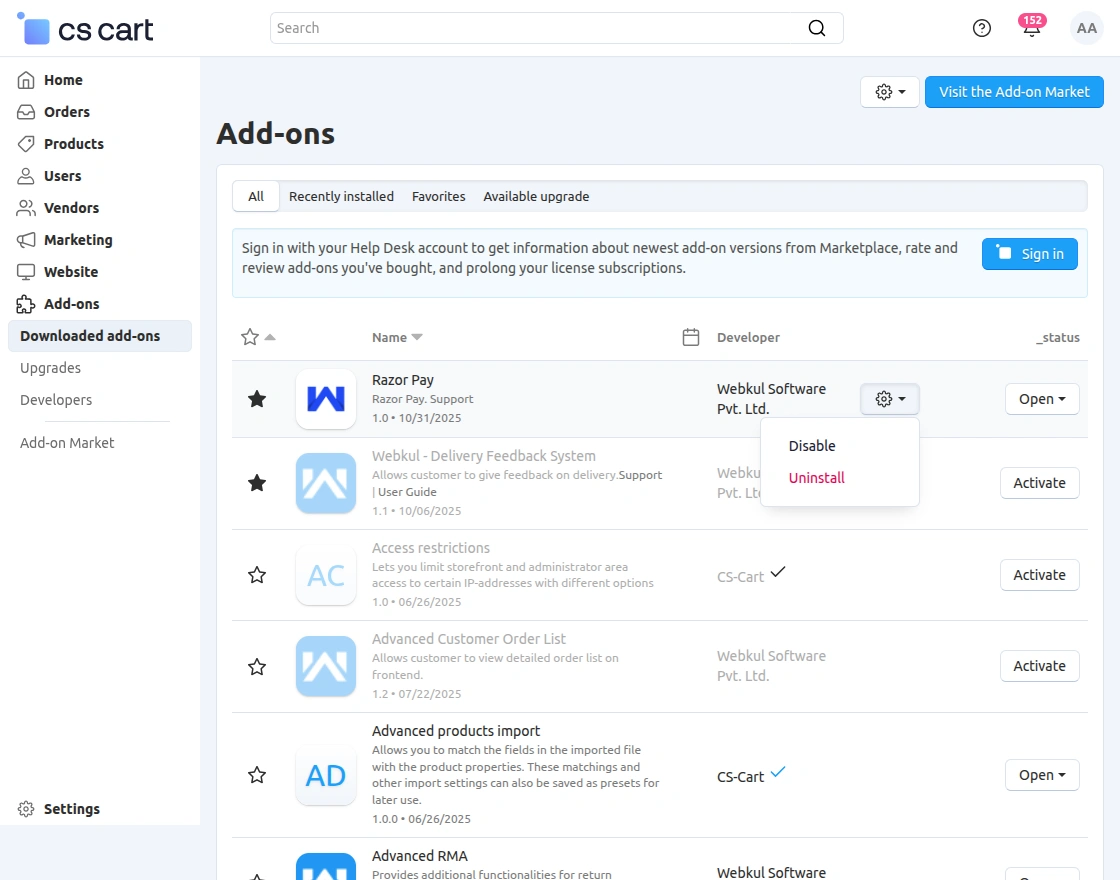
After installing the add-on, you will find CS-Cart Razorpay Split Payment in the list of available add-ons. We will then configure the settings.
Click on “settings” to enable, disable.
Make sure the add-on is activated, as shown in the snapshot below.
Razorpay | Add-On

- Connect Account – Vendors link their Razorpay account to receive payments directly.
- View Account – Vendors review their Razorpay account connection and details.
Generate API Key & Secret Key
API Key & Secret Key
First, sign up for a Razorpay account or log in if you have an existing account.
Fill in Your Details: Provide the necessary information to create your Razorpay account. This typically includes your email address, business name, and contact information.

Verify Your Email: After completing the sign-up form, you’ll receive an email from Razorpay with a verification link. Click on the link to verify your email address.
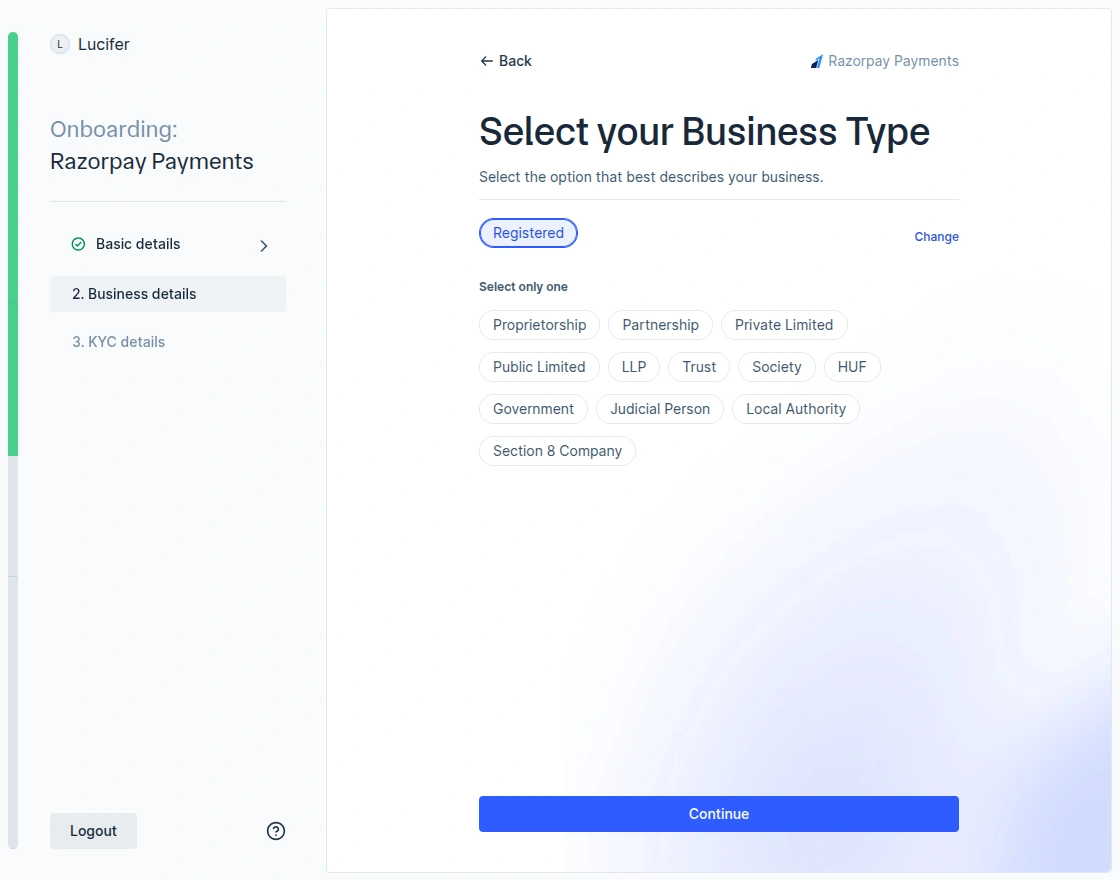
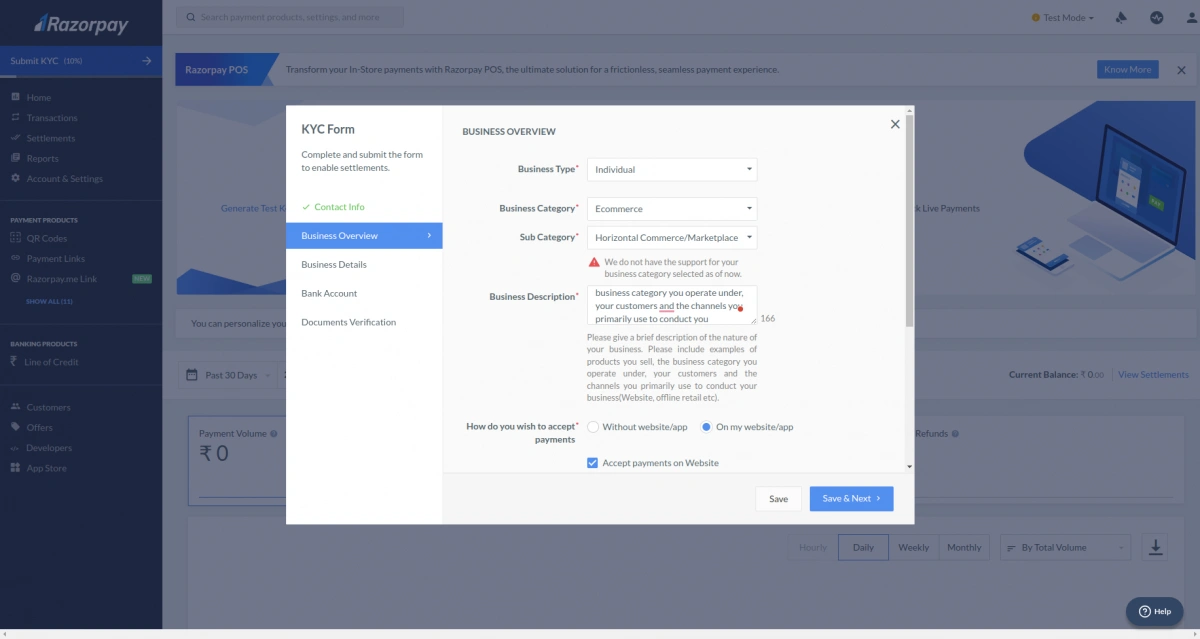
Complete Business Details: Once your email is verified, log in to your Razorpay account and complete your business details.
This includes information like your business type, address, and contact details.
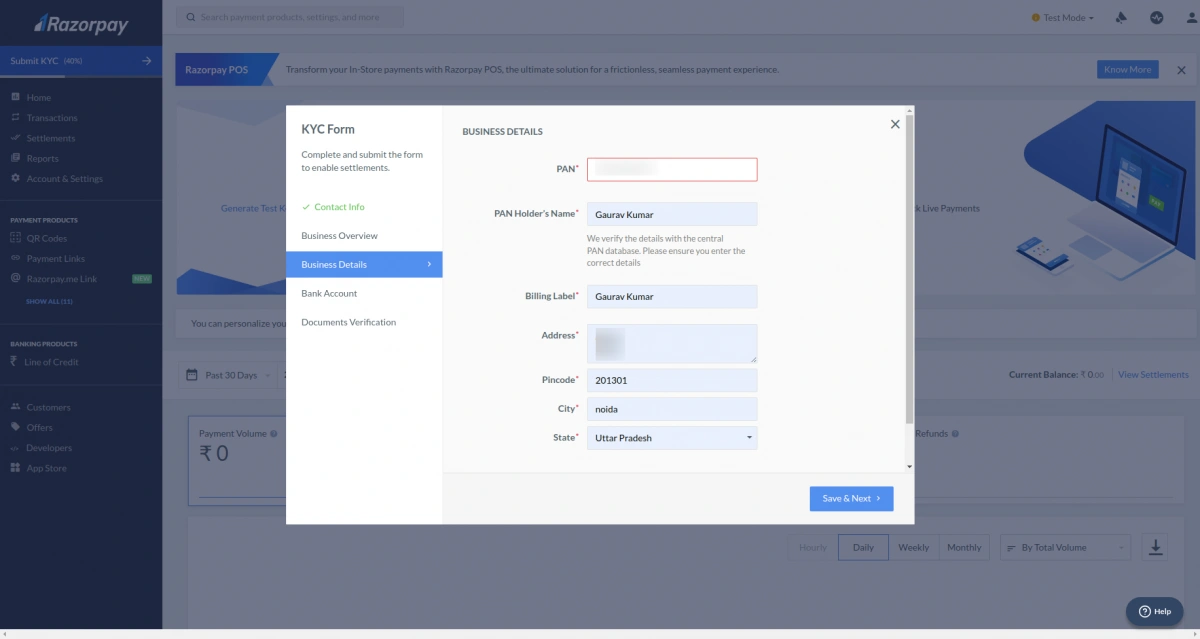
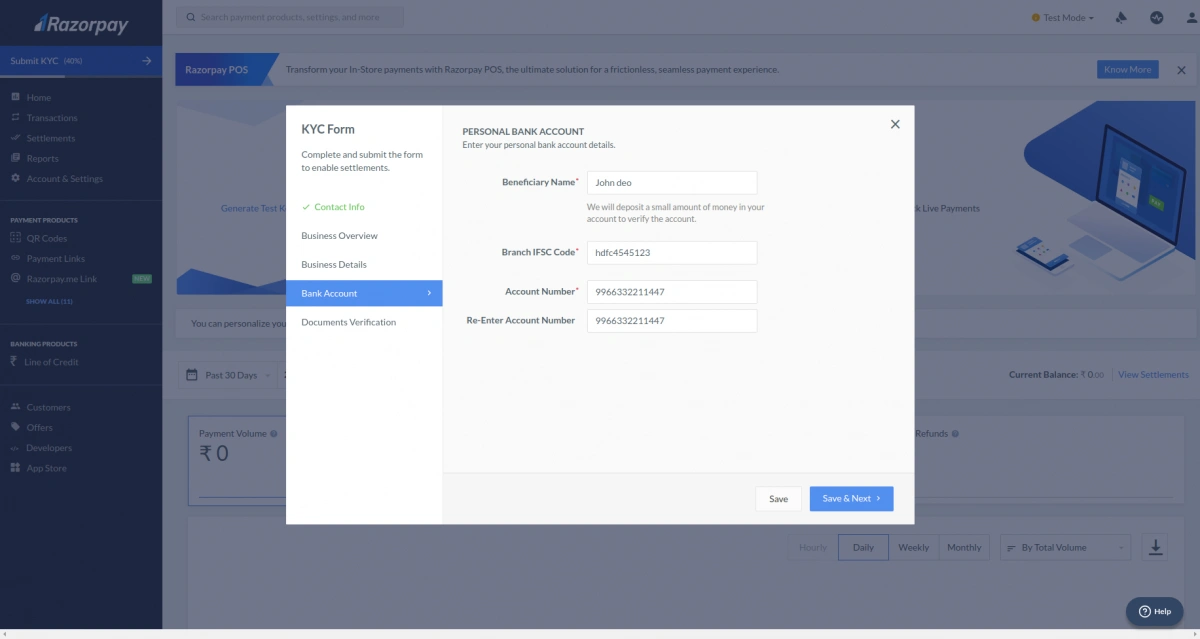
Bank Account Verification: Link your business bank account to your Razorpay account. This involves providing your bank account number and IFSC code. Razorpay will verify the account details.
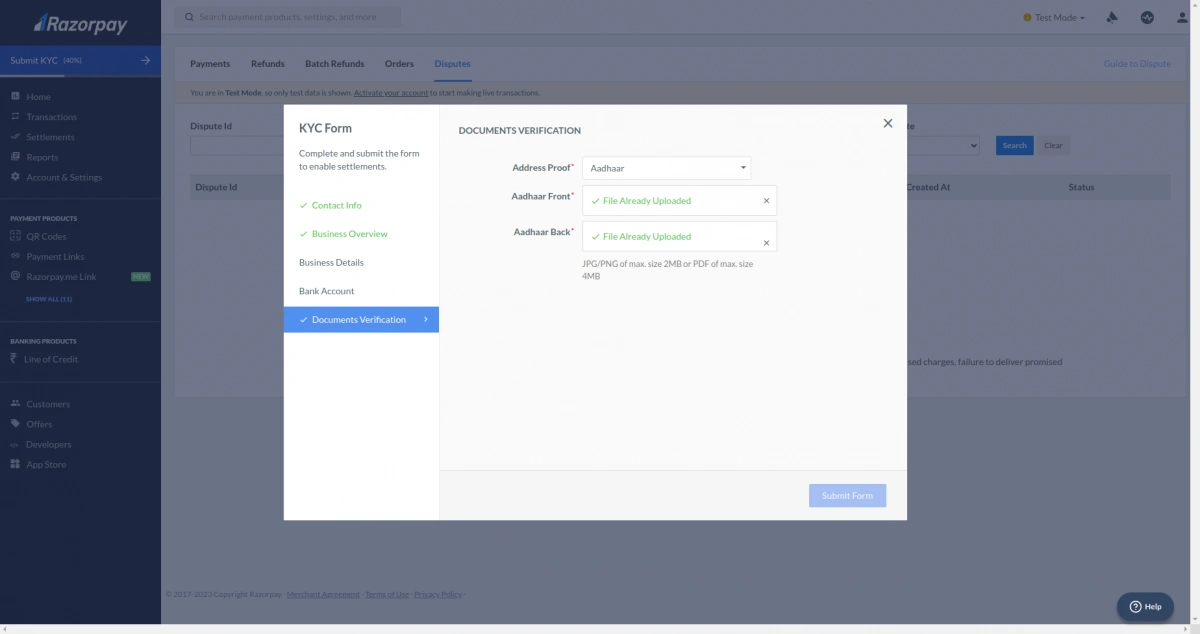
Provide KYC Documents: Upload your KYC document as shown in the screenshot
Get API Keys: Go to Settings > API Keys. Click to “Generate Key tab.
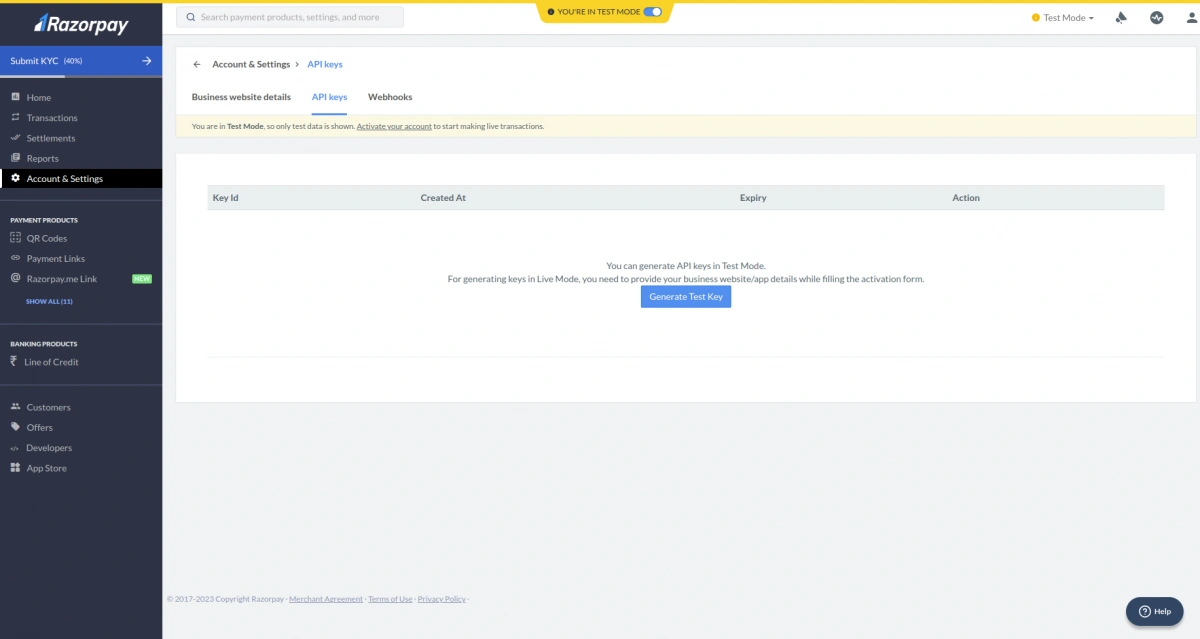
Use the generated API Key and Secret Key for integration
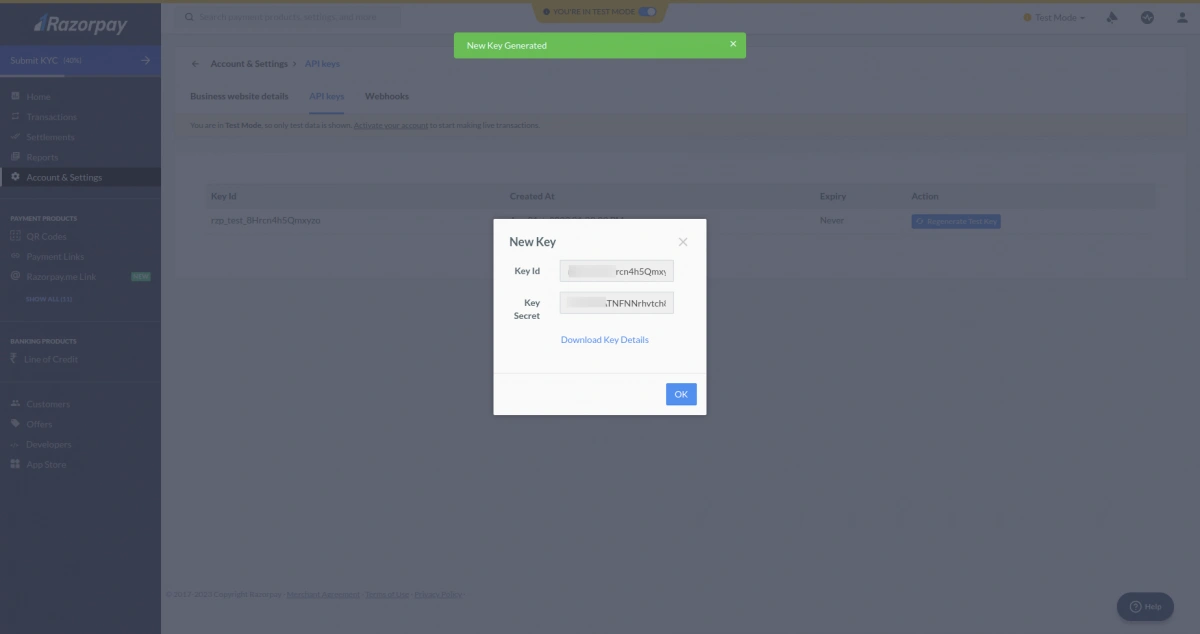
Please note – The key you have added would be live or test.
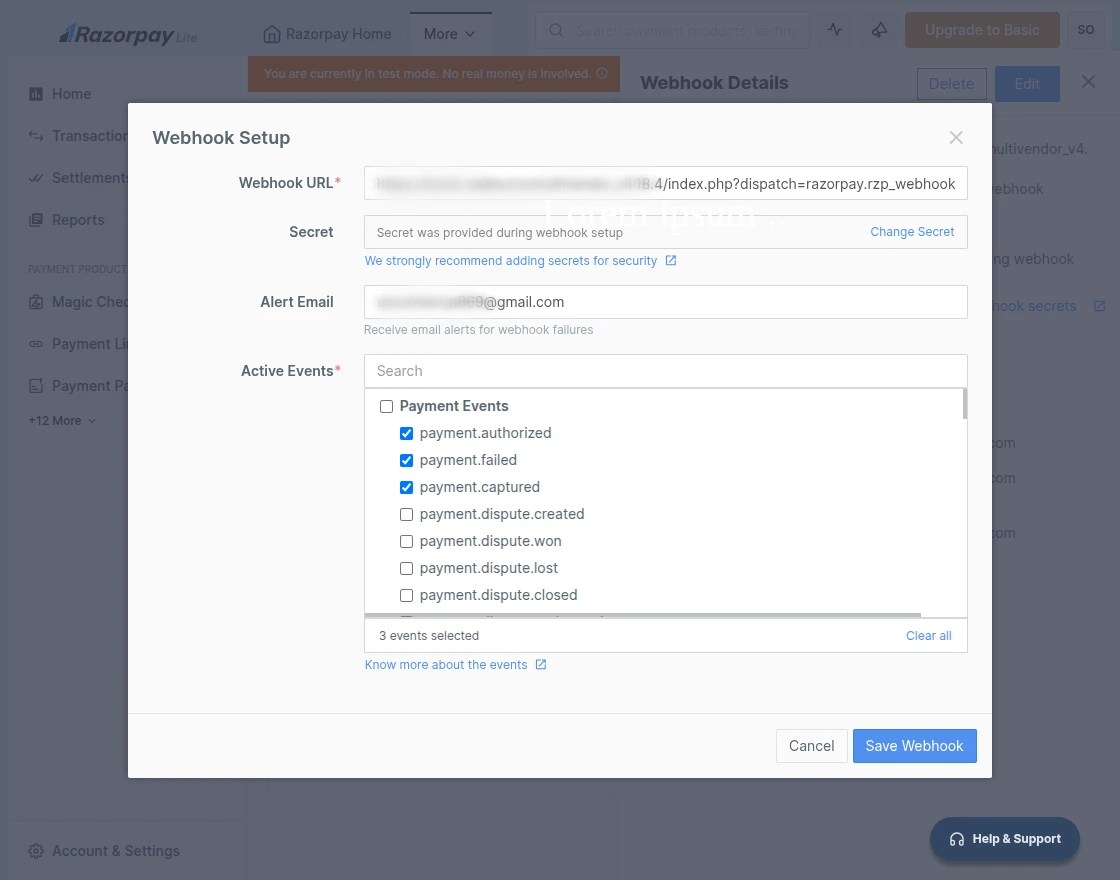
Register For Webhook Details
Webhooks help automate communication between Razorpay and your CS-Cart store.
When an event occurs, Razorpay sends the event data to the configured webhook URL.
Go to the My Account & Settings section in your Razorpay dashboard.
Under Developer Controls, open the Webhooks settings.
Add the webhook URL from your Razor Pay payment method, create a secret key, select the required events, and save the webhook.
Add “payment.authorized”, “payment.failed” and “payment.captured” as active events.
Module Configuration | Admin
Go to the CS-Cart admin panel and navigate to Settings > Payment Methods and click Add Payment Method.
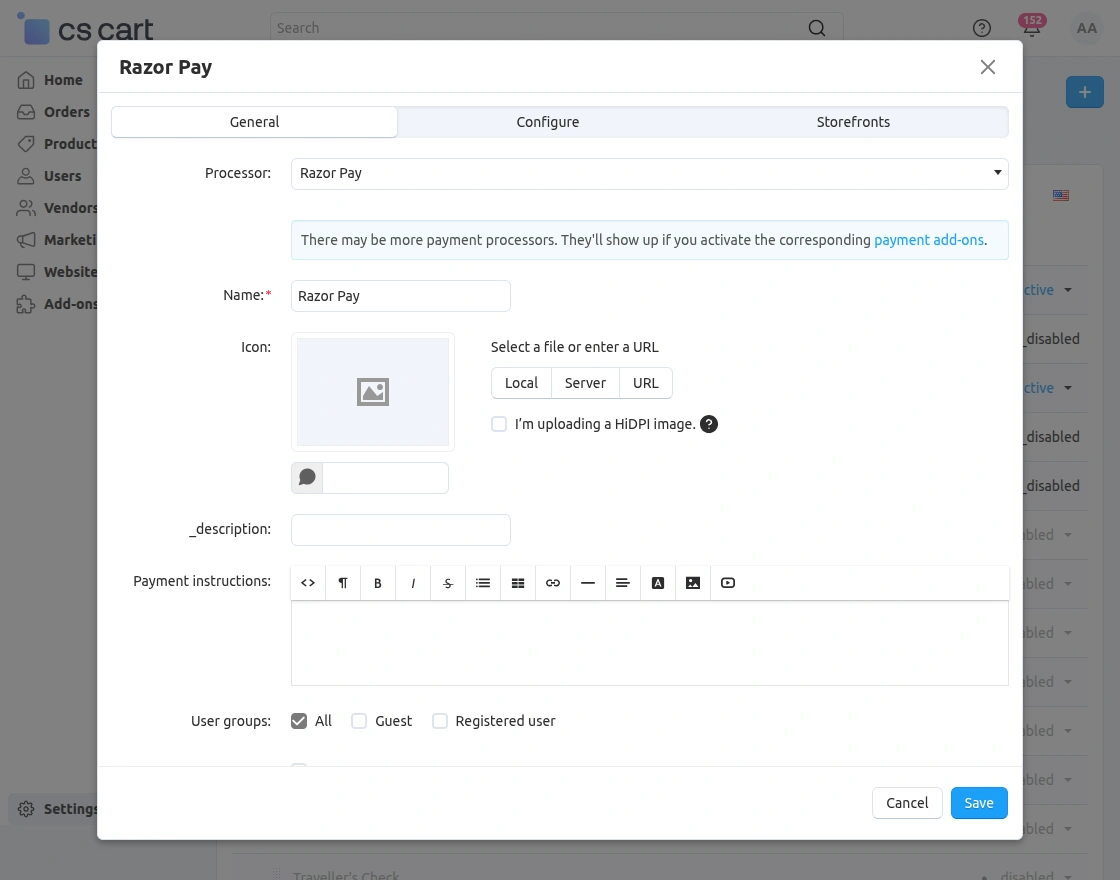
- Processor: Shows the selected payment gateway (Razorpay).
- Name: Name that will appear to customers during checkout.
- Icon: Upload or select a Razorpay logo to display with the payment option.
- Description: Short text to describe this payment method to customers.
- Payment Instructions: Optional instructions shown to customers at checkout.
- User Groups: Choose who can use this payment method (All/Guest/Registered users).
Below find more settings for admin configurations
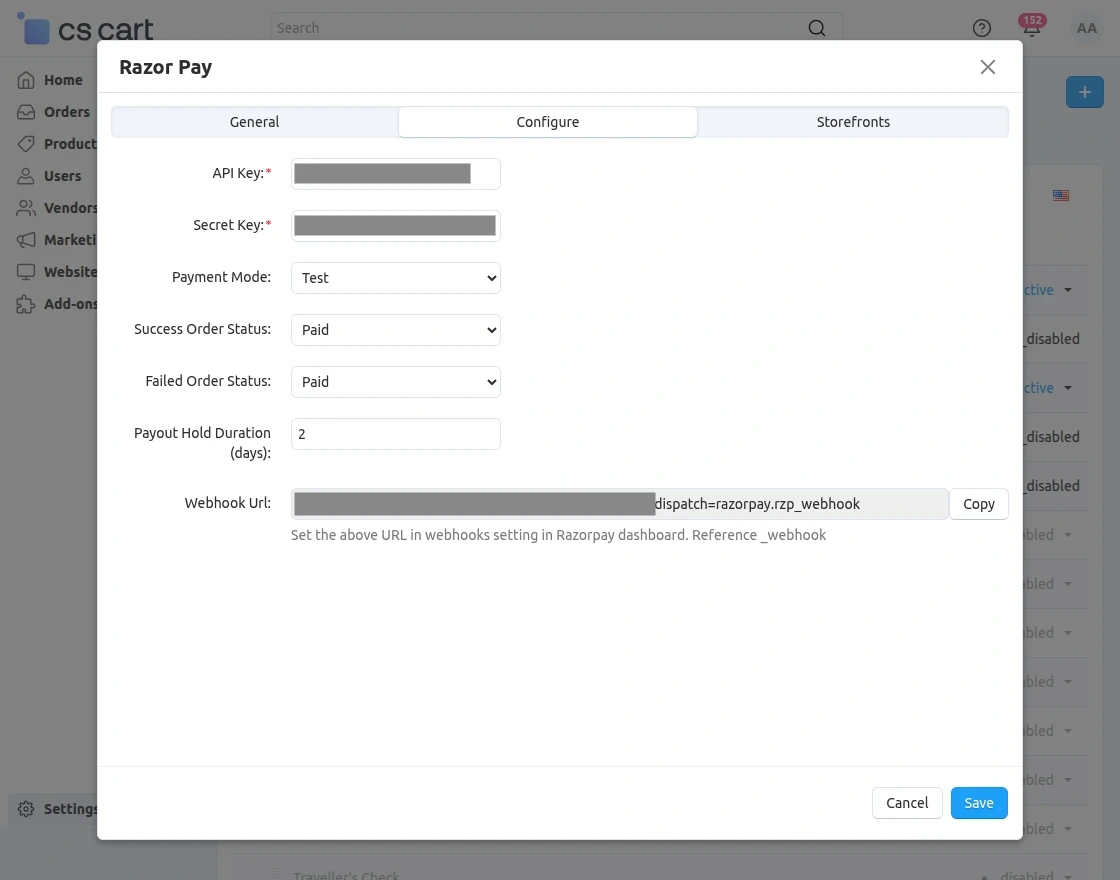
- API Key: Enter your Razorpay API Key to connect your CS-Cart store with Razorpay.
- Secret Key: Enter your Razorpay Secret Key for secure payment authentication.
- Payment Mode: Choose whether to use Test mode (testing payments) or Live mode (real transactions).
- Success Order Status: Select the status that will be assigned when payment is successfully completed (e.g., Paid).
- Failed Order Status: Set the order status for failed or declined payments.
- Payout Hold Duration (days): Specify the number of days to hold vendor payout before transferring the funds.
- Webhook URL: Copy this URL and add it inside your Razorpay dashboard to receive order and payout updates automatically.
CS-Cart Vendor Panel
Connect Razorpay Account for Payouts:
Vendors fill their business and bank details to connect their Razorpay account and receive split payments.
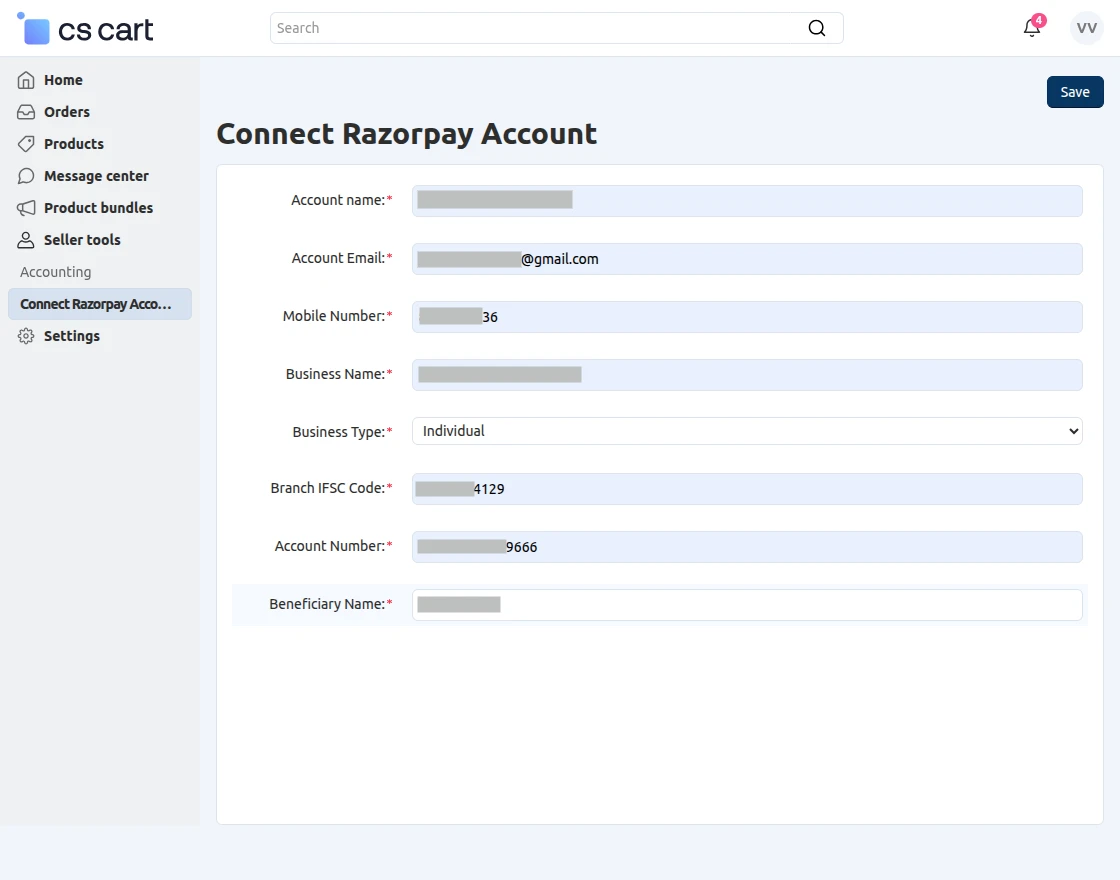
- Company Name: Select the vendor’s company/store name from the dropdown.
- Account Name: Enter the legal name of the vendor registered with Razorpay.
- Account Email: Provide the vendor’s email used for Razorpay communication.
- Mobile Number: Enter the vendor’s contact number linked to their bank/Razorpay.
- Business Name: Enter the business name that will appear in Razorpay records.
- Business Type: Select the business category (Individual / Company / etc.).
- Branch IFSC Code: Enter the bank branch IFSC code for payouts.
- Account Number: Enter the vendor’s bank account number to receive payouts.
- Beneficiary Name: Name of the bank account holder receiving payments.
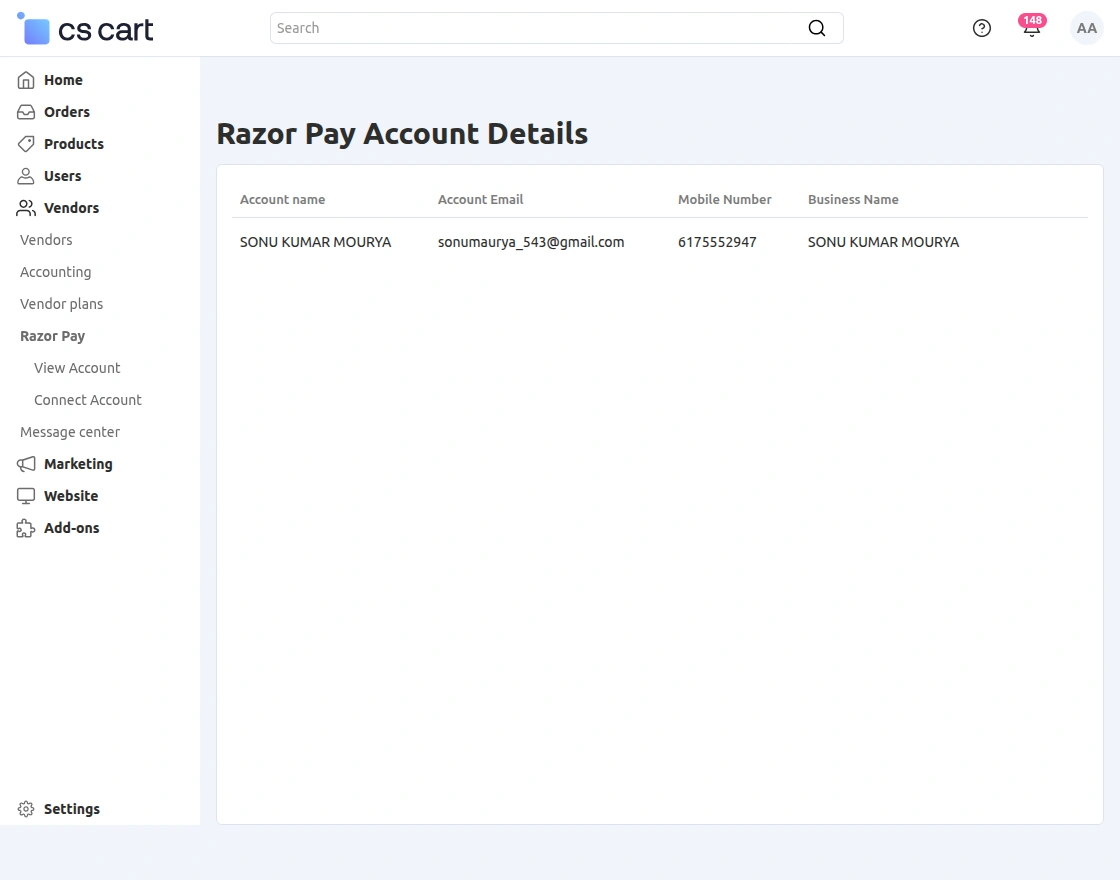
Vendors can view the Razorpay payout details they connected for automated split payments.
Vendor Razorpay Refund Management
Vendors can easily handle and process refunds for orders paid through Razorpay directly from their vendor panel.
To initiate a refund, go to Vendor Panel > Orders > View Orders > [Select Order].
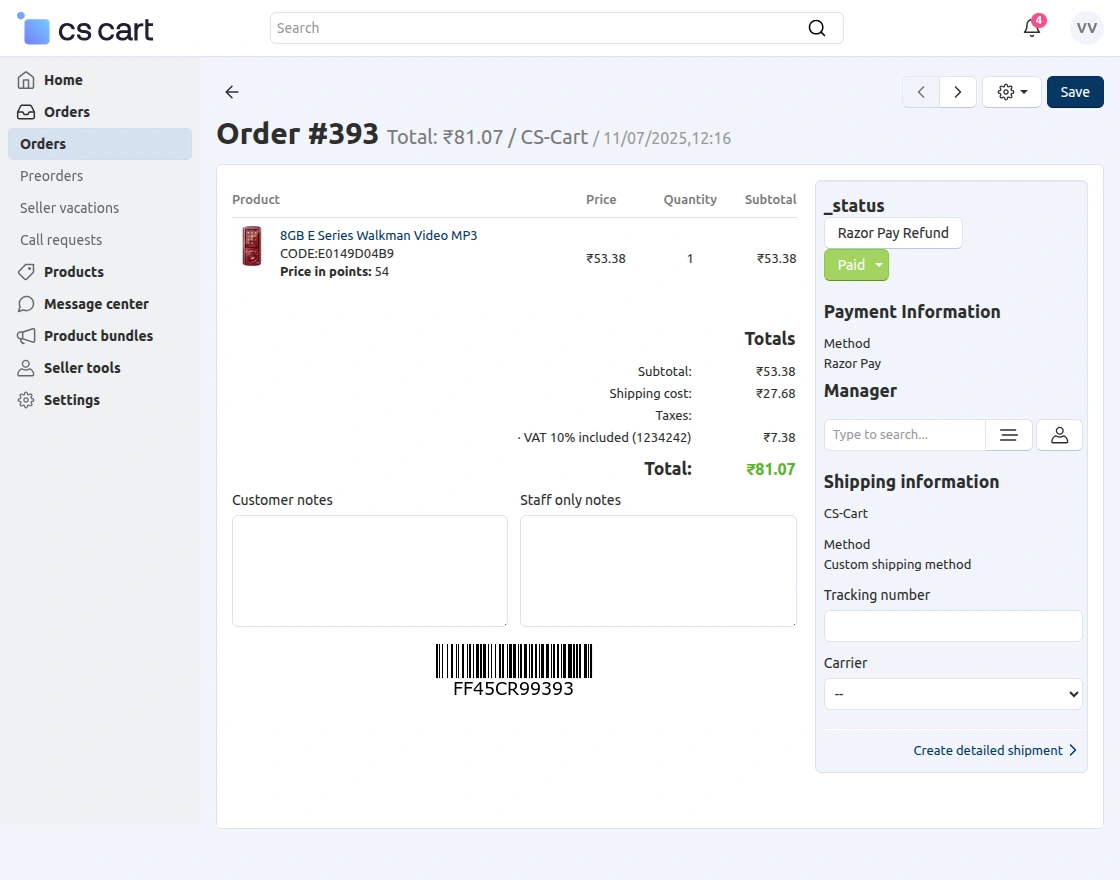
Inside the order details, the vendor can click on the Razorpay Refund option under the Payment Information section to process the refund.
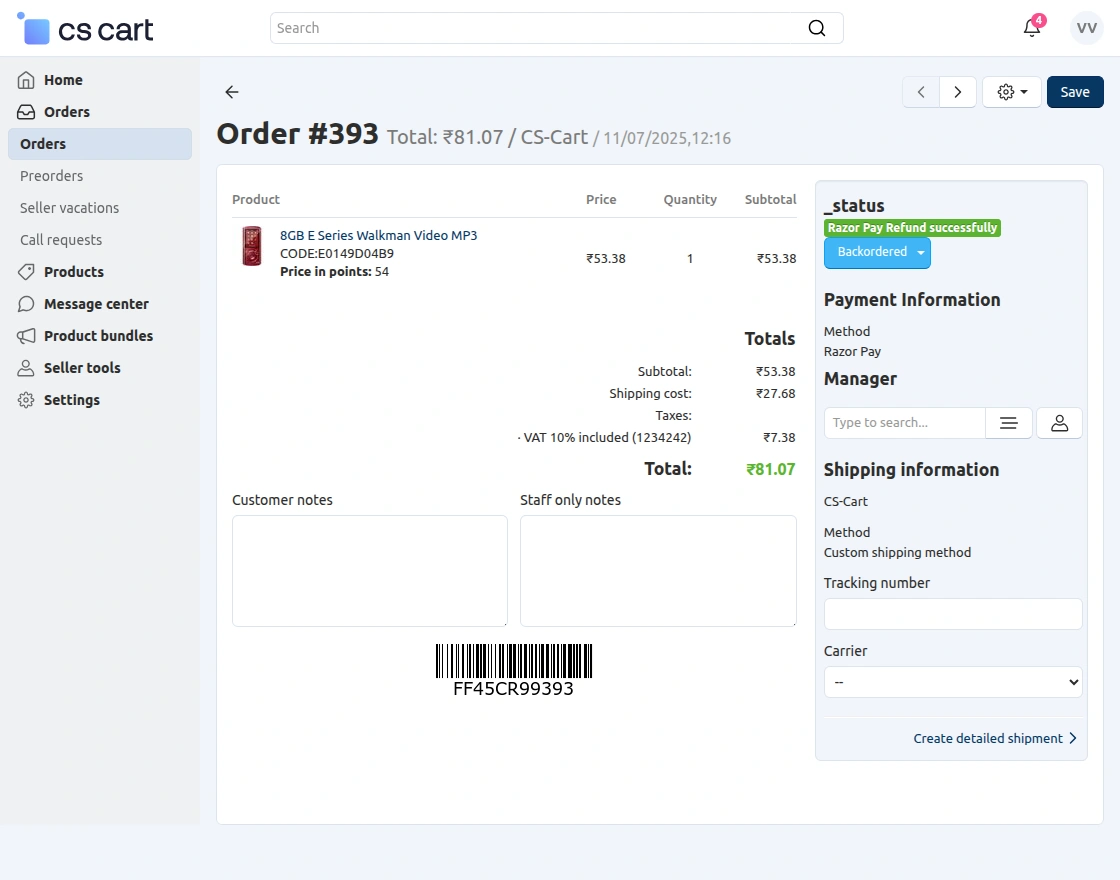
After the refund is successfully processed, the system automatically changes the order status to “Backordered” and displays the message “Razorpay Refund Successfully”.
This ensures real-time refund tracking and provides vendors with a secure and transparent refund process through the Razorpay gateway.
Module Configuration | Frontend
On the storefront, customers can easily choose Razorpay as their preferred payment option while placing an order.
During checkout, they can review the order summary, shipping details, and billing information before selecting the payment method.
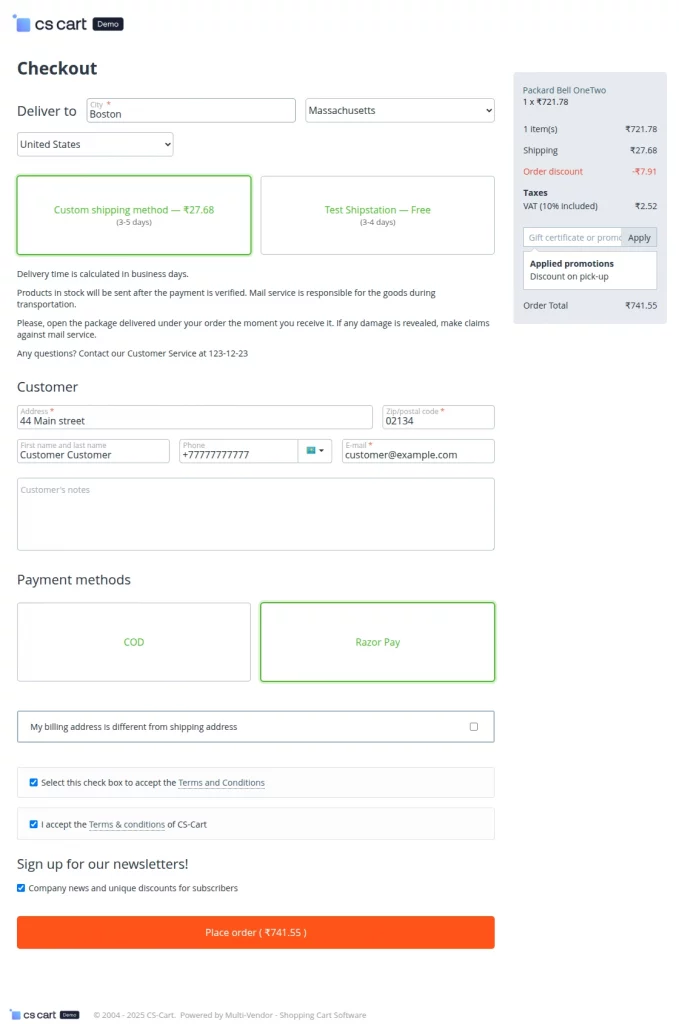
After confirming the order details, the customer clicks Place Order to proceed.
They are redirected to the Razorpay Checkout Page, where multiple payment options are available for a seamless transaction.
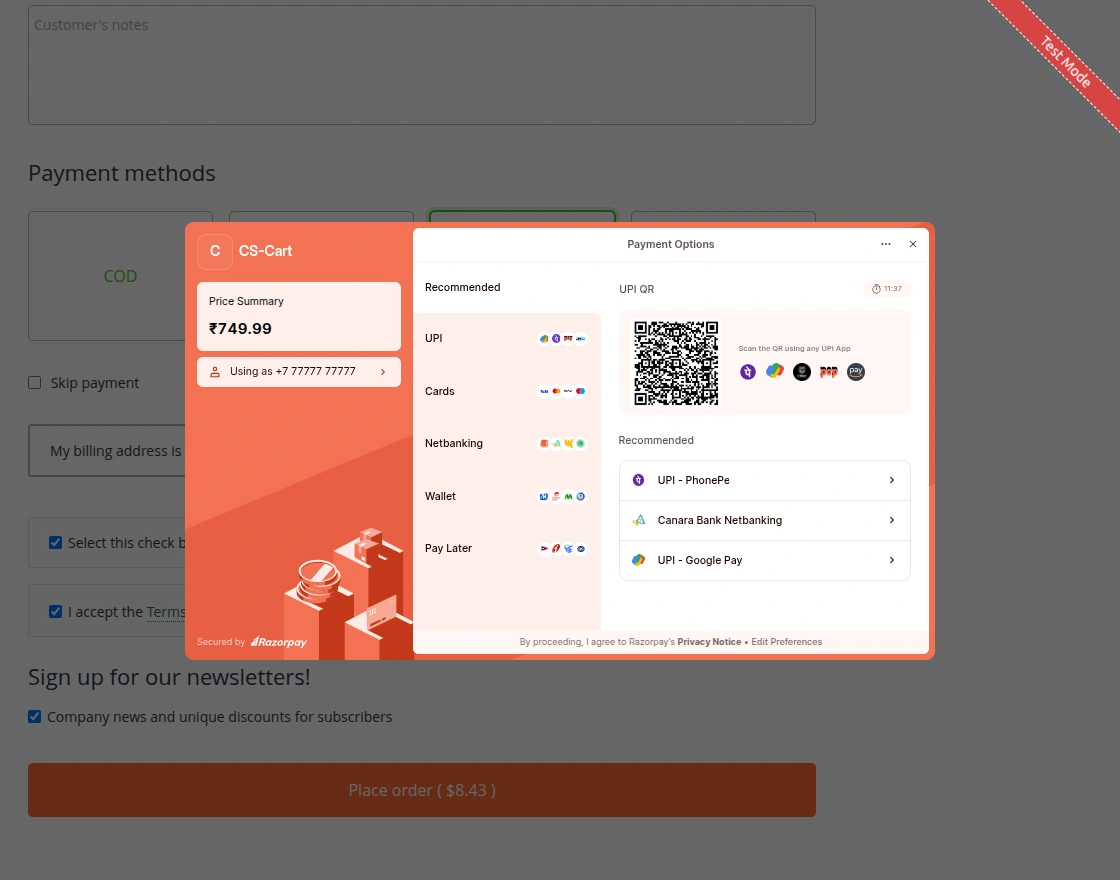
Customers can complete their payment using UPI, Credit/Debit Cards, Netbanking, Wallets, or Pay Later options.
They can also scan the displayed QR code for instant payment through UPI apps like Google Pay, PhonePe, Paytm, or BHIM.
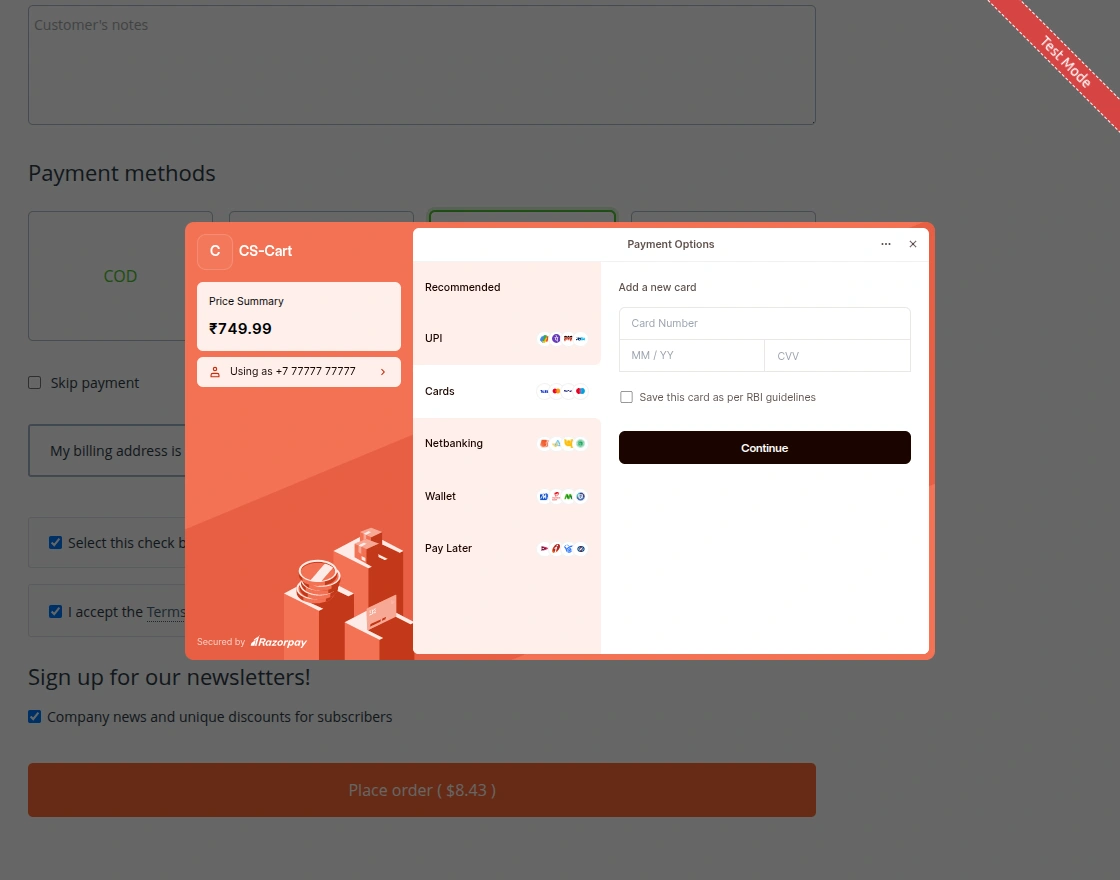
If the customer chooses the card payment option, they can securely enter their card number, expiry date, and CVV.
The Razorpay gateway ensures safe transactions compliant with RBI guidelines, providing a trusted payment experience.
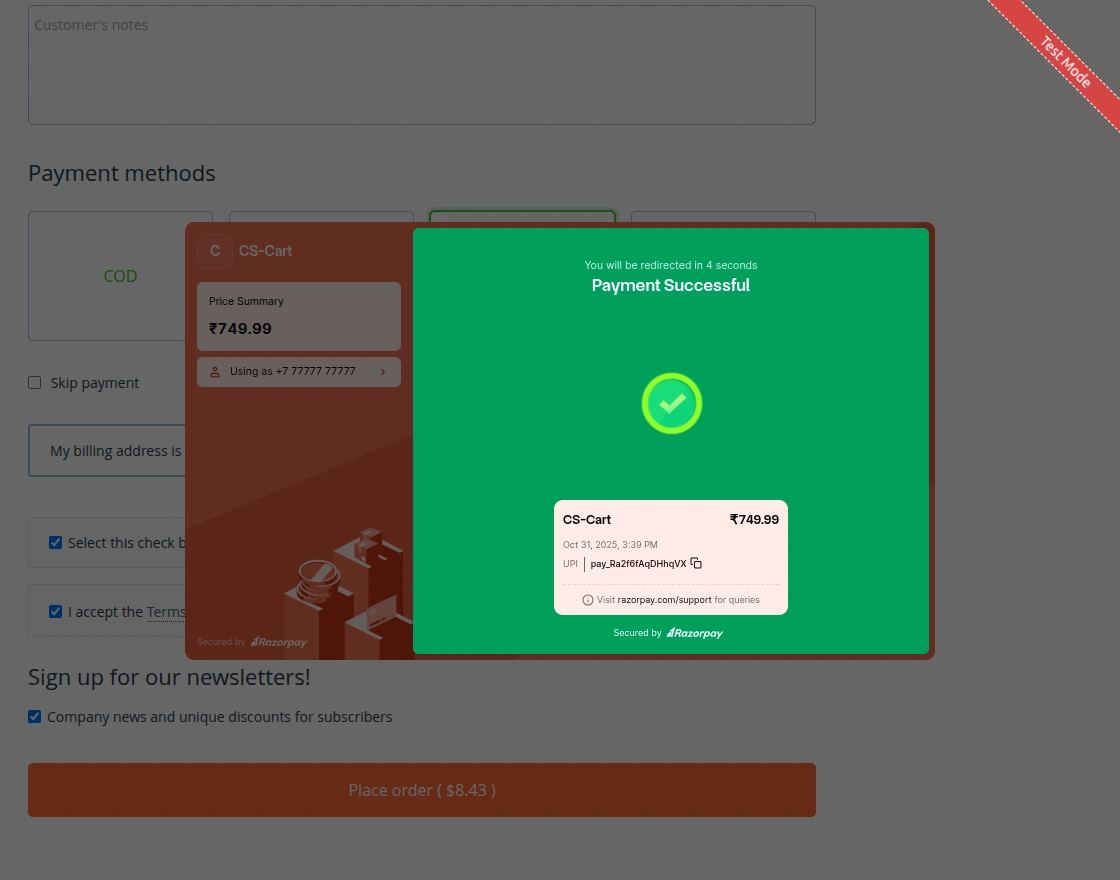
Once the payment is successfully processed, the Payment Successful screen is displayed.
It shows the order amount, transaction ID, and confirms that the payment has been completed securely through Razorpay.
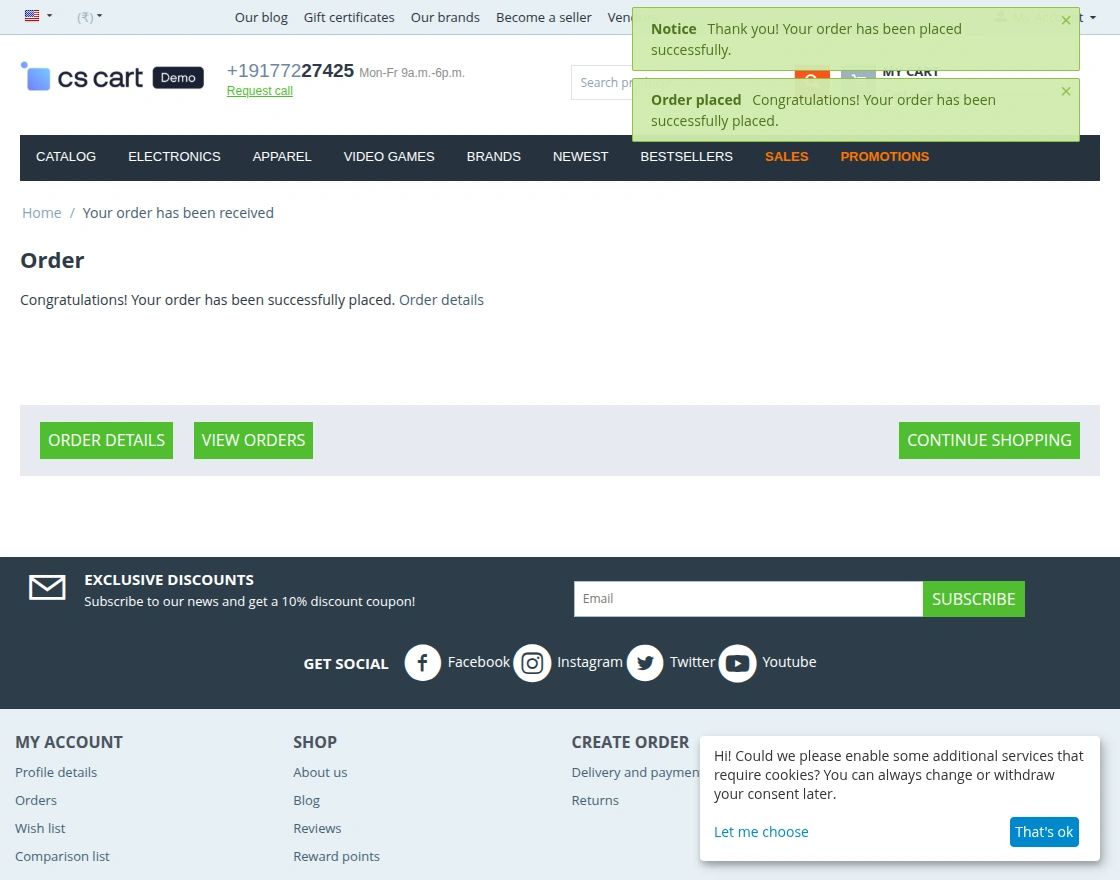
Afterward, the customer is redirected back to the store, where a confirmation message appears —
“Your order has been successfully placed.”
This confirms that the Razorpay payment has been processed successfully and the order has been recorded in the system.
Razorpay Dashboard – Payment & Refund Tracking
The Razorpay Dashboard allows both admins and vendors to track all payments and refunds processed through the gateway in real time.
To access this, navigate to the Razorpay Dashboard > Transactions > Payments section.
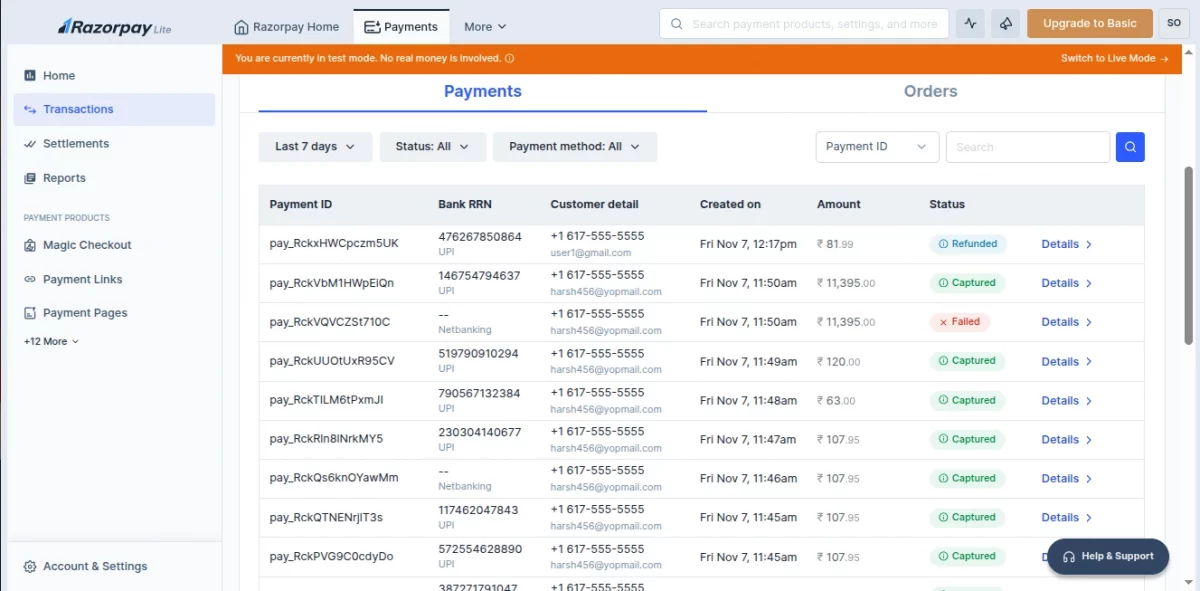
In the Payments section, all successful, failed, and refunded transactions are listed.
Each entry displays the Payment ID, Customer Details, Amount, Payment Method, and Status (like Captured, Failed, or Refunded).
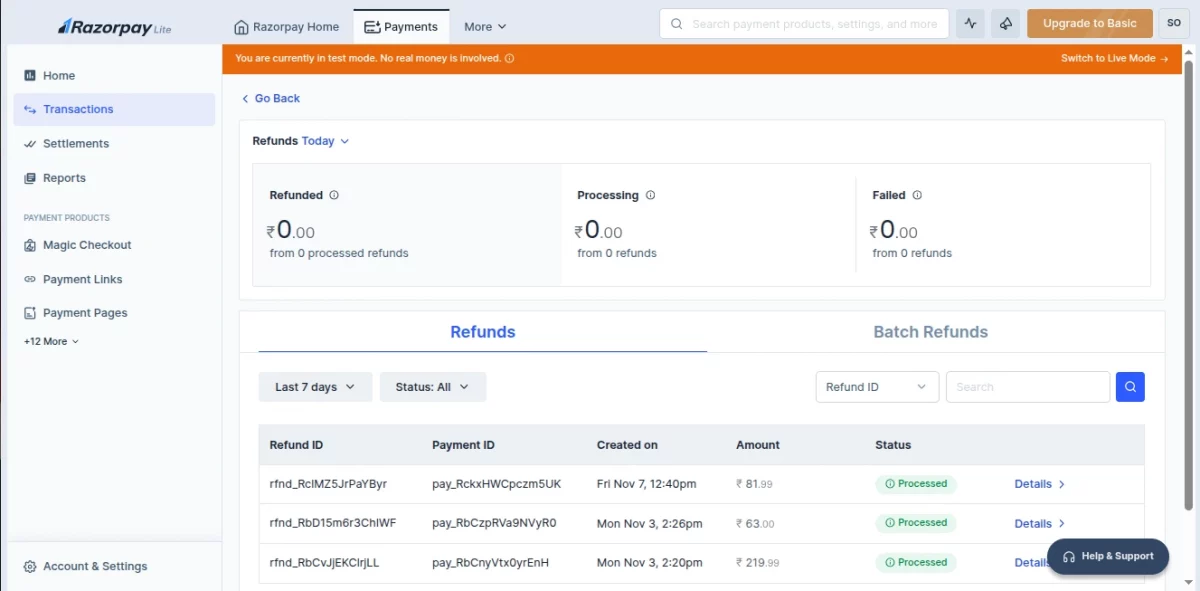
The Refunds section provides a detailed view of all refund activities.
Here, the admin or vendor can view the Refund ID, Payment ID, Created Date, Amount, and Current Status (Processed, Pending, or Failed).
It ensures full transparency between the CS-Cart store and Razorpay by syncing refund details automatically.
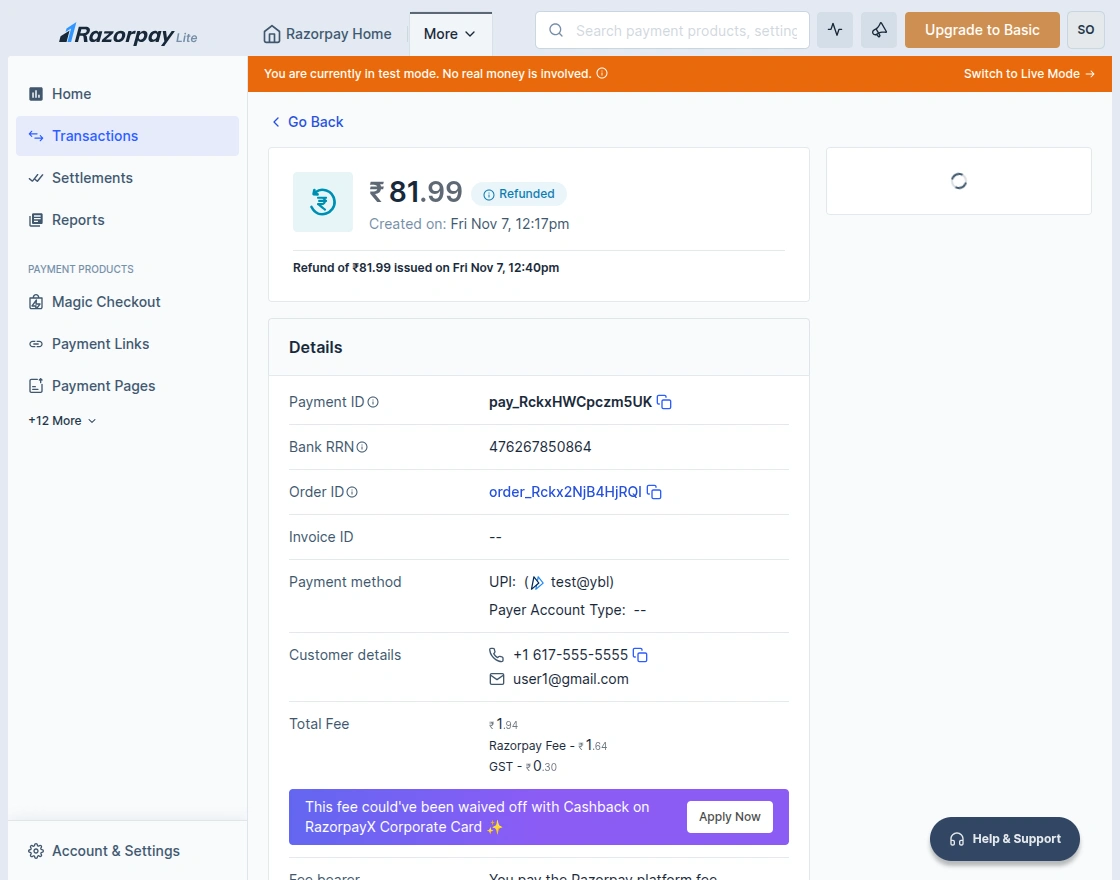
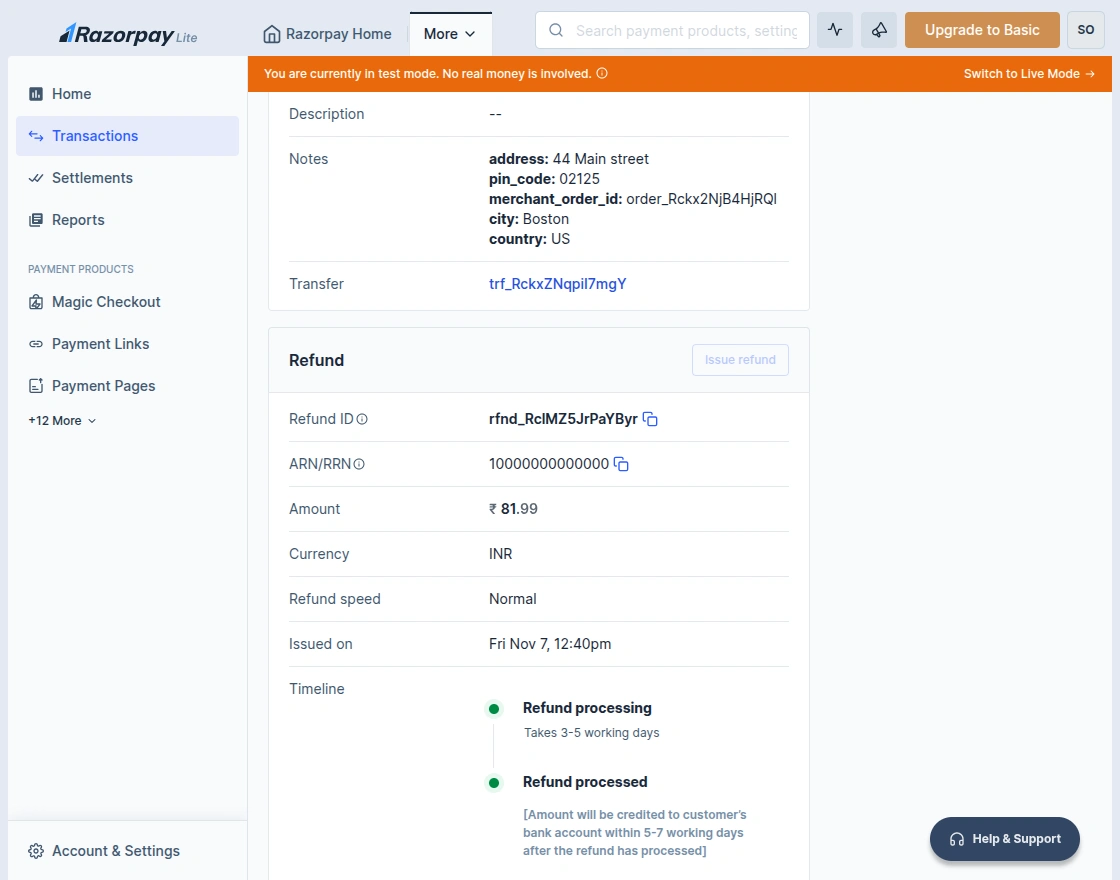
By clicking on a specific refund entry, users can open the Refund Details Page.
This page displays complete information including Payment ID, Order ID, Bank RRN, Payment Method, Customer Details, Refund Amount, and Transaction Fee.
It also shows the refund timestamp, confirming when the amount was returned to the customer.
Support
If you have any questions, suggestions, or customization requests, feel free to contact us at [email protected] or submit a ticket at webkul.uvdesk.com.
Explore our premium-quality CS Cart Extensions to enhance your store functionality.
You can also explore our CS-Cart Development Services and Quality CS-Cart add-ons.
Current Product Version - 1.0
Supported Framework Version - 4.16.x, 4.17.x, 4.18.x

Be the first to comment.