OpenCart Wallet System allows customers to add funds to their wallet and use the available balance for payments during checkout.
Customers can transfer wallet funds to other customers, manage transactions, and view their wallet balance and credit or debit history.
The module provides KYC Verification, BNPL, QR Code Transfer, Cashback, Referral System, and Discount Rules for enhanced wallet management.
Customers can also manage bank details, make partial payments, and download their wallet transaction statements whenever required.
Administrators can manage wallet transactions, customer details, KYC verification, BNPL records, cashback rules, discount rules, and wallet configurations.
The module also supports email and SMS notifications for supported wallet activities and transaction-related updates.
Note: Opencart Wallet System supports all templates and themes including the Journal theme.
Check out the plugin workflow at the customer’s end along with the configuration part –
Features
- The Wallet Payment Gateway allows customers to use their wallet balance to make payments during the checkout process.
- Customers can easily recharge their wallet using the available payment methods configured by the administrator.
- The administrator can configure minimum and maximum wallet recharge limits according to store requirements.
- Customers can view their wallet balance, credit history, debit history, and transaction details from their wallet account.
- Customers can add existing store customers as payees and transfer wallet funds directly to them.
- The administrator can configure transfer limits, including minimum, maximum, monthly transfer count, and monthly amount limits.
- Customers can receive a low wallet balance notification when their wallet balance reaches the configured minimum amount.
- The administrator can add or debit wallet funds from customer accounts with the required transaction details.
- Customers can add their bank details for receiving refunds directly through manual bank transfers.
- The administrator can configure minimum and maximum refund limits and manage eligible refund order statuses.
- The module supports partial wallet payments, allowing customers to pay the remaining order amount using another payment method.
- The administrator can create wallet discount rules based on subtotal or cart total conditions.
- Customers can receive cashback after eligible purchases when the configured cashback conditions are fulfilled.
- The administrator can create cashback rules based on products, categories, price, quantity, dates, priority, and payment methods.
- Cashback rules can be configured for automatic or manual cashback processing according to store requirements.
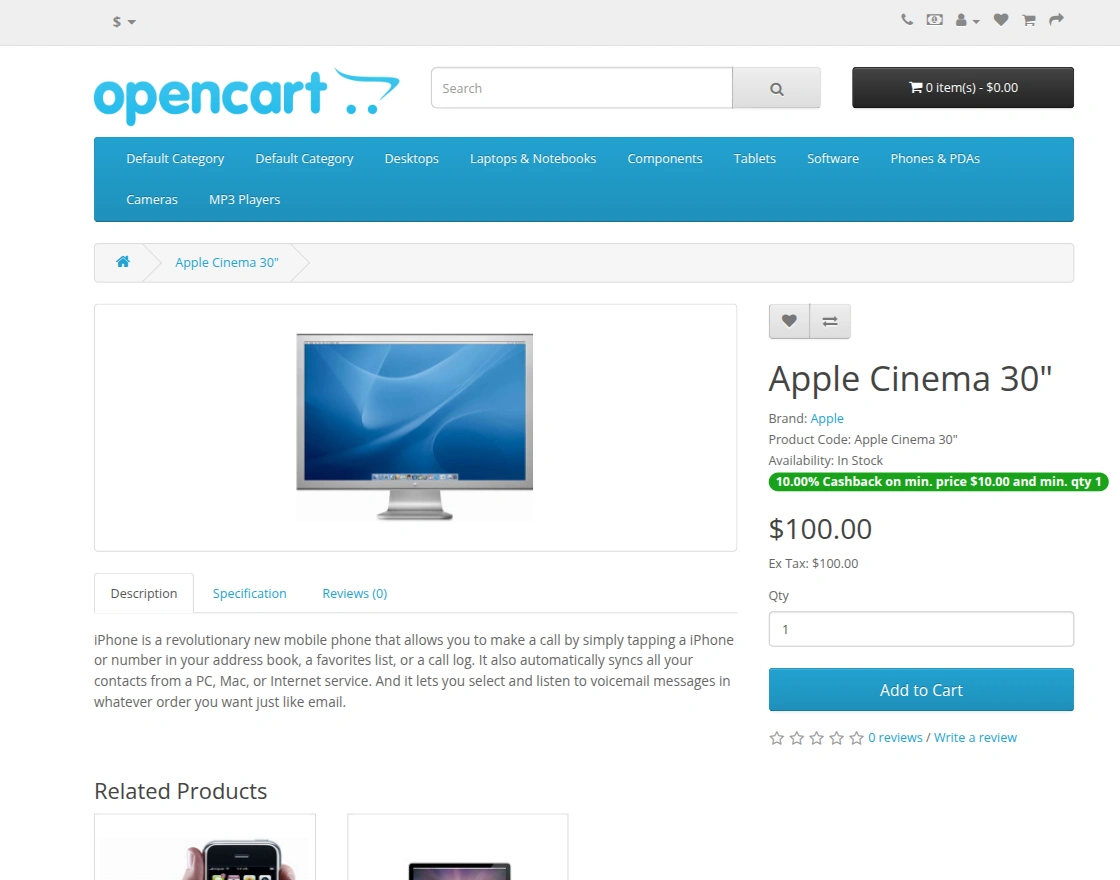
- Customers can view cashback information on product pages, during checkout, and within their wallet history.
- The module supports KYC Verification for customers before they perform restricted wallet operations.
- Customers can submit KYC documents in supported formats, with a maximum file size of 2 MB.
- The administrator can review submitted KYC requests and approve or reject customer verification from the admin panel.
- Customers can use QR Code Transfers to send wallet funds by scanning or entering a QR transfer token.
- QR transfers include token expiry, regeneration, recipient validation, and configured transfer amount restrictions.
- The module provides Buy Now Pay Later (BNPL) functionality for eligible customers and supported orders.
- Administrators can configure BNPL credit limits, interest rates, grace periods, auto-deduction, and minimum order amounts.
- Customers can view their available BNPL credit, used amount, outstanding debt, due dates, and repayment status.
- The module supports automatic BNPL repayment from the customer’s wallet balance according to the configured settings.
- The Referral System allows customers to invite new users and earn referral points through the configured referral rules.
- Customers can view their referral clicks, total referrals, points balance, referral history, and wallet conversion details.
- Administrators can configure referral points, exchange rates, minimum points, referral status, and referral bonuses.
- Customers can download wallet statements in PDF format by selecting the required transaction date range.
- The wallet statement can include credits, debits, transfers, and other available wallet transaction details.
- The module supports email notifications for wallet recharge, credit, transfer, bank detail updates, cashback, and other supported activities.
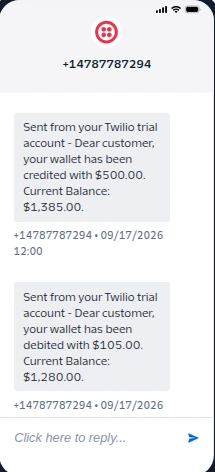
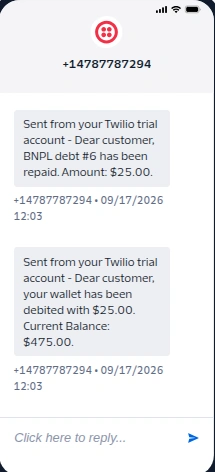
- The module supports SMS notifications through Twilio for wallet transactions, transfers, BNPL activities, and referral rewards.
- The administrator can manage credit and debit transaction records and view detailed customer wallet information.
- The module supports multi-store and multi-language functionality for supported wallet and cashback features.
- The module is open source, allowing developers to customize the wallet functionality according to store requirements.
Note: Cashback functionality will only work with the Wallet payment method, not with others.
Installation
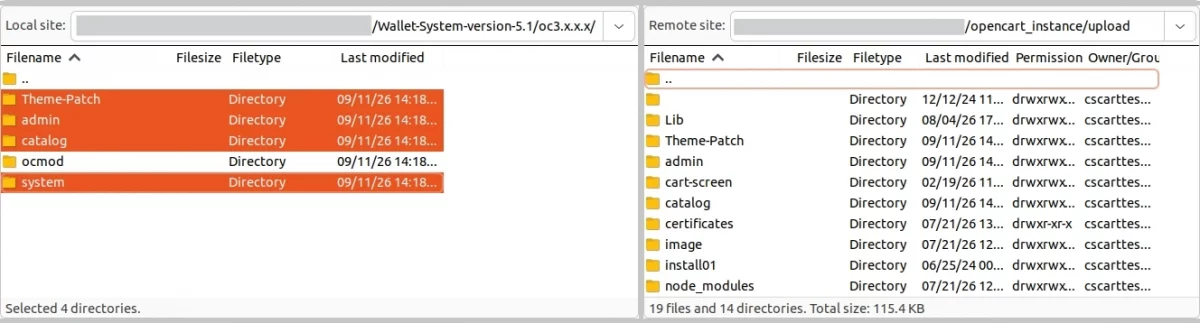
Extract the contents of the received zip folder on your system according to your Opencart version. The extracted folder has theme-patch, admin, catalog, ocmod, and system folders.
Now, upload the theme-patch, admin, catalog, and system directories into the Opencart root directory as shown below in the snapshot.
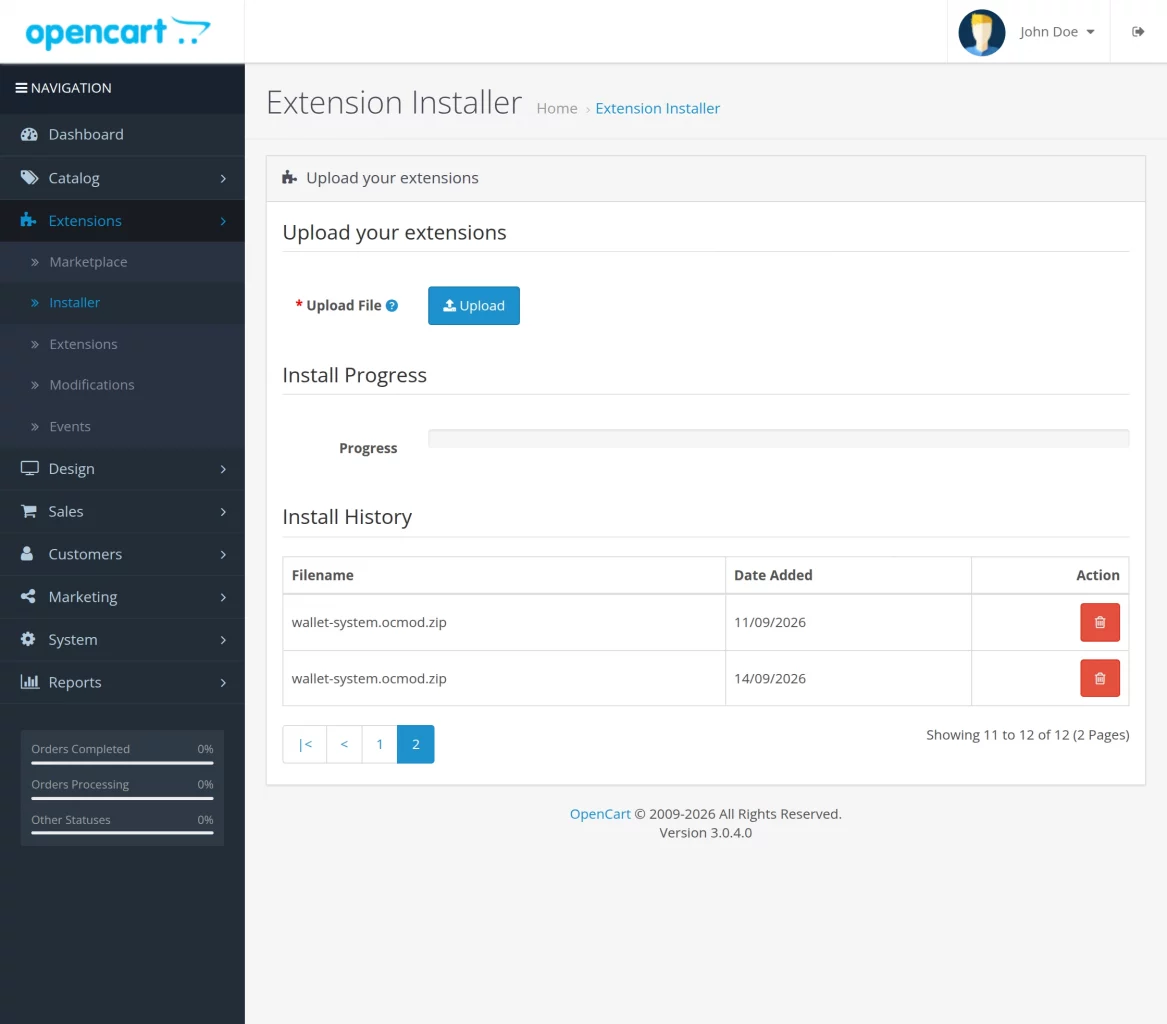
Once you have uploaded the folders, login to admin and then from the catalog section go to Extensions> Extension Installer and upload the zip file.
The zip file is in the ocmod folder under module directory. In the ocmod folder, select the Opencart version that you are using and under it, you will find wallet-system.ocmod.zip file.
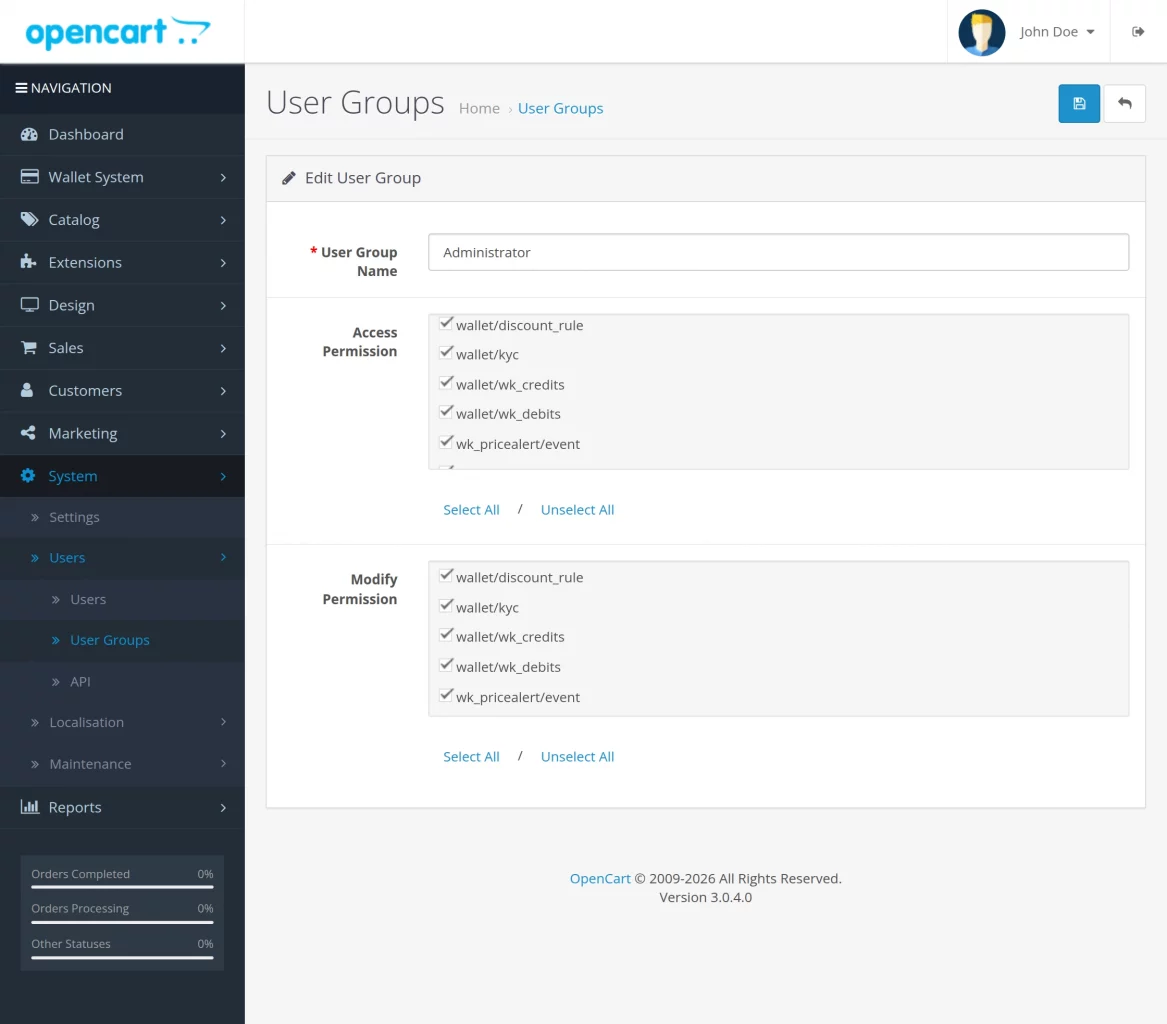
Now, Go to System -> Users -> User Groups >> edit ‘Administrator’ and choose to select all for both Access and Modify Permission for the permission that you want to provide and save it.
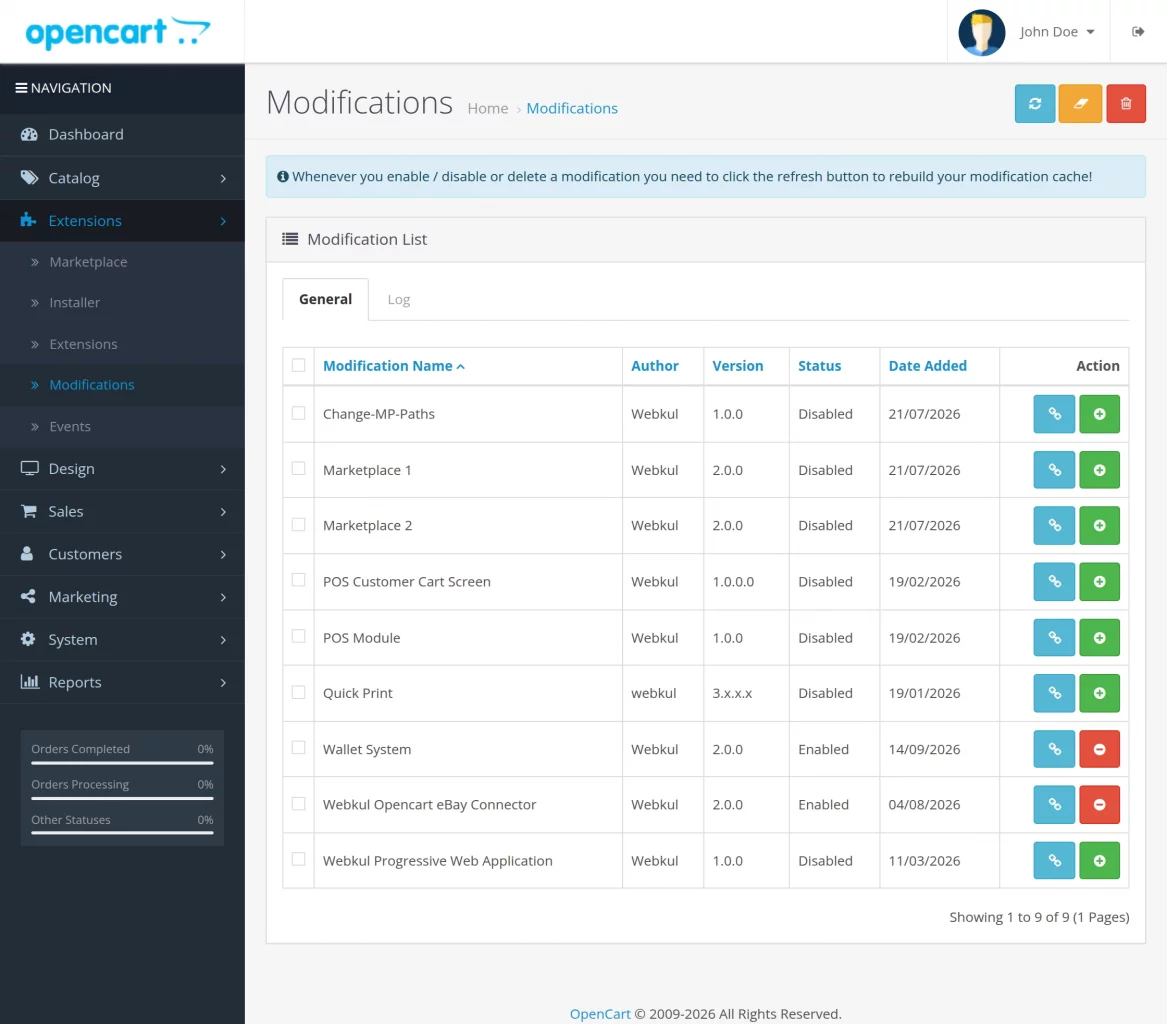
The user can navigate through Extensions > Modifications. Also, now click the Refresh button as visible in the below screenshot.
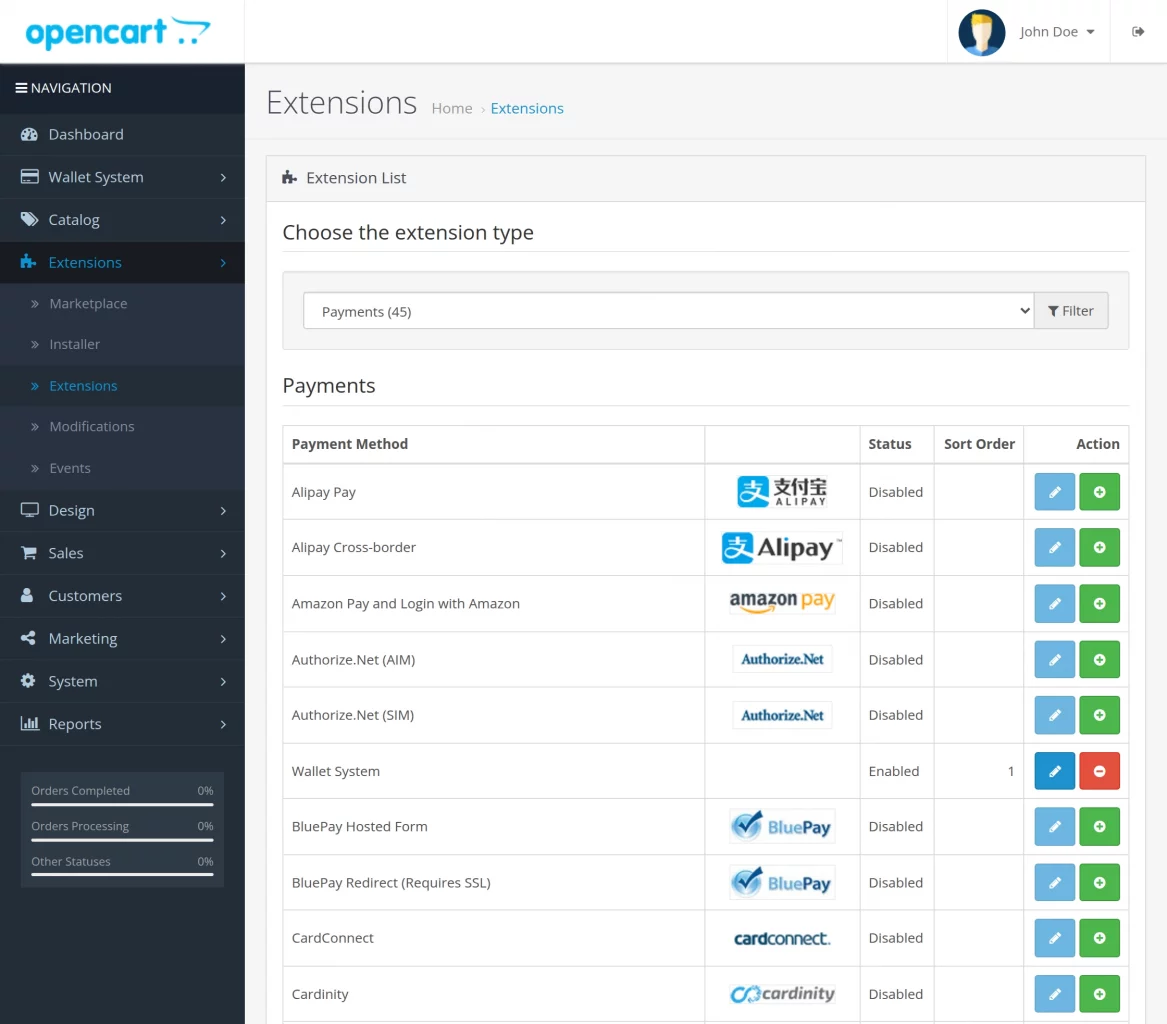
The admin can navigate to Extensions > Payments > Wallet System to install and edit the Wallet System.
Configurations: Wallet System
After the installation process of the Opencart Wallet System is complete, the admin can navigate through Extensions > Extensions > Payment > wallet system to set the following configurations:-
- General Configurations
- Order Total Settings
- Payment Method Settings
- Transfer Settings
- Info
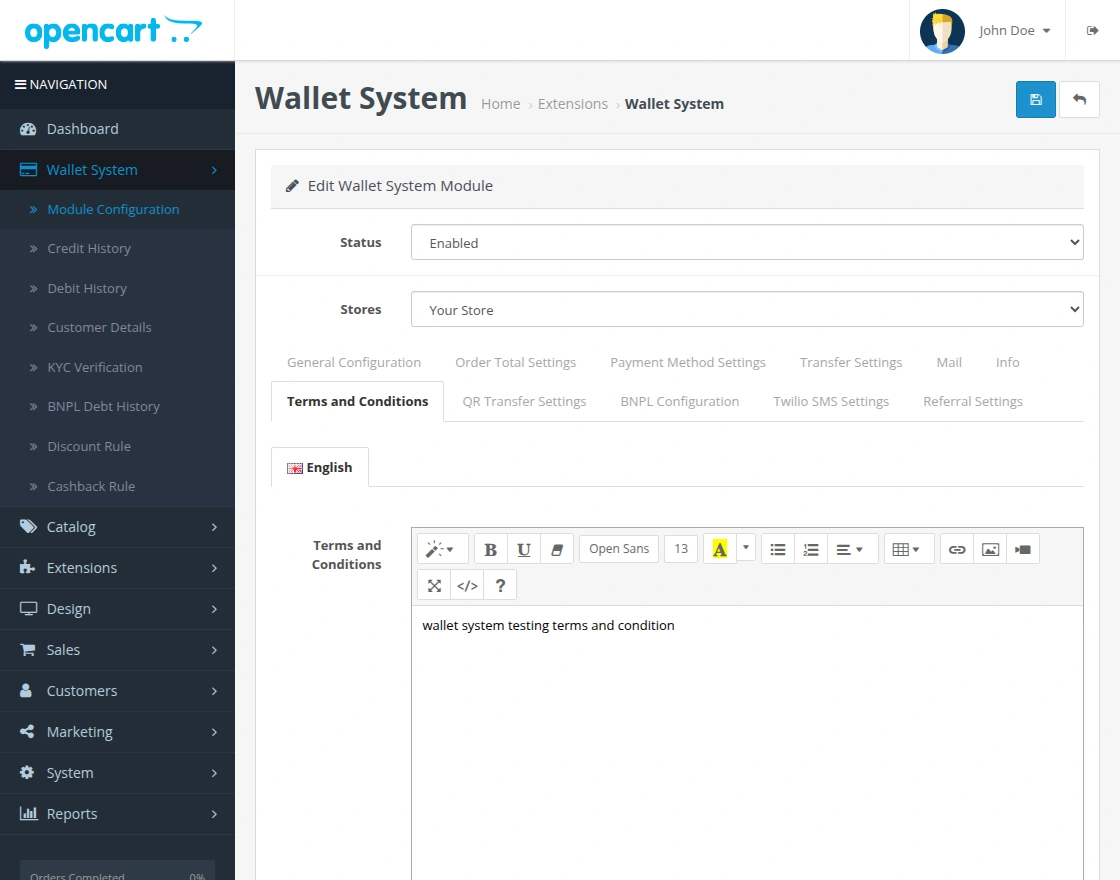
- Terms and Conditions
- QR Transfer Settings
- BNPL Configuration
- Twilio SMS Settings
- Referral Settings
Let us study the Wallet System Configurations in detail-
General Configuration:
In the General Configuration tab, the administrator can enable the module and configure the basic wallet settings.
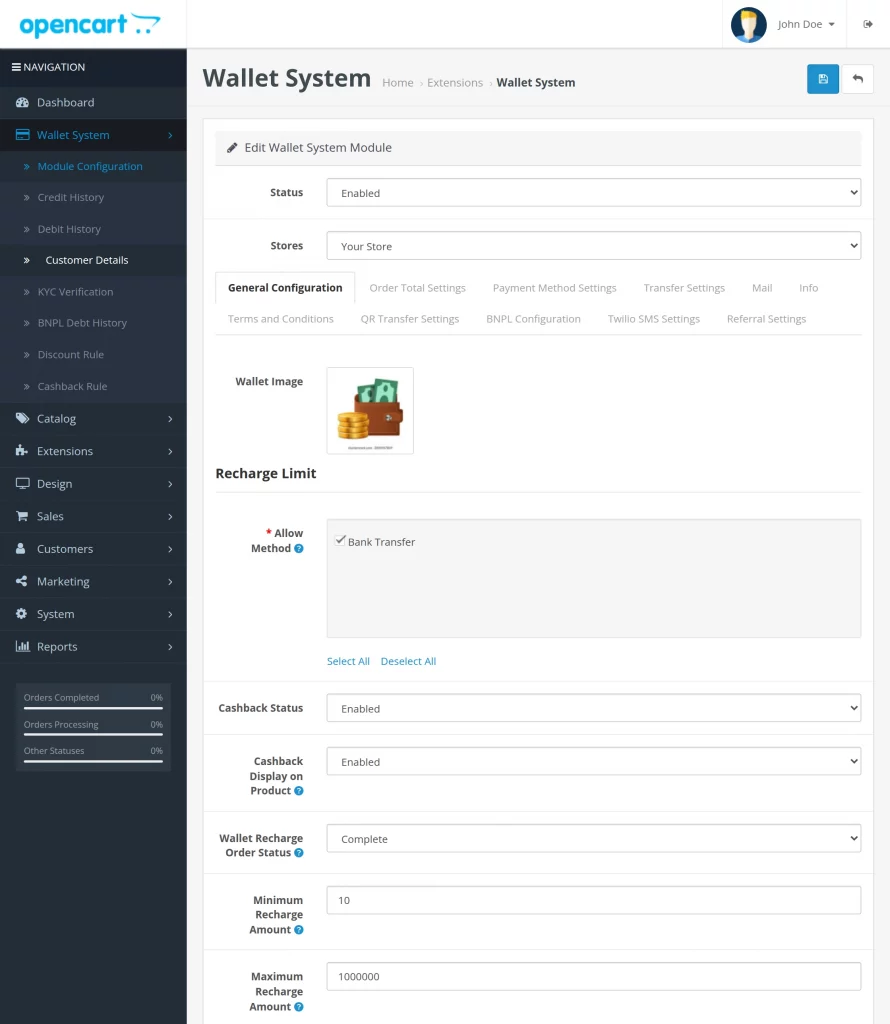
The admin configures the General Configurations under Recharge Limit-
- Wallet Image- The admin uploads an image for the wallet. Also, It is visible in the cart.
- Allow Method – Choose the preferred payment method which allows for the wallet recharge.
- Cashback Status- The admin has to enable the status of cashback.
- Cashback Display On Product- The admin can manage the visibility of the cashback on the product page.
- Wallet Recharge Status – Select the required wallet recharge status from the drop-down. The amount will not credit into the customer’s wallet until the wallet recharge status does not meet on selected status.
- Minimum Recharge Amount- It’s the minimum recharge limit of the wallet. If left blank, then there will be no minimum recharge limit.
- Maximum Recharge– The maximum recharge limit of the wallet. If left blank, then there will be no maximum recharge limit.
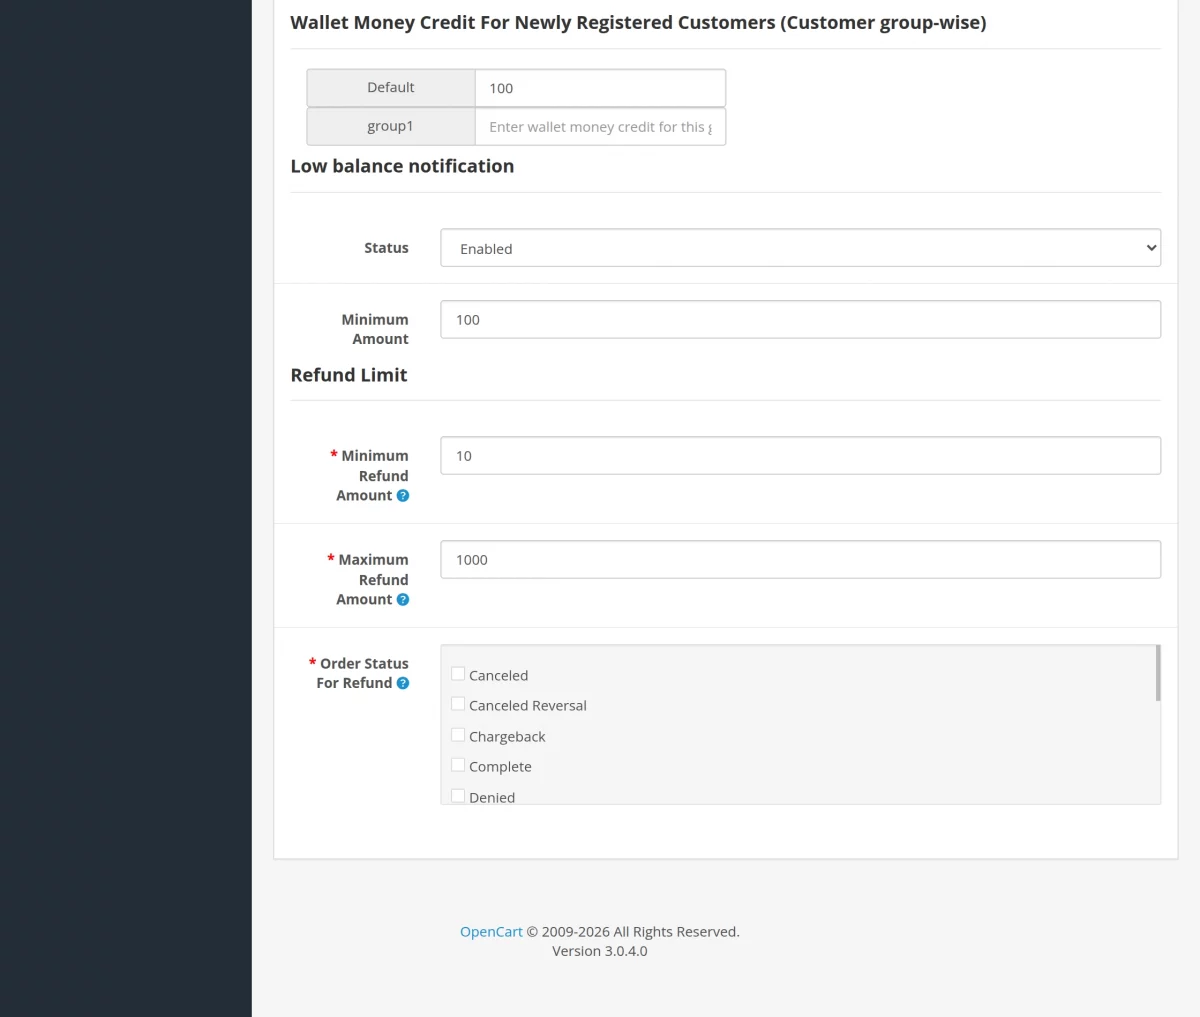
Wallet Money Credit for Newly Registered Customers (Customer group-wise)-
Whenever a new customer registers as one of the below-mentioned customer groups, the wallet amount set by the admin is allocated to the respective customer.
- Default- Set a default credit amount.
- Golden Membership- Also, set an amount for customers processing golden membership.
- Long-Time Customer- Default amount for long-time customers.
Low Balance Notification-
- Status- The admin may enable/ disable the low balance notification status. A low balance notification alert will show on the customer wallet page.
- Minimum Amount- Also, the admin sets a minimum balance amount. As the balance reaches this amount, the low balance notification will display.
Refund Limit-
- Minimum Refund Amount: The minimum refund amount limit for the wallet.
- Maximum Refund Amount: Maximum refund amount for the wallet.
- Order status for Refund: Also, the admin chooses an order status as Refunded.
To refund the order, first, the admin has to set the Refunded status against the Order status for the Refund field as shown in the above configuration image.

Furthermore, given below are a list of cases link to the refund process. Let us see and discuss them in detail.
Case 1:- Minimum & Maximum Refund Amount Limit:
For instance, the admin defines Minimum Refund Amount as 200 and the Maximum Refund Amount as 1000.
- Also, If any order’s amount falls under the price range of 200-1000 (minimum-maximum price), then it will be refunded.
- Suppose, if the order amount is 450, then the order will be refunded.
- If the order price is 200 or 1000, even then the order is refunded (the minimum-maximum price inclusive).
Case 2:- Order Price less than the minimum price (here 200).
- Also, If the order price is less than the minimum price, (here 200), then no refund for that order will be made.
Case 3:- Order Price more than the maximum price (here 1000).
- If the order price is more than the maximum price, (here 1000), then the price of the order up to $1000 will be refunded.
- For instance, if the order amount is $1300, then the refund of $1000 will be processed.
Order Total Setting
Thereafter, the admin will configure the fields under the Order Total Settings tab. The admin configures the fields under Manage Order Total.
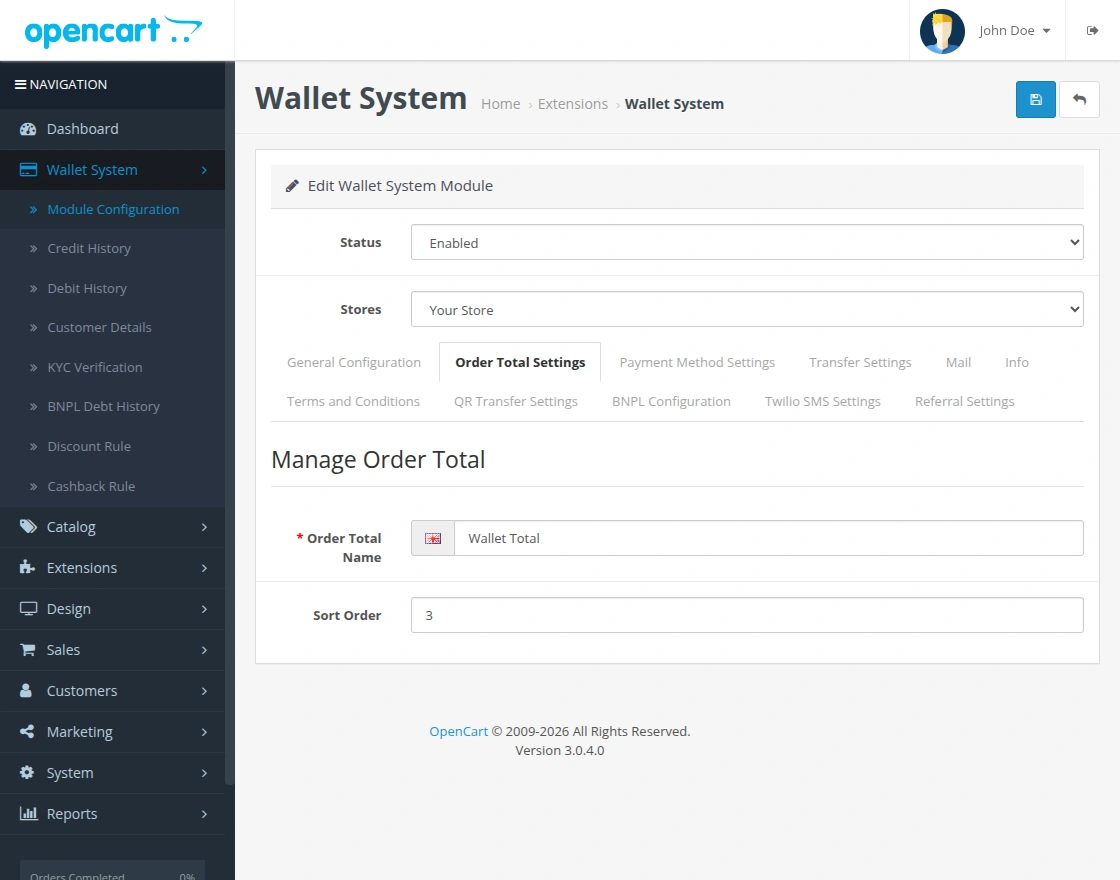
Also, the admin configures the Order Total Settings under Manage Order Total-
- Order Total Name: Name which displays on the checkout page.
- Sort Order: The admin sets the order total sort order.
Payment Method Setting
Under Payment Method Settings, the admin sets the configurations under Manage Payment Method.
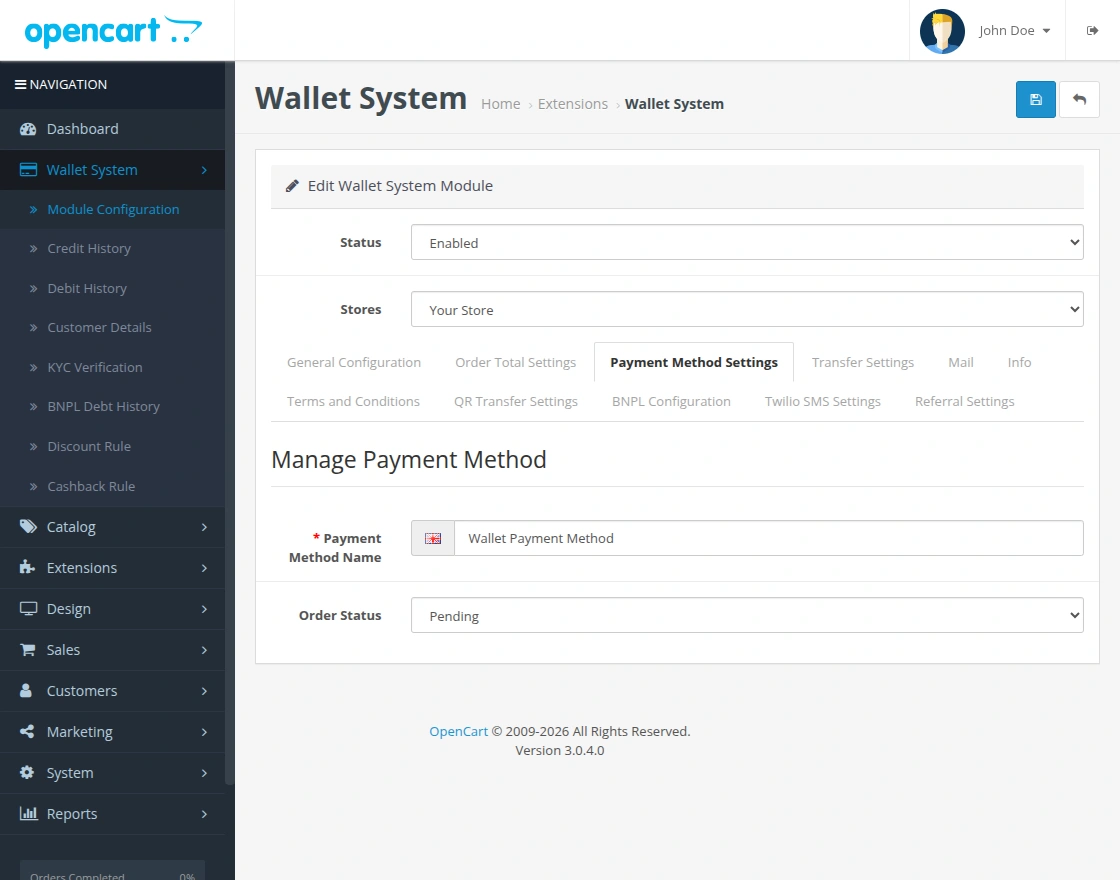
Also, the admin configures the Payment Method Settings as under Manage Payment Method-
- Payment Method Name: Name which displays on the checkout page.
- Order Status: An order status is set by the admin for the payment method.
Transfer Settings
Further, the admin will have to configure the configurations under Transfer Settings.
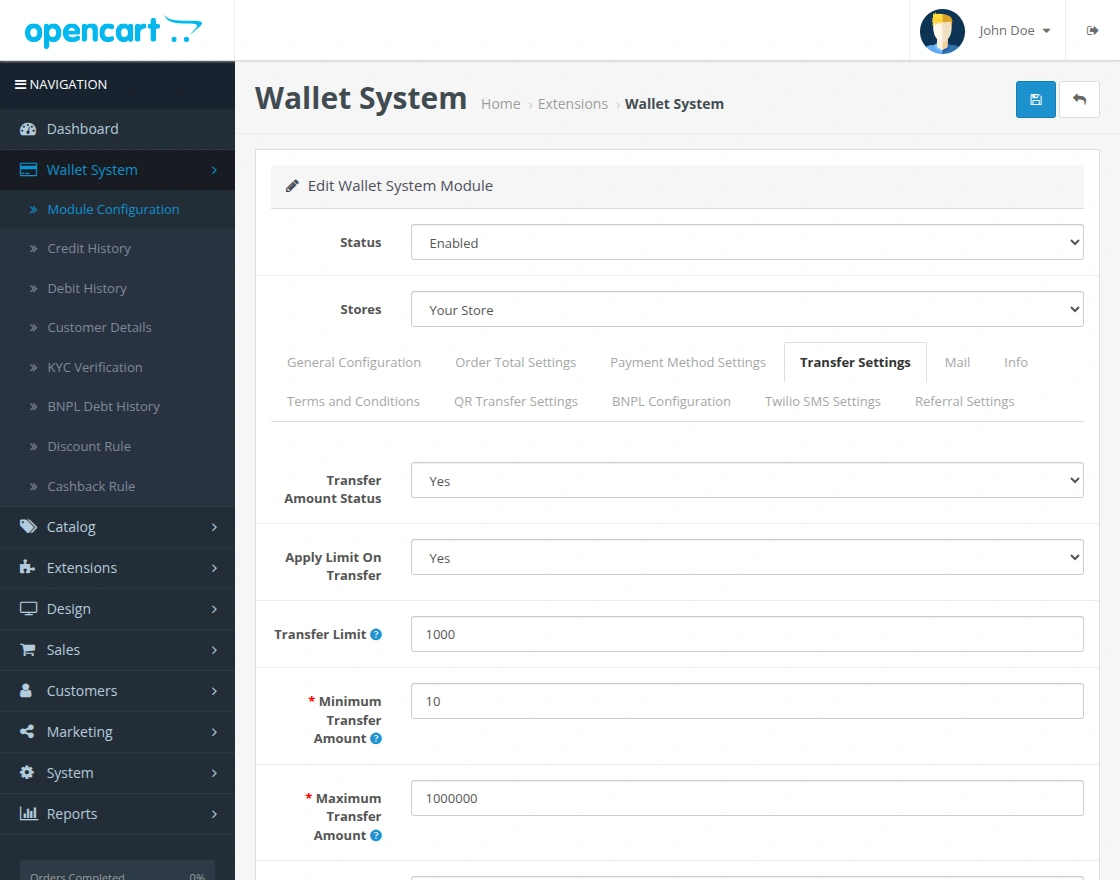
The admin configures the Transfer Settings as under-
- Transfer Amount Status: Enable or disable the wallet transfer functionality.
- Apply Limit on Transfer: Select yes to apply the transfer limit. If selected “NO” then the below fields will not work.
- Transfer Limit: Maximum number of transfers to another customer in a month.
- Minimum Transfer Amount: Minimum transfer amount for a single transaction.
- Maximum Transfer Amount: Maximum transfer amount for a single transaction.
- Amount Limit: Maximum limit of the amount for all the transactions done in a month.
Note: “If any customer breaches the transaction limit then the transaction would not be done.”
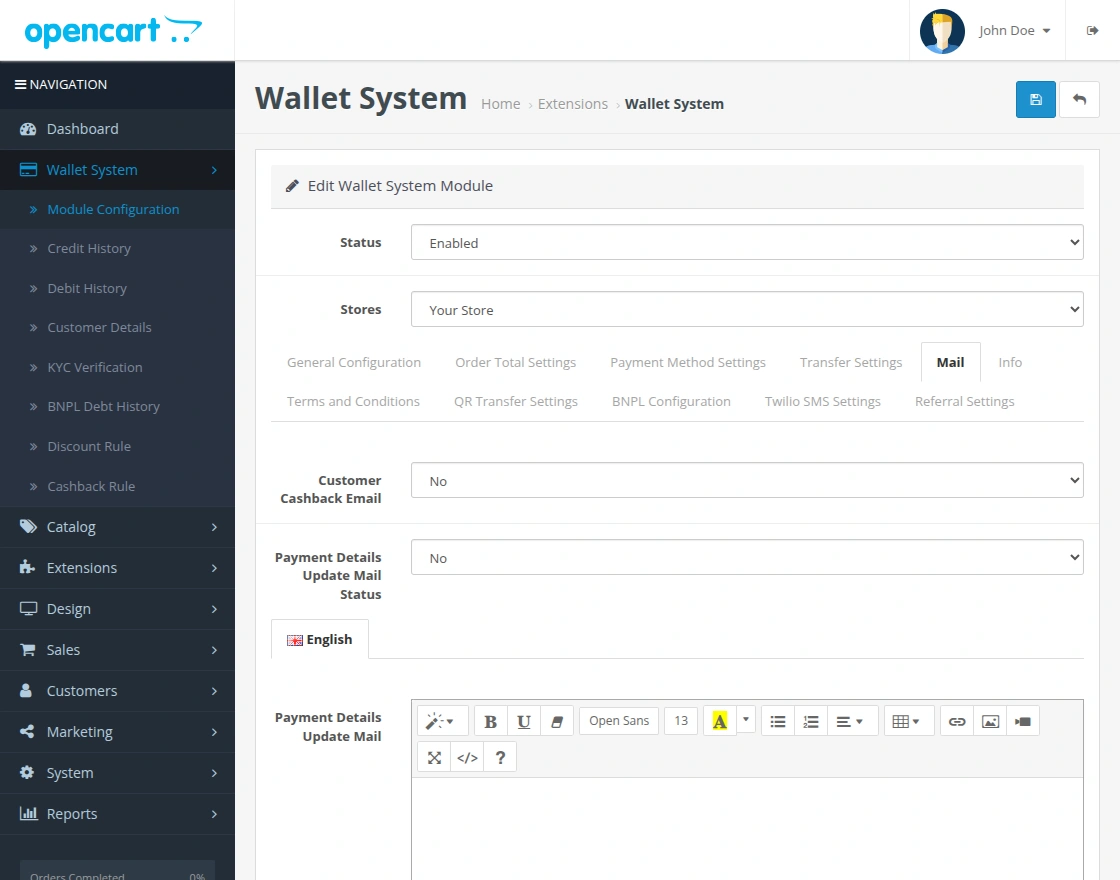
Mail:
The admin can manage the email template that will be used when a customer will update the bank details, the same email will be delivered to the customer. The admin can set Customer Cashback Status as Yes to send an email to the customer for cashback.
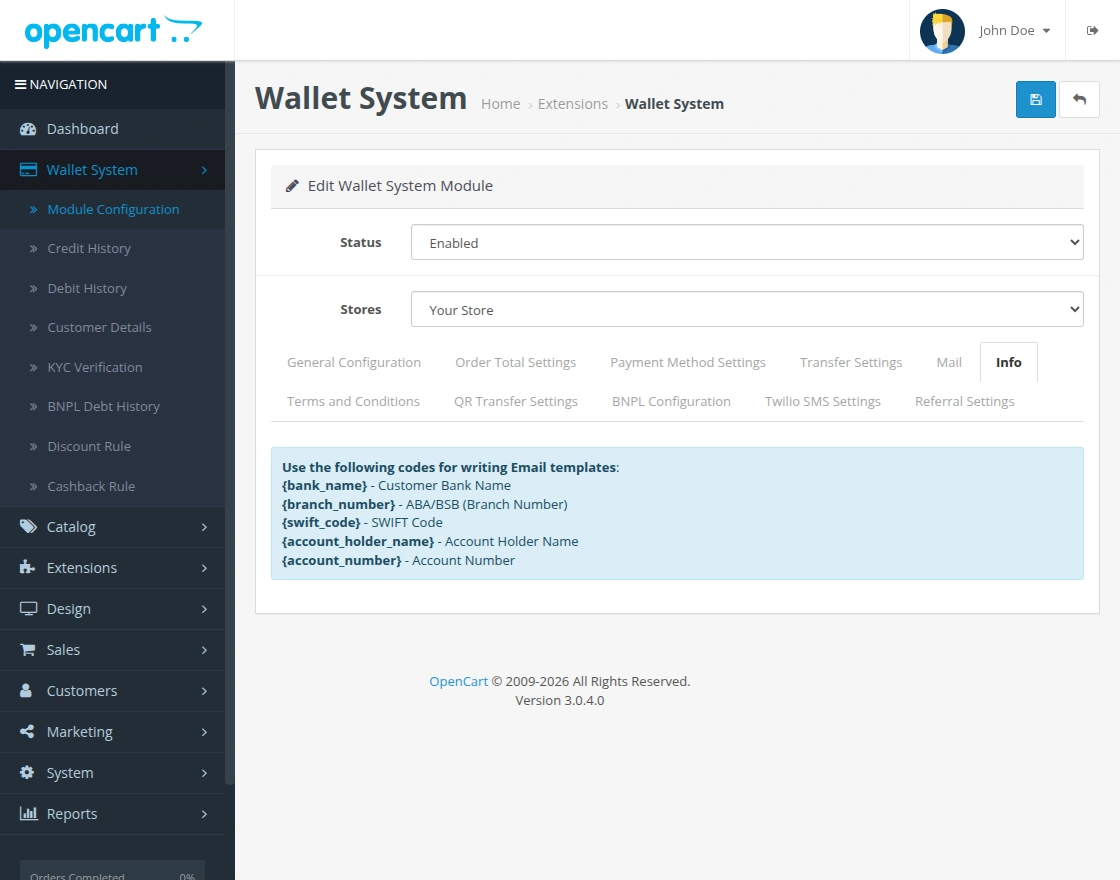
Info :
The admin can use the provided shortcode in the info tab, to manage the email template.
Terms and Conditions:
The admin can even add the Terms and Conditions for the wallet system as shown in the image below.
QR Transfer Settings
The QR Transfer Settings tab allows the administrator to configure QR-based wallet transfers.
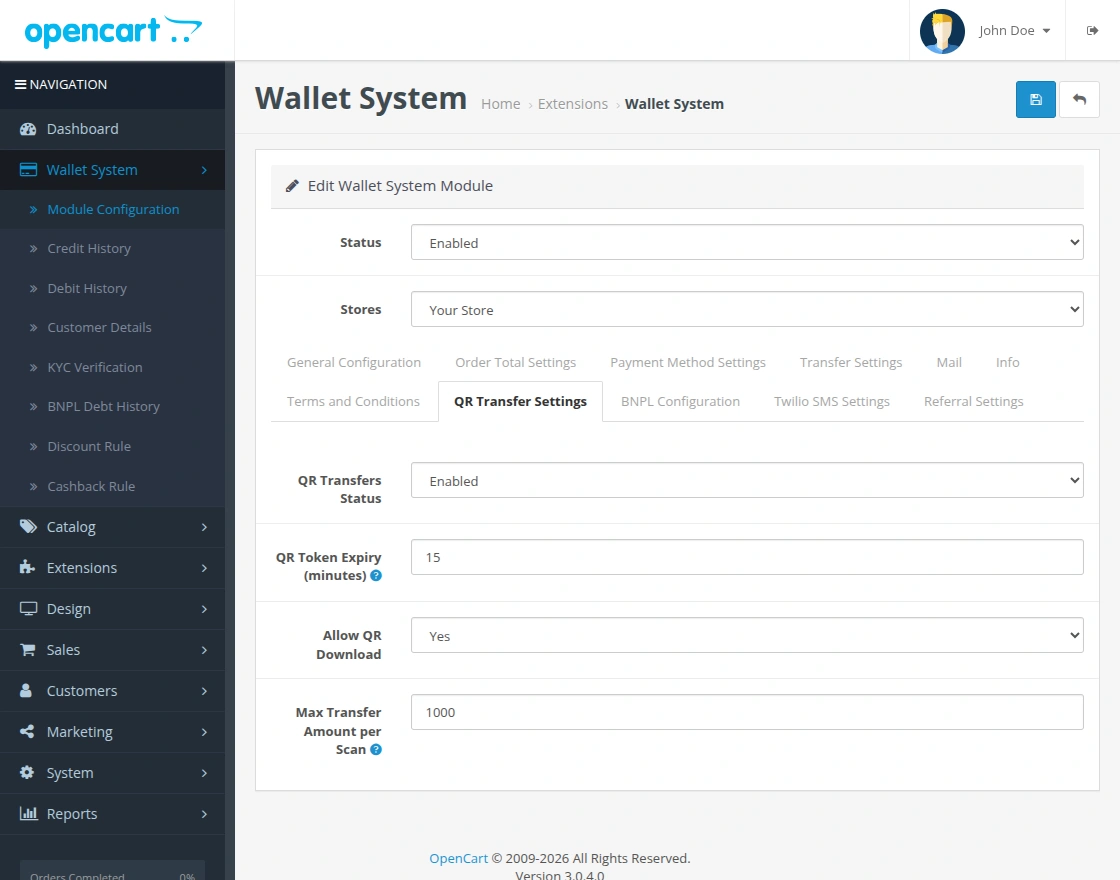
QR Transfers Status: Enable or disable QR transfer functionality.
QR Token Expiry: Set the validity period of generated QR transfer tokens in minutes.
Allow QR Download: Allow or restrict customers from downloading their QR codes.
Max Transfer Amount per Scan: Set the maximum amount allowed through a single QR scan.
BNPL Configuration
The BNPL Configuration tab allows the administrator to configure the Buy Now Pay Later functionality.
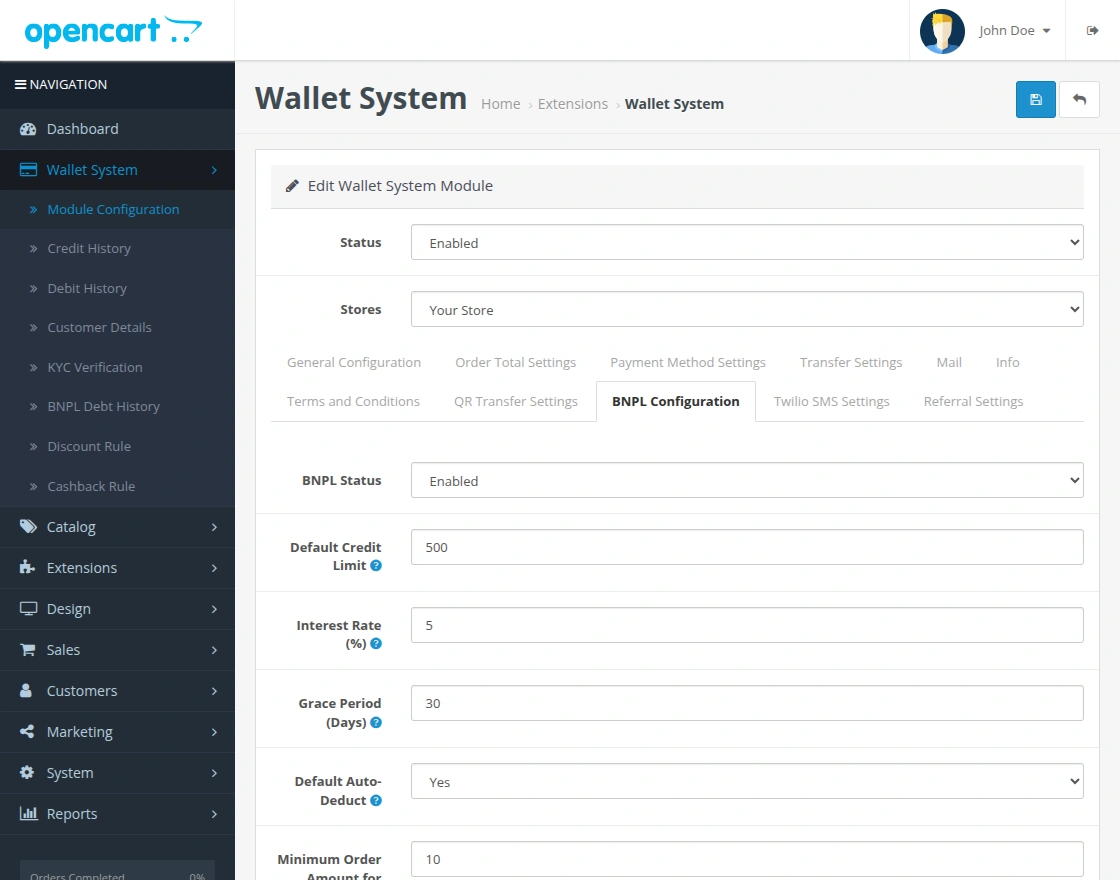
BNPL Status: Enable or disable the BNPL functionality.
Default Credit Limit: Set the default credit amount available to eligible customers.
Interest Rate: Define the interest rate applied to BNPL transactions.
Grace Period: Set the number of days provided before BNPL repayment becomes due.
Default Auto-Deduct: Enable or disable automatic repayment from the customer’s wallet balance.
Minimum Order Amount: Set the minimum order amount required for using BNPL.
Twilio SMS Settings
The Twilio SMS Settings tab allows the administrator to configure SMS notifications using Twilio.
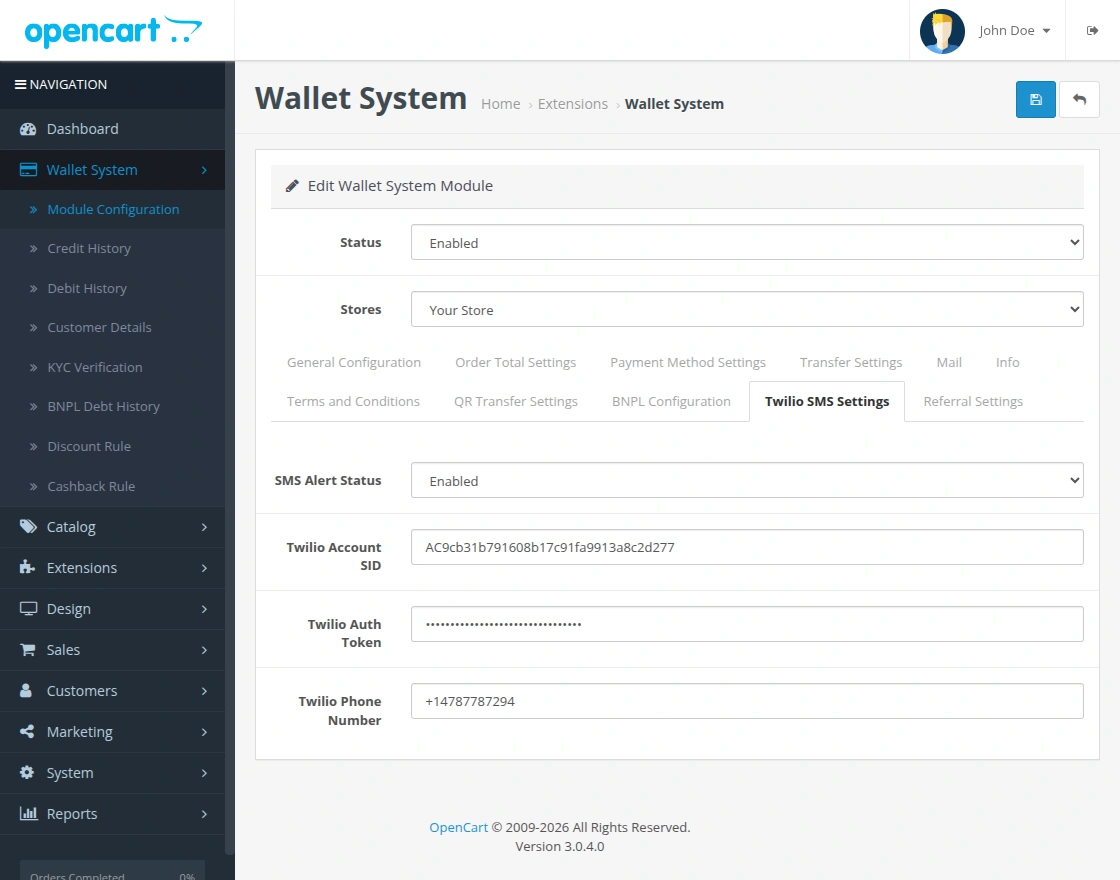
SMS Alert Status: Enable or disable SMS notifications for supported wallet activities.
Twilio Account SID: Enter the Twilio Account SID required for SMS communication.
Twilio Auth Token: Enter the authentication token associated with the Twilio account.
Twilio Phone Number: Enter the Twilio phone number used for sending SMS notifications.
Referral Settings
The Referral Settings tab allows the administrator to configure the wallet referral program.
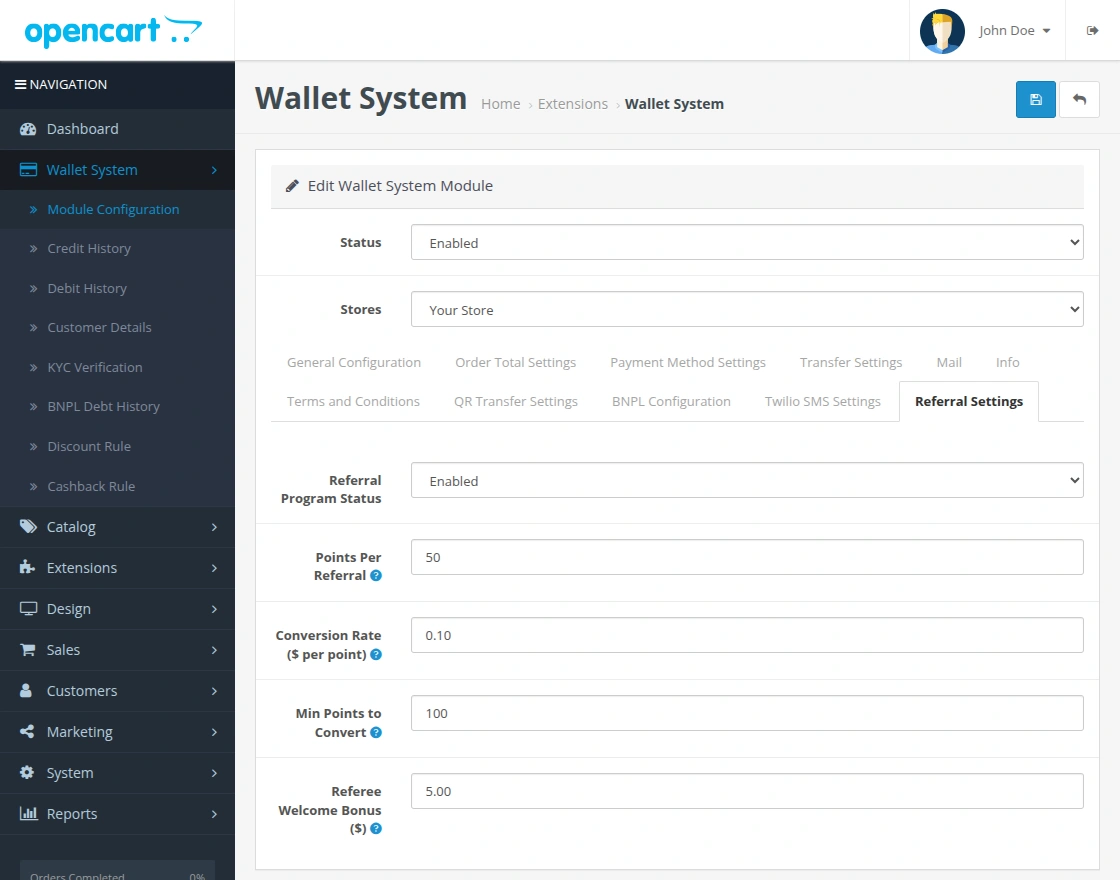
Referral Program Status: Enable or disable the referral program.
Points Per Referral: Set the number of points awarded for each successful referral.
Conversion Rate: Define the wallet value received for each referral point.
Minimum Points to Convert: Set the minimum points required to convert referral points into wallet funds.
Referee Welcome Bonus: Set the welcome bonus provided to the referred customer.
Frontend Workflow: Wallet System
After completing the configuration, customers can access and use the Wallet System from their account.
The updated Wallet System provides wallet recharge, transfers, KYC verification, BNPL, QR transfers, cashback, referrals, statements, and notifications.
New Customer Registration
A new customer can create an account on the OpenCart store by entering the required registration details.
After registration and login, the customer can access the available wallet options from the My Account section.
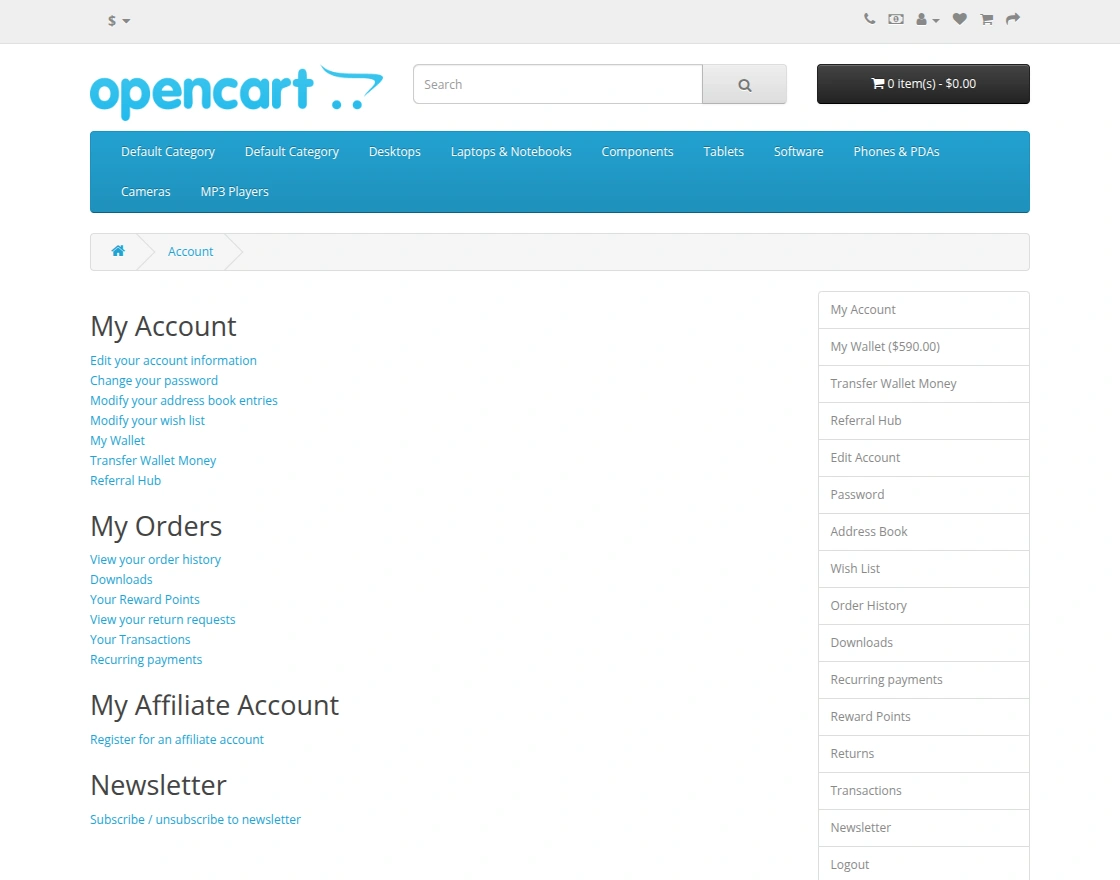
My Wallet
After logging in, customers can access My Wallet from their account to manage their wallet-related activities.
The wallet section provides options for viewing the balance, recharging the wallet, transferring funds, managing bank details, and viewing transactions.
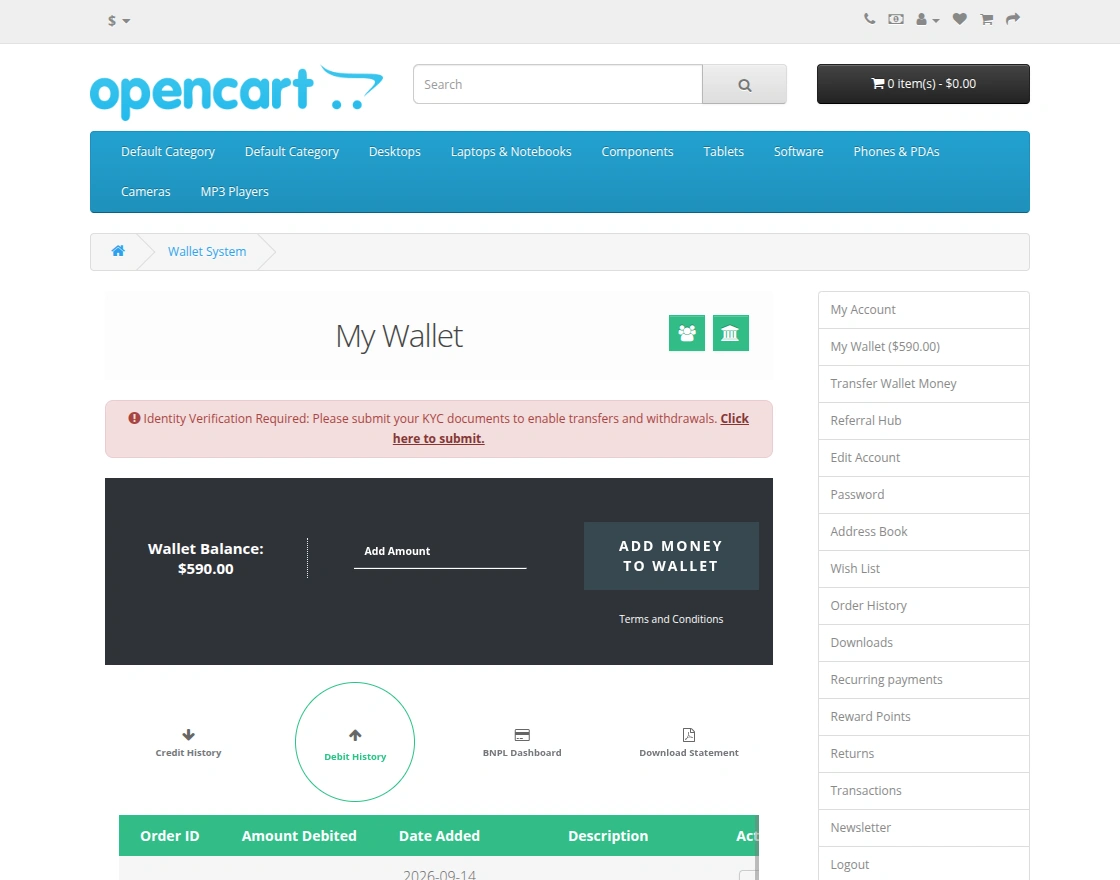
Low Balance Notification
Customers receive a low balance notification when their wallet balance reaches the minimum amount configured by the administrator.
The notification helps customers identify when their available wallet balance becomes low.
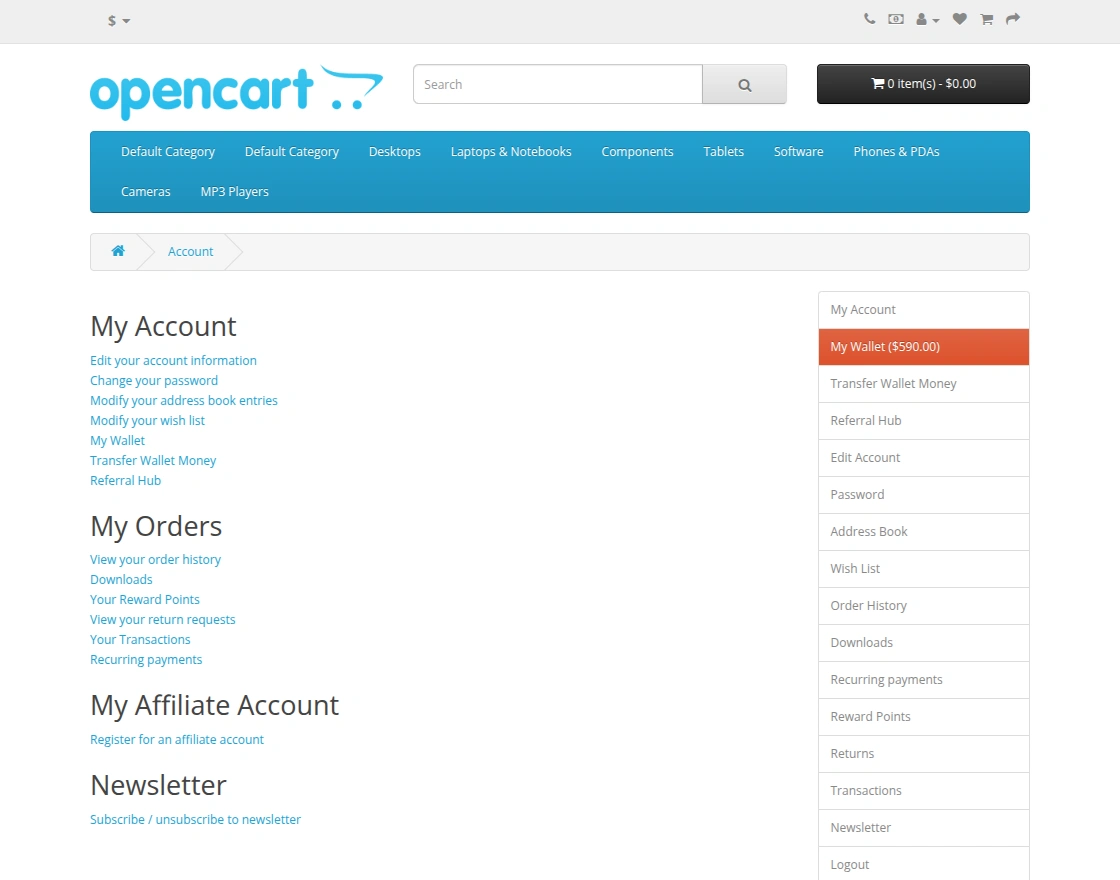
Wallet Recharge
Customers can add funds to their wallet by selecting the available payment method configured by the administrator.
The customer enters the required recharge amount and proceeds with the selected payment method.
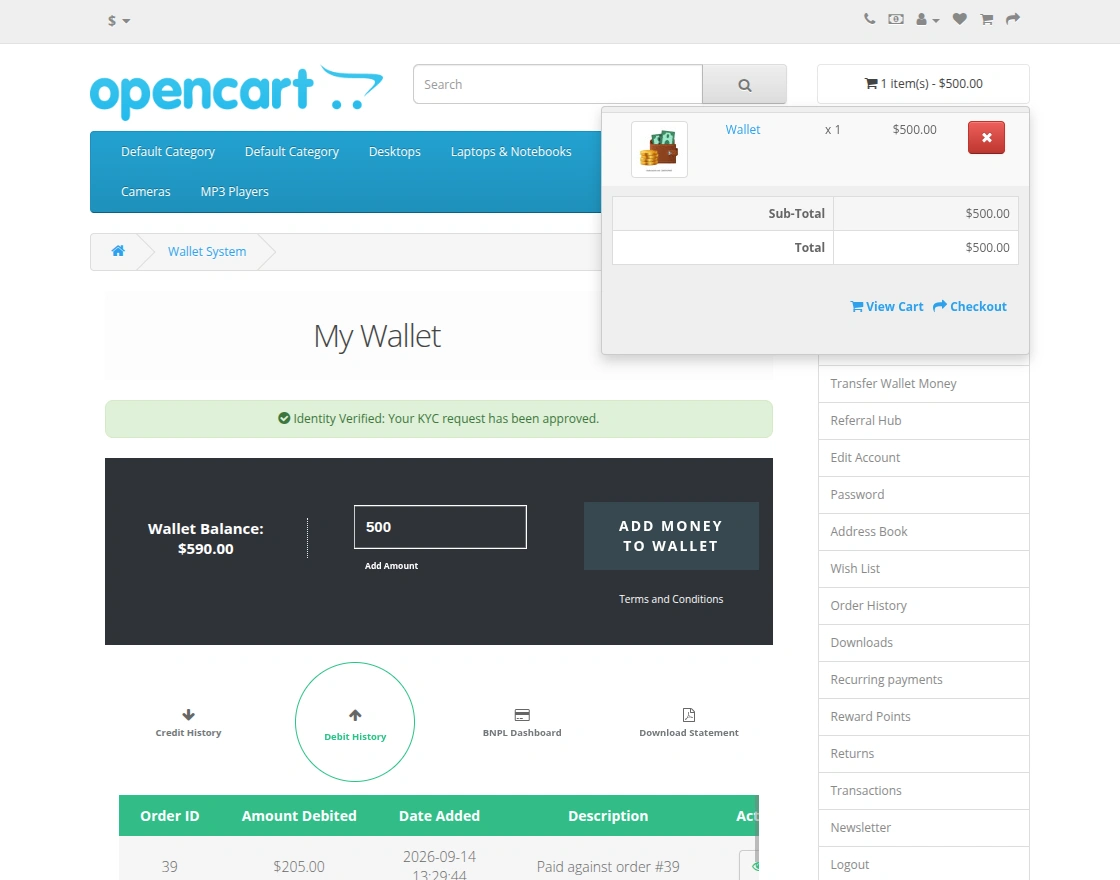
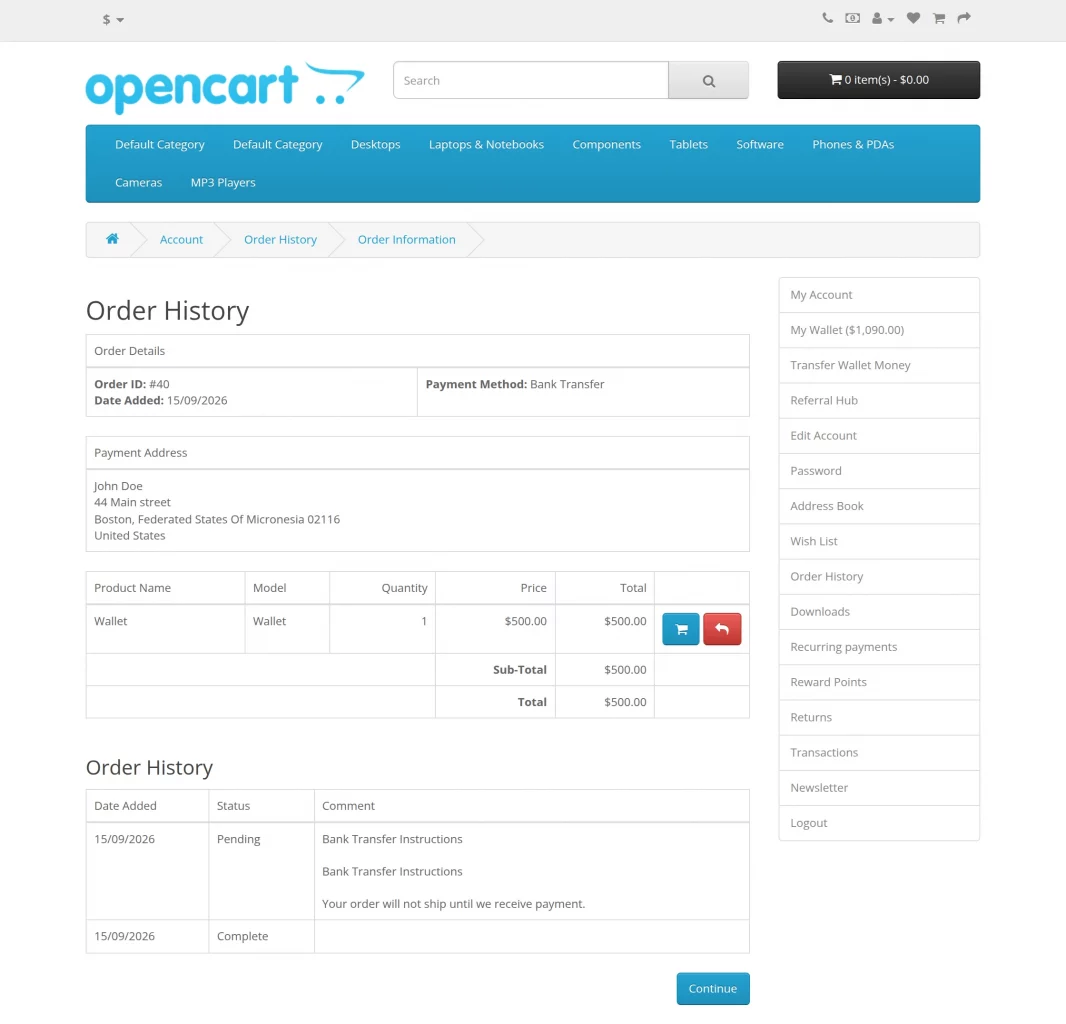
The wallet amount is credited according to the Wallet Recharge Order Status configured by the administrator.
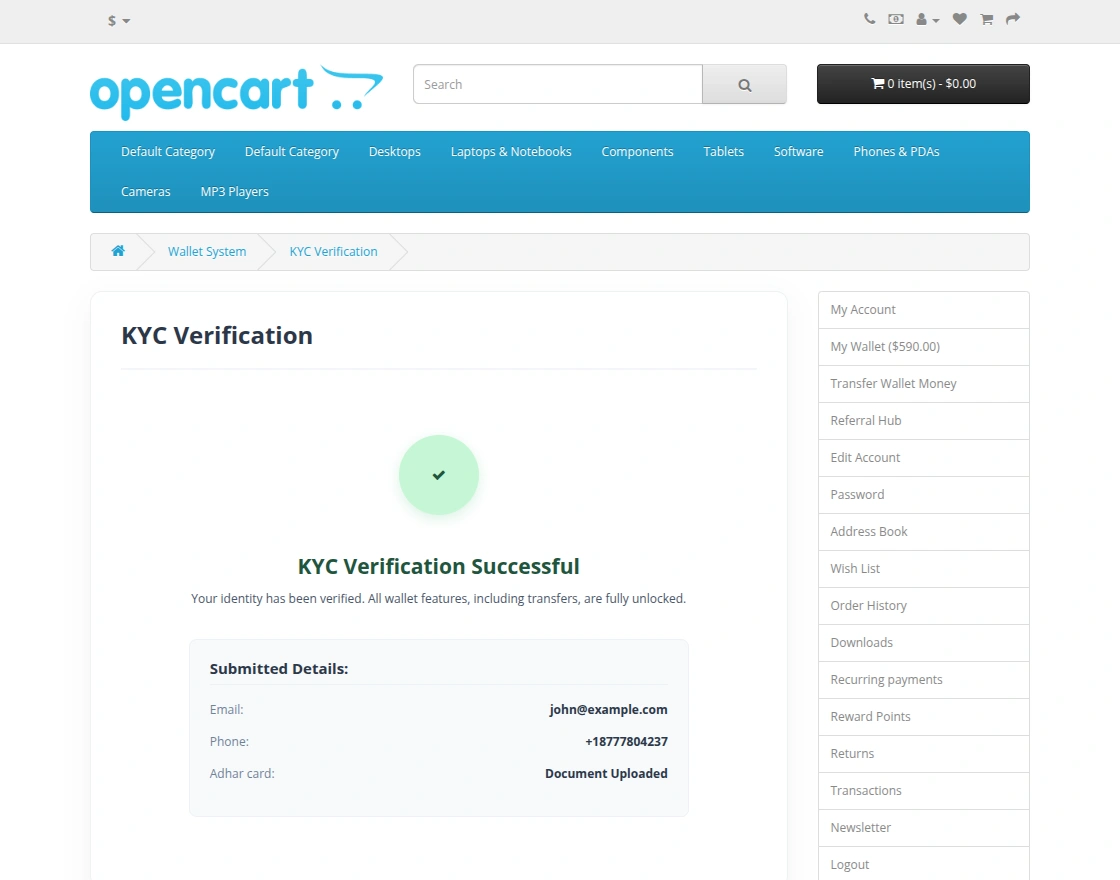
KYC Verification
Customers can submit their required KYC information from the KYC Verification section of their wallet account.
The customer needs to enter the required details and upload the supported documents for verification.
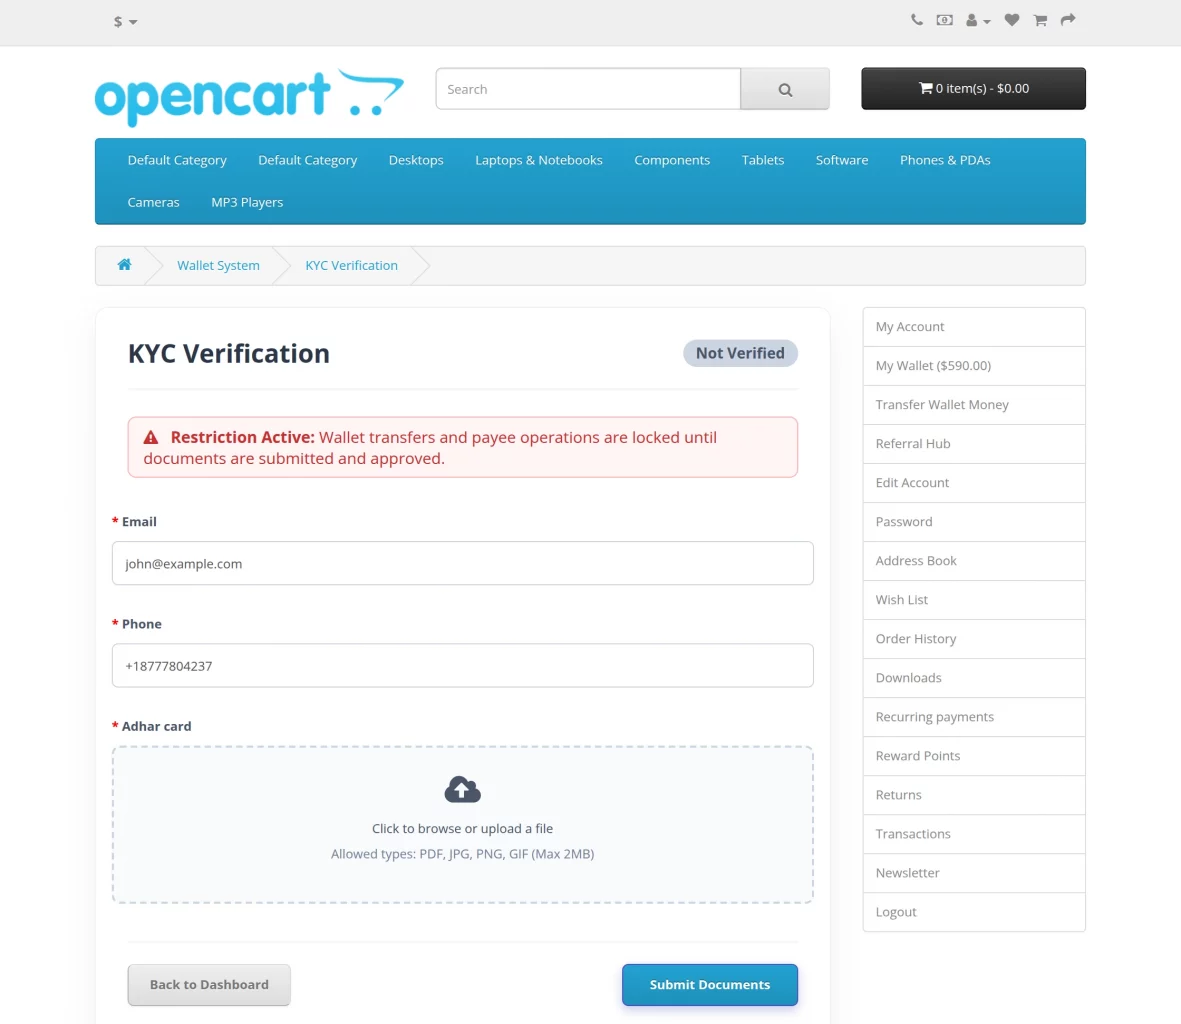
After submitting the KYC form, the customer can view the verification status from their account.
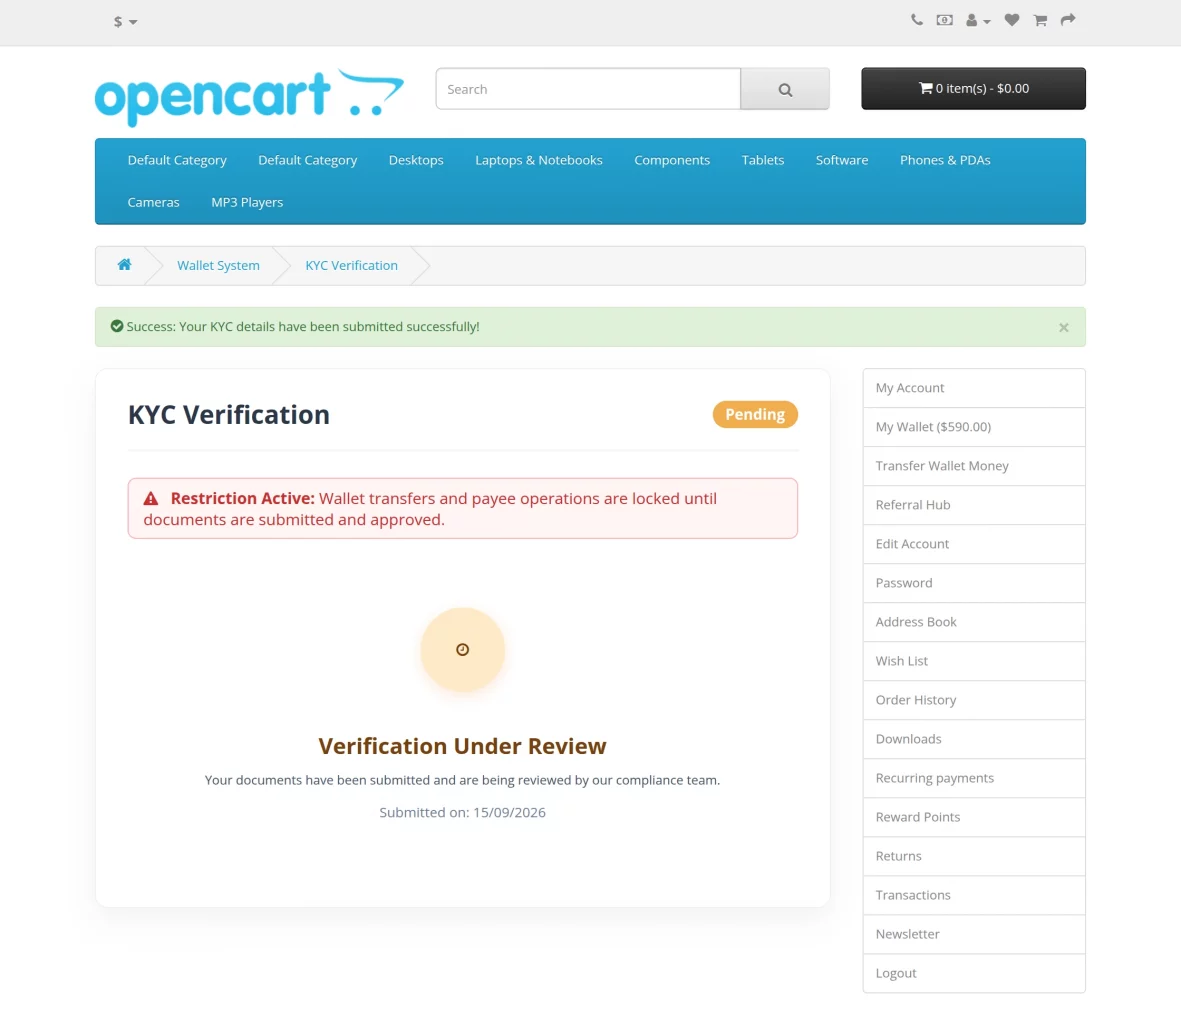
The customer can view whether the submitted KYC request is Pending, Verified, or Rejected.
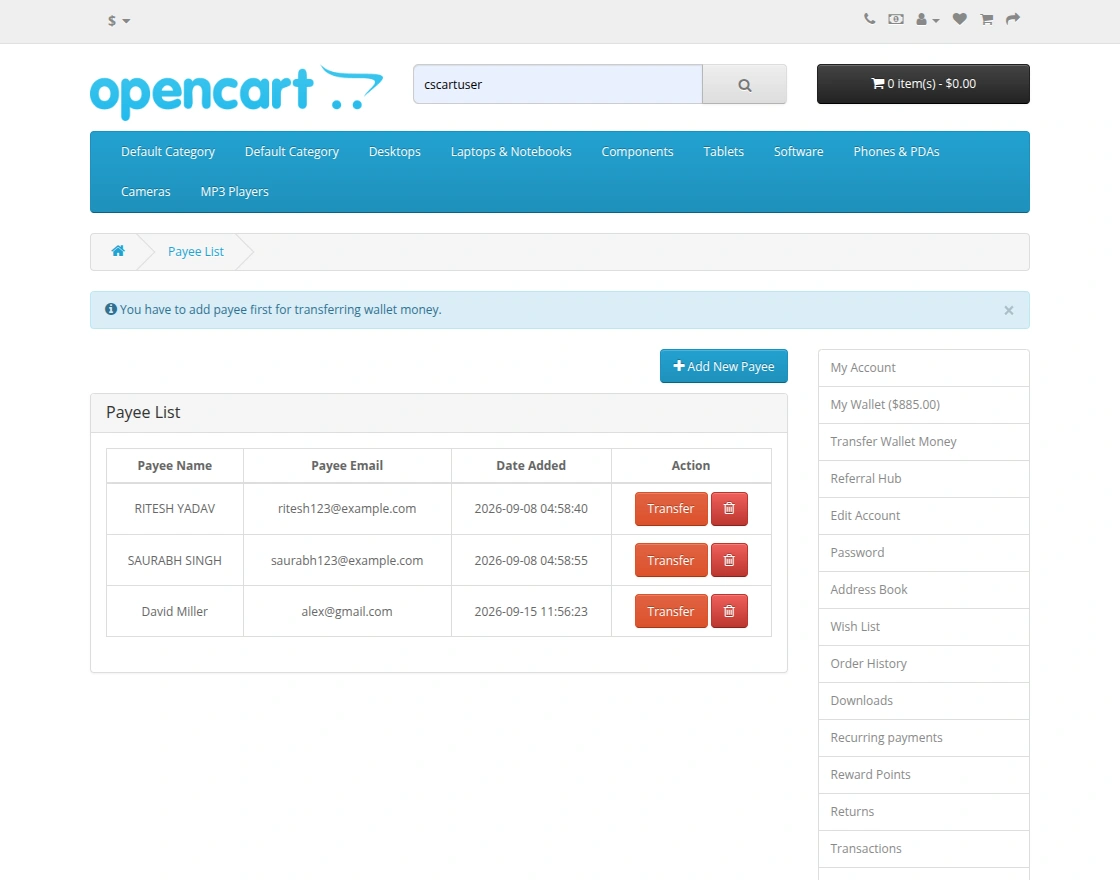
Transfer Wallet Money
Customers can transfer wallet funds to other existing customers of the store.
Before transferring funds, the customer needs to add the recipient as a Payee using the recipient’s email address.
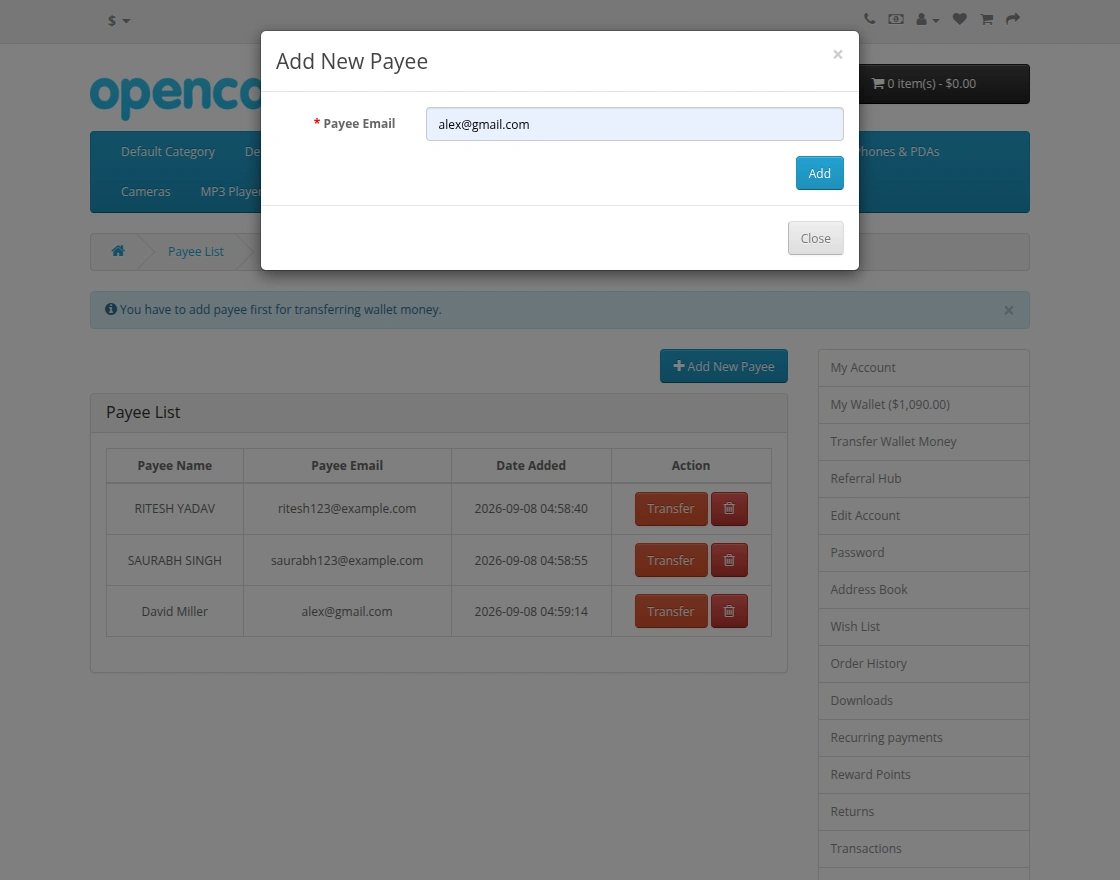
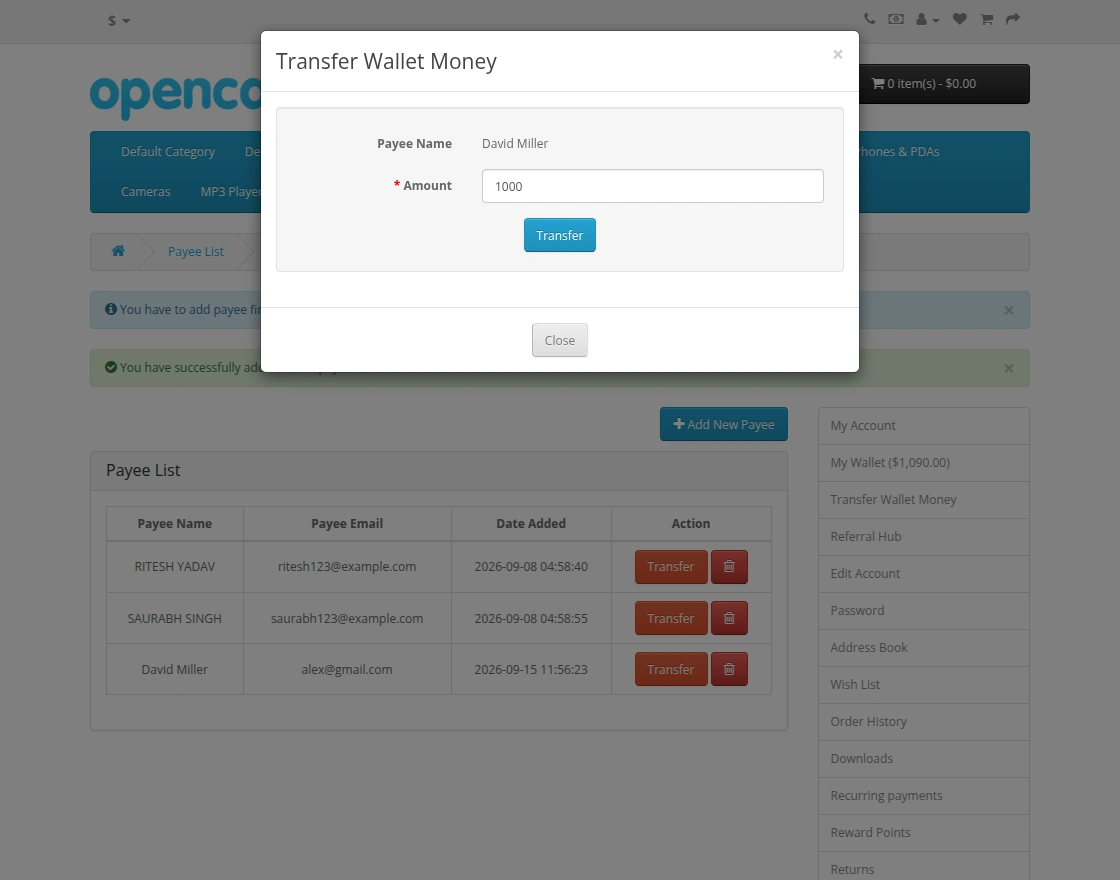
After adding a payee, the customer can select the payee and enter the amount to be transferred.
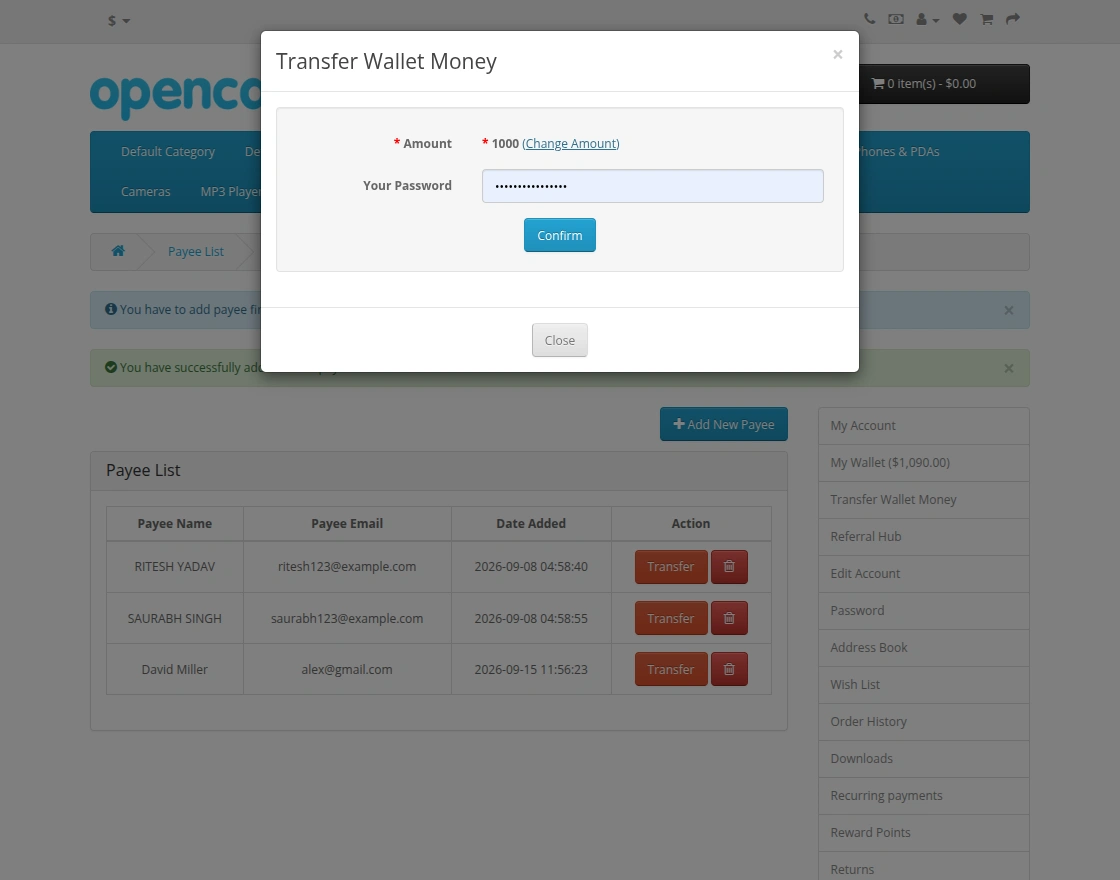
The customer needs to enter their password to confirm the wallet transfer.
After a successful transfer, the customer can view the updated transaction details in their wallet history.
QR Code Transfer
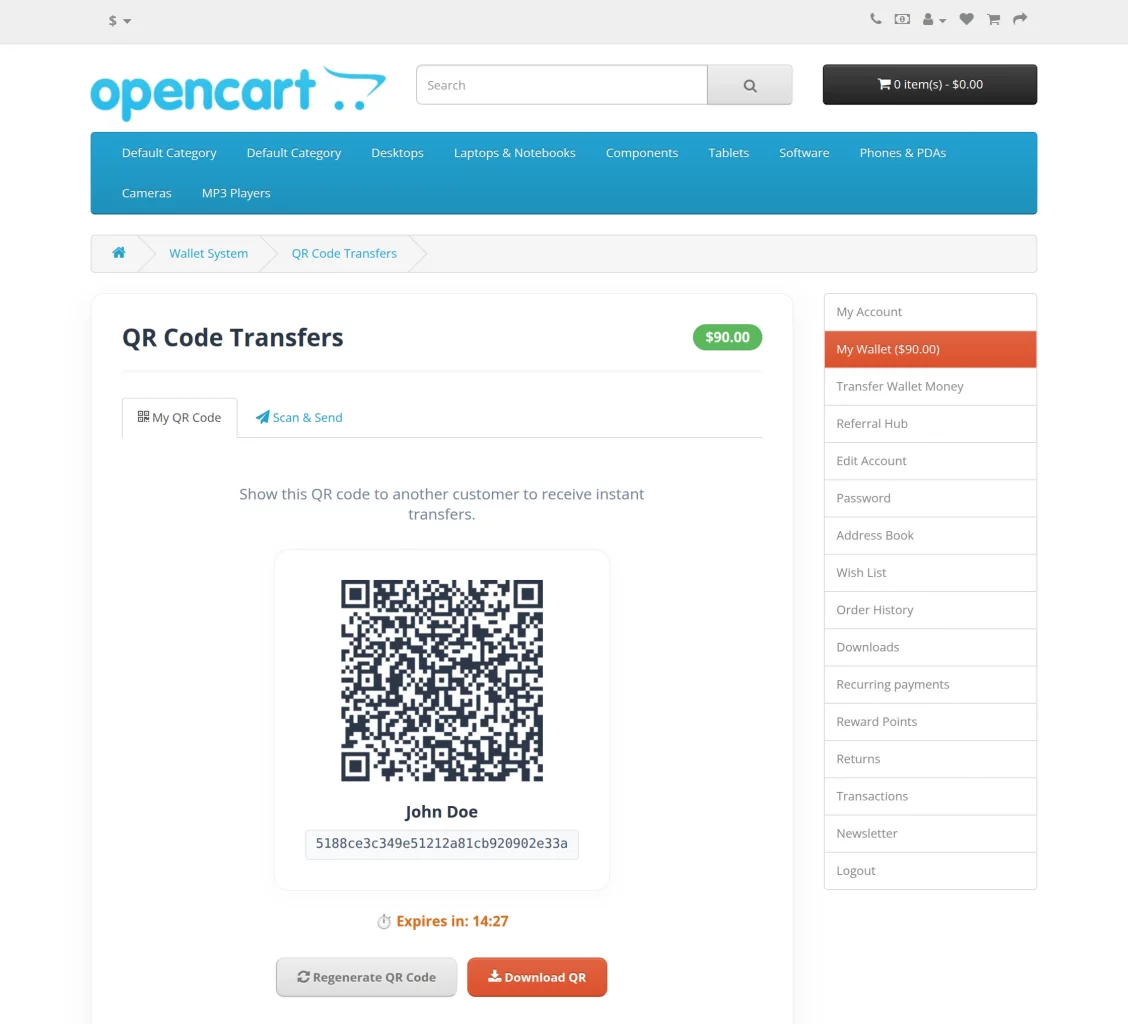
Customers can use QR codes to transfer wallet funds to another customer.
The customer can view their wallet QR code and share or download it according to the configured settings.
The recipient can scan the QR code and enter the required amount to transfer wallet funds.
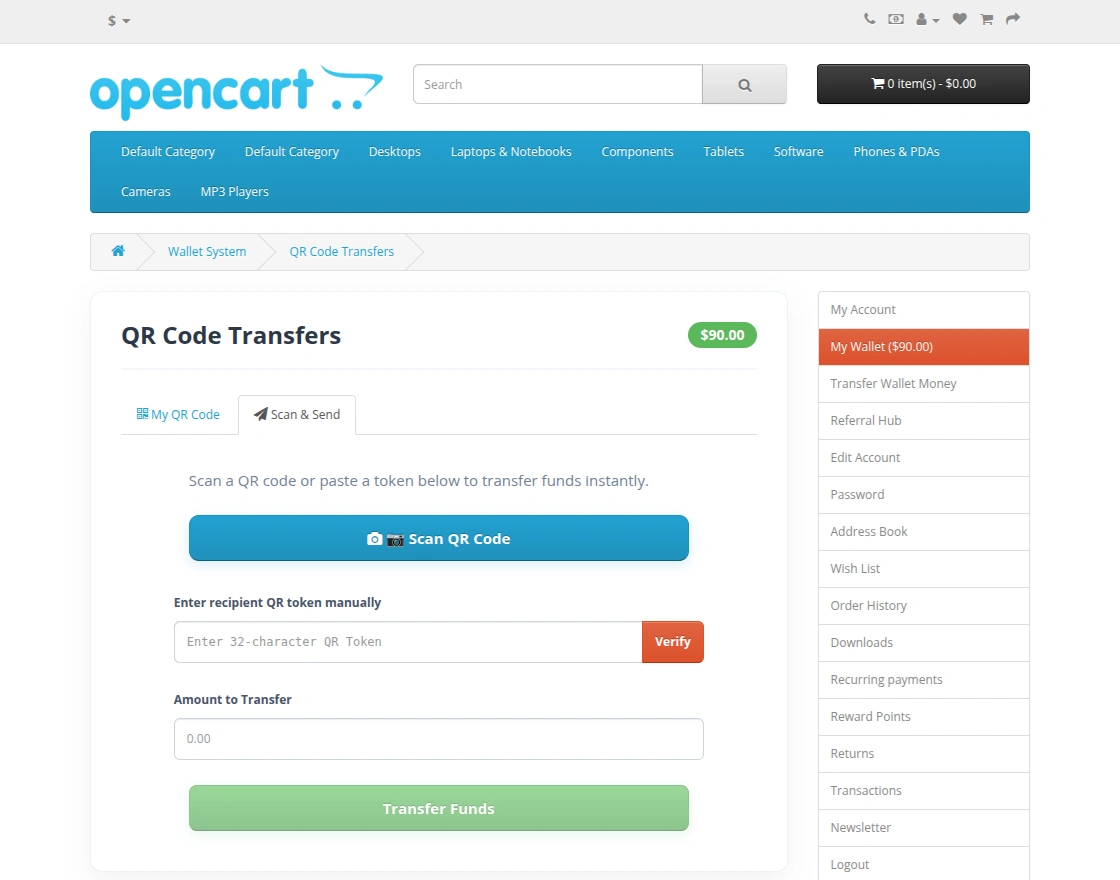
The QR transfer is processed according to the configured token expiry and maximum transfer amount.
BNPL
Eligible customers can use Buy Now Pay Later (BNPL) when purchasing products from the store.
The customer can view their available credit, used amount, outstanding amount, and repayment details from the BNPL dashboard.
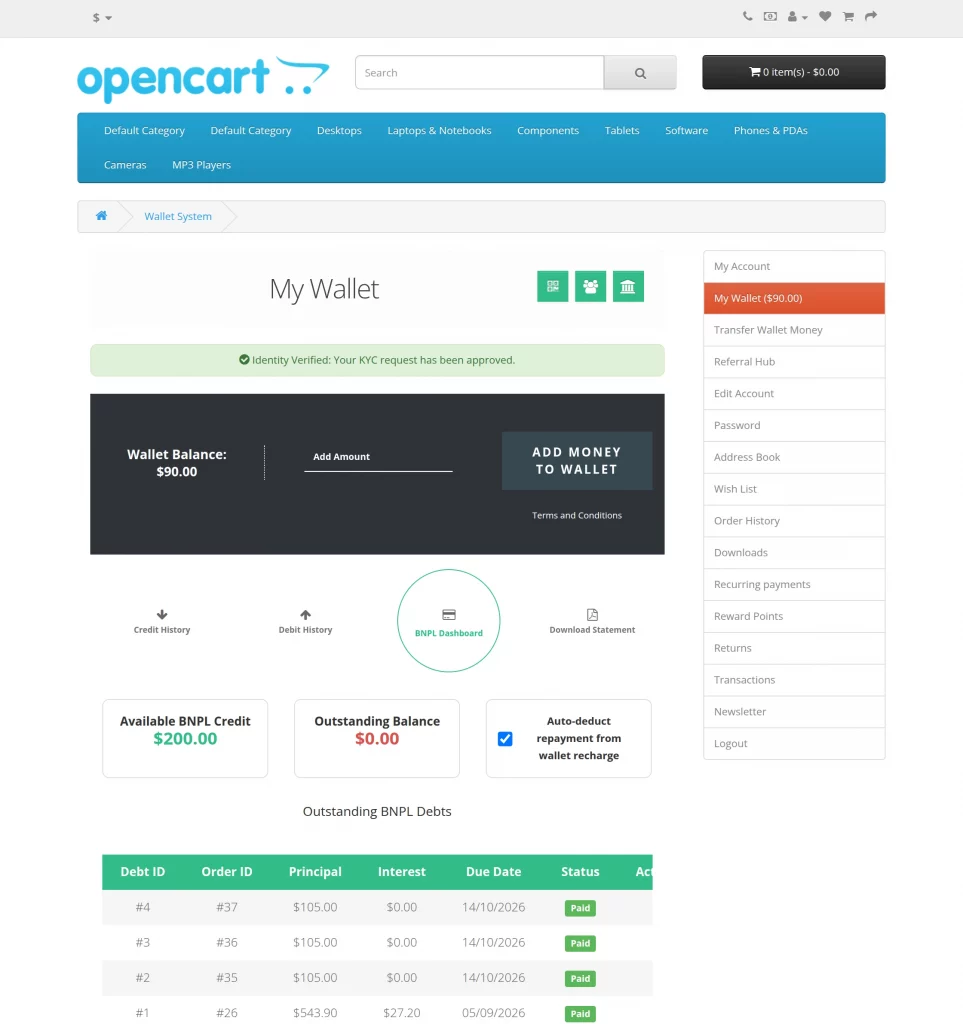
Customers can also have individual BNPL settings configured by the administrator, including credit limit and automatic deduction.
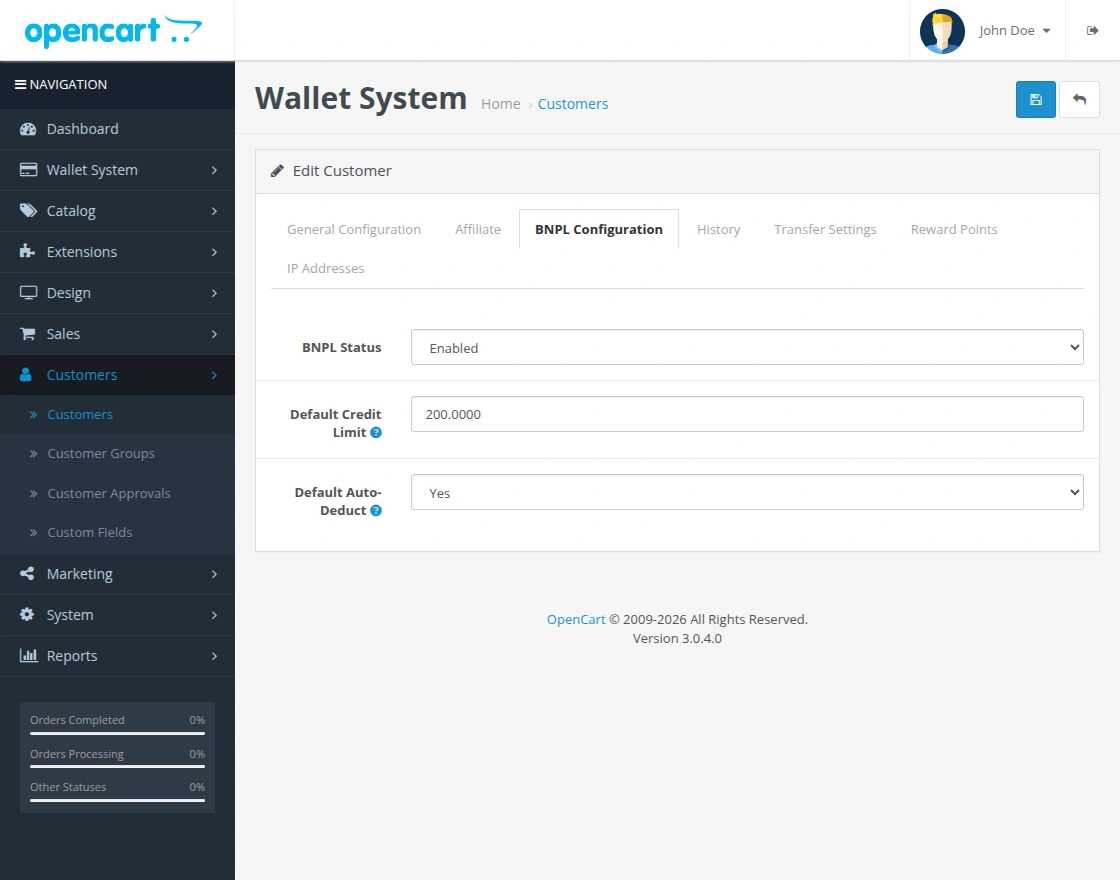
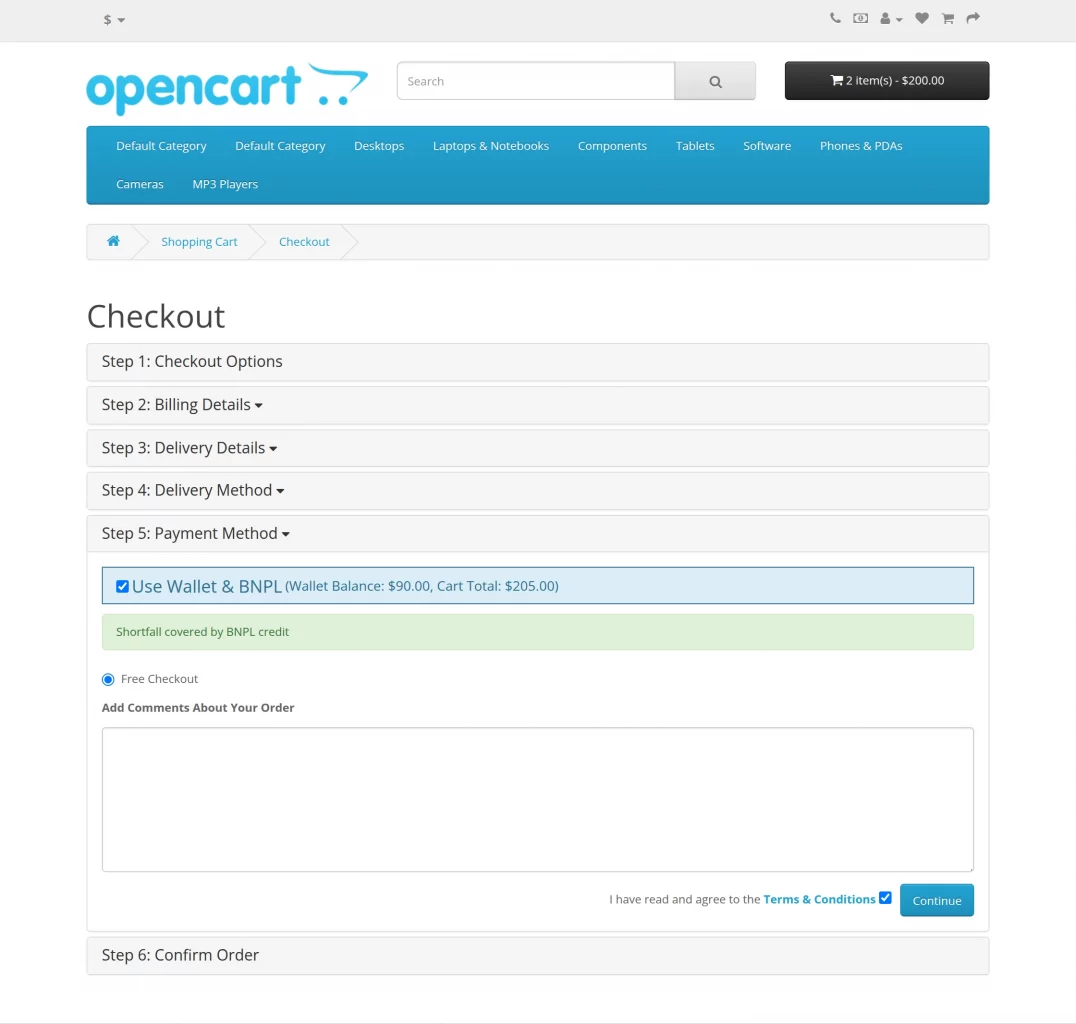
At checkout, customers can select Wallet & BNPL when the wallet balance is insufficient for the order.
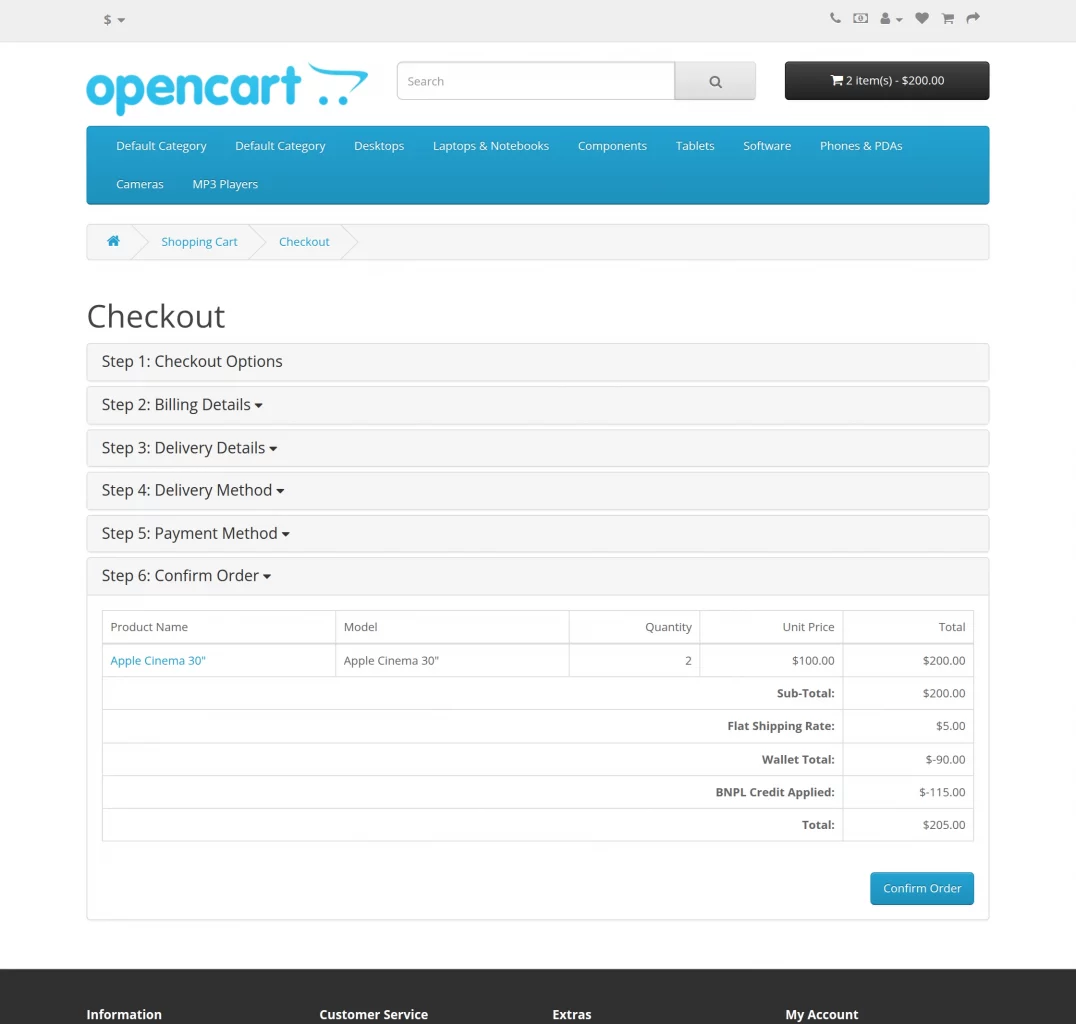
Cashback
Customers can view the applicable cashback amount on eligible product pages when cashback is enabled.
The cashback amount is also displayed during checkout and is added to the wallet according to the configured cashback rule.
Referral Hub
Customers can access the Referral Hub to view their referral information and available referral points.
The referral section provides the invite link, referral statistics, points balance, conversion rate, and referral history.
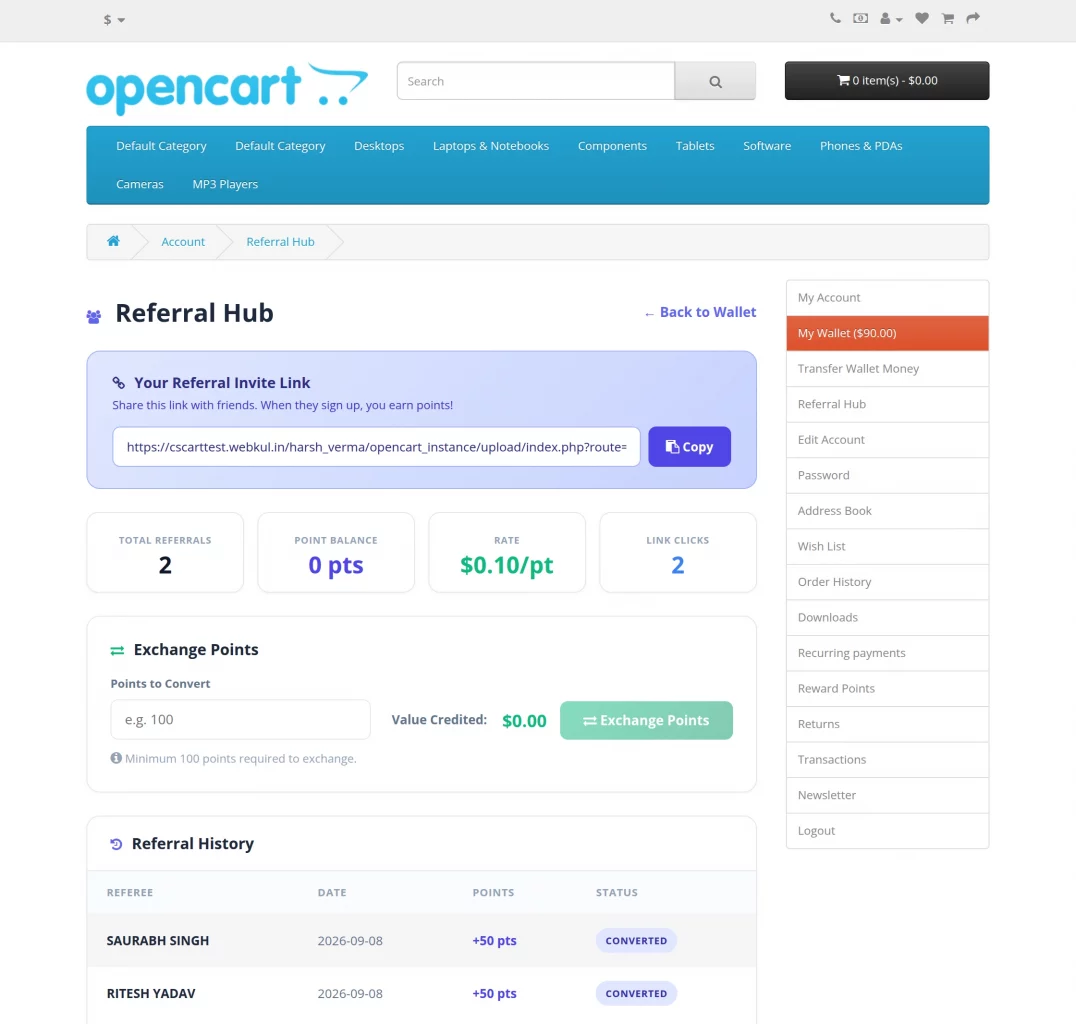
Customers can convert their eligible referral points into wallet funds according to the configured conversion settings.
Using Wallet at Checkout
Customers can add products to their cart and select the Wallet Payment Method during checkout.
The available wallet balance is applied toward the order according to the customer’s wallet amount.
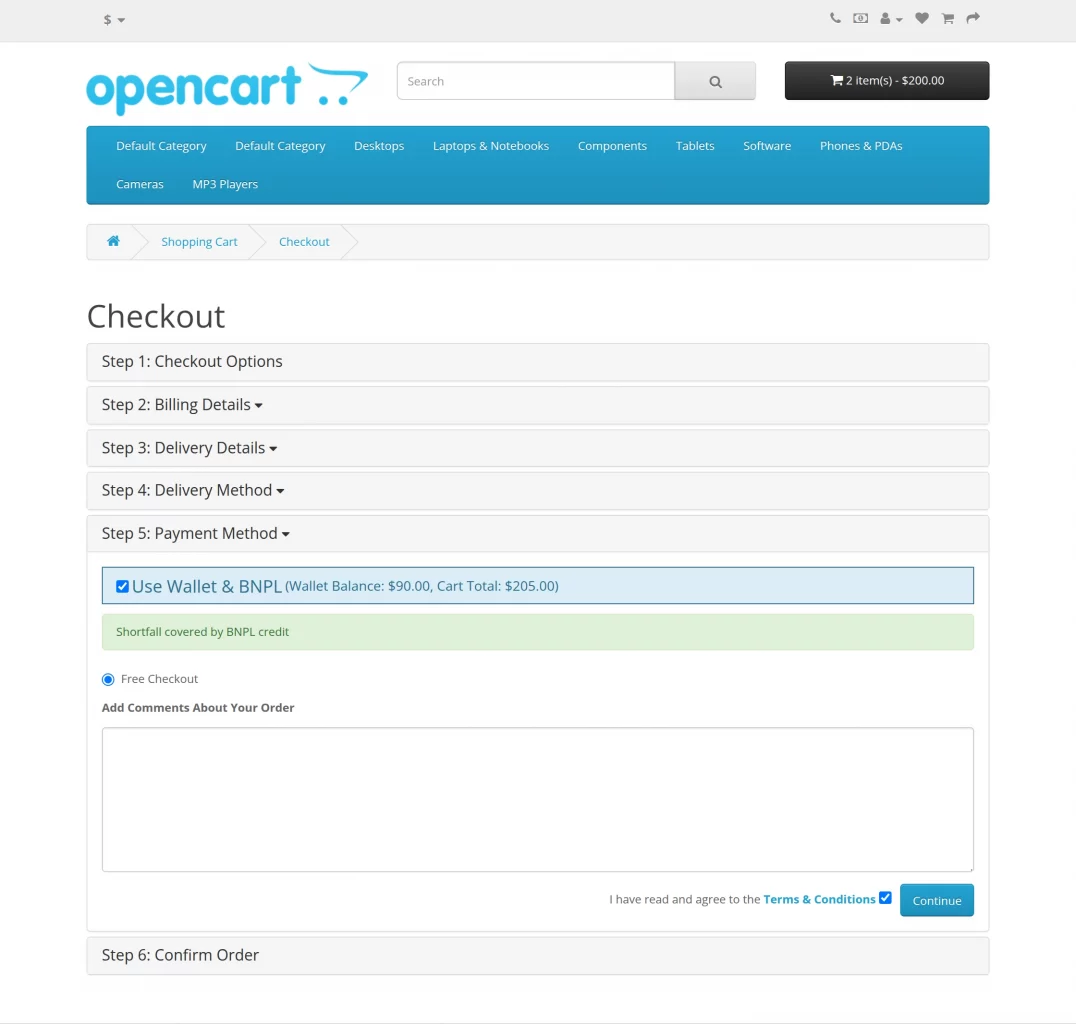
Customers can view the wallet amount applied to the order before confirming the purchase.
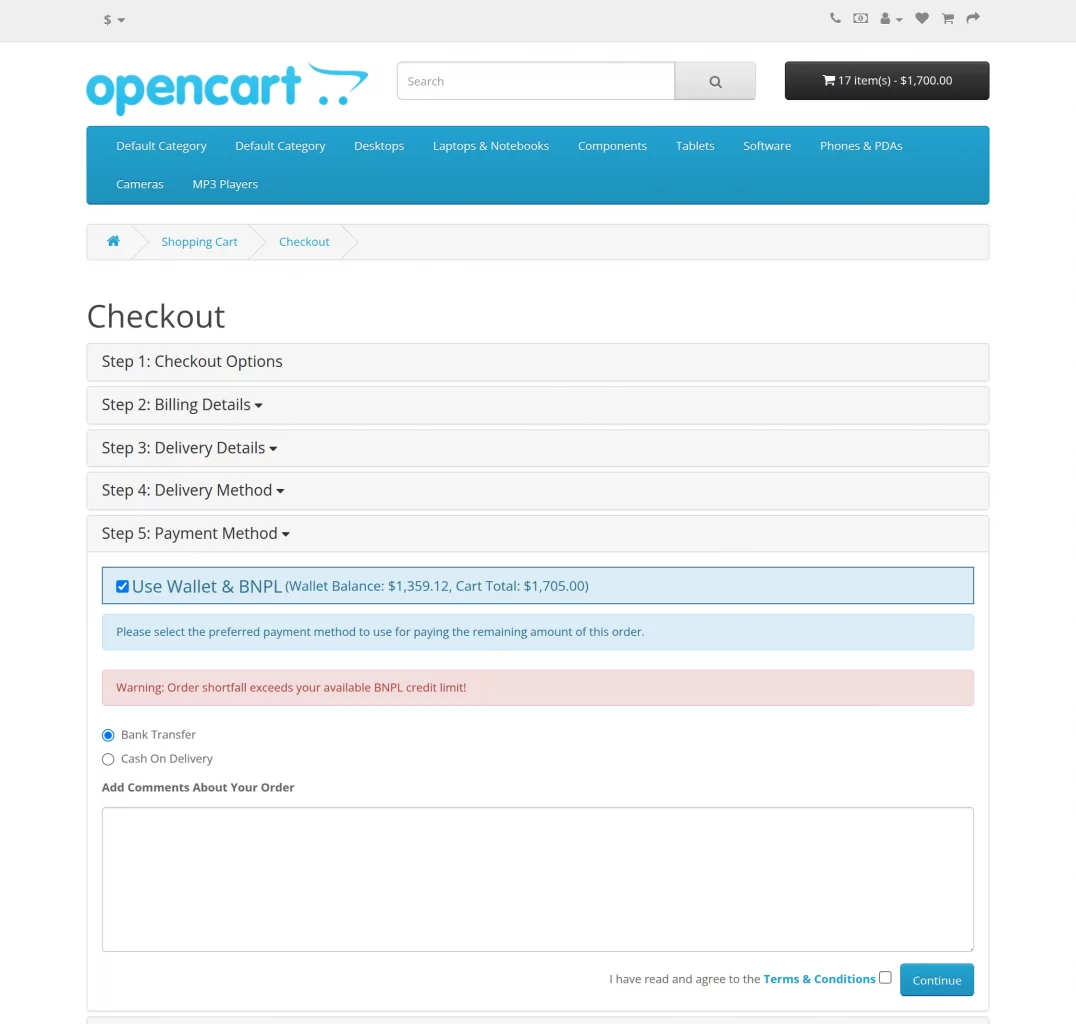
Partial Payment With Wallet
If the wallet balance is less than the order amount, customers can use their available wallet balance for partial payment.
The remaining order amount can be paid using another available payment method.
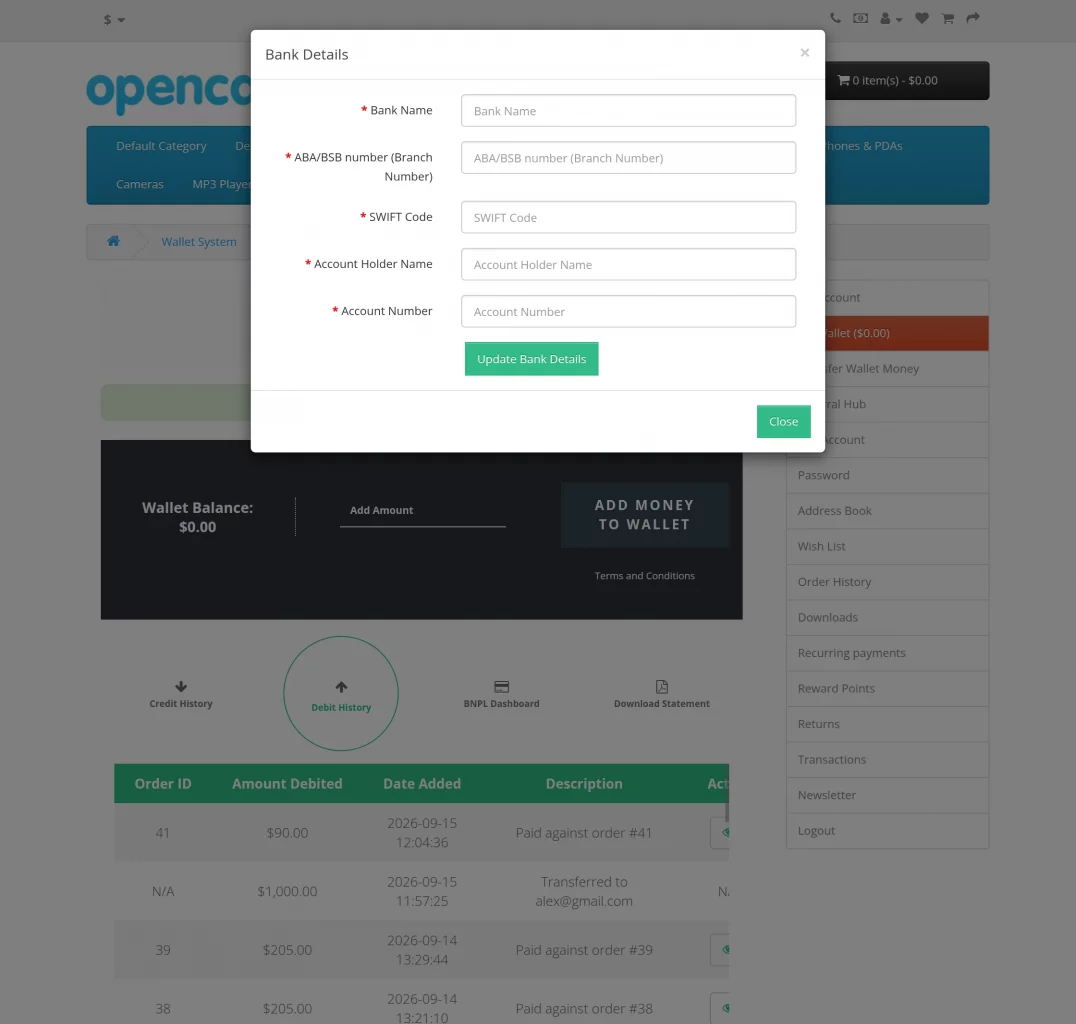
Bank Details
Customers can add and manage their bank details from the wallet section.
These details can be used by the administrator when processing applicable wallet-related refund or payment activities.
Wallet Statement
Customers can view their wallet transaction statement from their wallet account.
The statement provides transaction details that customers can use to track their wallet activities.
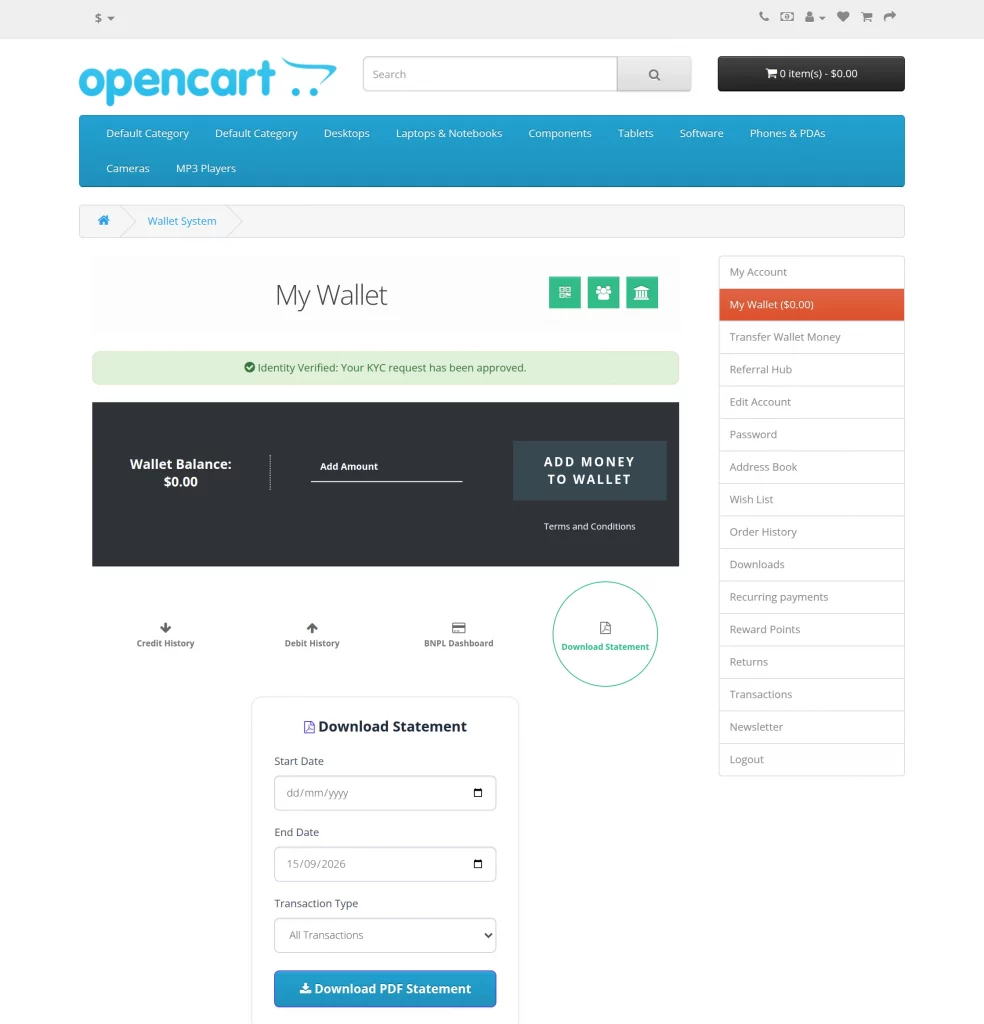
Customers can download their wallet statement in PDF format for the required transaction period.
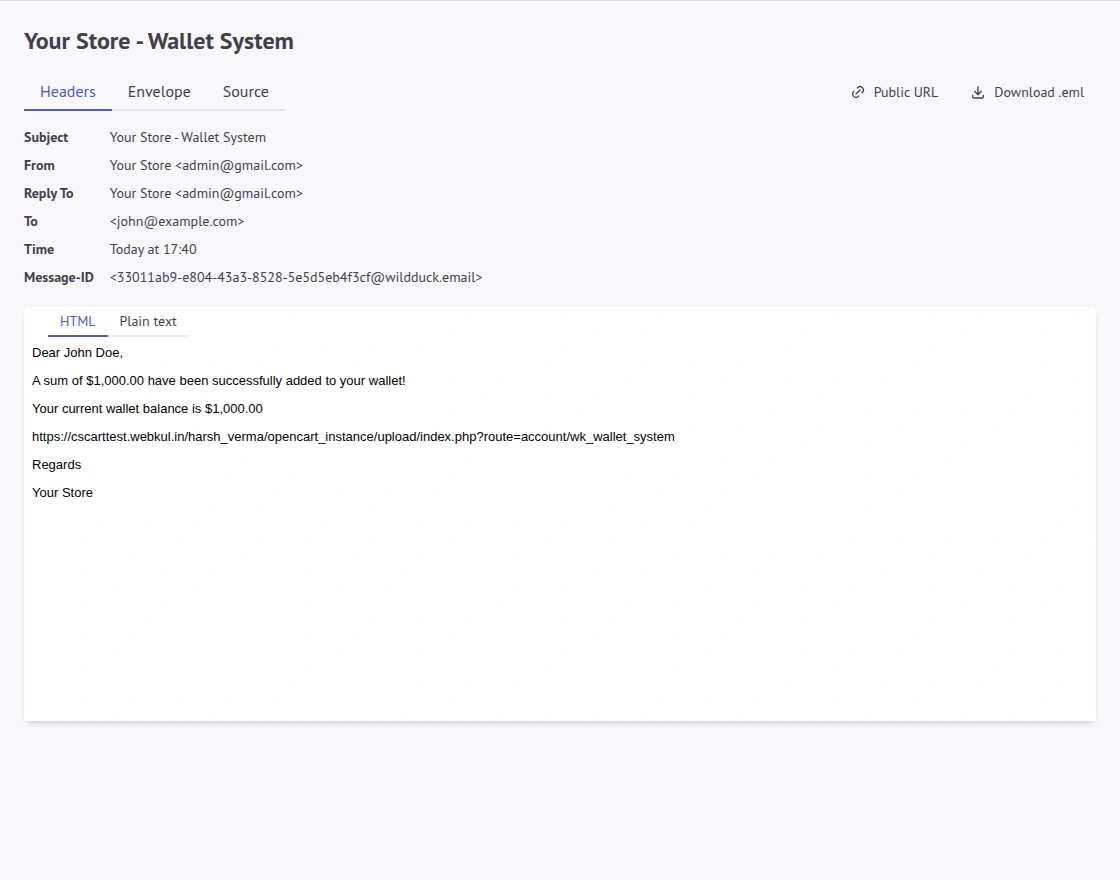
Email Notifications
Customers receive email notifications for supported wallet activities, including wallet recharge and credit transactions.
Email notifications are also supported for relevant transfer and wallet-related activities.
Mobile View
The Wallet System also provides a mobile-friendly wallet experience for customers using supported mobile devices.
Admin Management
After configuring the Wallet System, the administrator can manage wallet transactions and customer-related activities from the Wallet System menu.
The admin menu provides options for managing credit history, debit history, customer details, KYC verification, BNPL debts, cashback, and discount rules.
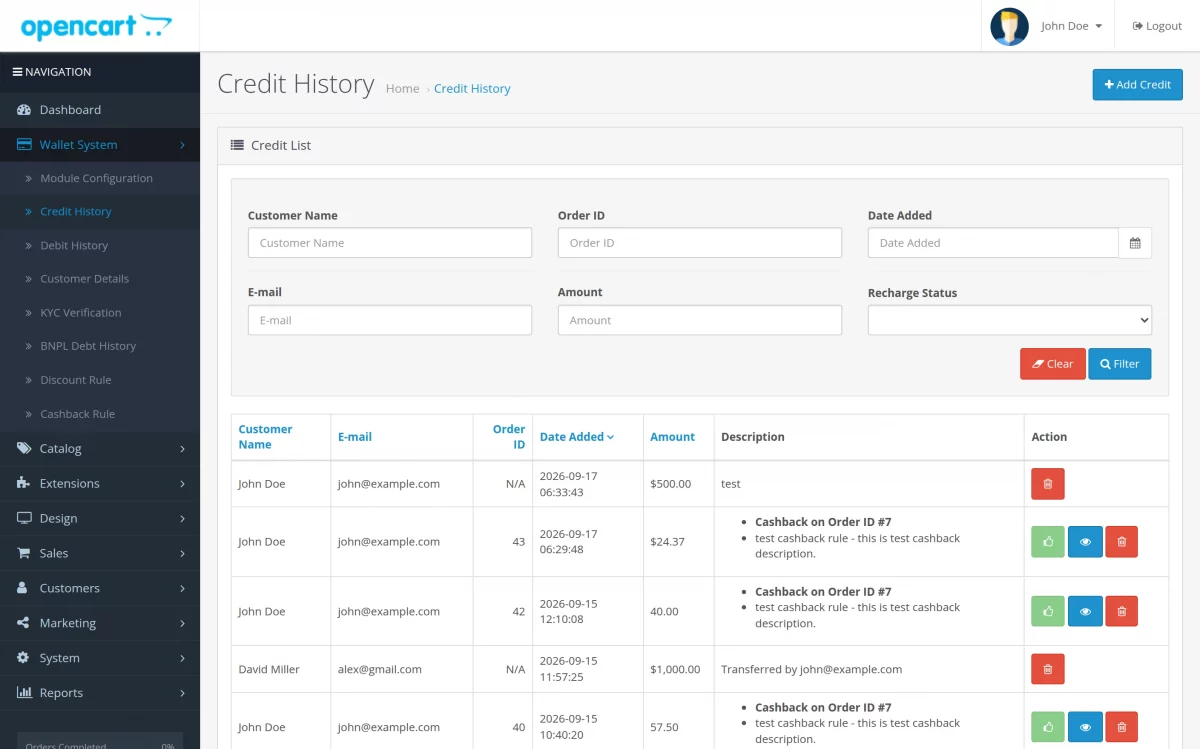
Credit History
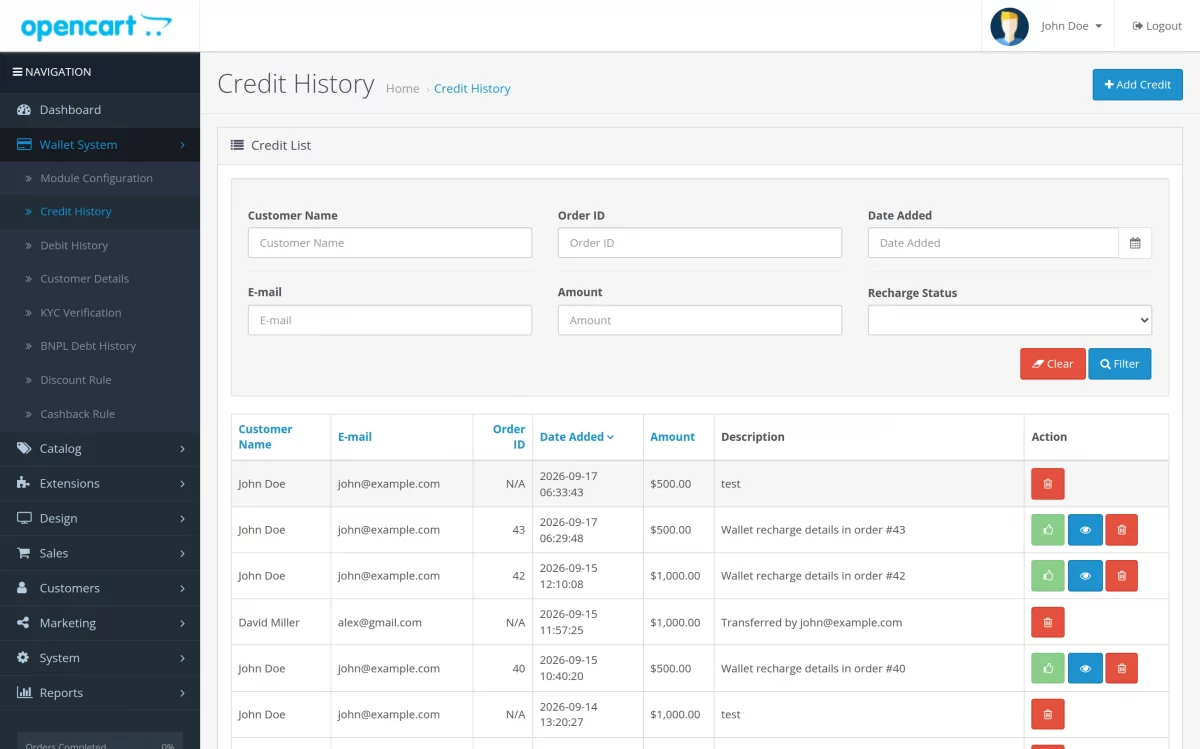
The Credit History section allows the administrator to view the complete history of amounts credited to customer wallets.
The admin can view details such as customer name, email, credit amount, credit date, and transaction description.
The administrator can also approve pending wallet recharge requests when manual approval is required.
After approval, the requested amount is credited to the customer’s wallet.
Add Credit
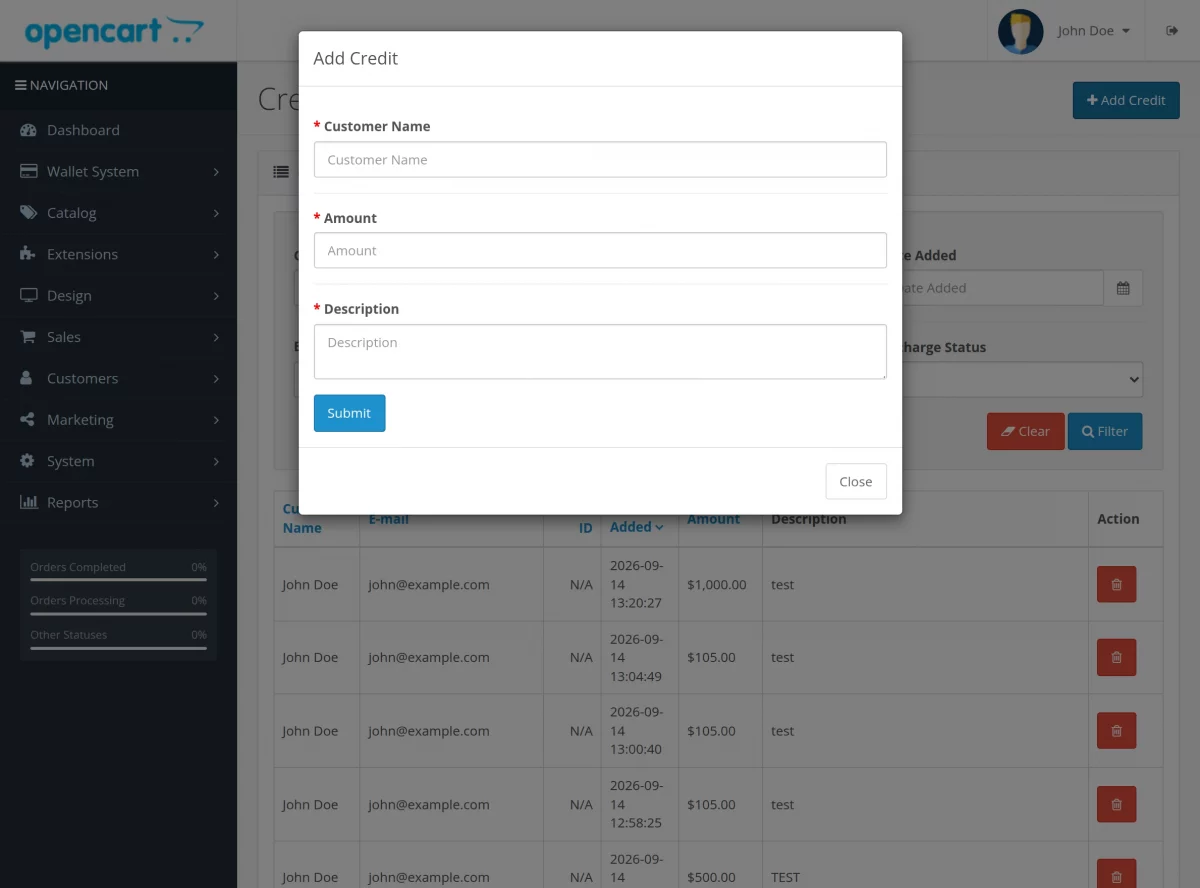
The administrator can manually add funds to a customer’s wallet using the Add Credit option.
The admin can select the customer, enter the amount, add a description, and submit the credit transaction.
Credit Cashback
The administrator can approve applicable cashback manually from the Credit Cashback action.
This option is available when cashback processing is configured for manual approval.
Debit History
The Debit History section allows the administrator to view the amounts deducted from customer wallets.
The admin can view customer details, debit amount, transaction date, description, and other available transaction information.
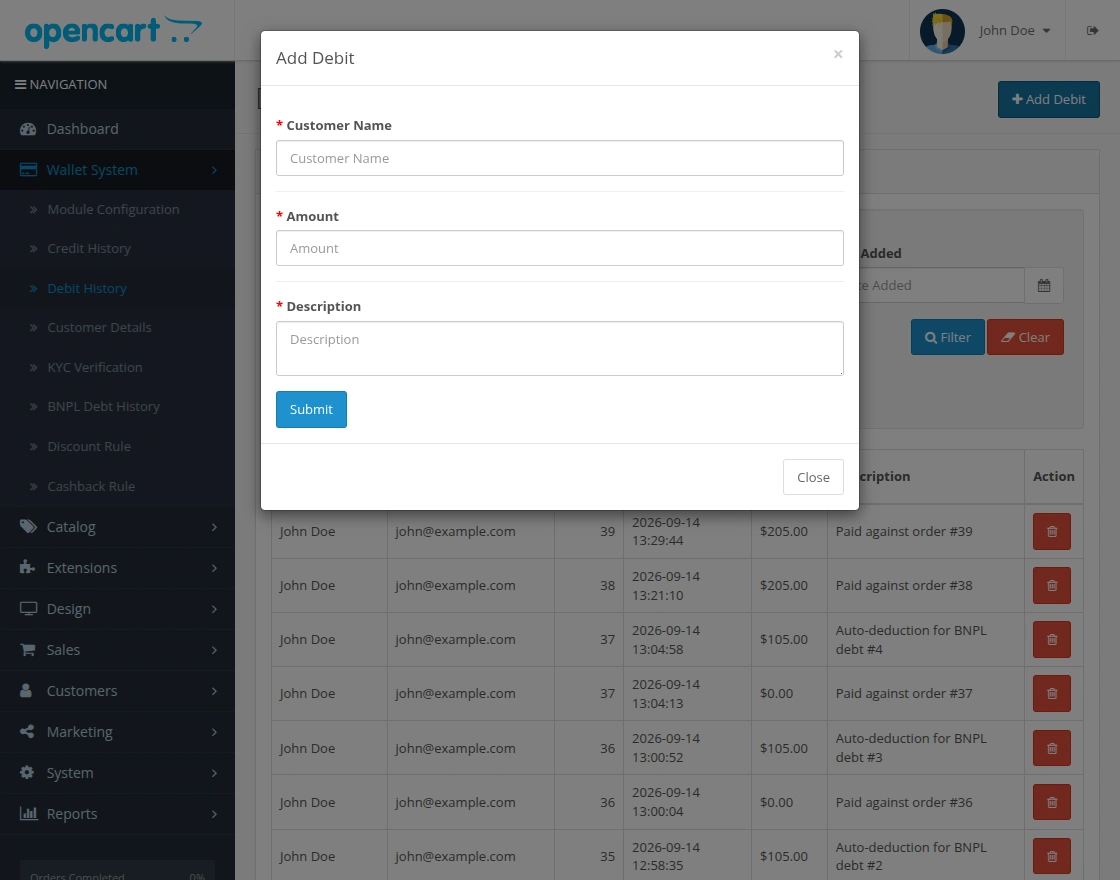
Add Debit
The administrator can manually debit funds from a customer’s wallet using the Add Debit option.
The admin can select the customer, enter the debit amount, add a description, and submit the transaction.
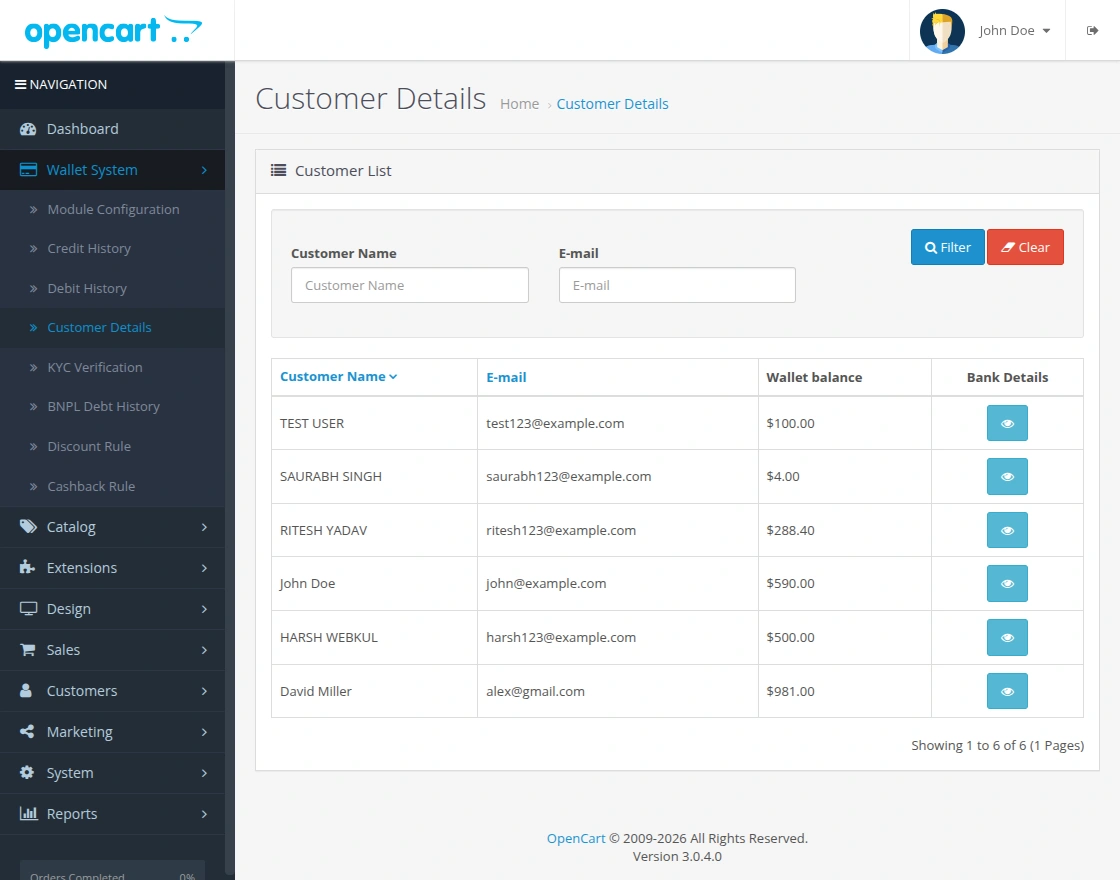
Customer Details
The Customer Details section displays the customers associated with the Wallet System.
The administrator can view the customer’s name, email address, and wallet balance from the customer list.
The admin can also open the available bank details option to view the customer’s saved bank information.
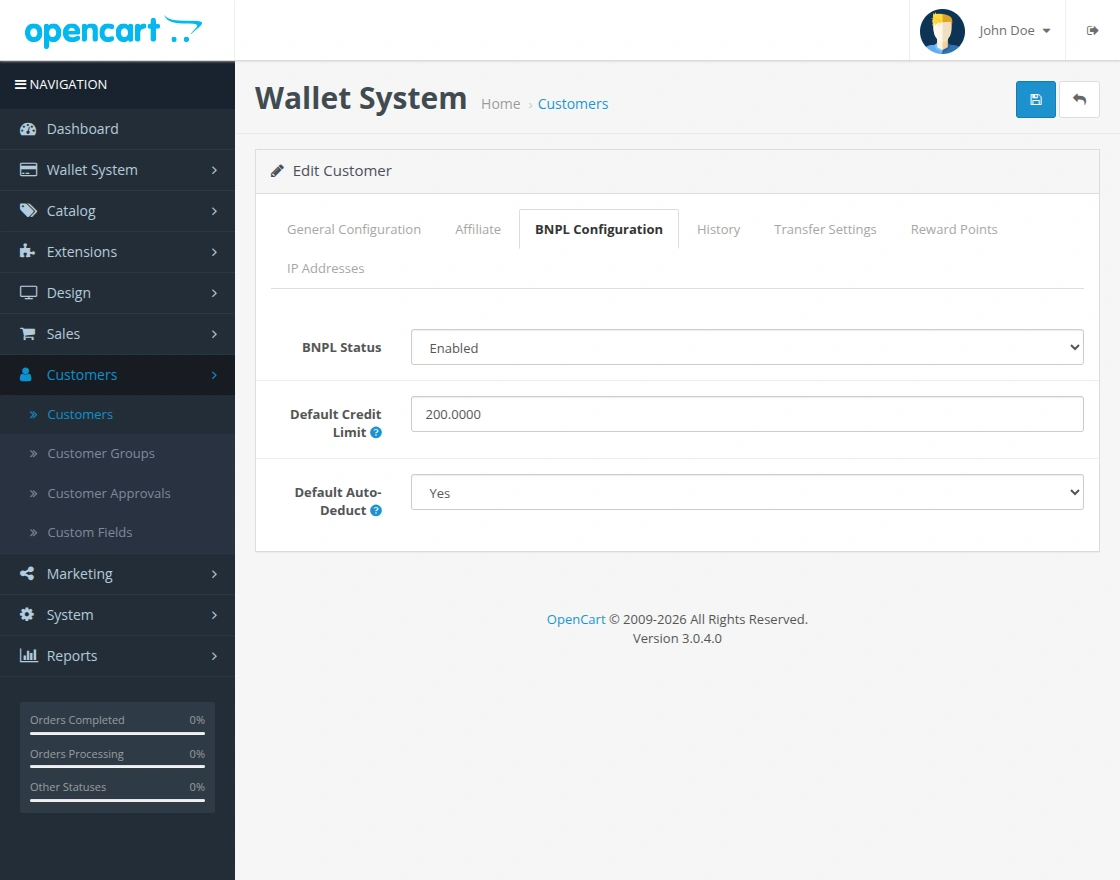
Customer BNPL Configuration
The administrator can configure BNPL settings for an individual customer from the customer’s BNPL Configuration tab.
The admin can enable or disable BNPL and configure the customer’s default credit limit and automatic deduction option.
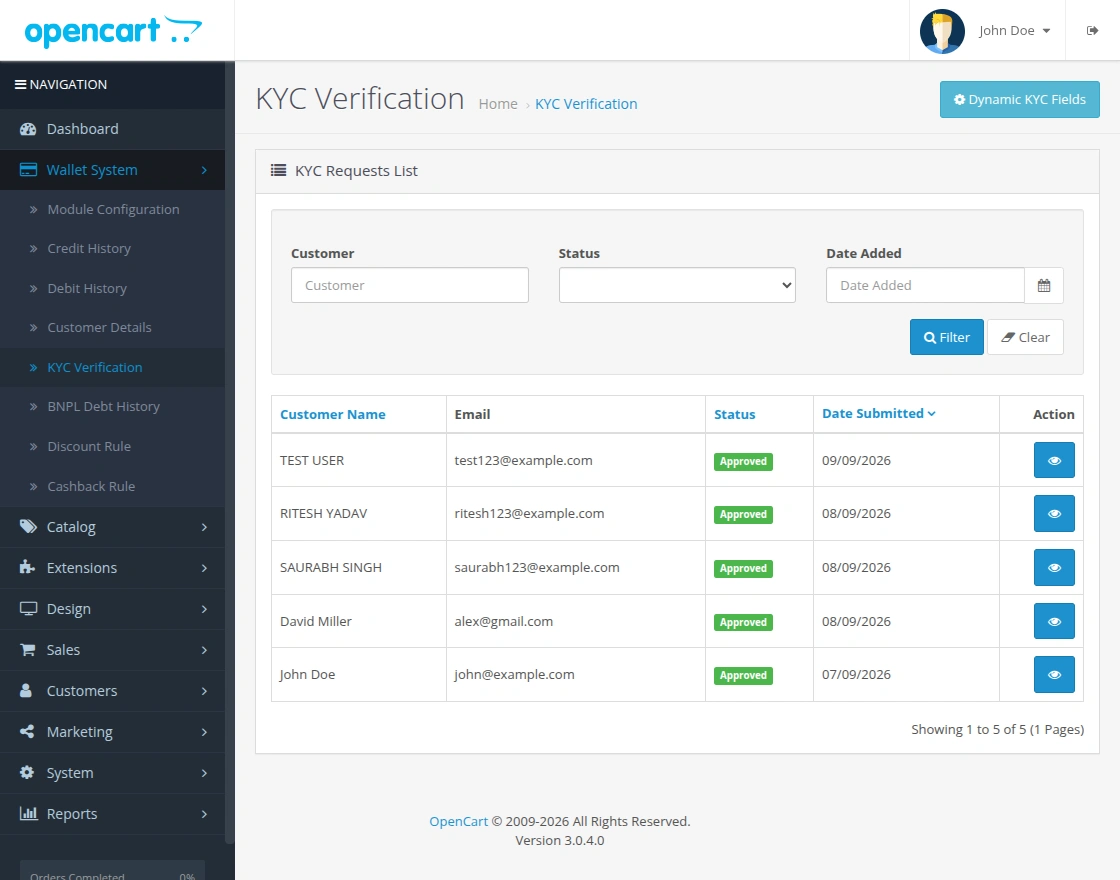
KYC Verification
The KYC Verification section allows the administrator to manage customer KYC verification requests.
The admin can review submitted customer information and check the current verification status.
The administrator can review the submitted KYC request and take the required verification action.
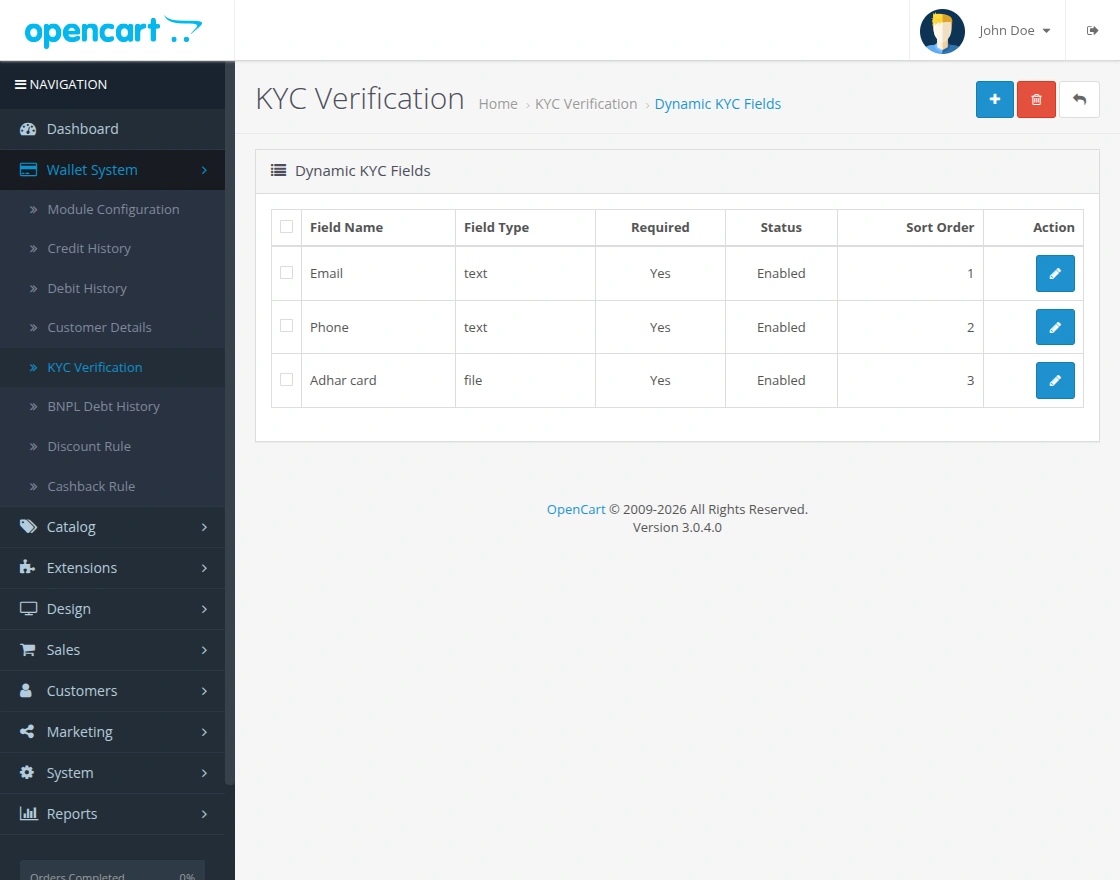
Dynamic KYC Fields
The administrator can create dynamic fields for collecting additional information during customer KYC verification.
The dynamic fields section allows the admin to manage the fields used in the customer KYC form.
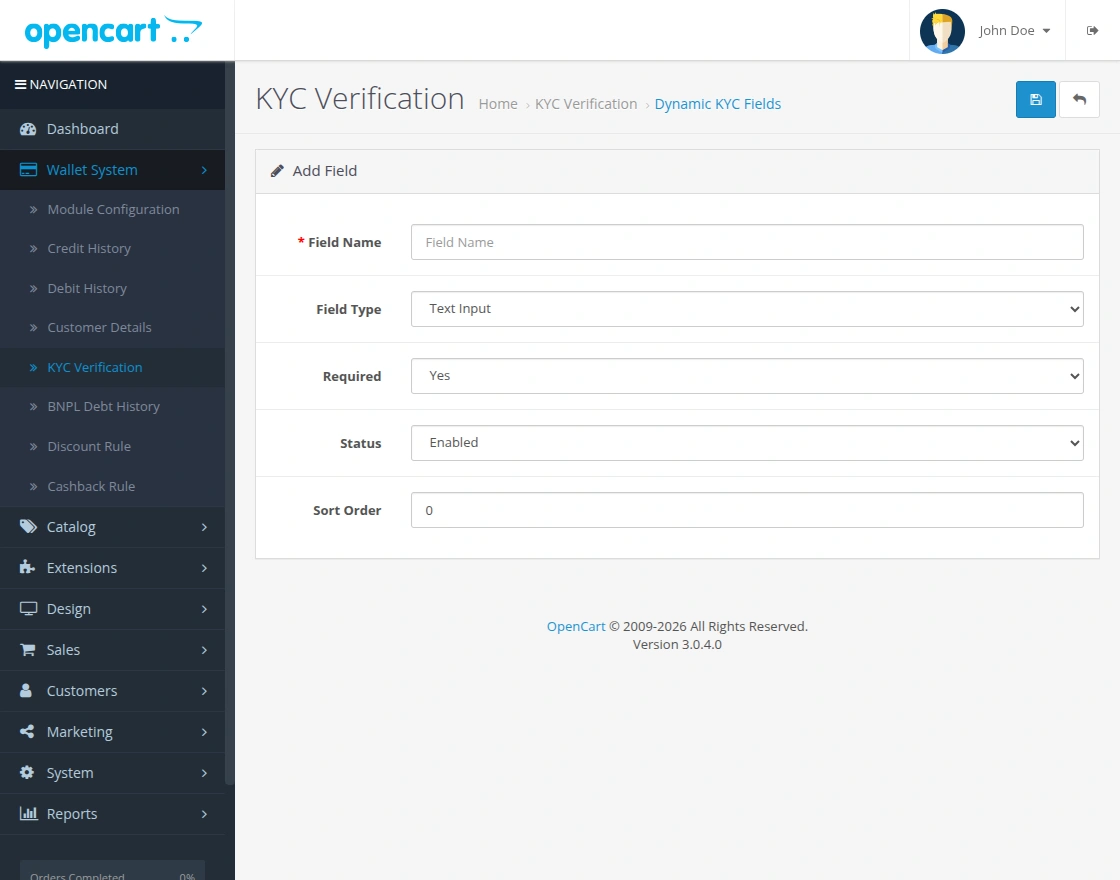
Create Dynamic KYC Field
The administrator can create a new dynamic KYC field by configuring its available field details.
The admin can set the required field options before adding the field to the KYC form.
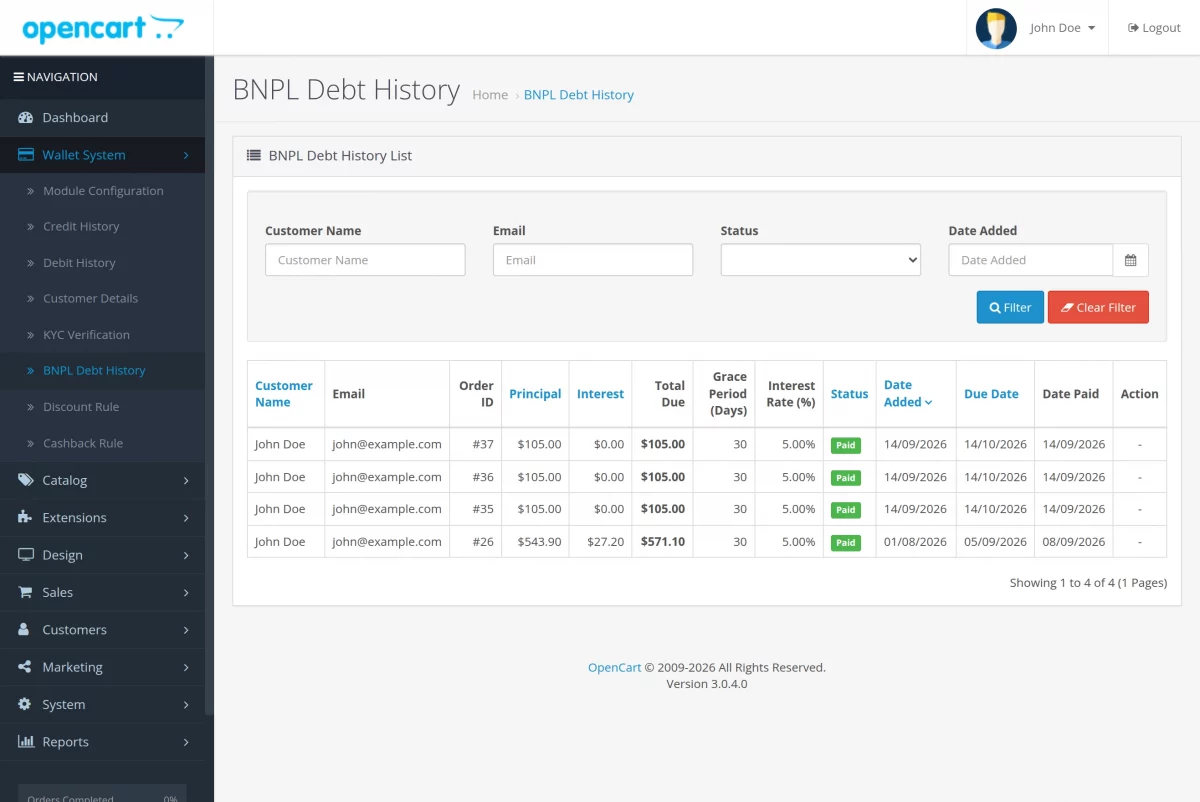
BNPL Debt History
The BNPL Debt History section allows the administrator to view BNPL debt records created for customers.
The admin can view details including customer, order ID, principal, interest, due amount, due date, and payment status.
The administrator can use the available actions to view the details of individual BNPL debt records.
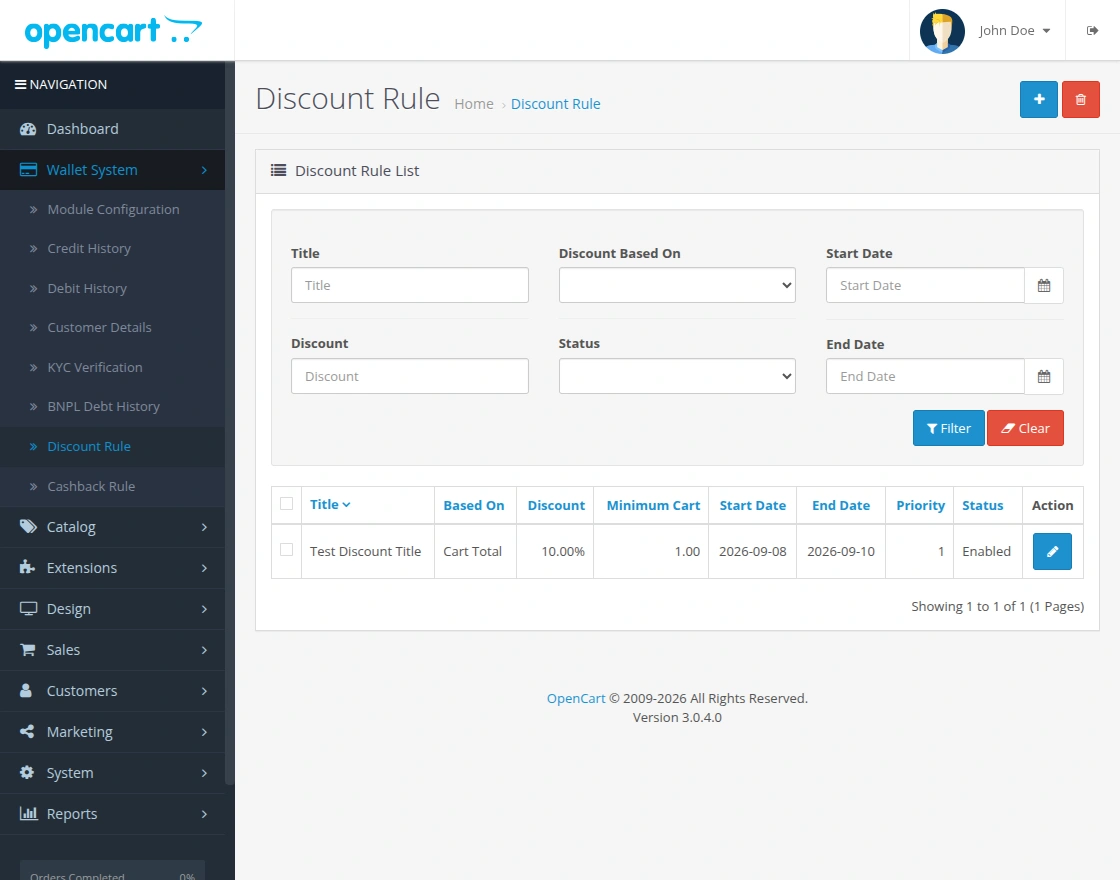
Discount Rule
The Discount Rule section allows the administrator to create and manage wallet discount rules.
The administrator can configure the store, discount type, discount value, minimum value, dates, priority, and status.
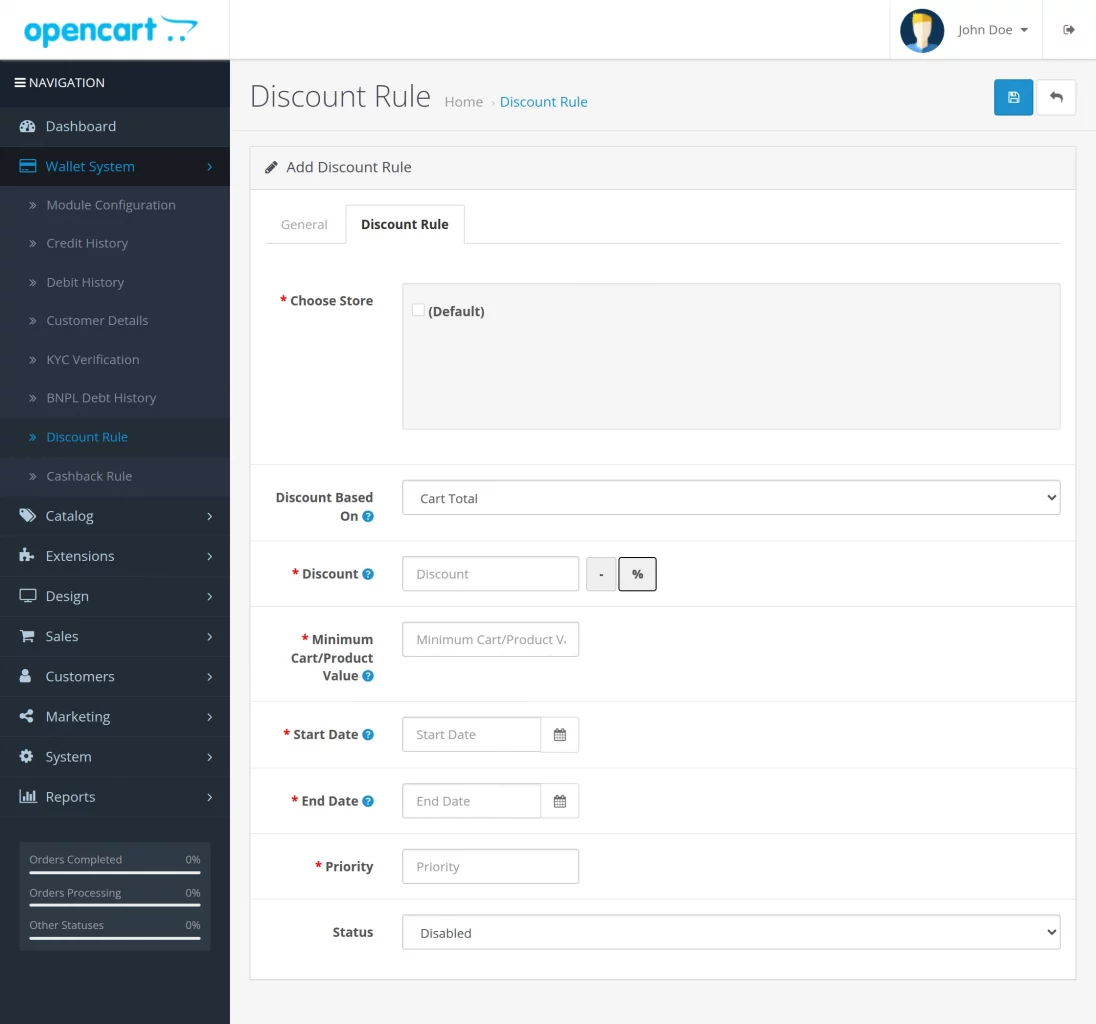
Create Discount Rule
The administrator can create a new discount rule by configuring the required discount conditions.
The admin can define whether the discount applies according to the subtotal or cart total.
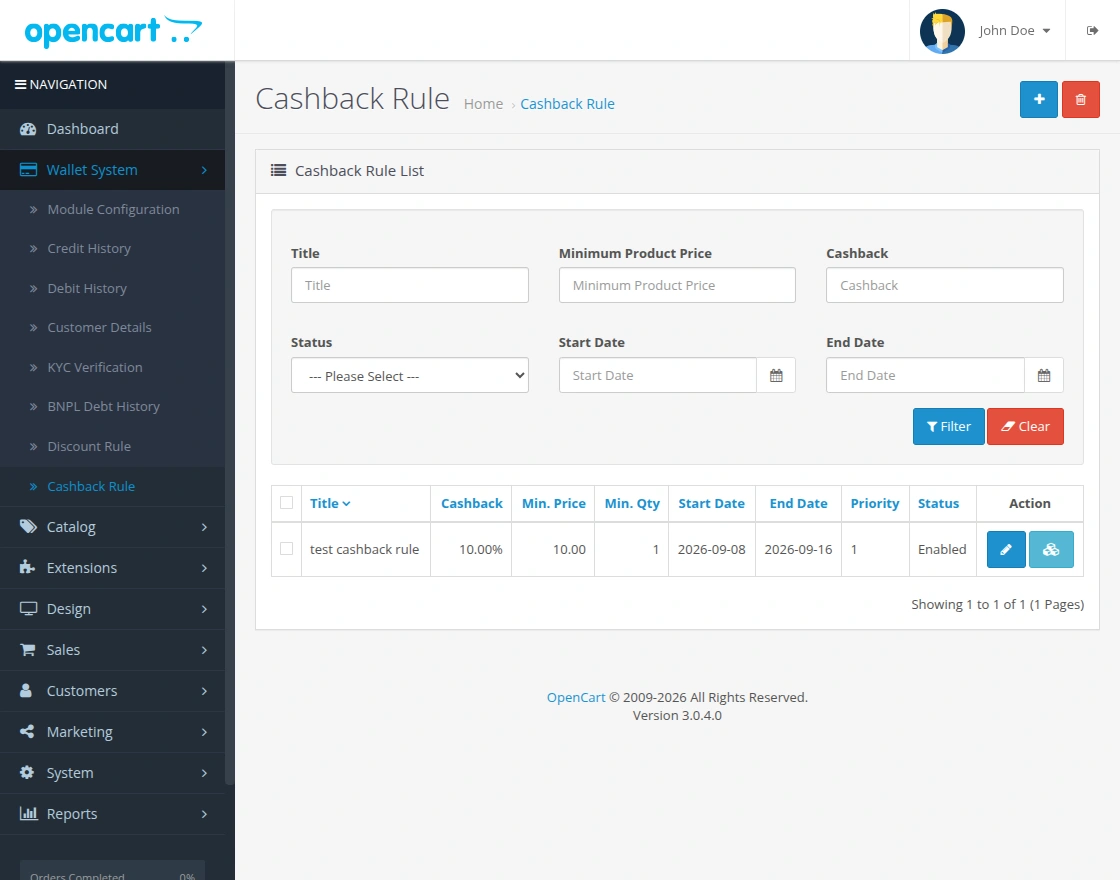
Cashback Rule
The Cashback Rule section allows the administrator to create and manage cashback rules.
The admin can configure cashback according to product price, product quantity, dates, priority, and status.
Cashback can be configured as a fixed amount or percentage, according to the selected rule.
The administrator can also configure cashback processing as manual or automatic.
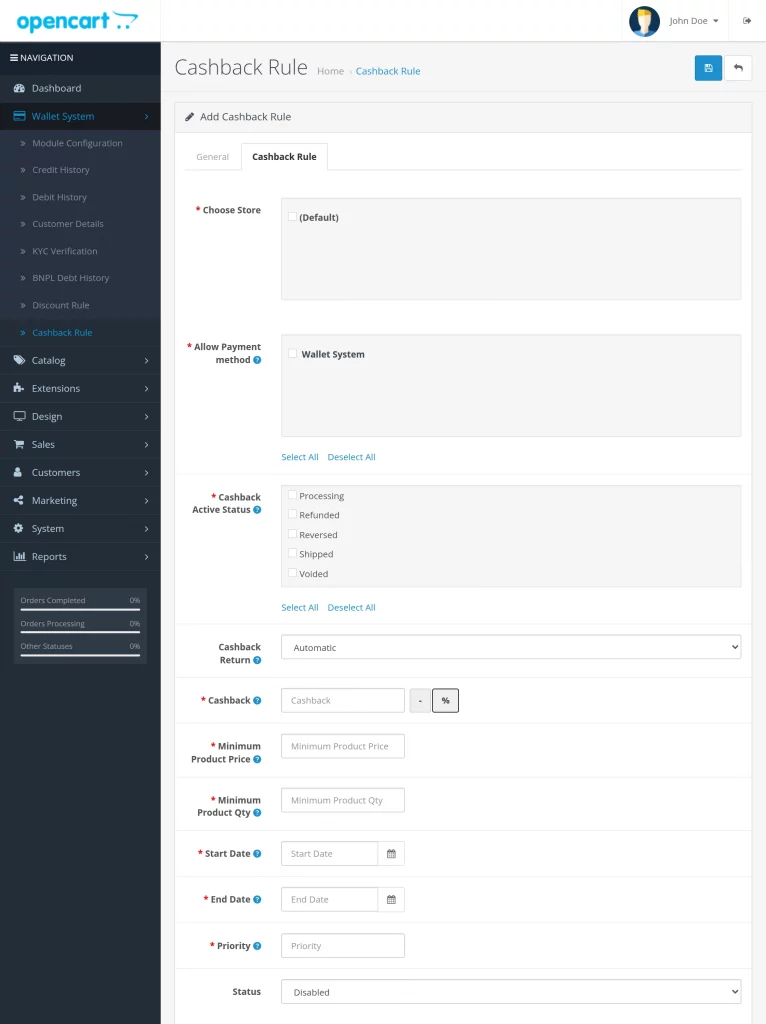
Create Cashback Rule
The administrator can create a cashback rule by configuring its general settings and applicable conditions.
The admin can define the store, payment method, cashback status, cashback return method, and other rule details.
Customer View for Cashback
The customer can view the cashback on the product page right below the product description as shown in the image:
The applied cashback amount will display in the payment method during checkout.
The cashback will also be visible to the customer in the order description of credit history as shown below:

Discount Rule
The last sub-menu option under Wallet System configurations is Discount Rule.
To have this feature, the admin must first enable the Discount Rule under Extensions > Order Totals > Wallet Discount.
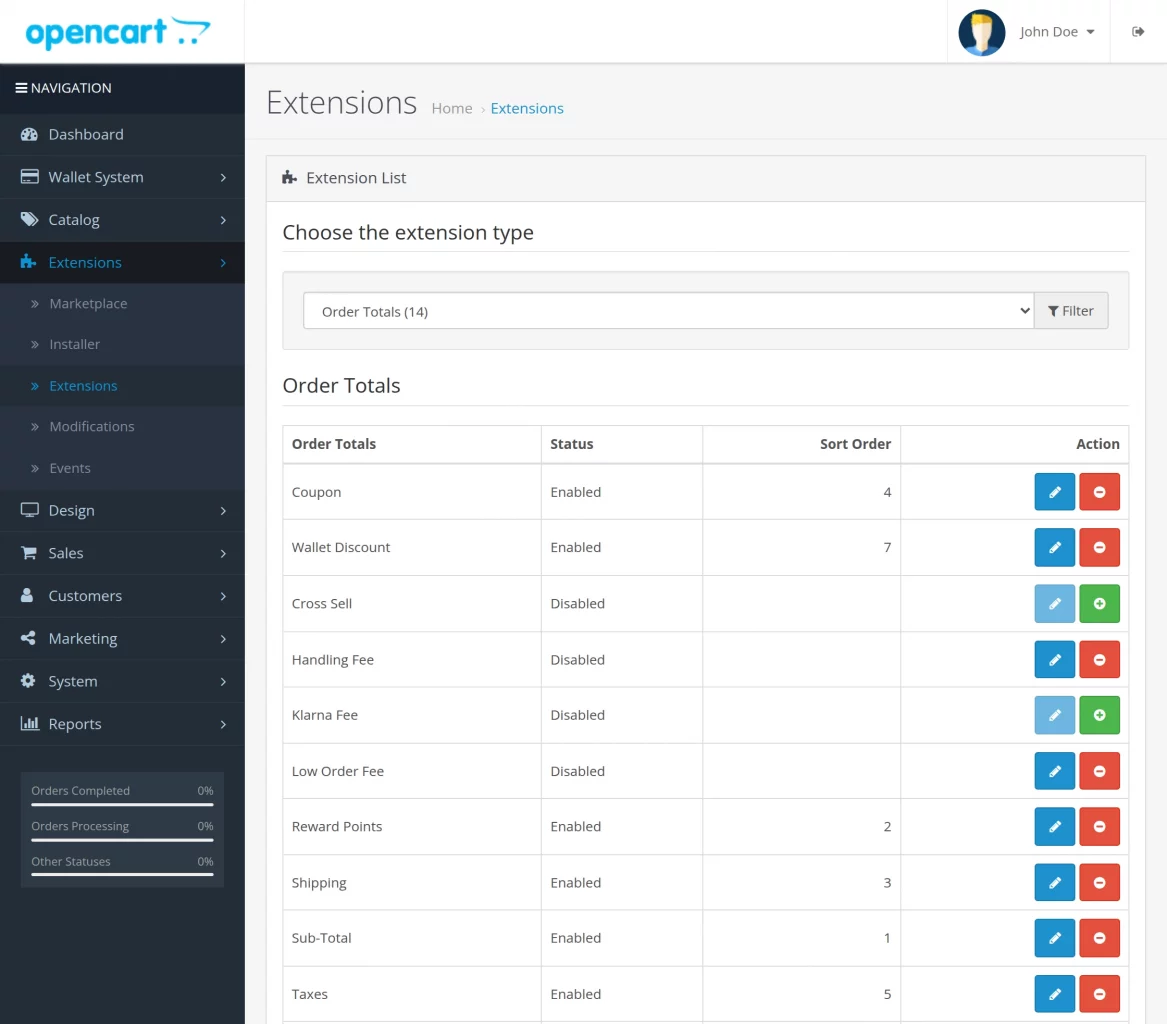
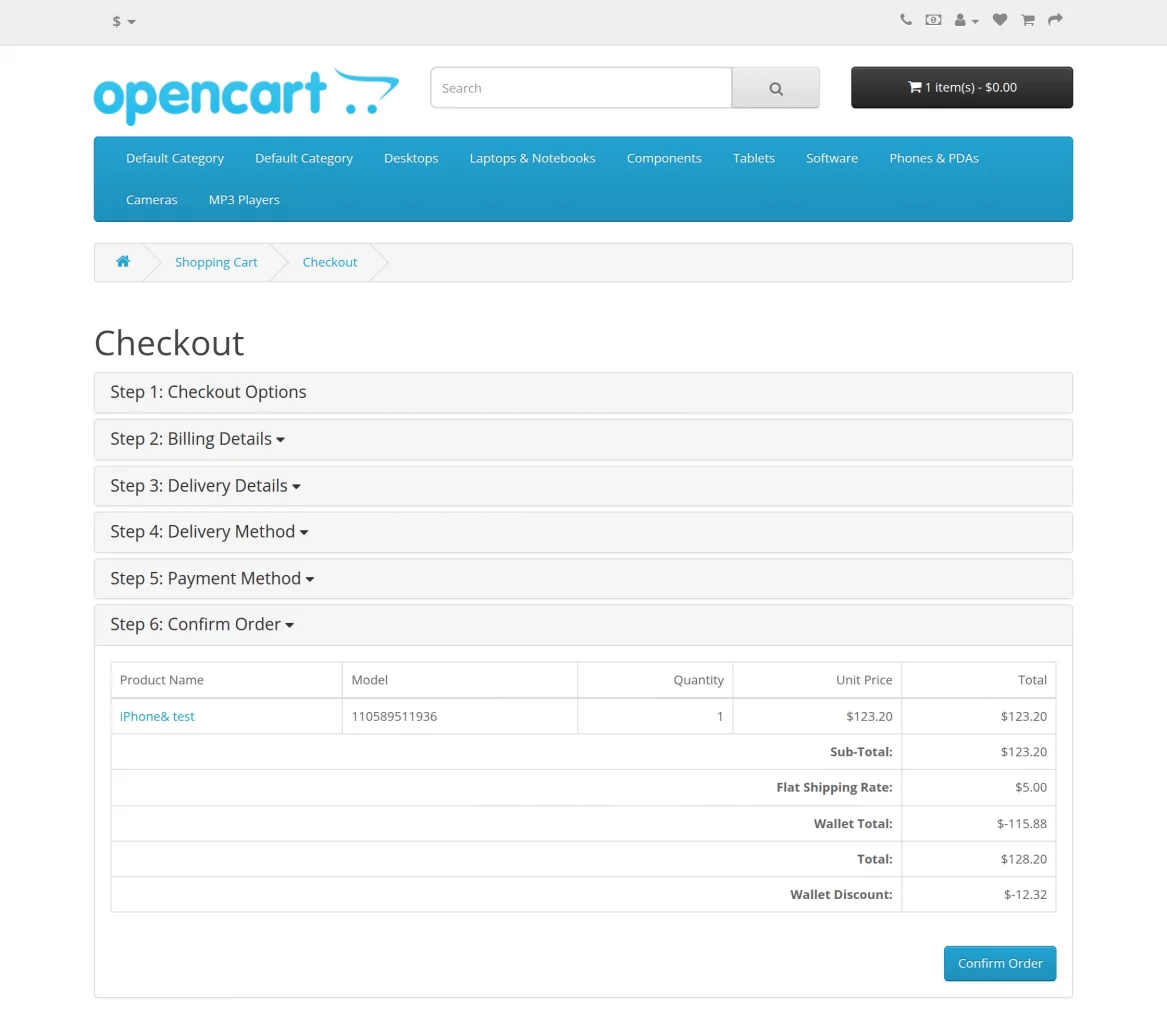
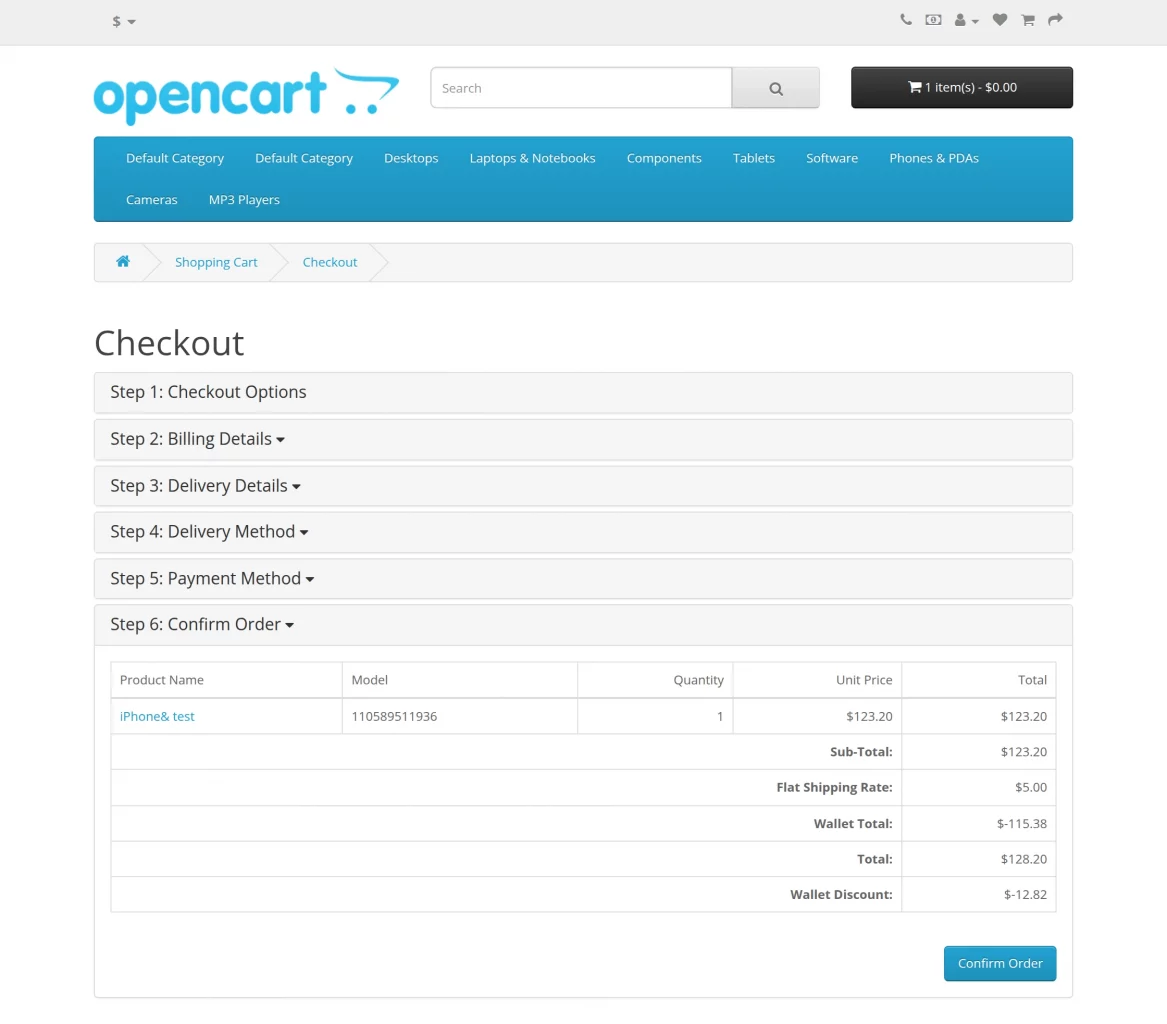
Further, the Discount Rule applies to the Subtotal and Cart Total.
On Subtotal
As the admin enables the Wallet Discount, the Discount Rule sub-menu option becomes visible under Wallet System configurations as shown in the image below.
Furthermore, the admin must click on the Discount Rule sub-menu option which redirects to the Discount Rule page.
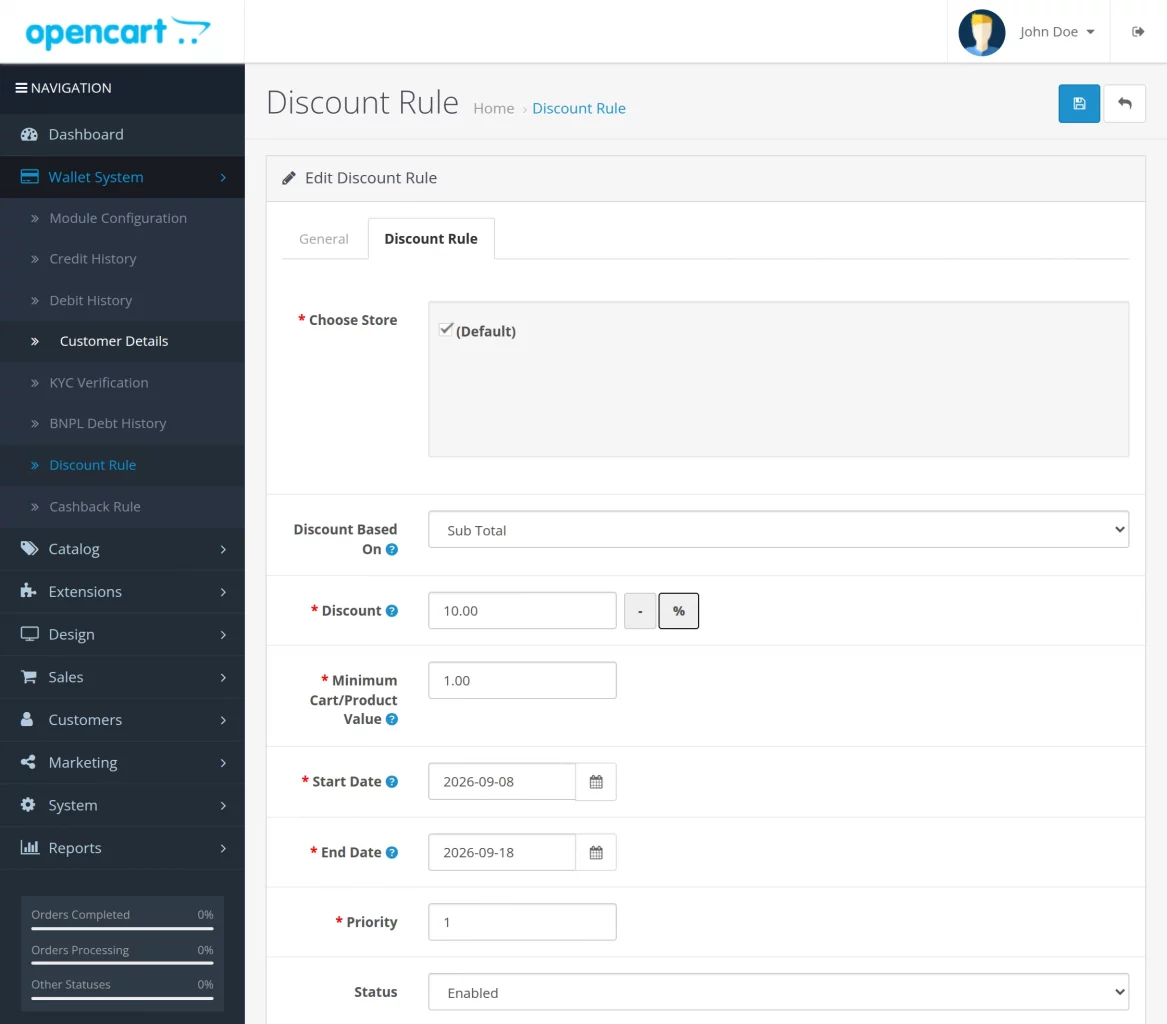
The admin will configure the following fields under the Discount Rule tab-
Choose Store- The admin has to choose the store, (here, Default).
Discount Based-On- Admin needs to choose Sub Total.
Discount- The admin may allow either percentage or fixed discount.
Minimum Cart or Product value: Admin must define the minimum subtotal value.
Start Date- The start date of the discount rule.
End Date- End date of the discount rule.
Priority- The admin sets the priority of the discount rule.
Status- Admin has to enable the status of the discount rule applicable to the subtotal.
On Cart Total
Under the Discount Rule tab, the admin can also choose Cart Total on the Discount Rule page as shown in the image below.
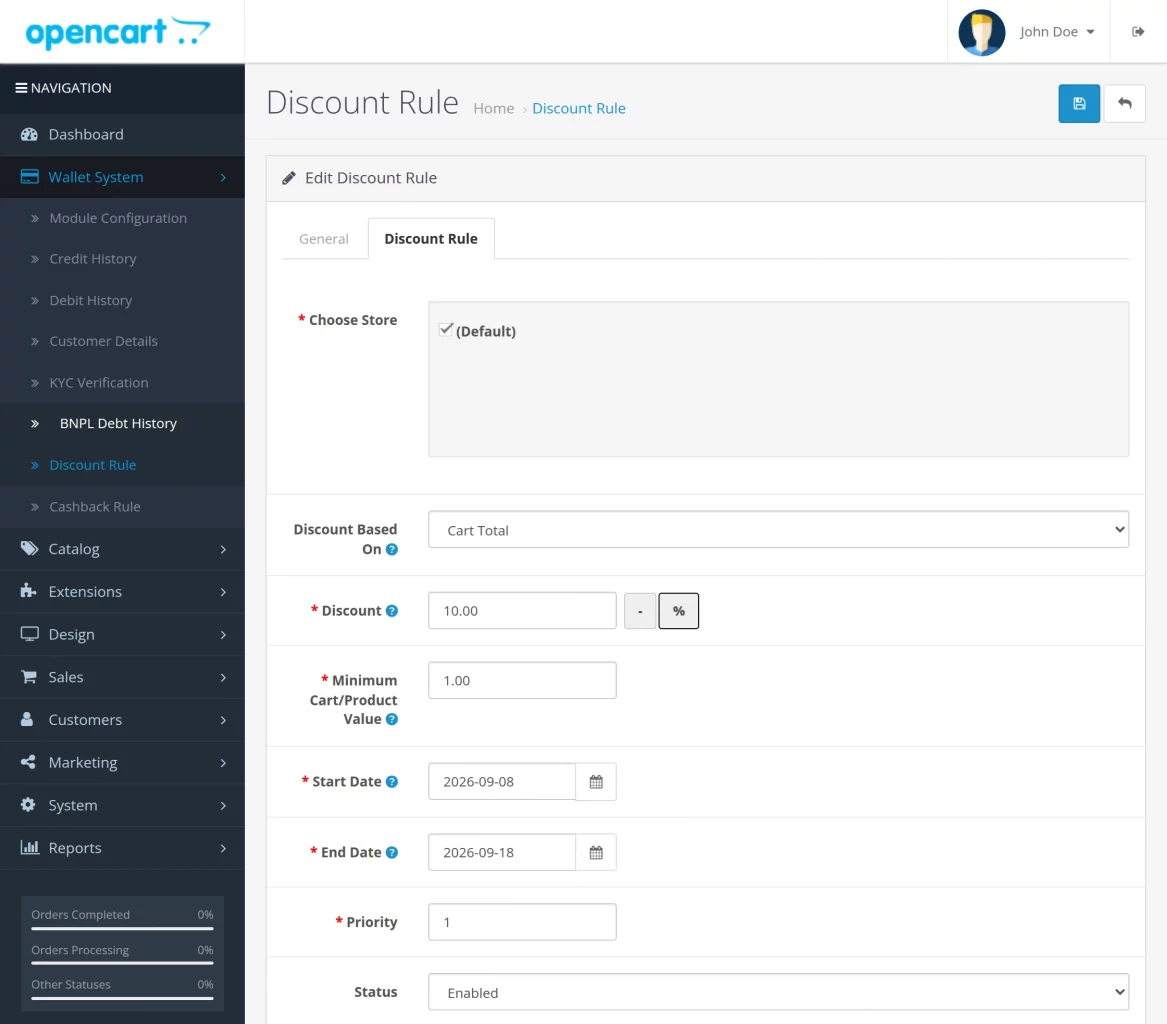
The admin will configure the following fields under the Discount Rule tab-
Choose Store- The admin will choose a store, (for instance, Default).
Discount Based-On- The admin will have to choose Cart Total.
Discount- The admin may allow either percentage or fixed discount.
Minimum Cart or Product value: The admin must define the minimum cart total value.
Start/ End Date- The start and end dates of the discount rule.
Priority- The admin will set the priority of the discount rule.
Status- The admin will have to enable the status of the discount rule applicable to the cart total.
Support
If you have any questions, suggestions, or customization requests, feel free to contact us at [email protected] or submit a ticket at webkul.uvdesk.com.
Current Product Version - 5.1
Supported Framework Version - 3.x.x.x

4 comments