We have introduced 6 different types of bookings in the Booking App for Unlimited Booking Scenarios.
Being a merchant, you can add bookings to your store products and allow customers to book slots as per their choice.
Thus, the booking service can be offered for any profession using the app whether it’s a-
hotel booking service, bike renting service, movie ticket booking service, online bookings for tuition classes, live concert booking, and the list still goes on.
Considering these requirements, Webkul has come up with the thought of improving the “Add Booking” form in the Booking App.
The app allows merchants to offer 6 different types of booking services to their customers.
Thus, the merchant can now offer the booking service of any profession using Booking App by Webkul.
Let’s move to Explore 6 different booking types to add bookings to existing store products/services.
6 Different Booking Types
Till now, the booking app was limited to only two types of booking either Appointment Type or Concert Type booking.
Now, We have introduced four more booking types. Thus, You can have multiple ways of creating slots for different booking scenarios.
In addition to it, You can now offer rental services to your customers as well.

1. One Day Booking
If You want to offer any booking service for a day then you can go with this booking type.
Let’s take examples:- Cab Booking Service, One Day Car Booking Service, etc.
You can set a duration i.e. a Date Range for your booking service & select the weekdays when the bookings will be available for the customers.
Now, the customers will choose a date and book for the service.
This way, you can create One Day Booking for your customers.
2. Appointment Type booking
In this booking type, You can add booking products/services by setting up a fixed duration i.e. Date Range when Your product/service will be available for booking.
Now, You can proceed to choose the days when You offer the service & create slot timings when the service is available.
For Example:- Doctor’s Appointment Booking Service, Dental Booking Service, etc.
You can set the doctor’s availability for clinic visits (Admin Location) or home checkups (Customer Location).
Now, Select the weekdays when the service will be provided and create multiple slots to be chosen by the customers.
3. Rent Type Booking
If You want to offer a venue booking service for concerts, parties or live events then, You can go with the range date slot type.
In this booking type, You can set duration i.e. a Date Range from the backend when the venues will be available for the booking.
For Example:- Venue Booking Service for Parties, Events or Concerts.
The customers will choose the from & to date when they want to book the venue.
4. Rent Type with Time
This Type of booking is typically used when you are offering rental services on your store.
For Example:- Bike Rental Service, Dress Rental Service, Furniture or Home Appliances on Rent, Bridal Jewelleries on Rent, etc.
You can set a fixed duration i.e. Date range when the service will be available for booking.
Now, customers will visit your website, select a start Date-Time and an end Date-time to book the product/service on rent.
5. Concert Type Booking
If You want to offer service for multiple day events or concerts then, You can go for Fixed Date Slots.
For Example:- multiple days booking for an event or seminar, multiple day event schedules, etc.
You as a store owner can add date range slots for any multiple days event and customers will select any of the date slots to book for that event.
6. Concert Type with Time
If You want to offer multiple days bookings for any live event or musical concerts with a fixed time interval, You can create fixed date time slots.
For Example:– Live Musical Concert, Venue booking for multiple Day events at Offices or Schools, etc.
In this Scenario, Customers will book the service for some specific days & a fixed time interval.
These are the 6 distinct booking types for multiple booking scenarios.

Get Ready to Explore..!!!
Overwrite Specific Days
Close Booking
In addition to this, we have introduced the “Overwrite Specific Days” feature for multiple booking types in the app.
Thus, admin can now create slots on some specific days or time duration that will overwrite the previous slots created for any booking product.
This means that admin can now close booking for some specific days or time period of any of his created slots.
Thus, the admin will now have more flexibility in booking creation with the Booking App by Webkul.
Schedule Updation
In the appointment type bookings, you can now update the time slots on specific dates in case you are not available to provide services on the previously created slots.
This newly updated slots will overwrite the previous slots created for the booking product.

Bulk Overwrite Specific Days
We have come up with the feature of bulk overwrite specific days.
So, from now onwards, you can select multiple booking products at a time and create different slots for the selected booking products on specific days.
This will overwrite the previous slots created for the booking product these days.

Select the products & click the “Overwrite Specific Days” button on the top. After that, select the overwrite type either “Duration” or “Particular Date” and create slots to close bookings.

Update Booking Type
You will now have the option to change the booking type if the product/service is not booked by the customer yet.
For this, you need to visit the “Booking Products” section of the app and you will get the option on the list.

Clicking the “Choose Booking Type”, you will be redirected to the “Availability” section from where you can select another booking type for the product.

Choose a booking type and create booking slots accordingly.
This way, you can change the booking type of the products/services that are not booked by the customers.
Introduced Booking Product Listing Page
Have a separate page to list all the bookings products/services listed in your store. You can anytime create a menu from your Shopify store and make it appear on your store front end.
Admin can also create a menu of Seller Listing Page on his/her store by referring to below-given steps:
- Visit Shopify Store Backend.
- Click “Online Store”.
- Go to Navigation.
- Click on Main Menu (if Created otherwise Add Menu).
- Enter a Title “Booking Products” and Link to Booking Product Listing.
- Lastly, click on Add & Save the Menu.
This way, you can add a Booking Product Listing menu to your store’s frontend.
Customers can easily filter any booking type by days/week/year/month and also by date range.

Allow Cart-Lock
Lock Cart Feature
You can now set a duration up to which you want to lock booking products/services in the customer’s shopping carts.
For this, you need to enable the Allow Cart-Lock option in the app and set a time to lock the booking products/services in the customer’s shopping cart.

EXAMPLE
Suppose a customer selects a slot from 11 A.M to 12 P.M to book service & you have locked the shopping cart for 60 minutes (1 hour) in the app.
Then, in this case, the selected slot ( 11 A.M to 12 P.M) for that particular service will be unavailable for the other customers for 1 hour.
This is how it appears on the cart page:

Reschedule Requests
The app has now a separate section to list all the reschedule requests that you receive from the customers.

Now, customers will also have an option to reschedule the approved bookings. To enable this option visit-
Booking app>>Configuration>>Booking Configuration>>Enable “Allow Reschedule Approved Booking”>>Save

Once this is enabled, customers will have a reschedule button on the account page using which they will be able to reschedule the approved bookings.

If you are using the Booking + Multi-vendor Marketplace integration to let the sellers add bookings to their products then, you can restrict booking features for your sellers directly from the app.
To enable this feature:-
Go to App>>Configuration>>Booking Configuration>>Enable “Restrict Booking Product Feature for Sellers“>>Save the changes.
These features include Product Information, Location, Availability, Overwrite Specific Days, Custom Information & Custom Fields.
You can enable/disable the features to allow sellers to manage the same from their respective seller panels.

As soon as you enable the above feature, a new feature gets added i.e. “Allow Seller to change Booking Type“.
Enabling this option will allow sellers to change the booking type of any product/service from their respective seller panels.

In addition to the Booking App monthly plan, we have now implemented the yearly plan as well. You can check your current plan and anytime switch to another plan.

PLANS
Basic Plan: $18/month
Premium Plan: $190.00/year
Opt for a plan that best suits your need:

Pause Subscription
You can anytime pause the subscription of the app just in one click. Pausing the app freezes your ability to access the app’s functionalities.
When you are ready to use it again, you can anytime unpause the subscription.
To Pause the app subscription:-
Login to the App>>Click the Subscription Icon>>Click the Pause Subscription button.
Note :- If you pause the app, you will not be able to access the app’s functionalities and you will be charged $5 per month.

You can now configure the date & time format of your booking widget.
Choose whether you want to show the 12-hour time format or 24-hours time format for the customers to choose the slot time on the frontend.
Moreover, You can define a specific date format for your booking widget. Keywords are defined in the app.

In case you have not yet selected the availability of your booking products, you can select an availability & create slots on multiple booking products in a go.
All you need to do is just select all the products to which you want to set availability and proceed to create slots for all the selected products at a time.
For this, Go to the Booking Products section>>Select all the products to which you want to set availability in bulk

After selecting the products, click the Choose Action>>Add Availability.

After the confirmation, you will be redirected to the Availability section from where you can choose a booking type & create slots for the same.
The slot created here will be applicable to all the products you have selected here in bulk.

Multi Vendor-Booking App Integration
In case you are using the Booking Product feature app with the Multi-vendor Marketplace app then, you can upload a favicon icon for your seller panel.
Follow the steps to upload the Favicon Icon: Go to Configuration>>Upload an Icon>>Save.
Recommended Image Size: 48x48px

You can now add the Booking App to your development store with 15 days Free Trial.
So, even if you haven’t opted for any Shopify paid plan & you are in the app’s free trial, you can install the app to your development store.
With the Blackout Days feature, you can configure when to cut off the dates while accepting rental bookings.
Those cut off dates will not be available in the booking calendar for customers to rent items.
Checkout the Blog for More Details: https://webkul.com/blog/blackout-days-booking-app-for-shopify
You can now export bookings in the app. You have two options whether you want to export all the bookings in one go or export via date range.

Now you ca request a refund on Shopify while canceling the customer’s booking. As soon as you cancel the booking, the respective bookings get canceled on Shopify also and a refund request is sent.
Let Customers Create Bookings from a Separate Global Booking Page
You can now have a separate page named “Global Booking” to let customers create multiple bookings from a single page and get those bookings listed only in the app (not in Shopify orders).
You can add a navigation menu to your Shopify store and link the Global Booking page to it. Now, clicking on the menu, the customer will redirect to that page and create bookings.

On that page, the customer will get the list of all the booking products of your store. Customers will select one or more products, choose preferred slots, and create bookings in a go.

Moreover, you can configure if you want to list the bookings made from this page to Shopify orders or not.
To enable this option, please visit the Booking App>>Configuration>>Bookings>>Create Bookings only in the app.
When you enable this option, the bookings created through the “Global Booking” page will be listed only in the app, not on Shopify.
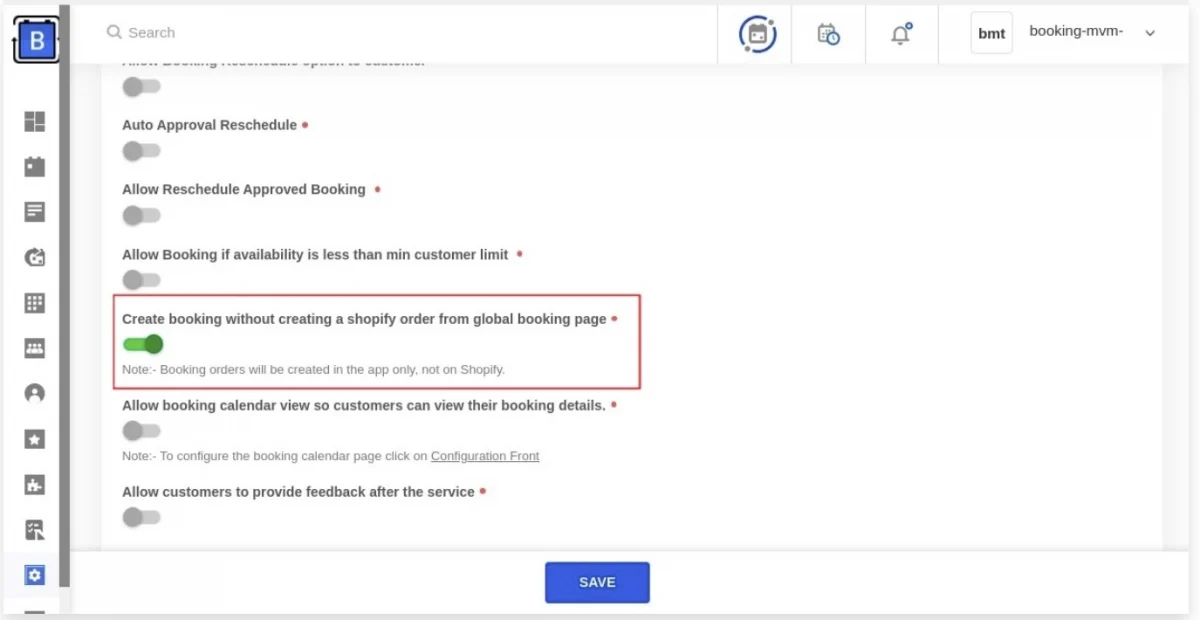
- If you enable this configuration:
All the orders from the booking app will be created within the app only , not in Shopify. - If you disable this configuration:
All the orders will be created in Shopify and on the app side .
You can now add user agents to the app and assign booking products to them.
In this case, when a customer books a slot, that slot becomes unavailable for all the booking products the agent manages in your store.
Why Use?
Suppose you opened a salon and you have only one agent to manage haircut and spa services.
Now, what if two customers booked the same slot for two different services i.e. Customer A booked [29 Nov ’20 2:00 P.M] for haircut and,
Customer B booked [29 Nov ’20 2:00 P.M] for the spa? You have only one agent to manage both services.
So, in this case, you can manage slots on a user basis. Now, once a customer selects a slot: [29 Nov ’20 2:00 P.M] for haircut,
this particular slot will be unavailable for spa and other booking products of the same booking type.
How To Add User Agent?

How To Assign Products to User?
Once you add the user to the app, you will get the option to assign a booking product to the agent. Go to Booking Products>>Edit Booking>>Assign Product to User>>Save Changes.

In case you allow slot booking on a user basis, you need to enable the status while adding a user.

Points To Be Noted:-
If you assign the same type of booking products to the same user agent, they will share their calendar and slot availability with each other.
For example, booking a slot for Product A (appointment-type) on December 30th at 2:30 A.M. will block that slot for all other appointment-type products assigned to the same agent.
Booking a slot for a “One Day Booking” will not affect the availability of slots for a “Rent Type” booking.
-In the case of “Appointment type” & “Rent type with time” booking, the time slot availability needs to be the same for all the products of that respective booking type.
-Not applicable for concert type & concert type with time bookings.
View Bookings in Calendar On the Basis on User
You can filter the bookings in the booking calendar on the basis of user bookings.

You can now apply taxes while creating manual bookings from the app.
For this, visit admin panel Booking App>>Bookings>>Create Order>>Select Booking Product/Service>>Select Slots>>Enable Create Booking with Tax>>Add Tax Name & Tax Rates (%).

Once you create the manual booking, Shopify will display the tax details in the Order section.

View the complete tax details:

Partial Payment feature for Admin
Now admin can allow customers to pay partially for the booking products.
This allows customers to pay a portion of the total upfront when booking, offering more flexibility and convenience.
Kindly note: As of now, the Booking App only supports this feature for products added by the Admin.
A- Enable for All Future Booking Products
Admins can enable partial payments for all future booking products.
To enable this feature, navigate to: Booking App Dashboard > Settings > Booking > Enable Partial Payment.
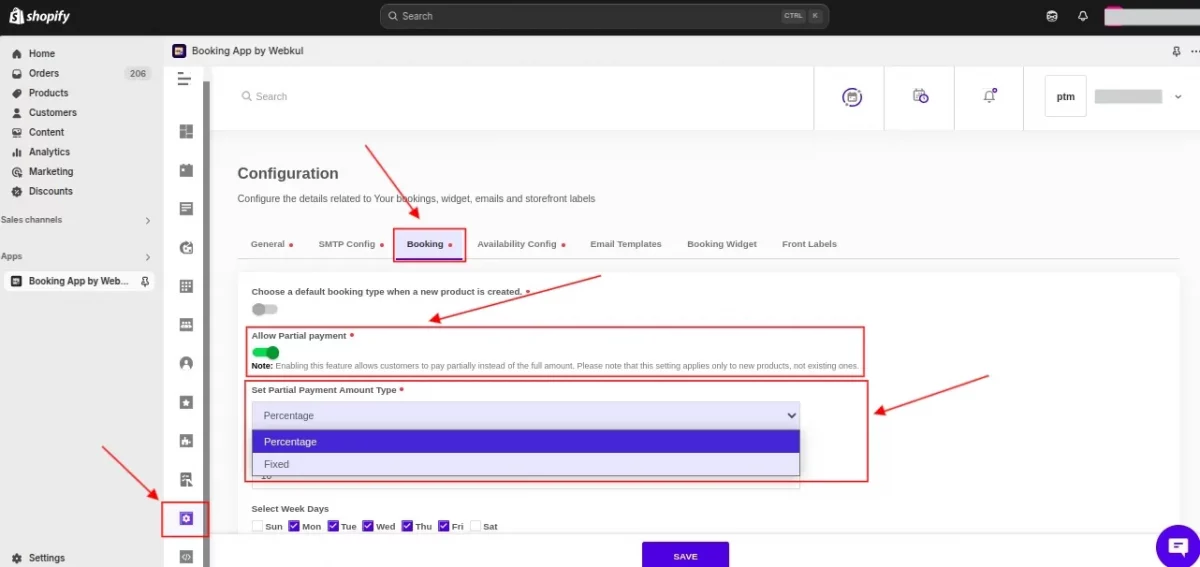
The Admin can also decide whether to calculate the partial amount as a fixed value or as a percentage of the total.
B- Enable for Existing Products
To enable partial payments on existing products, follow these steps:
Go to: Booking App Dashboard > Booking Products>>Click the three dots>>Edit product>> Enable Partial Payment.
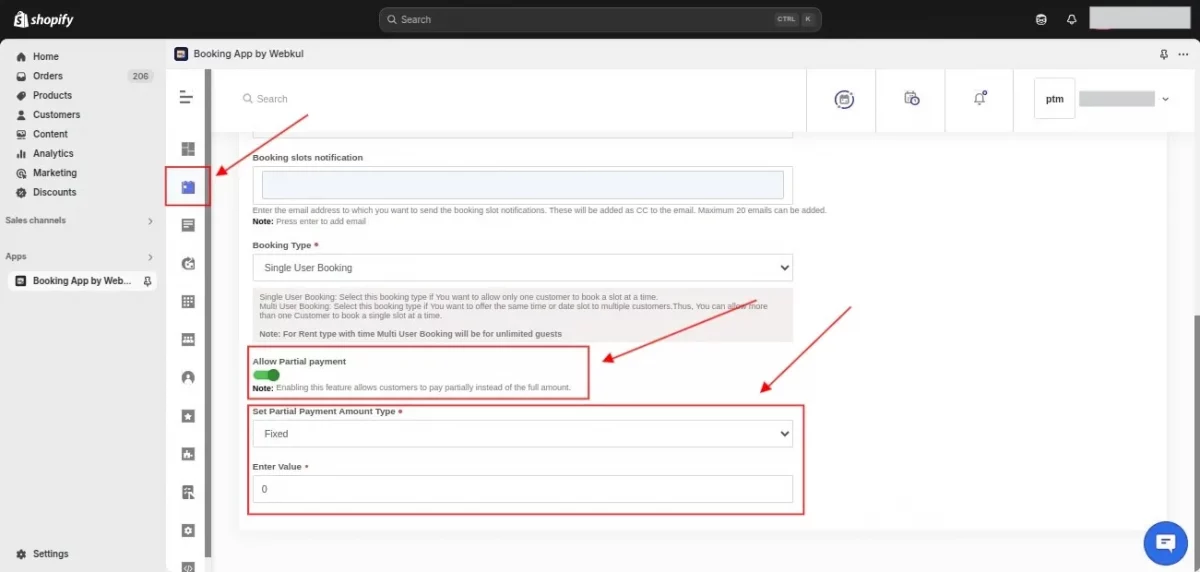
Here, the Admin can choose how the partial amount is calculated.
After a customer places an order, the admin is given the option to either approve or cancel the booking request.

Front end:
This is how the customer will be able to see the Partial Payment option in the front end.
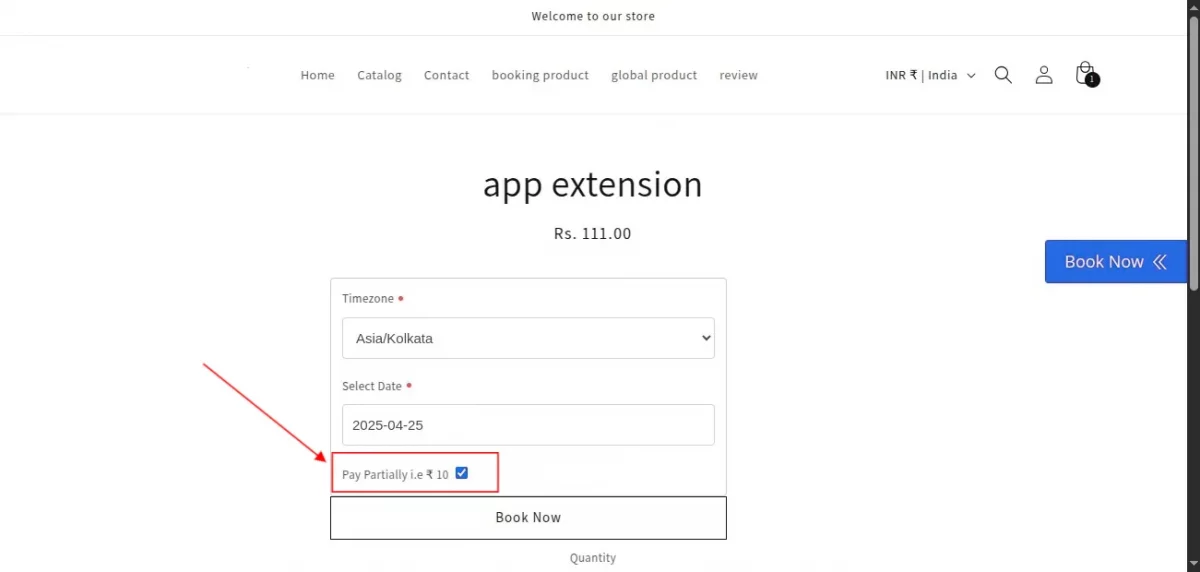
Please note that if the customer does not select the Partial Payment checkbox, they must pay the full amount at the time of booking.
KEEP FOLLOWING THE BLOG TO CHECK ALL THE RECENT UPDATES!
Demo
Check the DEMO of the Booking App for Shopify.
Need Help?
If you need any kind of support, just raise a ticket at https://webkul.uvdesk.com/en/. You can also contact [email protected] to get proper assistance.

Be the first to comment.