Multi-Vendor Marketplace for Shopify has come up with another marketplace shipping feature app for Indian Merchants, i.e., Vamaship.
Vamaship
Vamaship is a SaaS enabled logistics marketplace. Besides, it facilitates shipping via air, ocean, and surface to over 200 countries and 26,000 pin codes within India.
Using this featured app, the merchants can enable shipment & fulfillment through Vamaship. Moreover, he can automatically generate shipping labels for the same.
The Vamaship feature app is available only with the Multivendor Pro Plan ($60/month). Moreover, you need to enable the Shipping add-on (free) from the featured apps section of the app.
CHARGES:
This feature will have an additional charge of USD 10 per month over & above your current Multivendor plan.
NOTE:
Access to Shipping requires your Shopify store to be on the plan that supports Real-Time Carrier-Calculated Shipping.
THE VAMASHIP SHIPPING FEATURE APP IS AVAILABLE FOR BOTH RATE CALCULATION & FULFILLMENT.
Installation
To enable this ‘feature app’:
Go to multi vendor marketplace admin panel > click on the three dots > click on the ‘featured apps’. Further, enable the Vamaship add-on.

Furthermore, agree & approve the charges:


Configuration: Admin End
Firstly, go to:
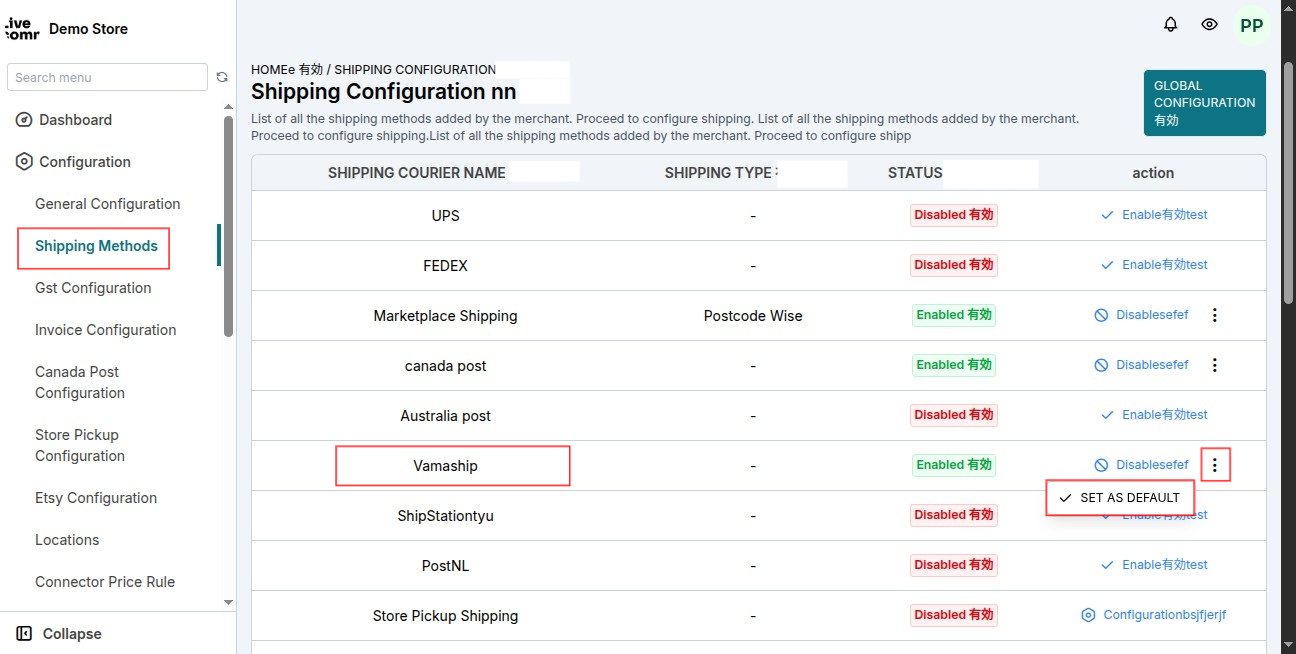
Multi-vendor marketplace admin panel > configuration > shipping configuration. Now, enable the shipping method:

After that, you’ll have one more option to configure this shipping.
So, either click on Configure Shipping
OR
Go to multi vendor marketplace admin panel > configuration > Vamaship Configuration.

Hence, this is what the configuration page will look like:

- SANDBOX MODE
If you want to test the functionality of this shipping add-on, enable the sandbox mode. So, use the sandbox mode for testing purposes only.
- AUTOMATIC GENERATE SHIPPING LABEL
Enable this to automatically generate a shipping label on order fulfillment.
- VAMASHIP ACCESS KEY
Further, in here, enter the API Username, i.e., the left part of the API key, before the colon. (It will be different for the Production and Development environment.)
Contact Vamaship to get the access key.
- CHOOSE SERVICE TYPE
- SHIPPING LABEL COST BORNE BY
Further, choose who will bear the shipping label charges, thus, the admin or the seller. (This is an extra cost apart from what the customer has paid.)
- USAGE AS
Select how you want to use Vamaship: For fulfilment or Both fulfilment & shipping.
Note: If you are using it for fulfillment only then customers will not get Vamaship shipping rates on the checkout page. That is, you will only be able to fulfil orders via Vamaship.
Set Shipping Method for Sellers:
The admin can further set the shipping methods for his sellers.
So, go to multi vendor marketplace admin panel > Sellers > Seller Listing > Edit (under Action).
On the edit seller page, the admin will have the following block:

The admin can set any shipping enabled on his multivendor marketplace as default also.
Further, the admin can view all the sellers which are using this shipping method by going to:
Multi-vendor marketplace admin panel > configuration > shipping configuration:
Make Shipping Address Phone Number Mandatory
The admin needs to make the Shipping address phone number mandatory at the time of checkout.
So, go to Shopify Backend > Settings > Checkout > Under Form Options, make Shipping address phone number as Required:

Configuration: Seller End
Note: Seller address & phone number is mandatory.
Further, the seller can configuration Vamashipping from his panel.
So, go to multi vendor marketplace seller panel > configuration > shipping configuration > enable the shipping:

Further, go to Global Configuration:

Moreover, from here, the seller can do the SHIPPING PACKET CONFIGURATION:
Note: 150 cm > LBH > 1 cm
In the case of Vamaship Air Domestic: 150 cm > LBH > 3 cm

Further, the seller can set the shipping method as by-default. So that every single product created it will have Vamaship Shipping as the by-default shipping method.
If not this, the seller can set the shipping method on individual products while adding/editing them.
So, go to Multi-vendor marketplace seller panel > Products >Product Listing > Add/Edit the Product:

Shopify Store Frontend
Further, the customer will have an option to select the shipping method as Vamaship after entering the information:

Shipping Label Generation
Seller will have an option to generate a shipping label from their seller panel. Also, shipping labels can only be generated for fulfilled orders.
So, go to Multi-vendor marketplace seller panel > Orders > Order Listing > View (under Action). In ADDITIONAL ORDER DETAILS, click on Actions > Print Shipping Label:
Moreover, this block will have the information regarding who is bearing the shipping label charges. (Refer to the screenshot below.)

Furthermore, this is how the shipping label will be downloaded in pdf form:

💡 Need Help?
Moreover, you can drop your query/suggestion at [email protected] or create your ticket at Webkul UV Desk

Be the first to comment.