Introduction
Magento 2 GST extension helps the Magento 2 store to support the GST functionality as per norms set under the Indian Government tax rules and Regulations.
It automatically adds the GST to the product at the time of checkout. Wherein the admin can assign the rate of the tax on each product. The GST amount is displayed in sections like the order detail page, and invoice.
Please Note:
- The extension supports all product types except gift cards.
- GST is applied to the associated product for the configurable, bundled, grouped product.
- This extension is meant for Indian Addresses, it will not work in another country.
Watch the video tutorial below to understand the Magento 2 GST extension workflow better:
Features
- Admin can add GST and HSN code to the products.
- Auto segregation of SGST and CGST into the equal part.
- Auto implementation of SGST+CGST and IGST as per address. Wherein SGST+CGST is for intra-state and IGST is for Inter-state.
- GST information is displayed in the invoice, emails, and pdf.
- Normal tax is applicable for other than India.
- The admin can specify the GST for the Maximum/Minimum price of the product.
- The extension is compatible with GraphQL.
- The extension is fully compatible with the Hyva Theme.
Indian e-Commerce market and GST
To set up an efficient business in India GST is a must. As per Indian Government tax rules and Regulations, every merchant located in India is liable to pay the GST amount for the sales of goods.

This Goods and Service tax is meant for the removal of other subsequent taxes. Thus, this module is for the addition of GST to the products.
Herein, the store owner need not worry about any separate GST calculation.
Installation of Magento 2 GST
The installation is quite simple just like the standard Magento 2 extensions.
Admin will get a zip folder and they have to extract the contents of this zip folder on their system.
The extracted folder has an src folder, inside the src folder you have the app folder.
You need to transfer this app folder into the Magento2 root directory on the server as shown below.

After the successful installation, you have to run these commands in the Magento2 root directory.
First command – php bin/magento setup:upgrade
Second Command – php bin/magento setup:di:compile
Third Command – php bin/magento setup:static-content:deploy
After running the commands, you have to flush the cache from the Magento admin panel by navigating through->System->Cache management as shown below.

Multi-Lingual Configuration
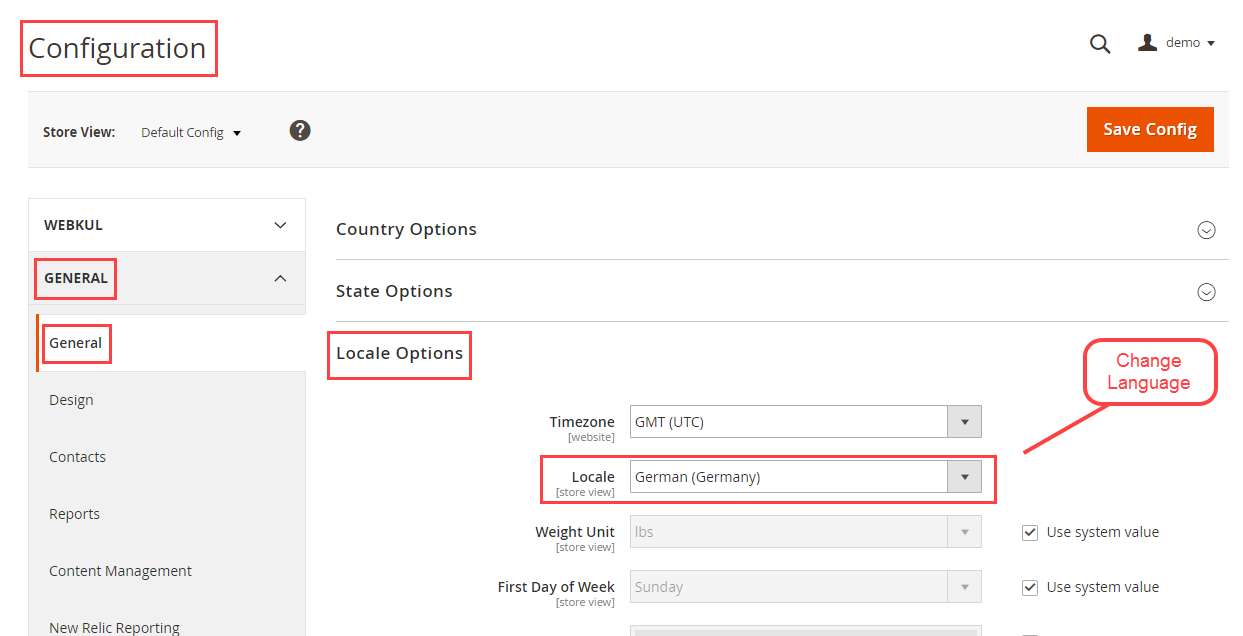
For Multilingual support, please navigate to Store>Configuration>General >Locale Options. And select your desired language from the Locale option.

Admin Configuration of Magento 2 GST
The admin now can easily edit the configuration of the module as per requirement. For this, the admin can navigate- Store>Configuration>GST.

The admin here just need to-
- Enable the module to allow its usage in the front end.
- GSTIN– The admin can specify this number which every merchant receives. This verification id of the merchant.
- Production State- It is the state where the admins business belongs to. It will determine if Intra-tax(SGST+CGST) is applicable or IGST is applicable.
Product and GST
Once the module is set the admin will navigate through Catalog>Products.
Herein the admin will edit a product to assign GST rate to the product.

Here the admin will edit few fields to implement the GST-
- Tax Class- The admin needs to make the product as Taxable Goods.
- GST Rate(in percentage)- The admin can specify the percentage of GST that is chargeable on the product.
- Minimum Price to Apply Different GST- Here admin will specify the minimum price of the product for different GST.
- GST Rate to Apply Below Minimum Price (in Percentage)- In this field, the admin will define the percentage of GST which will be applicable in case of the minimum price of the product.
- HSN code- Harmonized System of Nomenclature code is a system that was introduced to systematically segregate the goods all over the world.
Mass Update GST
The admin can enter the GST of the product collectively in the form of CSV. The admin can navigate GST>Mass Update GST.

Now the admin can download the sample CSV for the format. Henceforth, the admin could enter details in the CSV.
This will allow the admin to upload the CSV by choosing the file.
Thus, the CSV looks like this as specified in the image.

How GST Works at Storefront?
The customer can enter GSTIN in the Billing Address section. This number could be used by the customer to charge the other customers if they are reselling the product.

The customer can view the GST on various pages of the website. The customer can view the GST price by clicking on View and Edit Cart.

Here, the transaction is within the state, hence we have CGST+SGST.
Additionally, the customer can view the GST in the orders section. For this, the customer needs to navigate to My Order.

The GST is even visible in the invoice PDF of the order. Hence, the customer can keep it as proof of the order as sent by the admin.

Note- For the Marketplace solution kindly refer here- Multi-Vendor GST Tax for Magento 2.
So, that’s all for the GST module, for any question/query, please raise a Ticket at our HelpDesk System. We are always happy to help you out. You can also get back to us via mail [email protected].
Current Product Version - 5.0.3
Supported Framework Version - Magento 2.0.x, 2.1.x, 2.2.x,2.3.x, 2.4.x
Be the first to comment.