EasyPost is known to be one of the most powerful shipping solutions to manage shipments. The EasyPost API is now integrated with the Multi-vendor Marketplace app for Shopify.
Merchants can visit the Multi-vendor admin panel and enable the EasyPost shipping featured app. Thus, allow sellers to manage the order fulfillment via EasyPost API.
Also, automatically generate shipping labels of the orders.
This feature app will charge you a minimal amount of $10 per month over and above your current Multivendor plan.
NOTE:- This EasyPost shipping feature app is available only with the
Multivendor Pro Plan ($60/month). Moreover, you need to enable the Shipping Add-on for FREE from the ‘Feature Apps’ section of the app.
Also, Access to Shipping requires your Shopify store to be on the plan that supports Real-Time Carrier-Calculated Shipping.
EASYPOST SHIPPING FEATURE APP IS AVAILABLE for both Rate Calculation and Fulfillment.
How to Activate EasyPost Shipping Feature App?
To enable the feature app, all you need to do is to visit the “Featured Apps” section of the admin panel and enable it from there.

Once you click on “Feature Apps”, you will get the list of apps listing in this section. There, You will get the EasyPost feature. You just need to click the enable button.

In this way, you can enable the feature within your Multivendor App.
Configuration: ADMIN END
Once you enable this feature app, you will get a new sub-menu in the Configuration menu of the app i.e. EasyPost Configuration.
Please Note:- You need to get registered to EasyPost to configure the details in the app.
Before this, You need to visit the Configuration>>Shipping Methods and enable the EasyPost Shipping.

Enable the EasyPost Shipping:-

Shipping enabled:-

Moving forward to configure EasyPost details in the app:-
EasyPost Configuration
In this section, you need to enter the API key provided by EasyPost. Moreover, you need to configure the below-mentioned details as per your requirement.
AUTOMATIC GENERATE SHIPPING LABEL:- You can enable this tab to allow sellers to generate the shipping labels automatically on fulfilled orders, you need to enable the tab
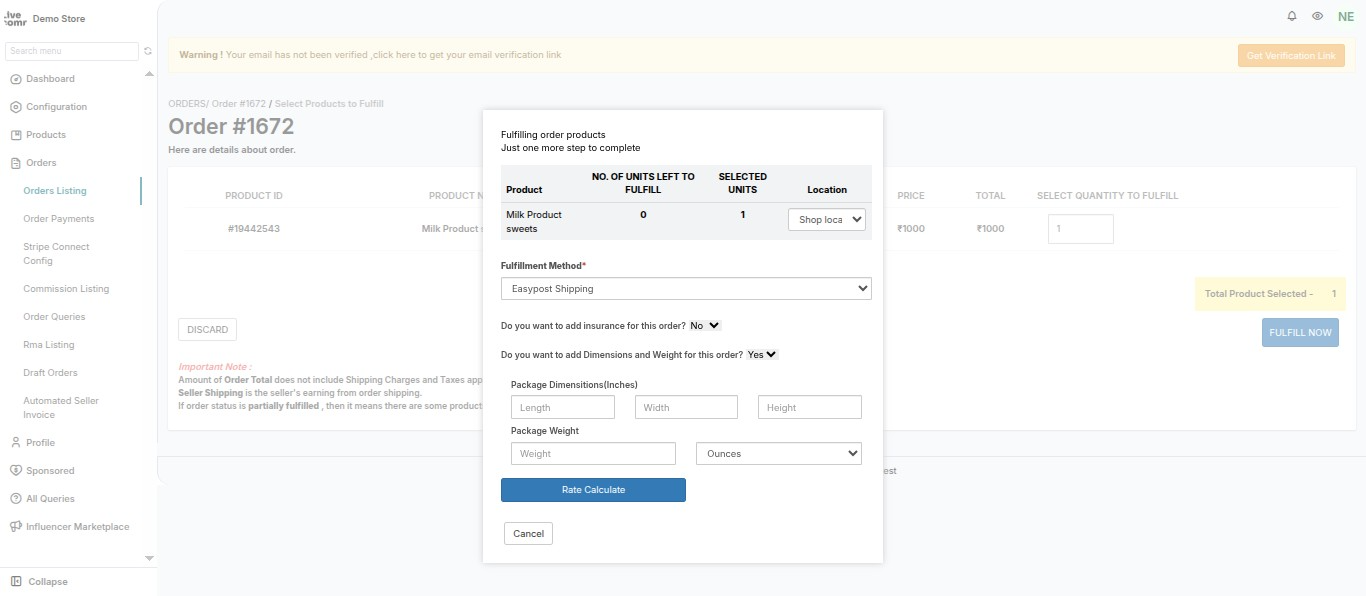
Custom Dimension on fulfillment:-
Enabling this, you can allow sellers to add Custom package dimensions: length, Width, height, and custom package weight for their order ignoring Product weight and dimensions.
Note: The unit of dimension and weight will be in Inches and ounces/pounds respectively.
Allow Create Insurance on order:
Enabling this, you can allow sellers to add Insurance during order fulfillment.
During the order fulfillment, the Seller will get an option “Do you want to add insurance for this order”. Simply choose “Yes” or “No” from the dropdown menu.
If the seller chooses “Yes,” the insurance amount will be prefilled which is equal to the sum of product prices of the order. The seller can also edit the insurance amount.
The insurance fee will be 0.5% of the insurance amount as per Easypost documentation.
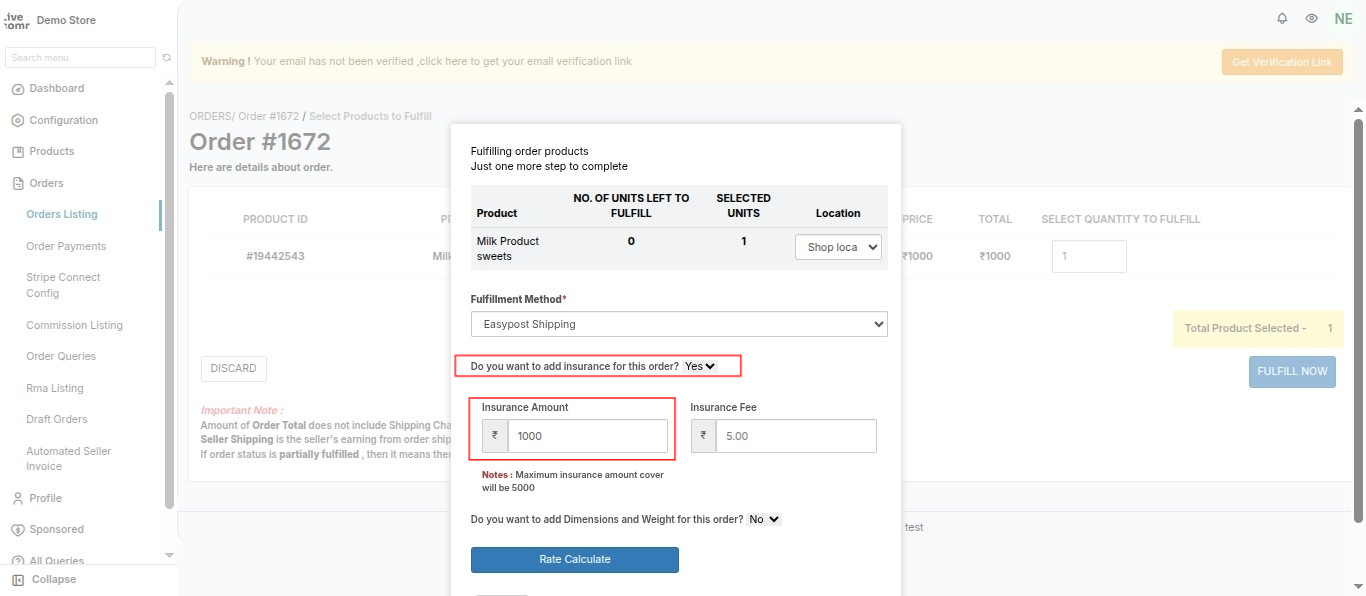
Note: The maximum Insurance coverage amount can be up to 5000 USD, and the minimum Insurance fee is 50 cents.
The admin has the discretion to decide whether the cost of the shipping label and insurance fee will be deducted from their own earnings or from the seller’s earnings.
To configure this, the Admin needs to navigate to:
Admin Panel>> Configuration>> EasyPost Configuration. And you will find the configuration.
Shipping Label Cost Beared by, Choose either Admin or Seller from the dropdown menu.

Insurance fee Cost Beared by, Choose either Admin or Seller from the dropdown menu.

USAGE AS:- Configure how you want to use the EasyPost shipping for the sellers. Either it’s for fulfillment only OR for both Shipping and fulfillment.
SHIPPING LABEL COST BEARED BY:- Also, configure if the admin or the seller will bear the shipping cost.
RECEIVE PARCEL TO YOUR ADDRESS:- In case you want to receive the parcel at your address, you need to enable the tab and enter the address for which you want to generate the shipping label.

Make Shipping Address Phone Number Mandatory
To use this feature add-on, the admin needs to make the Shipping address phone number mandatory at the time of checkout.
To do this, You need to go to Shopify Backend > Settings > Checkout > Under Form Options, make the Shipping address phone number as Required.

Configuration: SELLER END
Once you configure these details, the sellers will also get the option to enable the EasyPost shipping from the Shipping Configuration menu of their seller panel.

Once enabled, the seller proceeds to configure EasyPost shipping.

The sellers can set the EasyPost shipping as default option, can disable the shipping.
Now, clicking the Configuration button, the seller will enable the International Shipment to be managed via EasyPost, select the International content type and add description about the same.
Following are the fields need to be configured:-
International Shipment:- In case the seller wants to send the parcel internationally, he/she needs to enable this tab. For domestic shipment, keep it disabled.
International Content Type:- The seller needs to select the content type for the international parcels such as documents, gift, merchandise, returned goods, etc.
Content Explanation [Human readable description of content. Required for certain carriers] :- The seller can describe about the parcel to be delivered.

GLOBAL CONFIGURATION:- In case, the sellers need to configure the shipping parcel details, this can be done from the Global Shipping Configuration:-
Configure Width, height, length, girth, and weight.

Now, the seller can fulfill orders via the EasyPost shipping courier service.
Enable Predefined Packages
Sellers can now enable the feature for Predefined Packages to streamline the shipping process.
This option allows them to select from a list of standard package types, helping save time and reduce manual entry.
However, the Predefined Packages feature is currently available only for USPS shipping.
To use it, the seller must ensure that the shipping method is set to USPS in their EasyPost dashboard.

Shipping Label Generation
Both admin and seller can generate the shipping label for the fulfilled orders. Admin can configure the shipping Label details from his admin panel.
Seller needs to follow the below-given steps to generate shipping labels for fulfilled orders:
- Login to Multi-vendor Seller Panel.
- Go to Orders.
- Visit the Order Listing section.
- Click the Proceed To Fulfill The Order button.


Once fulfilled, click Print/Generate Shipping Label.

Thus, the shipping label will be generated automatically for the fulfilled orders. Thus, the seller can easily print the shipping label.

Order tracking is now available for EasyPost Shipping.

That’s all about the EasyPost Shipping feature app of the Multi-vendor Marketplace App.
Check Other Shipping Services integrated with the App.
DEMO
Link to check the demo of Multi-vendor Marketplace app for Shopify: https://egsma.io/shopify-multivendor-marketplace/
Need Help?
Hope you like this blog. To get more interesting blogs, keep in touch with us. If you need any kind of support, just raise a ticket at https://webkul.uvdesk.com/en/.
You can also contact [email protected] to get proper assistance.
Thank You for reading this Blog!

Be the first to comment.