PrestaShop QuickBooks Connector module help admin to synchronize QuickBooks with their PrestaShop store.
Using the PrestaShop QuickBooks Connector you will be able to create sales receipts, invoices, and estimates of your store orders on the QuickBooks – Manually and Automatically.
It will synchronize all the information related to customers (such as customer name, email address, order items, billing address, etc), products, and orders with your QuickBooks account.
Features of PrestaShop QuickBooks Connector
GENERAL
- Generate sales receipt, invoice, and estimate on QuickBooks for PrestaShop orders.
- Synchronize the PrestaShop products to QuickBooks or vice-versa.
- Synchronize customers on QuickBooks and PrestaShop.
- Synchronize taxes and payment methods on QuickBooks and PrestaShop.
- Synchronize QuickBooks Orders to PrestaShop.
- Admin can use the module for any QuickBooks company by selecting the country of their QuickBooks company shop.
- Admin can select the default shipping method for imported products on PrestaShop.
- Admin can map product categories and also can set default product category for products from QuickBooks with no category.
- Also, the admin can auto-map the Categories, Products, and Customers.
IMPORT
- Admin can import products, customers, and orders(sales receipt, invoice, and estimate) from QuickBooks on PrestaShop.
- Admin can import particular products from QuickBooks or import/update all the QuickBooks products.
- Admin can import particular customers, and new customers or import/update all customers from QuickBooks.
- Admin can import only active products and customers from QuickBooks on PrestaShop.
- During import orders, if the sales receipts have a discount then it will create and apply a default voucher(cart rule) with the name “QuickBooks SalesReceipt” (if not created). If the cart rule is already created then it will update according to the current order configuration and will be applied to this order.
- Admin can import all orders to PrestaShop or can import products to PrestaShop using the sales receipt number on QuickBooks.
- Admin can set the default payment method, shipping method, and order status while importing products from QuickBooks to PrestaShop.
- Select Order state for real-time order
EXPORT
- Admin can export products, customers, and orders on PrestaShop to QuickBooks.
- Admin can export particular or all products and customers to QuickBooks.
- Admin can export orders from PrestaShop to QuickBooks by selecting order status and date.
- While exporting products in combination to QuickBooks, it will create separate products with different QuickBooks product IDs at the QuickBooks end.
- QuickBooks can hold up to two addresses for a customer at its end.
- While exporting products to QuickBooks, it will create the products on QuickBooks with the base price for that product.
- If no category for an export product is map then it will create the product at QuickBooks end with no category.
- Admin can enable automatic export of customers to QuickBooks on its creation on PrestaShop.
- Admin can select the default payment method and a deposit account for the product to be exported to QuickBooks.
- Automatically export products on QuickBooks when created on PrestaShop.
UPDATE
- Admin can update the exported and imported products on QuickBooks altogether.
- Admin can enable the updation of sparse fields(changed fields) for a product and customer.
- Admin can enable auto update of the customer under “CUSTOMER SYNC SETTINGS”.
- Admin can also enable update of customer’s address during update of the customer on QuickBooks.
INACTIVE
- Admin can inactive(delete) a single or multiple products from PrestaShop end to QuickBooks.
- Admin can inactive(delete) a single or multiple customers from PrestaShop end to QuickBooks.
- QuickBooks company holders can inactive products and customers on the QuickBooks end.
ORDERS
- Admin can import orders using sales receipt number or all orders at once from QuickBooks to PrestaShop.
- Admin can export orders to QuickBooks from PrestaShop by selecting particular order statuses or all the statuses along with the dates.
- Admin can also export selected orders to QuickBooks or all orders with a single click to QuickBooks.
- Admin can select the default Deposit account for exported orders to QuickBooks.
- Admin can also select the default QuickBooks payment method for exported orders.
- Select a customer which will be use for all the PrestaShop exported orders
- Automatically export orders on QuickBooks when created on PrestaShop.
- Also, select the Order Status for automatic order export.
- Admin can choose to add PrestaShop order invoice on QuickBooks during order export from PrestaShop.
- Map PrestaShop order status with QuickBooks sell type.
Note: Click here to view the list of countries in which the service of QuickBooks is available.
How to Install PrestaShop QuickBooks Connector
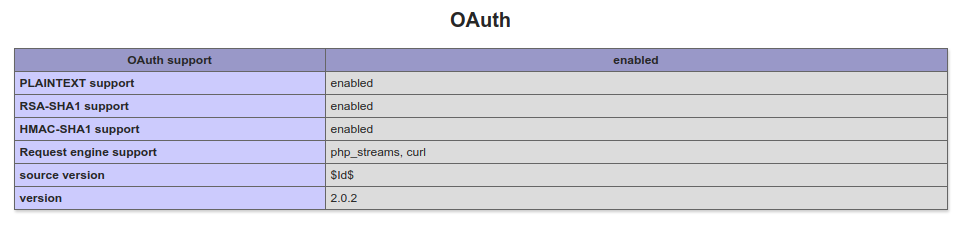
Note: In order to install this module you need to first install/enable the Oauth libraries on your PrestaShop server.
- Firstly, go to the module manager in the back office and click on ‘upload a module’.
- After that, drag and drop the module file or select the file from the system.
- In this way, the module installation will be successful.


How to get QuickBooks API credentials
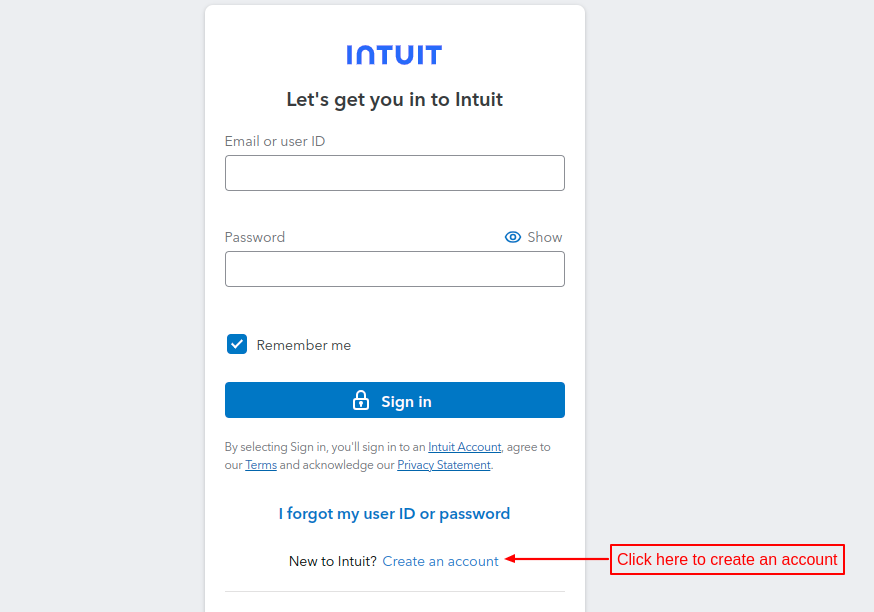
Firstly, a user needs to create an account QuickBooks.
On the sign in page, the user needs to click on ‘Create an account’ option.
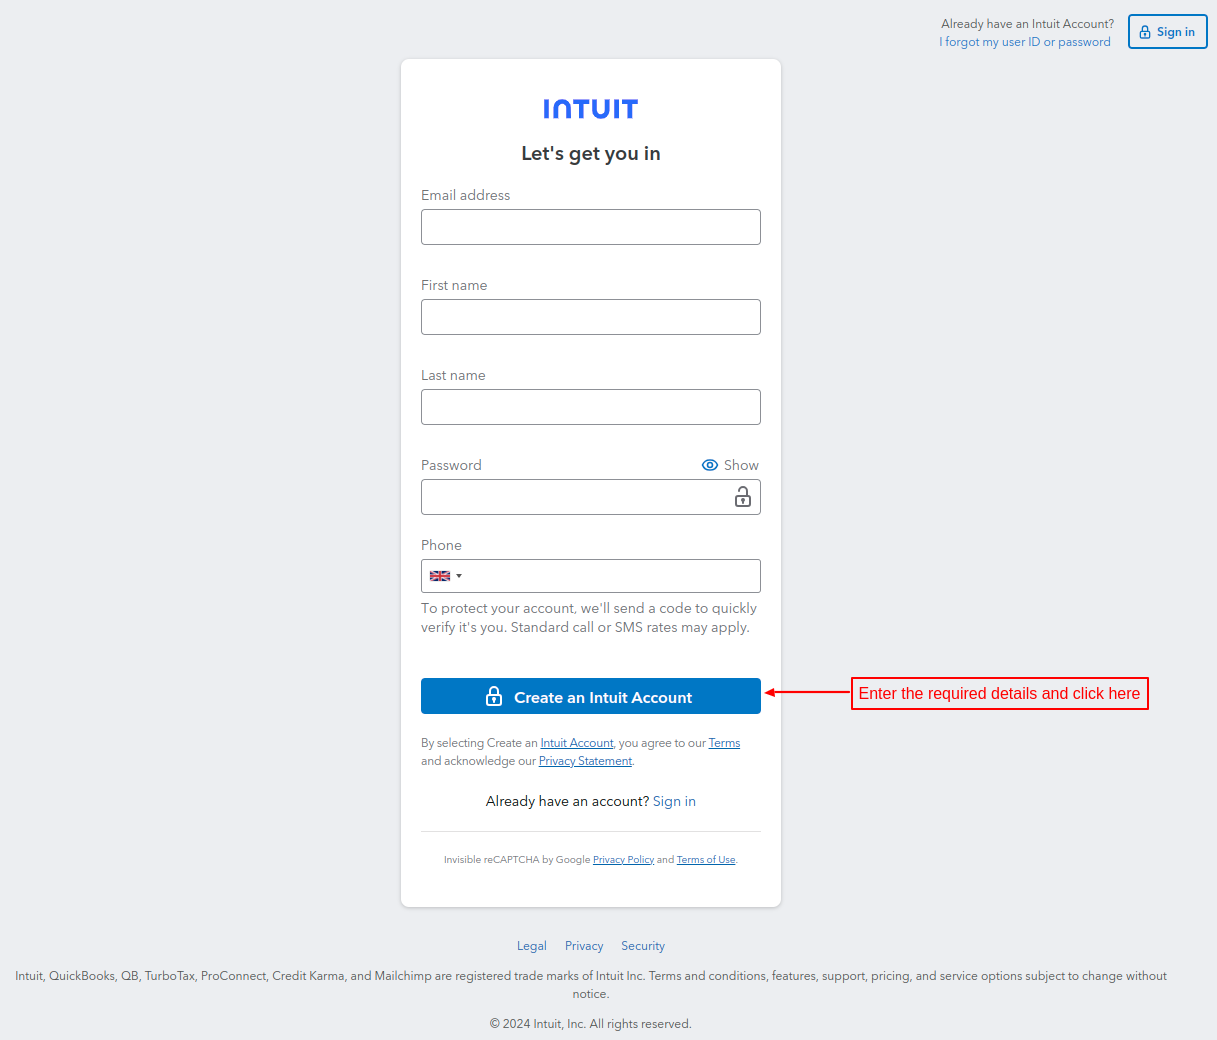
On clicking the option, a form appears on the page where the user needs to enter reguired details to complete the registration.
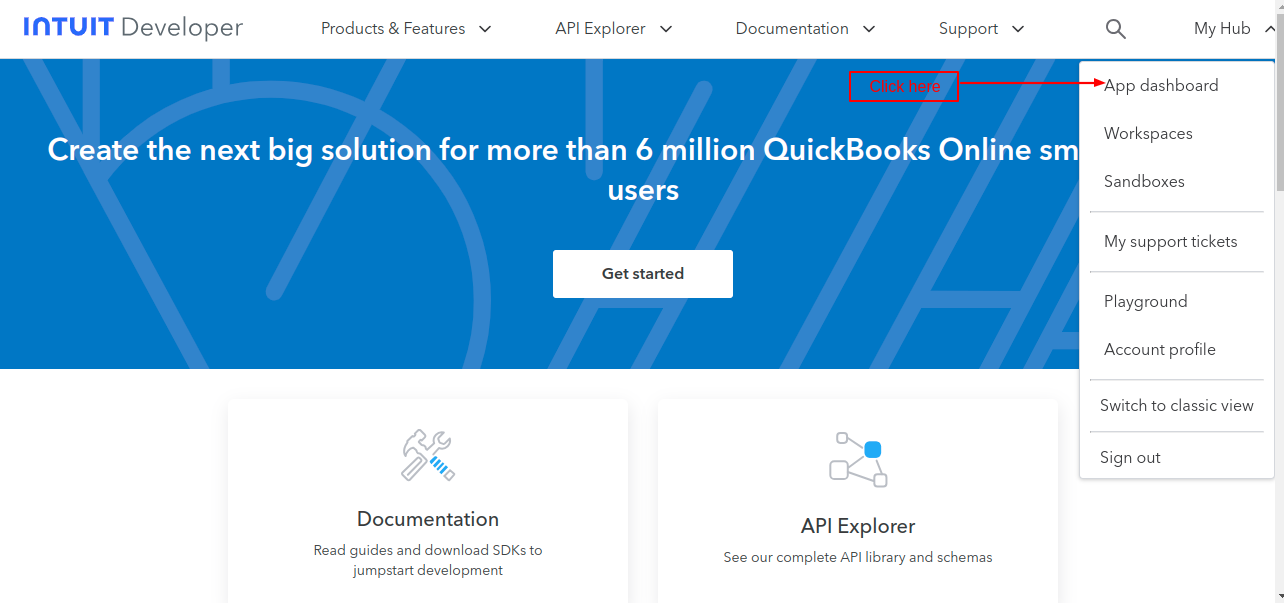
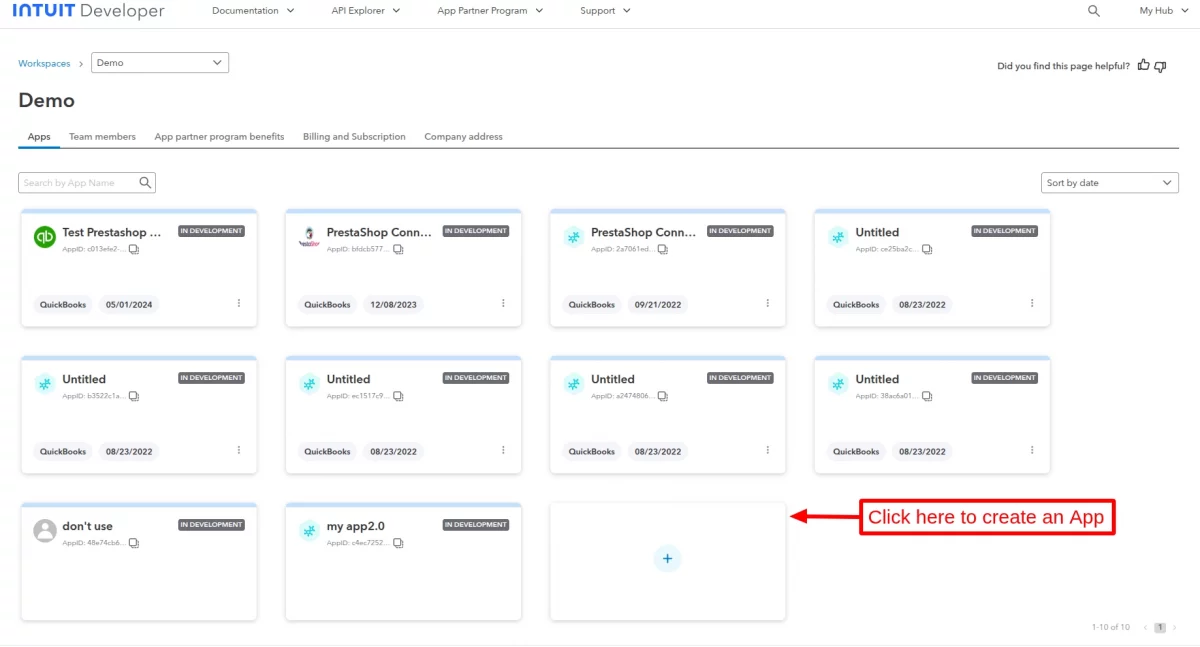
Once created, go to “App dashboard” under My Hub on the top-right position on the site.
Under Apps, click on ‘+’ button to create an app.
Now, click on “Get Started” button.

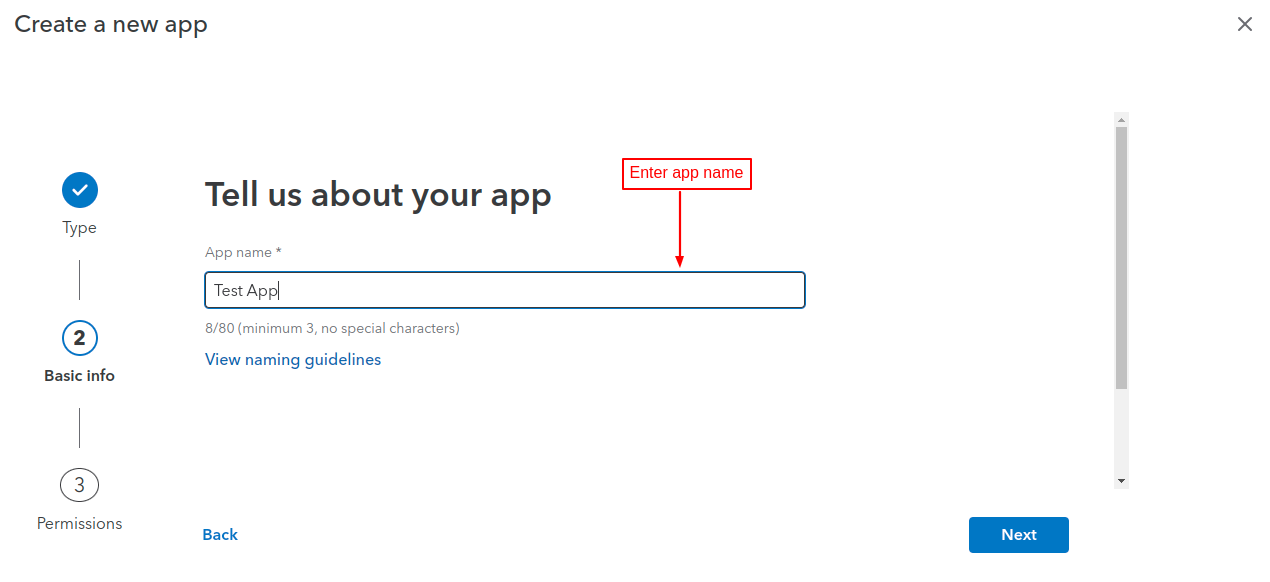
Enter app name and click on the next button.
Now, select the permissions and click on ‘Done’ button.
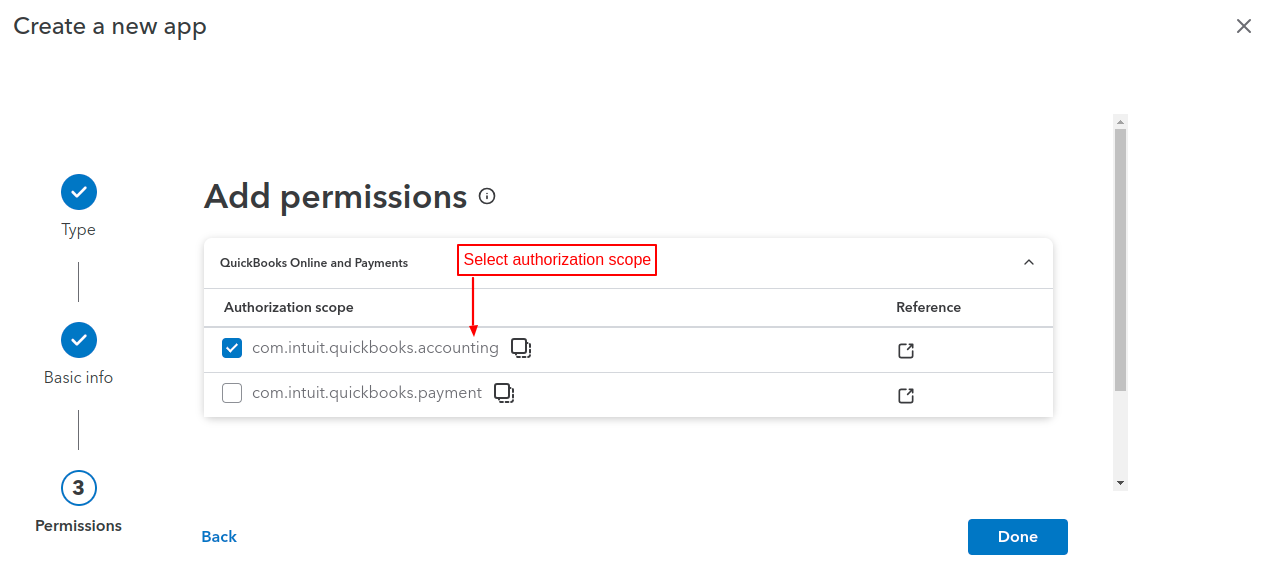
On clicking the ‘Done’ button, a popup appears on the page where the user can view the selected permission and click on Confirm to proceed.
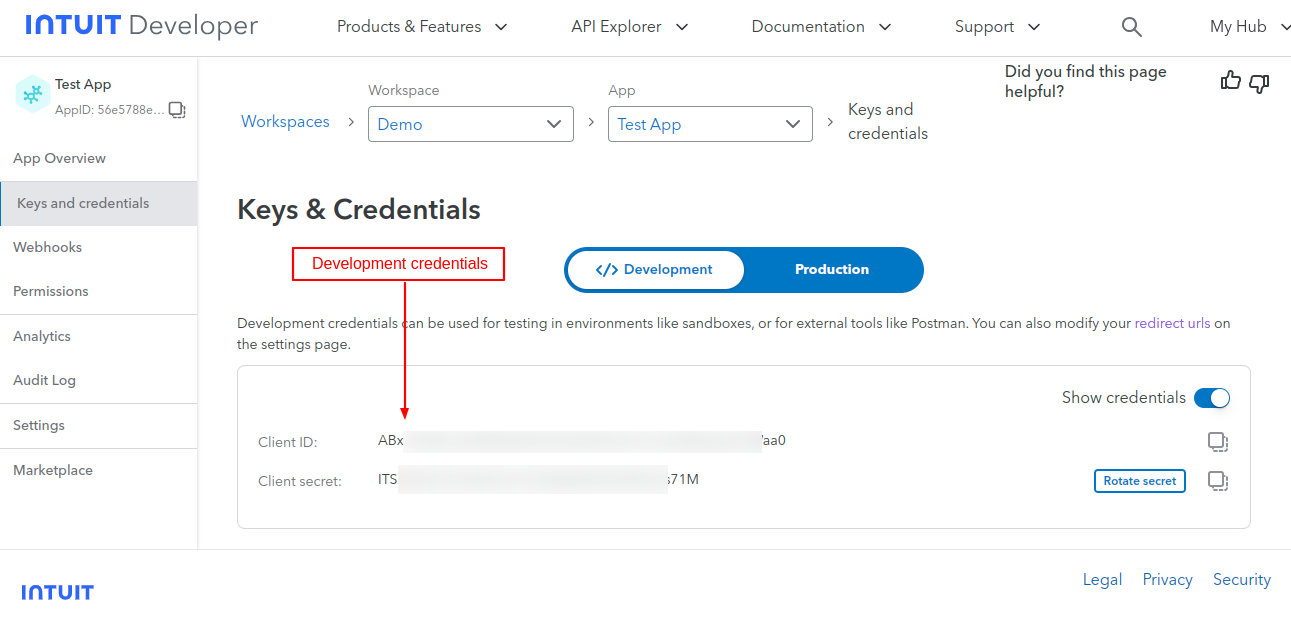
Now, the user can view development credentials.
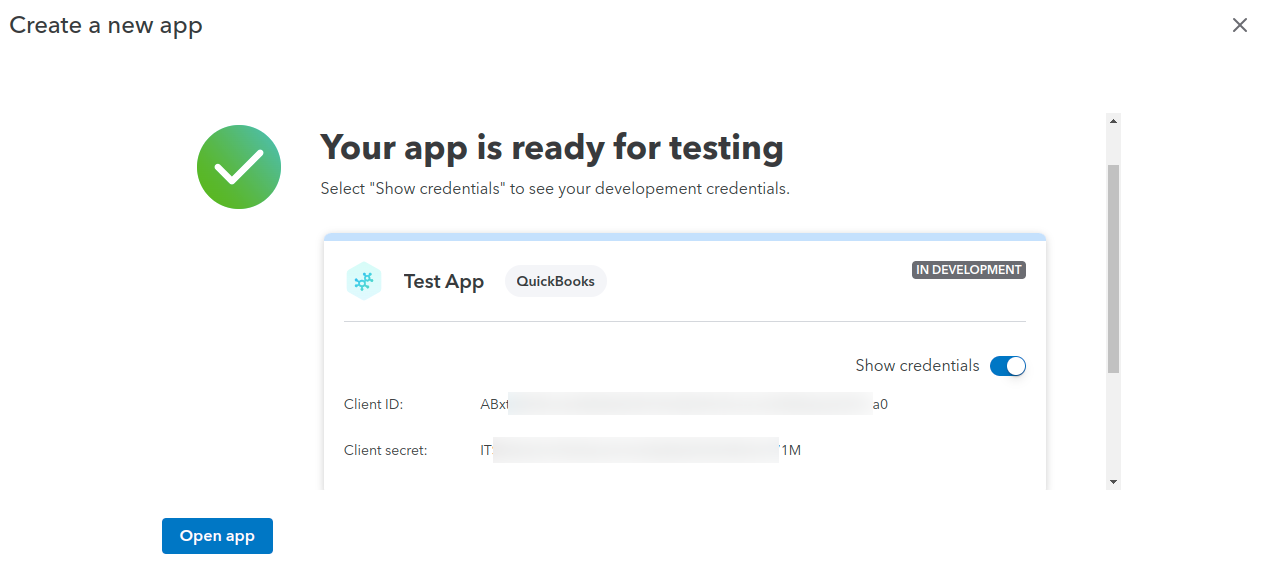
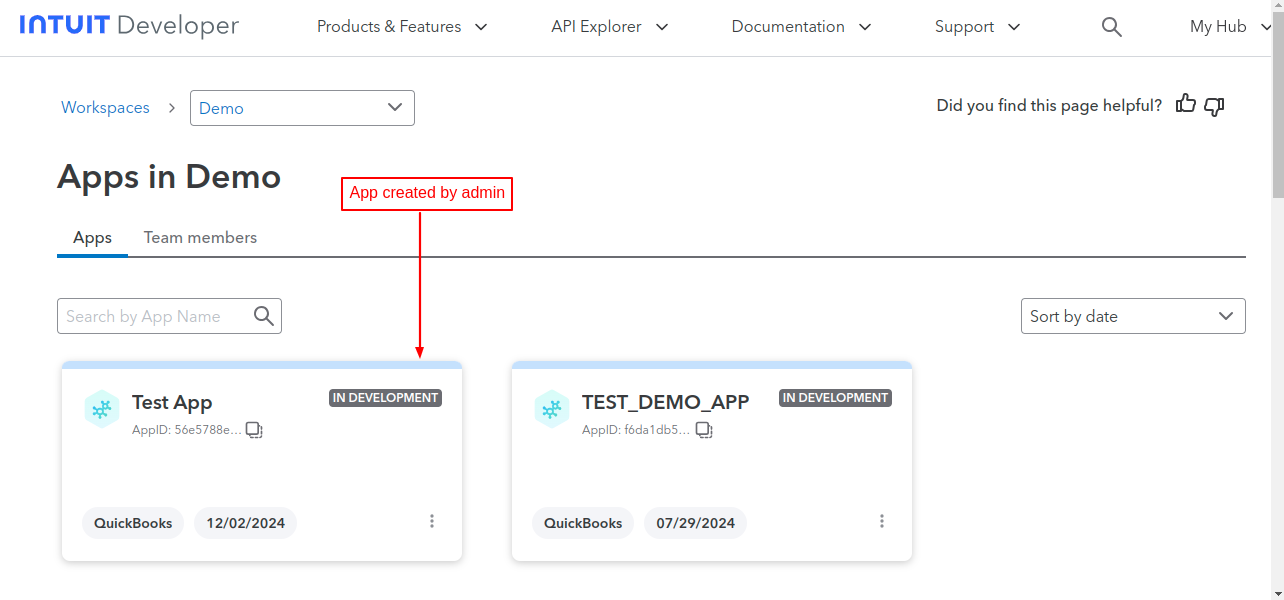
Click on the app to view keys & credentials.
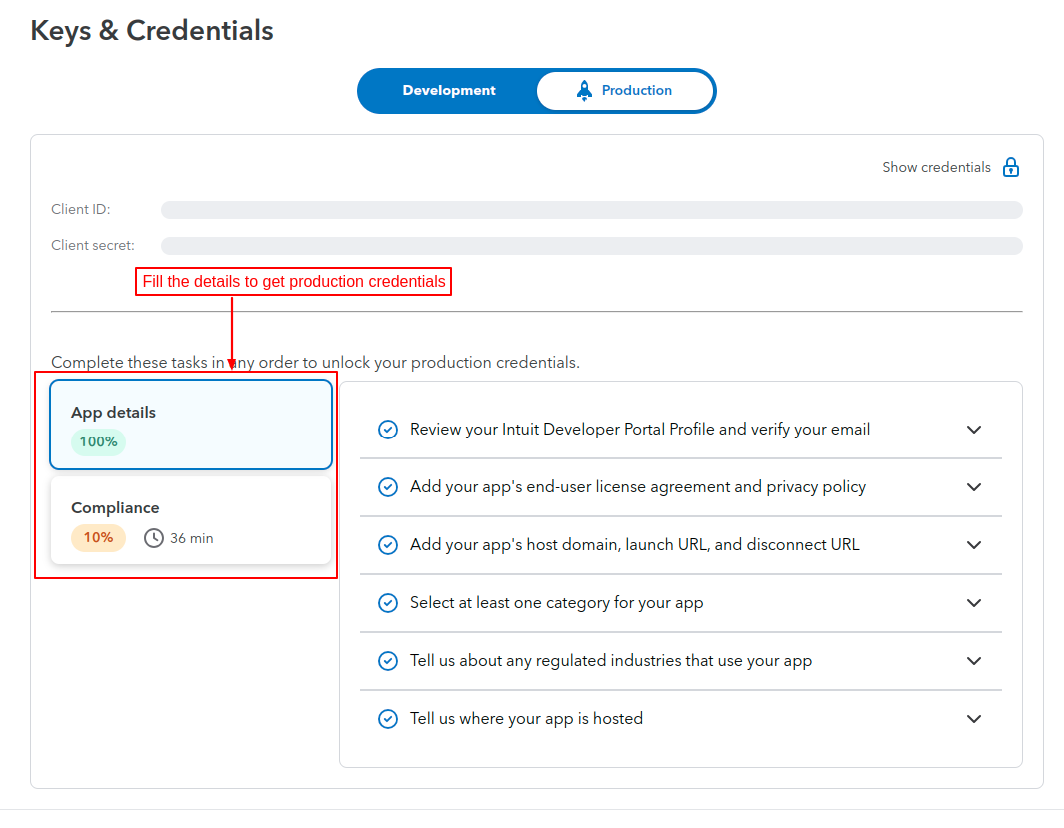
For getting the production credentials, the admin needs to fill a few details.
PrestaShop QuickBooks Connector Configuration
After successful installation, the admin needs to configure the module.
Note:
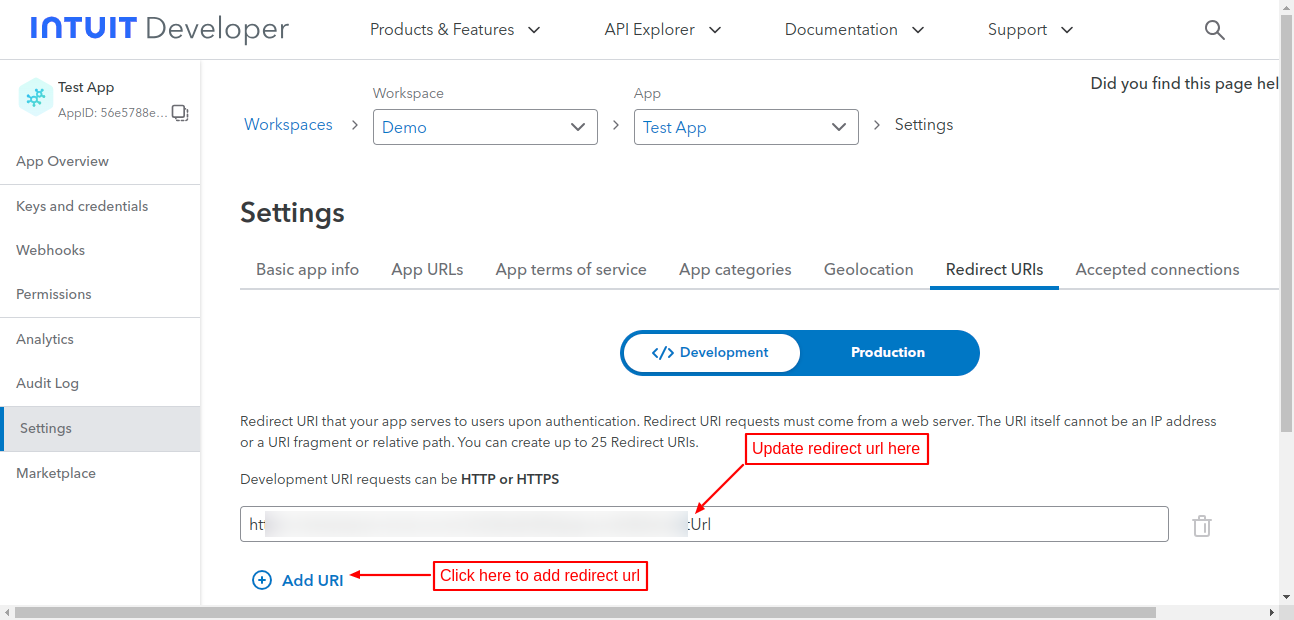
Before configuring the module settings, admin need to create a QuickBooks account and QuickBooks developer account and update the redirect URL in the QuickBooks developer account’s apps key section.
Admin can use the QuickBooks account credentials for the QuickBooks developer account.

Admin can update the redirect URL by copying the redirect URL from here and pasting it into the redirect URL field under app ‘Redirect URLs’ tab.
GENERAL SETTINGS:
Admin needs to configure the GENERAL SETTINGS of the module for the proper functioning of the module.
Mode: Admin can decide on whether the mode for building the application will be Development or Production.
Client ID and Secret: If the admin is using the application in the sandbox mode then he can make use of Development keys.
If using the application in the Live mode then he can make use of the Production keys.
Scope: Scope for the company is by default “accounting” and cannot be changed.
Enable API Logs: If enabled, it will record the API Logs in the Module file.

Clicking on the “connect” button admin can connect its PrestaShop QuickBooks connector account to Intuit account.


Once the connection is done between PrestaShop and QuickBooks, the admin will be redirected to the configuration page in the back office.

Note: It is mandatory to save these details to sync your store to your company.
CUSTOMER SYNC SETTINGS:
Admin can automatically manage the customer synchronization between QuickBooks and PrestaShop using “CUSTOMER SYNC SETTINGS”.

Auto synchronizes new customer: Admin can automatically synchronize or export its customer to QuickBooks on creation from PrestaShop.
Auto update Customer: Customer information will automatically update on QuickBooks on customers’ creation from PrestaShop.
On update customer, update address: On updating customer information, the customer address will also be updated. Up to two addresses for a customer can be updated on QuickBooks.
Sparse update: Using sparse update only changed fields of customer information will be updated.
Default customer password: Admin can either set a random password or customized password as default customer password for creation of QuickBooks customer on PrestaShop.

If the admin has selected the custom password then he can either enter the custom password in the field “Enter password” or can auto-generate a password by clicking on the “Generate password” button.

PRODUCT SYNC SETTINGS
Admin can automatically manage the product synchronization between QuickBooks and PrestaShop using “PRODUCT SYNC SETTINGS”.

Auto export new products on QuickBooks: If enabled, then whenever the product gets created on PrestaShop it will automatically export on QuickBooks.
Sparse update: Using sparse update, only changed fields of product information will be updated.
Default product category: If enabled by the admin then the product will be created with the selected category else the product will not be created at the PrestaShop end.
Account setting: Admin can select the following account setting for the products on QuickBooks.
- Income Account –
Select the account for the products created in QuickBooks. The selection made here for the income account will reflect at product information in QuickBooks. It’s an account to which a product belongs to so that it allows for easy management at a later time. - Expense Account –
Select the account for the products created in QuickBooks. The selection made here for the expense account will reflect at product information in QuickBooks. It’s an account to which a product belongs to so that it allows for easy management at a later time. - Inventory Asset Account –
Select the account for the products created in QuickBooks. The selection made here for the asset account will reflect at product information in QuickBooks. It’s an account to which a product belongs to so that it allows for easy management at a later time.
Note:
- There is a one-to-one mapping between PrestaShop and QuickBooks. While syncing products from PrestaShop to QuickBooks no combination at the QuickBooks end will be generated. All combinations for the product will be created as separate products.
- Products on QuickBooks can be without category.
ORDER SYNC SETTINGS
Admin can automatically manage the order synchronization between QuickBooks and PrestaShop using “ORDER SYNC SETTINGS”.
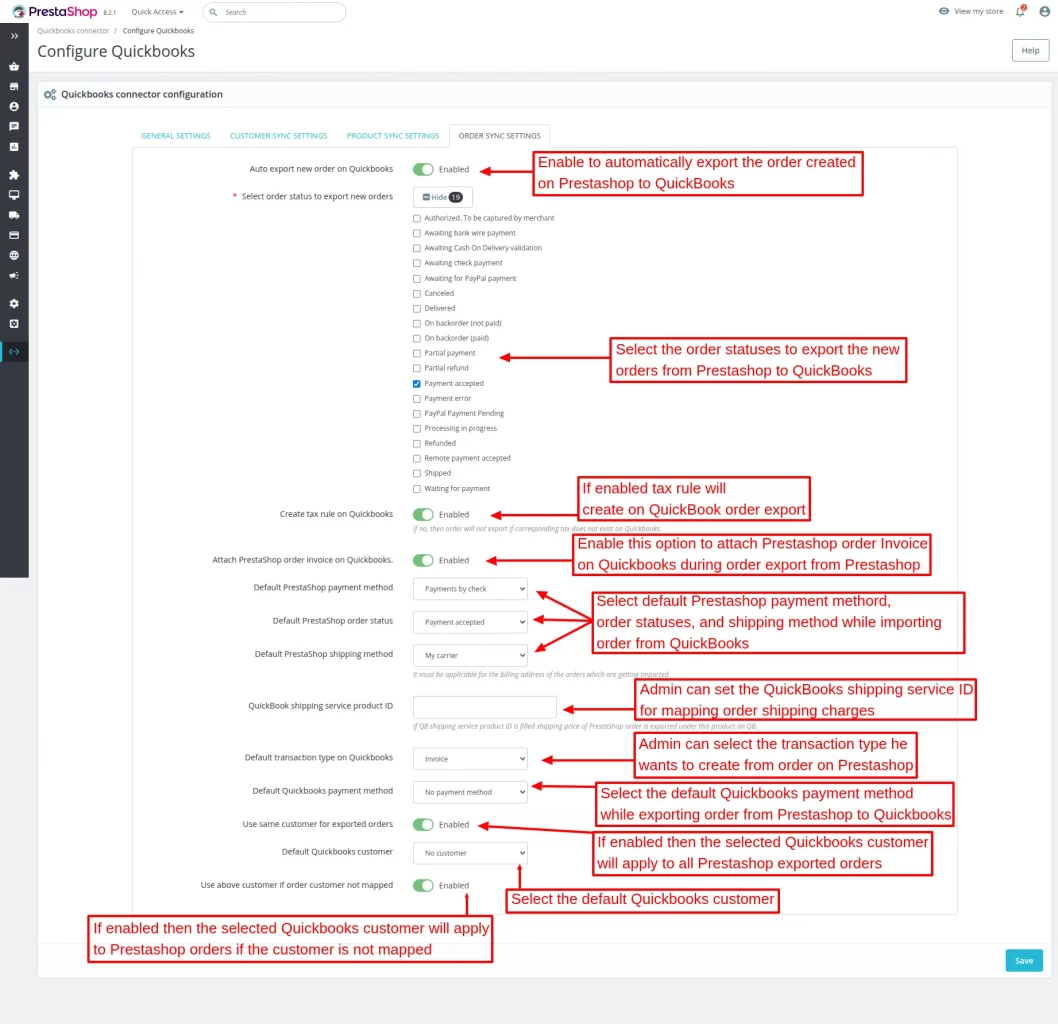
Auto export new order on QuickBooks: Enable the option to automatically export orders on QuickBooks when created on PrestaShop.
Select order status to export new orders: Select the order statuses to export the new orders from PrestaShop to QuickBooks.
In case, any order status is not selected, then it will export the new orders of all the order statuses from Prestashop to QuickBooks.
Create tax rule on QuickBooks: Tax rule will create on QuickBooks during order export from PrestaShop if enabled.
Note: If no and that tax does not exist on QuickBooks, the order will not be exported from PrestaShop.
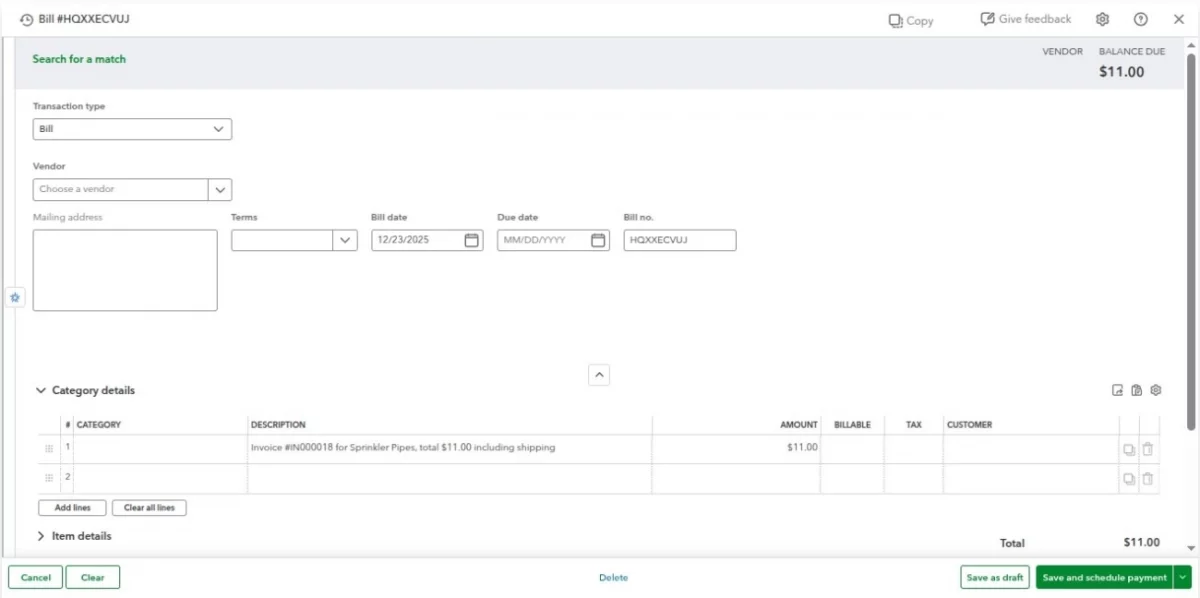
Attach PrestaShop order Invoice on QuickBooks: Enable this option to add PrestaShop order invoice on QuickBooks during order export from PrestaShop.
Default PrestaShop payment method: Admin can select default PrestaShop payment method while importing orders from QuickBooks to PrestaShop.
The Default PrestaShop order status: Admin can select default PrestaShop order status while importing orders from QuickBooks to PrestaShop.
Default PrestaShop shipping method: Admin can select the default PrestaShop shipping method while importing orders from QuickBooks to PrestaShop.
QuickBooks Shipping service Product ID: Admin can define the QuickBooks shipping service product ID. This ID is used to record shipping charges from PrestaShop orders during export.
First, create a Shipping Service item in QuickBooks (for example, “Shipping Charges”). Then enter its Product ID in this field.
During order export, the shipping amount is added as a separate line item. It is mapped to this service in QuickBooks.
The Default transaction type on QuickBooks: Admin can select the transaction type he wants to create on order from PrestaShop.
Default QuickBooks Payment method: Admin can select the default Quicksbook payment method while exporting orders from PrestaShop to QuickBooks.
Use the same customer for exported orders: If enabled by admin then the selected QuickBooks customer will apply to all PrestaShop exported orders.
Default QuickBook customer: Admin needs to select the default QuickBooks customer which will apply to all PrestaShop exported orders.
Use the above customer if the order customer is not mapped: If enabled by the admin then the selected QuickBooks customer will apply to PrestaShop orders if the customer is not mapped.
Import/Export/Update Products
After successful installation admin will have five new tabs under the “QuickBooks Connector” tab.

We shall discuss each of these tabs in detail and see how they work.
Sync Products and Category
From here Admin can sync products and categories from the PrestaShop store to QuickBooks and vice-versa.
Sync Category-
Go to QuickBooks Connector -> Sync products and category-> Sync category
Admin can sync or map categories from PrestaShop store to QuickBooks and vice-versa under the “Sync Category” tab.
Admin can decide on which category on PrestaShop to be mapped with which particular category on QuickBooks. Before mapping admin needs to download the QuickBooks categories first.
Note:
- For our module, there is a one-to-one mapping of categories on PrestaShop and QuickBooks.
- While importing a product from QuickBooks if that product does not fall under any category then the default PrestaShop category will be assigned to that product, if the configuration is set else product will not be imported.


Admin can refresh the categories he has downloaded from QuickBooks by clicking on the refresh button.
Suppose the admin has downloaded the QuickBooks categories. If some new categories get added on QuickBooks, then those categories will be downloaded in PrestaShop by clicking on the refresh button.
Auto-map Categories
The admin can auto-map the categories of PrestaShop with QuickBooks categories having the same name. Also, they can enable or disable case-sensitive matching for name matching.

Sync product
Go to QuickBooks Connector -> Sync products and category-> Sync product
Admin can sync or map products from PrestaShop store to QuickBooks and vice-versa under the “Sync product” tab.
- Export and update products from PrestaShop to QuickBooks.
- Import and update products from QuickBooks to PrestaShop.
- Inactive products on QuickBooks or export inactive products under export products.
Note:
- Before mapping the products save the “Sync Product Setting” configuration.
- Before mapping products, product categories should be mapped.
- The product will be created in the default currency of the dependent platform with the same price.

Export products
From the Sync product tab, the admin can export and update products from PrestaShop to QuickBooks.
There are three options:
- Export selected or all products to QuickBooks at a time.
- Update selected or all products on QuickBooks at a time.
- Inactive selected or all products on QuickBooks at a time.
Note:
- Only active product combinations will export to QuickBooks.
- On QuickBooks product will be created using the base price.
- If the product category is not mapped then the product will not have any category while exported to QuickBooks.

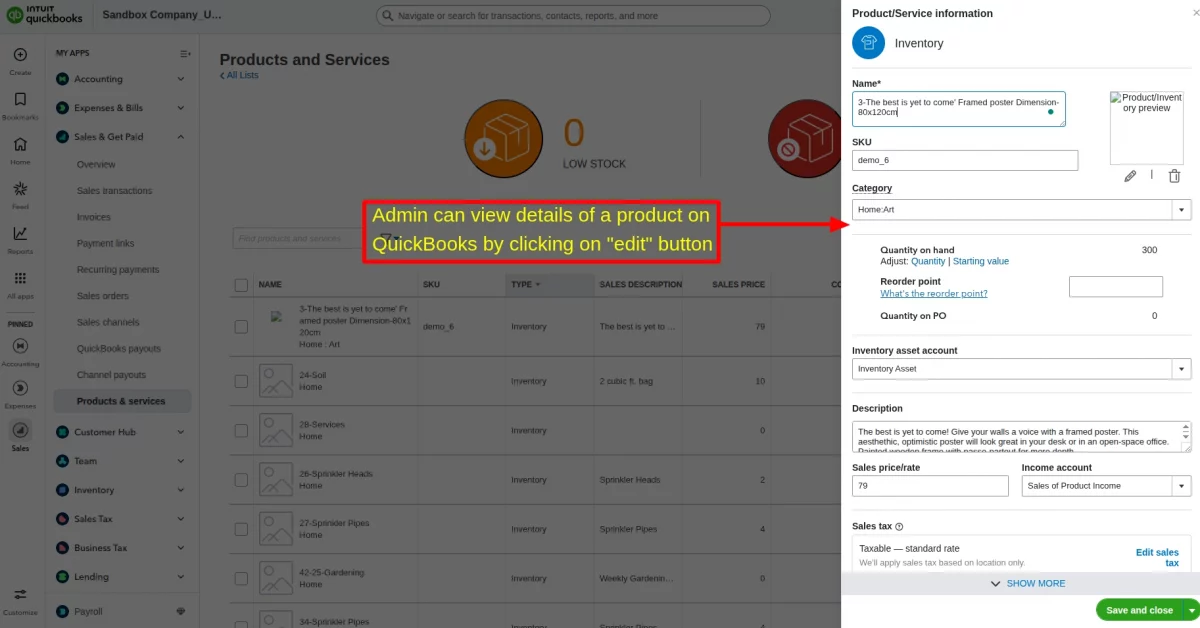
A list of exported products on QuickBooks can be seen and edited on the product and services page under the sales tab.
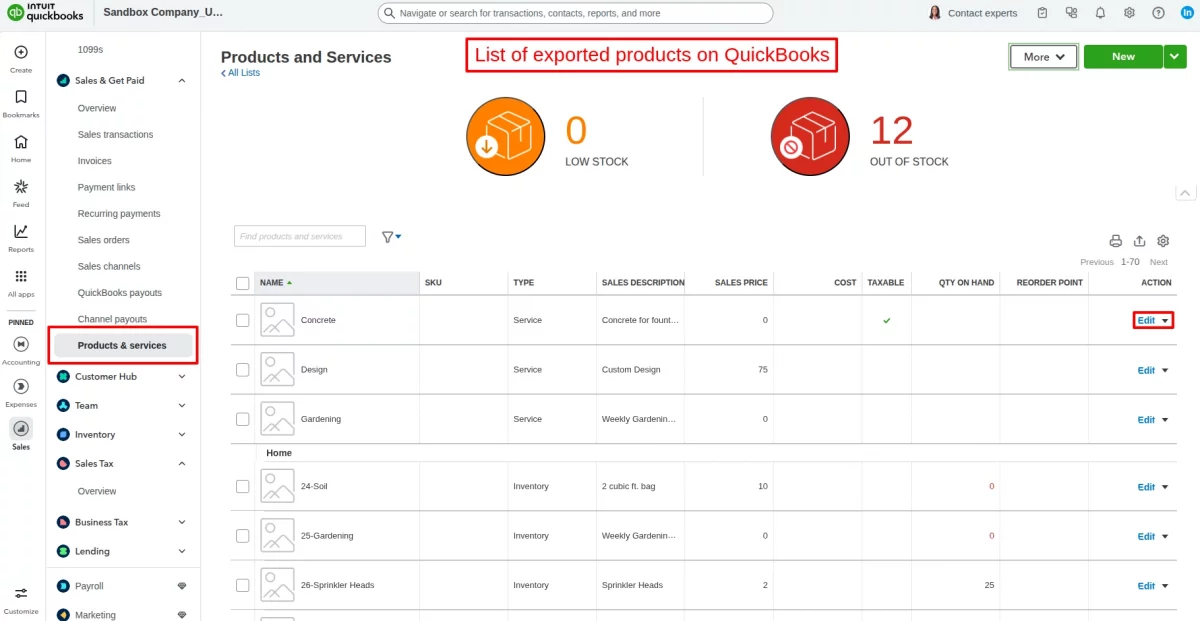
Admin can edit a particular product detail at QuickBooks end from here;
Once the product has been exported admin can see the exported product log.
Also, the admin can see the status of exported products on QuickBooks under the “message” column.
Admin can similarly update and inactive selected products or all products at a time.
Also, the admin can see the log for all the updated products to QuickBooks and inactive products on QuickBooks.

Import products
Admin can import and update products from QuickBooks to PrestaShop.
- Import a single product at a time.
- Import/update all products from QuickBooks on PrestaShop.
- Also, import all new products from QuickBooks to PrestaShop.
Note:
- Only active product combinations will be created on PrestaShop.
- If the product category is not mapped then the product created with the default product category selected in the product sync configuration.
Admin can enter the product name here to be imported from QuickBooks on PrestaShop.
Also, the admin can see the log for all the imported products by clicking on the link below the import product field and can see the status of the imported product in the “message” column of the log.

Once the product has been imported then on reloading the page, the option for “Import New Products from QuickBooks” will also be visible.

Admin can see the list of all the imported and exported products on “Sync Product” page.

Map Product
Admin can map PrestaShop product with QuickBooks product by clicking on map product button.

Auto-map Products
The admin can auto-map the products of PrestaShop with QuickBooks products on the basis of name or reference number. Also, they can enable or disable case-sensitive for name matching.

Sync Customer
Admin can sync customers on PrestaShop and QuickBooks from the sync customer tab.
Sync Customer -> Go to QuickBooks Connector -> Sync customer
- Admin can sync or map customers from PrestaShop store to QuickBooks and vice-versa under the “Sync customer” tab.
- Admin can import and export customers on PrestaShop and QuickBooks.
- Admin can update customers on QuickBooks.
- Admin can import new customers from QuickBooks to PrestaShop.
- Admin can Inactive customers on QuickBooks from PrestaShop end.
Note:
- Before mapping, the products save the “Customer Sync” configuration.
- During import, if a customer’s email id does not match on QuickBooks then it will not create on PrestaShop.
- During import, if the customer’s name does not follow the PrestaShop customer name validation rule then the name of the customer in PrestaShop will be “QuickBooks customer”.

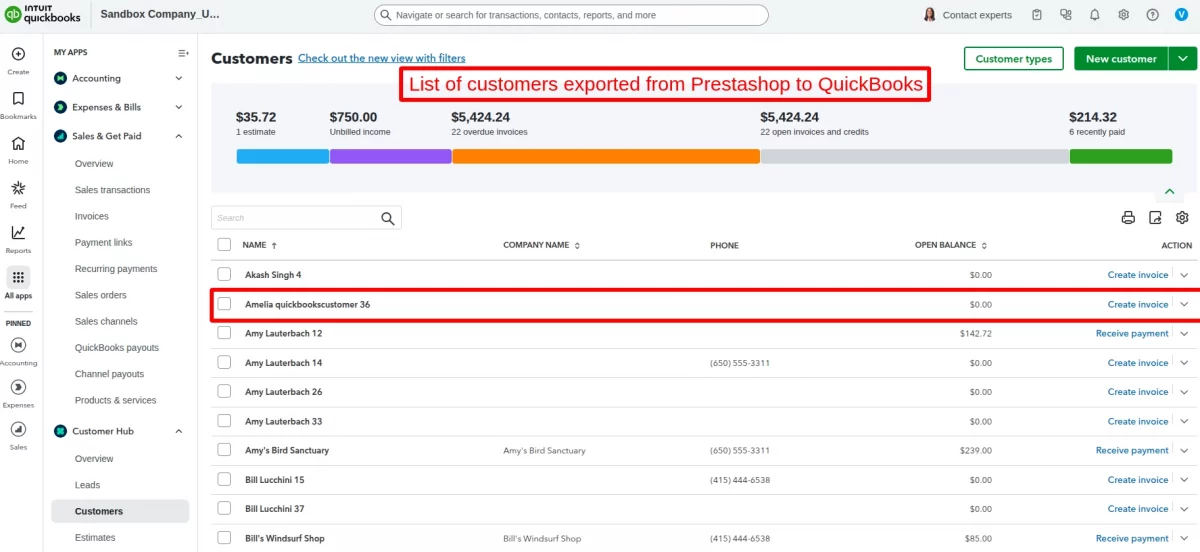
Export customer
Admin can export selected or all customers at a time. Also, the admin can see the log of the exported customer. Admin can see the status of the exported customer in the “message” column.

Once customers are exported to QuickBooks, the admin can update customers to QuickBooks and inactive customers on QuickBooks anytime from the back office.

Import customer
Admin can import a single or all customers at a time. Also, the admin can see the log of the imported customers on PrestaShop.
Admin can see the status of the imported customer in the “message” column.
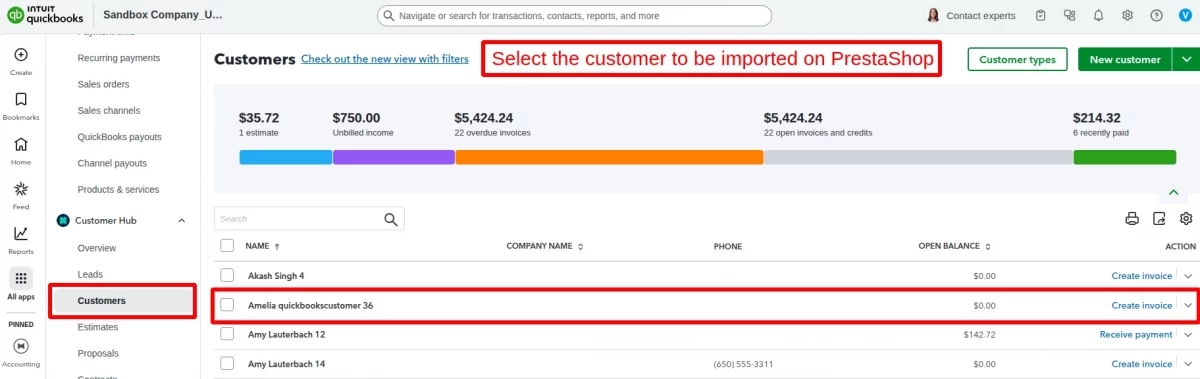
Enter the name of the customer to be imported on PrestaShop in the field “import particular customer from QuickBooks” and click on “GO” for importing.
Import and update all customers from QuickBooks. Admin can also import new customers from QuickBooks.

View the list of all customers imported and exported on the “sync customer” page.
Note: Two rows for a customer with the same customer id will generate since there can be two addresses for the same customer on QuickBooks.

Auto-map Customers
The admin can auto-map the customers of PrestaShop with QuickBooks customers on the basis of name or email. Also, they can enable or disable case-sensitive for name matching.

Sync taxes, payment methods, and orders
Admin can sync or map taxes on products, payment methods on products, and product orders on PrestaShop from QuickBooks and vice-versa.
Sync taxes
Admin can syn taxes to be applied on products from PrestaShop and QuickBooks while importing and exporting.
Note:
- Before mapping the taxes save the tax settings in the “Sync Order Setting” configuration. It is necessary for order sync.
- During order export from PrestaShop to QuickBooks if “Create tax rule on QuickBooks” is enabled then tax rule will create on QuickBooks during order export else if disabled and no such tax rule exists on QuickBooks, then the order will not be created on QuickBooks.

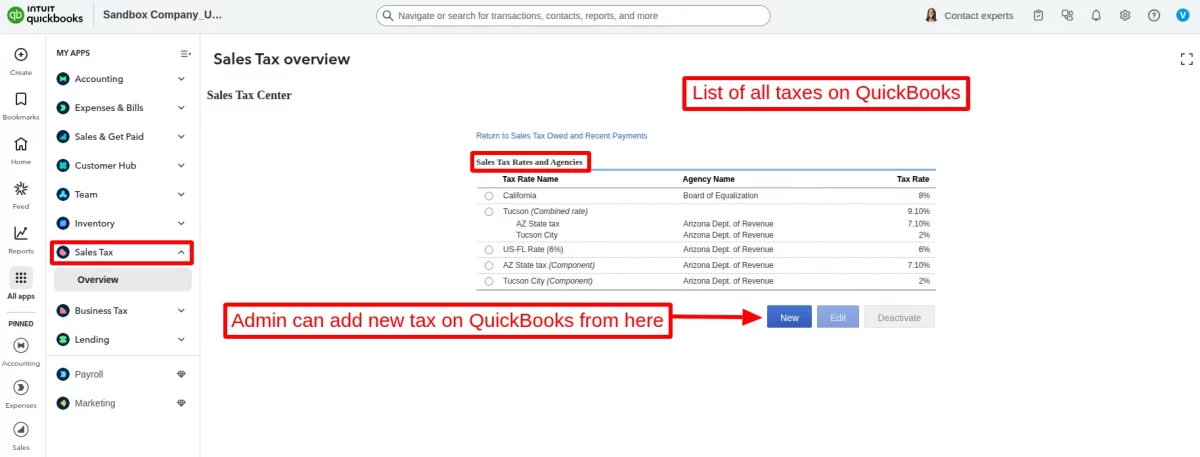
Admin first needs to download the taxes from QuickBooks.

Now, the admin can map PrestaShop tax with QuickBooks tax.


Admin can create the tax on QuickBooks as follows:
Go to Taxes -> Add / edit tax rates and agencies -> New
Sync Payments
Admin can sync/map payment methods on PrestaShop and QuickBooks.
- Select the default payment method on PrestaShop for the products imported from QuickBooks.
- Admin can also select a default payment method on QuickBooks for products exported from PrestaShop.
Note:
- Payment method mapping is necessary for order sync.
- If payment method mapping does not exist then default QuickBooks payment will apply. You can set the default QuickBooks payment method from the ORDER SYNC SETTINGS tab in the Setting up QuickBooks option.
- Before mapping, the admin needs to download the QuickBooks payment methods.


Admin can refresh the payment methods he has downloaded from QuickBooks by clicking on the refresh button.
Suppose the admin has downloaded the QuickBooks payment methods.
If some new payment methods get added to QuickBooks, then these payment methods will be downloaded in PrestaShop by clicking on the refresh button.

Sync orders
Admin can syn orders on PrestaShop and QuickBooks using PrestaShop QuickBooks connector.
- Export PrestaShop orders on QuickBooks.
- Admin can also import QuickBooks orders(sales receipts) on PrestaShop.
Note:
- If the ordered currency does not exist during import/order on the depending platform then action will not perform.
- Address country must be active on PrestaShop.
- Sales receipts can only be created with customer-selected currency on QuickBooks.
- If ordered products are not mapped by you, they will be automatically exported/imported while creating a sales receipt on QuickBooks or adding orders on PrestaShop.
- During the creation of the sales receipt on QuickBooks, if the ordered product map does not exist and also the product does not exist on PrestaShop then that order will not export to QuickBooks.
- Customer details will also automatically add while creating sales receipts in the Map Customer list.
- During creating sales receipts on QuickBooks, if a customer map does not exist and also a customer does not exist on PrestaShop then that order will not export to QuickBooks.
- During import orders, if the sales receipts have a discount then it will create and apply a default voucher(cart rule) with the name “QuickBooks SalesReceipt” (if not created). If the cart rule is already created then it will update according to the current order configuration and will be applied to this order.


Import orders
Here, the admin can import orders on PrestaShop from QuickBooks by entering the order sales receipt number from QuickBooks.
Also, the admin can import all orders to PrestaShop with a single click. Moreover, the admin can select the QuickBooks order type to import.
Note:
- While importing an order to PrestaShop from QuickBooks, if a customer and product do not exist for that order, then it will create them at the PrestaShop end.
- Also, during the creation of the product on PrestaShop, it will apply the default shipping method. And product price and tax will apply as on PrestaShop products.

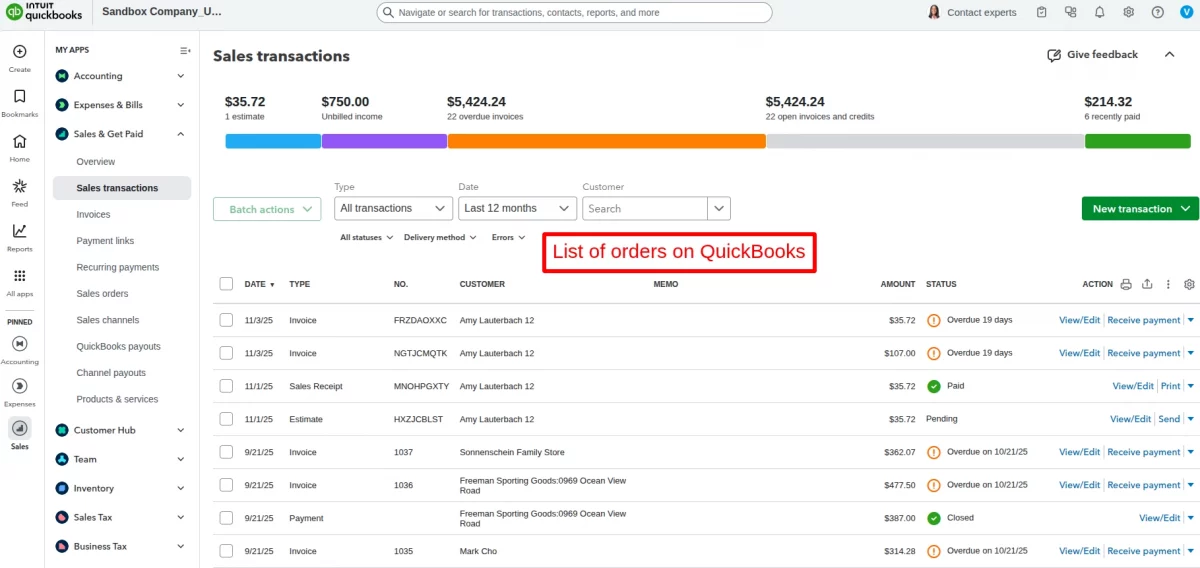
Export Orders
Here, the admin can export orders to QuickBooks from PrestaShop by selecting particular order statuses or all the statuses along with the dates.
Also, the admin can export orders by selecting them (one by one) or all orders with a single click to QuickBooks.

View a list of exported orders on QuickBooks under the Sales tab.
Map Order Status
Under Map Order Status, the admin can select the QuickBooks Sell Type to map it with PrestaShop order status.

This option lets the admin decide the type of order he wants to generate on QuickBooks. Suppose admin has select invoice for delivered status, then it will generate the sales receipt on QuickBooks.
This is how the sync order functionality of our Module works.
QuickBooks Invoice at PrestaShop Backoffice
The admin can download the QuickBooks invoice from the order listing page of the PrestaShop back office.

Support
For any kind of technical assistance or query, please raise a ticket or send us a mail at [email protected]
Also, please explore our Prestashop development services and vast range of quality Prestashop addons.
Current Product Version - 4.2.3
Supported Framework Version - 9.x.x, 8.x.x, 1.7.x.x

Be the first to comment.