INTRODUCTION
Rent products on the website with Odoo Rental Management!
Customers are rational and buy only those products which they find cost-efficient. But there is another customer group, which instead of buying prefers renting.
Renting products is a very profitable alternative for a business as you can rent products to different customers for different periods.
Further, when you rent products, you get the opportunity to earn multiple times the products’ original cost, increasing your profit manifolds.
But, how can you rent products on your Odoo eCommerce website?
Odoo rental management is the module specially designed for this purpose. Odoo rental management module allows you to manage rental products.
Further, you can create and manage rental tenure schemes, rental orders, rental contracts, incoming delivery, outgoing delivery, etc.
FEATURES
- Admin can create rental products in the backend.
- Every rental product may have several rental tenure schemes with corresponding rent prices (like $20.00 for 15 days, $500.00 for 3 months, etc.)
- Admin can manage various Rental UOM (like hours, Days, Months, Years, etc.)
- Admin can add security amount functionality for each rental product.
- Moreover, you can create a separate rental agreement for each rental product.
- Create a Rental Tenure Type (can be Standard or Custom) for each rental product.
- The rental category is available for each product.
- In addition, create a rental contract for each rental order (or renewal order).
- Separately manage incoming and outgoing stock delivery.
- Manage various rental invoices (like rental contract invoices and security refund invoices)
- Also, renew the expired rental contract with just a click.
- Admin can create and save standard tenures for each product in Odoo.
- The security amount is automatically added to the total of each sales order.
- Further, the security amount is refundable on product return.
- You can create separate rental agreements for various types of products.
INSTALLATION
- Once you purchase the App from Webkul store, you will receive the link to download the zip file of the module.
- Extract the file on your system after the download finishes. You will be able to see a folder named- ‘odoo_sale_rental.’
- Copy and paste this folder inside your Odoo apps path.
- Now, open the Odoo App and click on the Settings menu. Here, click on Activate the Developer Mode.
- Then, open the Apps menu and click on ‘Update Modules List.’
- In the search bar, remove all the filters and search ‘odoo_sale_rental.’
- You will be able to see the module in the search result. Click on ‘Install’ to install it.
RENTAL RATE CALCULATION METHOD
There are two options in the rate calculation method.
1. SIMPLE CALCULATION:
In the simple calculation method, the rental amount is calculated based on the shortest rental tenure scheme.
For example: If the product has the following rental tenure scheme.
- The rent for 5.00 days is $500.00, and
- the rent for 1.00 days is $150.00.
Now, if the customer will buy this rental product for 6 days then charges will be calculated based on the smallest rental tenure scheme of 1.0 days @ $150.00.
so rent price will 6✕150.00 / 1.0 = $900.00
2. DYNAMIC CALCULATION:
In dynamic calculation, the rental amount will be calculated dynamically. Moreover, this method finds the closest rental tenure scheme, then again for the remaining tenure, and so on.
For example: If the product has the following rental tenure scheme.
- The rent for 5.00 days is $500.00, and
- The rent for 1.00 days is $150.00.
Now, if the customer will buy this rental product for 6 days then the charge will be calculated as follows:
for 5.00 days, the applied rent will be according to the 5.00 days @ $500.00 rental scheme, and for the remaining tenure
for 1.00 days, the applied rent will be according to the 1.0 day @ $150.00 rental scheme.
Hence, the final rent price will be $650.00.
WORKFLOW CONFIGURATION
1. Firstly, Log in to your Odoo backend and go to ‘Rental> Configuration> Settings> Rental Terms.’ Also, you can choose between dynamic and simple calculation methods from here.

2. Next, go to ‘Configuration> Unit of Measure (Rental),’ on the page, you can view all the rental UOM. Click the ‘Create’ button to create a new unit of measure according to your need.

3. After that, go to ‘Configuration> Product Agreement’ and click the ‘Create’ button to create a new agreement as per the requirement or upload the agreement from files.

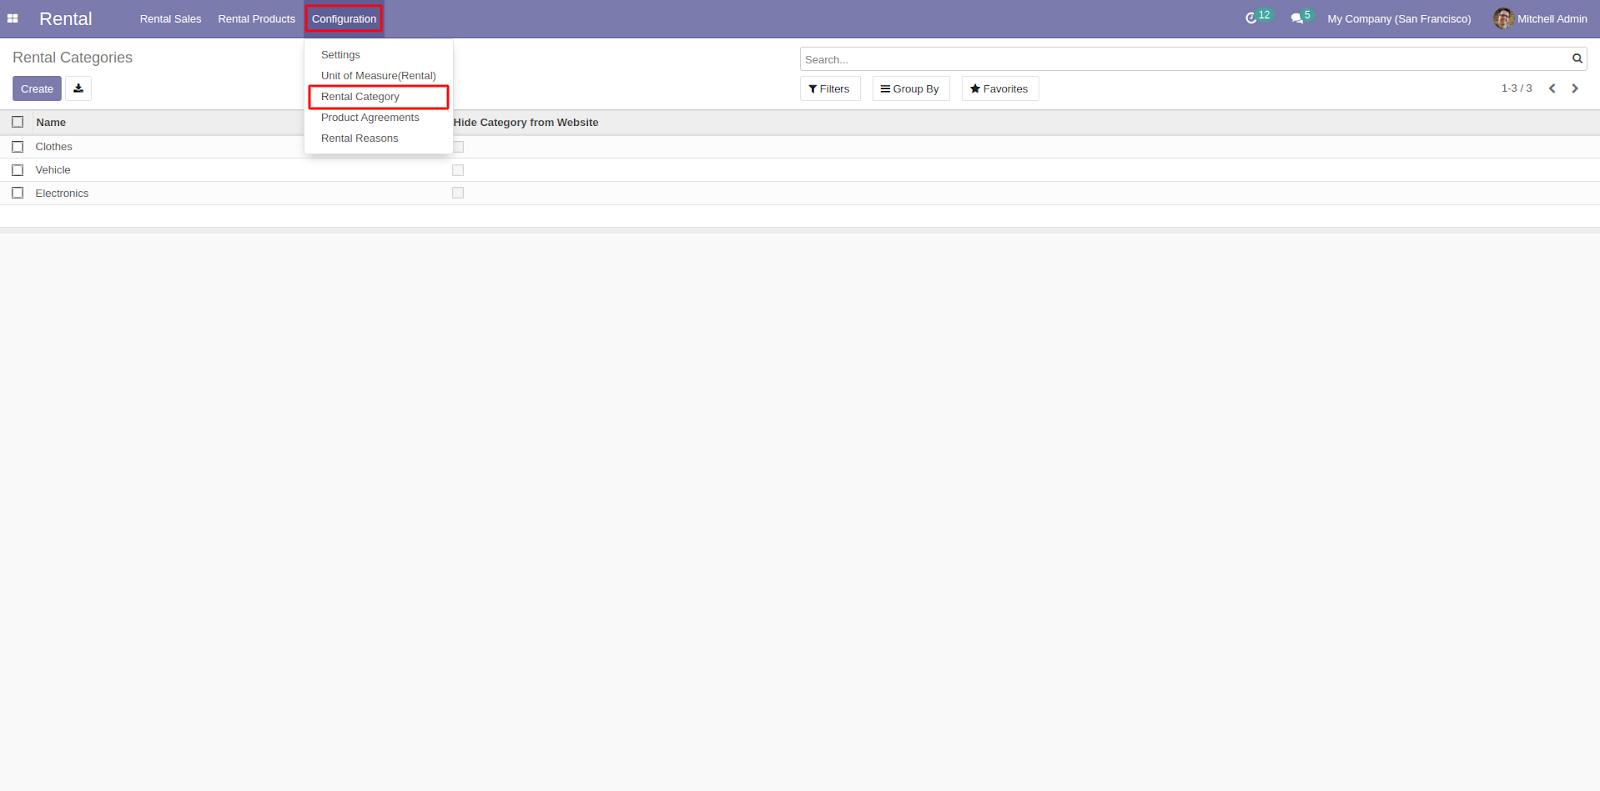
4. Once done, you can create rental categories by opening ‘Configuration> Rental Category.’ By the ‘Create’ button, you can create a new category. And by ticking the box under ‘Hide Category From Website,’ you can hide the new or existing category from the website.
CREATING PRODUCTS
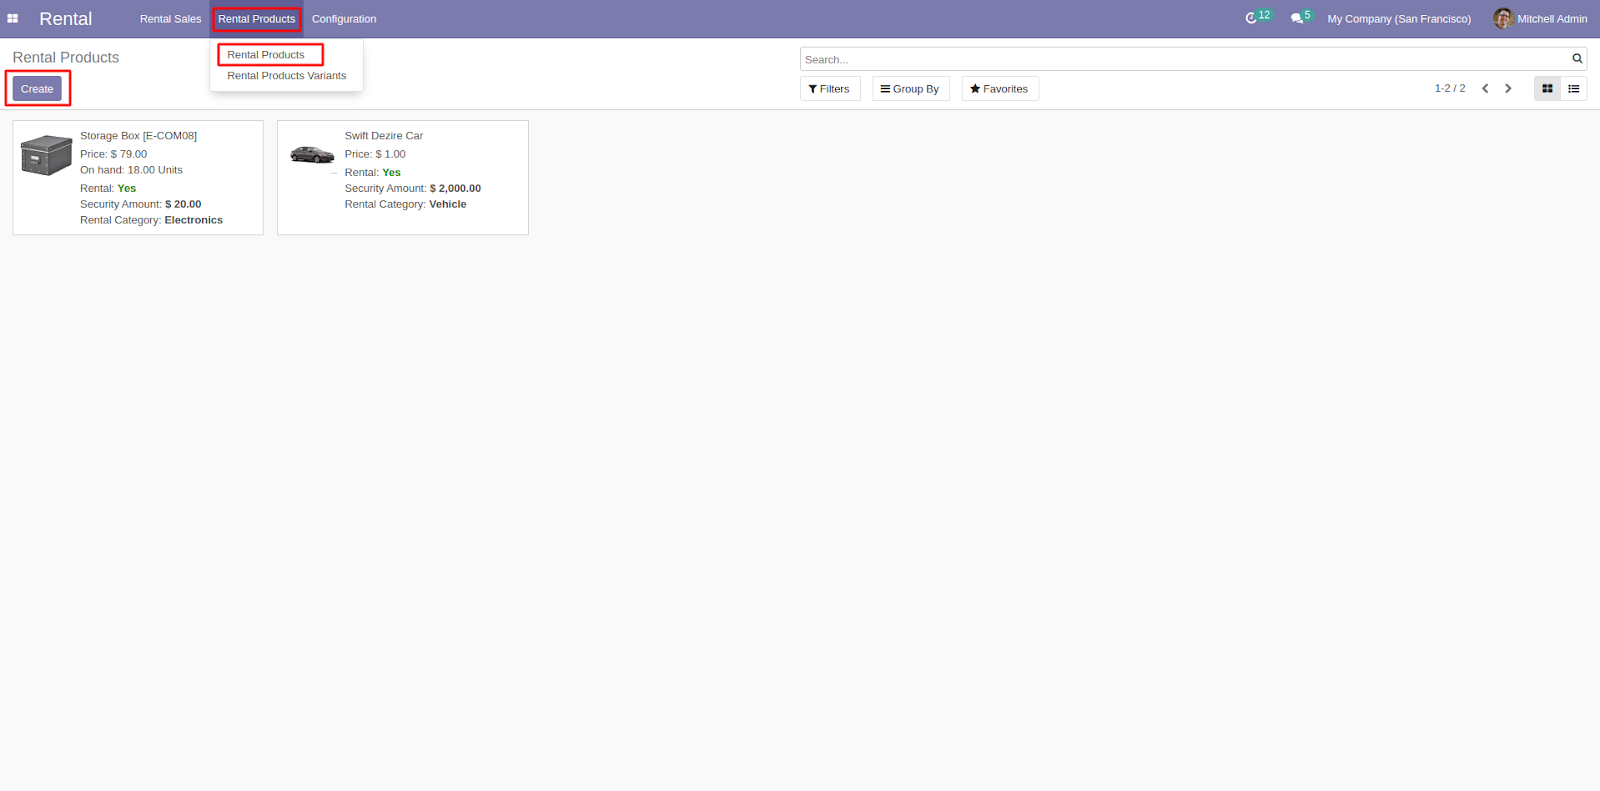
5. Once done, go to ‘Rental Products> Rental Products’ to view all rental products and click on the ‘Create’ button to create a new rental product.
6. While creating a product, fill in all the required fields in all tabs, especially in the ‘Rental’ tab.
6.1. Security Amount: If required, you can add a security amount with the product, and when the customer returns the product, the security amount is refunded to them.
6.2. Rental Tenure Type: You can choose ‘Standard Tenure’ or ‘Custom Tenure.’
6.2.1. Standard Tenure: When you pick standard tenure, all the existing tenure will be available for selection.
6.2.2. Custom Tenure: On selecting custom tenure, you need to define the tenure period manually.

7. Similarly, you can go to ‘Rental Products> Rental Products Variants> Create’ to create variants of already existing products.

PLACING RENTAL SALE ORDER
8. Now, go to ‘Rental Sales> Sales Orders> Create,’ enter the details and click ‘Add Rental Product.’

9. After selection, a popup will appear on the screen and choose the ‘Product, Tenure Type, and Rental Scheme.’ Once done, click ‘Add Rental Product.’

10. When you add the rental product, save the order by the ‘Save’ button and ‘Confirm’ the order.

CREATING DELIVERY OF RENTAL PRODUCT
11. Once an order is confirmed, click on the ‘Delivery’ option.

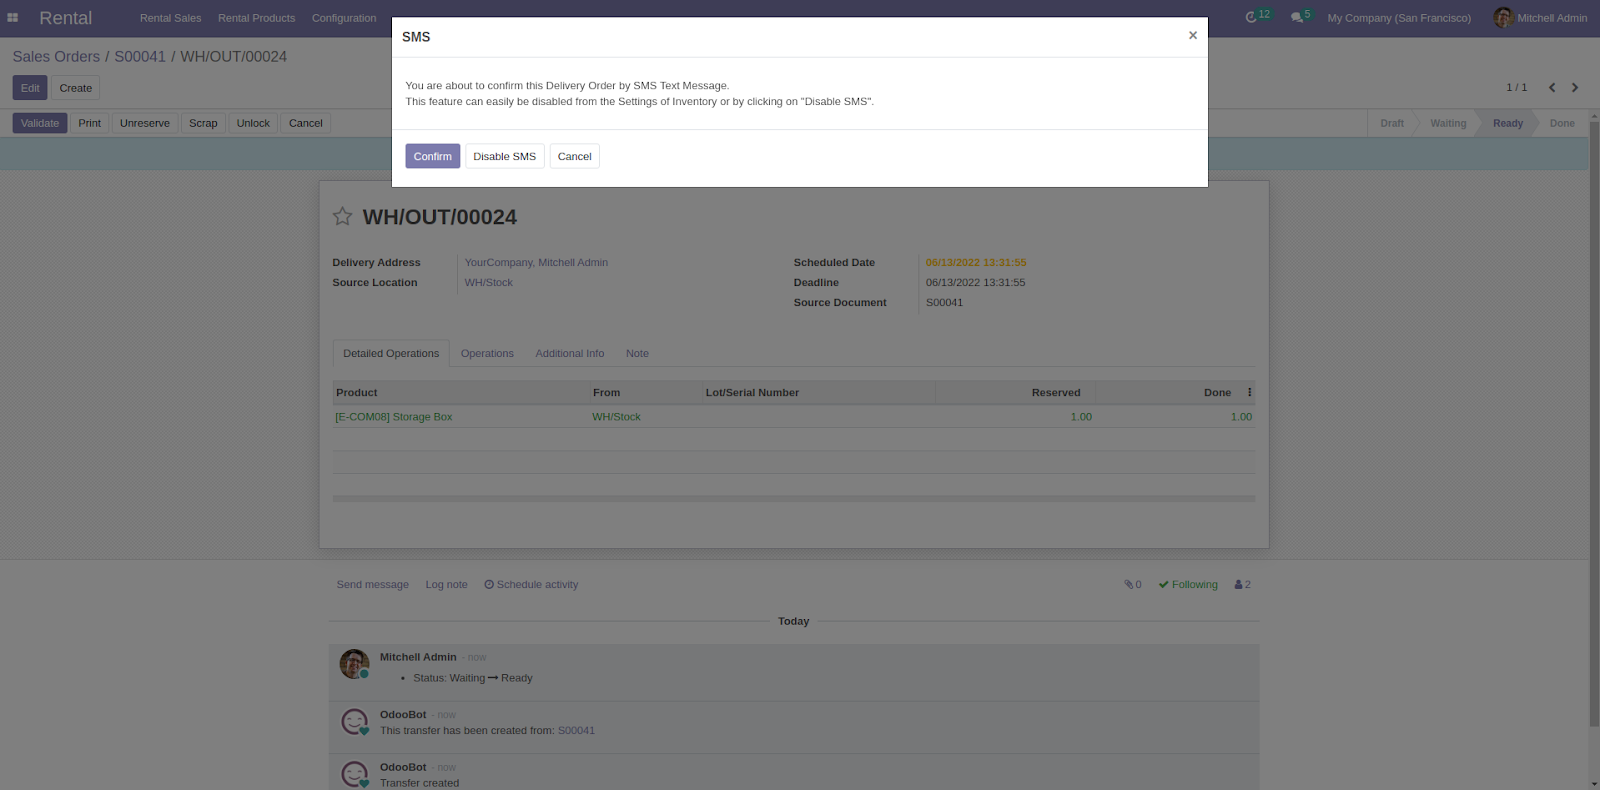
12. On the new page, click ‘Edit’ and add the delivery quantity. Once done, click the ‘Save’ button and then ‘Validate’ the order.

13. On clicking ‘Validate,’ a popup will appear on the screen, click the ‘Confirm’ button, and the delivery will be validated.
RENEWING RENTAL CONTRACT
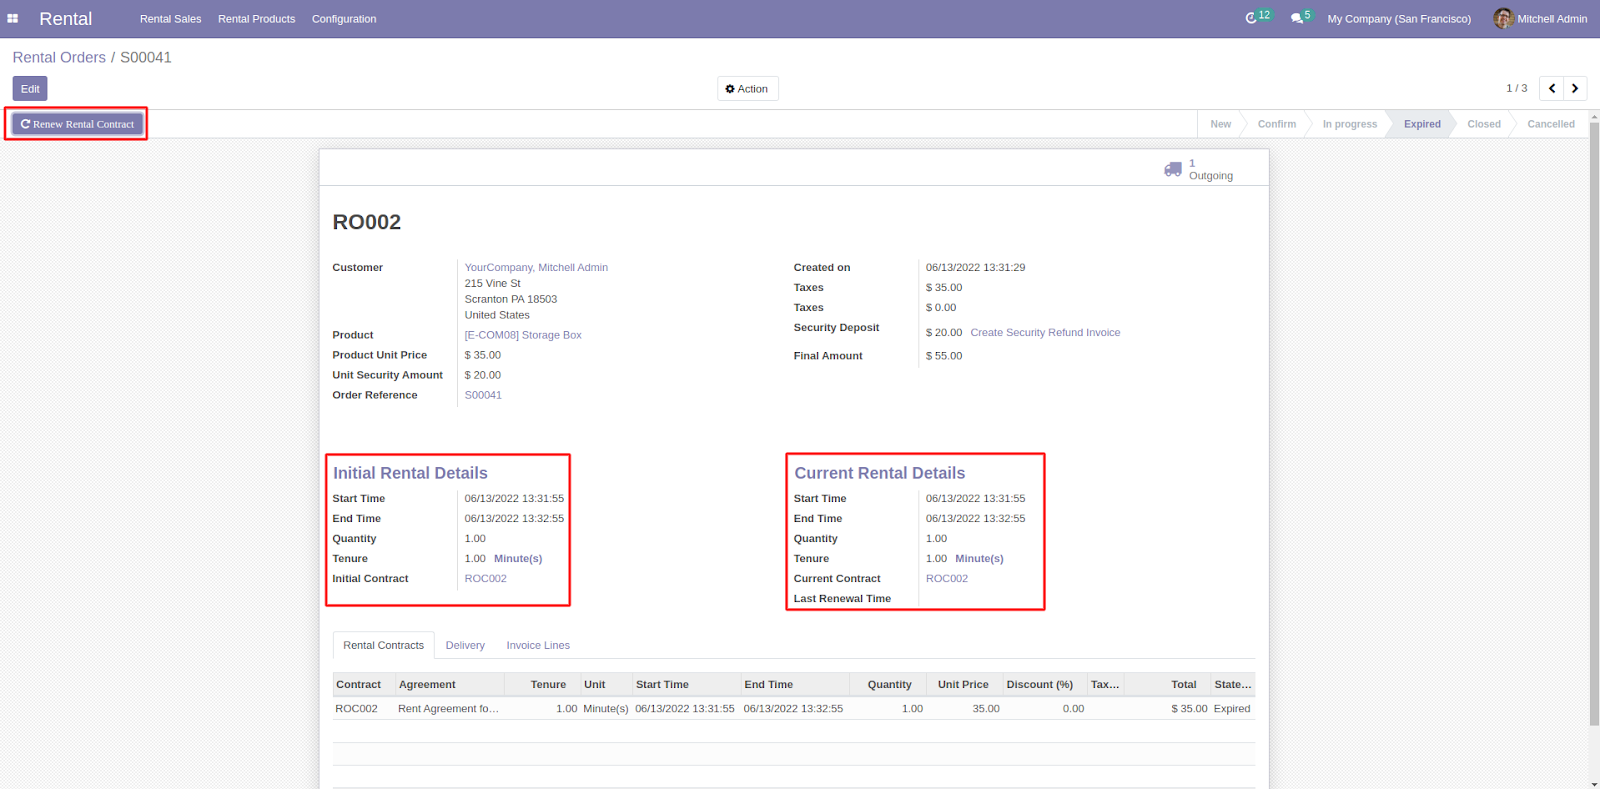
14. Once you validate the delivery, go to ‘Rental Sales> Rental Orders’ and open the expired product.

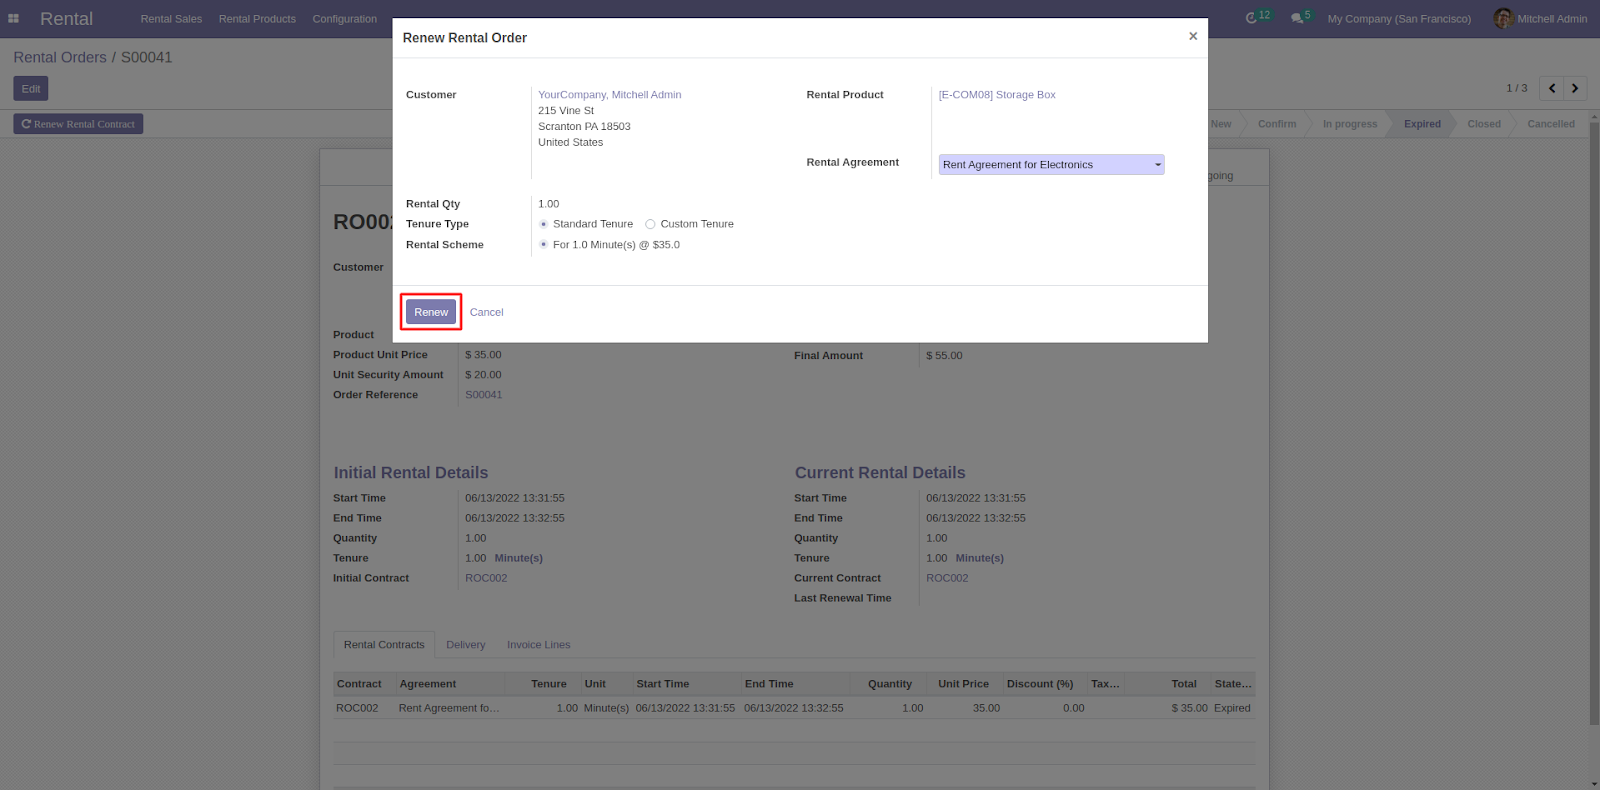
15. On the rental order page, you can view the ‘Initial Rental Details and Current Rental Details’ (In case the order is renewed). Also, you can restore the rental orders by the ‘Renew Rental Contract’ button.
16. After that, in the popup, choose the ‘Rental Agreement, Tenure Type, and Rental Scheme,’ lastly, click the ‘Renew’ button.
17. Once the order is renewed, go to ‘Rental Sales> Rental Contract’ and choose the order that expired recently.

18. On the order page, click ‘Create Return Transfer.’ After clicking, you will get a ‘User Error’ popup on the screen.
NOTE: The reason for this ‘User Error’ is that the order has already been renewed, so for creating a return transfer, you have to do it from the current rental order/agreement.

CREATING RETURN TRANSFER
19. Once the order expires, you can ‘Create Return Transfer,’ click on the return order button, choose ‘Return Location,’ and click the ‘Return’ button.

20. Once done, click the ‘Validate’ button to validate the return order. Also, you can ‘Source Document’ in the return order.

OTHER ODOO WEBSITE MODULES
- Odoo Spin And Win
- Odoo Website Save For Later
- Website Product Multi-Videos
- Odoo Website Social Share
- Odoo Website Survey to Employee
- Website Survey to Mailing List
- Odoo Website Google Adsense
- Odoo Affiliate Multi-tier Commission
- Website Survey Expiry Date
- Odoo Manage Vendors Per Variant
- Odoo Website OTP Authentication
- Website Product Related Accessories
NEED HELP?
Hope you find the guide helpful! Please feel free to share your feedback in the comments below.
If you still have any issues/queries regarding the module, please raise a ticket at https://webkul.uvdesk.com/en/customer/create-ticket/.
Also, please explore our Odoo development services & an extensive range of quality Odoo Apps.
For any doubt, contact us at [email protected].
Thanks for paying attention!!
Current Product Version - 1.0.0
Supported Framework Version - V15, V14, V13, V12, V11

Be the first to comment.