Introduction
Magento 2 Zip Code Based Pricing extension allows the admin to set the price of any product at any particular zip code and location as per their requirement.
This zip code pricing includes tier price, special price, and base price.
Check a brief overview of the plugin –
Features
- The admin can enable or disable the module configuration.
- This module helps to set the zip code price of simple products, virtual products, and downloadable products.
- The product zip code price can be set manually or by uploading a .csv file.
- The Customers can enter their zip code and based on that product price will display.
- The extension is compatible with the multi-shipping addresses as well.
- The admin can set the zip code-based pricing for products as base price, special price, and tier price.
- This extension is compatible with the Hyva Theme.
Install Extension from Webkul Store
The installation is quite simple just like the standard Magento 2 extensions.
#1 Download Module
Firstly, you need to log in to Webkul Store, go to My Account>My Purchased Products section, verify and then download and extract the contents of this zip folder on the system.
#2 Upload Folder
Once the module zip is extracted, follow path src>app and then copy the app folder into the Magento 2 root directory on the server as shown below:

#3 Run Commands
After uploading the module folder, you need to run the following commands in the Magento 2 root directory:
php bin/magento setup:upgradephp bin/magento setup:di:compilephp bin/magento setup:static-content:deployphp bin/magento indexer:reindexphp bin/magento cache:flush
Install Extension from Magento Marketplace
If you have purchased this extension from the Magento Marketplace then please follow the below process or visit this link.
#1 Get Access Keys
You need to get access keys, navigate to My Profile in Magento Marketplace, then choose Access Keys in the My Products section.

Go to Magento 2 and then you need to copy both the Access Keys – Public Key and Private Key. These access keys will be needed in the next steps for authentication.

If access keys are not created earlier, click Create A New Access Key, enter any name and click OK.

#2 Update composer.json File
To know the component name and version number, go to your Magento Marketplace account section, My Profile>My Purchases, then find this extension to view the details.
Please note – Below is an example image, every extension will have its unique component name and version.

After that, navigate to your Magento project directory and update your composer.json file in the following format.
composer require <component-name>:<version>
For example, to install version 5.0.0 of this extension you need to run the following command:
composer require webkul/module-zipcode-based-product-pricing:5.0.0
#3 Enter Access Keys
Now you will need to enter the Access Keys that you obtained as explained in the first step #1 Get Access Keys. Wait for Composer to finish updating your project dependencies and make sure there aren’t any errors.
#4 Run Command
You need to run the following commands:
php bin/magento setup:upgradephp bin/magento setup:di:compilephp bin/magento setup:static-content:deployphp bin/magento indexer:reindexphp bin/magento cache:flush
Language Translation
For translating the module language, navigate through src/app/code/Webkul/ZipcodePricing/i18n and edit the en_US.csv file.
Thereafter, rename the CSV as “en_SA.csv” and translate all right side content after the comma in the Arabic language. After editing the CSV, save it.
Then upload it to the path src/app/code/Webkul/ZipcodePricing/i18nwhere the Magento2 is installed on the server. The module gets translated into the Arabic Language. It supports both RTL and LTR languages.

How to Get the Google API Keys
The admin needs to get the Google Maps API key for the address auto-complete to work.
Please visit the following link for getting the API Key. Log into your Google account and then click the GET A KEY button is visible below:

A pop-up window will appear, to enable the platform and select the check box as required. Create Project and give any name to it or select the existing one. Henceforth, click Next.
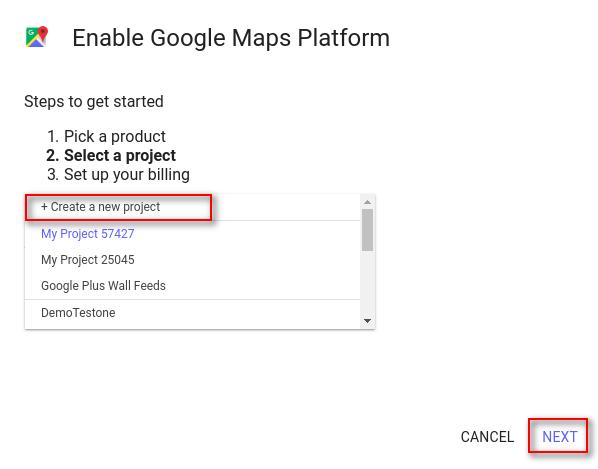
After a few seconds, the API Key will be generated. Copy the API key, it will be used at the time of the widget configuration.
Module Configuration
Admin End
After the successful installation of the module, the admin can navigate through, Stores > Configuration > Webkul> Zipcode Pricing Basic Settings.
For reference, please check the below image:

Apart from that you can also access the initial configuration by navigating Zipcode Pricing->Configuration Settings.

Here the admin set the zip code basic pricing settings following the below steps:
- Enable Zipcode Pricing Module: Select Yes to enable.
- Enter the Google Map API key.
- The location will pop up in the website window.
- Select Special price:- Product Special Tier Price or Special Price based on Zipcode.
Set Zipcode pricing in the product
Now to edit the product go to catalog>Product. After this product grid will appear. From here click on edit to edit the product.

Note: You need to set default pricing in advance pricing then the admin can set Zipcode-based Product Price.
When the product edit page appears, scroll down to the bottom and click on the drop-down of Zipcode Based Product Price.
For reference see the below image:

From the drop-down chose any method: Manually method or Using Import CSV file method.
Manually Method
Once the admin selects the Manually method click on Add Row. Now the admin has to fill in the following parameters. The parameters are ZipCode from, Zipcode to, Zip code-based price, and Special Price.

Hence, the manually added row will appear like the below image.

Using the Import CSV file method
When the admin selects the CSV method then click on choose file and select the.CSV file and click on upload.

Here the special price will always be less than the zip code price.
Zipcode Based Product Tier Price
When the admin wants to add the tier price for the product zipcode they have two methods for it. That is Manually method and using the import CSV file method.

Manually Method
After selecting the Manual method the admin will fill in the following parameters:- Website, customer group, zipcode from, zipcode to, Quantity, price value type, and value.

Using the Import CSV file method
When the admin selects the CSV method then click on choose file and select the.CSV file and click on upload.

Once the admin sets up the zip code-based product pricing from the above-discussed method, then click on Save to save the configurations.

Note: The admin needs to set tier price in the Advance pricing option then the admin can set ZipCode-based tier pricing.
Now we will discuss the Zipcode Based Product Tier price For Not logged in customer
In the below image the Zipcode Based Product Tier price grid is given.
Now when the customer enters the given zipcode from at storefront and adds the same quantity for which tier price is set. Then while proceeding to check out he will see the same price for the same quantity.
For reference see the below image:

Customer End
When a customer visits the website he will enter a particular zip code. For more reference see the below image.

When a customer searches the product he will see that product price only which is set by the admin.
For example, Customers search Joust Duffle Bag as a product, whose price is set at $50 on a zipcode-based product price while editing the product.
Now on the front-end search Joust Duffle Bag and go to the product page. Here customers will see the $50 as the price of the product at a particular Pincode.

Now click on Add to Cart. Hence the product will be added to the cart. After this click on the cart icon the Proceed to checkout.

Fill in the address details and phone number, and zip code. After this, the customer will be redirected to the payment page.

Hence the order will be placed successfully.
That’s all from Zipcode Pricing for Magento 2. Also, please visit our useful Magento 2 Extensions.
Get in touch
Have any queries, feel free to reach out to us at [email protected]. You can also raise a ticket at our Help Desk system webkul.uvdesk.com
Current Product Version - 5.0.5
Supported Framework Version - 2.0.x, 2.1.x, 2.2.x,2.3.x, 2.4.x

Be the first to comment.