Category Bulk Upload Using CSV/XML/XLS for Magento 2 helps the admin to import and export a bulk number of categories on the store.
The bulk import of categories can be done using CSV, XLS, or XML files as required.
Sample files are also available. The admin can do one-click export categories in CSV format for various Magento stores.
Also, if you are looking to import and export the product reviews then you can check the Magento 2 Product Review Import Export extension.
Moreover, to get a more clear idea of the module, kindly review the video below-
Features –
- Ajax one by one category import feature.
- Admin can import mass categories with and without images
- Admin able to export mass categories store wise
- Category upload via CSV/XLS/XML files.
- The admin can make changes in the exported category file.
- The code is fully open & you can customize it according to your need.
- Multi-Lingual support / All language working including RTL.
Installation – Category Bulk Upload
Firstly, customers will get a zip folder and they have to extract the contents of this zip folder on their system. The extracted folder has an src folder, inside the src folder you have the app folder.
You need to transfer this app folder into the Magento2 root directory on the server as shown below.
After the successful installation, you have to run these commands in the Magento2 root directory.
First command- php bin/magento setup:upgrade
Second Command – php bin/magento setup:di:compile

Third Command – php bin/magento setup:static-content:deploy

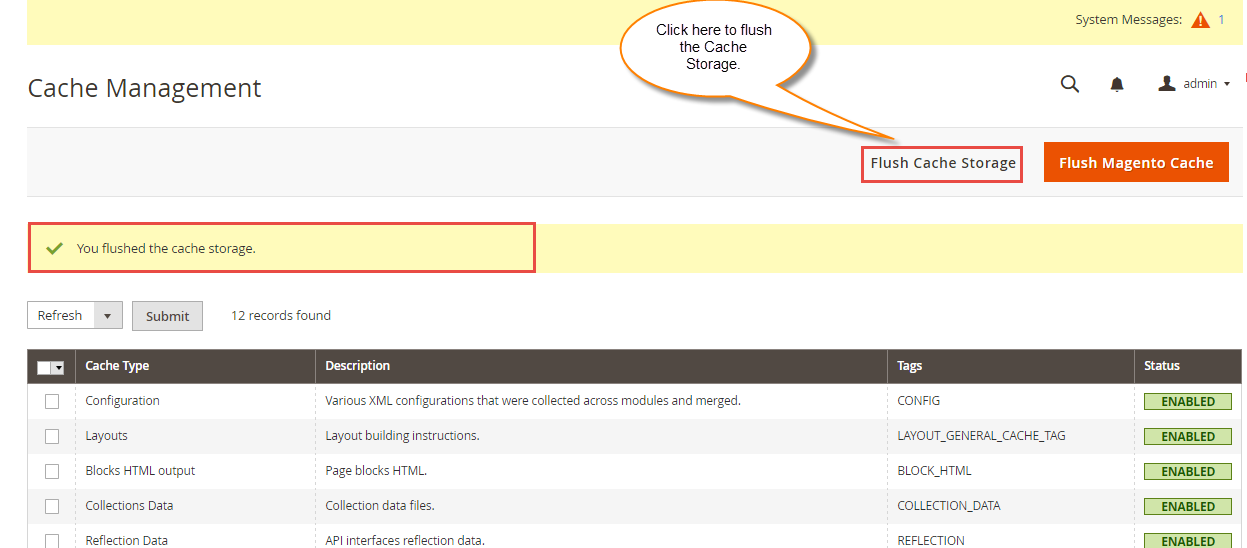
Further, after running the commands, you have to flush the cache from the Magento admin panel by navigating through->System->Cache management as shown below.
Multilingual Support
Module Translation
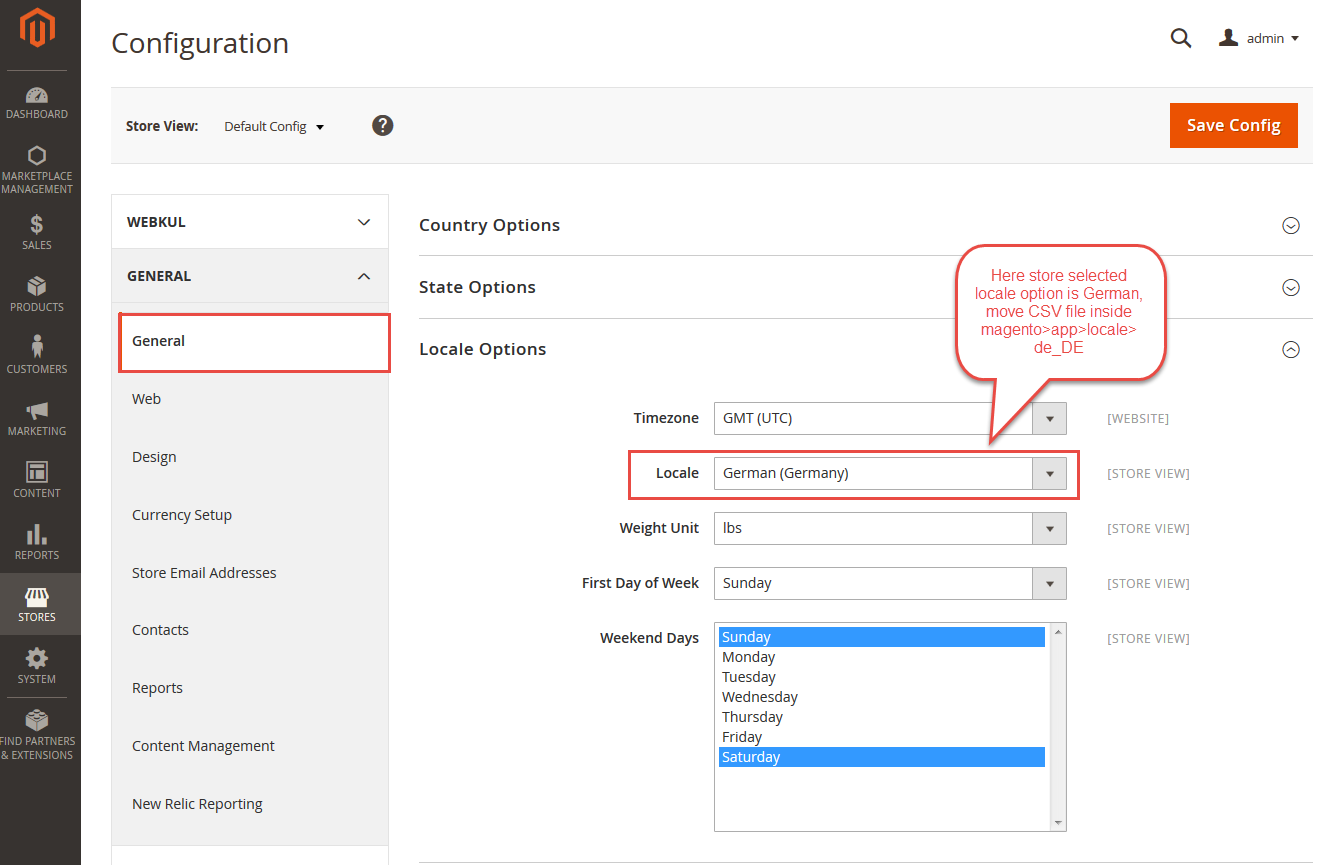
Meanwhile, if you want to translate their module language
from English to German then follow the path app/code/Webkul/CategoryMassUpload /i18n in their unzipped folder, and then you will get a CSV file with name “en_US.csv”.
Further, rename that CSV as to your region code and language code like – “de_DE.csv” and translate all right side content after the comma in your language.
After editing the CSV, save it and then upload it to the path app/code/Webkul/CategoryMassUpload /i18n where you have installed Magento 2 on the server. Moreover, Category Bulk Upload module will get translated into your desired Language. It also supports RTL and LTR languages.

Category Manager
Firstly, the admin will click on the “ Category Manager” option then the admin will get two options ” Manage Category Mass Import ” and “Manage Category Mass Export ” as per the below snapshot –
Manage Category Mass Import
Moreover, when the admin click on ” Manage Category Mass Import” the below page will be displayed. Here, the admin can download the sample file (CSV/XLS/XML) to import the categories and can edit the sample file as per the requirement.
Meanwhile, the admin can import the categories with the images or without the images.
Categories with Images – Upload the category file with the images zip file and save it. Moreover, the image zip file should contain image files mentioned in the category upload file.
Categories without Images – Upload only category file and save it

Sample CSV File

Category Id – Here is the column for the category ID,It will be blank while creating new categories as category ID of new category will be decided by SQL incrementer Although Category ID will be visible in csv while exporting categories.
Categories – Here, the admin can enter categories and their subcategories(like – Men/Clothes. Here, clothes is a subcategory of the Men category)
Parent ID – Here the admin needs to enter the parent id of the parent categories.
Store- Here the admin needs to enter **Storeview_id** of the store .
Name-The admin needs to enter the name of the category which he wants to import.
Path– Here the admin needs to enter the path of the category for this he has to enter category Ids followed by forward slash eg 1/2/3
Is Active – The admin can set 1 to display category at the front end else 0.
Include in Menu – The admin can set 1 to display category in the Menu bar at the front end else 0.
Is Anchor – The admin can set 1 to make the category clickable in the Menu bar at the front end else 0.
The admin can enter the meta title, meta keywords, and meta description.
Images – Here, you need to enter the category image name which will be the same as in the image zip file if you are uploading the categories with images.
Products – The admin can add products to the category by just entering the product Ids.
Description– The admin can enter the category description which will get imported with the category.
URL Key-Need to enter the url key which will be unique for the each category.
Import the Categories
Initially., you need to upload the categories file and save it then you will get the import complete notification message as per the below snapshot – 
Further, after importing the categories, the admin can view categories as per the below snapshot – 
Manage Category Mass Export
After that, when the admin click on the” Manage Category Mass Export” option then the below page will be displayed.
Here, you can choose the store view and export the respective categories CSV file as per the below file –
Meanwhile, the admin will get the Category id, Parent category id, Store view name, Category name, Path of the category(parent category Id/child category Id), Category image name, Is active, Is anchor, Include in Menu, Meta title, Meta Keywords, Meta description, description, URL key and product ids in the exported CSV file.
Updating the Existing Categories
The admin can check the existing categories from the Catalog > Categories section.

Now if the admin wants to update multiple categories. then navigate to Category Manager > Manage Category Export.
The admin can select the store view and click on the Export Categories button.

Note: In order to make the updates the following field should never be blank which are Category id, parent id and Path.

Now, the admin can edit the fields such as categories, name e.t.c, moreover, as we have selected the default store the changes made will only be reflected in the same.

After saving the edited CSV file, the admin needs to import the same for which navigate to Category Manager > Manage Category Import. Click the upload CSV button add the edited file and click Save.

Once, the process of Reading the File has completed the changes will be reflected in the categories.
Note: The admin needs to select the store view, to view the updated categories.

That’s all for the Category Bulk Upload Using CSV/XML/XLS for Magento 2 module still have any issue feel free to add a ticket and let us know your views to make the module better http://webkul.uvdesk.com/
Current Product Version - 4.0.4
Supported Framework Version - Magento 2.0.x, 2.1.x, 2.2.x,2.3.x, 2.4.x


Be the first to comment.