WooCommerce Marketplace Booking Reservation System allows the sellers to add their own booking products and update their products as well.
The seller can add/edit booking products from their profile and add booking slots by two types “One Booking for Many days” and “Many Booking For One Day” and can make it disable also
Similarly, the admin can also add/edit booking products from their profile and can add booking slots utilizing the available booking types.
Note:
This extension is an add-on to Multi Vendor Marketplace for WooCommerce. You must have installed it before making use of the WooCommerce Marketplace Booking Reservation System.
Features
- The admin and sellers both can add bookable products and manage their respective slots.
- Bookable Product type has been made available for creating the booking products.
- The admin and Sellers both can edit products and create two types of bookings “One booking for many days” and “Many bookings for one day”.
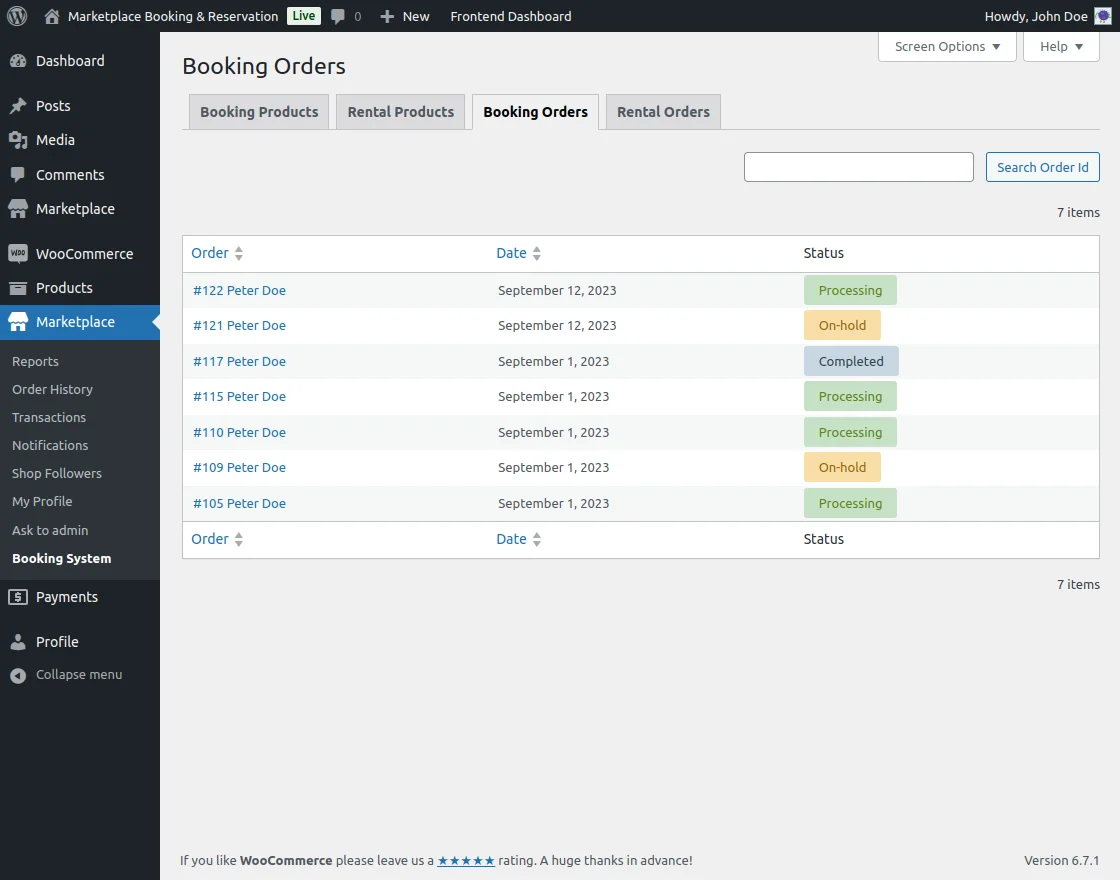
- The sellers can see all booked product history under their accounts.
- The customers can check their booked products under their account panel.
- The customers will have a panel on the product page from where they can book their booking as required.
- The admin and the sellers can keep the slots open or closed for particular time slots and particular days.
- The admin & the sellers can edit slots and set the disable days for the booking product.
- Booking Cancel functionality for the customer.
- Reschedule Booking functionality for the customer.
- Download the booking invoice pdf for the customer.
- Delete option for individual delete in the bookable products list.
- Email functionality on reschedule and cancel the booking.
- A button to create the booking reservation in the bookable products list.
- Send booking confirmation SMS to the client’s phone number.
- The admin and vendor can add rental products.
- The admin and vendor can track rental product orders.
- WooCommerce Marketplace Booking Reservation System is now compatible with Cart and Checkout Blocks and High Performance Order Storage(HPOS).
Installation
The user will get a zip file which he has to upload in the “Add New” menu option in the WordPress admin panel.
For this login to WordPress Admin Panel and Under the Dashboard hover your mouse over the “Plugins” menu option which brings out a Sub-Menu and then select the “Add New” option.

Click on the option “Upload Plugin” at the top of your page to upload the zip file of the WooCommerce Marketplace Booking Reservation System.

After that, click on the “Upload Plugin” option, Below that you will see a button “Choose File” Click on the button to browse for the zip file as per the snapshot below.

After that, the file, click the “Install Now” button to install the plugin as per the snapshot.

Now when the plugin is installed correctly, you will see the success message and an option to activate the plugin. Click on “Activate Plugin” to activate the installed plugin.

Module Activation and Update :
Check how to activate your WooCommerce plugin through the purchase code.
Check how to get updates of webkul modules directly on the Plugins page.
Module Translation
To know how to translate the module, WooCommerce Marketplace Booking Reservation System. You can click here.
Generate API Key – For Displaying Maps
- Go to the Google Maps Platform
- Tap ‘Get Started‘ on the top right-hand side.

- Now, check all options – ‘Maps‘, ‘Routes‘, and ‘Places‘ then tap ‘Continue‘.

- If you want to use an existing project, please select it from the list. Otherwise, select ‘Create a new project‘ and enter a project name.

- Create a Billing Account.
- Now, tap ‘Next‘ to continue and complete the steps.
- Click ‘Next‘ to enable the APIs then select the project.
- lastly, you need to copy the generated API key within the settings sub-menu option under the WC Marketplace Booking System.

How to Get Twilio Account Credentials?
Navigate to Try Twilio for free and fill in the required information as required.

After login, you need to navigate through Account->API Keys & tokens.

Here, you will find the respective Account SID and the Authentication token to be used for the configuration.

To get the Twilio Number tap My First Twilio Account option at the top left-hand corner.

Initial Configuration Settings
The admin will navigate through Marketplace->Booking System. Then navigate to the Configuration tab as per the snapshot below.

General
Here, the admin will –
- Enable the module status to use the functionality for the Marketplace store.
- Enter the Google Maps API so as to display the location Map at the front end to the customers.
- Set the booking cancellation available days for the customers.
- Set the booking reschedule days within which a customer can reschedule the booking.
- Allow customers to download the booking details in a PDF file format.
Lastly, tap the Save Changes button.
SMS
Under this section, the admin will enter the Twilio credentials and the Twilio phone number that is used to send the SMS notification.
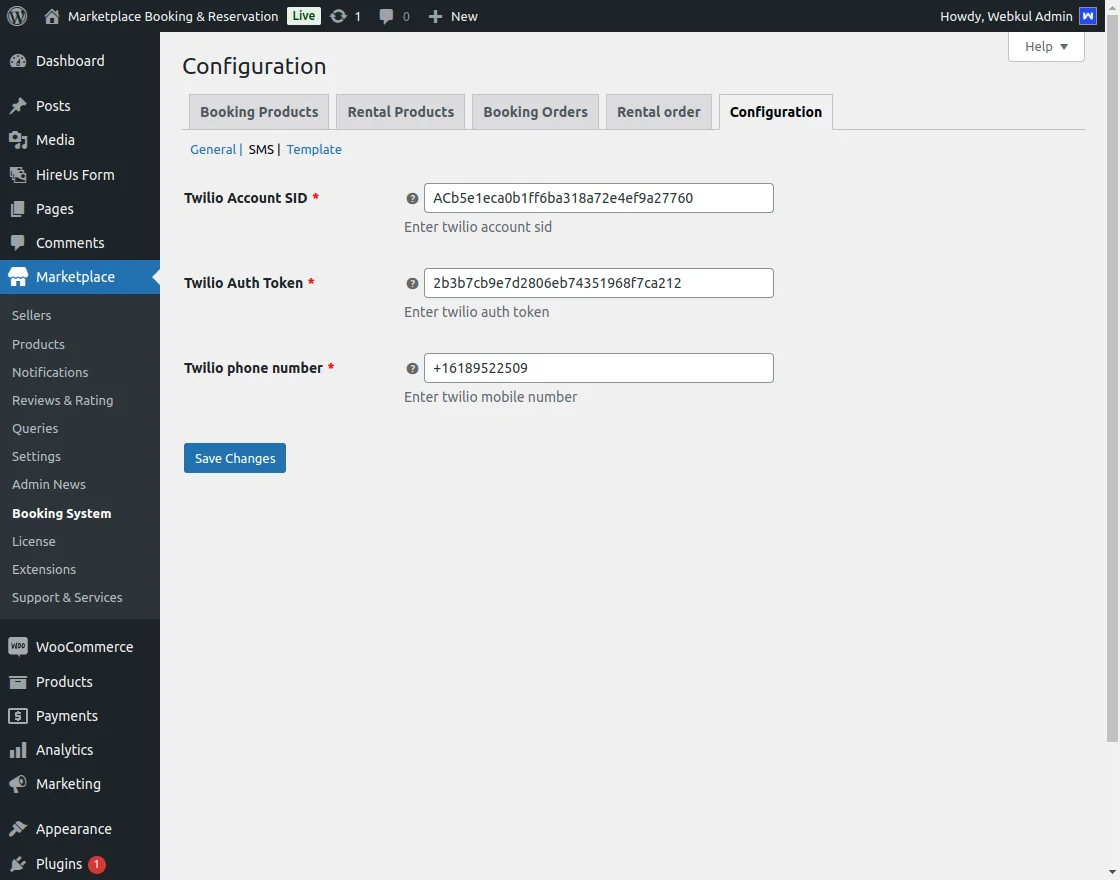
Here, the admin will enter the –
- Twilio Account SID.
- Twilio Auth Token.
- and the Twilio phone number.
Lastly, tap the Save Changes button.
Template
Here, the admin will set the template that will be used to send the booking confirmation SMS notifications to the customers.
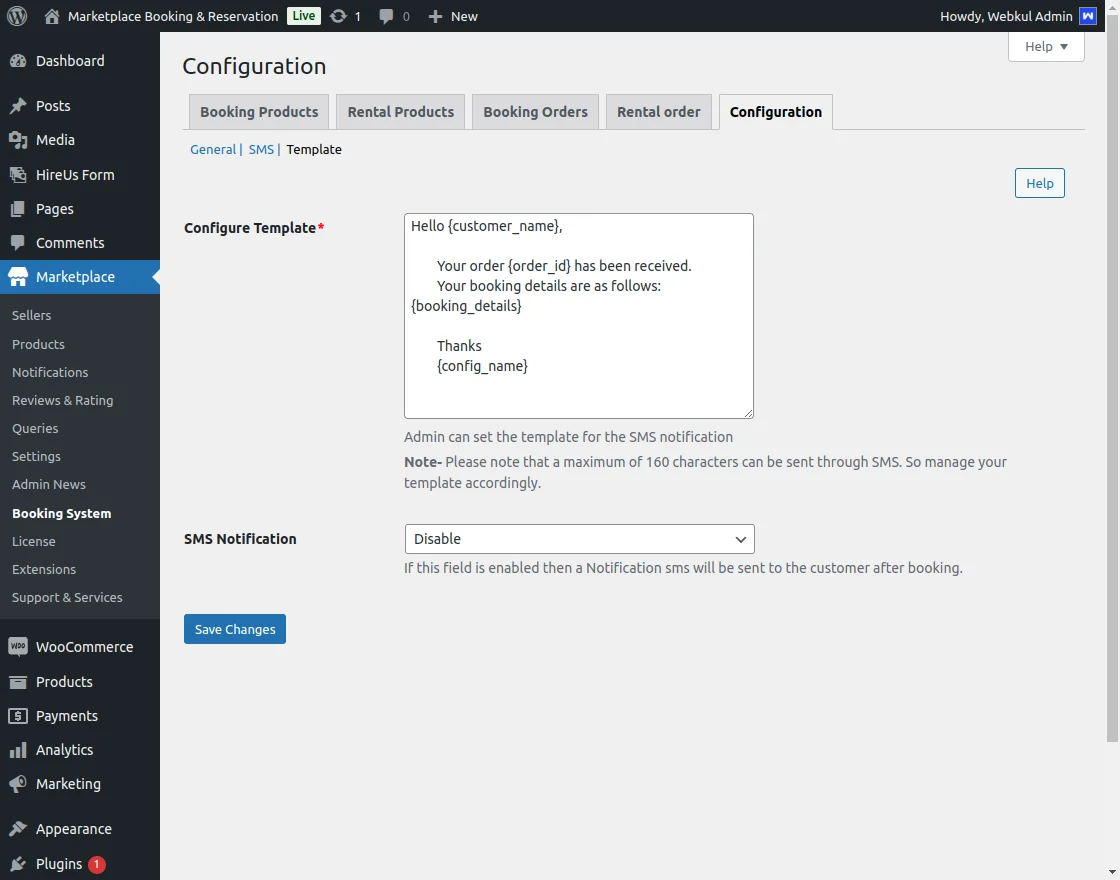
Lastly, tap the Save Changes button.
Admin End – Working
Example: Booking Type – One Booking For Many Days (Back end)
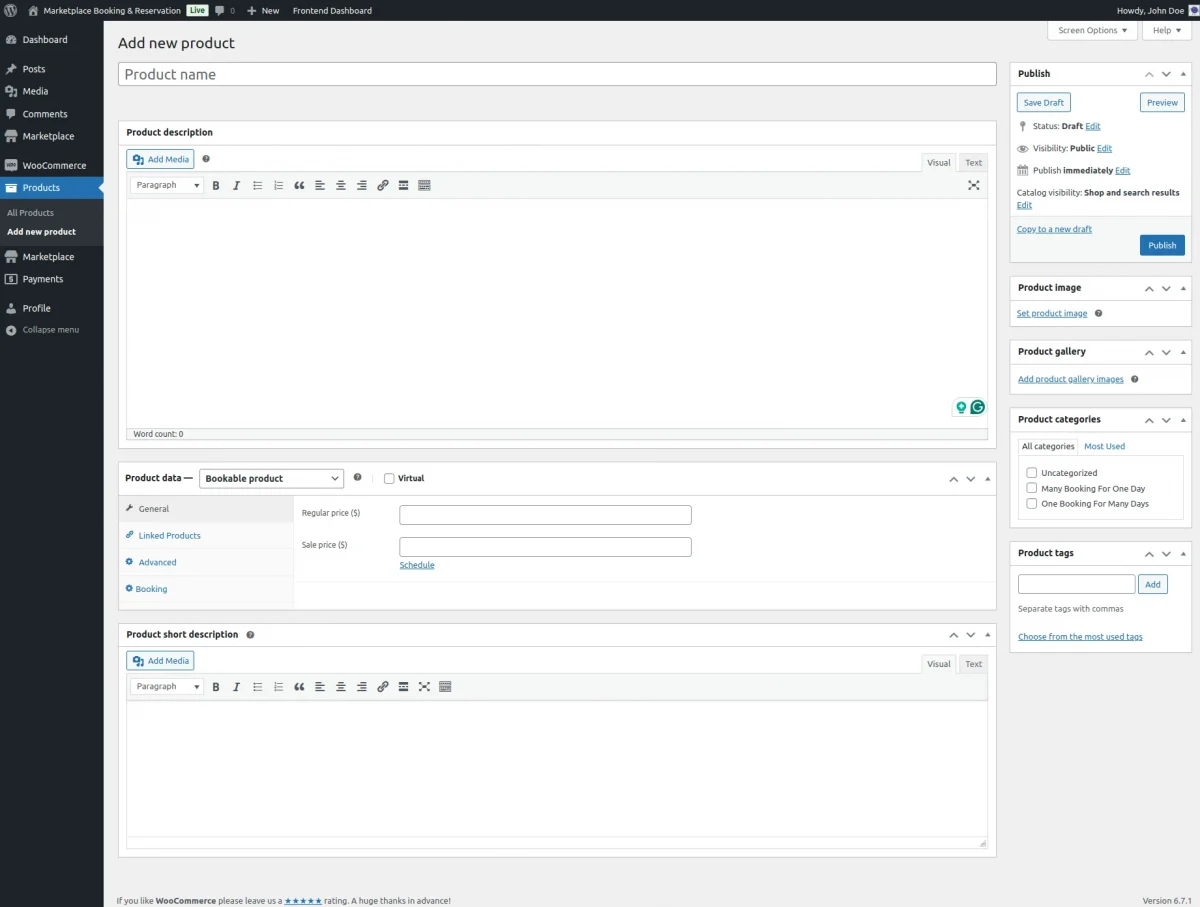
The admin will be able to add the booking product by navigating through Products->Add New.
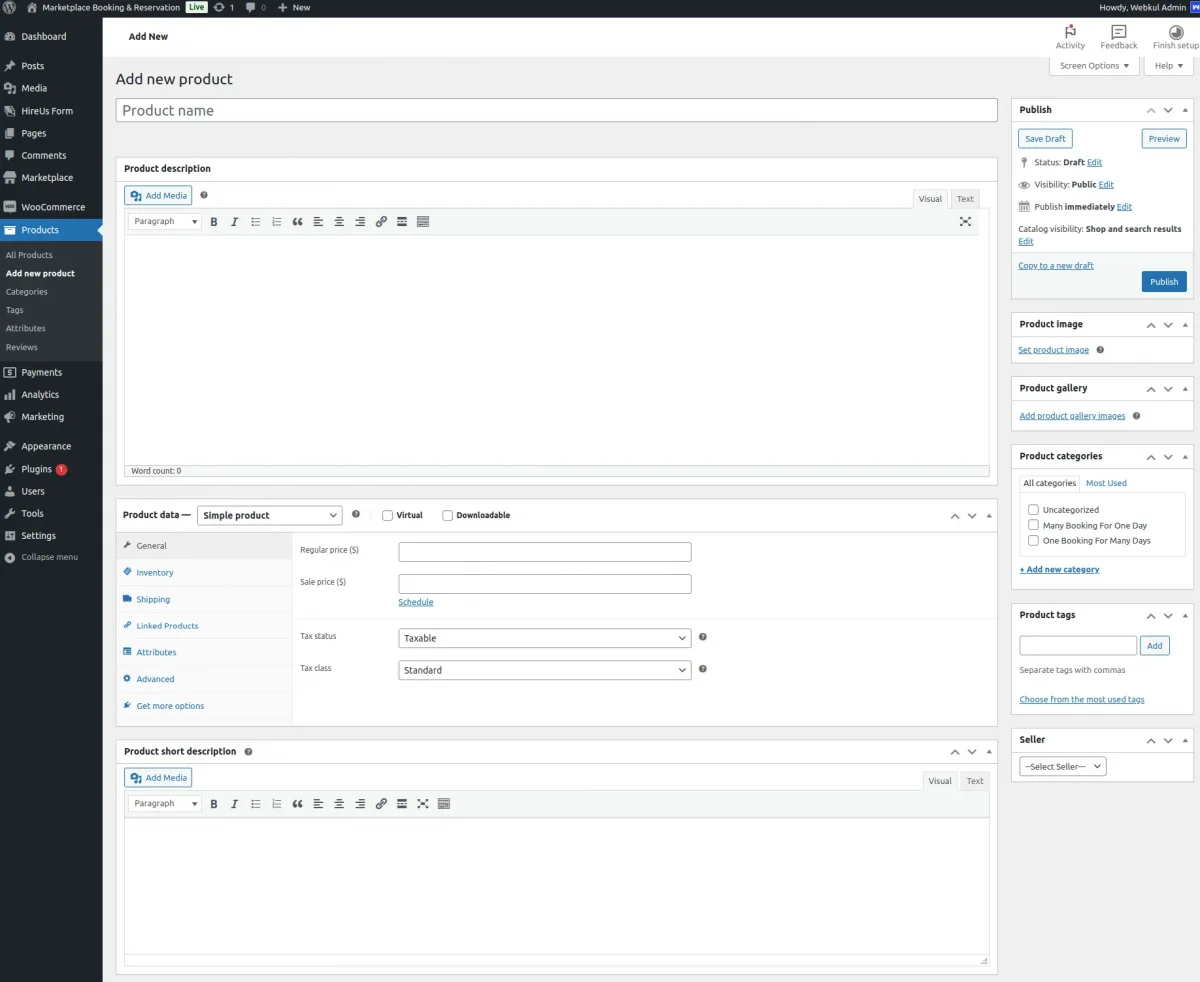
The admin can also add the booking products by navigating through Marketplace->Booking System->Booking products->Add New.

Then, the admin creates a booking product.

Here, the admin will have to enter the appropriate product information that includes –
- Booking Product Name
- Selecting the Product Data as – a bookable Product
- Choosing the product type as Virtual
- Setting up the Price of the booking product
After that, set up the appropriate product information, and navigate to the Booking menu option on the left-hand side.

Then, the admin needs to –
- Select a Booking Type as – ‘One Booking For Many Day‘.
- Set the Booking Status as – Enabled.
- Select the Start Date and End Date for the booking product.
- Enter the Booking Stock Per Slot.
- Enter the Location for the Booking(gets auto-detected using Google Maps API key).
- Set the Booking Time Slot.
- Set the span of the booking time slot by creating the Start Day, Start Time, and End Day, End Time.
Lastly, save the product and the booking product is ready for use at the front end.
Booking Type – One Booking for Many Days(Frontend View)
Now that, the booking product will be visible on the website storefront.
Here, the available slot can easily be chosen for the available dates by the customers. After that, the quantity for the selected slots can be set by the customer.

The location of the event can be checked by tapping on the location link and under the booking product you can see the exact location of the event.

After the order has been placed the customer will receive a SMS notification for the same.

The customer will also receive an email for the order confirmation.

Example: Booking Type – Many Booking in a Day(Back end)
The admin will add the booking product by navigating through Marketplace->Booking System->Booking products->Add New.

After that, the admin will enter the required details for the product.

Here, the admin needs to –
- Select a Booking Type as – ‘Many Booking In One Day‘.
- Set the Booking Status as – Enabled.
- Select the Start Date and End Date for the booking product.
- Enter the Booking Stock Per Slot.
- Enter the Location for the Booking(gets auto-detected using Google Maps API key).
- Set the Booking Stock Per Slot.
- Enter the Booking Break Time Between Booking as required.
- For the days of the week set the start time and end time for the slots and choose the status as open or closed as required.
Lastly, save the product and the booking product is ready for use at the front end.

Customers can select the available date and then select their preferred slot as required and make a checkout thereafter.

The location of the event can be checked by tapping on the location link and under the booking product you can see the exact location of the event.

After the order has been placed the customer will receive a SMS notification for the same.

The customer will also receive an email for the order confirmation.

Edit Slots – Store Admin
The admin can edit the slots for the two types of bookings as required.

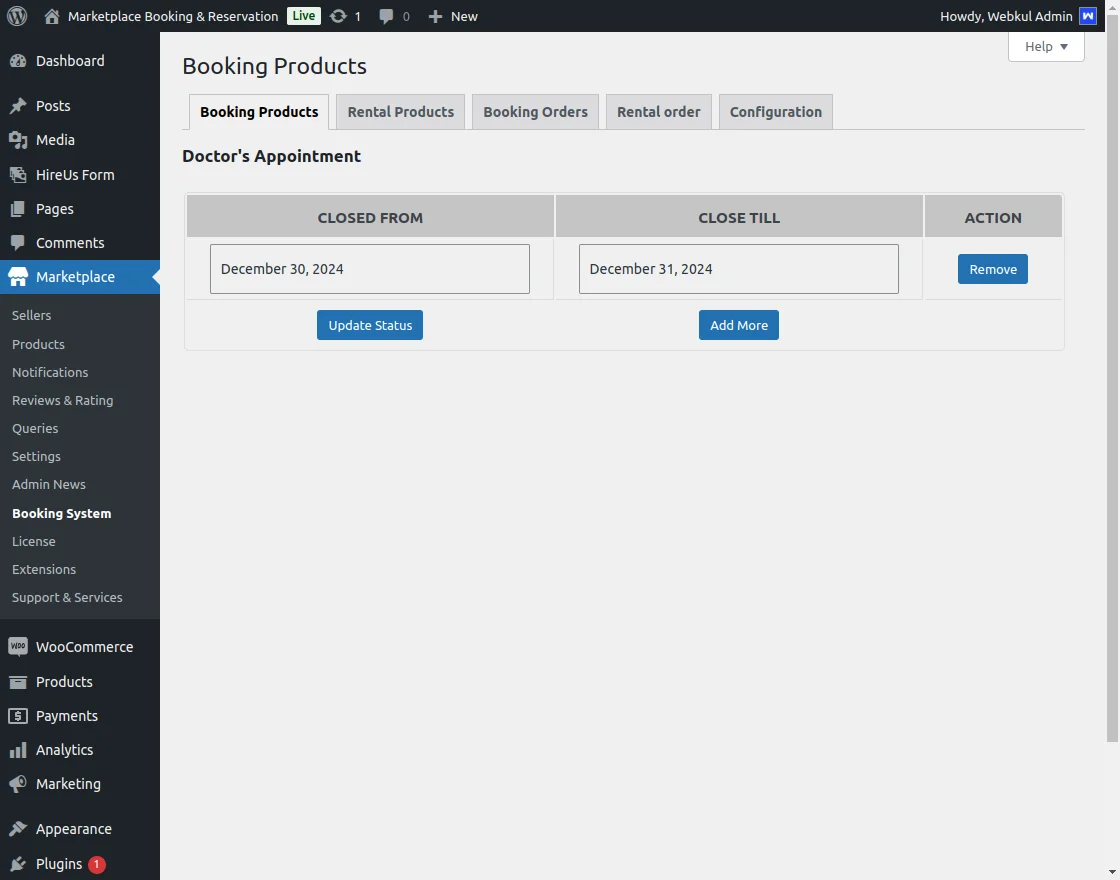
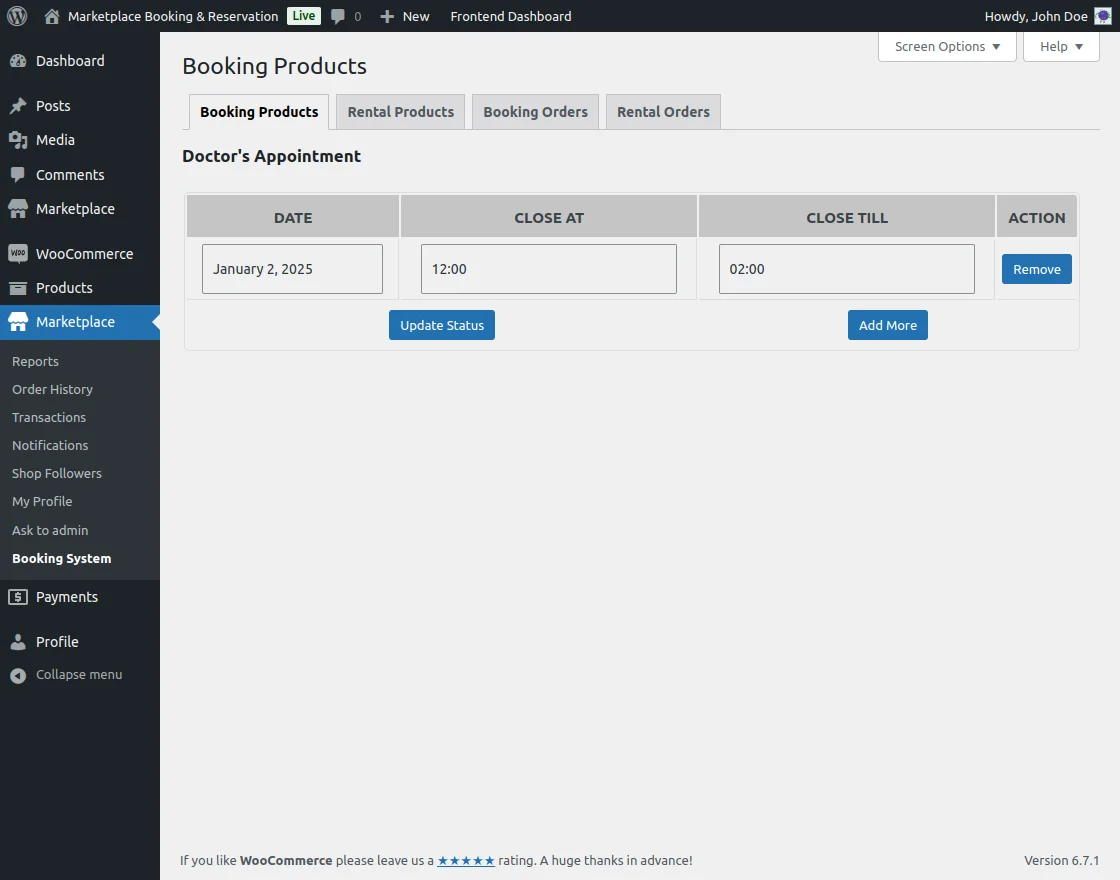
After tapping the Edit Slots for Many Bookings in One Day(Doctor’s Appointment) below section appears.
Slots:
The admin can make any of the slots open or closed as required.

Disable Time Spans:
The admin for a particular date can choose the time span when the bookings will not be available.
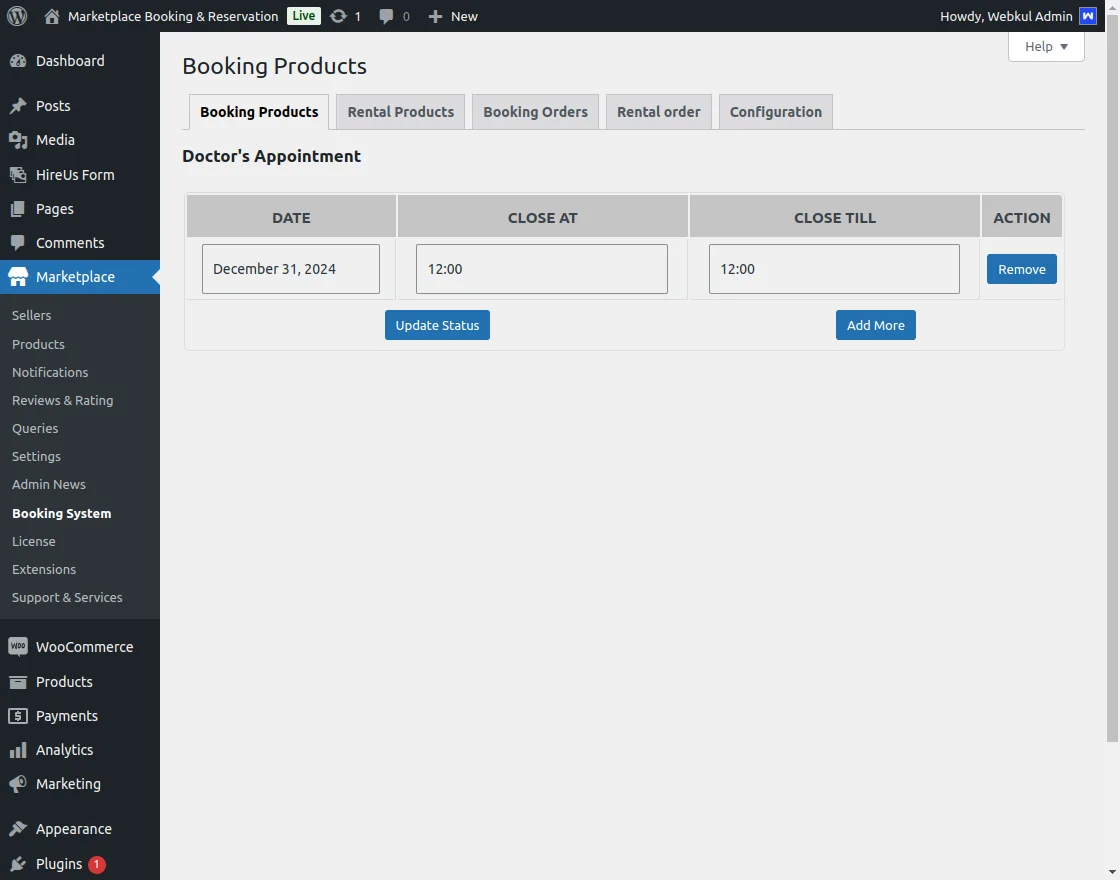
Disable Days:
Here, the admin can select the days when the booking will be disabled. The admin will select the closed from and closed till days as required.
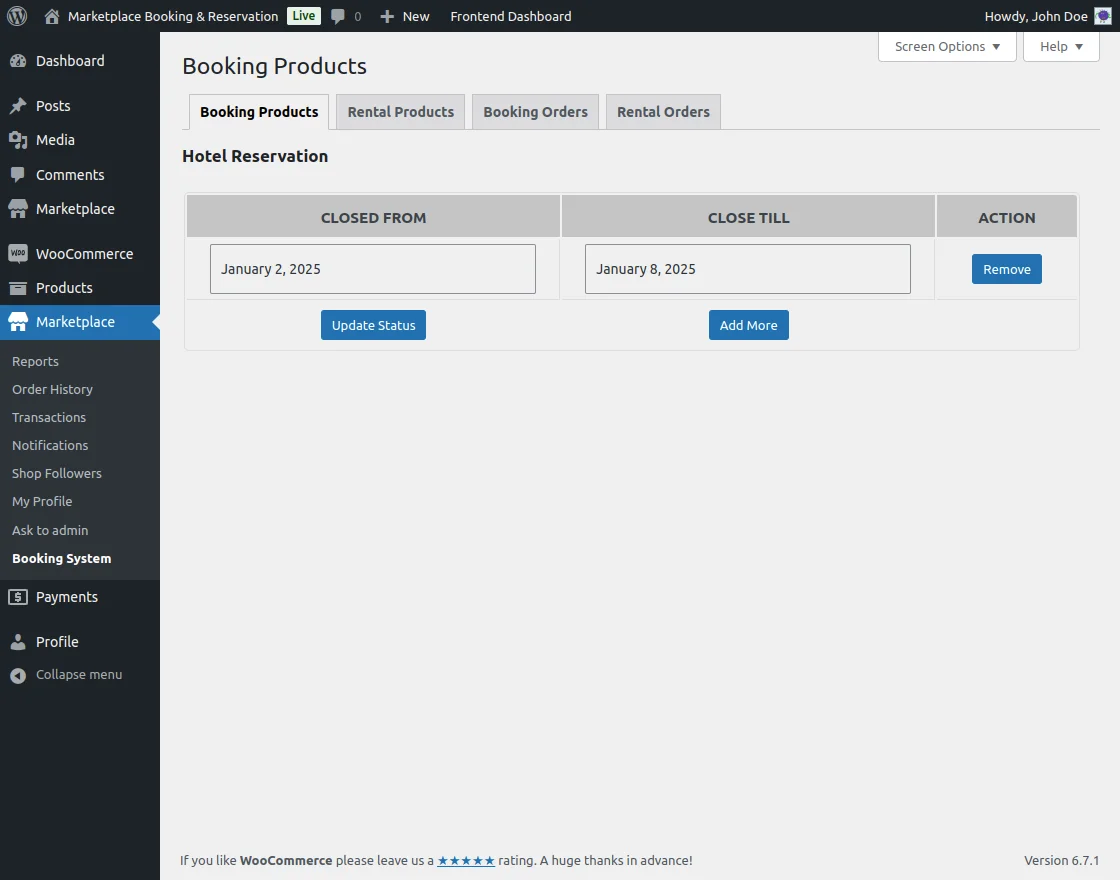
In the case of Edit Slots for One Booking for Many Days(Hotel Reservation) below section appears.
Slots:
The admin can make any of the slots open or closed as required.

Disable Days:
Here, the admin can select the days when the booking will be disabled. The admin will select the closed from and closed till days as required.
Admin End – Rental Products
The admin can also add the rental products by navigating through Marketplace->Booking System–>Rental Products->Add New.
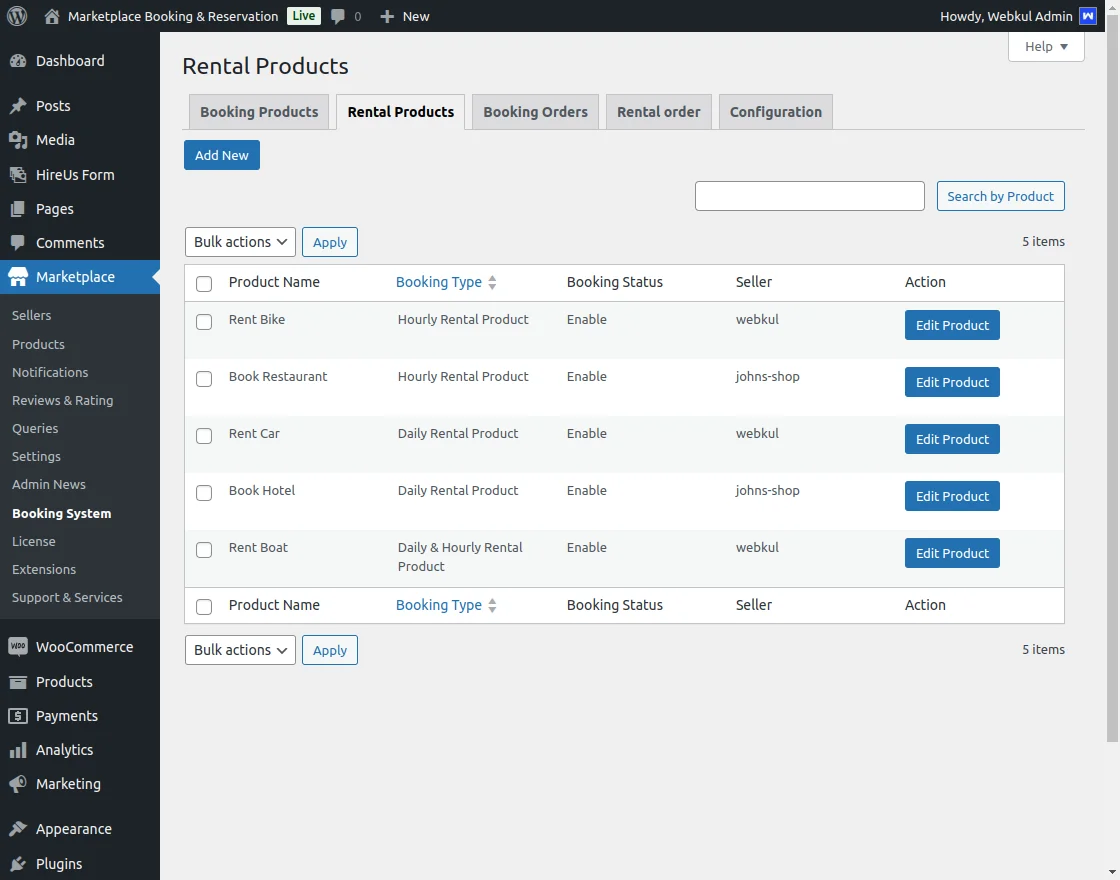
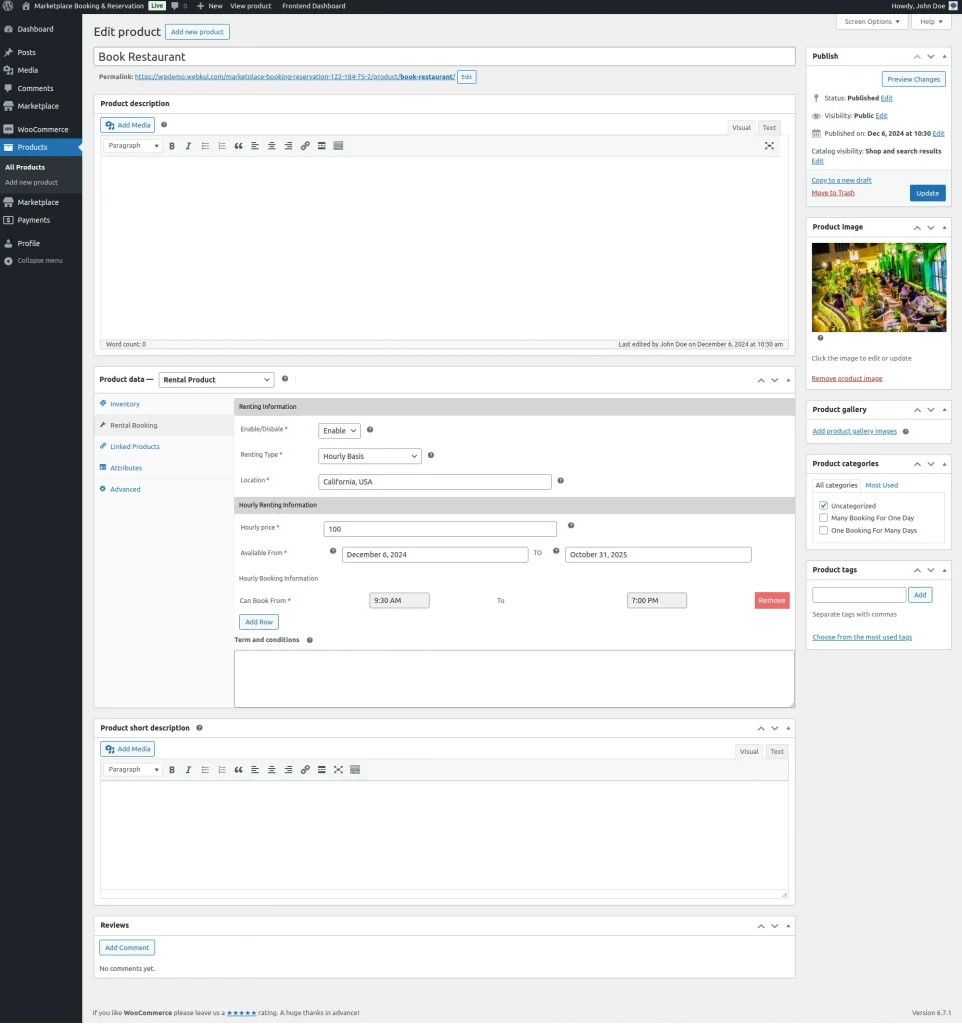
Then, the admin creates a rental product and can also edit it.
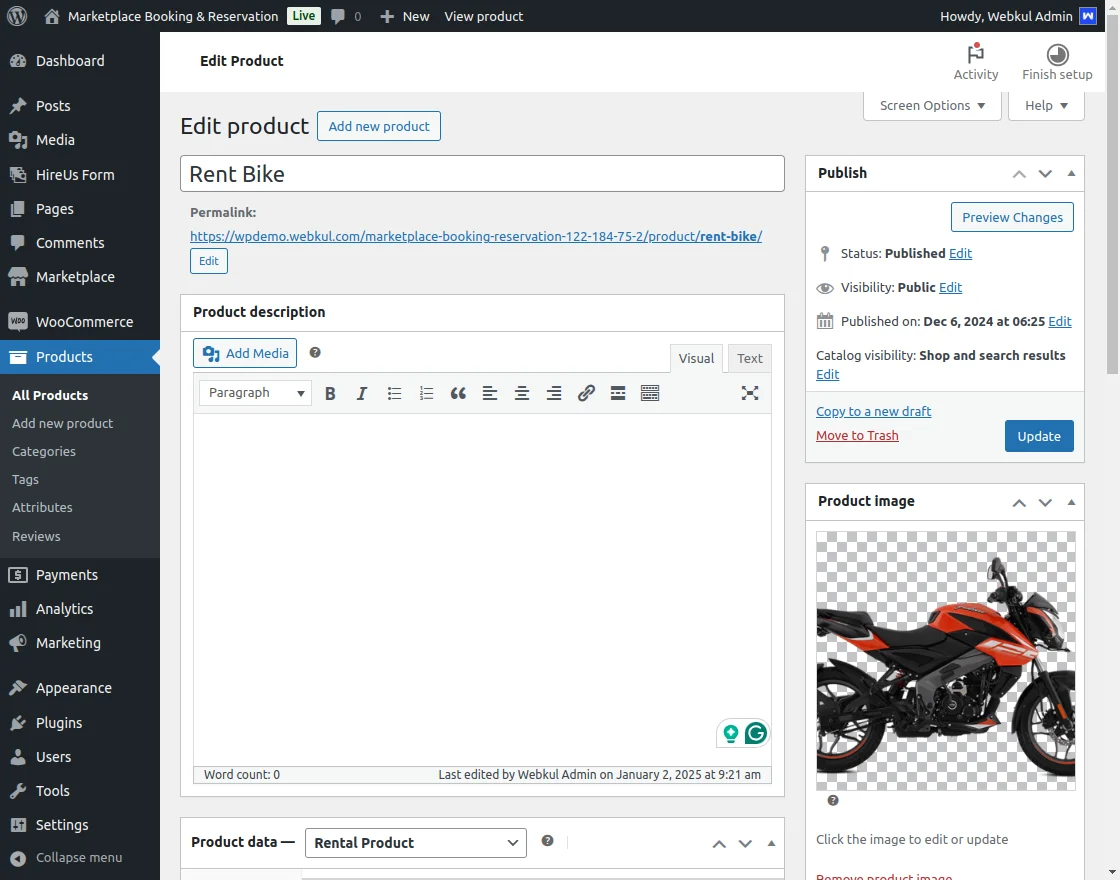
After that, set up the appropriate rental product information, and navigate to the Products menu option on the left-hand side.

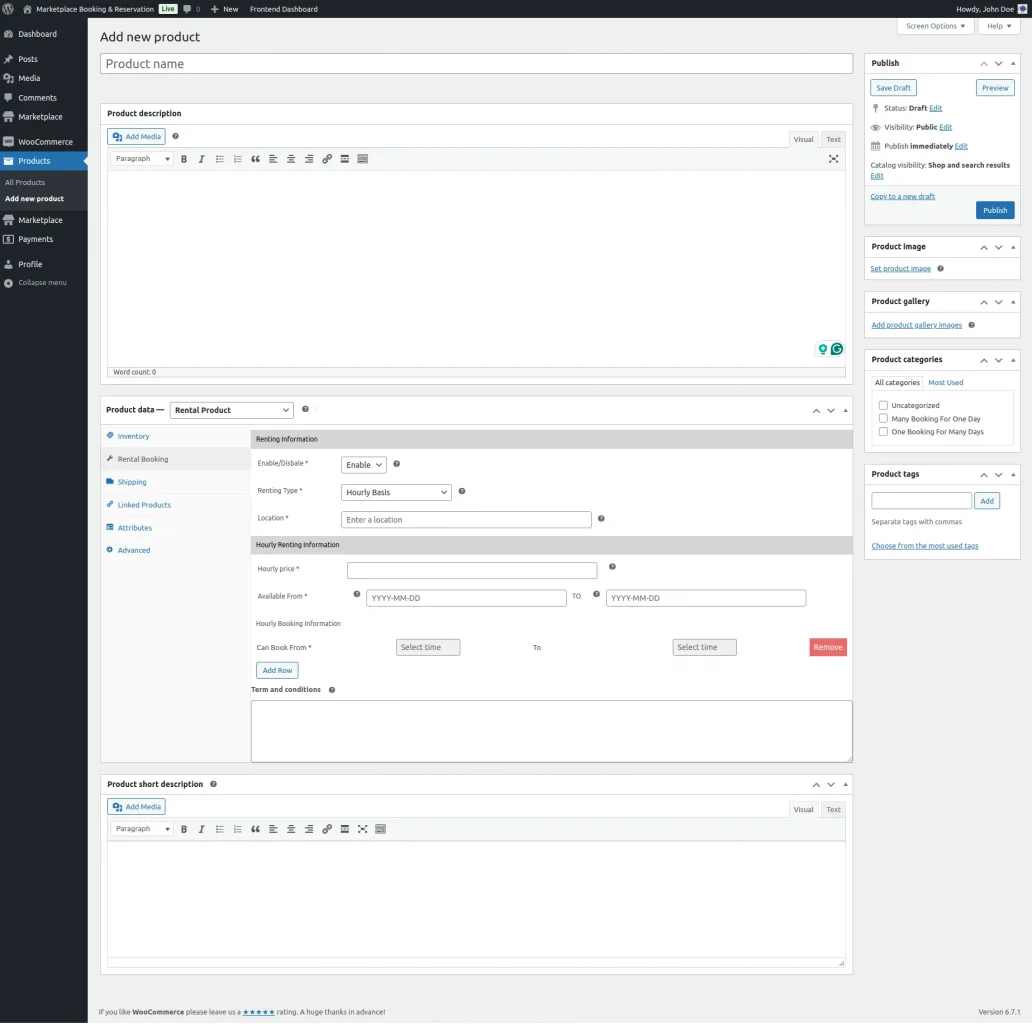
Here, admin will have to enter the appropriate product information that includes –
- Select a Product Type as – ‘Rental Product‘.
- Set the Renting Information Status as – Enabled or Disabled.
- Set the Renting Type as – Hourly Basis, Daily Basis or Both.
- Enter the Location for the Booking Rental Product.
- Set the Hourly Renting Information of the hourly price.
- Select the availability by setting Start Date and End Date for the booking product.
- Set the Booking Time Slot of the rental product.
- Set the span of the booking time slot by creating the Start Day, Start Time, and End Day, End Time.
- Terms and conditions is also mentioned as per the admin requirement.
- Product short description for the rental product is also provided by the admin.
Lastly, save the product and the rental product is ready for use at the front end.
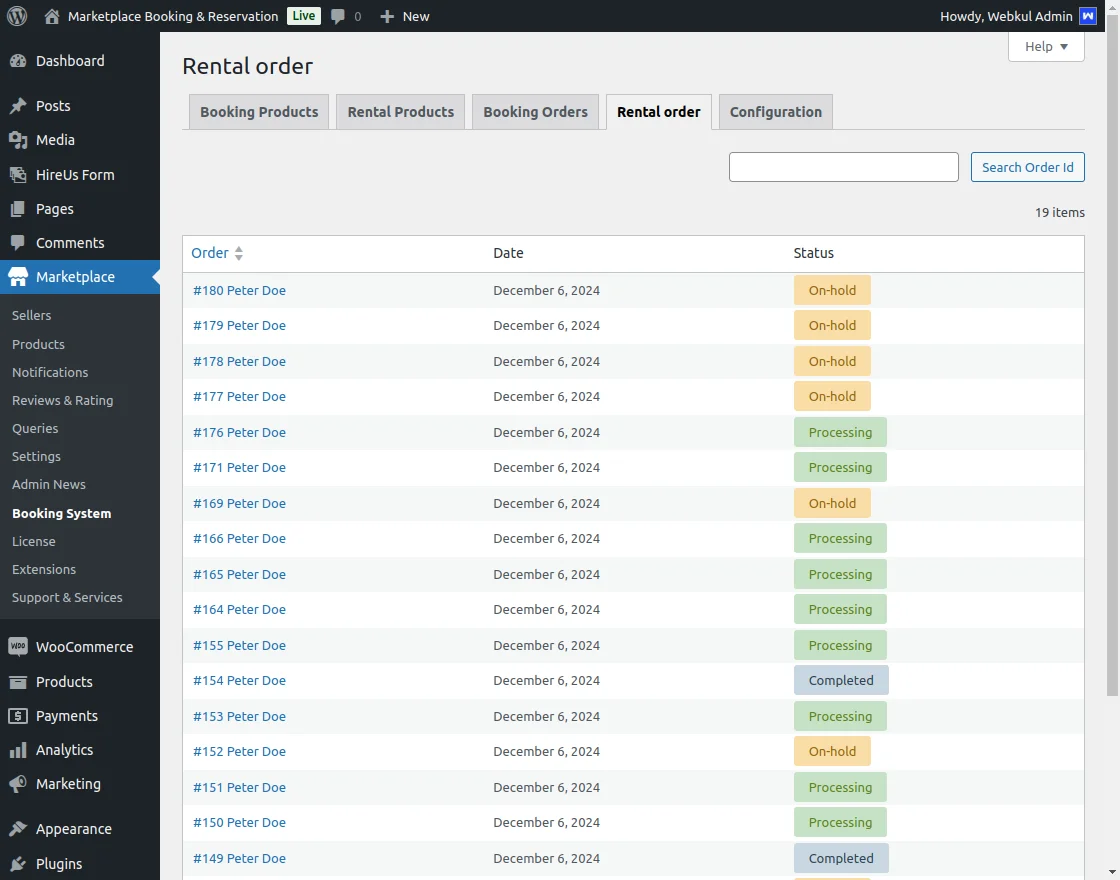
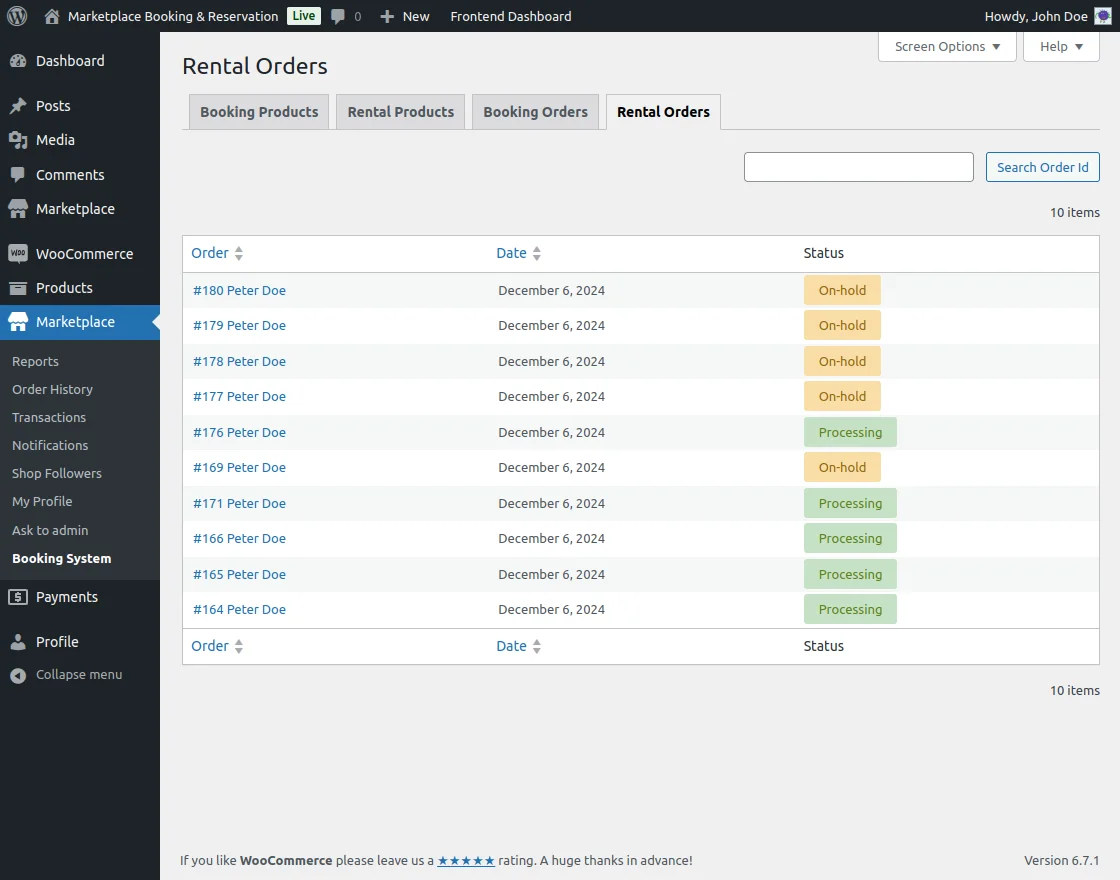
Admin End – Rental Orders
The admin can also track the rental order status of the rental products by navigating through Marketplace->Booking System–>Rental Order.
Seller End Workflow
The seller under the marketplace account panel options will get the Manage Booking option.
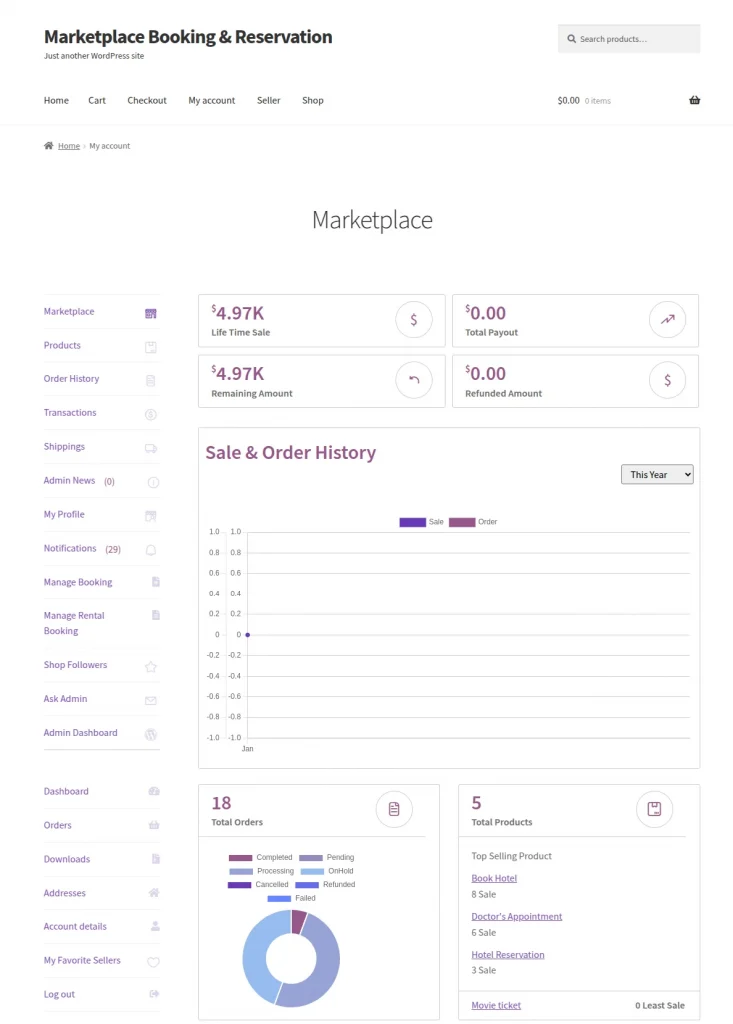
Tapping that up brings up the section that is similar to the admin dashboard.

Here, tap the Booking System side panel option, and that brings up the below section.
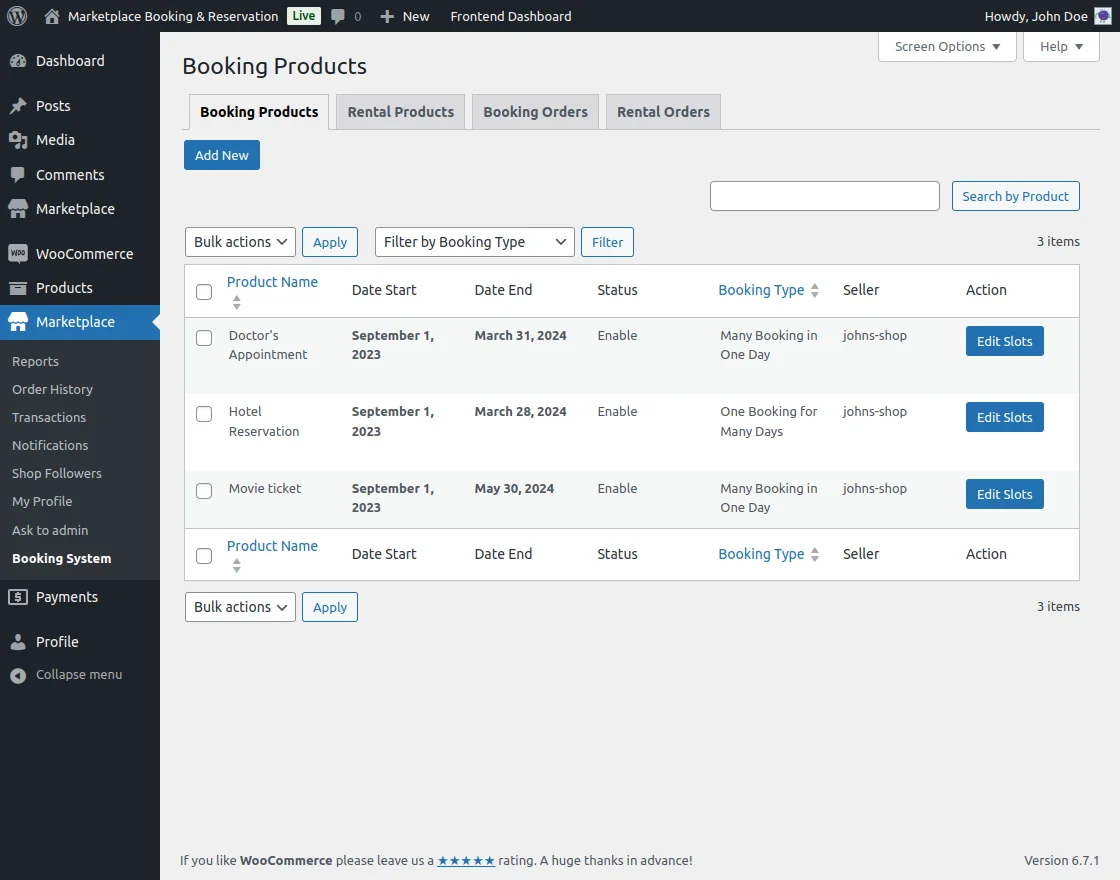
Here, the vendors can add a new booking product by tapping on the Add New button.
After that, go to the Booking section and for the product data – select Bookable product and fill in the rest of the data for the product accordingly.
The vendors can also view the booking order by tapping the Booking Orders tab.
Example: Booking Type – One Booking For Many Days (Vendor Account Panel)
To add a product the vendor will have to enter the appropriate product information that includes –
- Booking Product Name
- Selecting the Product Data as – a bookable Product
- Choosing the product type as Virtual
- Setting up the Price of the booking product.

After that, set up the appropriate product information, and navigate to the Booking menu option on the left-hand side.

Then, the vendor needs to –
- Select a Booking Type as – ‘One Booking For Many Days ‘.
- Set the Booking Status as – Enabled.
- Select the Start Date and End Date for the booking product.
- Enter the Booking Stock Per Slot.
- Enter the Location for the Booking(gets auto-detected using the Google Maps API key).
- Set the Booking Time Slot.
- Set the span of the booking time slot by creating the Start Day, Start Time, and End Day, End Time.
Lastly, save the product and the booking product is ready for use at the front end.
Booking Type – One Booking for Many Days(Frontend View)
Now that, the booking product will be visible on the website storefront.
Here, the available slot can easily be chosen for the available dates by the customers. After that, the quantity for the selected slots can be set by the customer.

The location of the event can be checked by tapping on the location link and under the booking product you can see the exact location of the event.

After the order has been placed the customer will receive a SMS notification for the same.

The customer will also receive an email for the order confirmation.

Example: Booking Type – Many Booking in a Day(Vendor Account panel)
The vendor will add the booking product by navigating through Marketplace->Booking System->Booking products->Add New.

Here, the vendor will also be able to edit the slots for the created booking products as required.
After that, the vendor will enter the required details for the product. Then go to the Booking section.

Here, the admin needs to –
- Select a Booking Type as – ‘Many Booking In One Day‘.
- Set the Booking Status as – Enabled.
- Select the Start Date and End Date for the booking product.
- Enter the Booking Stock Per Slot.
- Enter the Location for the Booking(gets auto-detected using the Google Maps API key).
- Set the Booking Stock Per Slot.
- Enter the Booking Break Time Between Booking as required.
- For the days of the week set the start time and end time for the slots and choose the status as open or closed as required.
Lastly, save the product and the booking product is ready for use at the front end.

Customers can select the available date and then select their preferred slot as required and make a checkout thereafter.

The location of the event can be checked by tapping on the location link and under the booking product you can see the exact location of the event.

After the order has been placed the customer will receive a SMS notification for the same.

The customer will also receive an email for the order confirmation.

Edit Slots – Vendor
The vendor can edit the slots for the two types of bookings as required.

After tapping the Edit Slots for Many Bookings in One Day(Doctor’s Appointment) below section appears.
Slots:
The vendor can make any of the slots as open or closed as required.

Disable Time Spans:
The vendors for a particular date can choose the time span when the bookings will not be available.
Disable Days:
Here, the vendor can select the days when the booking will be disabled. The vendor will select the closed from and closed till days as required.

In the case of Edit Slots for One Booking for Many Days(Hotel Reservation) below section appears.
Slots:
The vendor can make any of the slots as open or closed as required.
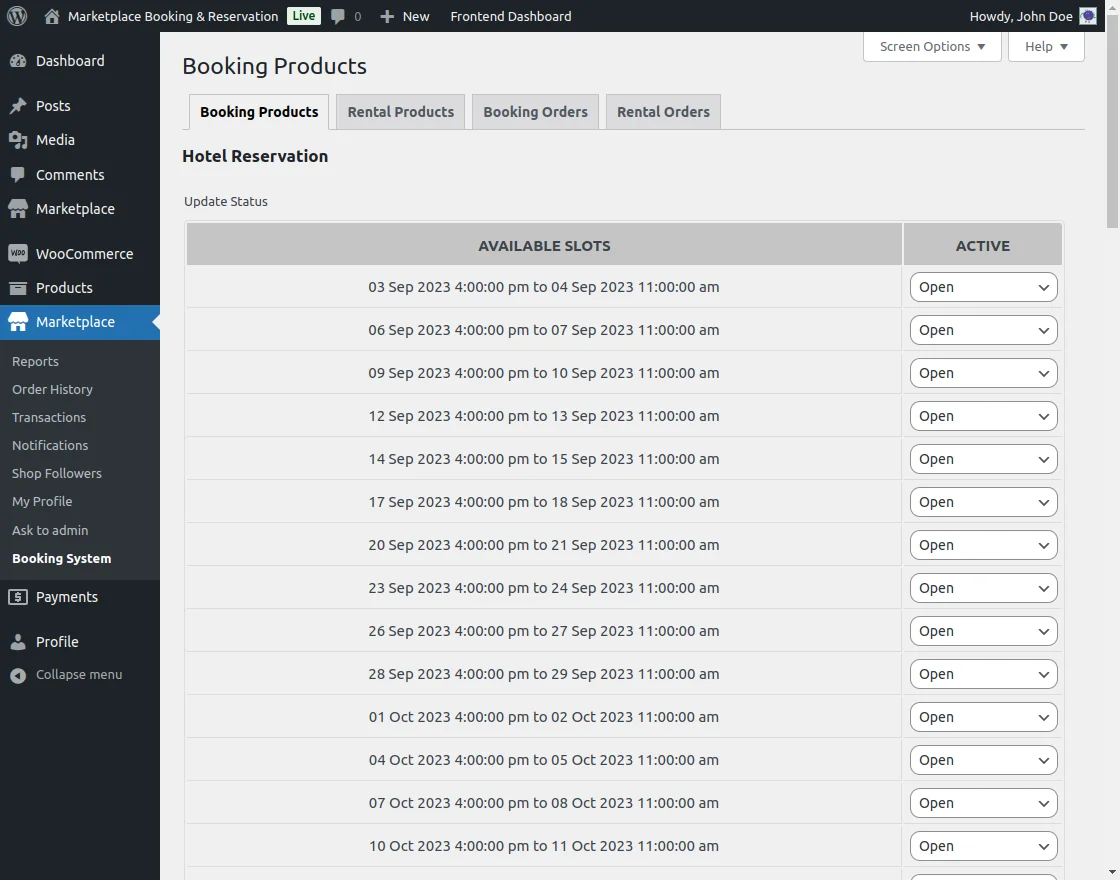
Disable Days:
Here, the vendor can select the days when the booking will be disabled. The vendor will select the closed from and closed till days as required.

Vendor Workflow – Rental Products
Under the marketplace account panel, the seller or vendor will click on Manage Rental Booking.
Sellers can manage, see the various options, and search rental booking products.
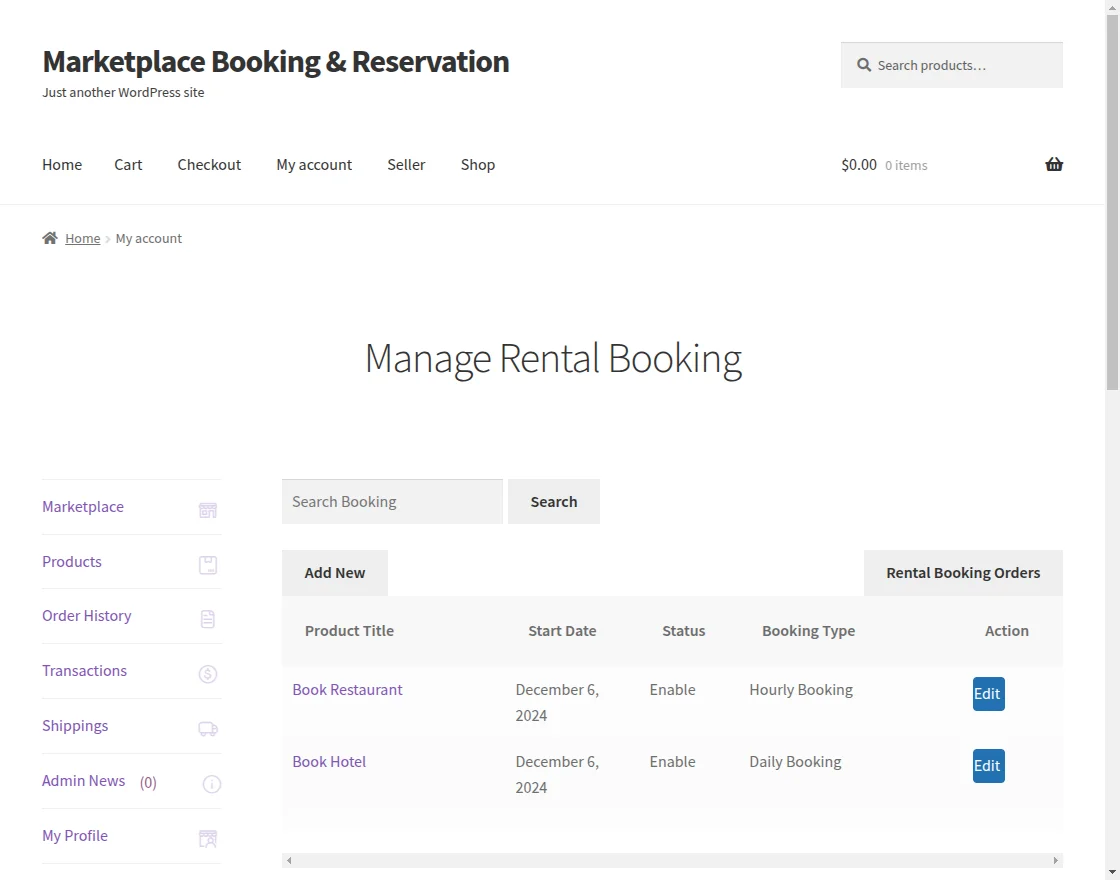
Vendors can also add rental products by clicking on Add New, by filling in the required fields such as
- Product Categories – Uncategorized
- Product Type – Rental Product

Vendors can edit products by entering the rental product information in the required fields.
Here, seller will have to enter the appropriate rental product information that includes –
- Select a Product Type as – ‘Rental Product‘.
- Set the Renting Information Status as – Enabled or Disabled.
- Set the Renting Type as – Hourly Basis, Daily Basis or Both.
- Enter the Location for the Rental Product.
- Set the Hourly Renting Information of the hourly price.
- Select the availability by setting Start Date and End Date for the booking product.
- Set the Booking Time Slot of the rental product.
- Set the span of the booking time slot by creating the Start Day, Start Time, and End Day, End Time.
- Terms and conditions is also mentioned as per the seller requirement.
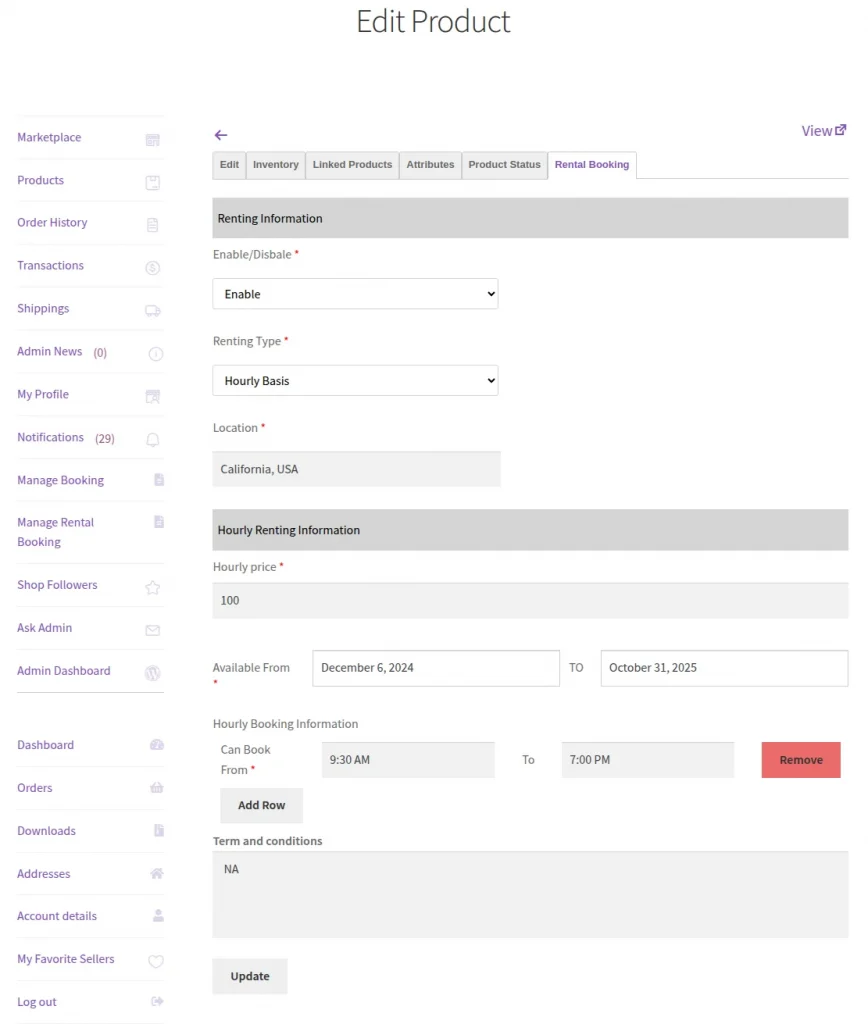
Sellers will update the information of the above details of the rental products.
Seller Workflow – Rental Orders
Vendors can also track the rental booking order status of the rental products by navigating through Manage Rental Booking–>Rental Booking Orders.
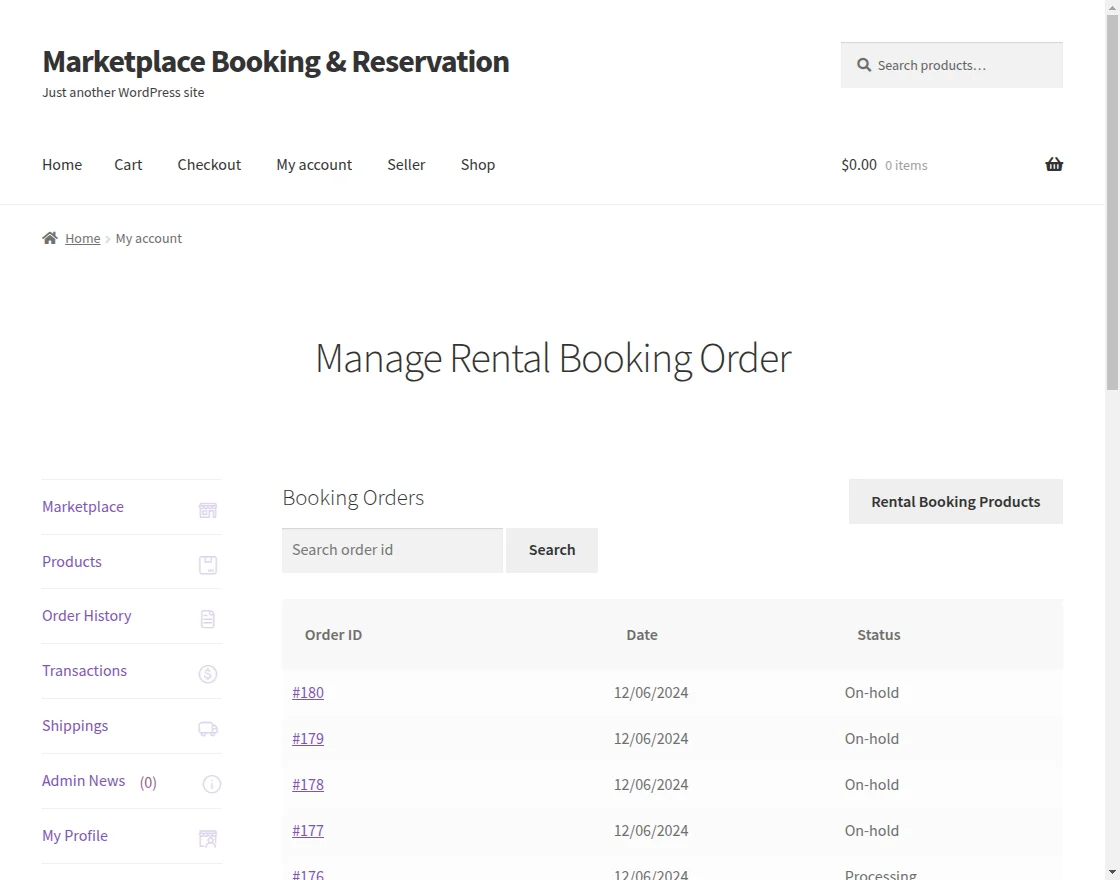
Here, the seller can locate rental product booking orders using the Order ID.
Vendor Backend – Rental Products
Vendor under the marketplace account panel options and then go to the Admin Dashboard.
Here, the seller can see all the rental products, in the below image.

Seller can add new rental products by clicking on Add New.
Seller will have to enter the appropriate rental product information that includes –
- Select a Product Type as – ‘Rental Product‘.
- Set the Renting Information Status as – Enabled or Disabled.
- Set the Renting Type as – Hourly Basis, Daily Basis or Both.
- Enter the Location for the Rental Product.
- Set the Hourly Renting Information of the hourly price.
- Select the availability by setting Start Date and End Date for the booking product.
- Set the Booking Time Slot of the rental product.
- Set the span of the booking time slot by creating the Start Day, Start Time, and End Day, End Time.
- Terms and conditions is also mentioned as per the seller requirement.
- Product Short Description is also mentioned as per the seller requirement.
Here, the vendor can edit the rental product by filling required fields, and then save.
Sellers Backend – Rental Orders
The seller can also track the rental order status of the rental products by navigating through Marketplace->Booking System–>Rental Order.
Customer Workflow
The customer for the booking product will select the date for the booking on the product page.

After selecting the date the customer will choose the available slot and enter the quantity.

The customer can even view the location of the event on Google Maps.

After that, add the booking product to the cart by tapping the Book Now button, and the product is added to the cart.

The booking details are visible in the cart as well.

Tap the proceed to checkout button and the details are visible for the booking product here as well.

Select the payment method and then tap the Place Order button to complete the order.

The customer will receive an SMS for booking confirmation.

An email for the booking confirmation will also be received by the customer.

Customer – Reschedule & Cancel Booking
On the order success page, the customers will be able to reschedule the booking as well depending upon the number of days before the booking event when the customers can reschedule the booking.
In the order confirmation mail as well there will be the Reschedule Booking link available.
Apart from that, within the order history of the respective order as well the customer will find the reschedule button.

Tapping the same, the customer will be redirected to the booking product page. Here, the customer will select the new date, slot, and other data. Then tap the Reschedule Now button.

After that, a success message will be displayed.

An email for the reschedule is also sent to the customer.

After that, when the customer checks the same order the rescheduled date will be visible. Apart from that, the customer can also cancel the booking by tapping the Cancel Booking button.

Tapping the Cancel Booking button will cancel the booking.

That’s much for the WooCommerce Marketplace Booking & Reservation System, plugin.
Customer – Order Rental Product
The customer can browse rental products by visiting the SHOP section and selecting the desired item.
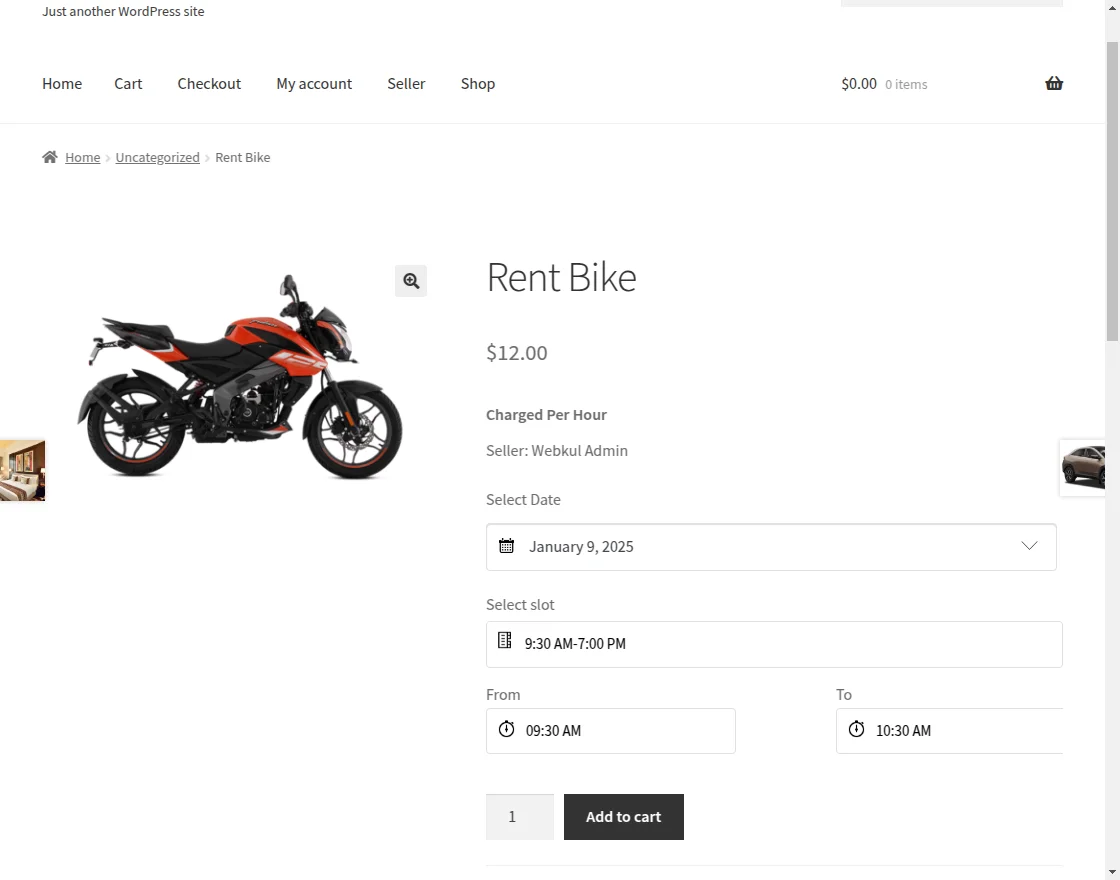
Here, the available slot can easily be chosen for the available dates by the customers.
And, then the customer can proceed to add to cart to place an order.

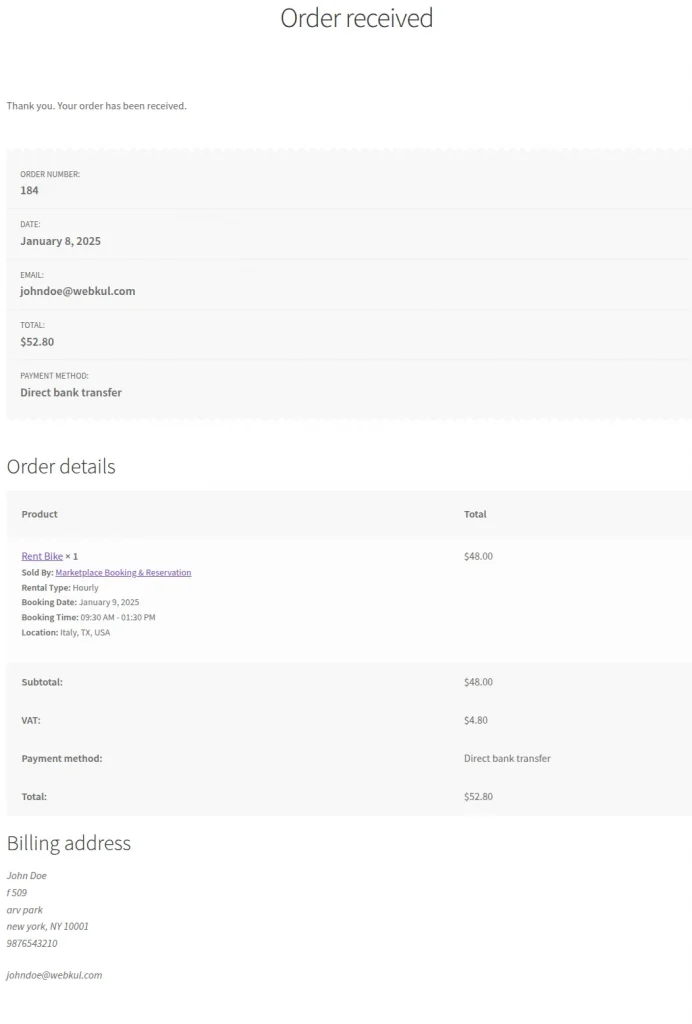
Once the customer has completed their selection, they can proceed to the checkout to finalize their order.

After the order has been placed the customer will receive a SMS notification for the same.
The customer will also receive an email for the order confirmation.
Support
Dear Customers, for any question/query, please raise a ticket at our help desk system.
We will do our best to answer as quickly as it is possible regarding the WooCommerce Marketplace Booking Reservation System.
Don’t give us a low rate without contacting support on the issue you’ve faced with. We are always happy to help you out.
For any queries, doubts, or suggestions regarding the extension WooCommerce Marketplace Booking Reservation System get back to us at [email protected] or raise a ticket at our HelpDesk System.
Current Product Version - 2.0.1
Supported Framework Version - WordPress 6.9.4, WooCommerce 10.7.0, WooCommerce Marketplace 6.6.0

Be the first to comment.