Prestashop Google WebP image converter module helps to convert various types of image formats into WebP format.
WebP images use both lossy & lossless compression methods to produce the best quality images with lesser size.
WebP is an image format that provides lossless & lossy compression for images. It is used to make richer & smaller images for making web pages faster.
According to Google, WebP lossless images are 26% smaller than PNGs and WebP lossy images are 25-34% smaller than JPEG images.
Lossless WebP compression applies already seen image fragments in order to exactly reconstruct new pixels. It can also use a local palette if it finds no interesting match.
To know more about compression techniques, read WebP Compression Techniques in Detail.
Note: Prestashop Google WebP Image Converter module is compatible with Prestashop multi-store feature.
Features of the Prestashop Google WebP Image Converter
- The module is multi shop compatible.
- Convert various types of images (Product, Category, Brand, Supplier, Store, Carrier, CMS, Slider Images) available on your store into webP format.
- Convert Store logo of your shop to WebP format.
- Ability to Convert images into WebP via CRON.
- Option to regenerate WebP images.
- It helps to reduce the size of an image.
- View the conversion process of images on the configuration page.
- A button to generate remaining images becomes available on the configuration page in case if the converter failed to convert some of the images.
- It helps to reduce page size & thus loading time.
- Upload cwebp binary for the proper conversion of the images via cwebp.
- Faster WebP generation
How to install the Prestashop Google WebP Image Converter Module
- Go to Module Manager in the Back office and click on ‘upload a module’.
- Now, Drag and drop the module file or select the file from the system.
- In this way, the module installation will be successful.


How to configure the Prestashop Google WebP Image Converter Module
After the successful installation of module, a new tab to manage settings of the WebP is added on the dashboard.

Auto configuration
Click here to automatically set the module to default configuration.
Converter binaries
For the functioning of the module, you have to download a cwebp binary for your operating system from the link given in the module.
After that upload the downloaded file via the field provided in the settings.
Generate image settings
There are four other options too in the configuration of the module.
As you can see the first option only allows you to show or hide WebP images at front office.
The 2nd option allows you to convert & show the shop logo in WebP format.
The 3rd option enables you to render .webP images on all the browsers, even the browsers that do not support it.
In the 4th option, select the type of images for which you want to generate WebP images.

In the ‘converter options’, there are multiple advanced options that you can use for better conversion of images.
Converters: Select the conversion methods to use. cwebp is already provided with the module. To use other converters, Install them on your server first.
Converter Shuffle: If this option is enabled, the conversion of the image is faster. It’s because the conversion takes place with whichever converter is found first on the server.
Encoding: There are 3 types of encoding available with the module.
- Lossy: Lossy compression method removes the unnoticeable data.
- Lossless: Lossless compression helps to keep the unnoticeable data.
- Auto: It will automatically select one of the encoding type from lossy & lossless.

Other advanced converter options are
- Automatic Filter: It enhances the quality of the image.
- Methods: Select ‘6’ to get the best image quality & fast conversion.

Image Converter Options
The module also allows you to configure the converter options specifically for JPEG & PNG images.
JPEG Converter Options

PNG Converter Options

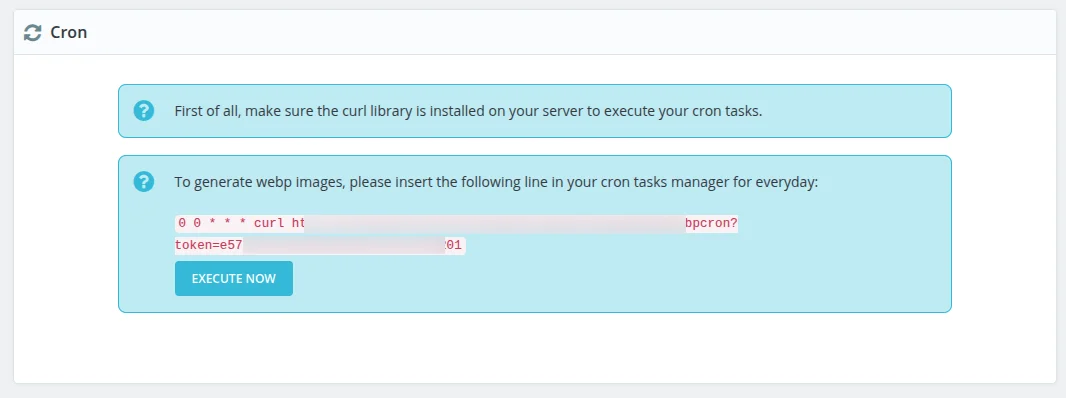
Cron Settings
For converting images into WebP via cron, admin has to set CRON job for everyday. Set following URL to CRON tab.
0 0 * * * curl http://www.sitename.com/module/wkwebp/wkwebpcron?token=your_token
You have to replace the string “www.sitename.com” with your site.
WebP Images
The following image is just an illustration to show the conversion of an image into WebP format.
However, there is not much noticeable difference between the two images. But, these two images can vary greatly in size.

So, this was all about Prestashop Google WebP Image Converter Module. I hope this document will help you in checking the functionality of the module in a better way.
Also, let us know about your views in the comments.
Note
As we know that Safari doesn’t support WebP images. Hence, it used to show a broken image after the conversion. Now, instead of a broken image, a normal image will display.
In case, if you are also looking for a module to help you add watermark on your products. Then do checkout the blog.
Support
For any kind of technical assistance or query, please raise a ticket or send us a mail at [email protected]
Also, please explore our Prestashop development services and vast range of quality Prestashop addons.
Current Product Version - 4.2.2
Supported Framework Version - 9.x.x, 8.x.x, 1.7.x.x

Be the first to comment.