Opencart Wallet System is an awesome module that allows customers to make an online payment from their Wallet. In this module, Customers/Users can use Wallet Cash during the checkout and money will be using from their Wallet Cash.
Also, the customer can transfer money to other customers. They can easily add credit to their wallet. The admin can configure the transfer limit and can manage the credit and debit history.
Note: Opencart Wallet System supports all templates and themes including the Journal theme.
Check out the plugin workflow at the customer’s end along with the configuration part –
Features- OpenCart Wallet System
- Opencart Wallet System module behaves as an online Payment Gateway.
- The customer can easily add credit to their wallet.
- Admin can set the credit limit for the Wallet System.
- Also, the admin can view the customer details who are using Wallet System for making the online payment.
- A customer can add a new payee.
- Customers can transfer money to the added payee of the store.
- The customer can see an alert if the amount in the wallet is less than the assigned limit.
- The wallet credit feature can be used to make a refund for products.
- The admin can define a minimum and maximum refund limit to process a refund.
- Also, discount rules can create which apply to subtotal or cart total.
- On the checkout page, a customer can view the total wallet cash.
- An email notification will be sent to the customer on each recharge and transaction.
- The admin can configure the Opencart Wallet System for the recharge limit (maximum and minimum) of the Wallet amount.
- The admin can manage the email template that will use to send emails to the customers while adding/updating the bank account.
- Customers will receive the email after adding/updating the bank details in the customer account.
- Debit/credit amount to the customer’s wallet can add by the admin.
- Admin and Customer/User can view credit and debit details.
Features of the Opencart wallet system
- Also, the admin can see the customer’s bank details and transfer the refund amount manually.
- Codes are open source, so you can customize them as per the need.
- Admin can enable/disable the cashback functionality.
- Admin can manage the visibility of cashback info on the product page.
- Customers get the cashback after checkout.
- The admin can create a Cashback rule.
- Here, the admin can make cashback rules Automatic and manual.
- Cashback rules can be created with product and category.
- Admin can set the priority of the cashback rule.
- Admin users can assign cashback amounts manually.
- Cashback information will display on the product page.
- Customers can view the history of the Cashback amount.
- Cashback functionality supports multi-store and multi-language also.
- The cashback amount will display in the payment method section during checkout.
Note: Cashback functionality will only work with the Wallet payment method, not with others.
Installation
The installation of the Opencart Wallet System is very easy. In the zip file, you should find 4 folders admin, catalog, image, and ocmod folders. Also, you need to move admin, catalog, and image folders into the Opencart root directory.

Refresh Modifications
The user can navigate through Extensions > Modifications. Also, now click the Refresh button as visible in the below screenshot.

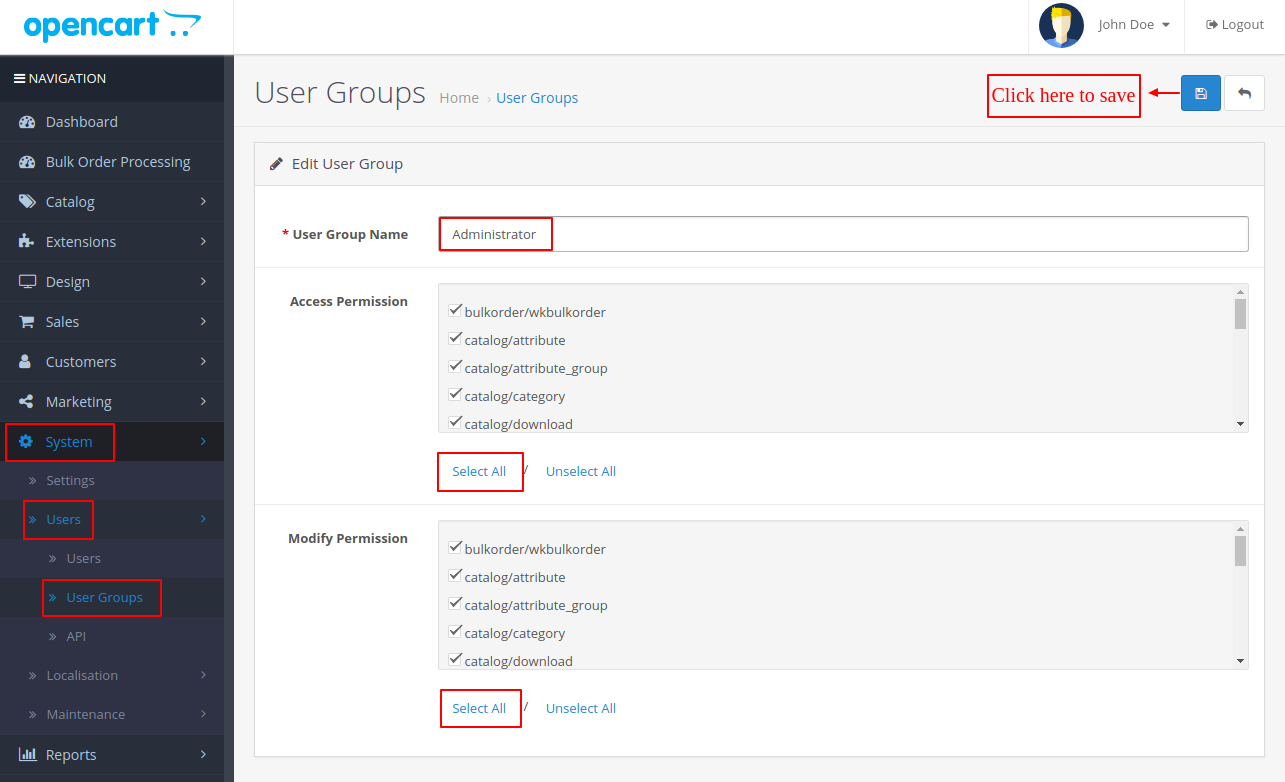
Edit User Groups
Thereafter, go to System > Users > Usergroups. And then edit ‘Administrator’. Click Select All for both Access Permission and Modify Permission and Save it.
The admin can navigate to Extensions > Payments > Wallet System to install and edit the Wallet System.

Configurations: Wallet System
After the installation process of the Opencart Wallet System is complete, the admin can navigate through Extensions > Extensions > Payment > wallet system to set the following configurations:-
- General Configurations
- Order Total Settings
- Payment Method Settings
- Transfer Settings,
- Terms and Conditions
Let us study the Wallet System Configurations in detail-
General Configuration:
Under General Settings, the admin has to enable the module and fill in the details for fields such as Recharge Limit, Wallet Money Credit, Low Balance Notification, and Refund Limit.

The admin configures the General Configurations under Recharge Limit-
- Wallet Image- The admin uploads an image for the wallet. Also, It is visible in the cart.
- Allow Method – Choose the preferred payment method which allows for the wallet recharge.
- Cashback Status- The admin has to enable the status of cashback.
- Cashback Display On Product- The admin can manage the visibility of the cashback on the product page.
- Wallet Recharge Status – Select the required wallet recharge status from the drop-down. The amount will not credit into the customer’s wallet until the wallet recharge status does not meet on selected status.
- Minimum Recharge Amount- It’s the minimum recharge limit of the wallet. If left blank, then there will be no minimum recharge limit.
- Maximum Recharge– The maximum recharge limit of the wallet. If left blank, then there will be no maximum recharge limit.

Wallet Money Credit for Newly Registered Customers (Customer group-wise)-
Whenever a new customer registers as one of the below-mentioned customer groups, the wallet amount set by the admin is allocated to the respective customer.
- Default- Set a default credit amount.
- Golden Membership- Also, set an amount for customers processing golden membership.
- Long-Time Customer- Default amount for long-time customers.
Low Balance Notification-
- Status- The admin may enable/ disable the low balance notification status. A low balance notification alert will show on the customer wallet page.
- Minimum Amount- Also, the admin sets a minimum balance amount. As the balance reaches this amount, the low balance notification will display.
Refund Limit-
- Minimum Refund Amount: The minimum refund amount limit for the wallet.
- Maximum Refund Amount: Maximum refund amount for the wallet.
- Order status for Refund: Also, the admin chooses an order status as Refunded.
To refund the order, first, the admin has to set the Refunded status against the Order status for the Refund field as shown in the above configuration image.

Furthermore, given below are a list of cases link to the refund process. Let us see and discuss them in detail.
Case 1:- Minimum & Maximum Refund Amount Limit:
For instance, the admin defines Minimum Refund Amount as 200 and the Maximum Refund Amount as 1000.
- Also, If any order’s amount falls under the price range of 200-1000 (minimum-maximum price), then it will be refunded.
- Suppose, if the order amount is 450, then the order will be refunded.
- If the order price is 200 or 1000, even then the order is refunded (the minimum-maximum price inclusive).
Case 2:- Order Price less than the minimum price (here 200).
- Also, If the order price is less than the minimum price, (here 200), then no refund for that order will be made.
Case 3:- Order Price more than the maximum price (here 1000).
- If the order price is more than the maximum price, (here 1000), then the price of the order up to $1000 will be refunded.
- For instance, if the order amount is $1300, then the refund of $1000 will be processed.
Order Total Setting
Thereafter, the admin will configure the fields under the Order Total Settings tab. The admin configures the fields under Manage Order Total.

Also, the admin configures the Order Total Settings under Manage Order Total-
- Order Total Name: Name which displays on the checkout page.
- Sort Order: The admin sets the order total sort order.
- Payment Methods Order Status: An order status for payment methods is set by the admin.
Payment Method Setting
Under Payment Method Settings, the admin sets the configurations under Manage Payment Method.

Also, the admin configures the Payment Method Settings as under Manage Payment Method-
- Payment Method Name: Name which displays on the checkout page.
- Order Status: An order status is set by the admin for the payment method.
Transfer Settings
Further, the admin will have to configure the configurations under Transfer Settings.

The admin configures the Transfer Settings as under-
- Apply Limit on Transfer: Select yes to apply the transfer limit. If selected “NO” then the below fields will not work.
- Transfer Limit: Maximum number of transfers to another customer in a month.
- Minimum Transfer Amount: Minimum transfer amount for a single transaction. Maximum Transfer Amount: Maximum transfer amount for a single transaction.
- Amount Limit: Maximum limit of the amount for all the transactions done in a month.
Note: “If any customer breaches the transaction limit then the transaction would not be done.”
Mail:
The admin can manage the email template that will be used when a customer will update the bank details, the same email will be delivered to the customer. The admin can set Customer Cashback Status as Yes to send an email to the customer for cashback.

Info :
The admin can use the provided shortcode in the info tab, to manage the email template.

Terms and Conditions:
The admin can even add the Terms and Conditions for the wallet system as shown in the image below.

Frontend Workflow: Wallet System
New Customer Registration
Meanwhile, a new customer will have to create an account to register with the website. While adding personal details, the customer has to choose an option against customer groups.

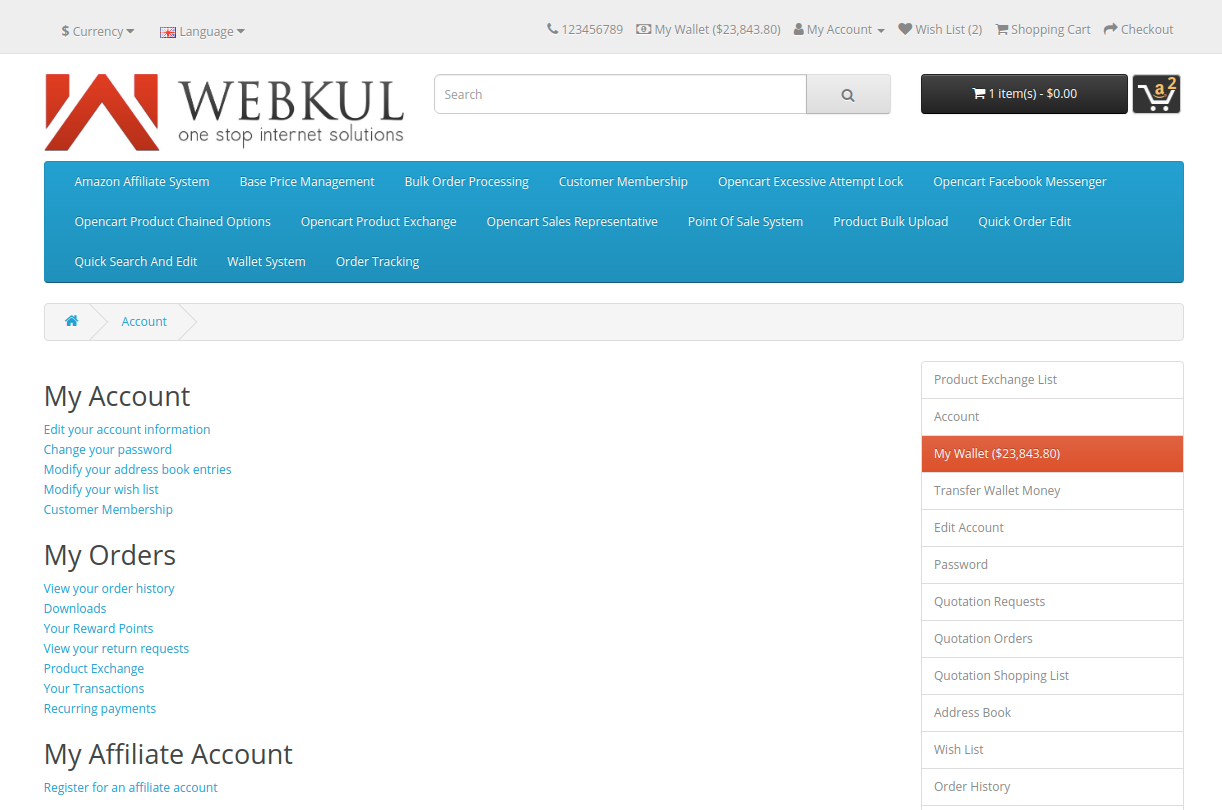
After logging in, the customer can navigate to the My Account page and find out two of the Wallet System options-
- My Wallet, and
- Transfer Wallet Money

Low balance alert: A low balance alert will display as soon as a low balance amount is reached as shown in the below image.
Recharging the Wallet
Once the customer logs in, a My Wallet along with the total wallet amount displays to the customer as shown in the image below.
On clicking My Wallet, a new page opens up as shown in the image below. The My Wallet page displays the Wallet Balance, Add Amount field, check Terms & Conditions, and credit/ debit history.

Bank details:
The customers will find a Bank option on the My Wallet page, clicking which the admin can add the bank details as shown in the image below.
A form pops up where the customer needs to fill in the Bank Details as shown below.

Also, when a customer will add/ update the bank details an email notification will be sent to the customer.

Furthermore, the customer can enter a wallet amount in the Add Amount field, and click on Add Money to the Wallet to add the wallet amount to the cart.

It is mandatory to clear the cart before adding money to the wallet. If not an error message as shown in the image below shall display. One must note that a customer cannot purchase the wallet amount. If any other product is already present in the cart.

After removing the other product from the cart. The customer can easily add up the desired money to the wallet. Desired money will be processed as a product that needs to be checkout.


Once the payment is made and the order status (from the admin panel) is the same as ‘Payment Methods Order Status’.
If not then the customer needs to wait for the approval of the credit wallet amount request from the admin.
Once, it’s approved, the customer can view the updated wallet balance in their wallet after adding the amount.

Opencart Wallet System allows a feature where a customer can transfer wallet money to another customer.
Transferring Wallet Amount
For that, the customer needs to add a payee to their account first. On clicking the Transfer Wallet Money in the menu list a payee list opens up.
Thereafter, the customer can transfer the amount to the payee.

To add a new payee the customer needs to tap on Add New Payee tab, where the customer must add the Payee Email.

As the customer clicks on the Add button, a popup form opens up, where the customer confirms the payee’s email ID. Note: The customer can add only existing customers of the store as the payee.

After clicking on the confirm button, a success message, as shown in the image below shall display and the payee is added to the customer’s account and the payee list.
The customer can view the name and email of the payee, and add the date under the payee list. Thereafter, the customer can delete or transfer the payee from the payee list.

To transfer the amount to the payee, the customer must click on the Transfer tab present against the Payee Name as shown in the above image.
Enter the amount
After that form opens up, where the Payee Name will display and the customer needs to add the transfer Amount.

Thereafter, the customer needs to enter the password and click on confirm to complete the transaction. If need be, the customer can even alter the transfer amount in the popup form.
As the customer clicks on the change amount link, it will redirect to the previous section of “enter amount”.

After a successful amount transfer, it redirects to the My Wallet page. The customer can view the recent debit and credit history of the transactions.

Using Wallet System at Checkout
A customer can add any product to their cart and perform a checkout.
It is to be noted that if there is some wallet amount in the cart already, then the customer will receive an error message after being redirected to the cart page as shown in the image below.
The customer needs to remove the wallet amount from the cart to add the product.

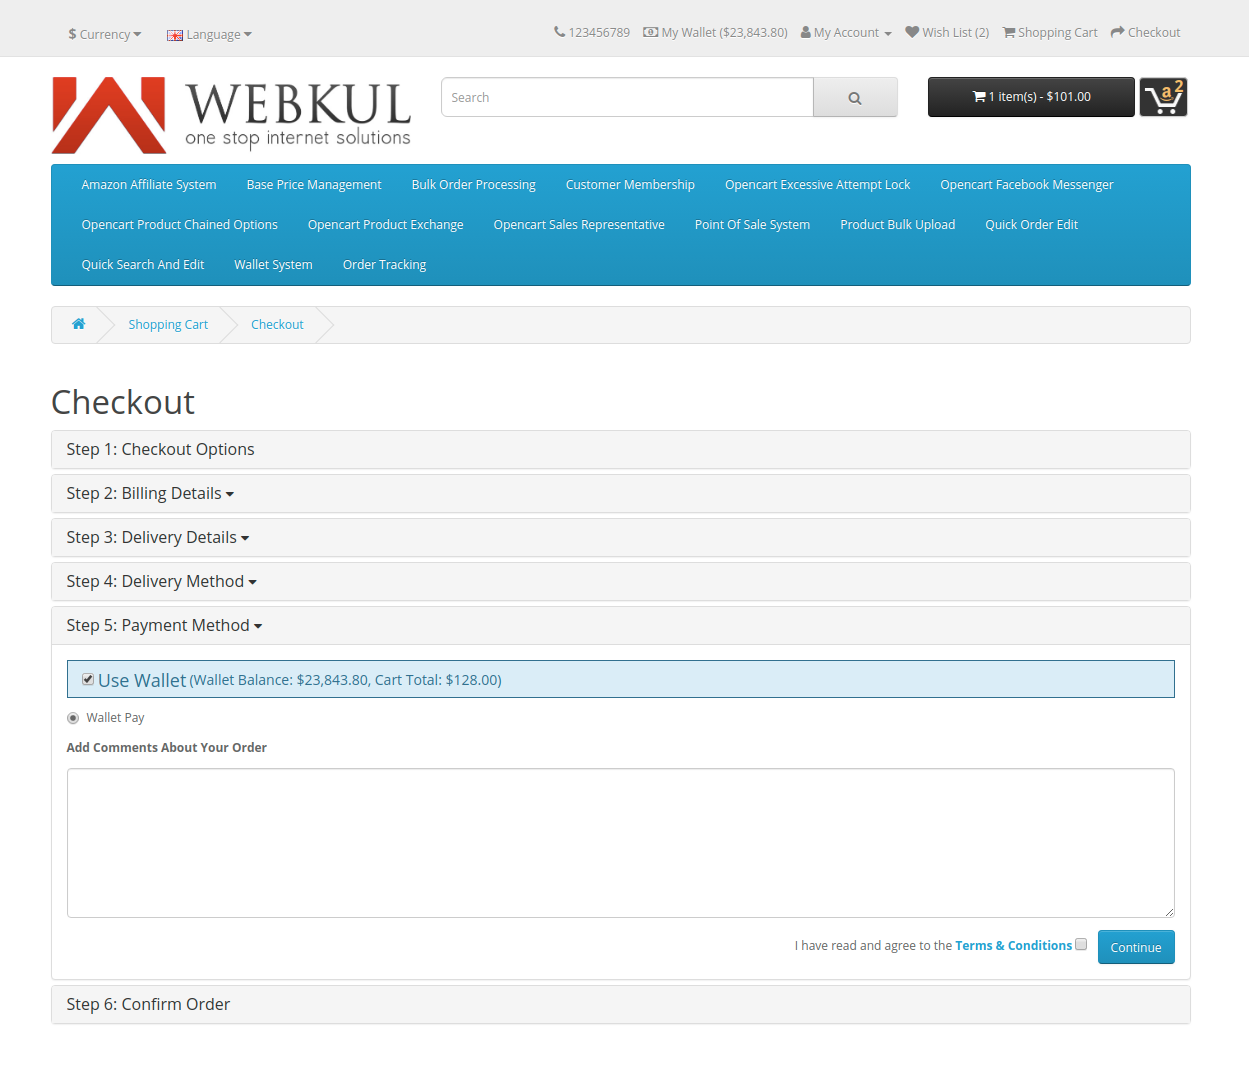
After adding the product to the cart a customer can easily perform checkout and select Wallet to make payment for the order.

Before confirming the order, the customer can view the order details. The customer will find the Wallet Total along with the other details as shown below.

Debit History:
On confirming the order, and making the payment, the customer can view the wallet amount that debits from their accounts, under “Debit History” as shown below.

The customer can easily view the complete transaction details by clicking on the view button.

Customers can select the Wallet System for making the payment at the checkout page like the image below
Pay Through Wallet Money:
Customers can also check the order status, payment method, and other details on the order information page.
How To Make Partial Payment With Wallet
If the wallet amount is less than the product price then a customer can make a partial payment using the wallet amount.
After selecting the wallet system as the payment method the customer will receive a message to select the payment method to pay the remaining amount like this.

Customers can also see the total remaining amount on the order confirmation page.

Also, Customers can find the details of the order on the order information page. Here customers can see both the payment method with other order details.

Email Notifications

At the time of recharge: The customer will receive an email for each recharge of the wallet.

Also, At the time of Credit: Customers will receive an email if any amount is credited to their account.

Lastly, at the time of amount transfer: Customers will receive an email if any amount starts the process of transferring from their wallet.
Admin Management
After the module installation and configuration, the admin will find the “Wallet System” Menu in the Admin Dashboard as shown in the image below.

Further, the admin can tap on Wallet System to view its sub-menu options, i.e.
Cashback Rules
The admin can configure the general settings for cashback rules by navigating through Wallet System>Cashback Rule> General.
From here, the admin can select the language, Cashback Title, and Cashback Description for the cashback rule.

To create cashback rules, the admin needs to make the following settings as shown below:

Choose Store- The admin can select the store for which he wants to allow the cashback functionality.
Allow Payment Method- The admin has to select the allowed payment method.
Cashback Active Status- Cashback Active Status must be similar to the order status of Manage Payment Method under Payment Method Settings.
Cashback Return
Here, cashback Returns can be selected as Manual or Automatic.
- If Cashback Return will be set as Automatic then the cashback will be credited in the wallet automatically.
- In the case of Manual selection, the Admin has to allow the cashback from Credit History by clicking on the Credit Cashback button in the action tab.
Cashback- From here, the admin can set the amount of cashback on a fixed or percentage basis.
Minimum Product Price- The admin can set the minimum product price for cashback in fixed amount and percentage.
Minimum Product Quantity- Minimum Product Quantity can also be set by the admin for cashback.
Start Date- The admin can set the start date for the cashback.
End Date- The end date can also be set by the admin to which date he wants to allow the cashback for customers.
Priority- The priority can also be set for the cashback.
Status- The status for Cashback must be enabled to apply cashback.
Note: The cashback rule will be applicable only when the cashback rule conditions for price and quantity will be satisfied.
Eg: Cashback Rule: Suppose Min’s price is $90 and Min’s quanity is 2 units.
If the price of a product is $90 or more than $90 and the quantity is 2 units or more than 2 units then the cashback will be only applicable.
Credit history:
The first submenu option under Wallet System is Credit History. Under Credit History, the admin can view the complete history of the credited amount along with the details such as customer name, email, credit amount, credit date, and description.
The admin can approve credit amount requests manually if the recharge order status differs from the payment method status by clicking on the Approve(Green) button.
Pending approval credit amount requests will be visible in the dark Green icon. Once the admin click on the Approve button, the wallet amount will be credited into the customer wallet.
The admin can allow the cashback return by clicking on the Credit Cashback button under the action tab.

To view the complete credit amount history, the admin needs to click on the view icon. An order history page will display once will click on that icon as shown below:

The admin can even add credit to the customer’s wallet by simply tapping on the Add Credit tab.
In doing so, Add Credit pop-up shall display where the admin needs to add the customer Customer Name, Amount, and Description. The admin can then click on Submit to add credit.

To get complete credit history the admin needs to click on the view button
Debit history:
Under Debit History, the admin will all the debit history of customers along with their names, email, credit amount, credit date, and description. The admin can even debit the amount from the customer’s wallet by tapping on the Add Debit button.

On clicking the same, an Add Debit form pop up opens up, where the admin needs to add the select the Customer’s Name and enter the Amount which is to be debited and its Description.

Customer details:
The next sub-menu option is Customer Details under which the admin will find the list of customers. If need be, the admin can check/ view the wallet balance of any customer as shown below.

After clicking on the bank details button, the admin will receive a pop-up and it will show the customer’s bank details.

Customer View for Cashback
The customer can view the cashback on the product page right below the product description as shown in the image:

The applied cashback amount will display in the payment method during checkout.

The cashback will also be visible to the customer in the order description of credit history as shown below:

Note: The wallet must have some amount to apply cashback.
Discount Rule
The last sub-menu option under Wallet System configurations is Discount Rule.
To have this feature, the admin must first enable the Discount Rule under Extensions > Order Totals > Wallet Discount.

Further, the Discount Rule applies to the Subtotal and Cart Total.
On Subtotal
As the admin enables the Wallet Discount, the Discount Rule sub-menu option becomes visible under Wallet System configurations as shown in the image below.
Furthermore, the admin must click on the Discount Rule sub-menu option which redirects to the Discount Rule page.

The admin will configure the following fields under the Discount Rule tab-
Choose Store- The admin has to choose the store, (here, Default).
Discount Based-On- Admin needs to choose Sub Total.
Discount- The admin may allow either percentage or fixed discount.
Minimum Cart or Product value: Admin must define the minimum subtotal value.
Start Date- The start date of the discount rule.
End Date- End date of the discount rule.
Priority- The admin sets the priority of the discount rule.
Status- Admin has to enable the status of the discount rule applicable to the subtotal.

On Cart Total
Under the Discount Rule tab, the admin can also choose Cart Total on the Discount Rule page as shown in the image below.

The admin will configure the following fields under the Discount Rule tab-
Choose Store- The admin will choose a store, (for instance, Default).
Discount Based-On- The admin will have to choose Cart Total.
Discount- The admin may allow either percentage or fixed discount.
Minimum Cart or Product value: The admin must define the minimum cart total value.
Start/ End Date- The start and end dates of the discount rule.
Priority- The admin will set the priority of the discount rule.
Status- The admin will have to enable the status of the discount rule applicable to the cart total.

Hence, that’s all for the base Opencart Wallet System. If you have any issues, feel free to add a ticket and let us know your views to make the module better http://webkul.uvdesk.com
Current Product Version - 5.0.0.0
Supported Framework Version - 3.x.x.x

4 comments