Opencart Order Tracking Module: It is the customers right to know the whereabouts of the purchase. Its human nature and to an extent important also.
Obviously, which customer will like it when the order package misplaces while on the way before being delivered to the customer.
Opencart Order Tracking Module facilitates the customers as well as the admin to track the order while it is on the way.
The admin can simply add the tracking number and courier service for the order which the customer places.
The customer can view the tracking number and courier service in the order information page.
The admin, as well as the customers, can click on the tracking number in the admin panel and frontend respectively and the status of the order will display.
The module uses the AfterShip Shipment Tracking API.
Opencart Order Tracking Module will help keep the customer as well as the admin informed about the whereabouts of the order like pending, shipped, delivered, etc.
Note: Please check the following link for the supported carriers of this module.
Check the plugin’s workflow below –
Features
- The module uses AfterShip Shipment Tracking API.
- The admin can add a tracking number as well as the courier service for the shipment of the orders.
- Admin can click on the tracking number to trace the status of the order in the admin panel.
- The customer can view the tracking number in the front end in the order information page.
- On clicking the tracking number the customers can view the status of the order.
- On clicking the Track your Shipment tab, the customers can track the shipment as well.
Installation
Upload Files
First, extract the downloaded zip file. After that, open the correct Opencart Version Folder.
According to Opencart Version installed in your system. Then, upload admin and catalog to the Opencart root directory.
Refresh Modifications
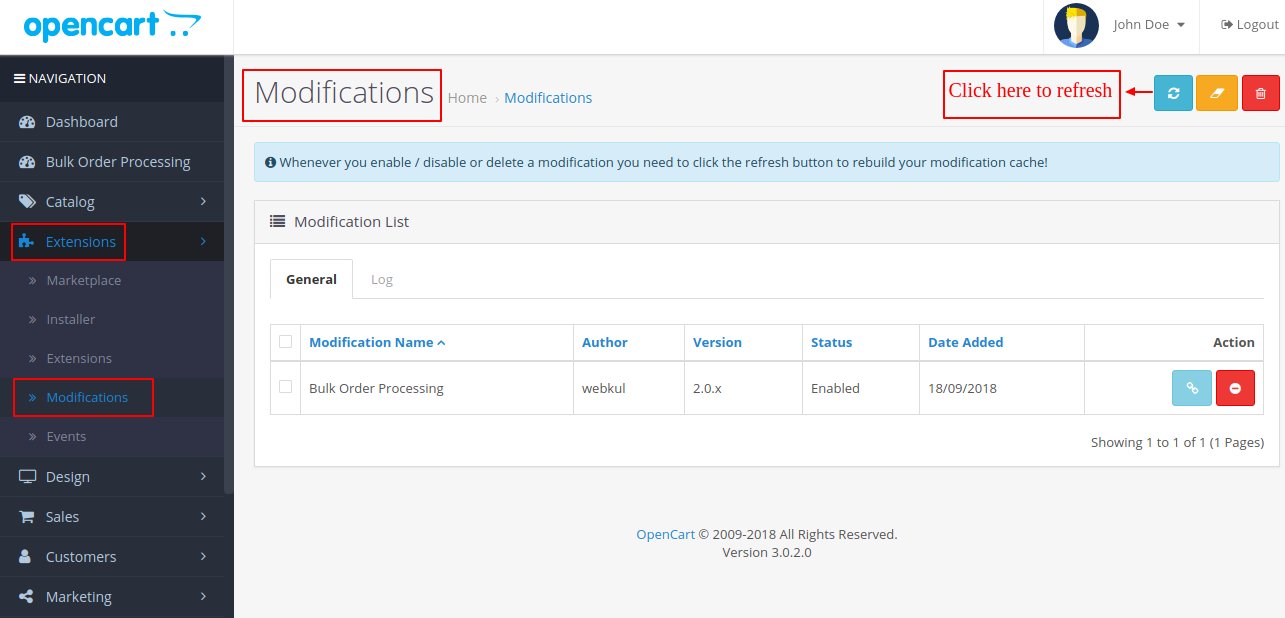
The user can navigate through Extensions > Modifications. Now click the Refresh button as visible in below screenshot.
Retrieving Aftership API Key
- On clicking the AfterShip site link, the user registration page will open. The user has to fill in the details and create the account with AfterShip.
Note: From here click on Get Started you can register and log in.

2) Once the account is created, the user needs to enter the Organization Name, Short website, Website for which you need the courier services and the Monthly Shipment charges. 3) The user needs to add a Subdomain name here. On clicking the Let’s Go tab, the account for the user is created.
![]()
4) Once the account is created, the user will be redirected to the AfterShip dashboard.

5) A pop up will appear where the user can select courier services required for the website. The user needs to select the Active and Inactive button for Enable and Disable.

6) Thereafter, under the Settings tab, the user will have to click on Generate APi key then add the description to generate the API key.
7) The API will be generated and the user can be retrieved under API KEY as shown.
The AfterShip also provides a default API as well against the default option.
8) The user can add more courier services if needed. The courier list will be updated on adding more courier services.
To do so, navigate through Settings > Couriers.  9) The user can add a new shipment by clicking the Add shipment button. The user can also see the previous shipment details as shown in the image.
To do so, the user needs to navigate through Shipment > Add shipment.

From here the user can check the shipment as shown in the image below.
Admin Configurations
After successful installation Module, the admin can view the Opencart Order Tracking tab through the Extension > Extensions > Modules as shown in the image.
The admin can manage the order tracking under Extension > Extensions > Modules > Order Tracking.
The admin can click on the edit button for the Order Tracking.
On clicking the edit button, the user can view the Order Tracking Status field, Subdomain field as well as the Aftership API Key field.![]()
The Admin can enable or disable the Order Tracking Status field, enter the subdomain and retrieve the Aftership API key by following the steps mentioned above.
Once the admin fills in the Aftership API Key and saves the order tracking configurations, the admin will have to click on the ‘Refresh’ button.
On clicking the ‘Edit’ button of the Order Tracking Module again.![]()
This time the courier services will be visible in the in Edit Order Tracking page against the “Enabled Couriers” option.
Admin-End Workflow
Once the admin configures the Order Tracking module in the admin panel, the customers can place an order and make a purchase.
In the admin panel, the admin will navigate through Sales > Orders.
The Order List page will open where the admin can click on the View button under the Action tab as shown in the image below. ![]()
On clicking the View button, the Order Details page opens up.
The admin can add the courier service against the Courier option under Order History and tracking number against the Order Tracking option.
On clicking the Add Tracking button the order tracking number and the courier service shall be added under Order History > Order Tracking as shown in the below. ![]()
As the admin clicks on the Add Tracking button, “Success: You Have Added Order Tracking!” message displays.
The details are added under Order Tracking as shown in the image below.![]()
On clicking the Tracking Number under Order History in the Order Details page, the admin can view the Status of the Order such as pending in the image below.![]()
Order Tracking- Customer End Workflow
The customers can place an order and view their tracking number in the frontend as well.
Thereafter, the customer will log in to the frontend and under Order History, the customer can view the Order. ![]()
On clicking the View button for the order, in the Order History page, the customer can view the Tracking Number and the Courier details under the Order Tracking tab.![]()
The customer can simply tap on the Tracking number of the order placed under the Order Tracking tab.
It redirects the customer to the Courier service’s page where the customer can view the status of the order. ![]() Track your Shipment
Track your Shipment
The cutstomer can also track the shipment under Track Your Shipment tab in the My Account page.![]() The user will have to enter the ‘Tracking Number’ as well as the ‘Courier’ and click on the Track button.
The user will have to enter the ‘Tracking Number’ as well as the ‘Courier’ and click on the Track button.
The shipment status details will display as the customer clicks the Track button as shown in the image.
That’s all for Opencart Order Tracking Module. If you still have any issues, feel free to add a ticket and let us know your views on our Webkul Support System.
Current Product Version - 3.2.0.3
Supported Framework Version - 2.x.x.x, 3.x.x.x

Be the first to comment.