Magento 2 Zoho Inventory Integration supports inventory management from Magento 2 to Zoho.
It will allow importing of products from multiple Zoho accounts. Also, synchronize Zoho inventory products with Magento.
The admin can also sync the orders from Zoho inventory. The module supports simple and configurable product export from Magento to Zoho inventory.
We also have created the Zoho Inventory Connector for OpenCart platform which you can check.
Magento 2 Zoho Inventory Features
- Admin can set up multiple Zoho Inventory accounts.
- Admin can get products from Zoho Inventory.
- Synchronized Zoho Inventory product work like same as Magento products.
- Only Admin can add or update Zoho Inventory products.
- Admin can synchronize orders from Zoho Inventory.
- Admin can export simple and configurable products from Magento to Zoho Inventory.
- Auto products and orders are imported from Zoho through Webhook.
- Admin can export orders from Magento to Zoho.
- The store owner can check the Webhook events, status and details on Zoho.
- The admin can also create Workflow rules for Webhooks.
Installation
#Download Module
Firstly, you need to log in to Webkul Store, go to My Account>My Purchased Products section, verify and then download and extract the contents of this zip folder on the system.
#Upload Folder
Once the module zip for Magento 2 Zoho inventory connector is extracted, follow path src>app and then copy the app folder into the Magento 2 root directory on the server as shown below:

#3 Run Commands
You need to run the following commands:
php bin/magento setup:upgrade
php bin/magento setup:di:compile
php bin/magento setup:static-content:deploy
php bin/magento indexer:reindex
php bin/magento cache:flush
Language Translation
For translating the module language, navigate through src/app/code/Webkul/ZohoInventoryConnect/i18n and edit the en_US.csv file.
Thereafter, rename the CSV as “en_SA.csv” and translate all right side content after the comma in the Arabic language. After editing the CSV, save it.

Now, upload it to the path src/app/code/Webkul/ZohoInventoryConnect/i18n where the installation of Magento 2 is on the server.
The module gets translated into the Arabic Language. It supports both RTL and LTR languages.
The user can edit the CSV like the image below.

How to get Zoho API credentials?
Step1: Go to the Zoho API console and sign in using your email ID. Once you logged in a new page will open.

After that, click on the Add Client button and create a client.

Here, the user needs to choose the client type.

Once it’s selected as Server based application then click on create now option. It will navigate to you on another page to enter the client details.

Once the details are entered your Zoho API client credentials will be created.
Note – You will get the authorization URL from Magento while creating a Zoho account on the Magento 2 store.

Here you can check client credentials, client secret keys, and settings.

In the settings tab, the admin can enable or disable the permission for multiple stores/local.

How to get an organization ID?
Once the admin gets the API credentials they need to create an organization on Zoho inventory.

To create an organization, the admin needs to sign in to the Zoho inventory. After that, it will navigate you to the dashboard of the Zoho inventory.

Click on the organization tab to create an organization.

Here, click on the manage button and it will redirect you to another page.

Here, the admin can create a new organization and check the previously created organization with the organization ID.

Once the organization is created admin will get the organization ID which will use in Magento 2 Zoho inventory integration.
Create Webhook
Now the admin can auto import/export the products and orders by adding webhook to the Magento 2 store. Open the Zoho inventory page and log in. Then move to the settings tab and search Webhook.

Select the Webhook option and it will navigate you to the Webhook page.

Click on the New Webhook button and create a new Webhook for import or export.

Like this, you can add the webhook separately for products and orders.
These are two examples of the URLs to notify –
for item event: {BASE_URL}/zohoinventoryconnect/ItemEvents/index
This endpoint handles item-related events in Zoho Inventory.
for item order: {BASE_URL}/zohoinventoryconnect/OrderEvents/index
This endpoint handles order-related events in Zoho Inventory.
Workflow Rules
The admin can create workflow rules for the Webhooks events and assign them to the Webhook. Accordingly, the Webhook event will run.

Workflow Logs
In the Workflow blogs, the admin can check the Webhook events status.

Magento 2 Zoho Inventory Configuration
Once the admin gets all the necessary credentials they can configure the Zoho inventory with Magento 2. They need to navigate to store > configuration > Zoho Inventory Connect > General settings.

Use Zoho Global App Details For All Zoho Accounts:
If set ‘Yes’, All Zoho accounts will authenticate with the same Zoho application. If set ‘No’ then need to authenticate a separate app with separate credentials.
Client ID: The Admin has to fill client ID in this column.
Client Secret: Fill the client’s secret number.
Data Centers: It will select the India as its work for the same.
Default Settings for Zoho Product
Product Revision on Zoho:
If set ‘Yes’, the product will get revised on Zoho whenever you update mapped products with Zoho on Magento.
Automatic Product Creation On Zoho:
If set ‘Yes’, Product will Automatic create on Zoho whenever you create products on Magento.
Default Source
Selected sources will be assigned to all Zoho products by default.

Default Settings For Import Zoho Orders
Auto import order on Zoho – If set ‘Yes’, when order place on magento it will import to zoho.
Zoho Imported Order Status – The admin can set the default order status for orders which imported from Zoho.
After the successful configuration admin can import orders and import/export products. Also, they can manage the Zoho seller account and add a new one.
Add Zoho Seller Account
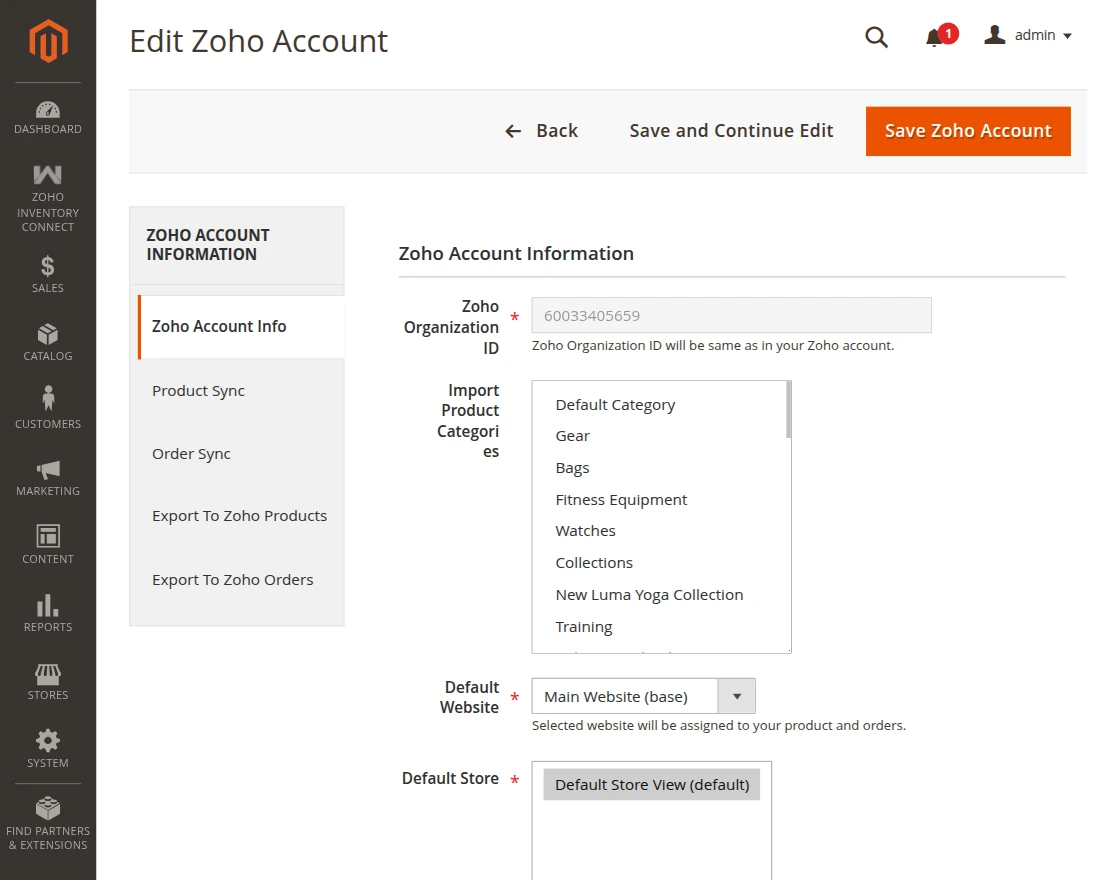
Once done with the configuration will move forward to add a Zoho account on Magento 2. For that navigate to Zoho inventory connect > Zoho account manager.
Here admin can find the added Zoho account and also add a new one.

Click on the Add Zoho seller account button and it will navigate to another page.

Enter the organization ID, and attribute set, click on the save button and it will navigate to another page.
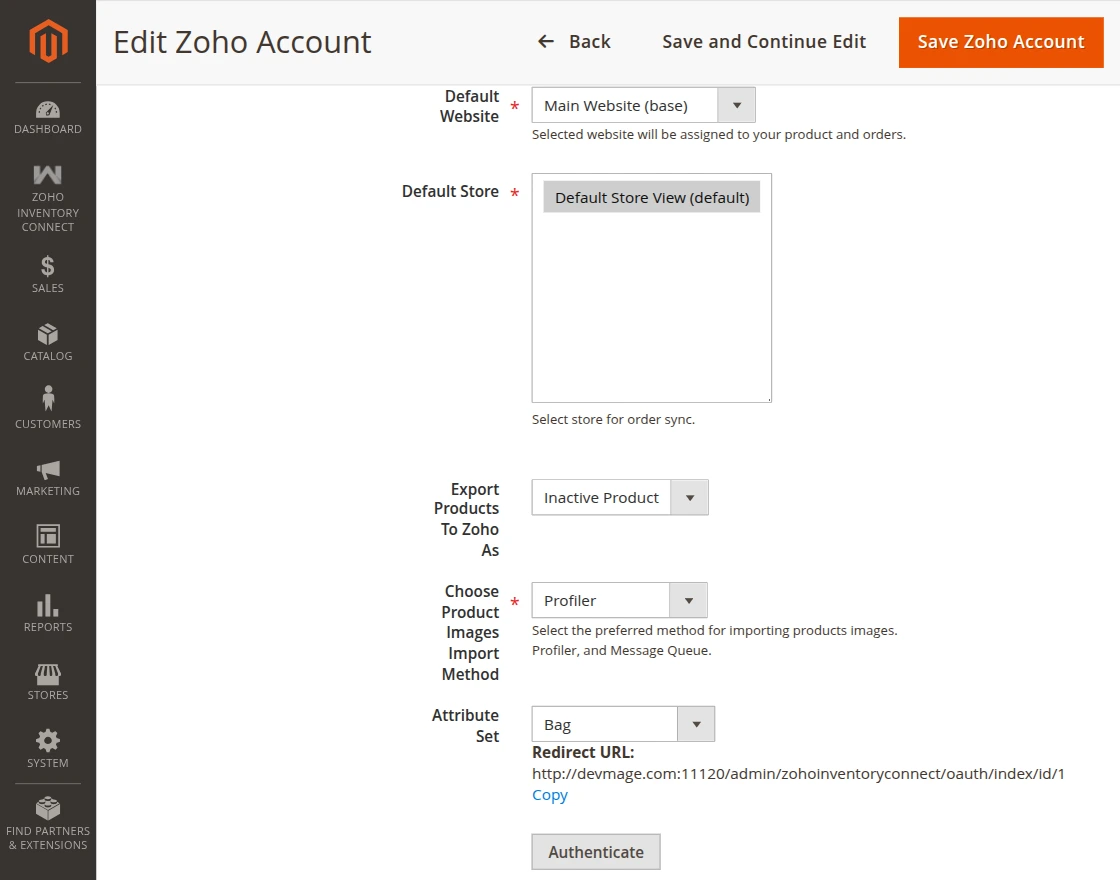
To configure the account admin needs to authenticate the account by clicking the button. It will redirect you to the Zoho website for acceptance.

Note: When admin will export the grouped product the Export product to Zoho as option should be on active product mode.
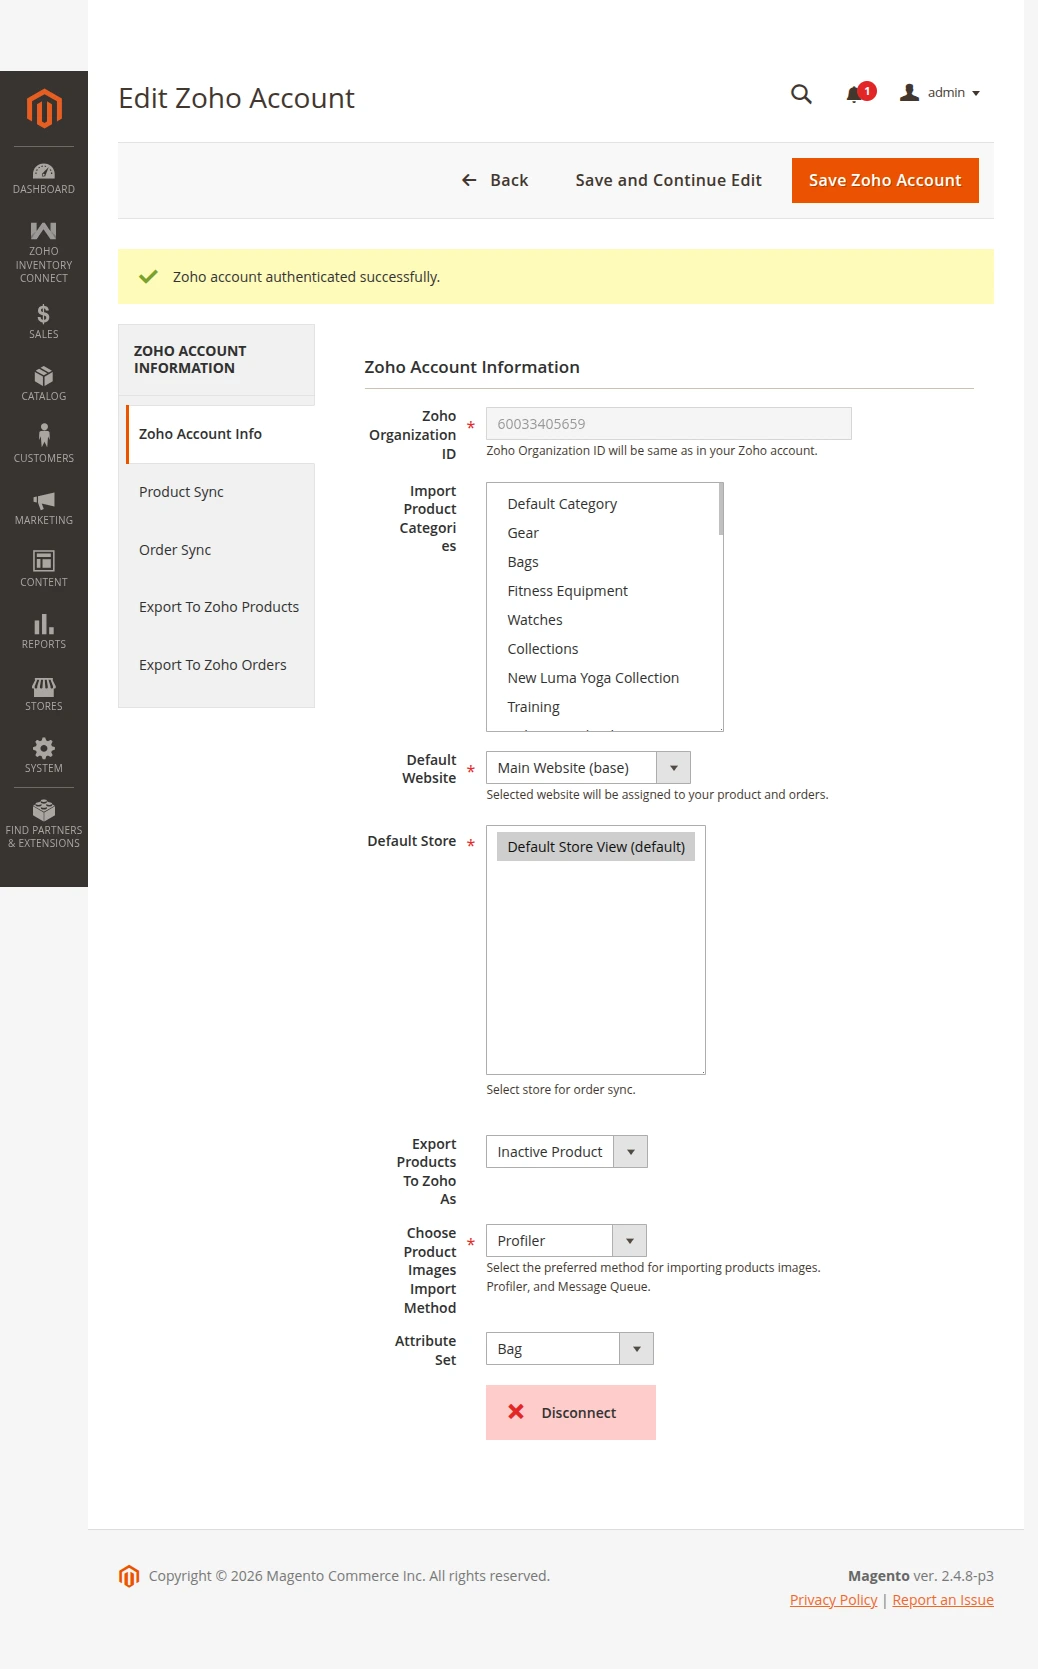
Once accept the Zoho authentication it will redirect back to the Magento 2 store. Now the Zoho account is configured successfully and the admin can use it for product import/export and order export.
The admin can disconnect the Zoho account at any time by clicking the “Disconnect” button
Product Sync

Before importing a product from Zoho admin needs to create a product on the Zoho end or they can import the previously created products.
Add Product on Zoho

Open the Zoho inventory account and move to Item, here few options are available they need to be enabled first for adding product.
- Items – for simple products
- Composite Items – for grouped and configurable products
- Price List – for adding product price.

Once enabled click on the new item button and proceed with adding a new product.

Add all necessary details and add the product. Once the product is added it will display in the product list.

Similarly, create grouped and configurable products from the composite item tab.

Import Products from Magento
Once the product is created on Zoho inventory a button will display on the Magento end.

When click on the import product from Zoho button it will display a popup for confirmation.

Once click on the ok button a new tab will show on the product sync page.

When clicking on create imported product in store button a run job will work and display as a popup.

Once the product gets imported it will show here on Magento 2 end.

Now the admin can import the product image as well. They need to click on the import product image button and a run profile will execute for the same.

After successful import, the admin can check the product image in the product edit section.

Re-Import Product
The admin can also reimport the product from Zoho to Magento by choosing the option.
They need to select the product click on the action scroll-down button and choose a re-import option and then submit it.

Export Products on Zoho
Click on export to Zoho tab and it will navigate to you on the export product page.

For product exportation, need to select the product and an option will display to Export to Zoho option then click on the submit button to complete the process.

Run profile will execute for the same.

After successful export, the admin can check the product in the product list on Zoho inventory.
Configurable Product Export
The module also supports configurable product export and import. For example, created a product on the Magento end.

Add the configuration details.

Once the product is successfully created it will display on the export to Zoho tab.
Click on the export option and export the configurable product to Zoho.

Once the execution is done you can check the product on Zoho inventory.

Note: For configurable & grouped products the sub-products will automatically be exported.
Import Order from Zoho
The store owner can also import orders from Zoho to Magento. Create an order on the Zoho end.

Fill in the required data and then choose the product to be added to the order.

Now, on the Magento 2 end click on the order sync option.

When click on the import button a popup will show to choose the date or import all orders.

Once choose Import all Zoho orders again and click on Create imported order in store. A popup will display for confirmation.

A run profile will execute for the same.

After successful execution order will be imported to the Magento 2 store.

Note: If the admin deletes any mapped product on Magento 2 then it will not delete from Zoho inventory.
Export Orders on Zoho
Now, the admin can export the Magento 2 orders on the Zoho Inventory. For that, they will navigate to the Export to Zoho orders tab and click on it.

A run job will execute for the same.

Now the admin can check exported orders on Zoho Inventory.

That is all about the Magento 2 Zoho Inventory Connect module. If you have any queries regarding the plugin send an email to [email protected].
Moreover, if you require development assistance, you can Hire Magento 2 Developers for your project work.
Also, check our complete range of Magento 2 extensions. that add more features and functionalities to your online store.
Current Product Version - 4.0.4
Supported Framework Version - Magento 2.0.x, 2.1.x, 2.2.x,2.3.x, 2.4.x

Be the first to comment.