Introduction
Multi-Shipping Methods for Magento 2 module allows the admin to create multiple shipping options for customer deliveries.
Both registered and guest users can select from the available shipping methods.
The admin can select the countries for which this shipping method will be available and can even set the name for the shipping method.
While creating a new shipping method the admin can set the price, weight range and zip code range.
Check the overview of the multiple shipping methods for the Magento 2 platform based online web store in the video mentioned below –
Features of Multi-Shipping for Magento 2
- The admin can add shipping labels with multiple shipping options.
- The admin can enable/disable shipping method/label.
- Mass delete/status change at admin end.
- Shipping will be calculated based on Country Id, ZIP, and weight.
- Customer can select enabled shipping options according to his/her address.
- This module is compatible with multi-address shipping.
- Customers can also use multiple shipping checkout cart pages.
Installation – Multi-Shipping for Magento 2
Firstly, customers will get a zip folder and they have to extract the contents of this zip folder on their system.
The extracted folder has an src folder, inside the src folder you have the app folder.
Further, the admin needs to transfer this app folder into the Magento 2 (Adobe Commerce) root directory on the server as shown below.

After the successful installation you have to run these commands in the Magento 2 root directory:
First command –
php bin/magento setup:upgrade
Second Command –
php bin/magento setup:di:compile
Third Command –
php bin/magento setup:static-content:deploy
Fourth Command –
php bin/magento indexer:reindex
Right after that flush the cache from the Magento admin panel by navigating through->System->Cache management as shown below.

Configuration of Multi-Lingual
The admin will navigate through Store > Configuration > General ->Locale Options and select the locale as German (the language into which admin wants to translate his store content).
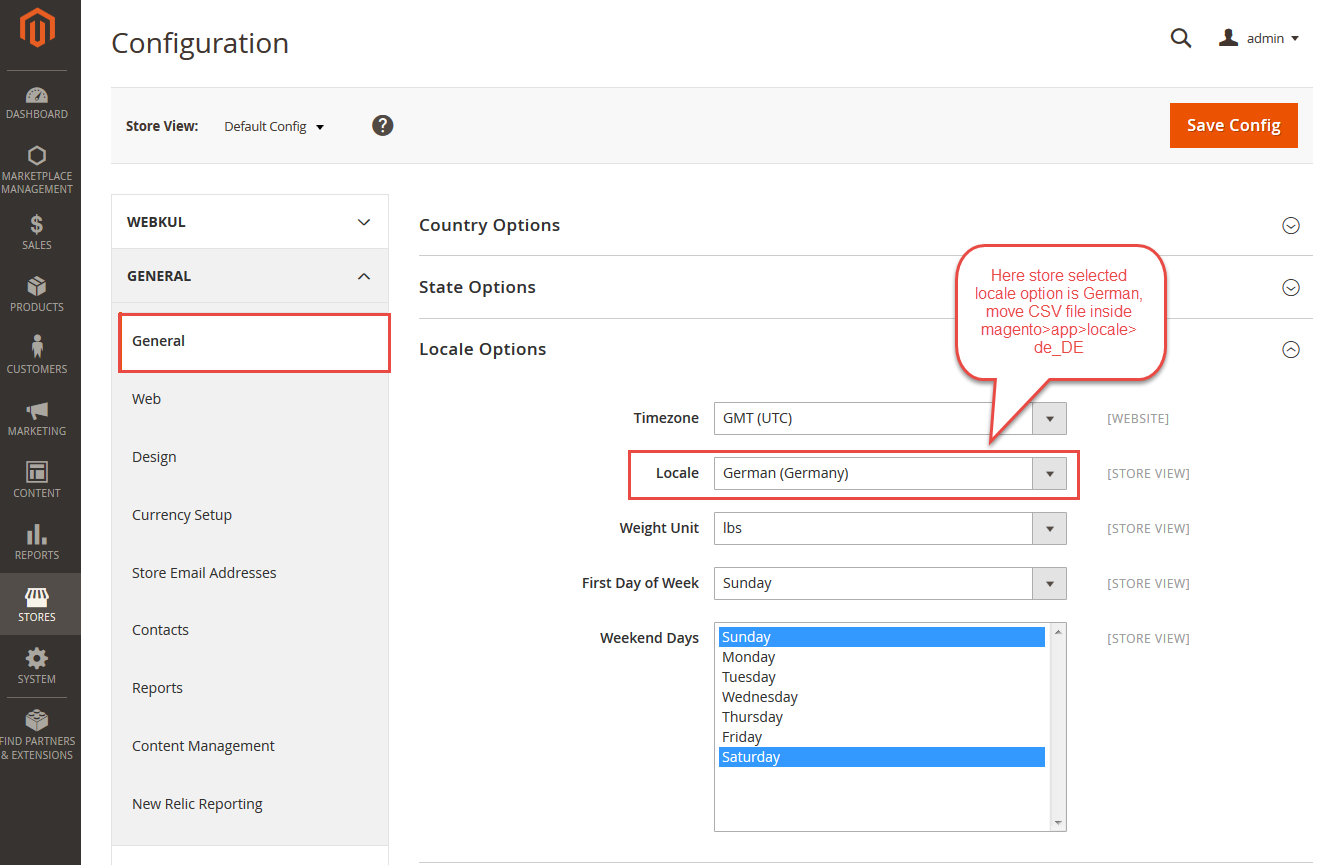
Language Translation
If you need to do the module translation, please navigate the following path in your system app/code/Webkul/MultipleShipping/i18n.
Open the file named en_US.CSV for editing as shown below screenshot.

Once you have opened the file for editing, replace the words after the comma(,) on the right with your translated words.

After editing the CSV file, save it and then upload it to the same path app/code/MultipleShipping/i18n.
The module will now get translated into your desired language. It supports both the LTR and RTL languages.
Module Configuration in Multi-Shipping for Magento 2
Firstly, to configure the module the admin needs to go to the Stores > Configuration > SALES > Delivery Methods.
Now under the field Webkul Multiple Shipping, the admin needs to give the below details as shown.
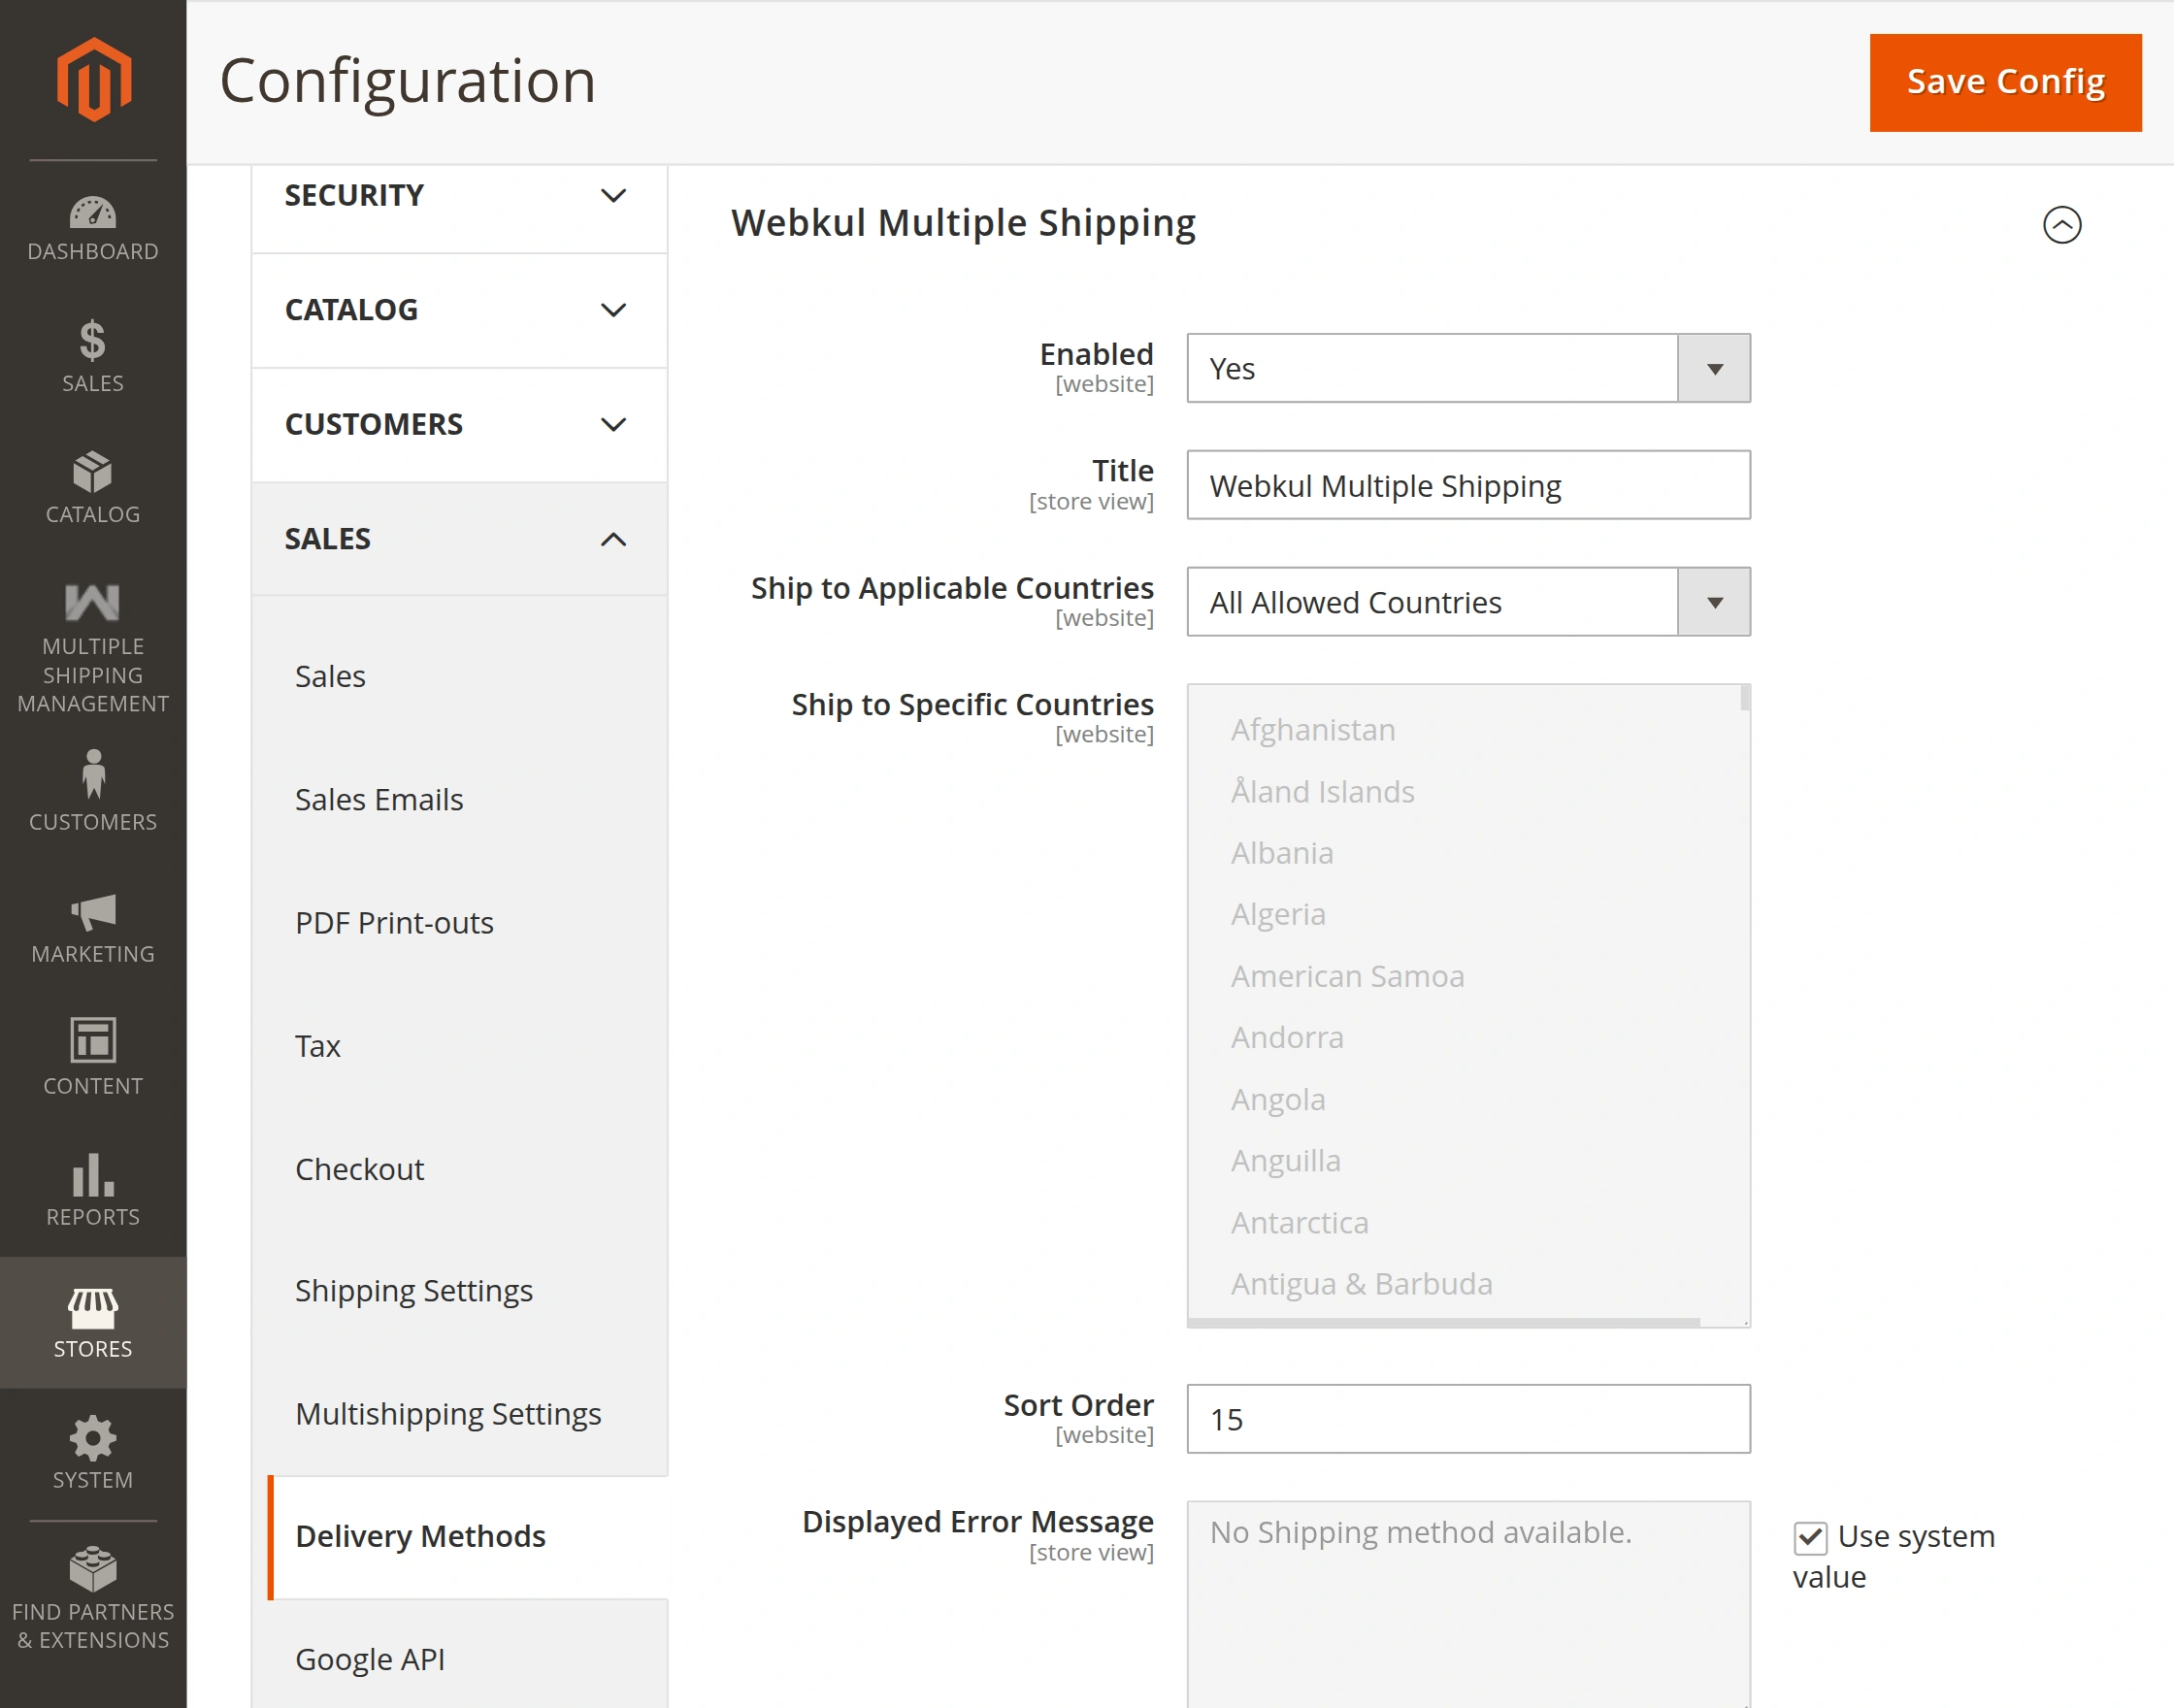
- Enabled: Set the status as Yes/No to Enable/Disable the module.
- Title: Here, enter a required title.
- Name: Here, enter a required Name.
- Ship to Applicable Countries: The admin can select All Allowed Countries or Specific Countries from the drop-down to enable shipping for the required countries.
- Ship to Specific Countries: The option is enabled when the admin selects to ship to specific countries only, here just select the required countries from the multi-select.
- Sort Order: Here, enter the sort order so that you can set the priority.
- Displayed Error Message: In this field, the admin can either use the system value or by clicking on the checkbox enter a personalized error message.
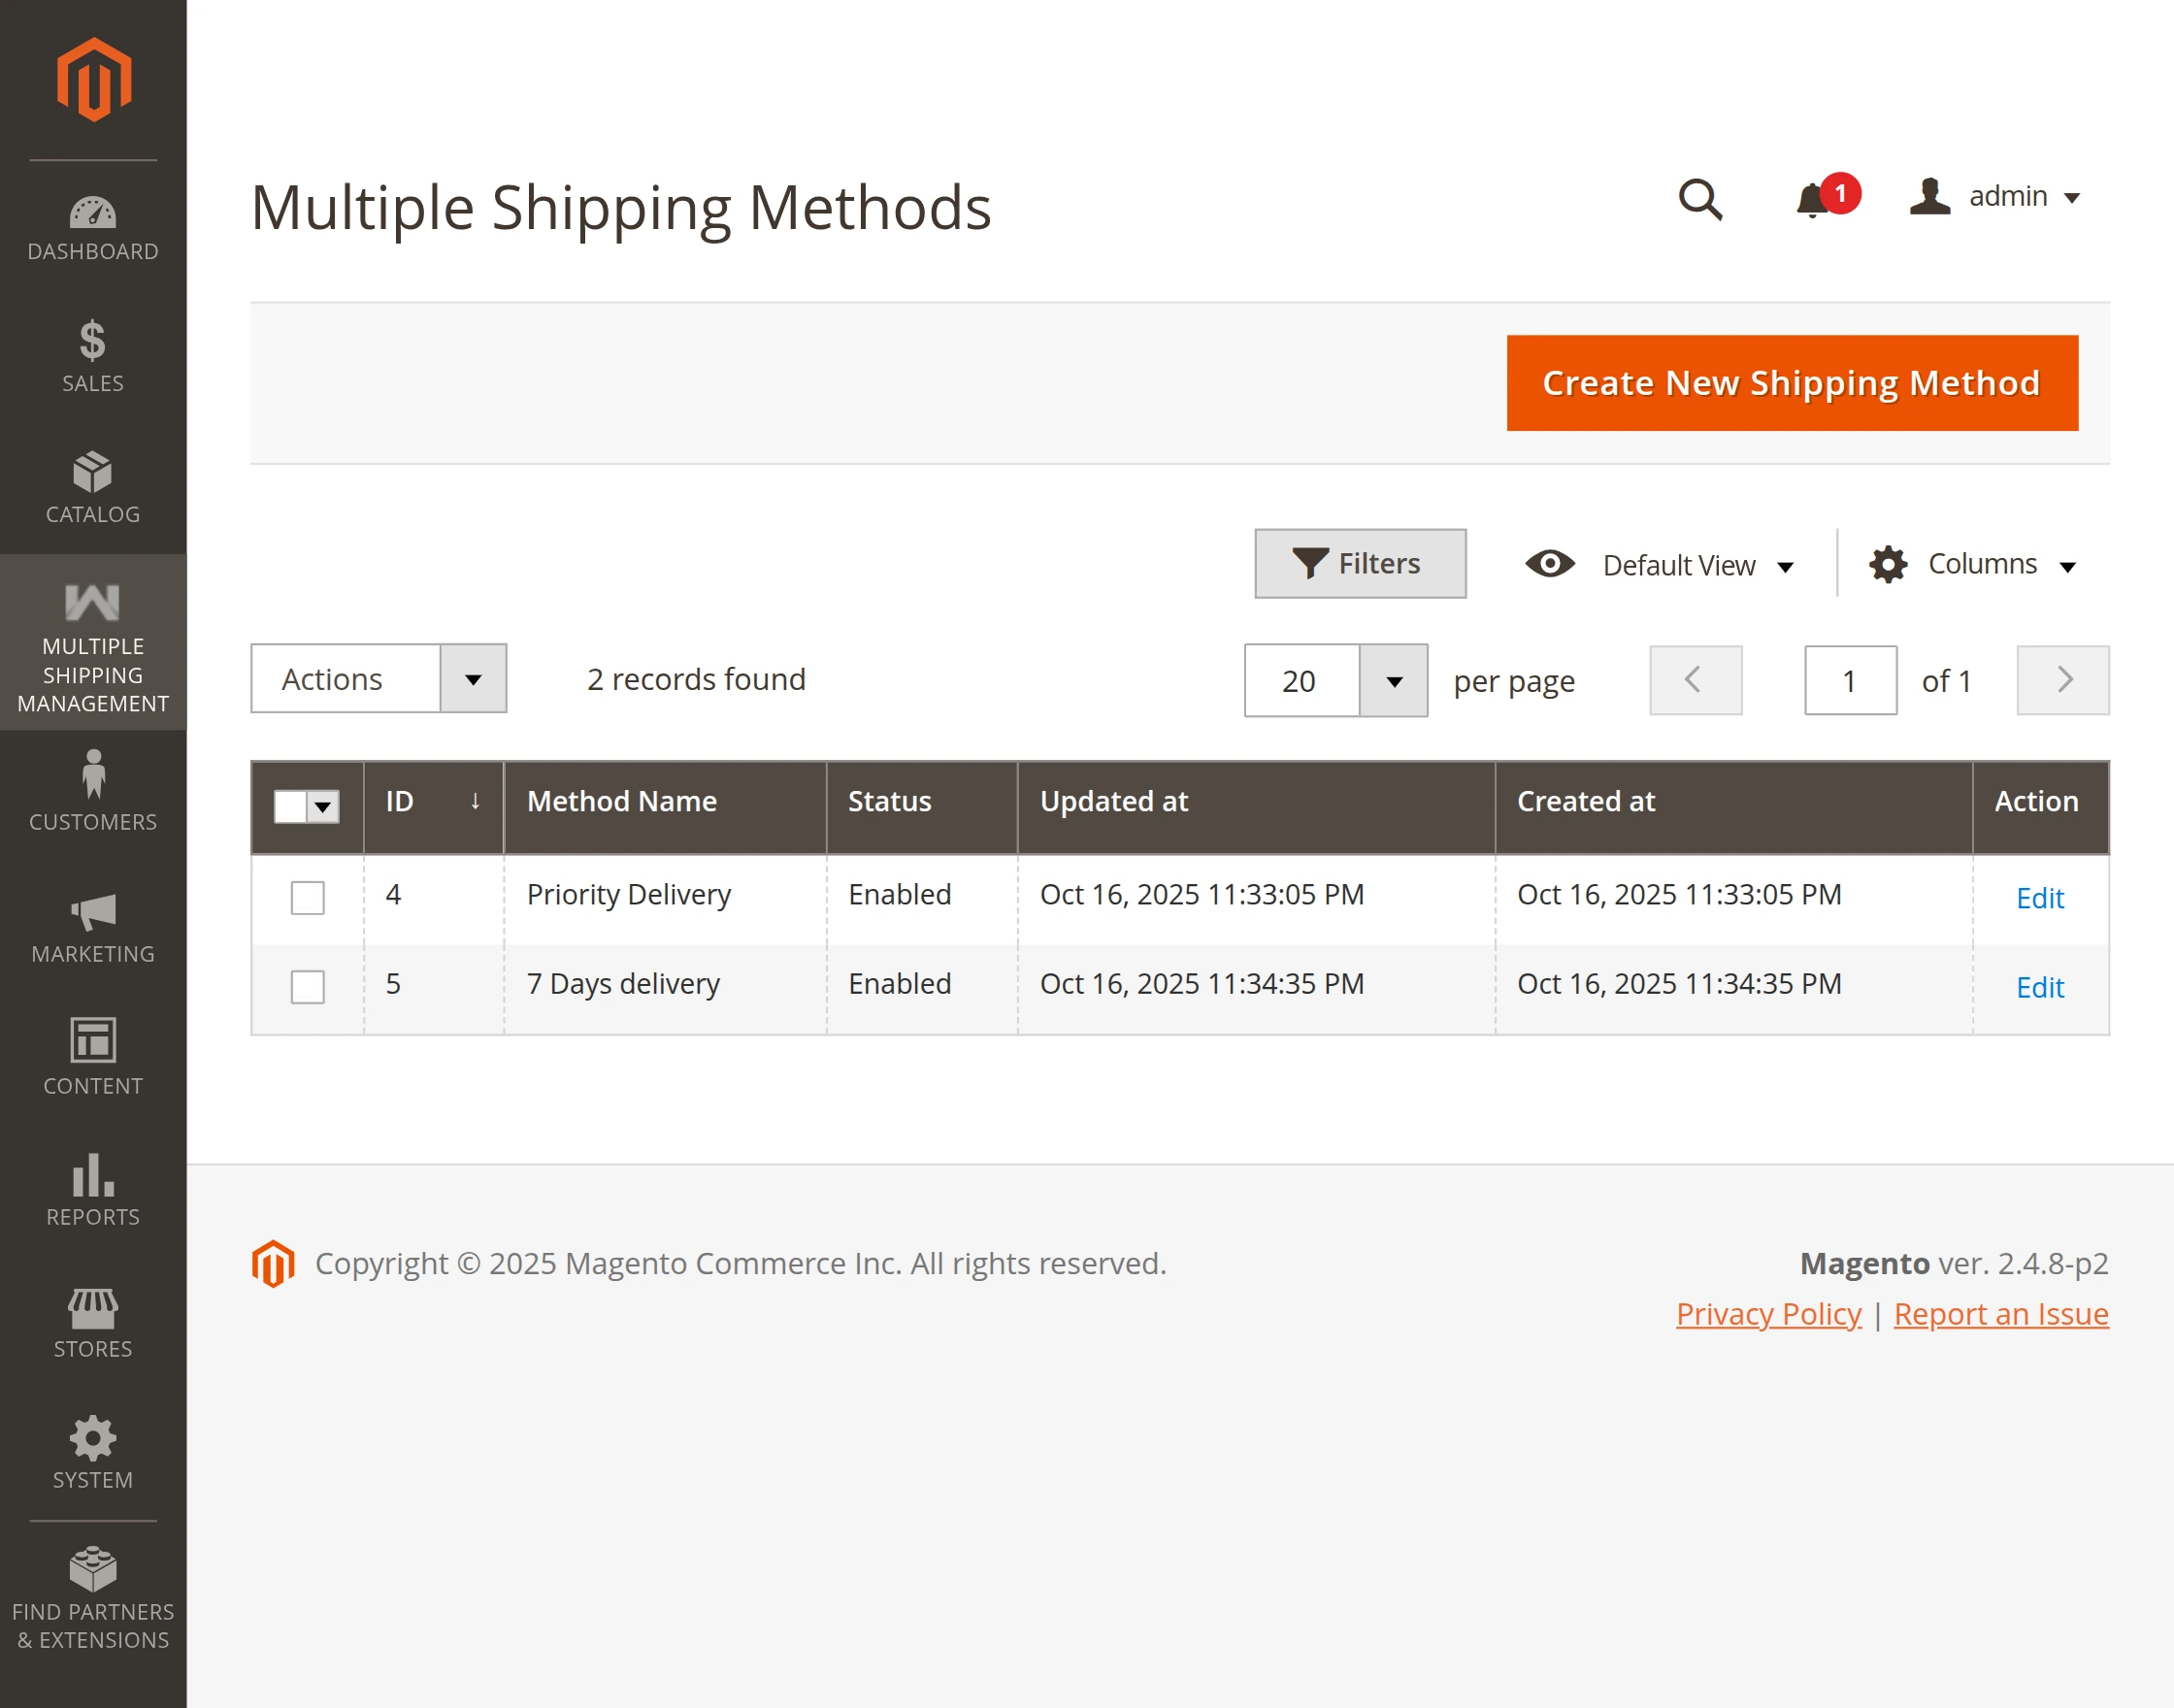
Multiple Shipping Management
To manage the Multi Shipping for Magento 2 module firstly, in the sidebar menu go to the MULTIPLE SHIPPING MANAGEMENT > Multiple Shipping Methods.
All the created and existing Shipping methods are visible in this section.
The admin can click on the Edit button under the Actions tab to make changes in any of the created shipping methods.
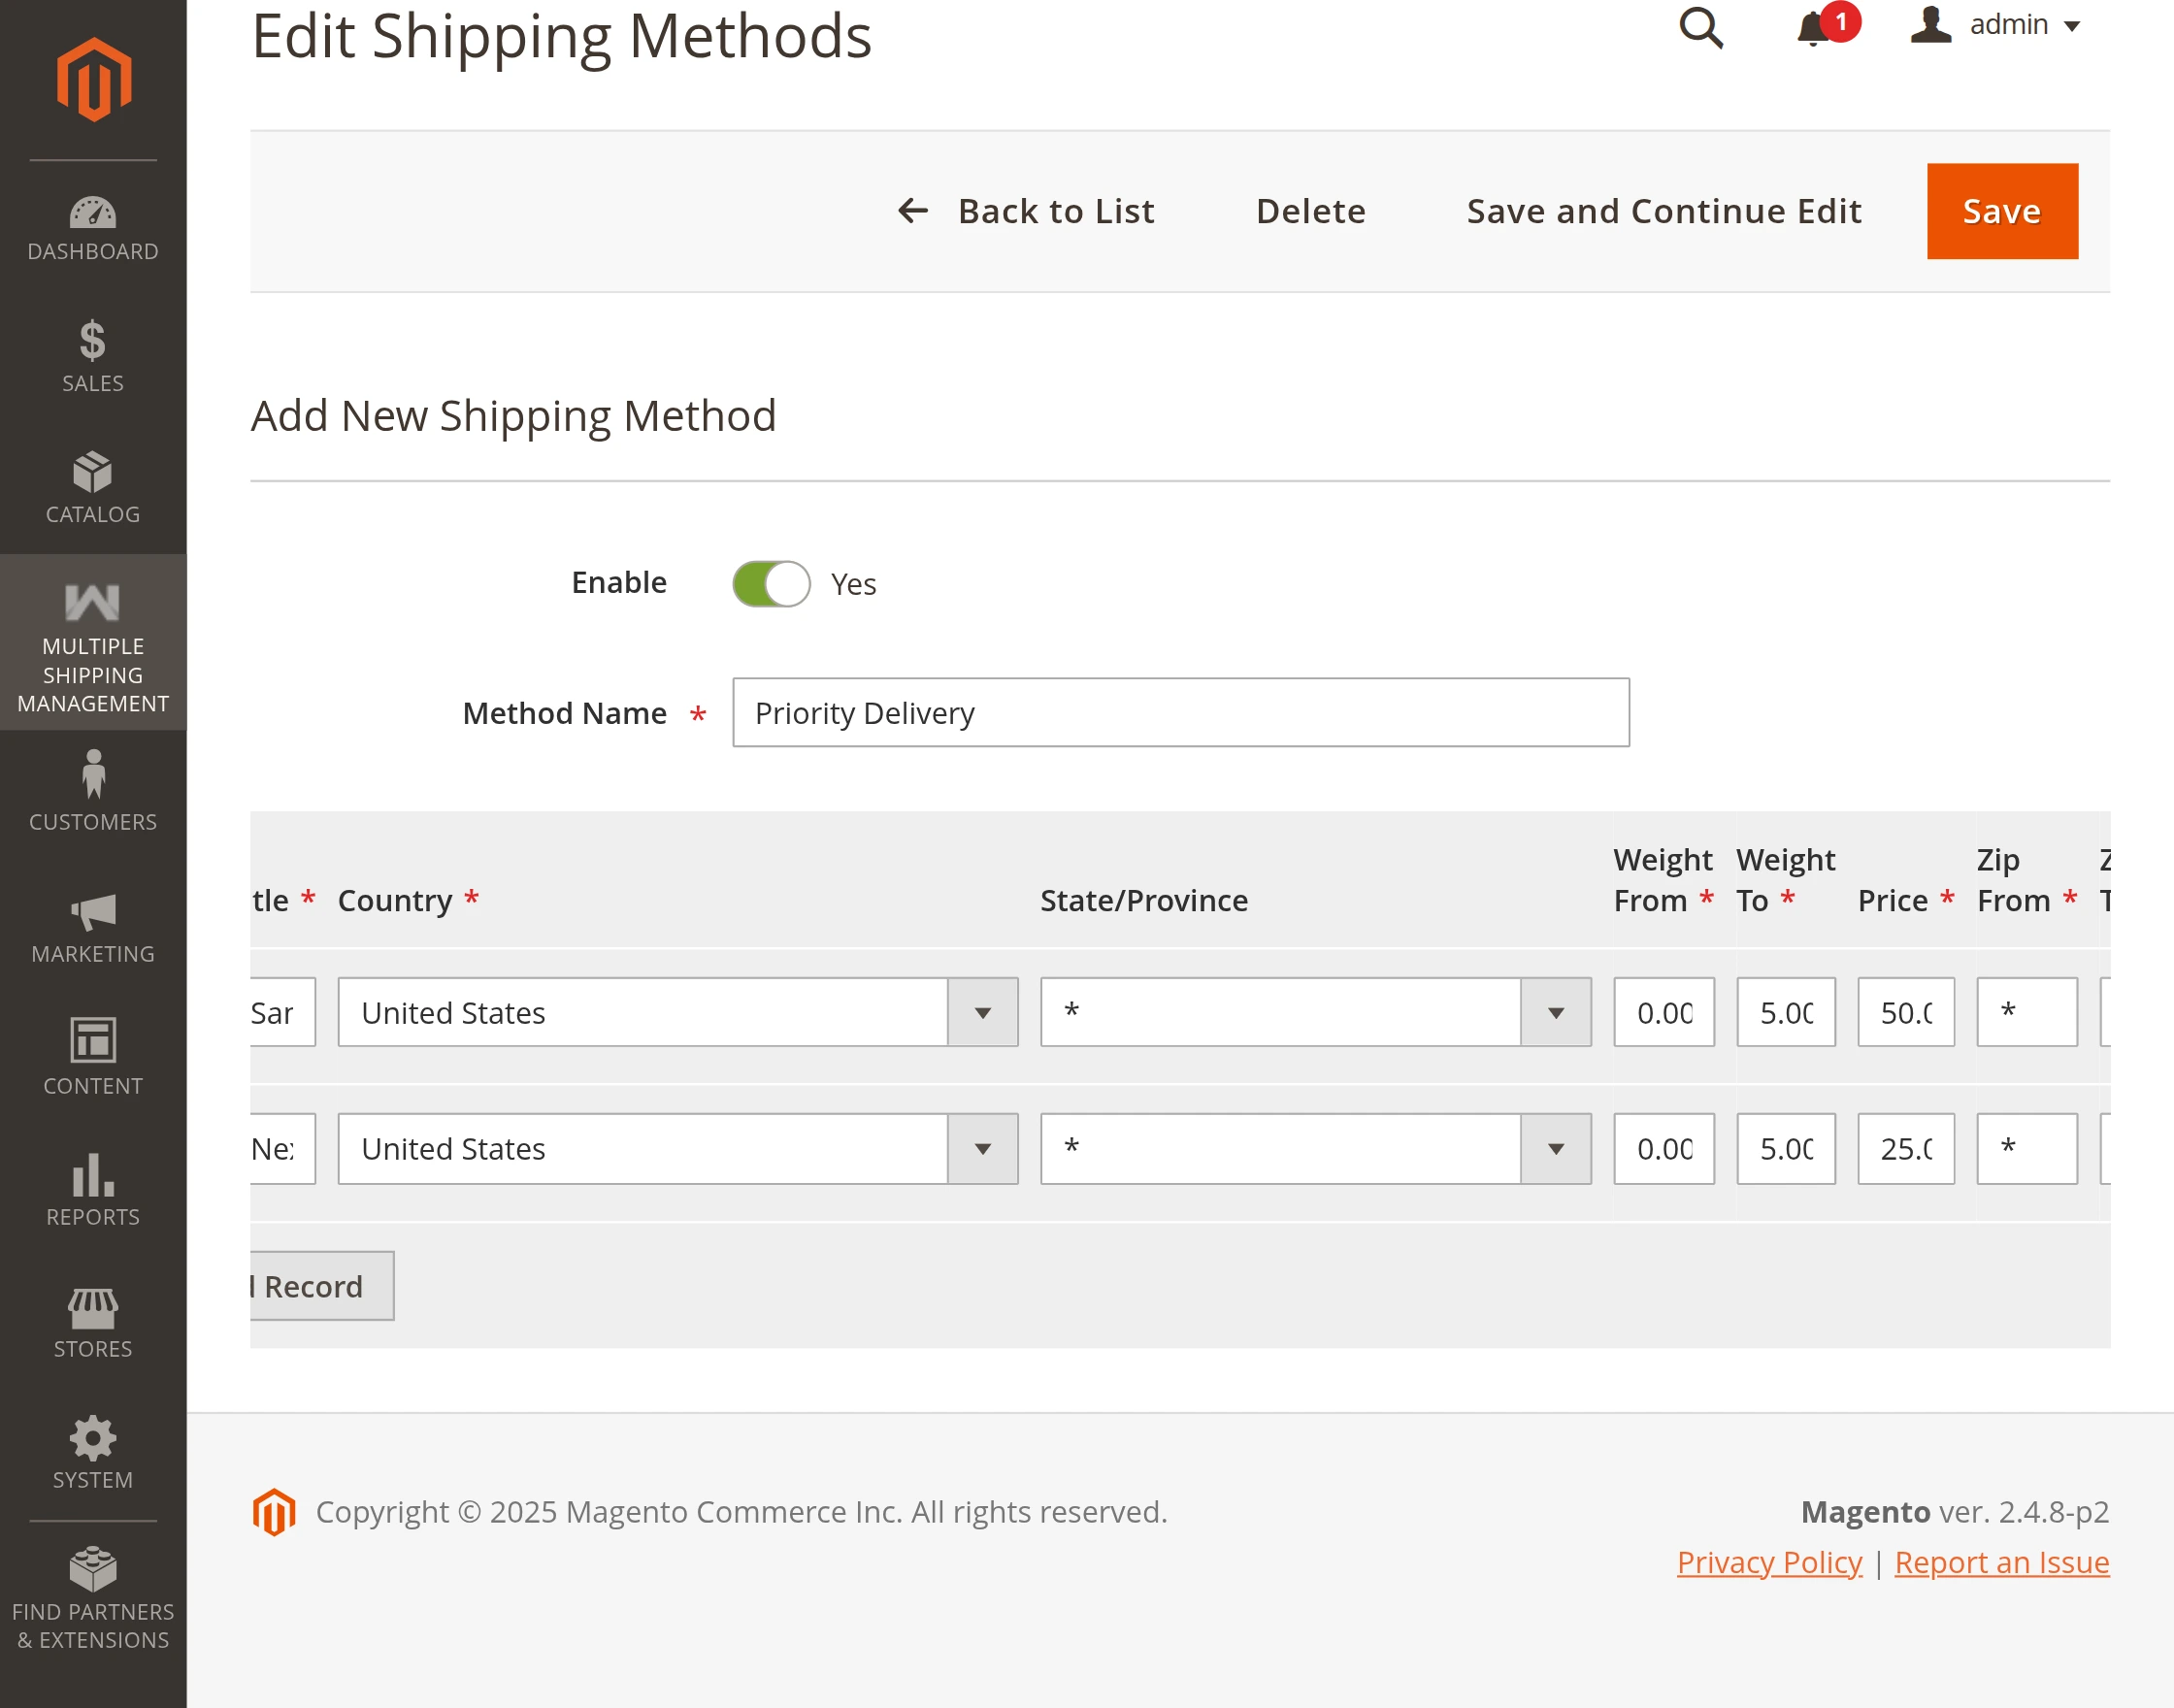
Edit Shipping Methods
The admin can make changes to any of the fields here and can further, click on Save.
As a result, the edited changes will be reflected over the front end.
Add New Shipping Methods
To add a new shipping method simply click on Create New Shipping Method and enter the details.
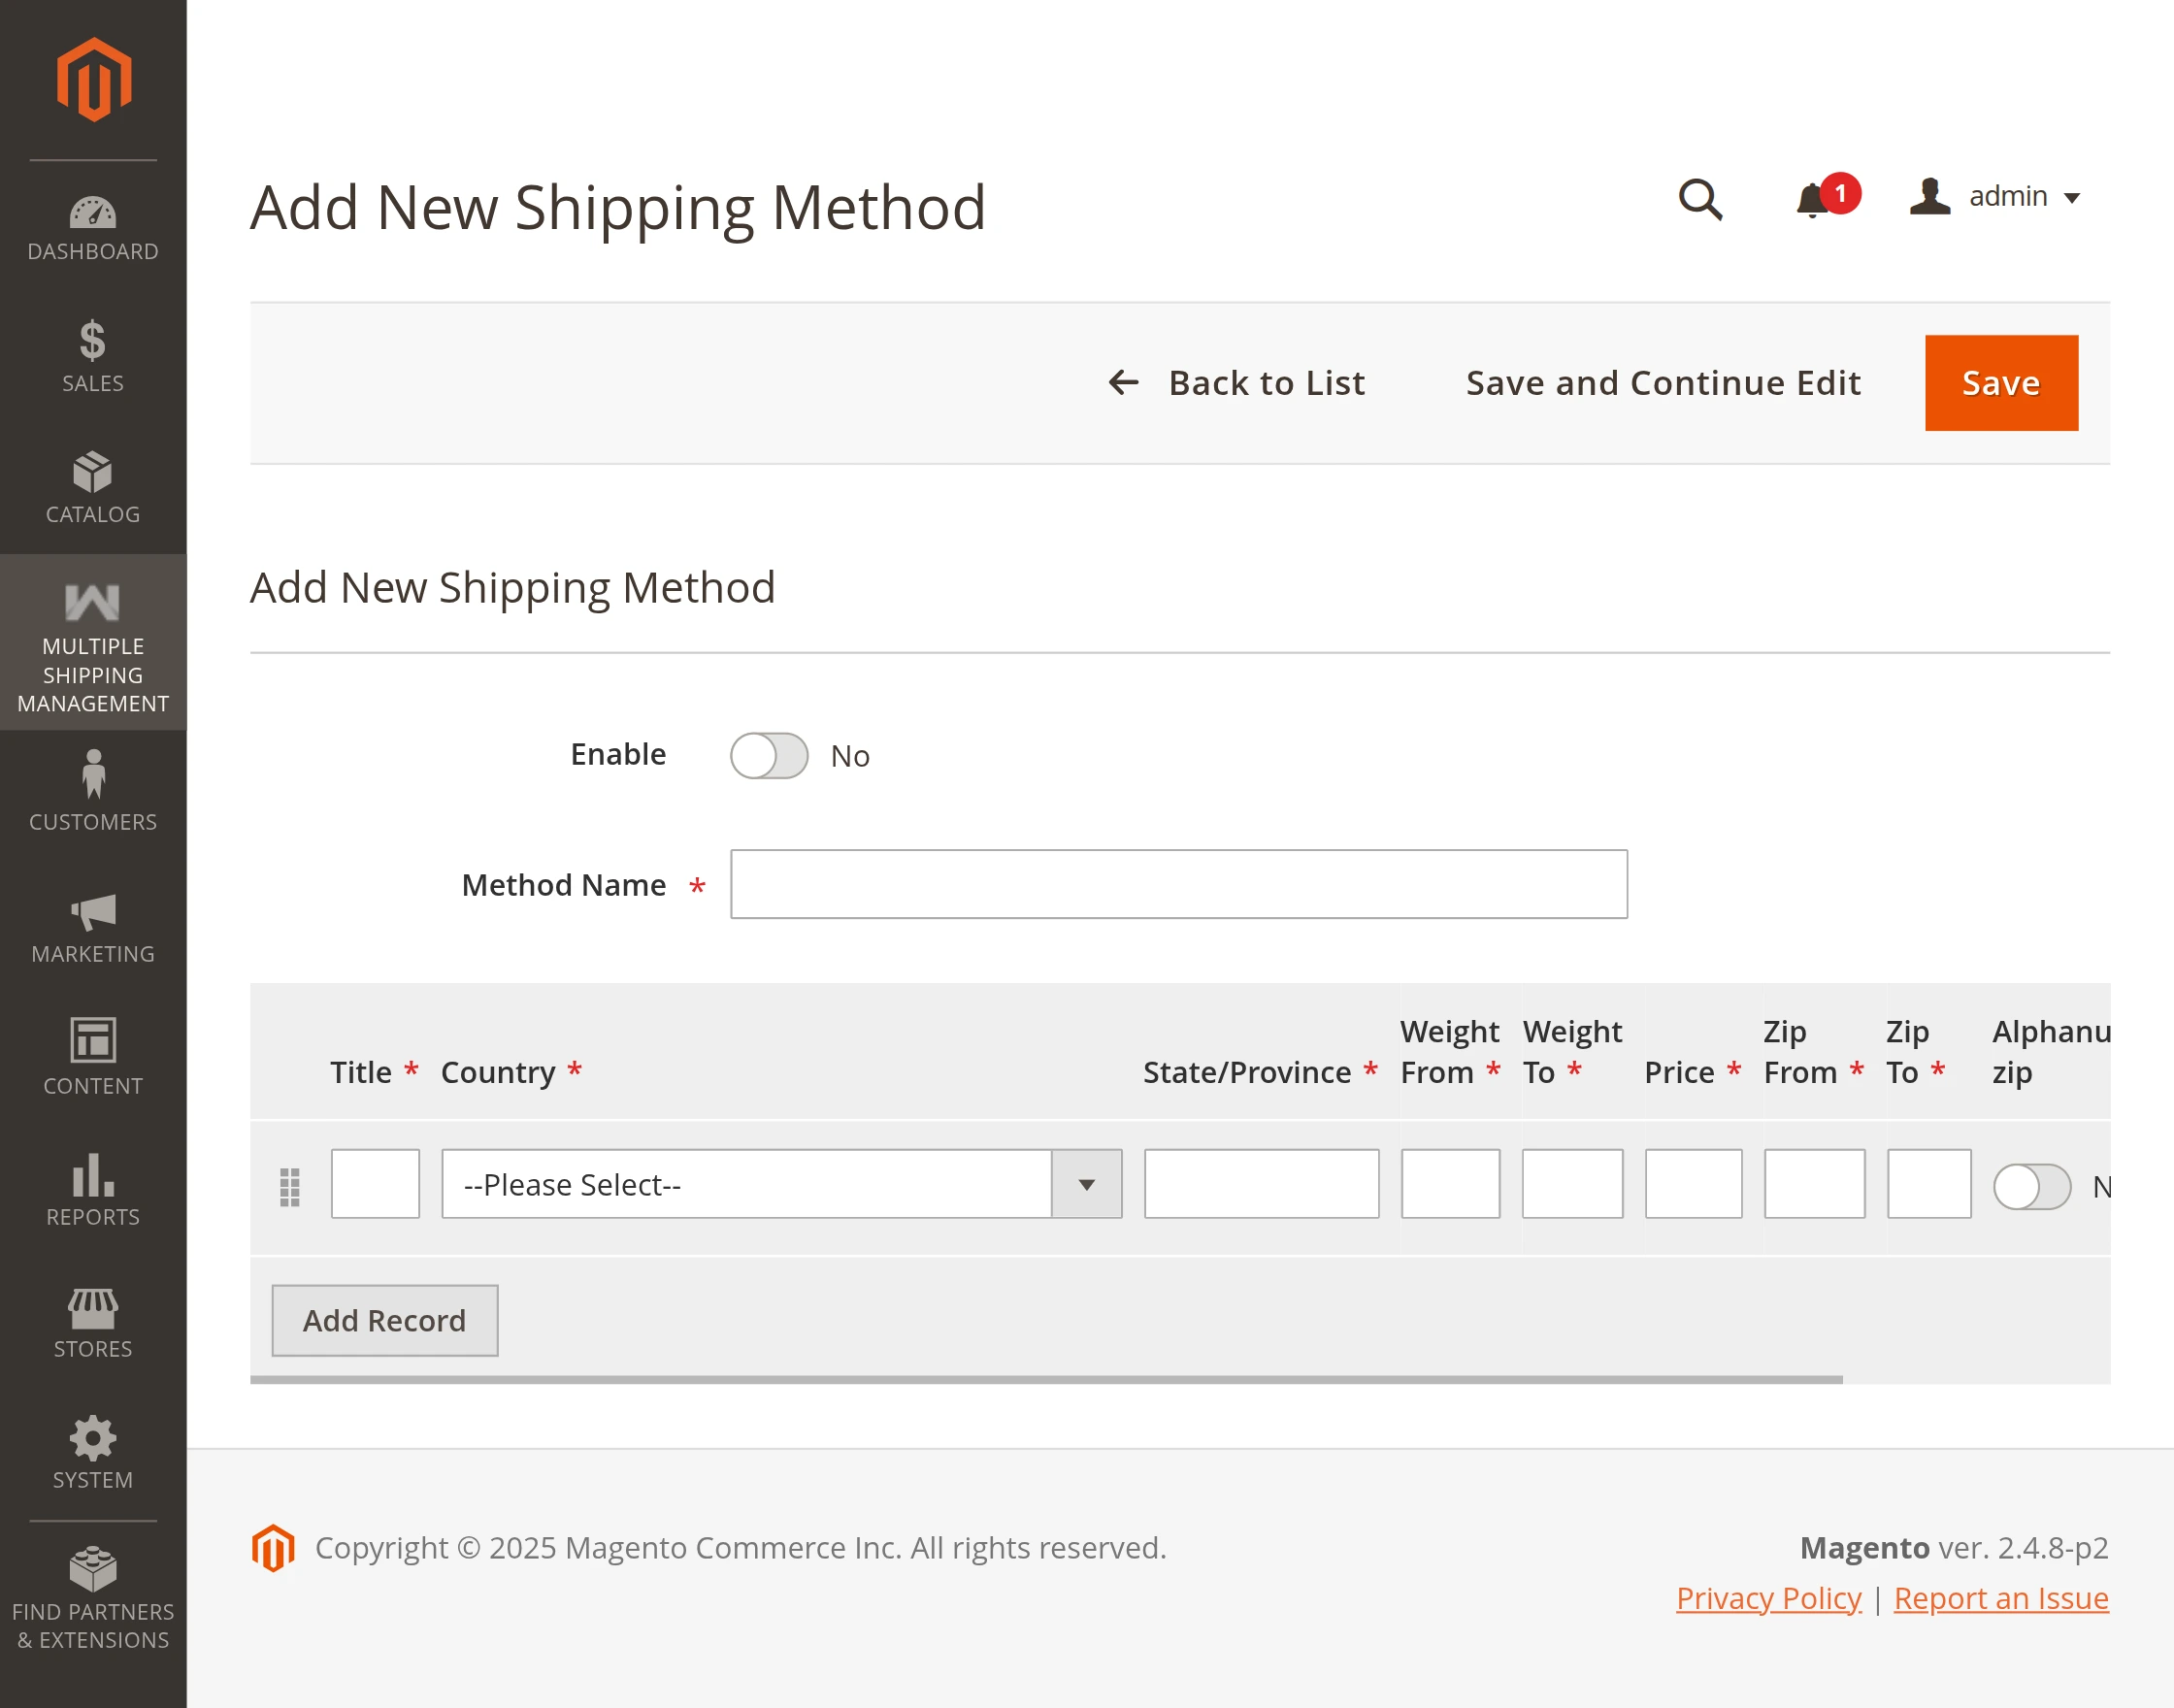
- Enable: The admin can set the field as Yes as No to enable or disable the Shipping Method.
- Method Name: Enter the Shipping method name over here.
- Title: The admin can even give a required title using this input field.
- Country: The admin needs to enter the country to which the shipping method will be applicable.
Note:
To include more countries simply click on Add Record in the same shipping method and give the country name.
- State/Province: Enter the State/Province in this field.
-

- Weight From – In this field the admin needs to insert the minimum weight.
- Weight To – In this field the admin needs to insert the maximum weight.
- Price – Here, enter the price or the shipping method charge that will be applied to the shipping method according to the above-mentioned weight range.
- Zip From – In this field the admin needs to insert the zip code from this method will be applicable.
- Zip To – In this field, the admin needs to insert the zip code till where this method will be applicable.
- Alphanumeric zip: (The zipcodes which include letters and the digits as well in it are called alphanumeric zip such as in Canadian zip codes )
If the admin wants to allow alphanumeric zip codes for the shipping methods then set this field as Yes.
- Zipcode: Enter the Alphanumeric Zipcode over here.
If the admin wants the shipping method for all zip codes of a state, enter “*” in the “zip from” and “zip to” fields.

Note:
To include more alphanumeric zip codes the admin can press Add Record and enter more alphanumeric zip codes for the same shipping method.
Note: At checkout, multiple shipping methods show only for the country, state, and zip code set by the admin.
This is applicable also in case the admin has selected the option – allowed countries as ALL in the configuration settings of the delivery method.
Front end – Customer Workflow
First of all the admin needs to add a product into his/her cart.

Open the Shopping cart page.
Before clicking the proceed to checkout button the customer can Estimate Shipping and Tax for the same click on the Estimate Shipping and Tax drop down in the order summary section.

Further, the customer needs to select the Country, State/Province, and Zip/Postal Code based on the same the available shipping methods are visible.
The customer can select the best suitable shipping methods.
When a customer purchases either single or multiple products, the same shipping rates will be applicable as configured by the admin.
Note: The module also supports the Check Out with Multiple Address.
Based on the country entered and zip code the available shipping methods will be visible under Webkul Multiple Shipping.
Also, if the customer doesn’t enter any Zip/Postal Code or enter a region code for which no shipping method is available then the following error message is displayed as shown below.

After clicking on the Proceed to Checkout.

The customer can select any of the available shipping methods and click Next.

Post that the customer can click the Place Order button to make the purchase complete.

Order Details – Customer end
The customer can check their order from My Orders. Here, the customer can check the used multi shipping method in Order Information here as shown in the below image.

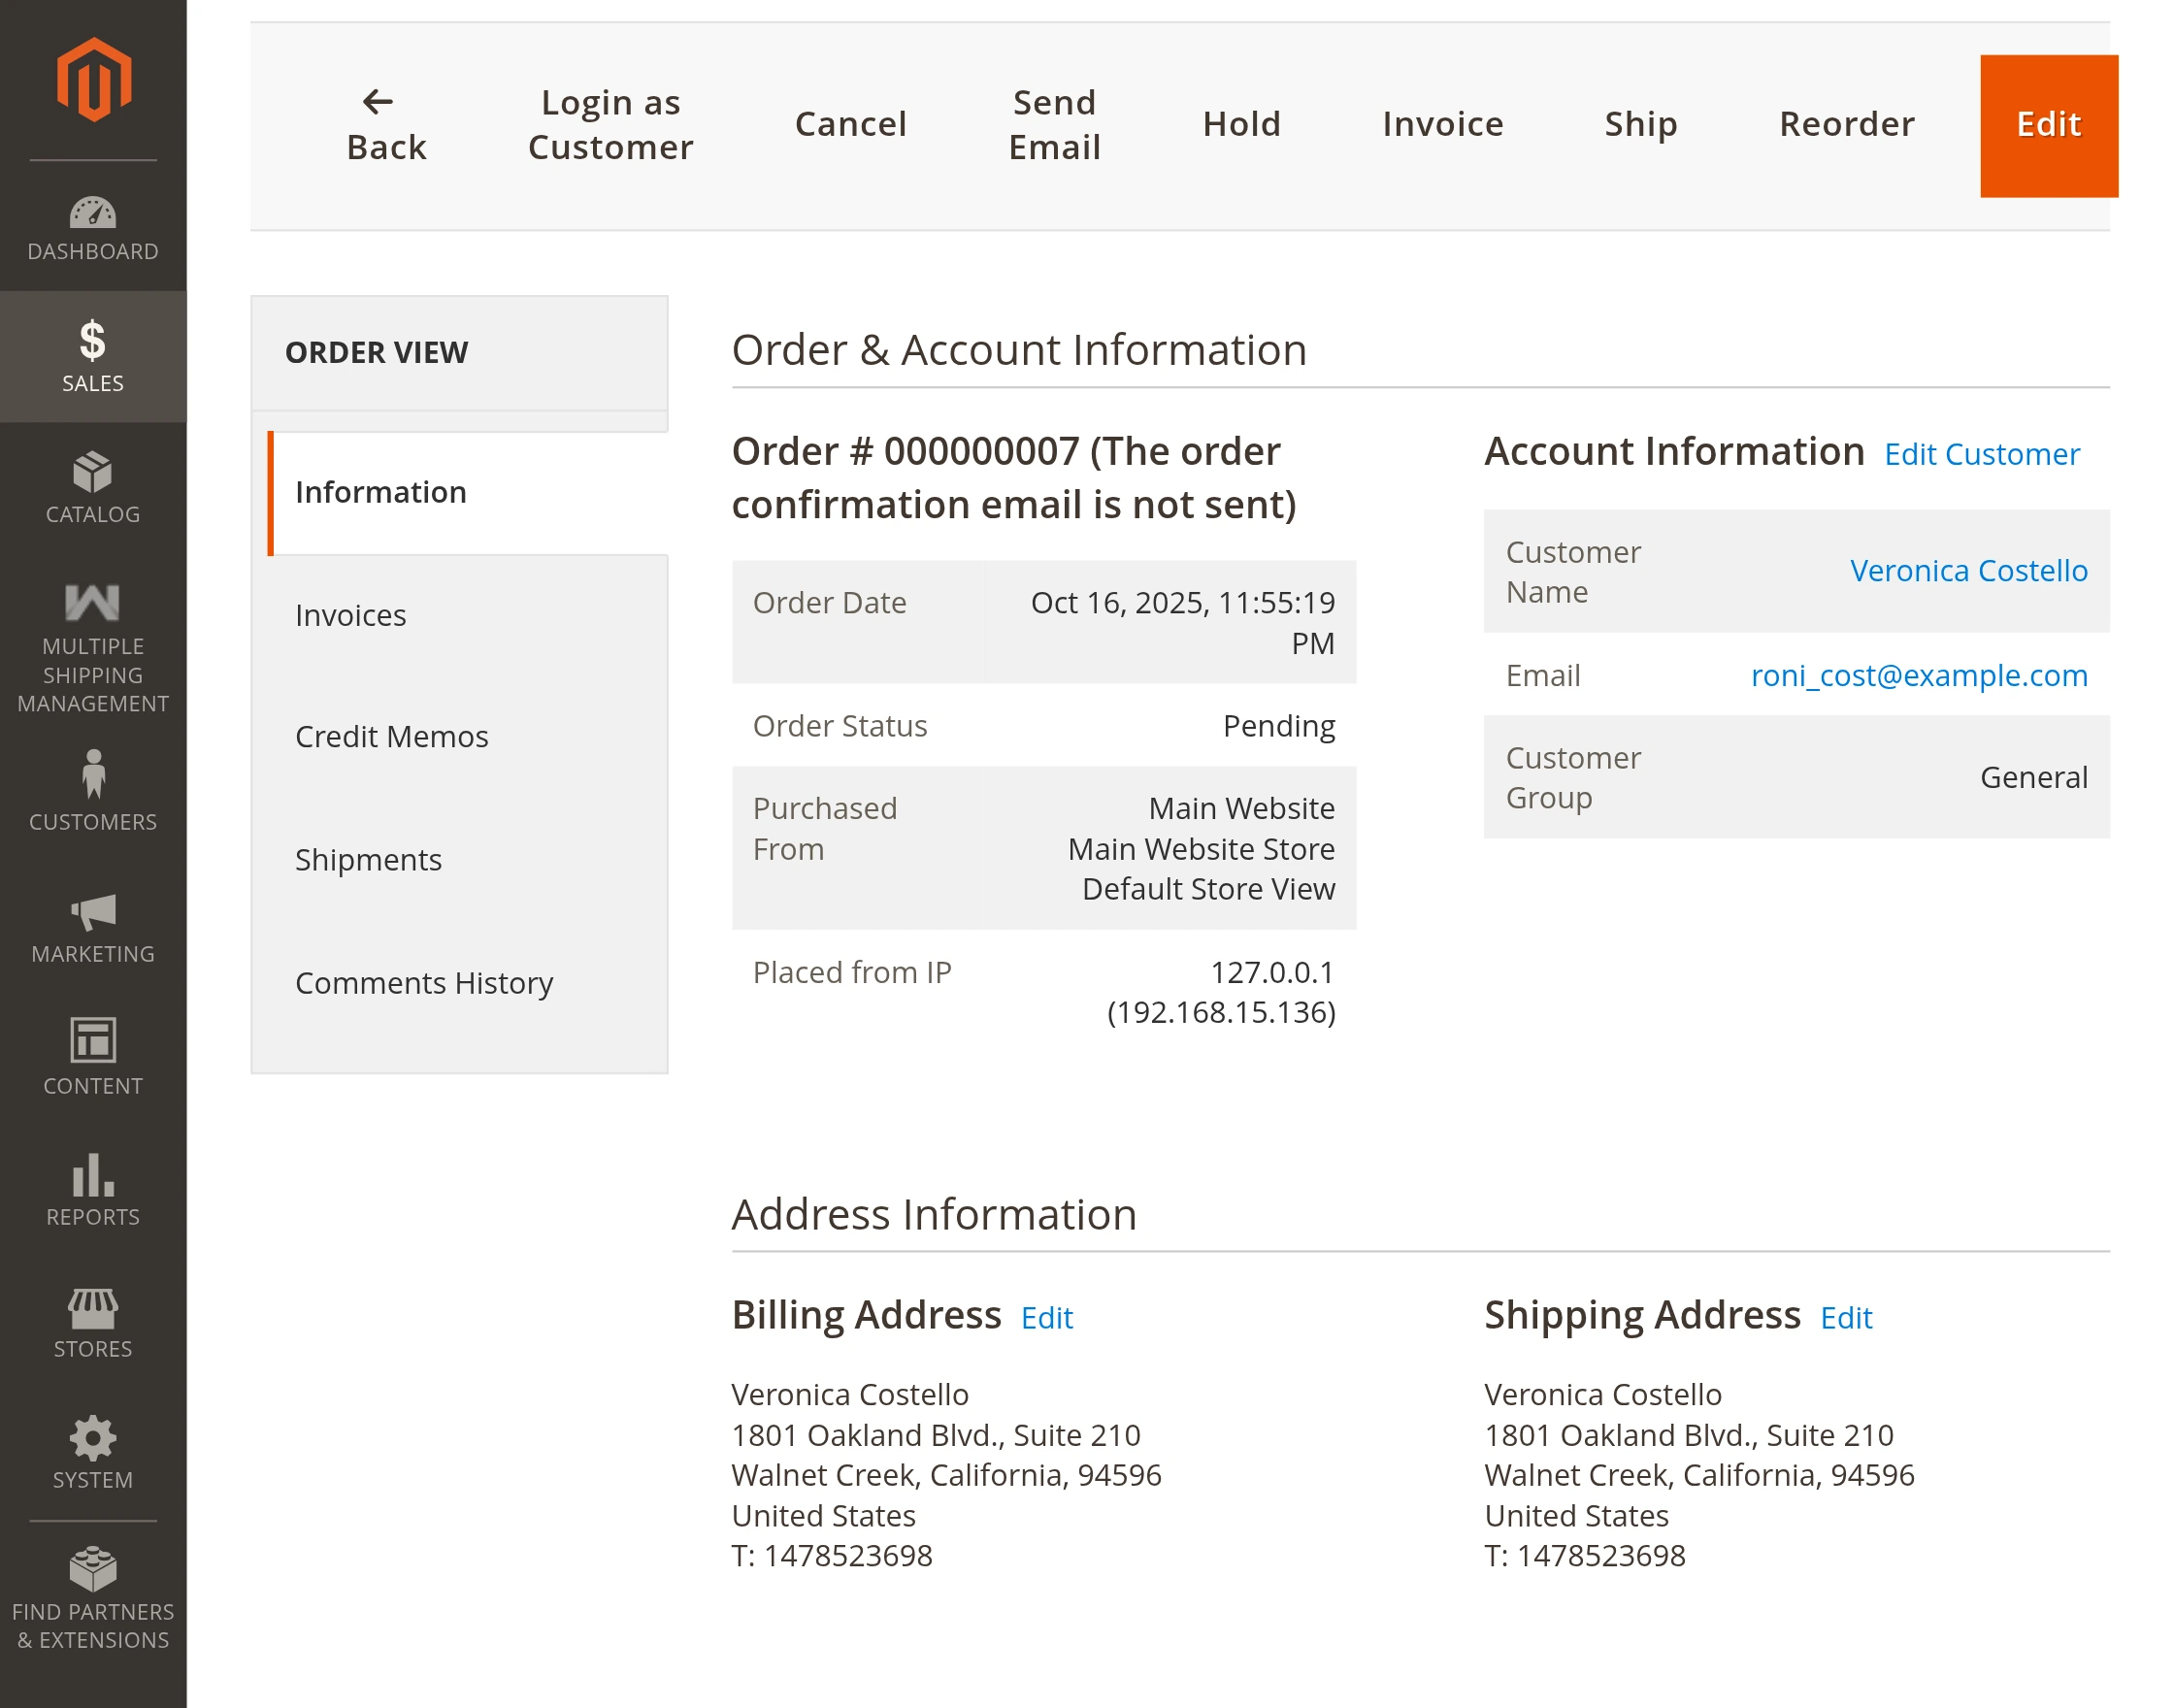
Order Details – Admin end
The admin can go to Sales > Order. Click View under the actions section.
Here, the admin can check the used multi shipping method in Order Information here as shown in the below image.
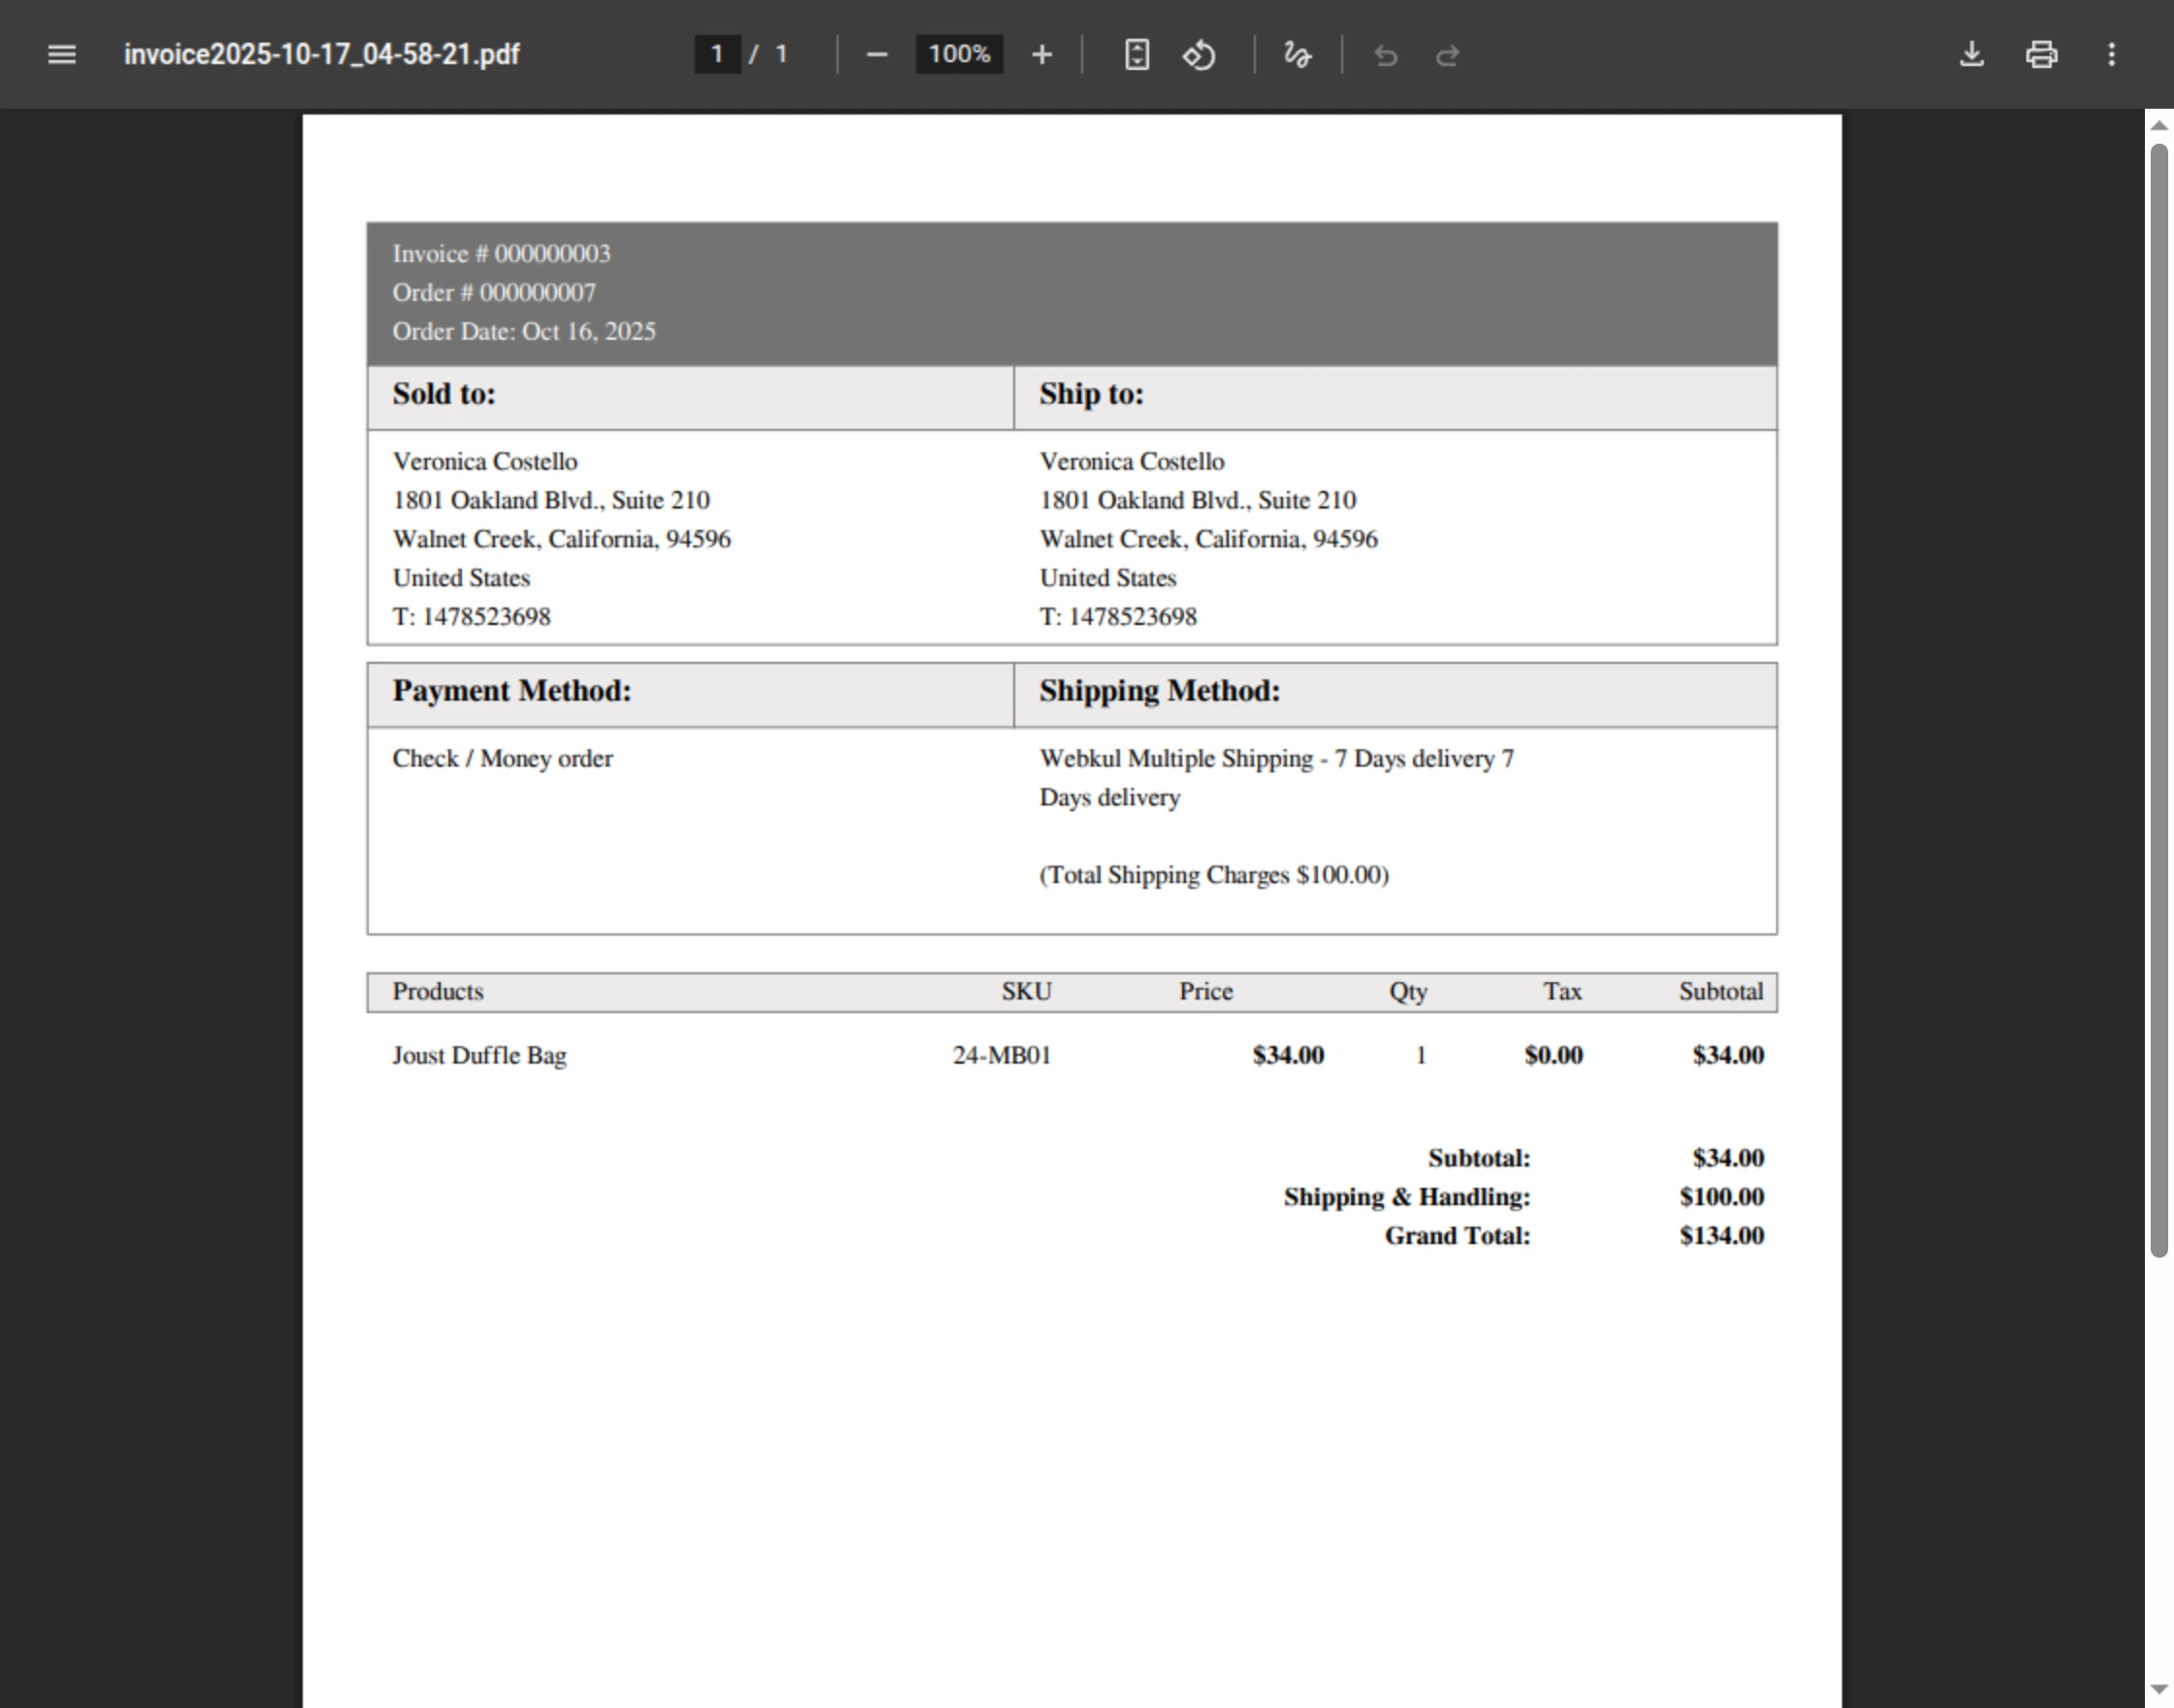
Order Invoice
Here, is the order Invoice PDF with details including the shipping method.
Order Shipment – Admin end
The admin needs to go to Sales > Order. Click View under the actions section.
Here, the admin can check the selected multi-shipping method in Order Information.

The admin can check the shipping information, payment information as selected by customer.
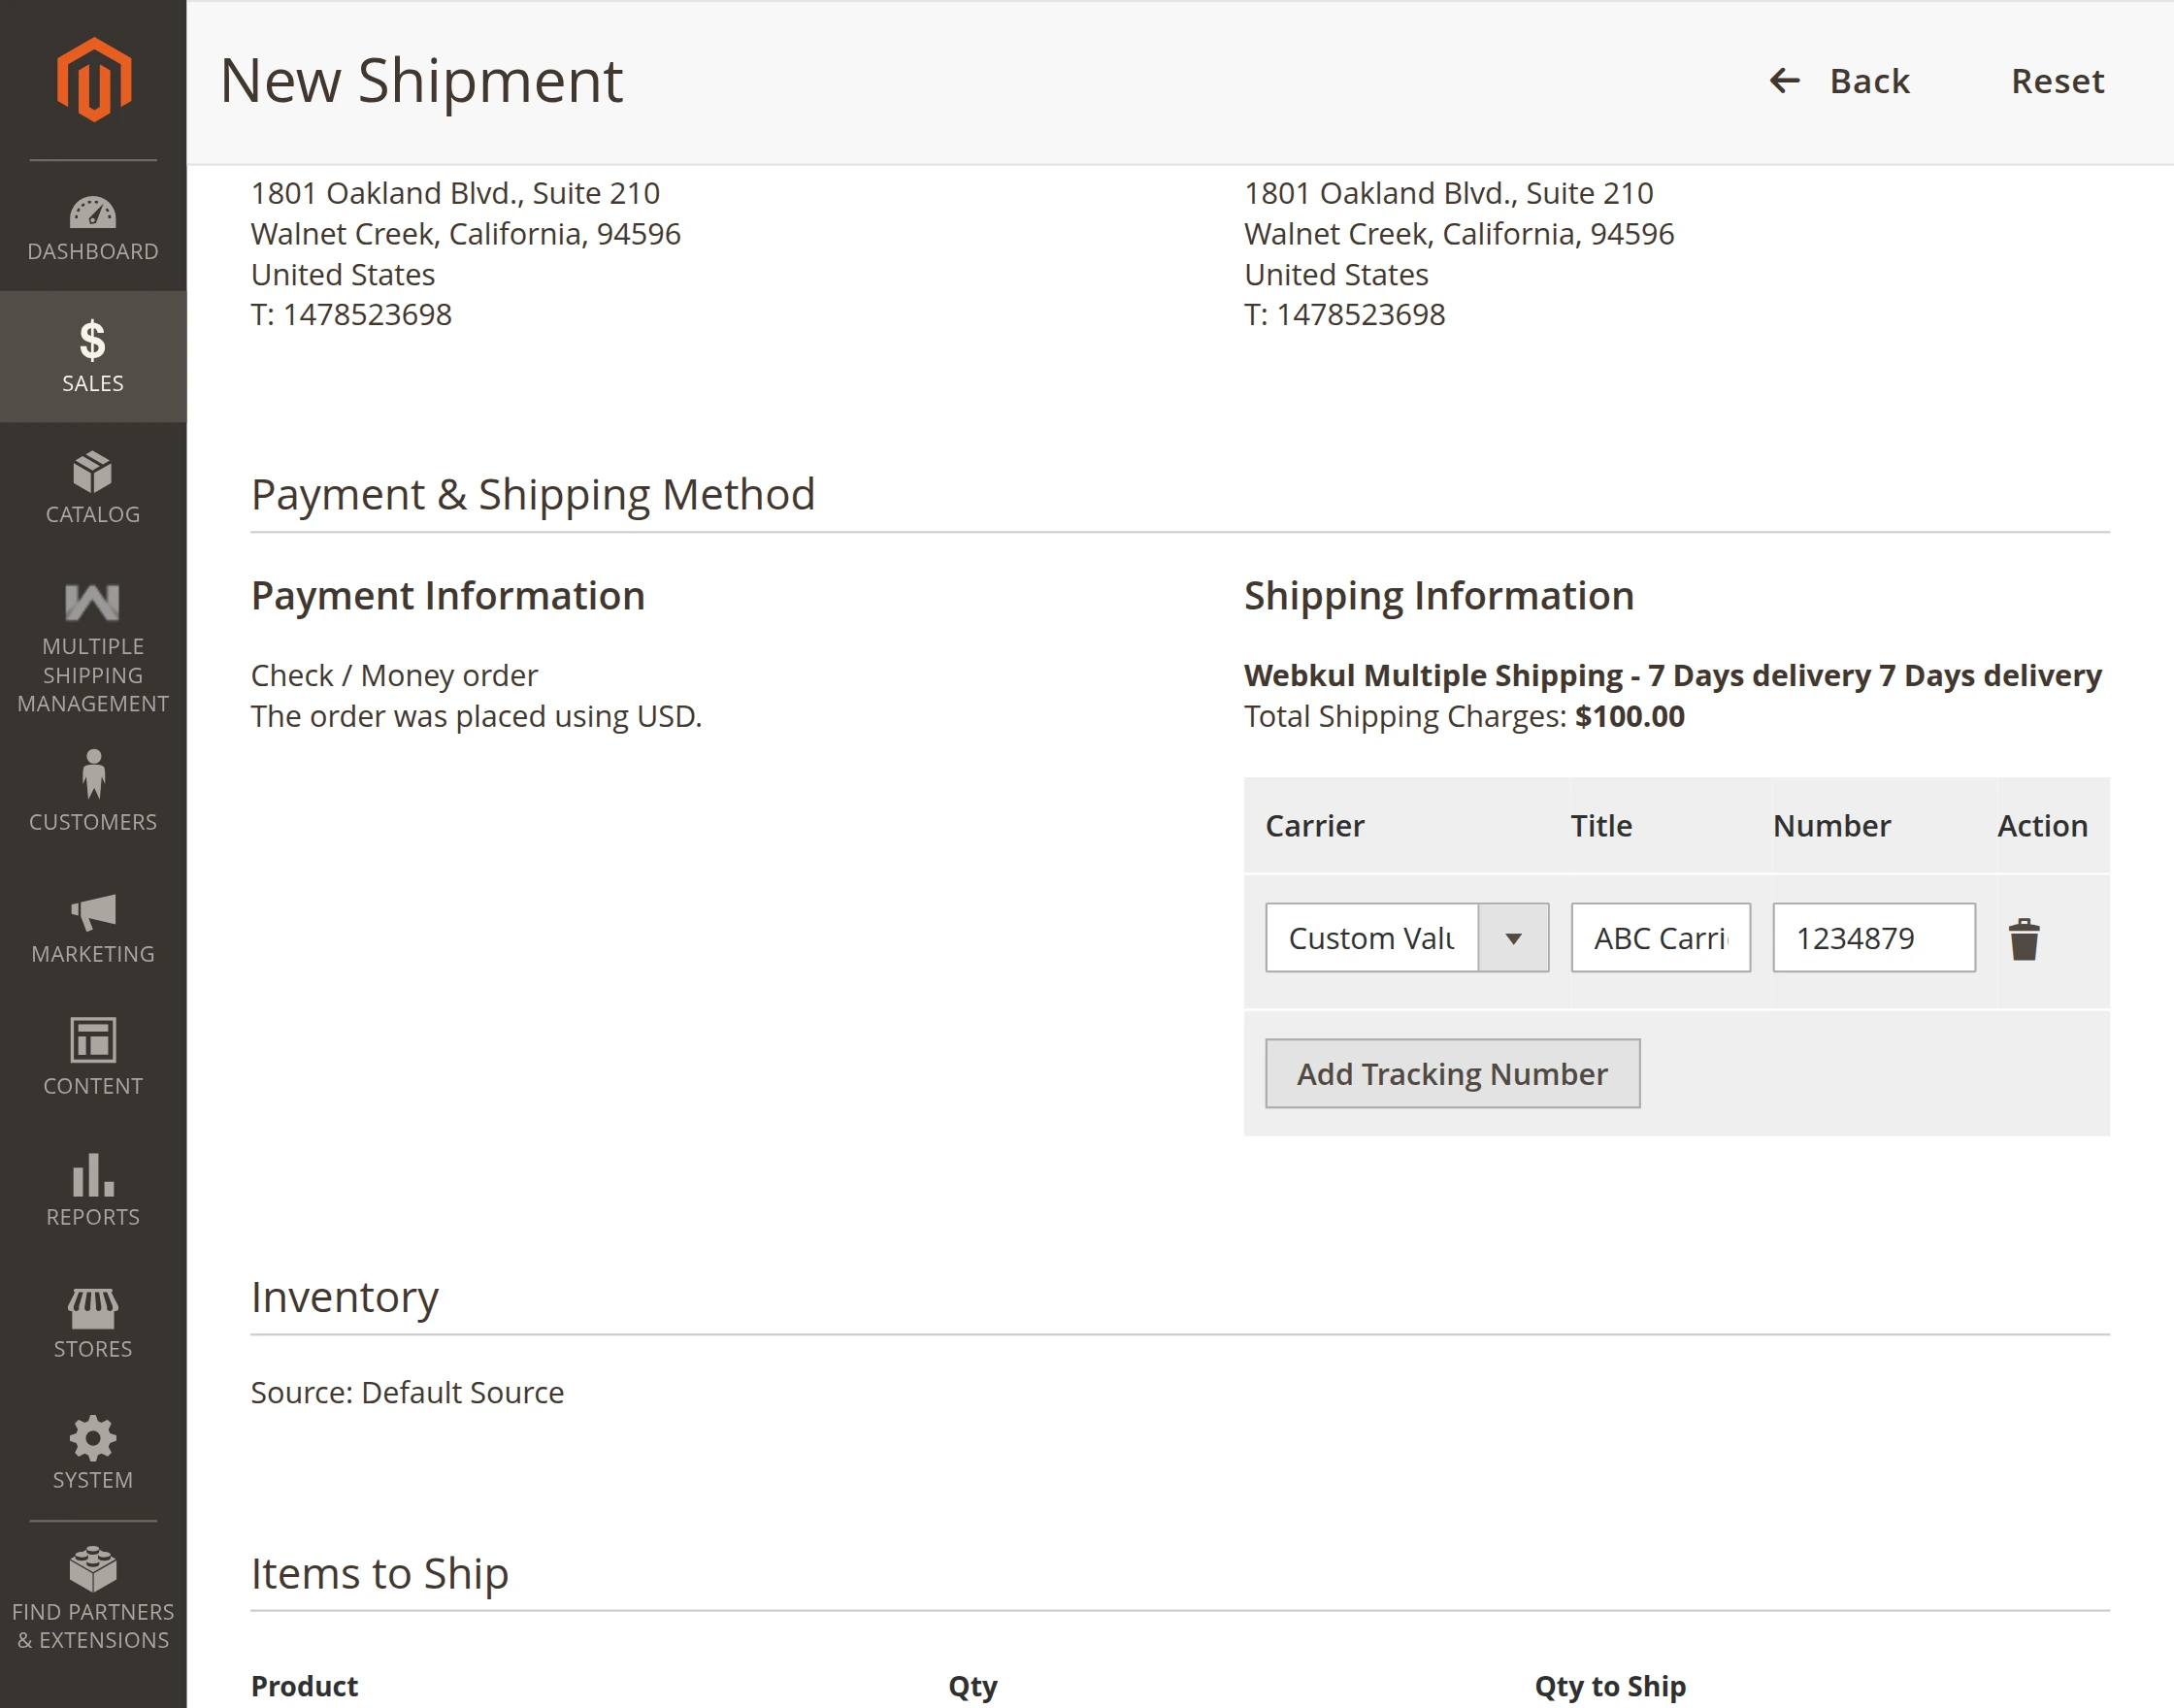
To complete the shipment process the admin needs to click on submit shipment button as shown in the image below.

The admin needs to click on shipment under the order view section and click on the view under the Actions column.
Now the admin will be redirected to a new page as shown below image. The admin can send tracking information to the customer through the mail and can also print the packing slips.

Packing Slip
Once the shipment has been created the admin can print the packing slip by clicking on the print button. The packing slip will be created as shown in the below image.

Customer end
When the admin creates the shipment this is how the customer will be notified on the mail and order page as shown in the image below.

That’s all for the Multi-Shipping for Magento 2 (Adobe Commerce) extension.
If you still have any questions regarding the module please create a support ticket by clicking here or send an email to [email protected]
Explore the Adobe Commerce Cloud development services by Webkul. You may also browse other quality Magento 2 extensions.
Current Product Version - 5.1.1
Supported Framework Version - Magento 2.0.x, 2.1.x, 2.2.x,2.3.x, 2.4.x

Be the first to comment.