Magento 2 Custom Option Marketplace add-on allows marketplace sellers to create and manage custom options for their products.
The module will allow the seller to add multiple custom options to each product. The sellers can also set up price-dependent or independent custom options and delete the custom options as per the requirement.
The module supports the following input types- Text(Field, Area), File(File), Select(Drop-Down, Radio Buttons, Check-Box, and Multi-Select), and Date(Date, Date & Time, Time).
Note: To use this module, you must have installed the Magento 2 Marketplace extension first.
Check the plugin working at storefront –
Features
- The admin can enable or disable the module.
- The seller can add various custom options for their products new and existing products.
- Support all input types- Text(Field, Area), File(File), Select(Drop-Down, Radio Buttons, Check-Box, and Multi-Select), and Date(Date, Date & Time, Time).
- The seller can set the price for the custom options along with the price type and SKU.
- It supports both price-dependent and independent custom options.
- Define the price type as fixed or percentage.
- The seller can make the custom option as required or not.
- The seller can manage his custom product options of their products.
- The vendors can drag and drop the options position as per their needs.
- The customers will be able to choose the product options on the product page.
- Fully dynamic custom option creation.
- Fully open-source and easy to use.
- The extension is compatible with the Hyva Theme.
Installation
The installation is quite simple just like the standard Magento 2 extensions.
Customers will get a zip folder and they have to extract the contents of this zip folder on their system.
The extracted folder has an src folder, inside the src folder you have the app folder. You need to transfer this app folder into the Magento 2 root directory on the server as shown below.
If you have downloaded the module from Magento Connect then unzip the respective extension zip and create Webkul(vendor) then Customoption(module) name folder inside your Magento root directory as app/code/Webkul/Customoption and then move all module’s files inside /app/code/Webkul/Customoption/ folder in Magento root directory.
After the upload, you can see the folders in your Magento 2 Root Directory.
After the successful installation, you have to run these commands in the Magento 2 root directory.
First command- php bin/magento setup:upgrade
Second Command – php bin/magento setup:di:compile
Third Command – php bin/magento setup:static-content:deploy
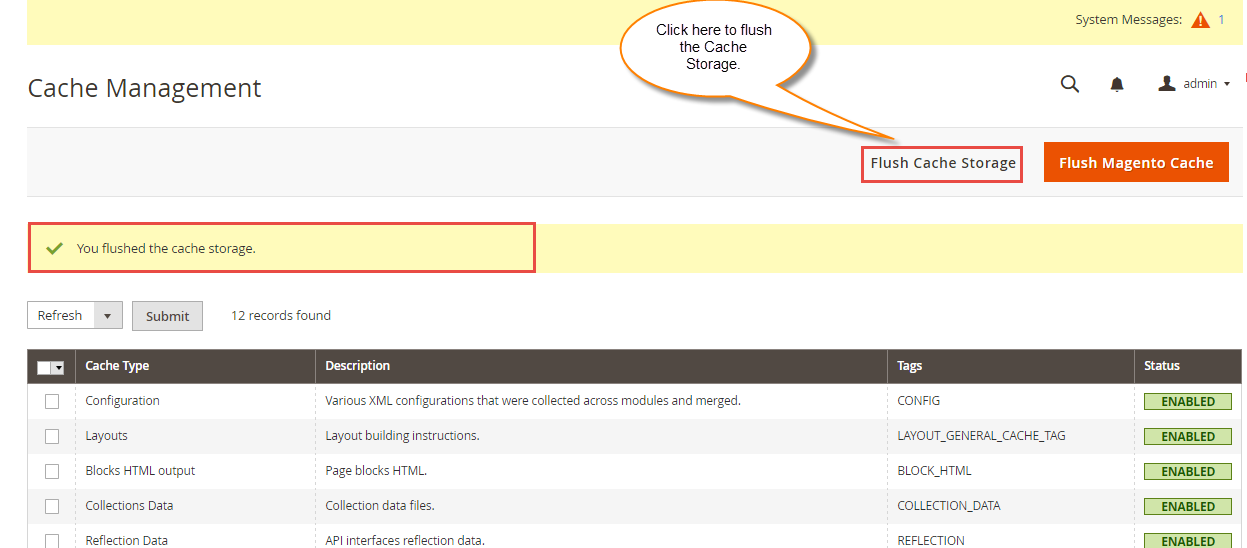
After running the commands, you have to flush the cache from the Magento admin panel by navigating through->System->Cache management as shown below.
Multi-lingual Configuration
Module Translation
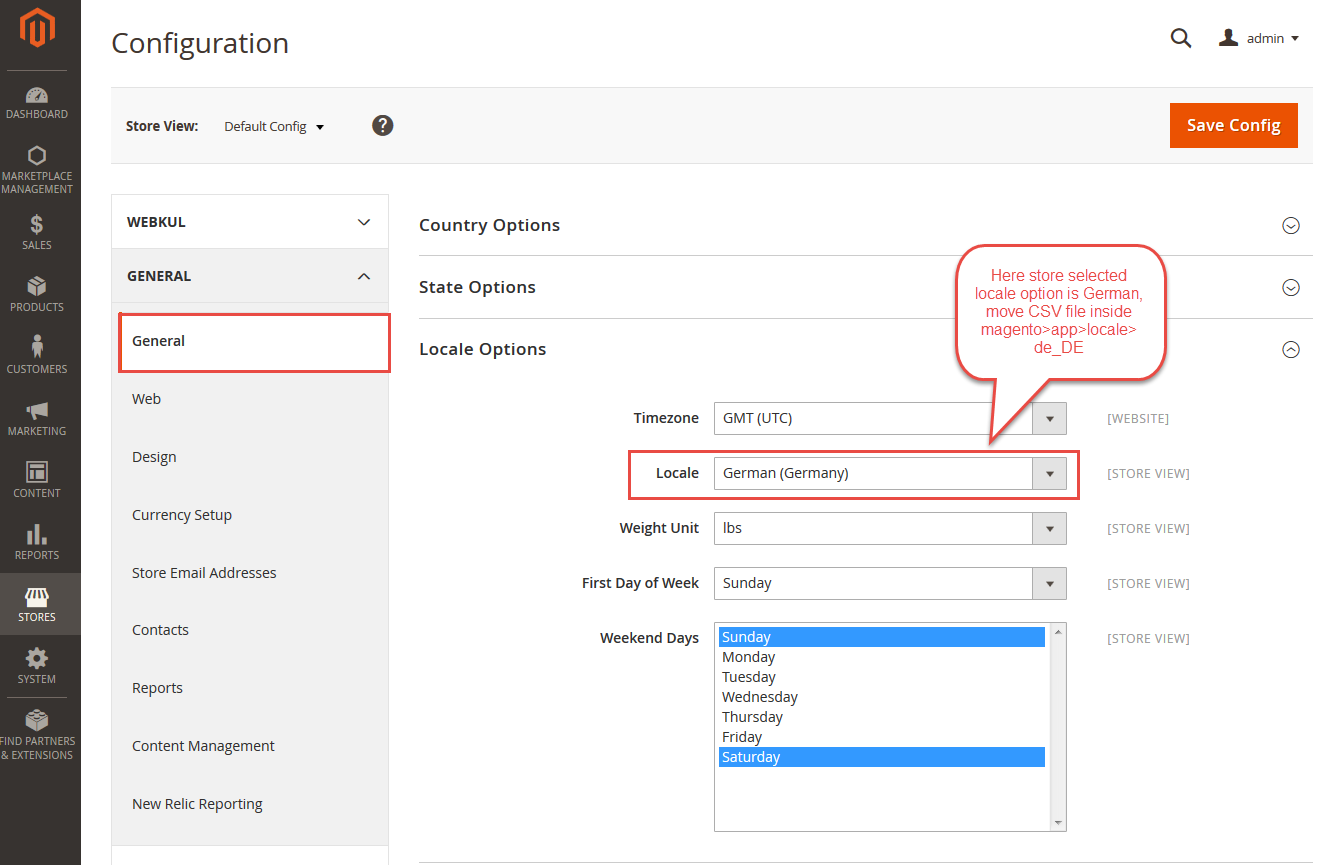
If the user wants to translate their module from English to German then they need to follow the path app/code/Webkul/Customoption/i18n in their unzipped Magento 2 Customoption folder and will get a CSV file with name “en_US.csv”.
Now they will rename that CSV as “de_DE.csv” and translate all right side content after the comma into the German language.
After editing the CSV, save it and then upload it to the path app/code/Webkul/Customoption/i18n where they have installed Magento 2 on the server.
The module will get translated into the German Language. It supports both RTL and LTR languages.
Module Configuration
Seller End
The seller can easily use the custom options for their products.
For this, the sellers will navigate to the “New Products” page in the seller marketplace account and add/edit the product with the custom option like in the below snapshot.
 The seller can edit and manage(add/delete) custom option as per the requirement. Also, can create price dependent and an independent custom option. The seller can set the price for the custom options along with the price type and SKU.
The seller can also make the custom option as required or not. And, can drag and drop the options and custom rows position as per their need.
Note: The module supports the following input types as per the below image.

Front-End
The custom option will be visible on the product view page that was set by the seller as per the below image.
When a customer buys a product by selecting the custom option then the additional price for that custom option will be added to that product.
The selected custom option will be visible in the shopping cart also as per the below image.
That’s all for the Magento 2 Marketplace Custom Options extension. Still, have any issues feel free to contact us at http://webkul.uvdesk.com/
Current Product Version - 5.0.3-p1
Supported Framework Version - Magento 2.0.x, 2.1.x, 2.2.x,2.3.x, 2.4.x


1 comments