Magento 2 Advanced Booking Notification: Using the Magento 2 Booking reservation Notification extension, the admin can send SMS notifications in advance to the customers for the booking notifications. The notifications can be sent out to multiple customers at a time as well.
Note:
1. This extension is an add-on to the Magento 2 Advanced Booking and Reservation extension. So, to use this extension you must have first installed the Magento 2 Advanced Booking and Reservation extension.
2. Booking types supported – Default, Appointment, Event, Rental, Hotel, and Table.
Features
- Send SMS notifications to customers on Booking Products.
- SMS Notification on the booking confirmation.
- SMS Notification on booking cancellation.
- The admin can select bookings and send a notification through mass action.
- SMS Notification option on view booking admin grid.
- Bulk SMS Notifications to customers with frequency days before.
- Bulk SMS Notification to customers with frequency minutes before.
Installation
Follow the below steps for installing the extension –
Step 1:
Unzip the respective extension zip and then move the “app” folder (inside the “src” folder) into the Magento 2 root directory on the server.
Step 2:
Now, run the below-mentioned commands in the Magento 2 root directory via the terminal.
composer require twilio/sdk
php bin/magento setup:upgrade
php bin/magento setup:di:compile
php bin/magento setup:static-content:deploy
Step 3:
lastly, flush the cache and re-index all by navigating through System->Cache management.

Language Translation
To translate the module language, please go to app>code>Webkul>AdvanceBookingNotifications>i18n and edit the en_US.csv file. Now, translate the words on the right and upload the modified file to the same location. The filename of the translated file should be according to the language and region code like de_DE.csv.

How to get Twilio Credentials?
The admin can get the Account SID, Auth Token, and Twilio Phone Number by following the below steps:
Step 1: Go to the web address https://www.twilio.com/ and click on the SIGN-UP button as shown below –
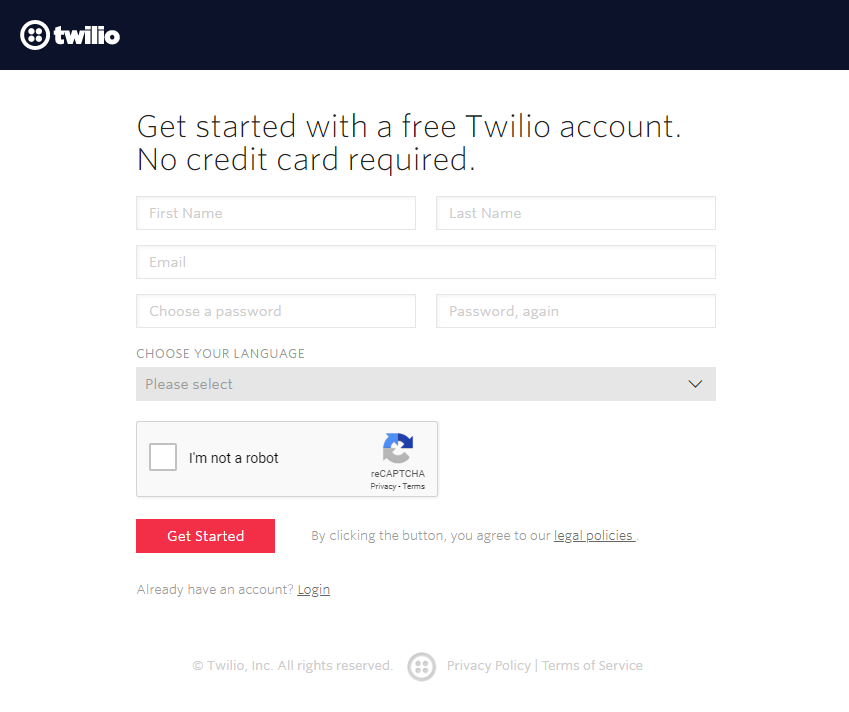
Step 2: Now after clicking on the SIGN-UP button, below page will open. Here, the admin will enter all details to get registered and will tap the Get Started button to proceed further.
Step 3: Now, enter your mobile phone number and tap the Verify button to verify the number.
Step 4: Now, you will receive a verification code on your mobile phone. Enter that verification code and tap the Submit button.
Step 5: Now, the page that comes up, on the top right-hand next to your name tap the down arrow and then click the User Settings menu option.
Step 6: Now go to the Dashboard menu option in the left panel. Here, you will find the Account SID, Auth Token.
Step 7: To get the Twilio phone number, go to the dashboard again and tap the Phone Numbers link.
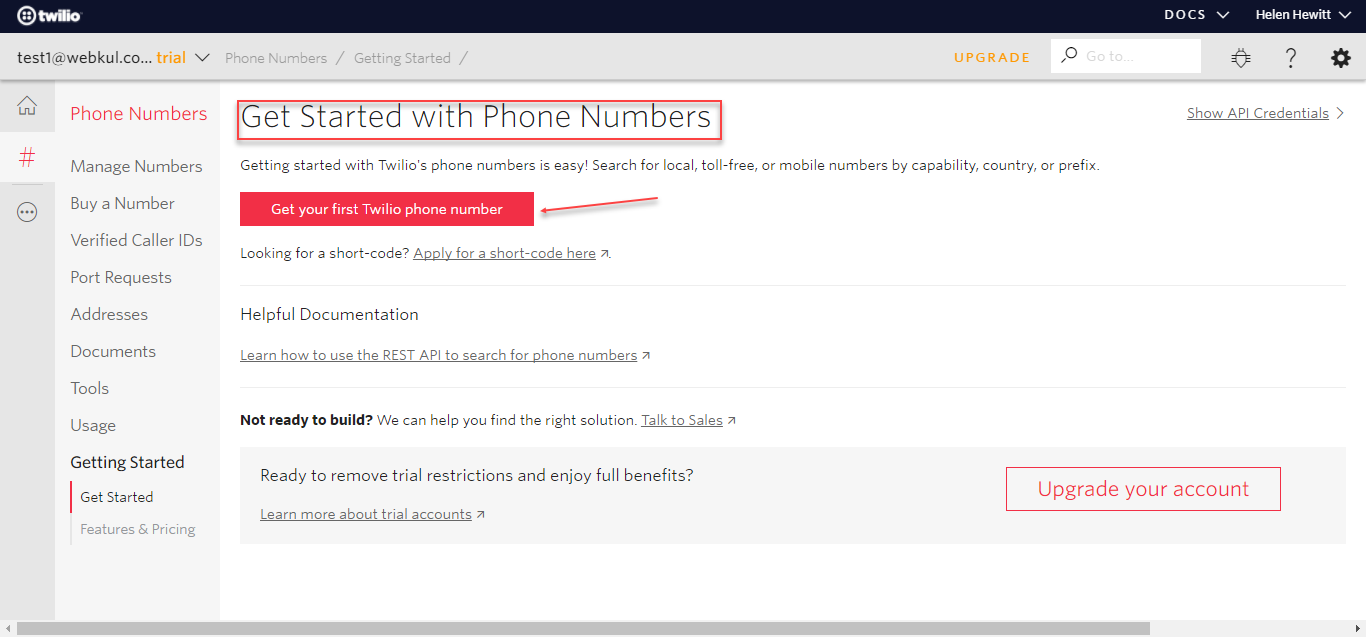
Step 8: Clicking the phone numbers link will bring up the below page. Here, click on the Get Started button.
Step 9: The section that comes up, click the Get your first Twilio phone number button.
Step 10: Clicking the Get your first Twilio phone number in the previous step brings up a pop-up window. Click Choose this Number button to proceed further.
Step 11: Now, you can see your new phone number, click done to go back.
Step 12: Now, to check your phone number click the Phone Numbers link under the dashboard section as shown in step 7 and you will redirect to your phone number section.
Module Configuration
After the successful installation, to configure the module settings navigate through Stores->Configuration->Webkul->Notifications Setting. Here, we have three sections for the configuration of various settings of the extension.
Twilio API Details:
Auth ID: Enter the Auth ID that the admin received after registering at Twilio.
Token: Enter the Token that the admin received after registering at Twilio.
Sender Mobile: Enter the mobile number that the admin received after registering at Twilio.
Booking Reminder:
Booking Reminder (Days Before): Set the days for the booking reminder message that will send to the customers prior to the actual booking date.
Booking Reminder (Minutes Before): Set the minutes for the booking reminder message to be sent to the customers prior to the actual booking time.
Reminder Messages:
Message(Minutes Before): Configure the the message for minutes before event reminder that will send to the customers prior to the actual date of booking.
Message(Days Before): Configure the message that will deliver to the customers for the days before the event reminder.
Message(Invoice Create): Configure the message that will send to the customers when the invoice gets created.
Message(Order Create): Configure the message that will send to the customers when the order gets created.
Message(Order Cancel): Configure the message that will send to the customers when the order gets canceled.
Default Message: This message will send to the customer if the message field is left empty while sending custom messages from the ‘View Bookings‘ grid.
After making all the settings, tap the Save Config button at the top right-hand corner.
SMS Notifications
Order Place:
When the customer places an order, the sms notification for the order palce is sent to the customer.

INVOICE CREATION:
When the admin generates the invoice from the backend, the Invoice Generated notification will be sent to the customer as shown below.

ORDER CANCELLATION:
When the admin cancels the booking from the backend, the Booking Cancellation notification will send to the customer as per the below image.

REMINDER/ALERT MESSAGES:
Booking alert messages will send to the customers on configured date and time. And, this configured date and time should be prior to the actual booking date and time. These messages will remind the customers about their booking date and time.

Note: A cron is set for this module. So, the alert messages will send to the customers automatically.
Send Custom Messages – Admin
The admin will be able to send custom messages to the customers. To do so, the admin will navigate to the View Booking Orders section under Advanced Booking System.

To send the message notifications manually, the admin will first select the booking IDs for which he wants to manually send the notifications. Then from the Actions drop-down option select the Send Notification option to send the notification manually to the customers.

After clicking the Send Notification button, a pop-up will appear. here, the admin can enter the custom message and tap the Continue button to send the message.

Here, the admin will see a success message as shown below in the snapshot.

After this, the customer receives the message as shown below in the snapshot.

That’s all about the Magento 2 Advanced Booking Notification extension. If you have any query or suggestion regarding this extension then kindly get back to us at [email protected].
Current Product Version - 5.0.0-p1
Supported Framework Version - Magento 2.0.x, 2.1.x, 2.2.x,2.3.x, 2.4.x


Be the first to comment.