Magento 2 Distance Shipping module helps calculate shipping charges based on the distance between the store location and the customer’s delivery address.
This module is designed for Magento 2 store owners, eCommerce businesses, local delivery services, and merchants who want to offer distance-based shipping rates for accurate delivery pricing.
Magento 2 Distance Shipping Module ensures accurate shipping cost calculation, improves pricing transparency, and lets customers estimate delivery charges before placing an order.
Check the plugin workflow –
Features- Magento 2 Distance Based Shipping Calculation
- Admin can enable/disable the Distance Rate Shipping method for their Products.
- Shipping Origin Address can be set by the Admin, based on which the calculations will be done.
- The Shipping Rates per Unit Distance can be set by the Admin.
- Admin can set to apply the shipping rate item wise.
- The unit distance set by the admin can be in Kilometer or Mile.
- Also, the Admin can add a Handling Charge, Minimum Charge.
- The Maximum area to cover can be set by the Admin.
- Also, the Admin can set Custom Error Message to display if shipping not applicable.
- The admin can enable to Display Estimate Shipping Rate on Product pages.
- Also, the Admin can set distance calculations based on “Google Map Distance Matrix” or “Latitude Longitude”.
- The extension Supports Graphql API.
- The extension is compatible with the Hyva Storefront and Hyva Checkout.
Install Extension from Webkul Store
#1 Download Module
Firstly, you need to log in to Webkul Store, go to My Account>My Purchased Products section, verify and then download and extract the contents of this zip folder on the system.
#2 Upload Folder
Customers will get one zip folder and they have to extract the contents of the zip folder on their system.
Also, the extracted folder will have a src folder, inside the src folder you have the app folder.
Then, You need to transfer this app folder into the Magento2 root directory on the server as shown below.

After the successful installation, you have to run these commands in the Magento2 root directory:
#3 Run Commands
After uploading the module folder, you need to run the following commands in the Magento 2 root directory:
php bin/magento setup:upgrade
php bin/magento setup:di:compile
php bin/magento setup:static-content:deploy
Install Extension from Magento Marketplace
If you have purchased this extension from the Magento Marketplace then please follow the below process or visit this link.
#1 Get Access Keys
You need to get access keys, navigate to My Profile in Magento Marketplace, then choose Access Keys in the My Products section.

Go to Magento 2 and then you need to copy both the Access Keys – Public Key and Private Key. These access keys will be needed in the next steps for authentication.

If access keys are not created earlier, click Create A New Access Key, enter any name and click OK.

#2 Update composer.json File
To know the component name and version number, go to your Magento Marketplace account section, My Profile>My Purchases, then find this extension to view the details.
Please note – Below is an example image, every extension will have its unique component name and version.

After that, navigate to your Magento project directory and update your composer.json file in the following format.
composer require <component-name>:<version>
For example, to install version 5.0.0 of this extension you need to run the following command:
composer require webkul/distance-rate-shipping:5.0.0
#3 Enter Access Keys
Now you will need to enter the Access Keys that you obtained as explained in the first step #1 Get Access Keys.
Wait for Composer to finish updating your project dependencies and make sure there aren’t any errors.
#4 Run Command
You need to run the following commands:
php bin/magento setup:upgrade
php bin/magento setup:di:compile
php bin/magento setup:static-content:deploy
php bin/magento indexer:reindex
php bin/magento cache:clear
Hence, after running the commands, you have to flush the cache. This is done from the Magento admin panel by navigating through->System->Cache management as shown below.

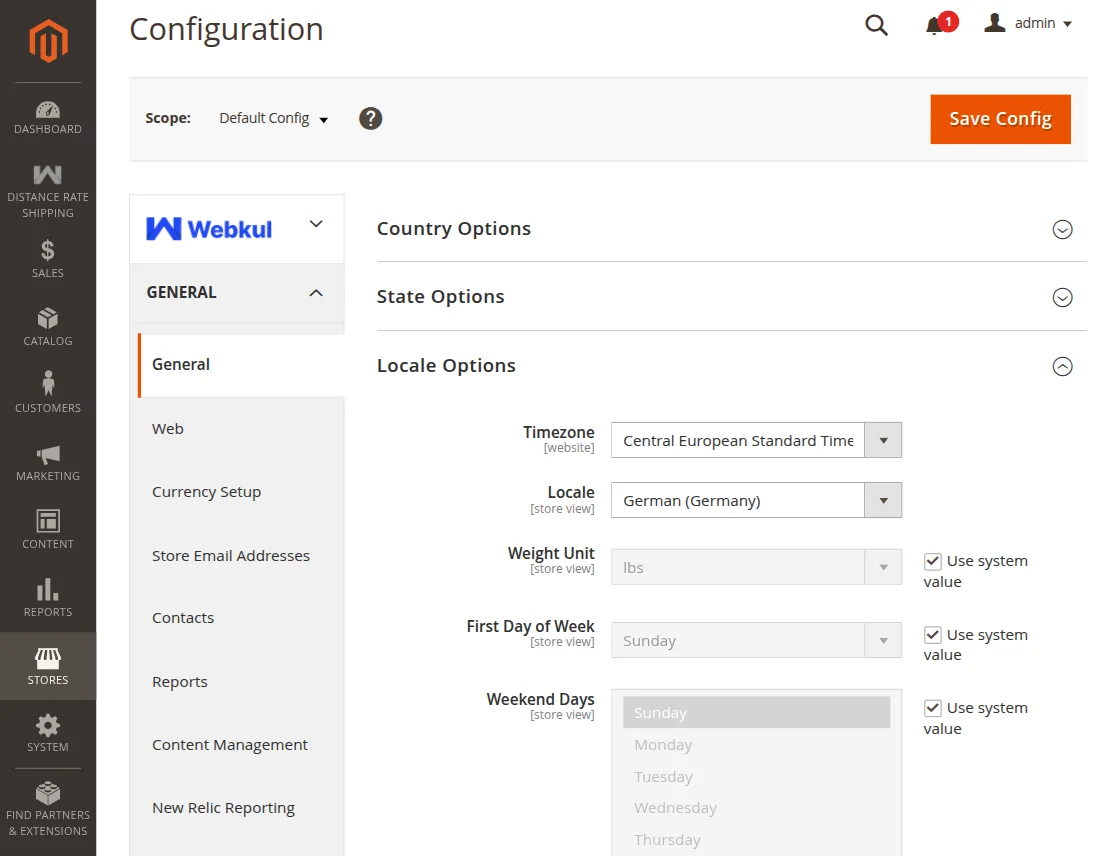
Configuration For Multi-lingual Support
For the multilingual support, the admin will navigate through Store->Configuration->General ->Locale Options
Then, the admin can select the locale as German (the language into which admin wants to translate his store content).
Translation
If the user wants to translate their module from English to German.
Then, they need to follow the path app/code/Webkul/DistanceRateShipping/i18n in their unzipped Magento 2 DistanceRateShipping folder and will get a CSV file with the name “en_US.csv”.
Now they will rename that CSV as “de_DE.csv” and translate all right side content after the comma in the German language.
After editing the CSV, save it and then upload it to the path app/code/Webkul/DistanceRateShipping/i18n where they have installed Magento2 on the server.
The module will get translated into the German Language. It supports both RTL and LTR languages.

Then, the user can edit the CSV file as shown below.

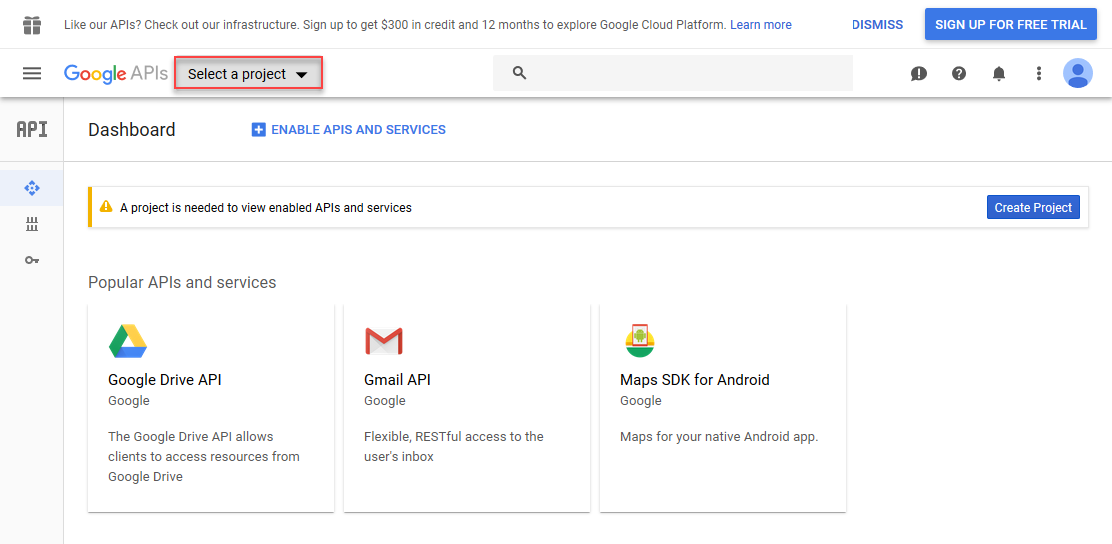
How to Get Google API Key
The admin needs to get the Google Maps API key to address auto-complete to work.
For getting the google API key, the admin needs to follow these steps:
Step 1. Go to console.developers.google.com and log in using your Gmail ID. After that, click on select a project.
Step 2. Click on New Project Button. After that, you need to enter the name of the project and Browse the location of the organization.

Step 3. After creating the project click on the Enable API And Services.

Step 4. Then click on the Maps JavaScript API to get the API key.

Step 5. After clicking on the Maps JavaScript API, you need to click on the ENABLE button.

Step 6. Once you have enabled the API then you need to navigate through Credentials> Credentials in APIs & Services.

Step 7. After that, you need to click on the create credentials and select the API key.

Step 8. Now you can copy the generated API key.

Configurations
After the successful installation, the admin will navigate through Stores-> Configuration-> Distance Rate Shipping to configure the initial module settings.
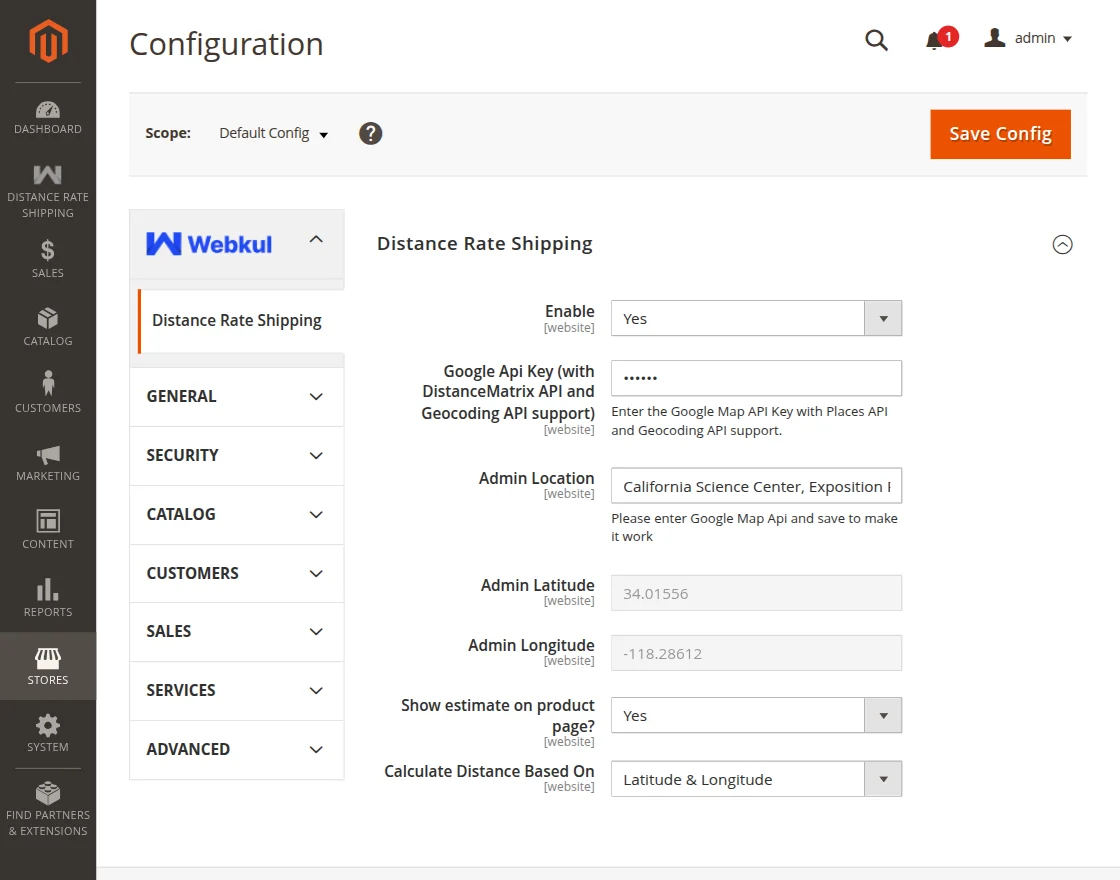
- Enable: The Admin can select Yes to enable the module.
- Google Map API Key: Enter the above generated Google Maps API Key here.
- The Admin Location: Here, the Admin can enter the location of the store.
- Admin Latitude: The latitude of the admin’s location will be automatically entered once the location is entered.
- Admin Longitude: Also, the longitude will be automatically set according to the entered location.
- Show Estimate on Product Page: If set Yes then this will show the estimate shipping charges on the product page.
- Calculate Distance Based On: The Admin can calculate shipping distance by either selecting “Google Map Distance” or “Latitude and Longitude”
Distance Rate Shipping Configurations
There are a few of the other configurations as well. The admin can configure further configurations by navigating through Stores-> Configuration-> Sales-> Delivery Methods-> Distance Rate Shipping.
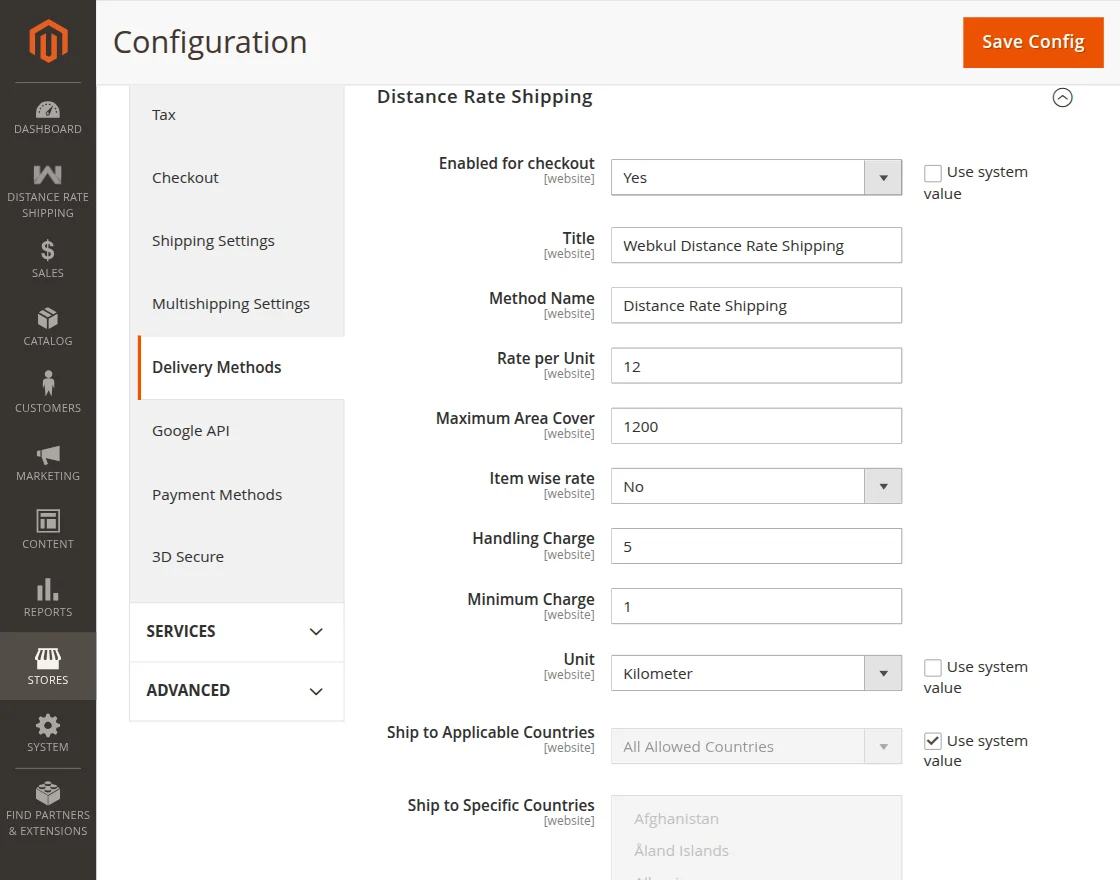
- Enabled for Checkout: If set yes then the Distance Rate Shipping will be visible at checkout.
- Title: Enter the Title of the shipping method that will display to the customers on the website front-end.
- Method Name: Also, the method name entered will display to the customers on the website front-end.
- Rate Per Unit: Enter the shipping charges applied on the basis of per unit, set. For example, if the rate per unit is set 50 and the unit set is kilometers and if any customer orders a product within a 1kilometer range then shipping charges will be 50.
- Maximum Area Cover: Here, enter the maximum area to cover for a distance rate shipping.
- Item Wise Rate: If set Yes then the shipping charges will be calculated based on per product. The shipping amount will be multiplied by the number of products ordered.
- Handling Charges: Enter the handling charges.
- Minimum Charge: Set the minimum charge. If shipping charges calculated is less than the minimum charge then minimum charges will be applied.
- Unit: Select the unit that will decide the shipping charges. The Admin can either select “Kilometers” or “Miles”.
- Ship to Applicable Countries: Here, select the countries where distance rate shipping will be applicable. The Admin can either select “All Allowed countries” or “Specific Countries”.
- Ship To Specific Countries: Select the specific countries where this shipping will be applicable. Also, This setting will be available if the admin has selected “specific countries” on “Ship to Applicable countries”.
- Show Method If not Applicable: If yes then the method will show at the front if even if the shipping is not applicable to that area.
- Display Error Message: The entered error message will show when the distance rate shipping is not applicable.
Distance Rate Shipping Manager
The admin can manage the shipping by navigating to Distance Rate Shipping > Distance Rate Shipping Manager under the admin panel. Two Options will be visible as Shipping Detail and Add Shipping.
Under the Shipping Details tab, all the range of regions will be visible in the form of a list. The admin can apply filters and take actions like deleting the regions from the list.
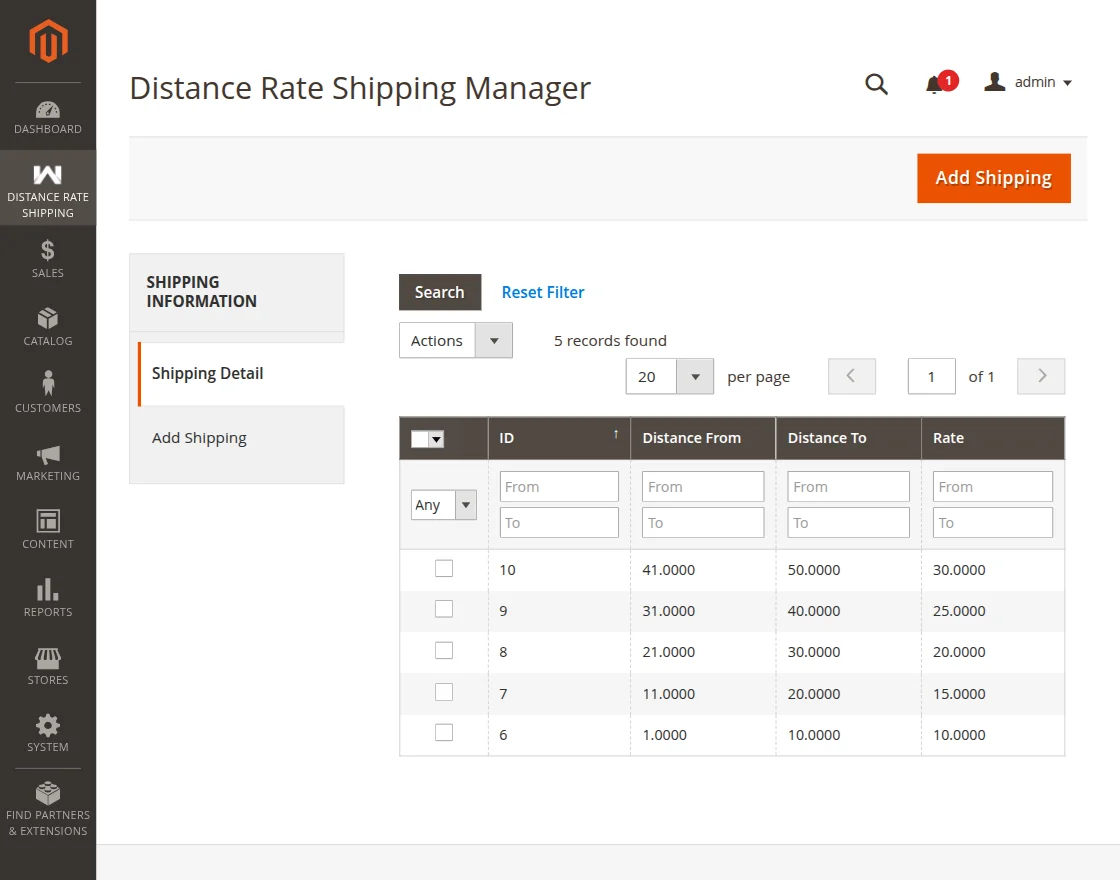
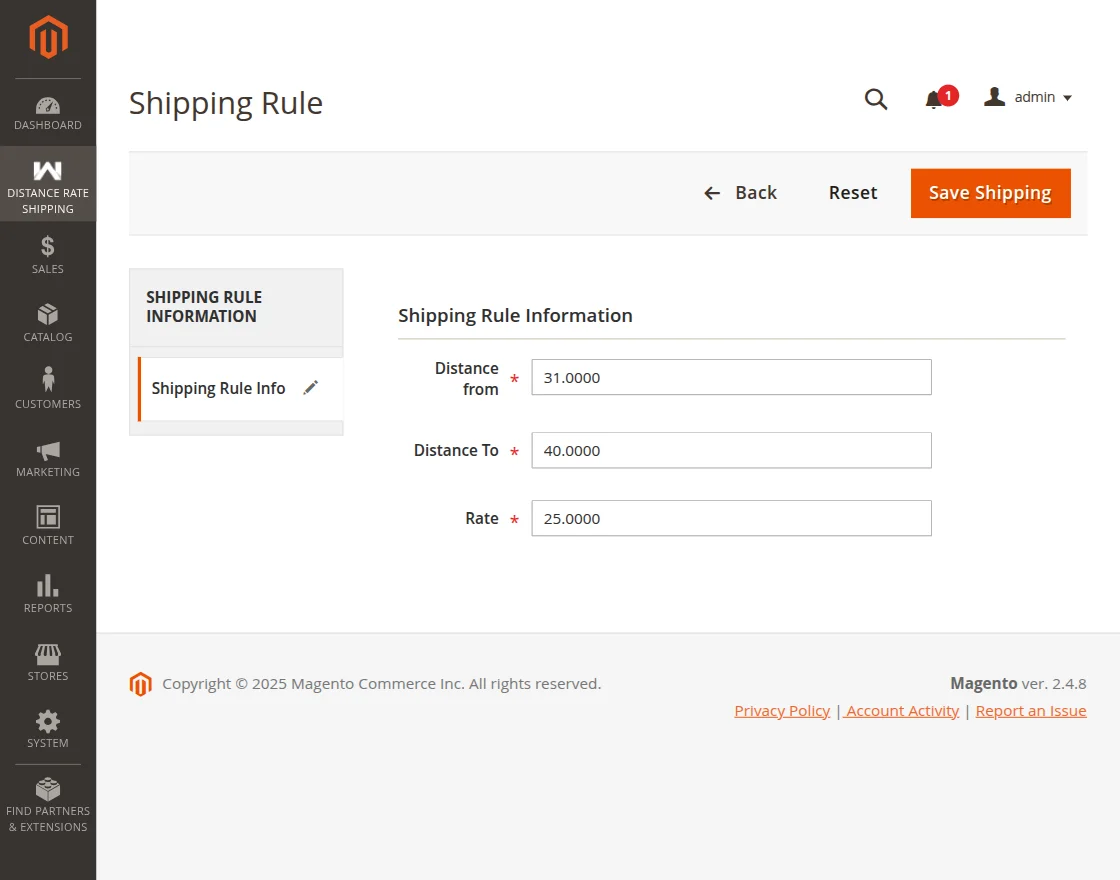
The admin can also Edit the desired range by double-clicking on the particular grid. Further, the page will appear showing the Shipping Rule Information.
There the admin can enter the updated Distance From, Distance To, and Rate as shown in the image below:
Under the Add Shipping tab, the admin can upload the desired CSY that will help to enter many regions at once. By clicking on the Choose File button, the admin will upload the file.
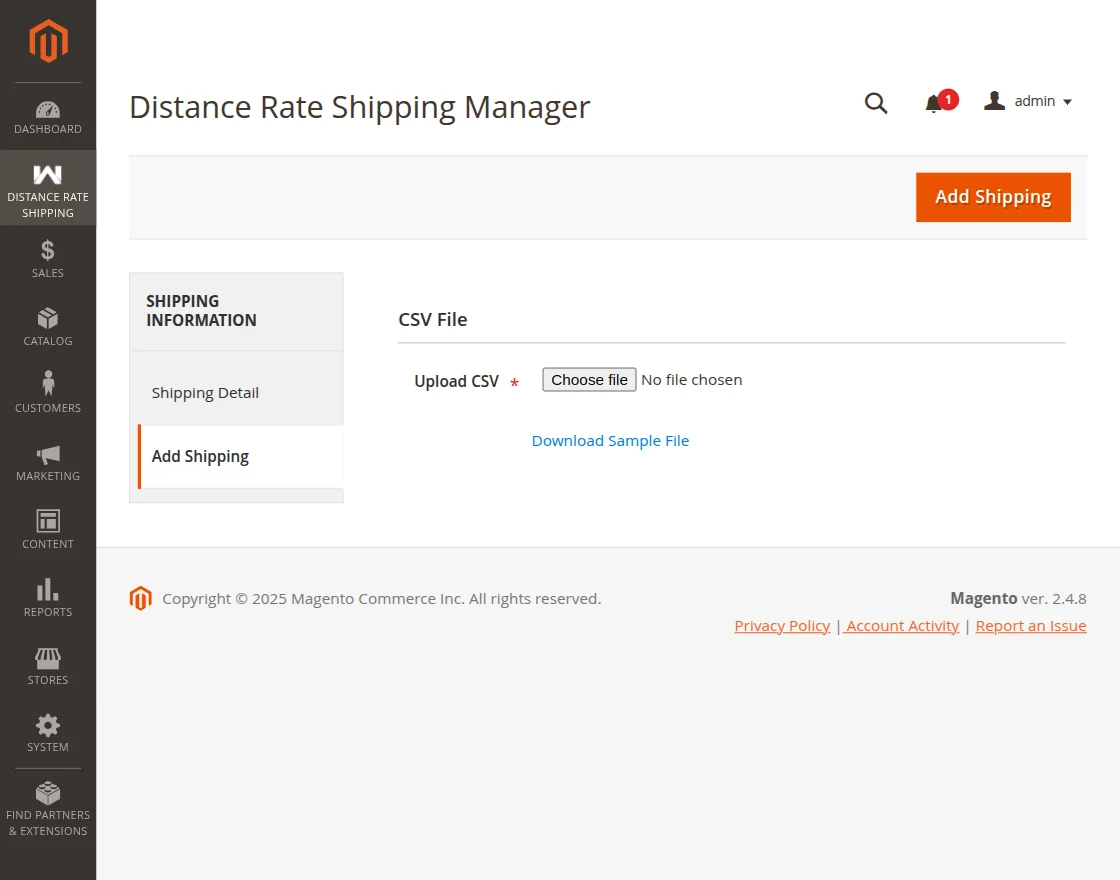
The format of the CSV file will be similar to the below image:

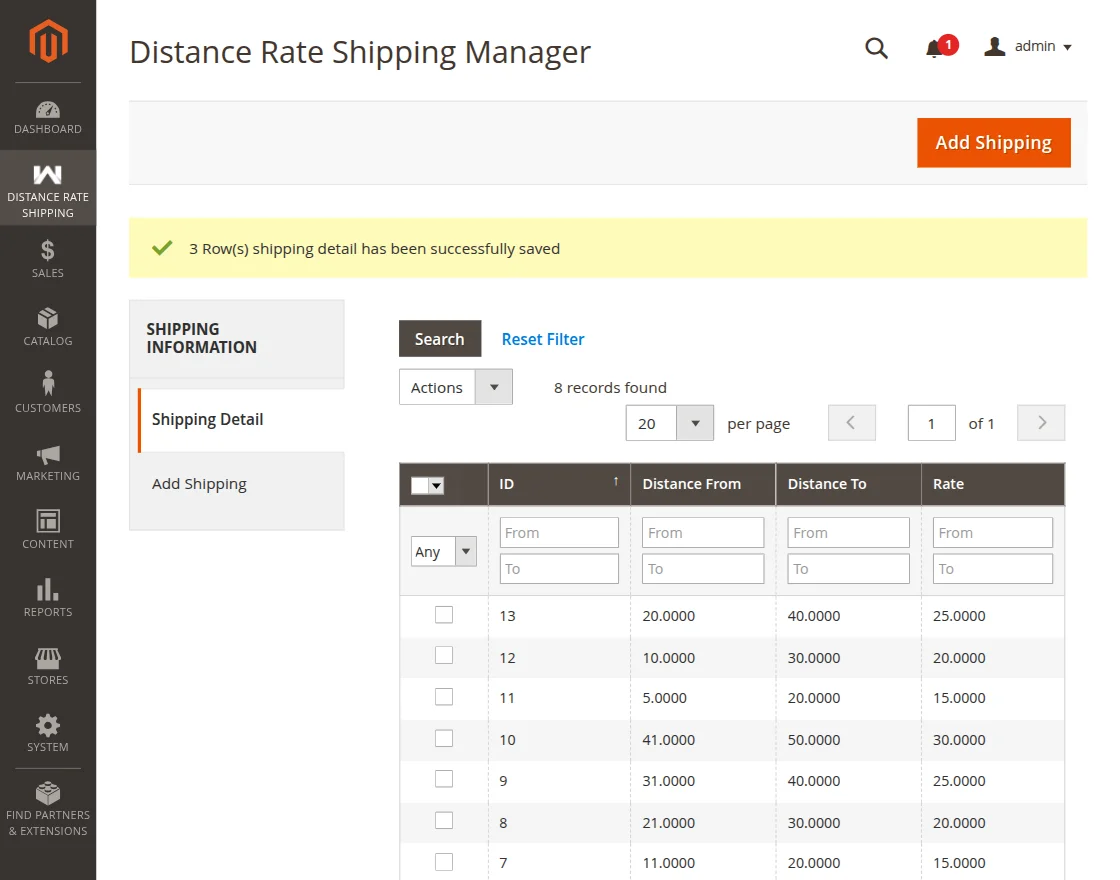
Once the admin will click on the Add Shipping button, the details will get saved and the success message will appear as shown in the image below:
In this way, the shipping details can be added and managed.
Note: In case, if similar ranges are mentioned then the system will always choose the lower rate.
Shipping Charges Magento 2 Distance Shipping – Customer View
The customer can check the estimated shipping charges on the product page as shown below:

Also, the customer will enter the location and click on calculate to know the estimate shipping charges.

If the entered location is not available within the maximum coverage area then a message “Shipping is not available in this location” will appear.

After the availability of shipping in the desired location, the customer can Add the product to the Cart and can proceed towards the checkout process.
The customer can also check the estimated shipping charges on the cart page as well.

Now the customer can select the Distance Rate shipping and proceed towards the checkout process

Now the customer can add the shipping address and can select the Distance Rate Shipping.

After selecting the shipping address using the Magento 2 Distance Shipping, the customer can select the payment method, click on “I agree to the terms and conditions” and can place an order.

So, that’s all for Magento 2 Distance Shipping Calculation extension. For any further, assistance, just raise a ticket here and for any doubt contact us at [email protected].
Current Product Version - 4.0.3-p1
Supported Framework Version - Magento 2.0.x, 2.1.x, 2.2.x,2.3.x, 2.4.x

Be the first to comment.