INTRODUCTION
Access Odoo data without login with Box Odoo Integration!
Storage and remote access to data are some of the common problems that shop owners often face. And to overcome them they need robust and secure storage that they can manage with ease and anyone easily.
Cloud storage can solve this problem conveniently as they are secure and strong and you can easily manage them and share data directly from them. But, how which cloud storage to choose?
We have the best solution for your problem, Box Odoo Integration module helps you with your storage and sharing problem. Further, you don’t need to worry about security and storage as Box cloud storage offer expandable storage and classification-based security control.
NOTE: Box Odoo Integration Module works in conjunction with the following module:
You would require to install this module first for Box Odoo Integration to work perfectly.
FEATURES
- You can store your Odoo data in Box Cloud.
- Manage attachment size and type in the Box cloud storage.
- Create/update file(s) or folder(s) in the cloud storage.
- Manage scheduler to export files/folders to Box or export them in real time.
- Set the maximum number of files allowed to export at a time.
- Create root folders in Odoo to manage all the files and folders inside it.
- The advanced filters differentiate the same object into different folders in Odoo.
- Import files from a specific folder to Odoo.
- Import data to Odoo in bulk or store all the attachments in a specific object (the directory should be mapped properly).
- You can also sync data dynamically model-wise or record-wise from Odoo to Box cloud.
- Access files from anywhere without logging in to your Odoo.
- Every synchronization history is managed in Odoo.
- Dynamic dashboard to track the data of the Box in the Odoo.
INSTALLATION
- Once you purchase the App from Webkul store, you will receive the link to download the zip file of the module.
- Extract the file on your system after the download finishes. You will be able to see a folder named- ‘box_odoo_integration.’
- Copy and paste this folder inside your Odoo Add-Ons path.
- Now, open the Odoo App and click on the Settings menu. Here, click on Activate the Developer Mode.
- Then, open the Apps menu and click on ‘Update Modules List.’
- In the search bar, remove all the filters and search ‘box_odoo_integration.’
- You will be able to see the module in the search result. Click on ‘Install’ to install it.
WORKFLOW CONFIGURATION
1. Firstly, open your Odoo backend and go to ‘Settings> Odoo Cloud Storage’ to view and add Box Cloud details.

2. In the image below, you can see the connection details like connection name and status.


3. Now, go to ‘Menu’ and select ‘Cloud Storage Integration’ to view all the integrated cloud storage. Further, you can import files and folders by clicking on the ‘Import’ button. In the same way, you can export files and folders by the ‘Export’ button. Further, the ‘Add’ button lets you add a new connection.

4. On the ‘Cloud Storage Integration’ homepage, you can see the donut charts of all the files and folders imported or exported on the cloud storage. Moreover, it will show ‘Storage Drive,’ ‘Folders,’ ‘Storage Drive’ details, and ‘Overall Storage Record.’

5. When you click the ‘Import button,’ a popup will open up on the homepage of cloud storage. In this popup, choose ‘Cloud Connection’ and ‘Select Folder,’ once done, click ‘Action Now,’ it will load and show you a ‘successful’ message.
The same thing will happen on clicking the ‘Export’ button, but the ‘Action’ will change from ‘Import File’ to ‘Export File.’

6. After that, click on ‘Cloud Mappings’ and choose ‘Folder.’
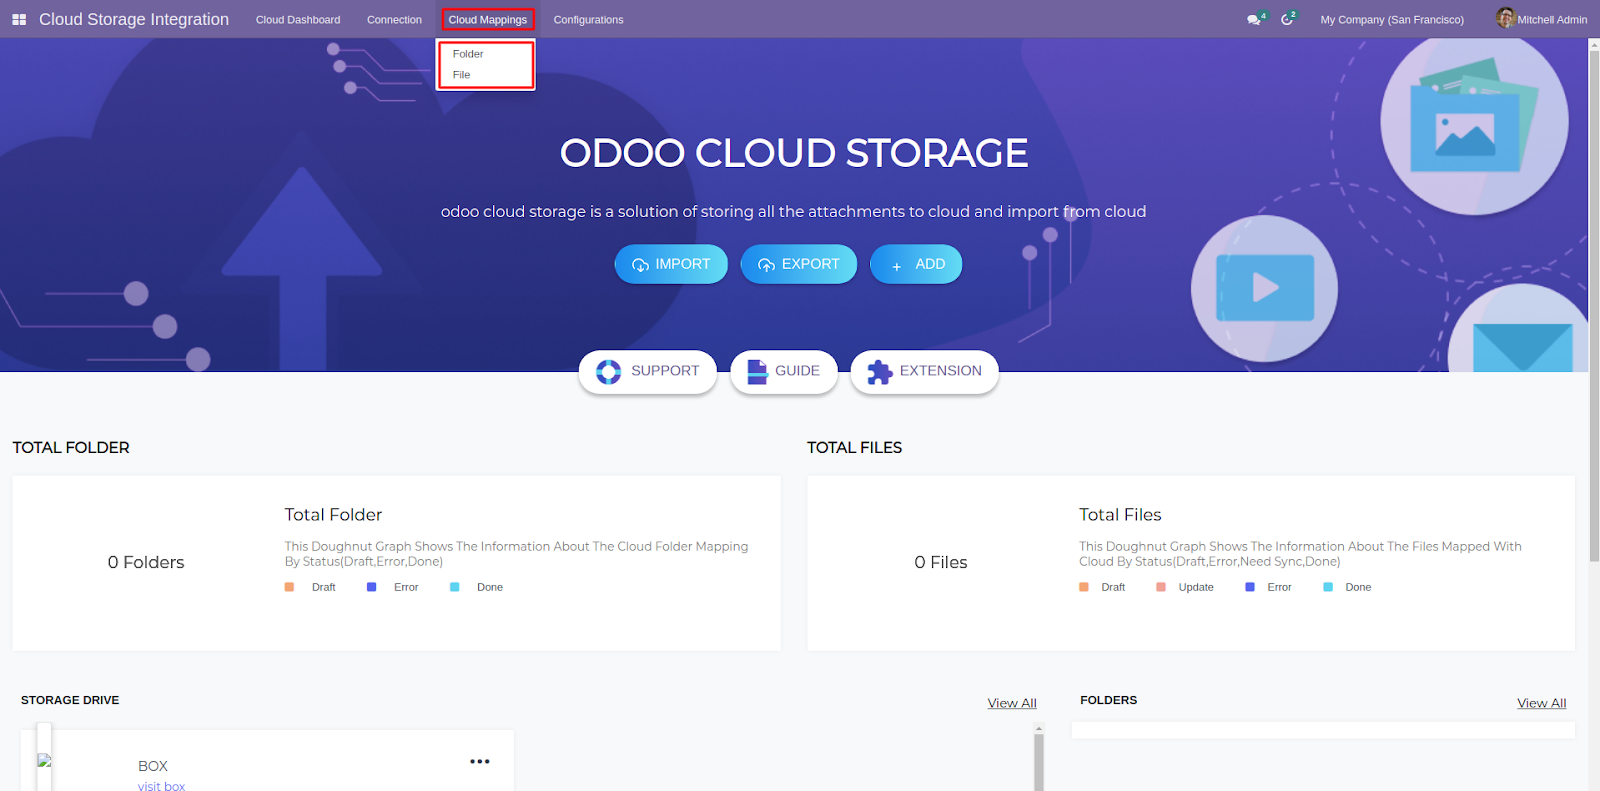
7. On the new page, you can see each mapped folder. Click on any folder to view all its details.


8. Go to ‘Cloud Mappings> File’ to view all the files. On the page, click on any record to view all its details.


9. You can also import or export attachments from ‘Quotations’ or ‘Sales Order.’ Go to ‘Sales> Quotations,’ open anyone of them and click the ‘Action’ button to view and choose ‘Export Update Attachment’ or ‘Import Attachment’ from Odoo to Box cloud or vice versa.

OTHER ODOO CLOUD MODULES
- Odoo Google Cloud Storage
- Odoo Amazon S3 Cloud Storage
- Dropbox Odoo Integration
- Odoo Google Drive Integration
- Odoo OneDrive Integration
- Nextcloud Odoo Integration
NEED HELP?
We hope you find the guide helpful! Please feel free to share your feedback in the comments below.
If you still have any issues/queries regarding the module, please raise a ticket at https://webkul.uvdesk.com/en/customer/create-ticket/.
Also, please explore our Odoo development services & an extensive range of quality Odoo Apps.
For any doubt, contact us at [email protected].
Thanks for paying attention!!
Current Product Version - 1.2.3
Supported Framework Version - V15, V14

Be the first to comment.