Adobe Commerce Cloud comes with an inbuilt RMA system. Hence, it can be utilized by the store owner to provide RMA functionality to their customers. Here, the store owner just needs to configure the RMA in their Magento 2 store.
An eCommerce website that has a dedicated return/refund policy assured the buyer towards their purchases. Therefore, a buyer feels secured by this.
In case something went wrong, their money is protected by the refund/return policy. Hence it is critical to get the attention of new buyers.
You may also check our Magento 2 RMA extension.
What is an RMA System?
A return merchandise authorization (RMA) system is essential for businesses selling their products online via an eCommerce Store. It is the system by which the store owner manages the requests of return/refund from their customers.
An RMA system makes it easy to submit a refund/return request on the eCommerce website. Therefore, the customer can send back the items they have purchased from the online eCommerce website.
Hence, an RMA system makes it simpler for the customers to exchange the items they have purchased or issue refunds.
A good RMA system includes other features as well, like having a conversation on top of a refund/return request. Generate shipping labels in case of return/exchange and many more.
Why Should an eCommerce Store Have an RMA System?
For the survival of a business, customer retention is one of the key factor. The companies which are selling even digital products look towards the subscription model.
In this way, the respective company can generate a recurring income. But is not limited to digital products. It is essential for the eCommerce businesses that are selling physical products.
Products that are get delivered with the help of a courier partner, likely have a chance of product damage during transit. And a good return/refund policy provides a sense of security to the first time buyer.
Boosting customer’s satisfaction is how those businesses get returning customers. An RMA system ensures a smooth experience during the return/refund or exchange of a product.
A bad experience while returning a product scares the most of a customer. It creates a terrible impression if a customer is facing a lengthy return/refund process.
The SLA to complete the return/refund cycle must be in a minimum time. Hence, a small process towards return/refund a product will boost the confidence of a customer for the next purchase.
It is the worst situation if a customer is not even able to connect with a business towards their return/refund requests. Hence, an RMA system is very crucial for an online business.
Adobe Commerce Cloud RMA (Configuration and Workflow)
Configuring Returns
Once enabled, a customer can submit the RMA request from the website. To generate an RMA the respective customer must have an item in the order that is available for the return.
Requests to return individual items are managed by the Enable RMA attribute in each product record.
By default, the configuration settings are applied to the product (Use Config Settings is selected). If Enable RMA is set to "No“, the product does not appear in the list of items that are available for return.
If the store owner changes the Enable RMA setting, it applies to both new and existing orders.

Enable RMAs for your store
- On the Admin sidebar, go to Stores > Settings > Configuration.
- In the left panel, expand Sales and choose Sales underneath.
- Expand the RMA Settings section.

- Set Enable RMA on Storefront to “
Yes".
This determines if customers can create and view RMA requests from the storefront. RMAs can be applied to both new and existing orders. - Set Enable RMA on Product Level to “
Yes".
This determines the default value for the Enable RMA attribute for individual products. - Set Use Store Address to one of the following values:
- “
Yes"– Send returned products to the store address. "No” – Enter an alternate address for product returns.
- “
- Click Save Config.
Configure shipping methods for returns
- On the Admin sidebar, go to Stores > Settings > Configuration.
- In the left panel, expand Sales and choose Delivery Methods.
- Expand the section for the carrier that store owner want to use for return service, such as UPS.

- Set Enabled for RMA to “
Yes". - Click Save Config.
Request RMA (Customer end)
A Customer needs to follow the below steps on the storefront to submit an RMA:
- In the footer, clicks Orders and Returns.
- To identify the order, enters the order information:
- Order ID
- Billing Last Name
- Clicks Continue.

- Below the order date, clicks Return.

- Chooses the Item to return and enters the Quantity to Return.
- Sets Resolution to one of the following:
- Exchange
- Refund
- Store Credit
- Sets Item Condition to one of the following:
- Unopened
- Opened
- Damaged
- Sets Reason to Return to one of the following:
- Click Submit.

Return request (Admin end)
Create a return request
- On the Admin sidebar, go to Sales > Returns.
- Click New Return Request.
- Click an order with a “
Complete"status to create a return request. - Under the Return Information section, select the Return Items tab.
- To add items to return, click Add Items.
- Select the checkbox for the required product and click Add Selected Product to returns.
- For Requested, enter the number of items to be returned.
- Set Return Reason to one of the following:
- Wrong Color
- Wrong Size
- Out of Service
- Other
If the reason for the return is different from those listed, store owner can enter their own if it is selected as the"Other” option.
- Set Item Condition to one of the following:
- Unopened
- Opened
- Damaged
- Set Resolution to one of the following:
- Exchange
- Refund
- Store Credit
- To create a return, click Submit Returns.

The newly submitted RMA request appears on the Returns page with a “Pending” status.
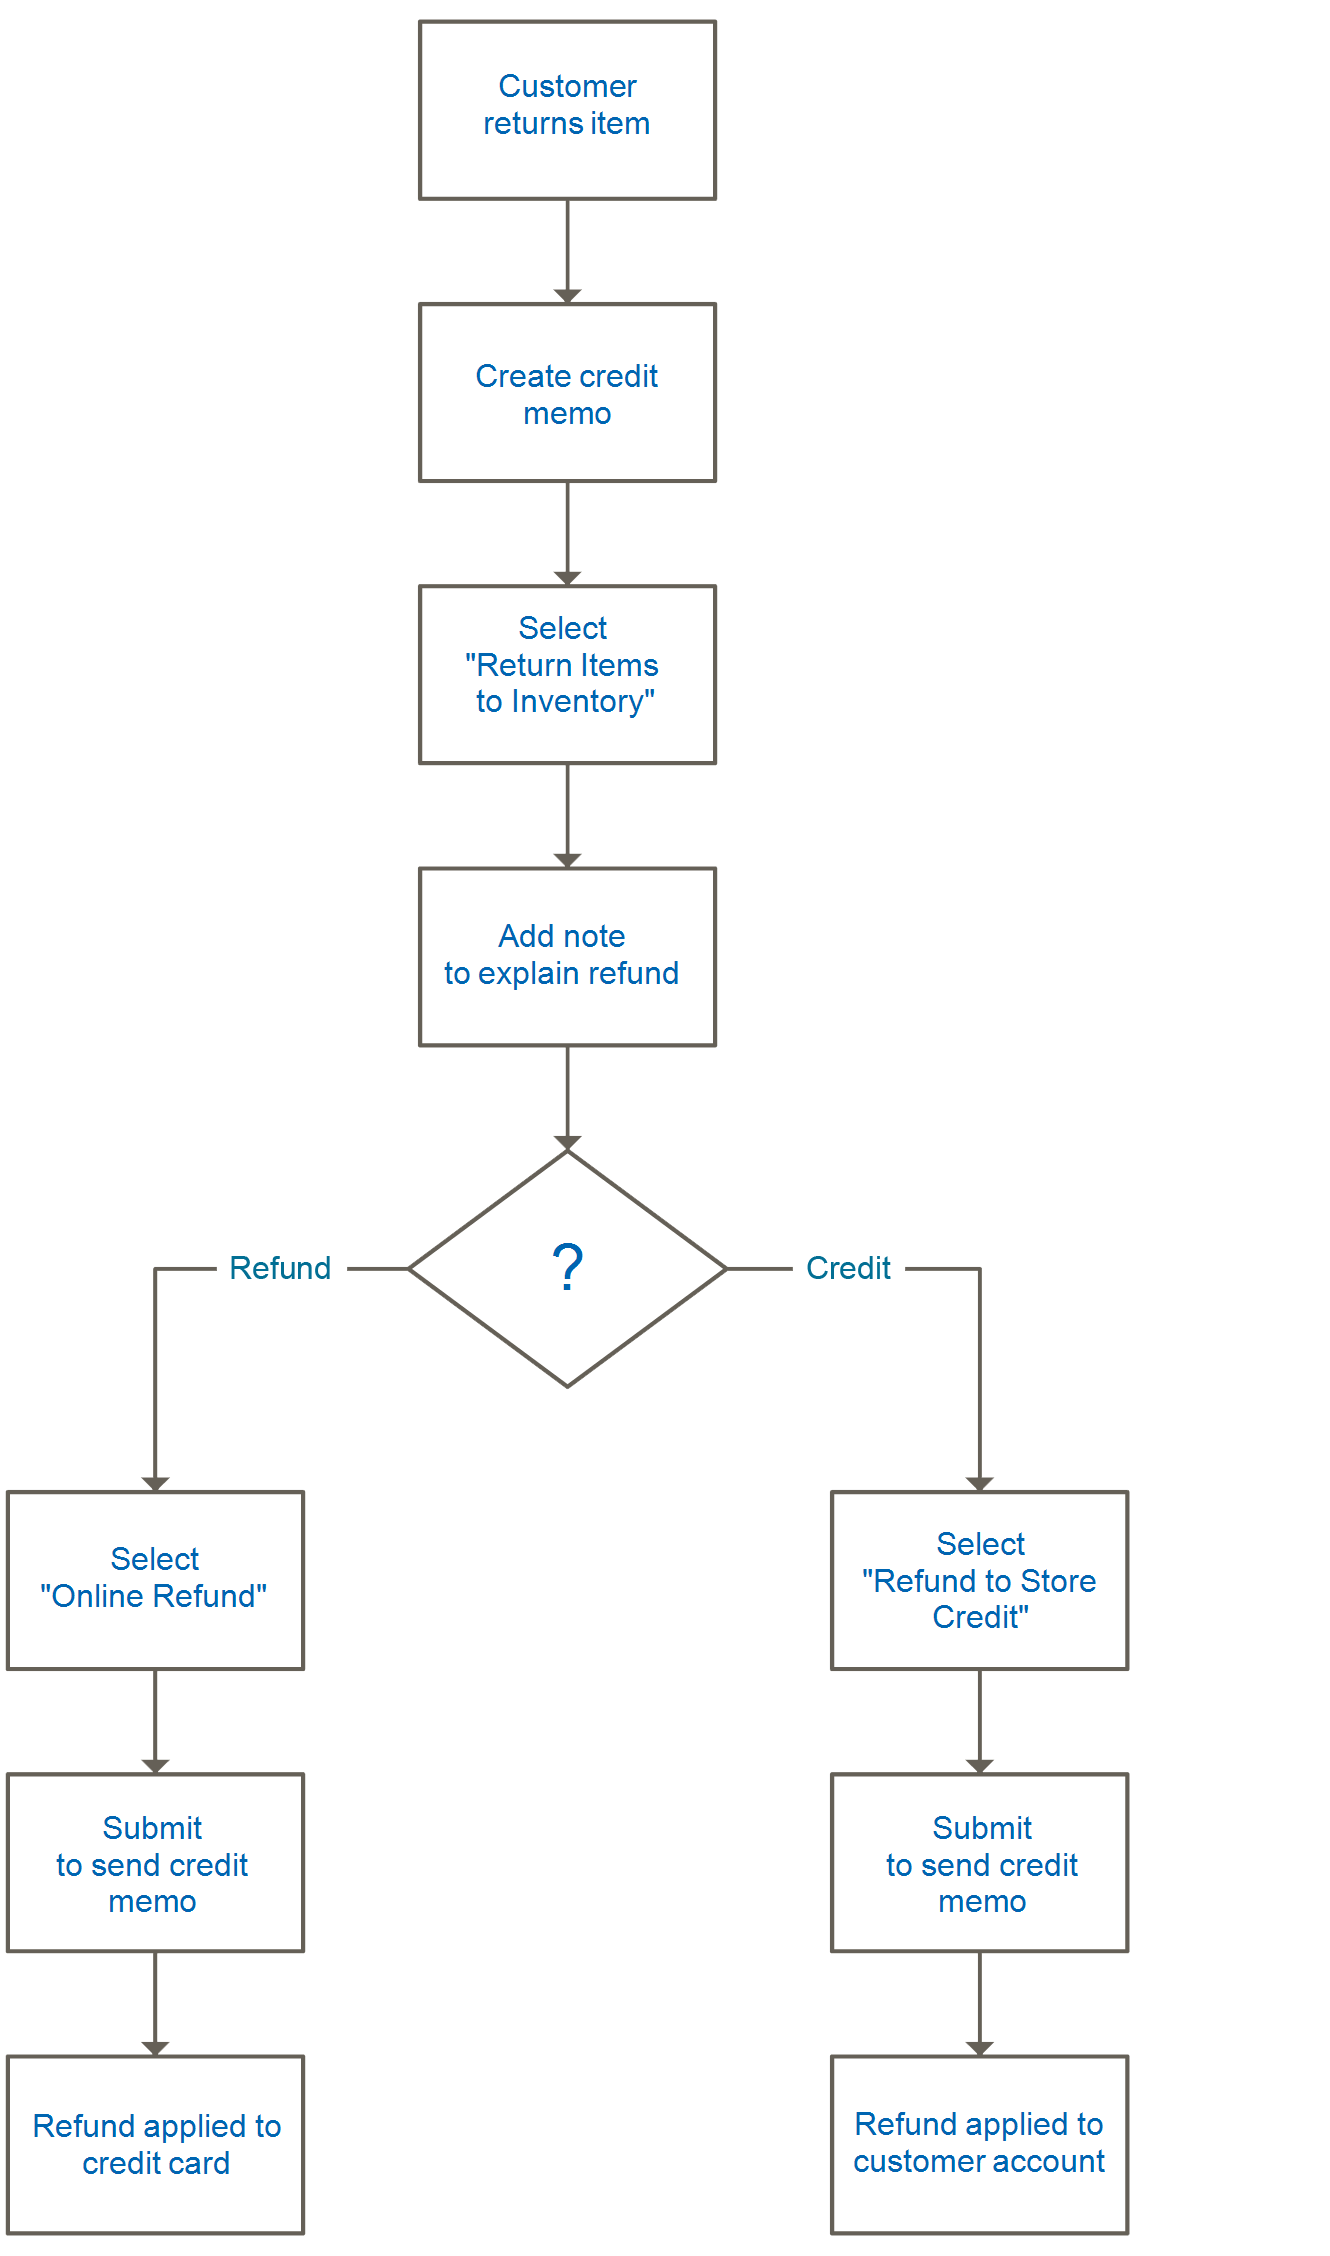
RMA and return workflow
1: Receive Request
Both registered customers and guests can request an RMA. The store owner can also submit an RMA request from the admin panel.
2: RMA Issued
After collecting requests, the store owner can authorize it partially, completely, or cancel the request.
If the store owner authorizes the return and agrees to pay for the return shipment, the store owner can create a shipment order from the admin panel with a supported carrier.
3: Merchandise received and return processed
The following flow chart describes the operational order to complete the return process:
Returns Attribute
The Return Attributes are used to provide the store information that is needed in the product return process.
The default attributes include the condition of the returned product, the reason for the return, and a field that indicates how the return was resolved.

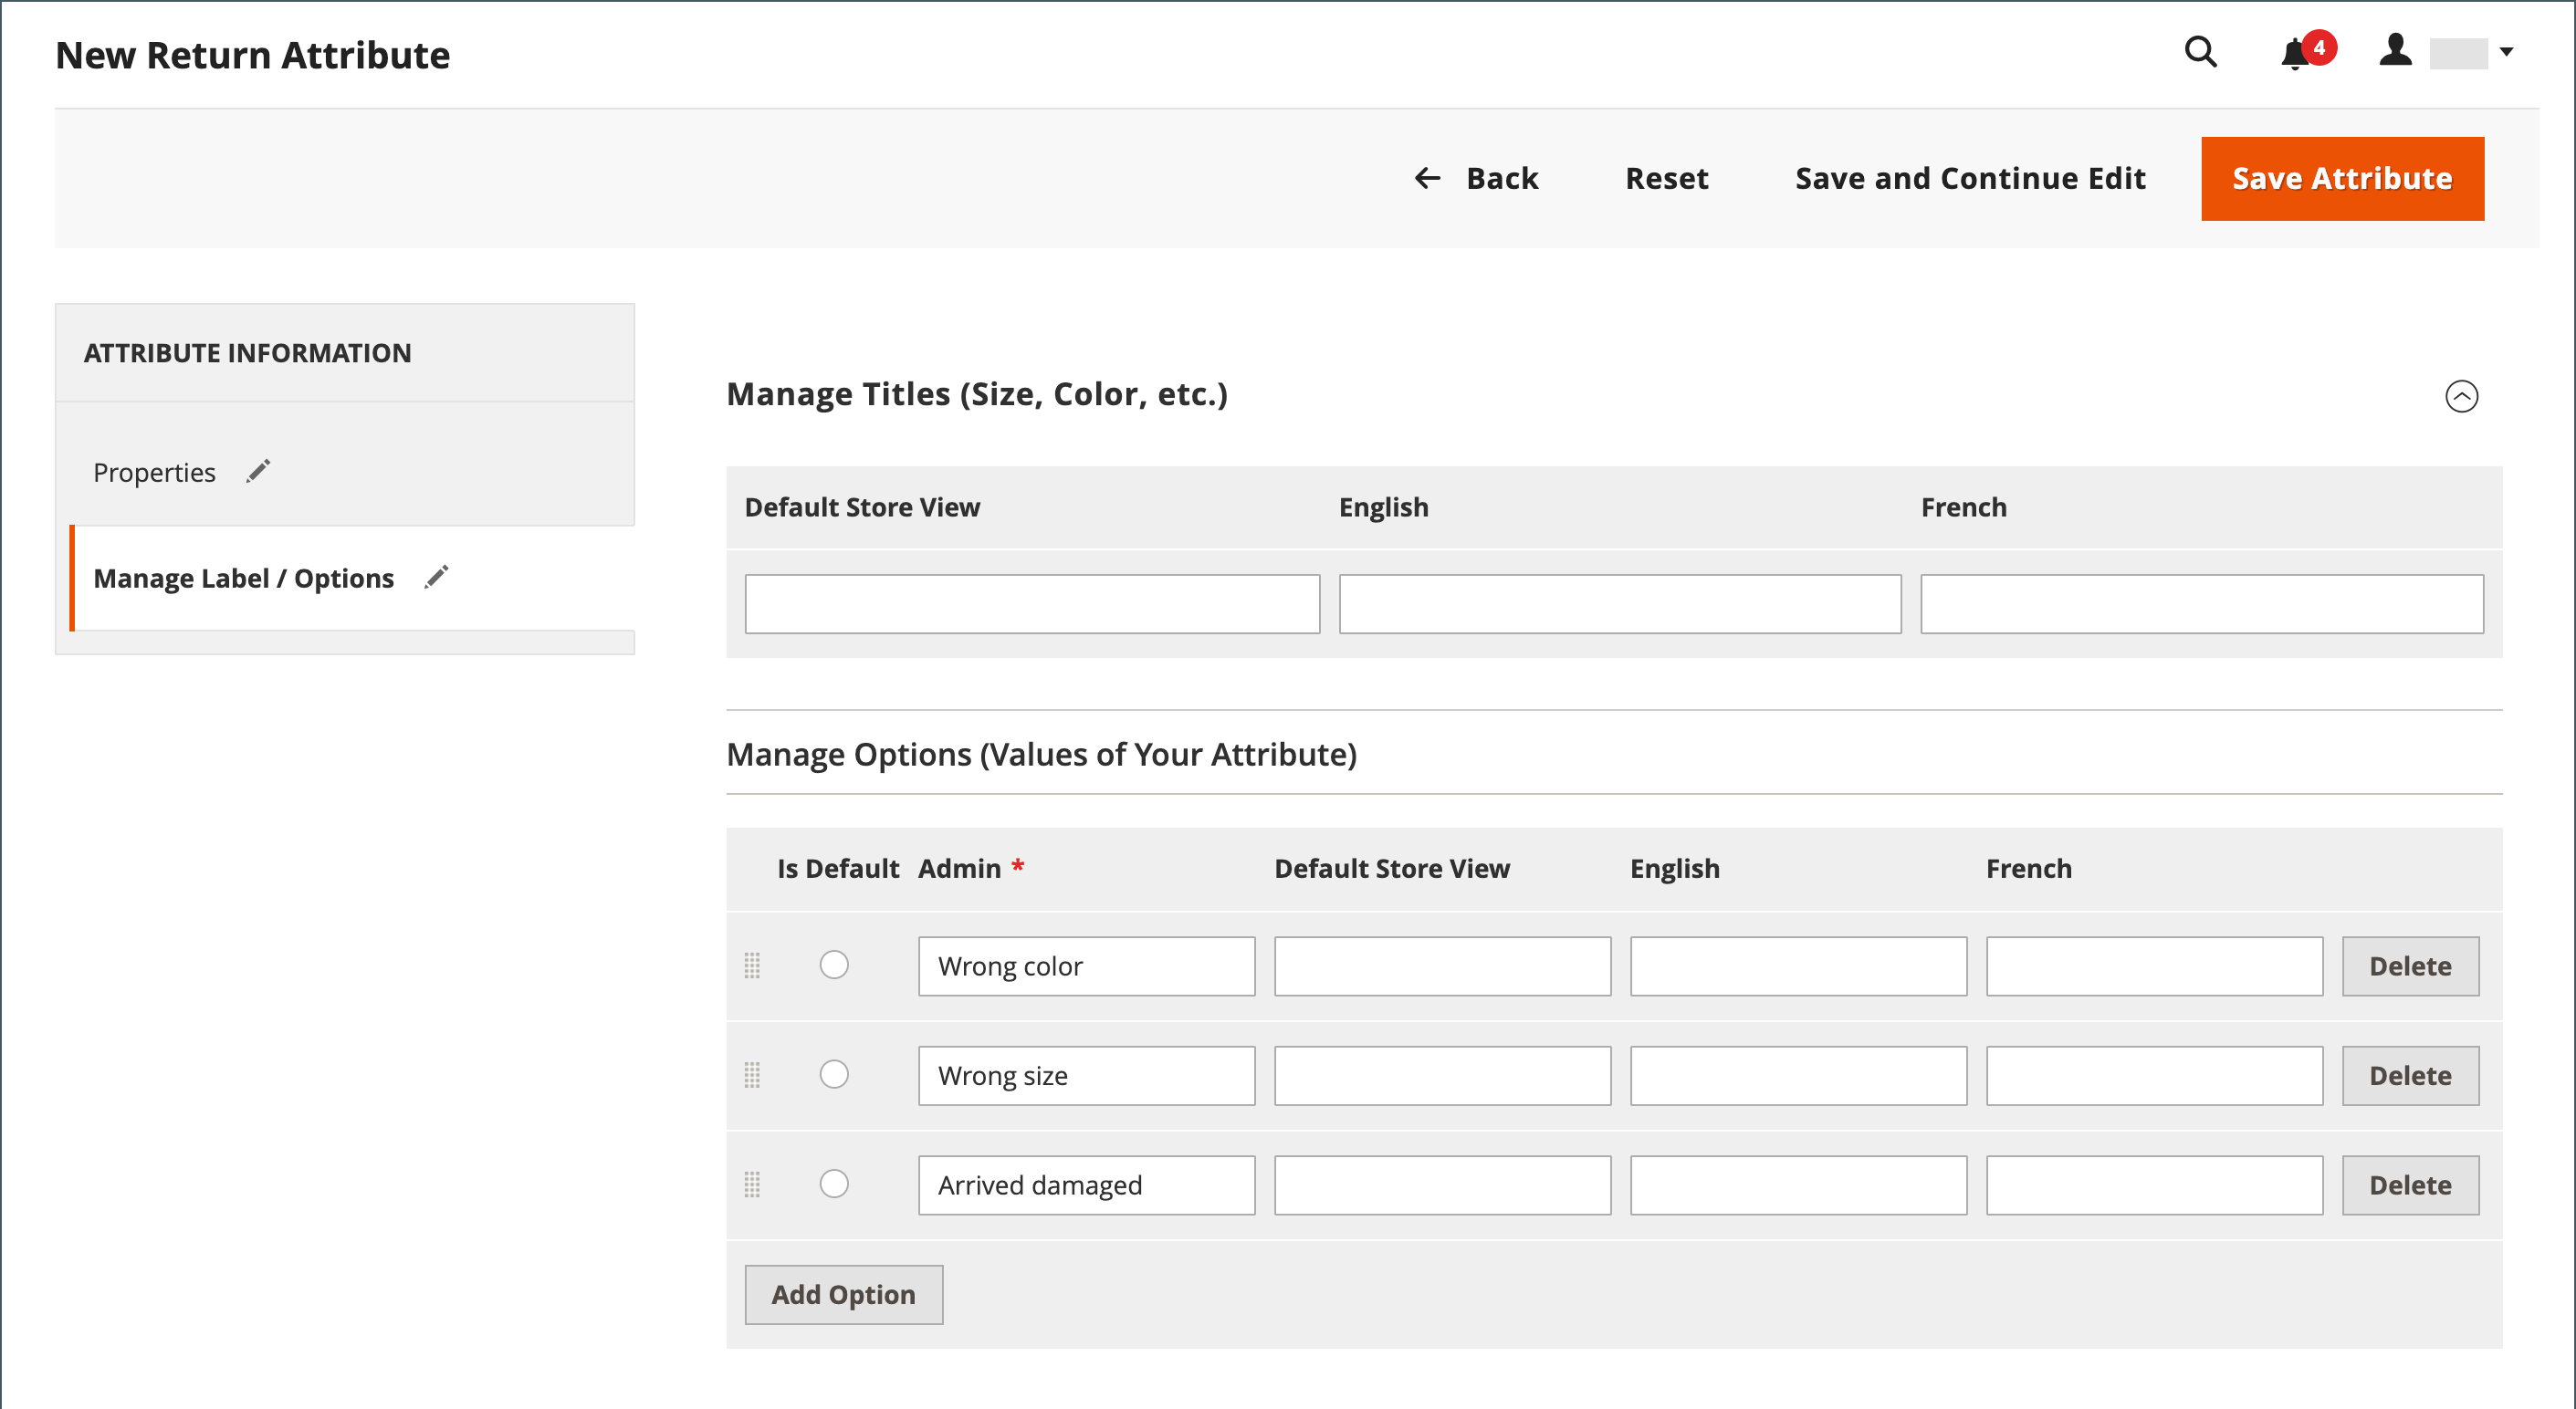
Create a returns attribute
- On the Admin sidebar, go to Stores > Attributes > Returns.
- In the upper-right corner, click Add New Attribute.

- To identify the attribute during data entry set the Default Label.
- Enter an Attribute Code to identify the attribute within the system.
- To determine the type of input control that is used for data entry, set Input Type to one of the following:
- Text Field
- Text Area
- Dropdown
- Yes/No
- File
- Image File
- To make the field required, set Values Required to “
Yes". - To assign an initial value to the field, enter a Default Value.
- For validation of data entered into the field for accuracy before the record is saved, set Input Validation to one of the following:
- None
- Alphanumeric
- Alphanumeric with Space
- Numeric Only
- Alpha Only
- URL
- For the Text Field and Text Area input types, enter the Minimum Text Length and Maximum Text Length.
- To apply a preprocessing filter, set Input/Output Filter to one of the following:
- None
- Strip HTML Tags
- Escape HTML Entities
- To make the attribute visible to customers, set Show on Storefront to
Yesin the Storefront Properties section. - (Optional) For Sort Order, enter a number to determine where this attribute appears relative to the others in the same part of the page. (
"0” = first,"1” = second, “2"= third, and so on.)
Manage the labels/options
- In the left panel, choose Manage Labels/Options.
- Enter the Default Store View.
- To save changes, click Save Attribute.
RMA Lifecycle
In the RMA lifecycle, a returned merchandise authorization (RMA) can have many assigned statuses (such as Pending, Authorized, etc.).
The RMA status indicates the progress of an RMA request raised by the user or the store owner.
RMA status
| STATUS | DESCRIPTION |
|---|---|
| Pending | This is the initial status assigned to an RMA request when it is raised by a user on the storefront or by the store owner in the Magento Admin. |
| Authorized | This status is assigned to the RMA when all requested items are authorized by the store owner in the Magento Admin for the returns. |
| Partially Authorized | This status is assigned to the RMA if any of the requested items have been denied and other products are authorized. |
| Denied | This status is assigned to the RMA if all the requested items are rejected by the store owner in the Magento Admin for the returns. |
| Return Received | This status is assigned by the store owner to the RMA when the requested items are received from the user. |
| Return Partially Received | This status is assigned by the store owner to the RMA when the requested items are partially returned and some of the items are denied to process. |
| Approved | This status is assigned by the store owner to the RMA when the requested items are approved to process further. |
| Rejected | This status is assigned by the store owner to the RMA when the requested items are rejected to process further. |
| Processed and Closed | This status is assigned by the store owner to the RMA when all the requested items are approved to process further. |
| Closed | This status is assigned by the store owner to the RMA when the requested items are denied to process for return. |
Get in touch
Drop your query/suggestion at [email protected] or create your ticket at Webkul UVdesk. Also, visit our useful Magento 2 Extensions.

Be the first to comment.