Magento 2 Mobile POS is built in Dart language with the Flutter framework. It’s used for building user interfaces for mobile applications.
Moreover, Magento 2 Mobile POS allows you to create reusable UI components as Flutter POS App is fast, scalable, and simple.
Why use the Flutter POS App?
Magento 2 Mobile POS App allows us to create exciting mobile apps by just making use of Dart and is both supportable for Android and iOS platforms.
Just create the code once, and the Magento 2 Mobile POS is available for both the iOS & Android platforms, thus saving much of the development time.
As it is an open-source framework, it will surely be compatible with other platforms like Windows and others that are there.
Also, if you know the Flutter POS App, then the developer doesn’t need to learn Android or iOS-specific languages for development.
The Flutter POS App Framework helps to serve both platforms(Android & iOS) in one go and provides a Flutter app experience on each of these platforms.
What this means is that it ends the war of selection for the developers on whether to go with Android or iOS development.
Magento 2 Mobile POS App(Flutter-Based App)
The Adobe Commerce Mobile POS(Point Of Sale) App is a Flutter-based mobile application for your Magento 2 online website.
Using this flutter app, your cashiers can make use of this single application on their Android or iOS devices for your multiple physical stores.
Check the below mentioned video for a brief overview of this Magento 2 Mobile POS App:
Features – Flutter POS App
- Real-Time Synchronization
- Easy Product Search
- Interactive Home Page
- Flutter POS App
- Offline/Online Mode
- Print Invoice
- Barcode Scanning(using device camera)
- Offline/online Order Hold
- Multi-Currency
- Discount Coupon
- Image For Cashier
- Invoice Generation
- Cash Drawer Printing
- Order Return/Credit Memo
- Customer Add/Edit/delete
Installation – Flutter POS App
Firstly, you need to log in to Webkul Store, go to My Account>My Purchased Products section, verify and then download and extract the contents of this zip folder on the system.
#2 Upload Folder
Once the module zip is extracted, follow path src>app and then copy the app folder into the Adobe Commerce Cloud root directory on the server as shown below:

#3 Run Commands
After uploading the module folder, you need to run the following commands in the Magento 2 root directory:
php bin/magento setup:upgrade
php bin/magento setup:di:compile
php bin/magento setup:static-content:deploy
php bin/magento indexer:reindex
php bin/magento cache:flush
Home – Flutter POS App
Opening the Store
After opening the app, the login screen appears where the cashier can log in to the POS system by entering his email ID and the password created by the admin and then tapping the Login button on the POS interface.

Now, the cashier will have to select the Opening Balance for the Point Of Sale system. After entering the amount, the cashier will tap the Proceed button.

Now, the cashier can see the POS home screen. Here, the cashier will find the products displayed according to the selection made in the web configuration settings for the POS system.

You can also find the cart on the right-hand side, and you can toggle between the main options at the bottom panel – Home, Order, Hold–Cart, CashDrawer, Report, and More.
Home
On the home page to add a product to the cart, tap on the respective product to add it to the cart. You can add multiple products by tapping them up. To delete all the products from the cart tap the delete button.
To increase the product count for a particular product in the cart, tap the three-dot menu to the right of the product and select the update quantity option.
It brings up a pop-up to change the quantity of the product. Tap the + or – buttons to increase or decrease the quantity of the product. After confirming the quantity, tap the Update Quantity button.

Here, you can also apply the discount by selecting the Add discount option from the three-dot menu. After tapping the button, a pop-up appears where the cashier can select the type of discount to be applied as –
- Fixed or Percentage

Discount Option –
After choosing the type of discount, the cashier can enter the discount amount as required and tap the ok button after that.

The discount will added to the cart.

Coupon Code –
When enter on coupon code icon it will show the active coupon code for you. Select the coupon code and apply the same.

As per the chosen code, the discount will apply.

To clear the products from the cart one at a time, swipe toward the left-hand side of the respective product, and you will see a delete button. Tap on the delete button to remove the product from the cart.

Category Selection
To change the category, tap on the three horizontal lines in the top left-hand corner.

It brings up all the available categories. To reach a child category for a particular parent category, tap the right-pointing angle icon in front of that category.

Tapping the right-pointing angle icon brings up the sub-category, and then you can reach the last child as well.

Tapping the Bags will bring up the sub-child under that if any. Or the cashier can tap on the View Products in Bags to display all the products in Bags.

It displays a complete list of watches under the Bags sub-child.
Note: To reset the category to the default selected one, tap the three horizontal lines.
Search for Products
The cashier can search for the products by –
- Product Name/Characters and
- By product Barcode Scan
The cashier can easily search for the products by tapping on the area next to the search icon on the Home page.
Product Name/Characters –
Within the search, tab enter the name of the product that you are searching for and it will display back the results for the same.

Barcode Scanner
The cashier needs to tap on the Barcode Icon that is next to the search box for searching the products using the barcode. This opens the camera on the device and the cashier can easily scan the product barcode to add it to the cart.

Order
Under this section, the cashier can check for the Online and offline orders that have been placed. To check the orders, tap the enter order ID field and fill in the order ID and the respective order will be displayed.
Online Orders

Tap the enter order ID field and fill in the respective order ID.

Now, you will see the particular orders that are placed. Tap a particular Order ID to display the order details for the same.
Here, the cashier can also print the invoice(depending on the option chosen – View PDF, WiFi Printer) for a particular order by tapping the Print button a the top right-hand side.

Offline Orders
The cashier can even process a transaction in offline mode. This feature is great for areas where internet connectivity is weak. To check the offline orders for a particular ID, tap and enter the particular order ID under the offline orders. After this, you can see the offline order that has been placed.

Tap on an order number to check the details of the order.
Online/Offline Hold Cart – Process
The cashier can easily put a cart on hold if the situation requires. The cashier can put the current cart on hold to process another customer. To do so, the cashier can put the current cart on hold by tapping the Pause button on the top right-hand corner.
Tapping the pause button brings up a pop-up for adding a note and then click on the proceed button to move your cart on hold.

Tapping Proceed, the cashier can add a cart note for putting the cart on hold. After entering the note tap the proceed button.
Now you can check the hold cart for online orders.

Now, the cashier can again add the hold-cart contents into the cart for checkout by first navigating to the Hold-Cart section, and for the respective order tapping the Resume button.
Then, the POS agent clicks on the proceed button and selects the customer.

From here, the cashier can even Remove a hold cart by tapping the Remove button.
Offline Hold Cart – The cashier can put the cart on hold in offline mode as well.
You can enter the cart hold note and click on the proceed button to move further.
The offline order will added in the hold section now the cashier can resume it or remove it as per their choice.

Click on the resume button the popup will show again to resume the order.

Tapping the Resume button adds the hold-cart to your Cart. For this, the cashier will have to Select proceed. After this, the hold-cart is added to the cart again.

After clicking on the remove button it will ask you permission to remove the order. Once you click on the Proceed button the order will be removed from the hold cart.
Checkout Process
After adding the products to the cart the cashier can tap on the Pay button.
Here, the cashier can see the default customer that is added from the admin backend panel. The cashier can also add a new customer by tapping the Customer Icon.
This brings up a section where the cashier can search for the customer or can add a new customer as well.
To add a new customer tap the Customer Add button. This brings up the section to enter the customer details. After entering the details, tap the save customer button to save a new customer.

This brings up the section where the cashier can tap the PLACE ORDER button to complete the order.

Here, the customer has to pay the Grand Total amount in cash.

After updating the payment.

Note: if the customer is low on cash and wants to make the remaining amount, then the cashier can make use of the credit card button to receive the remaining amount for the order to be placed.
For this, the cashier will first enter the amount the customer is paying out in cash by tapping the Cash button which brings up a pop-up.

Update payment Amount
Here, the cashier will enter the amount and tap the update payment button to update the amount that the customer is paying in cash.
Now, this updates the amount that the customer is paying in Cash as shown below in the snapshot.

Here, enter the amount the customer is paying via credit card, enter the 16 digits of the customer’s credit card, and tap the UPDATE PAYMENT button.

Now, the cashier can see the updated details showing the amount the customer is paying in cash and via card. Cash Payment – $100 and Card Payment – $41.

Before placing the order, the cashier can also add a note for the order to be placed. To do so, tap the add order note button which brings up a pop-up to enter the note. After entering the note, tap the Add button.

Lastly, tapping the PLACE ORDER button completes the order.

Here, the cashier can also print the invoice by tapping the PRINT INVOICE button.

Order Return – Credit Memo
It might happen that a customer sometimes wants to return the items within an order. To do so, the cashier will navigate to the Order section. Here, select the order to create its credit memo and tap the order Return button on the bottom.

Selecting the checkbox brings an option to update the return quantity for the respective items in the order.
Now, the cashier can easily update the return quantity for the items in the order as required. After updating the quantity, tap the create button and select the check return to the stock checkbox.

After tapping the create button, the credit memo gets generated.
Moreover, the cashier can check the details of the same by tapping the Credit Memo icon on the top right which brings up the details of the credit memo.
Now, the cashier can check the details for the same.

Cash Drawer
Under here, the cashier will be able to check the close counter, Today cash, and Sale history pages.


Check today cash section to check the opening drawer amount, cash sale, and other payment sales.

Check previous sale history.

Reports
The cashier can check the reports here on a daily, weekly, or monthly basis.
Daily Report – It will show gross revenue and order in graphical form.

Weekly Report –

Monthly Report –

More Section
Here, the cashier will be able to refresh the POS which includes refresh the Hold orders, Orders list, cash drawer, product list, and category list by tapping on the refresh icon that’s present in front of the respective options.

Here, the cashier can synchronize the offline hold orders, orders lists, cash drawer, product, and category list by tapping the refresh icon. This syncs all mentioned with the server for a POS update.

To go back to the home page, the cashier can tap the <Home icon on the bottom left-hand corner, log out tap the Icon on the top right-hand corner.

Under the Select Language option, the cashier can change the language of the POS system. After tapping on the drop-down option the cashier can see the different languages to choose from and can select one as per need.

Under the Printer option, the cashier can select the options to view the PDF and WiFi.
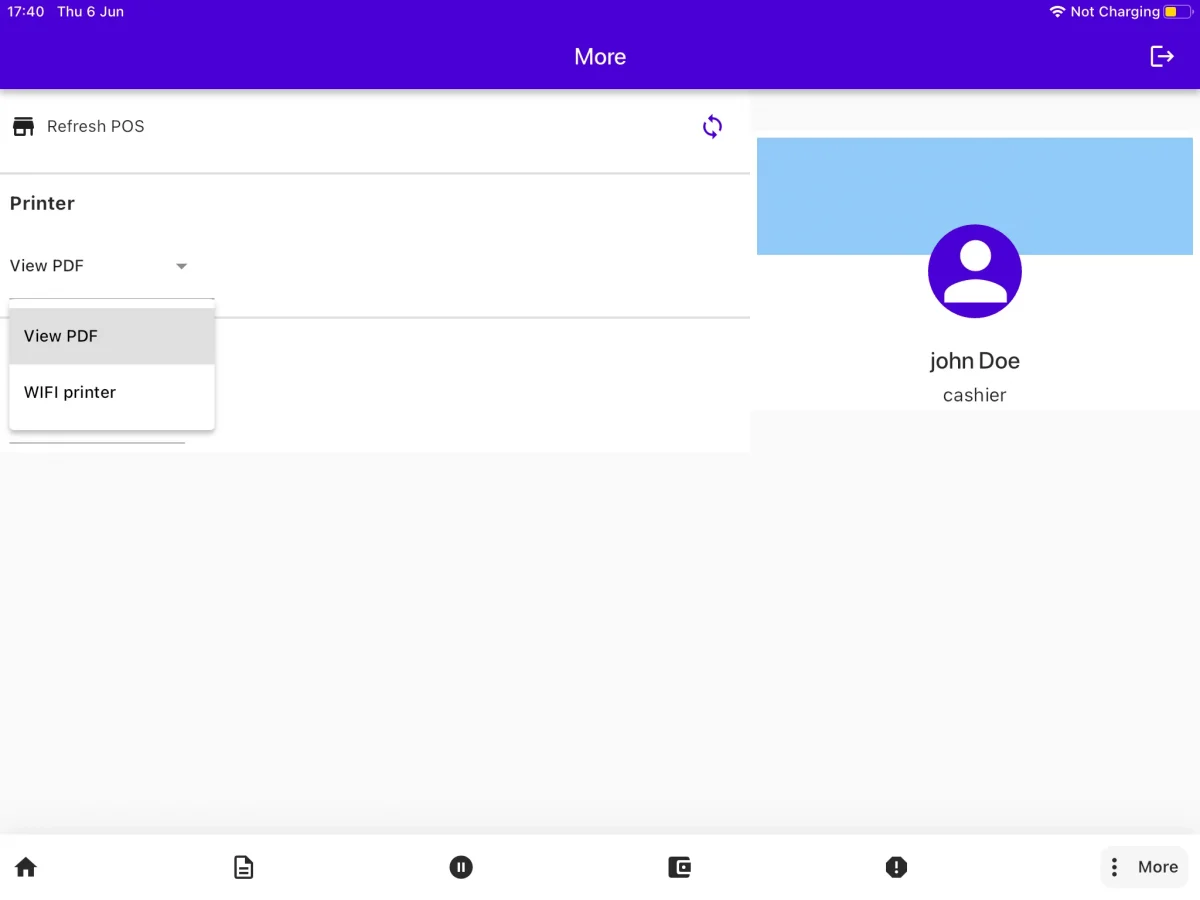
After tapping the Printer drop-down selection, the cashier will be able to select –
- View PDF – When this option is selected, then after placing the order, the cashier can view the PDF of the Invoice.
- WiFi Printer – When this option is selected, then after placing the order the cashier can print the invoice using a WiFi-connected printer.
However, that’s much about the Adobe Commerce Mobile POS App(Flutter POS App) For any queries or doubts related to the app get back to us at [email protected] or raise a ticket at our HelpDesk System.
Current Product Version - 5.1.0

4 comments
Thanks for showing interest in our product.
For this, you can purchase the application with source code from Buy Now!
Post-purchase you can contact us on [email protected] or create a ticket- https://webkul.uvdesk.com/en/customer/create-ticket/.
Thanks and Regards.
The product is Live now, and you can purchase it from the store link – https://store.webkul.com/magento2-native-pos-app.html
Also, a few features of the Web POS – the cash drawer and the RTL are in the process and shall be added to the app shortly and you will be getting regular updates over this.
For any doubts, suggestions or clarifications regarding the application you can get back to us at [email protected]