Introduction
Magento Stripe Payment Gateway is an advanced and feature-rich module that will integrate your Magento store with the Stripe payment gateway. This module work with checkout for payment in Magento.
This module allows the admin to collect online payments from the customers’ Stripe accounts. Customers can make payments using various cards. The admin can easily link the Magento store with the Stripe payment gateway.
All / Selected countries can be mapped from admin configuration to make the store accessible and allow users to make payments residing within those countries. Also, the flexibility of managing the refunds of the orders is a very useful feature.
Admin can manage the refunds in no time from the backend. It will work live as well as Debugging mode.
Important Note
- Stripe has ended the support for Bitcoin payments. You can find more details at – https://stripe.com/blog/ending-bitcoin-support
- Stripe Payment Gateway module is also available for Magento 2
Features
- Enable/disable the payment solution.
- Define the Stripe payment gateway module title.
- Put the order limit for Stripe payment application.
- Set allowed countries for which Stripe payment method will be applicable.
- Put new order status and sort order.
- Provide secure, trusted and fast payment to the customers.
- The customer can select the Stripe payment method available on the checkout page.
- The customers can make payments either through various cards
- Check placed orders details like invoices and transaction.
- Can also make easy refunds to the customers if the customers cancel their orders.
- The module is designed to follow default Magento checkout workflow
- Source code is open for customization, for details contact Webkul Support.
Installation
It’s pretty easy you just need to move all folders (app, lib) into Magento root that’s it.

Cache Management
After moving both the folders flush the cache from the Magento admin module. Under System > Cache Management.

And now your Stripe Payment Gateway module has been installed.
Language translation
Post the module installation, you need to unzip the folder and click on src folder. Inside that folder, you will find app folder. Click on the app folder. And you will get locale and inside that, you will find the language folder in the English language as en_US.
Now follow the same path and open the locale folder where you have installed the Magento. And go inside the locale folder and create a new folder.
Set a folder name with the language for which you want to translate your module content. Now edit the language CSV file and then upload it to your server inside the locale folder.

Before uploading the CSV file, open and edit it with the translated keywords.Right side keyword(as highlighted in the screenshot) would be the translation of left side keyword.


Configuration
Subsequent to the successful installation of the Stripe Payment Gateway module, you will be able to see the configuration panel under System > Configuration as per the below screen.

As per the above screen, you can see many admin config parameters for the Stripe Payment Gateway module, we are going to explain every config parameters one by one:
Configuration Parameters
- Enabled- Firstly, with this option admin can enable or disable payment solution.
- Title- Then admin can set the title which will display on the front end.
- API Test Key – After that, enter the API Test key which will be used for testing the payment gateway.
- Publishable API Test Key – Now next is to set the API Test Publishable key which will be used for testing the payment gateway.
- Live API Key- Thereafter, allows setting the API Live key which is provided by Stripe Payment Gateway.
- Live Publishable API Key – This option sets the API Live Publishable Key which is provided by Stripe Payment Gateway.
- Set Name Display On Form – Name for the Payment Gateway that will be visible on the form.
- Image Set – Even, you can set a relative URL pointing to a square image of your brand or product. This image is visible on the stripe popup for making the payment.
- Debug- Then with this option admin can enable or disable the debugging mode.
- Payment from Applicable Countries- Here admin can select the specific countries for stripe payment.
- New Order Status- This part determines the order status after the completion of checkout. Admin can set Pending or Processing status.
- Minimum Order Total- This option allows admin to set minimum order total. If the Grand total of the order is less than the specified Minimum Order Total value. Consequently, the Stripe module will not allow you to checkout with the Stripe payment gateway.
- Maximum Order Total- Additionally, allows admin to set maximum order total.
- Sort Order- Finally, Set the order of payment options on the checkout page.
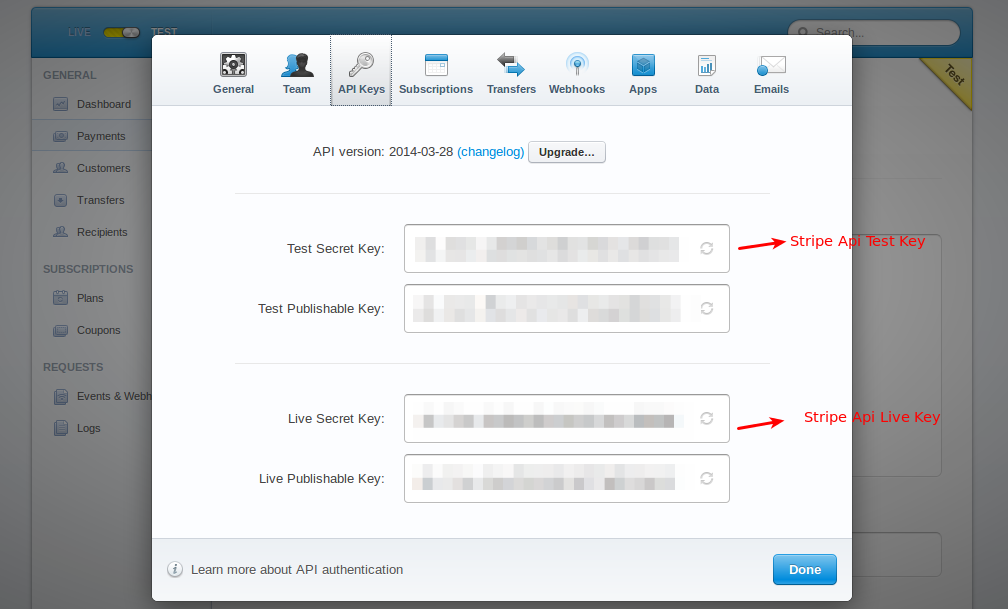
While you can see in the following screen Test Secret Key and Live Secret Key. Stripe Payment Gateway will provide you these keys.
Magento Stripe Payment Gateway At Frontend
Add products to the cart and proceed towards the checkout. At the checkout page, the customer will select the Stripe as the payment method under the Payment Information section to pay the amount. This will display the stripe pop up window as shown below.
MAKING PAYMENT THROUGH CARD:
The customer can pay through the card.

Forthwith, the buyer will enter his email id, enter the card number, expiry date, and the CVV number.
The buyer can also select the checkbox for “Remember Me“, that will allow the buyer to enter his mobile number that will be used to verify the buyer identity at Stripe Pay and other sites using the Stripe Checkout.
Lastly, the buyer will click on the “Pay” button to make the payment after which another page with “Order Review” will open as shown below in the screenshot.

Refund- Even, admin can also refund online complete and partial amounts with the Stripe module.
Under the Invoice menu, click on the specific invoice and then click on the Credit Memo button.

Therefore, click on the Refund button to check the refund status and refunded the amount of Stripe payment gateway.

That’s all for the Magento Stripe Payment Gateway.
If you still, have any issue feel free to add a ticket and let us know your views to make the module better webkul.uvdesk.com
Current Product Version - 1.0.1
Supported Framework Version - 1.6.x.x, 1.7.x.x, 1.8.x.x, 1.9.x.x

Be the first to comment.