INTRODUCTION
Odoo Wix Connector enables data import/export between Odoo and Wix, with cron-based syncing for efficient management.
Many people today struggle to manage their online stores efficiently. Even though eCommerce platforms have good website tools, they don’t handle inventory well.
An automation tool is needed to prevent overselling on Wix and ensure timely order delivery, streamlining Wix management with Odoo.
The Odoo Wix Connector syncs products, orders, and customer data between Odoo and Wix, simplifying inventory tracking and enhancing operations.
Prerequisites for using Odoo Wix Connector
The Odoo Wix Connector works in conjunction with the following module:
You must install this module first for the Odoo Wix Connector to work.
FEATURES
- The Odoo Wix Connector for Multichannel lets you connect your Odoo platform with your Wix store.
- It syncs products, orders, categories, and customer data from Wix to Odoo.
- You can sync the product and categories bidirectionally.
- Transfer data between Wix and Odoo in bulk or individually as needed.
- Data automatically syncs on a schedule set by the cron scheduler.
- You can set the time intervals for cron scheduler syncs to suit your needs.
- The dynamic dashboard allows for efficient tracking and management of synced data.
- Import or export data directly from the dashboard with just a click.
- Visual data cards, graphs, and charts on the dashboard help you analyze data.
- View a detailed history of every import or export and check each mapping.
- Synchronize records manually using all records, specific IDs, or a selected date range.
- Apply Wix-specific filters such as All, Date Range, Order State, and Store ID while synchronizing records.
- Automatically synchronize new Wix orders and supported order status updates with Odoo using webhooks.
- Automatically synchronize newly created products and product updates from Wix to Odoo through webhooks.
- Synchronize stock quantity updates, cancellation status, shipment status, and invoice/payment status from Odoo to Wix in real time.
INSTALLATION
- Once you purchase the App from the Webkul store, you will receive a link to download the module’s zip file.
- After the download finishes, extract the file on your system. You will see a folder named ‘Wix_Odoo_connector’.
- Copy and paste this folder inside your Odoo Add-Ons path.
- Now, open the Odoo App and click on the Settings menu. Here, click on Activate the Developer Mode.
- Then, open the Apps menu and click on ‘Update Modules List.’
- In the search bar, remove all the filters and search ‘Wix_Odoo_connector’.
- You will be able to see the module in the search results. Click on ‘Install’ to install it.
WORKFLOW
CONNECTION
PREREQUISITES
Before starting the connection, make sure you have:
- A Wix Studio account.
- Access to Wix Custom Apps.
- Odoo server URL.
- Odoo database credentials.
- Odoo Multichannel Sale module.
- Administrator access in both systems.
WIX CUSTOM APP CREATION FLOW
Step 1: Log in to Wix Studio
Open your Wix Studio account.
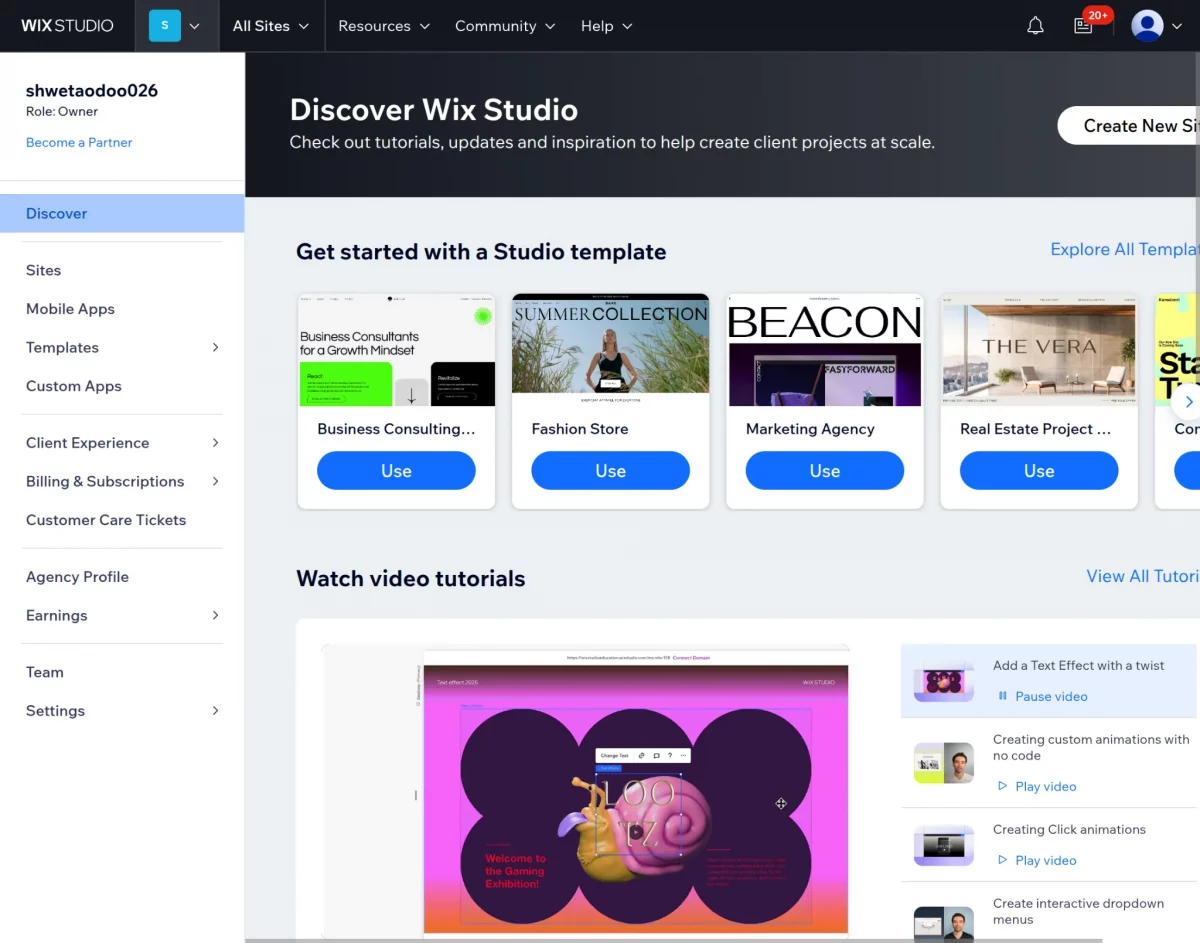
Step 2: Open Custom Apps
From the left sidebar, go to Custom Apps.
Use this section to create and manage custom integration apps.
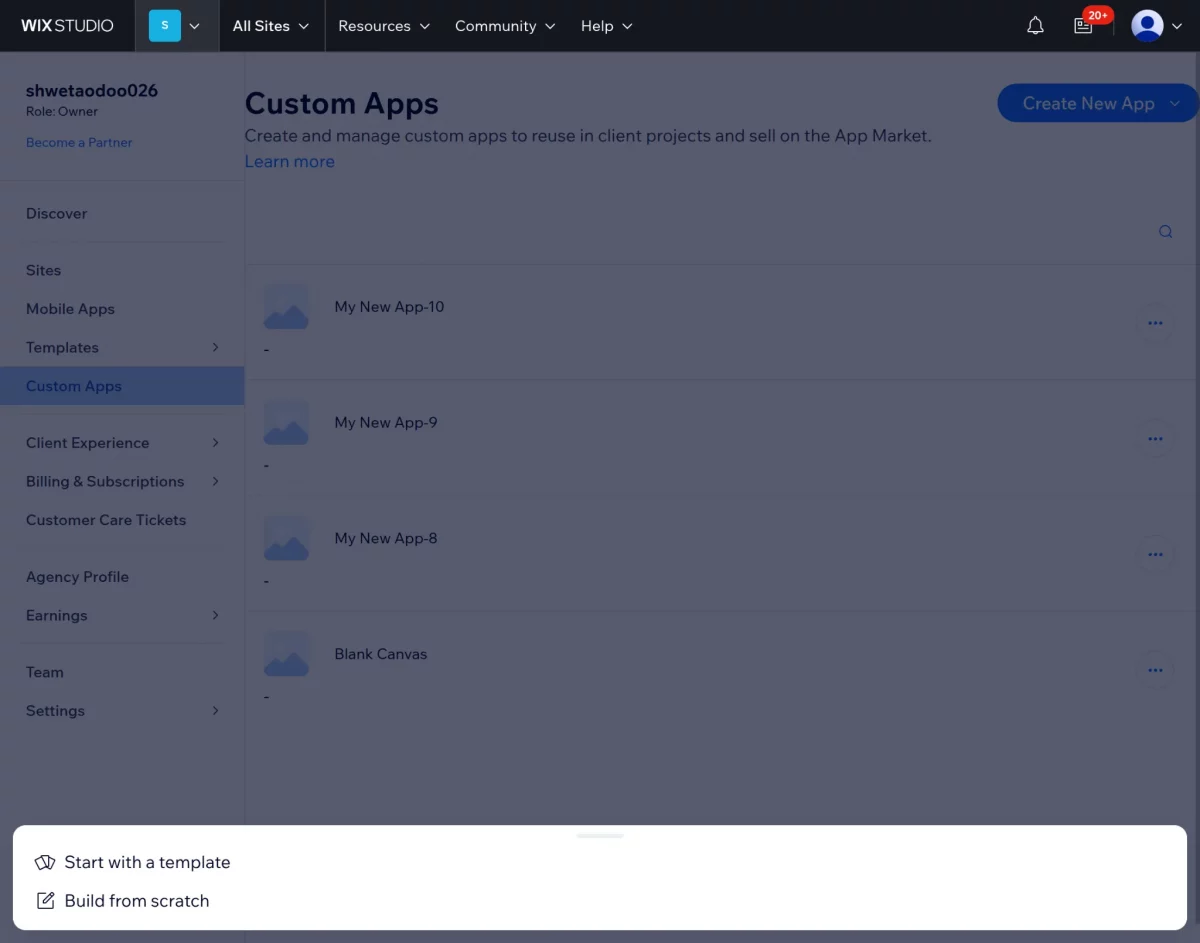
Step 3: Choose App Development Framework
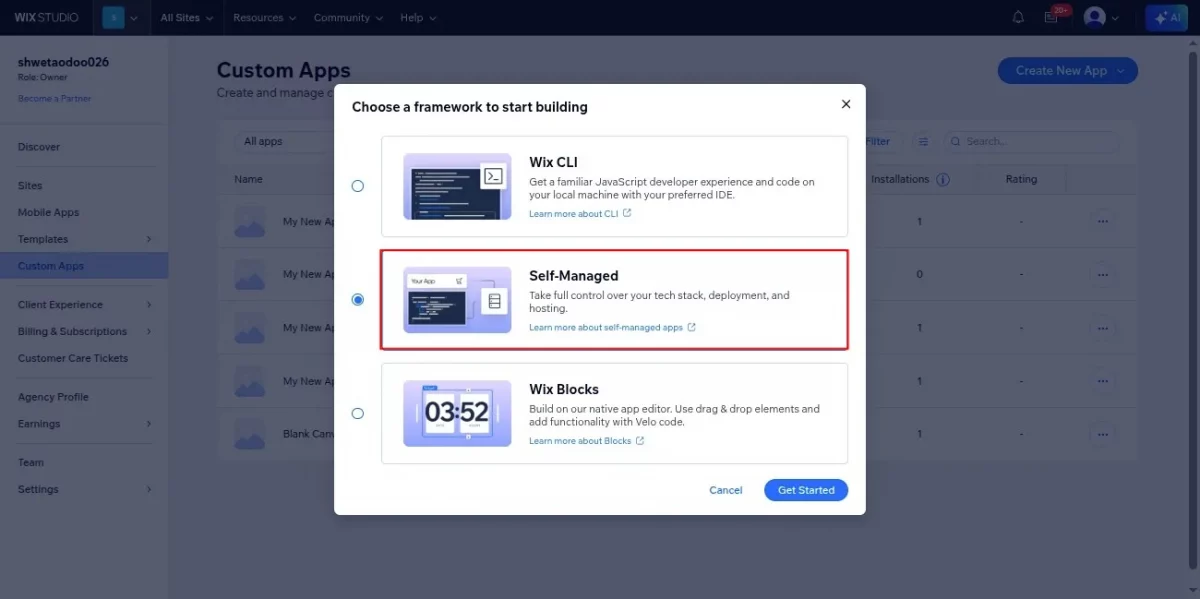
After clicking Build from scratch, Wix asks you to select a framework for app development.
Select Self-Managed for this setup.
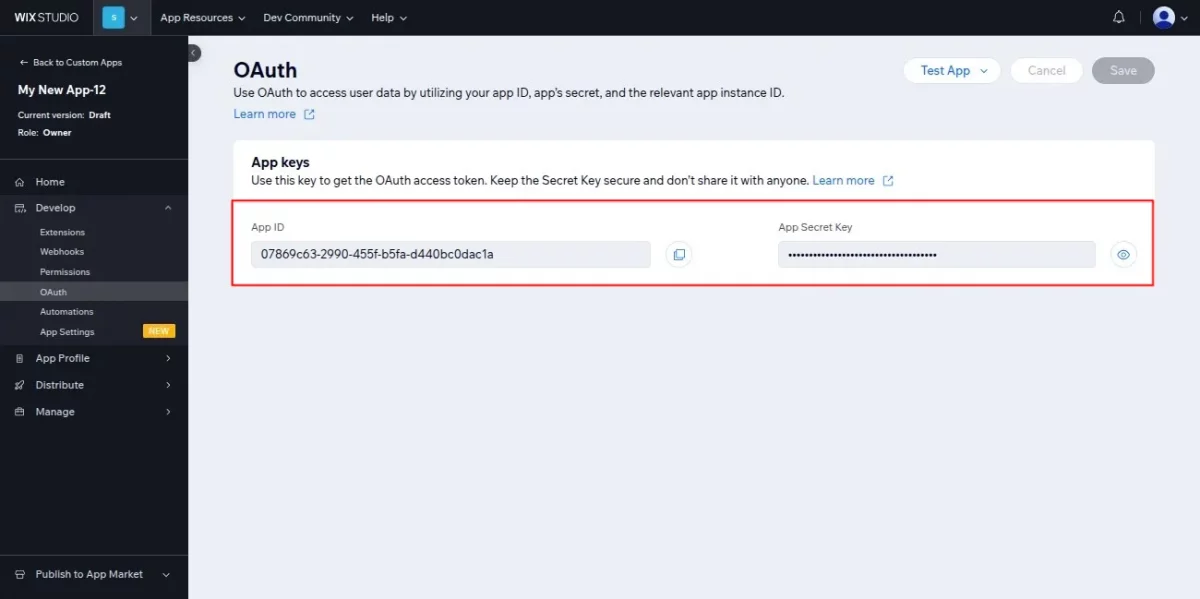
Step 4: Configure OAuth Credentials
After creating the app and selecting the framework, open the app dashboard.
From the left sidebar, configure the OAuth credentials.
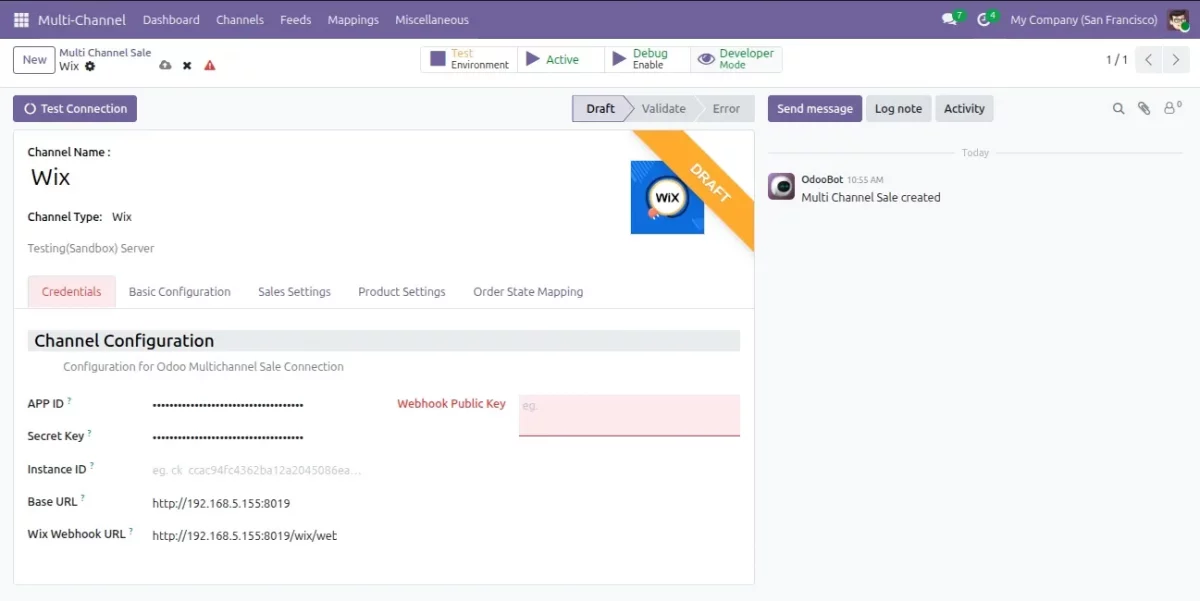
Step 5: Configure Wix Credentials in Odoo Multi-channel
After generating the OAuth credentials from Wix, open the Wix connector configuration in Odoo.
Configure the Wix credentials in the Odoo Multi-channel configuration.
CONFIGURE WEBHOOKS IN WIX
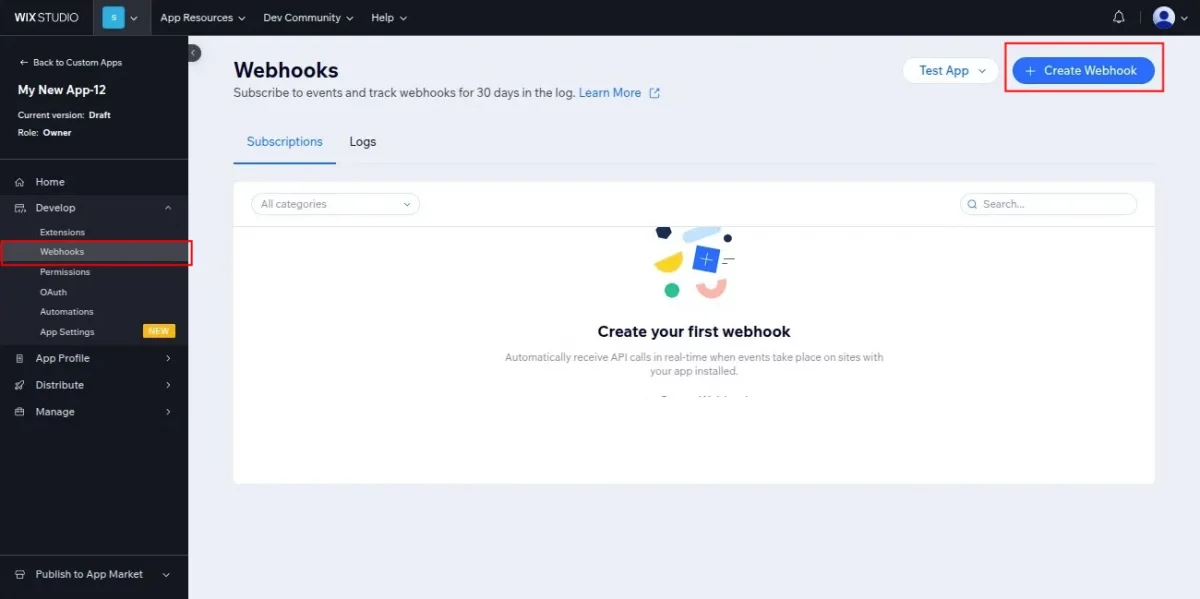
Step 6: Configure Webhooks in Wix
After configuring the OAuth credentials and connecting the app with Odoo, create webhooks in Wix.
Navigate to Develop → Webhook.
Step 7: Select Webhook Event in Wix
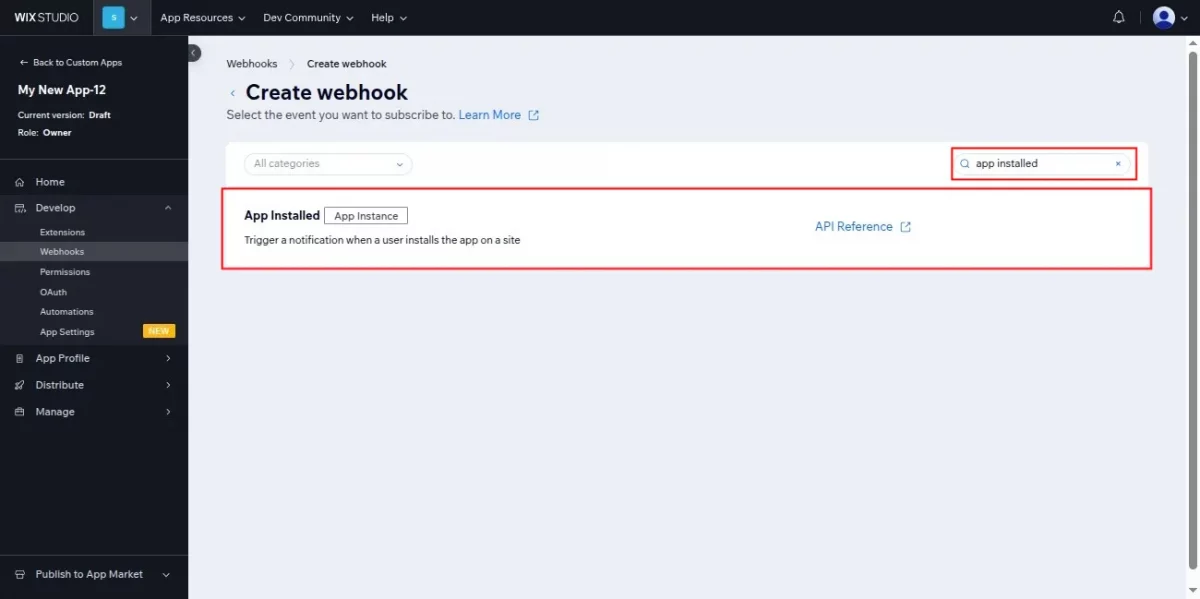
After clicking Create Webhook, select the required webhook event.
Use App as the example search to filter the webhook events related to:
- App installation
- OAuth apps
- Permissions
- App instances
Step 8: Copy Wix Webhook URL from Odoo
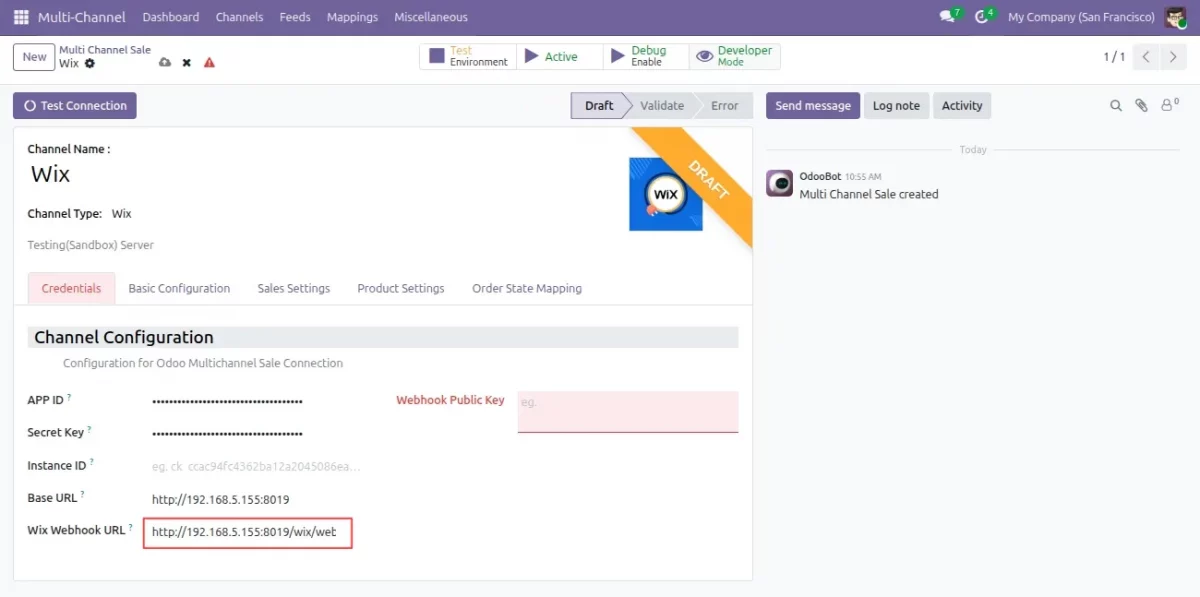
After configuring the Wix channel in Odoo, copy the webhook endpoint URL.
Navigate to:
Multi-Channel → Wix Channel → Credentials
Configuring Wix on Odoo end
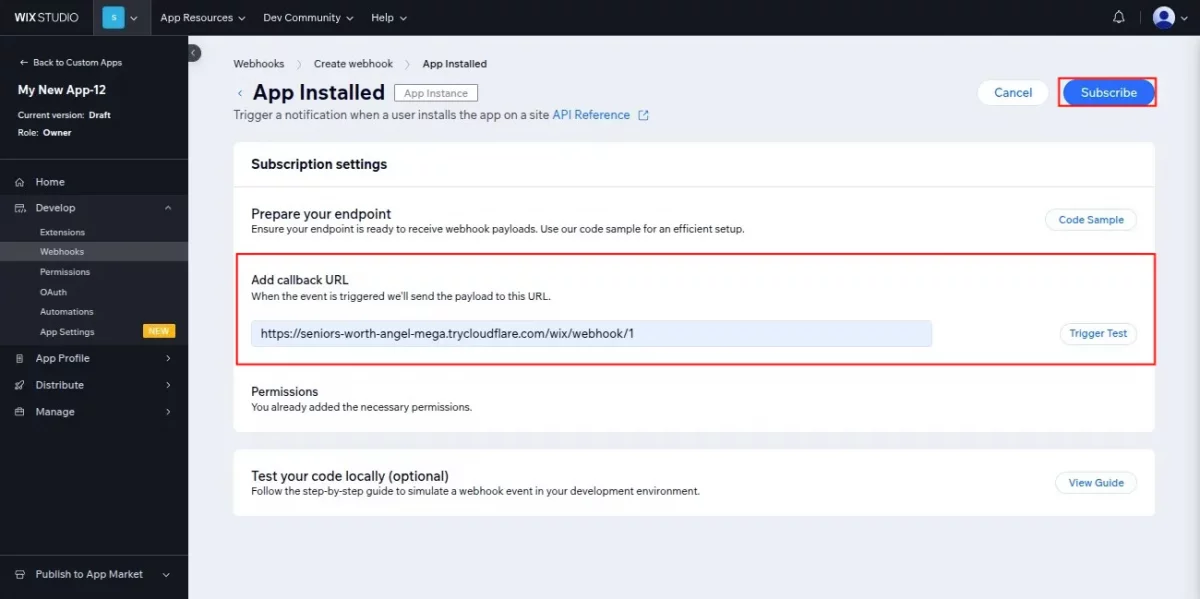
Step 9: Add Webhook Callback URL in Wix
Add the copied webhook URL as the callback URL for App Installed.
CONFIGURE WEBHOOK PUBLIC KEY
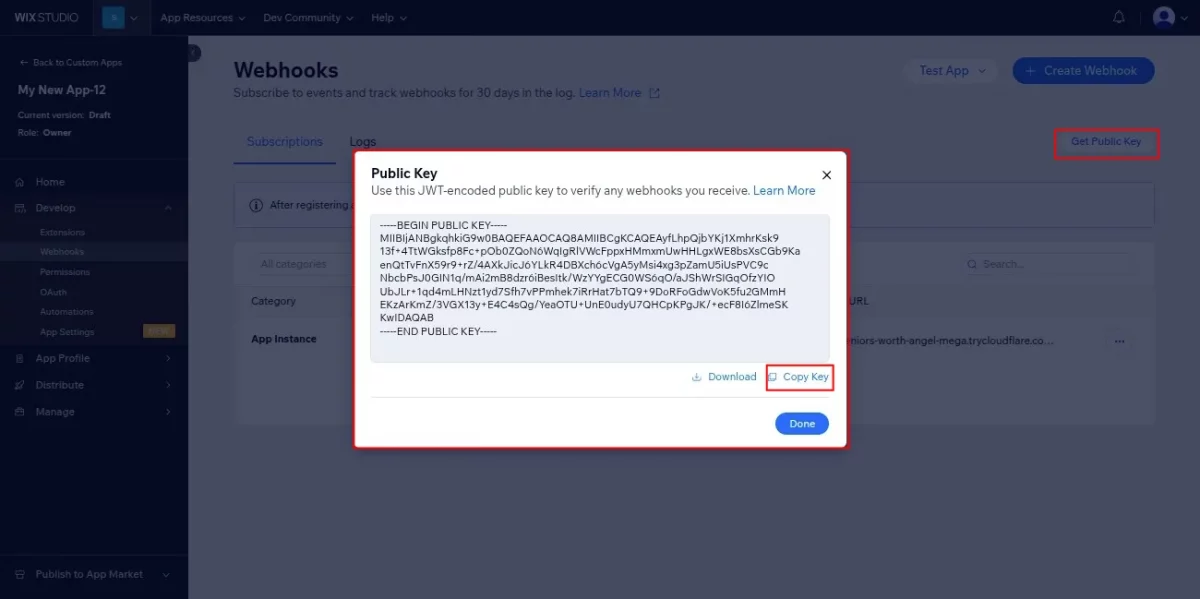
Step 10: Generate and Copy Webhook Public Key
After creating the webhook subscription, Wix provides a public key for webhook verification.
Copy the public key.
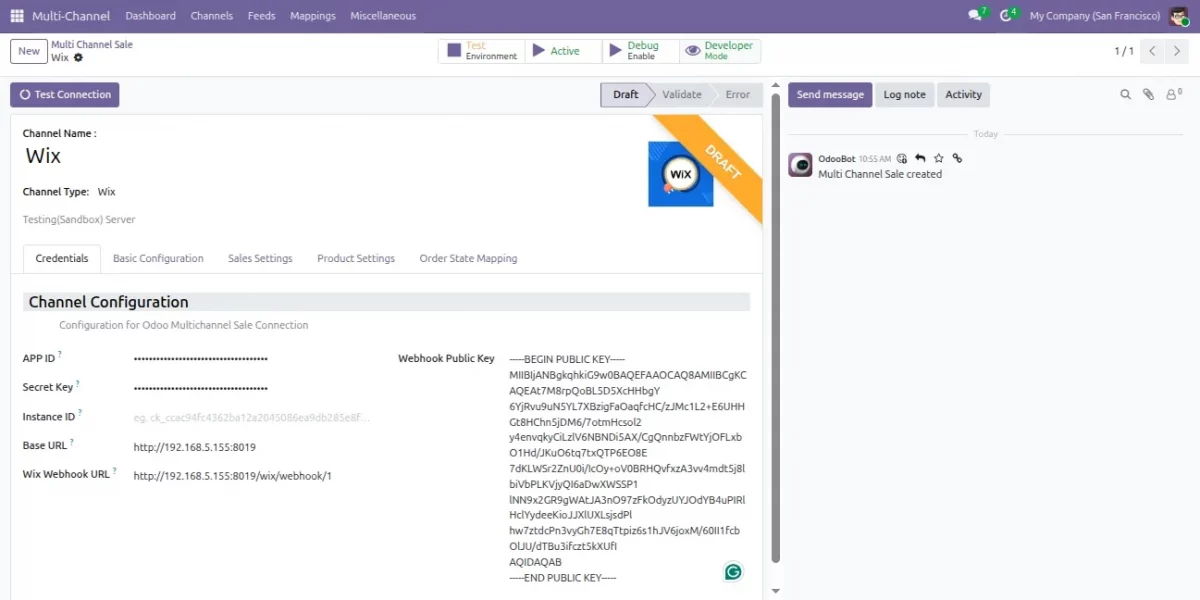
Step 11: Add Webhook Public Key in Odoo
After copying the webhook public key from Wix, paste it into the Odoo Wix channel configuration.
CONFIGURE PERMISSIONS
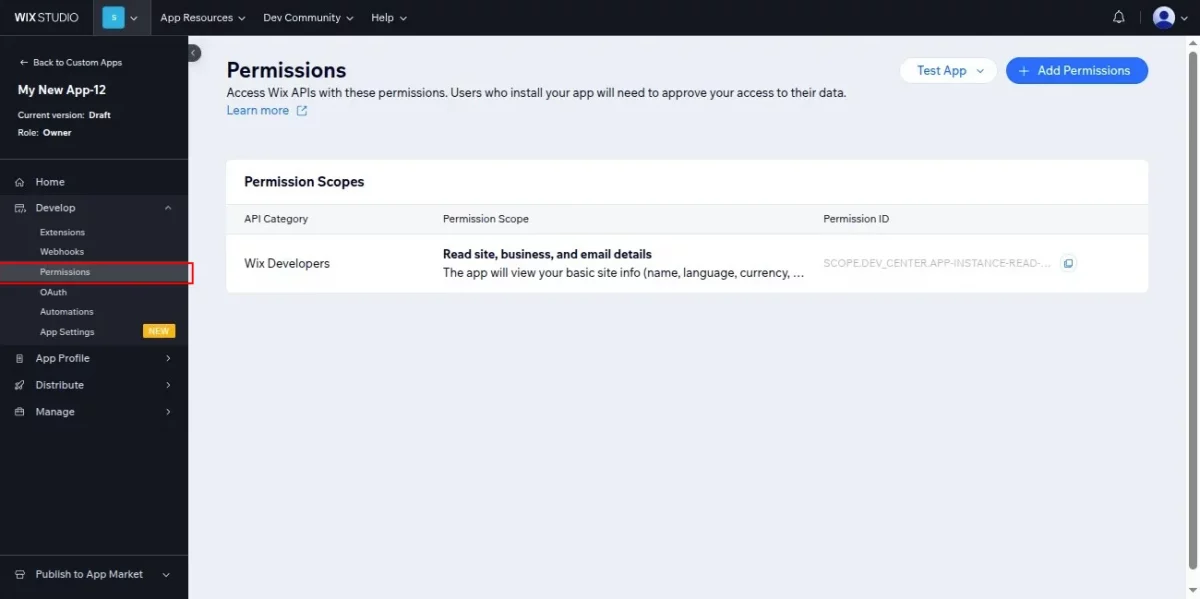
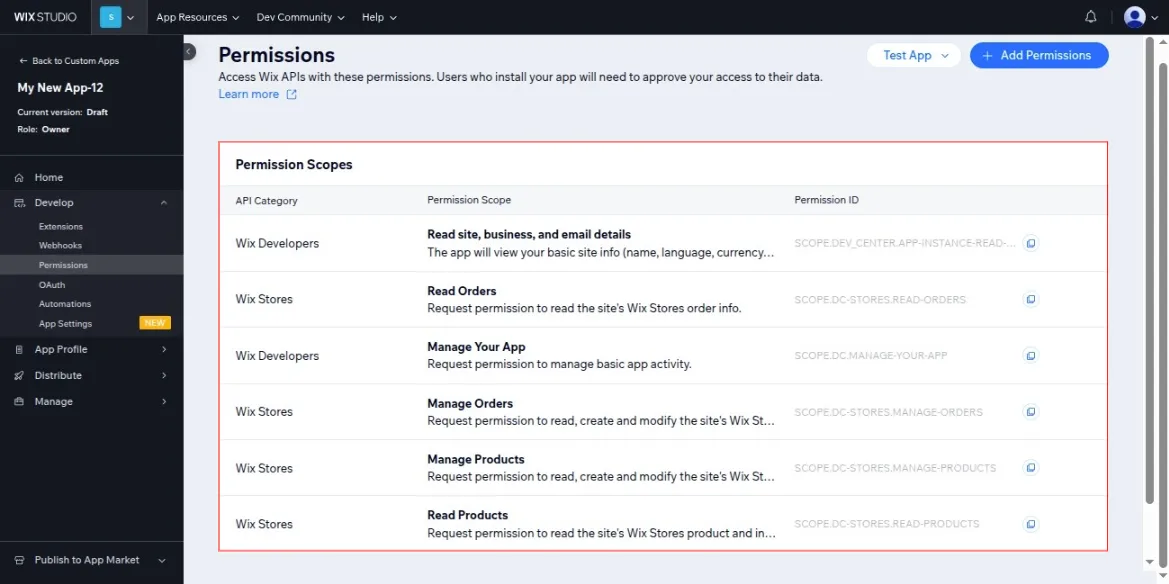
Step 12: Permission Scopes
After adding the required permissions, review the configured permission scopes in the Wix app.
Step 13: Configure Required Permissions for Odoo Integration
Add the required permission scopes needed for Wix and Odoo synchronization.
Navigate to:
Develop → Permissions
INSTALL THE WIX APP
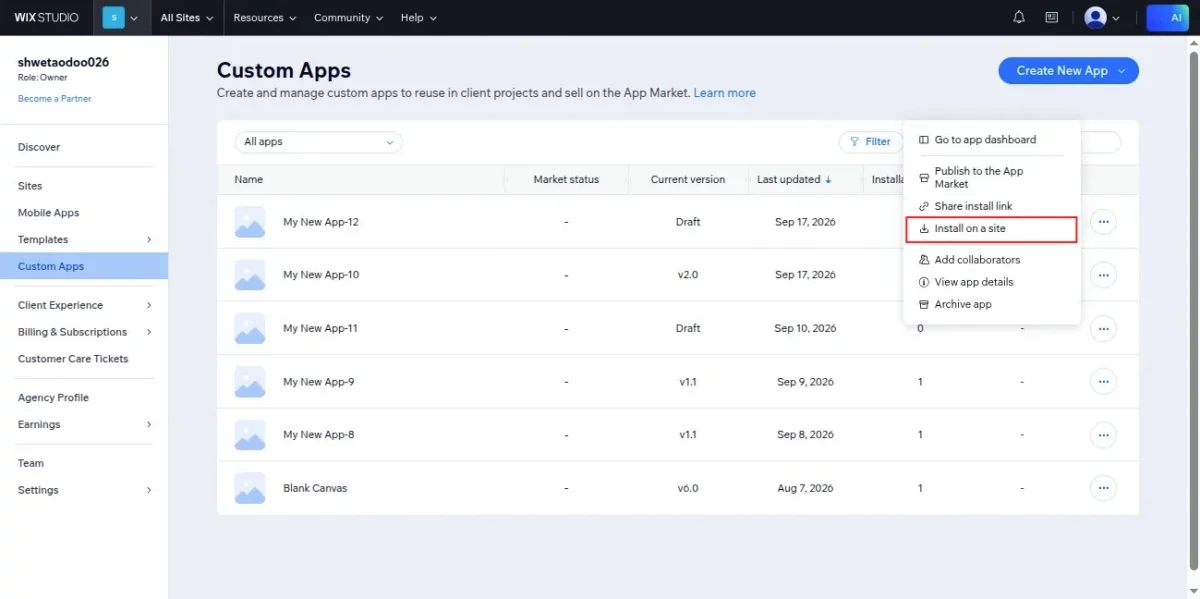
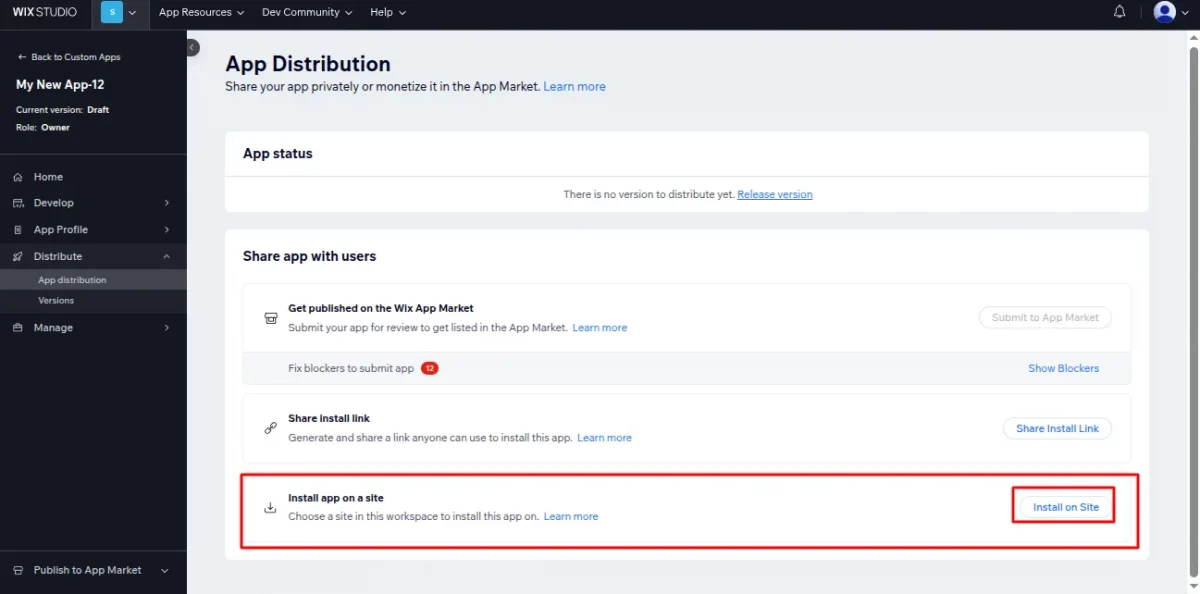
Step 14: Install the Wix App on a Site
Install the Wix app on the required Wix site.
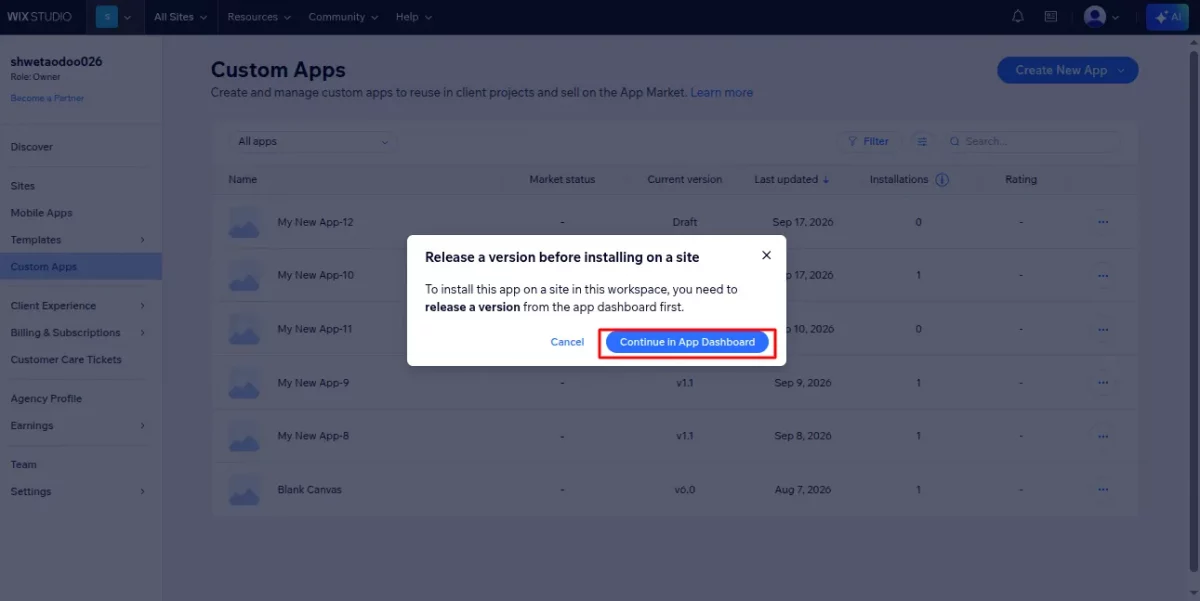
Step 15: Release App Version Before Installation
Wix may display a pop-up requiring you to release the app version before installation.
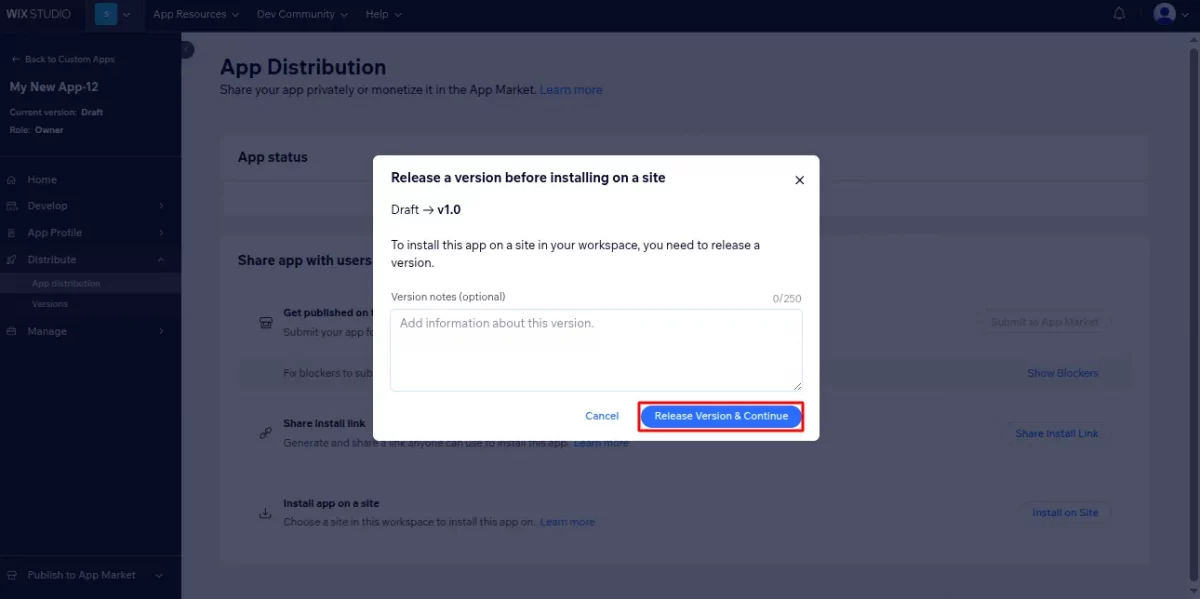
Step 16: Release the App Version
Open the App Dashboard and release the app version from the version release popup.
Step 17: Install the Released App on Wix Site
Install the released app on the required Wix site.
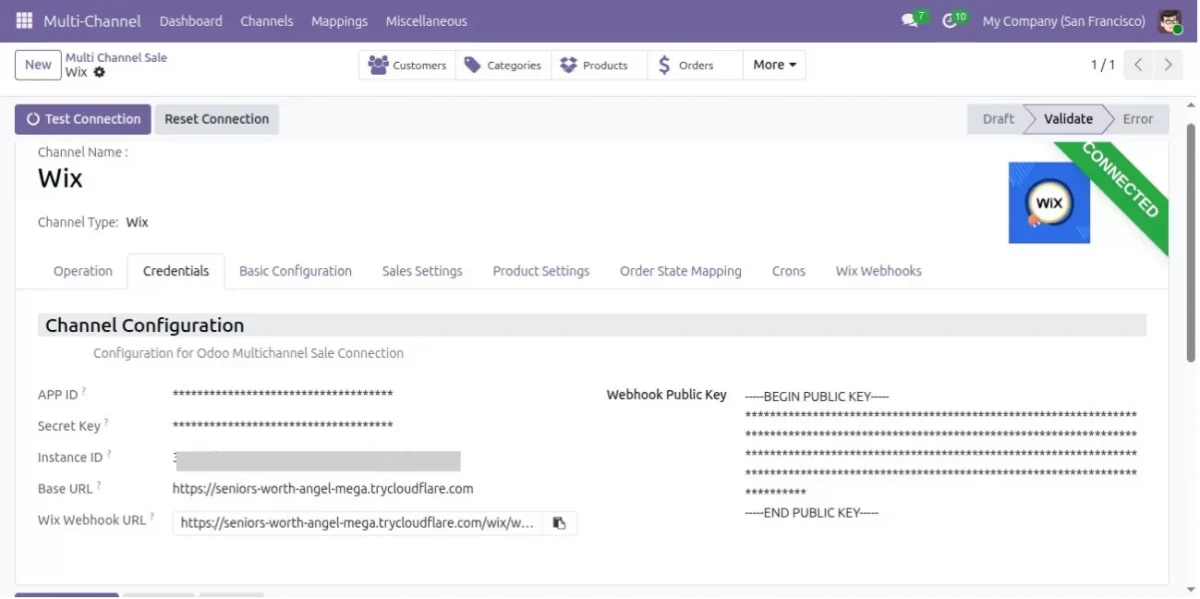
Step 18: Copy the Instance ID
After installing the Wix app, copy the generated Instance ID and add it to the corresponding Wix configuration in Odoo.
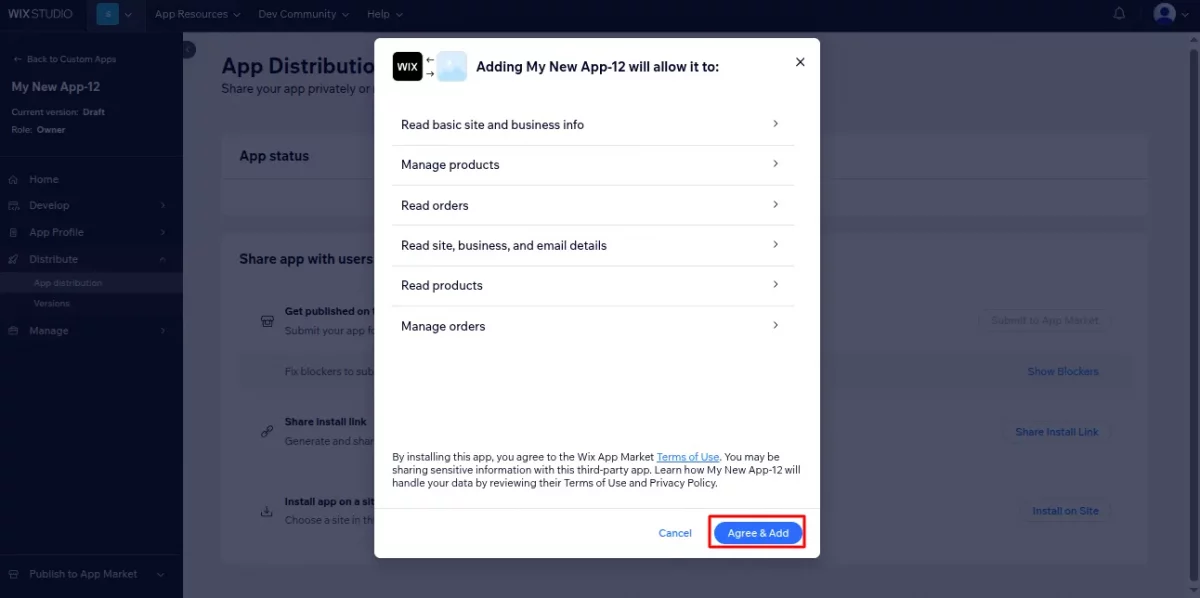
Step 19: Approve App Permissions During Installation
Approve the required app permissions during the installation process.
CONFIGURING WIX AT ODOO END
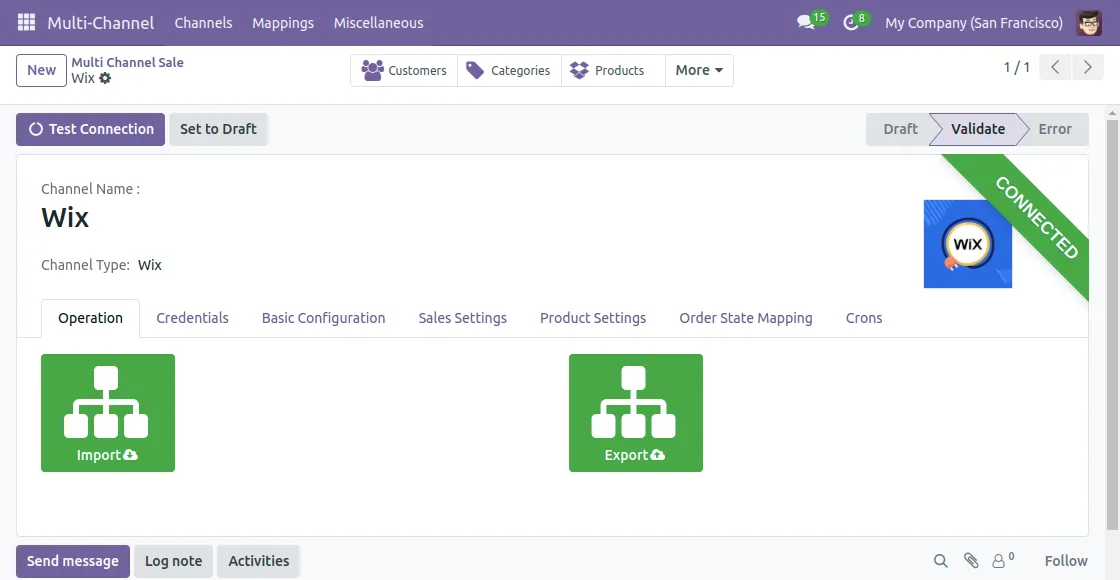
NOTE: First configure the Wix end, and from there, you will be redirected to Odoo. After establishing and validating the connection, you can use this connector.
1.Now, the ‘Operations’ tab will let you import or export data between Odoo and Wix.
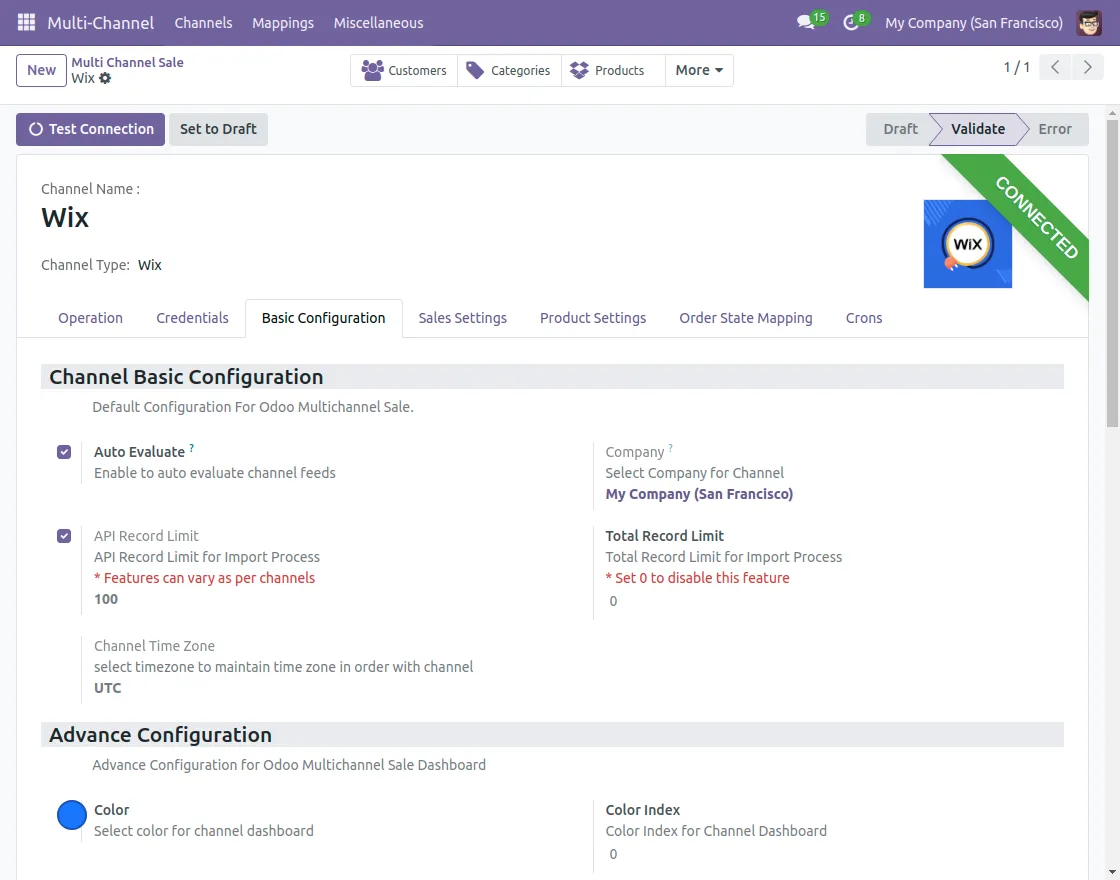
2. In the ‘Basic Configuration’ tab, you can define settings like API limit, Auto evaluate, and numerous other settings.
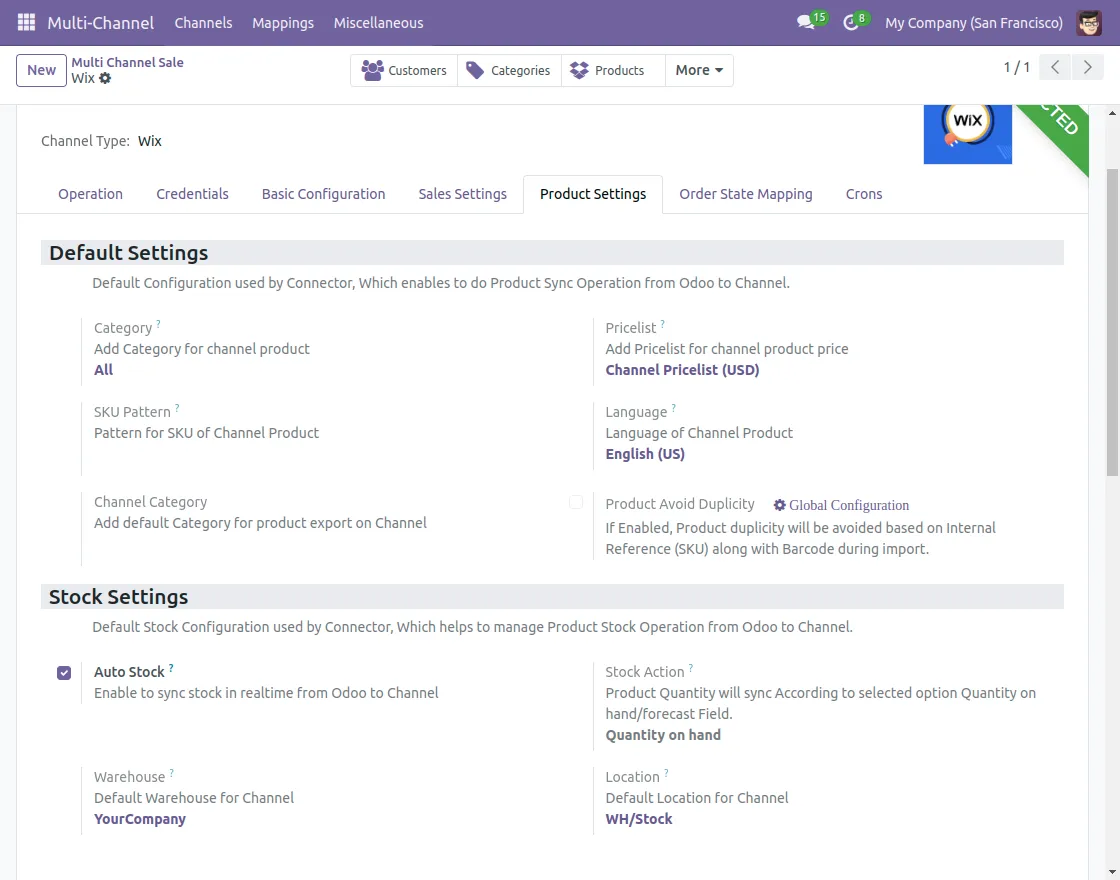
3. Further, from the ‘Sales Settings and Product Settings’ tab, you can manage the available settings according to your requirements.

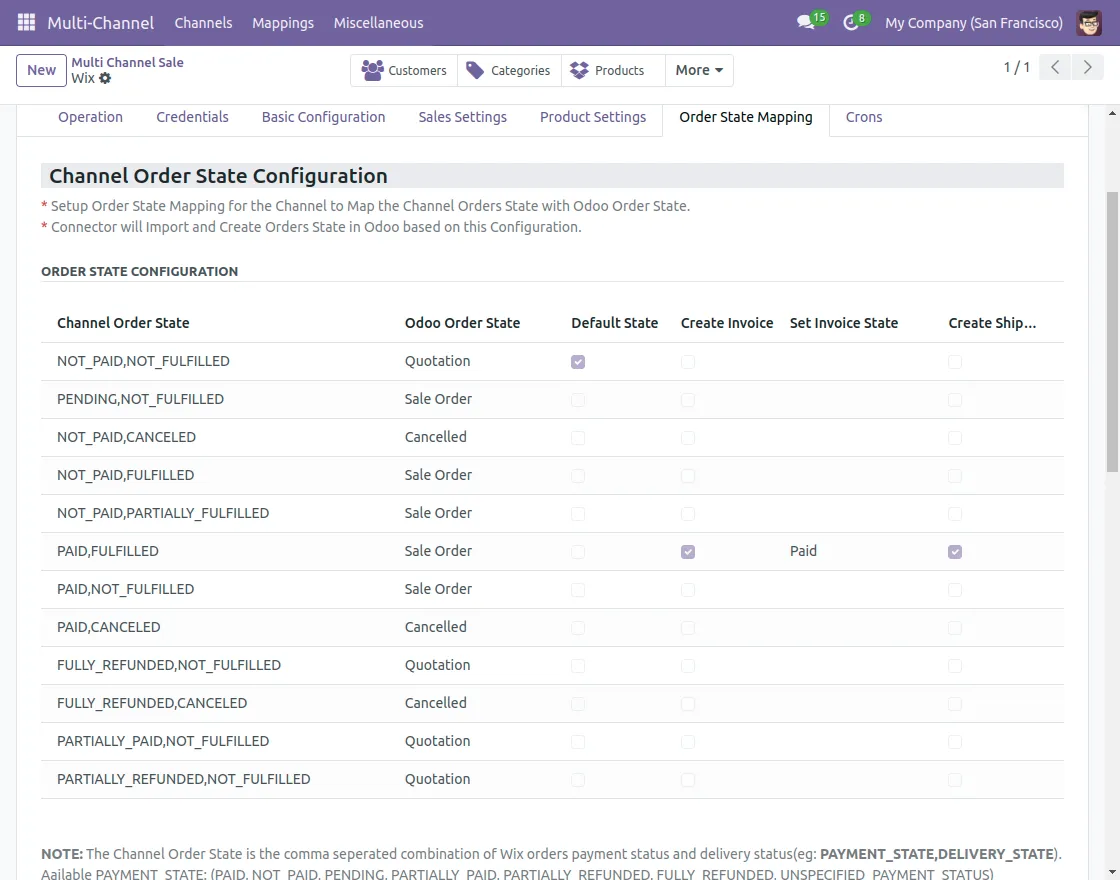
4. ‘Order State Mapping’ tab allows you to select which state of the order you want to map while importing.

5. The ‘Crons’ tab authorizes you to select which data you want to import on each cycle.

BASIC CONFIGURATION
Channel basic configuration: The basic configuration of the channel includes the following settings:
Auto-evaluate: When you enable auto-evaluate, it will evaluate the feed of the imported data automatically.
Company: Select the default company for the imported data from Wix to Odoo.
API Record Limit: In the API record limit, you can set the limit of data that will sync between Odoo and Wix.
Channel time zone: Select the timezone to maintain the time zone in order with the channel
Advanced configuration Under the advanced configuration for Odoo Multichannel Sale you can configure color, color index, blog URL, and store URL.

SALE SETTING
Channel Sales Order
- Channel Payment Term: Configure the Payment terms for the payment of sale orders imported from Wix to Odoo
- Channel Sales Team: Configure the sales team for sale orders imported from Wix to Odoo
- Channel Salesperson: Configure the salesperson for sale orders imported from Wix to Odoo
- Channel Order Campaign: Configure the UTM Campaign for sale orders imported from Wix to Odoo
- Channel Order Medium: Configure the ordered medium for sale orders imported from Wix to Odoo
- Channel Order Source: Configure the order Source for the sale order imported from Wix to Odoo.
- Channel Tax Type: Configure the Tax Type used in channel order. You can select the tax type as tax type tax included or tax excluded.
- E-Commerce Order Reference Sync: If enabled order will created with the ecom sequence at the Odoo end.
Channel Order Default Product
- Discount Product:
Configure the service product for the Service Product for Order Discount on the imported sale order. - Shipping Product:
Configure the service product for the Service Product for Shipping product for the imported sale order. - Realtime Sales Order Status Sync
With this setting, you can enable the real-time sync of the order status from Odoo to Wix. You can configure the real-time sync of the cancel and shipment status .

PRODUCT SETTING
Default Settings
- Category: At the ecom end user can apply multiple categories but at the Odoo end only a single category is applied.
Set the default category in which imported orders will be stored - Pricelist: This price list stores the Original price of the product exported from ecom to Odoo.
- Language: the set language in the language option will be applied to objects synced from ecom to Odoo.
- Channel Category: while exporting the product from Odoo to Wix, the product will be stored in the configured category.
- SKU Pattern: The value configured here will be used as an SKU in case the SKU is not present.
- Product avoid duplicity: If Enabled, Product duplicity will be avoided based on Internal Reference (SKU) along with Barcode during import.
Stock Settings:
- Auto Stock: If enabled stock will be synced from Odoo to Wix in realtime
- Stock Action: Product Quantity will sync According to the selected option Quantity on hand/forecast Field.
- You can either select the sync of on-hand quantity or forecasted quantity.
- Warehouse: It is the default warehouse that is used for the import of products from Wix to Odoo.
- Location: It is the default location where your stock will be stored when imported from Wix to Odoo.

ORDER STATE MAPPING
Here you can map the order state of Wix with the order state of Odoo. You need to type the same name of the order status in the channel order status.
You can also configure the map’s default state. Creation of invoice, and shipment( paid and open)
CRON
We have provided cron features that will import data from Wix to Odoo. Data will be Imported Based on the Created/Updated after a defined date.
Cron Configuration
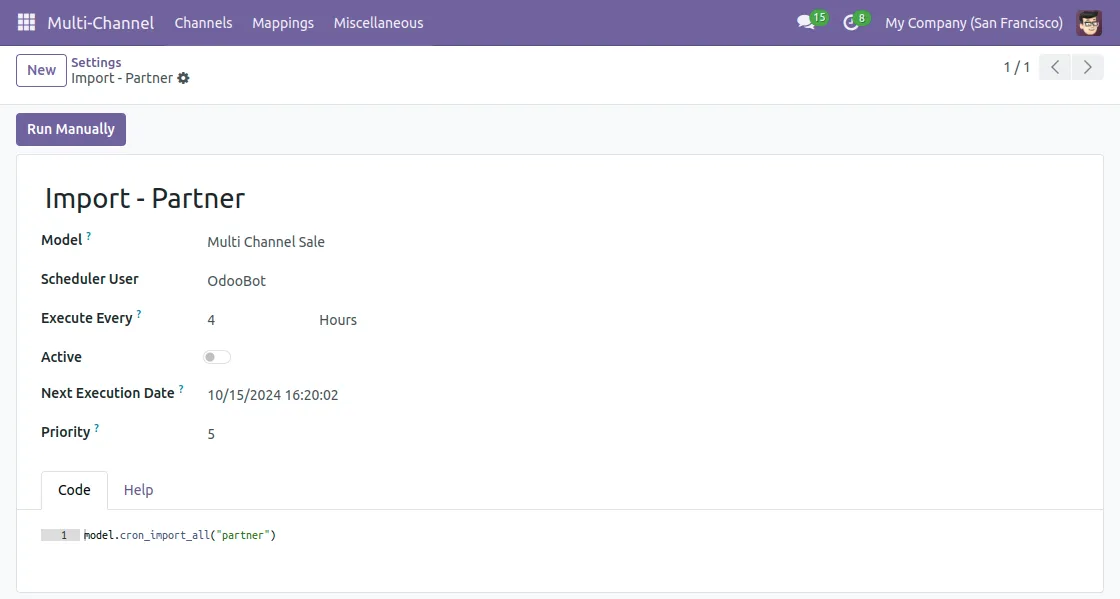
To configure the cron, navigate to Miscellaneous >> Global configuration >> Select the cron you want to configure.
Here, You will find the order product customer category and feed cron.
NOTE: Data will be imported based on the created/updated or defined date.
- Model: It is the module on which the server acts.
- Scheduler User: This user will be responsible for running the scheduler.
- Execute Every: Here you can configure the time interval for the execution of the cron.
- Active: Enable if you want to enable the respective cron.
- Next Execution Date: The next Planned execution date for this job.
- Priority: The priority of this job
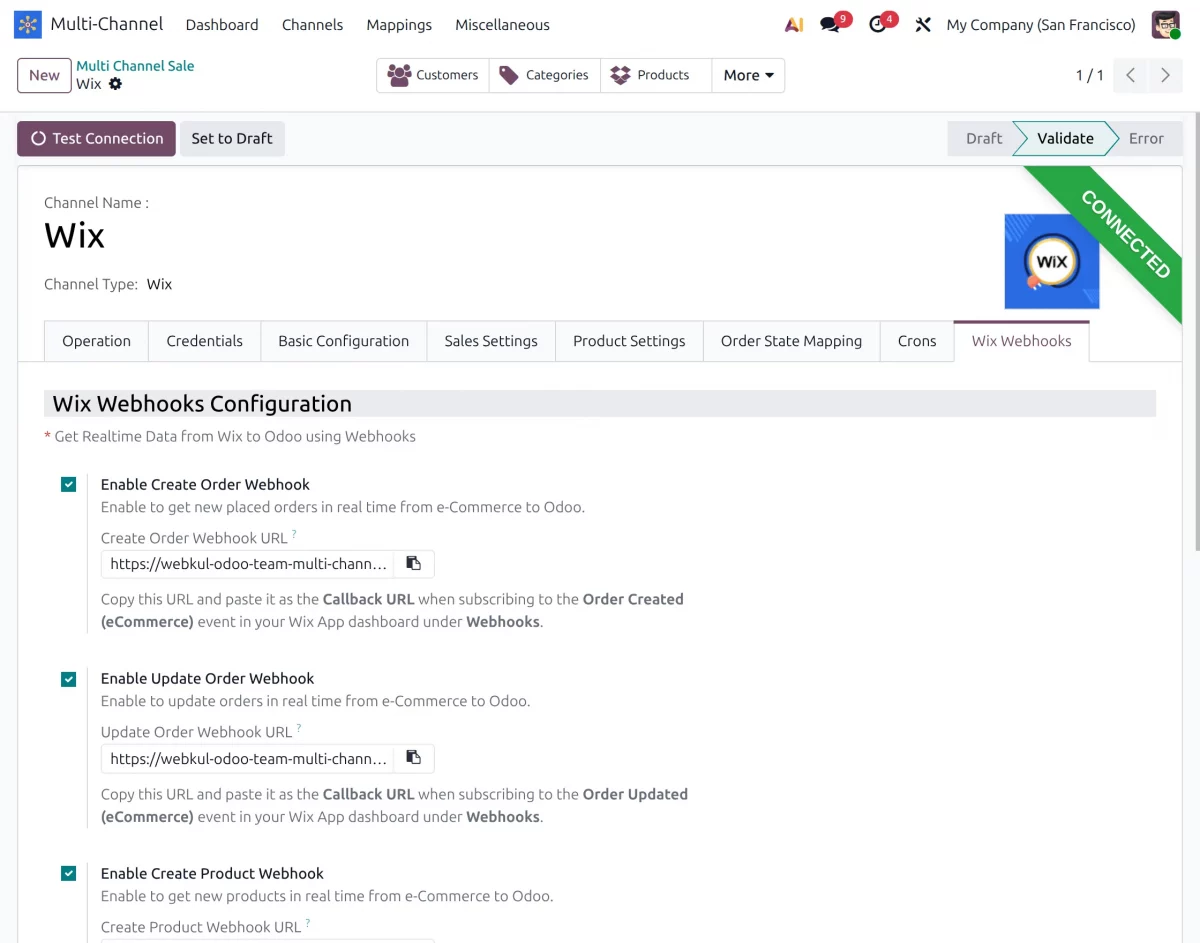
WEBHOOK CONFIGURATION
The Wix Odoo Connector supports webhook-based synchronization to automatically synchronize supported changes from Wix to Odoo in real time.
Order Webhooks: When a new order is created on Wix, it can be automatically synchronized with Odoo. Supported order status updates can also be synchronized through webhooks.
Product Webhooks: Newly created products and supported product updates on Wix can be automatically synchronized with Odoo through webhooks.
This helps keep supported order and product information updated in Odoo without requiring manual synchronization.
MISCELLANEOUS
GLOBAL SETTINGS
Go to Multi-Channel > Miscellaneous > Global Configuration to set up the import scheduler and enable “Avoid Duplicity” to prevent duplicate imports or exports.

SYNCHRONIZATION HISTORY
In the ‘Synchronization History’ option, you can view the entire history of every sync. On clicking anyone, you can see all the details of the history sync.

Data Mapping In Odoo
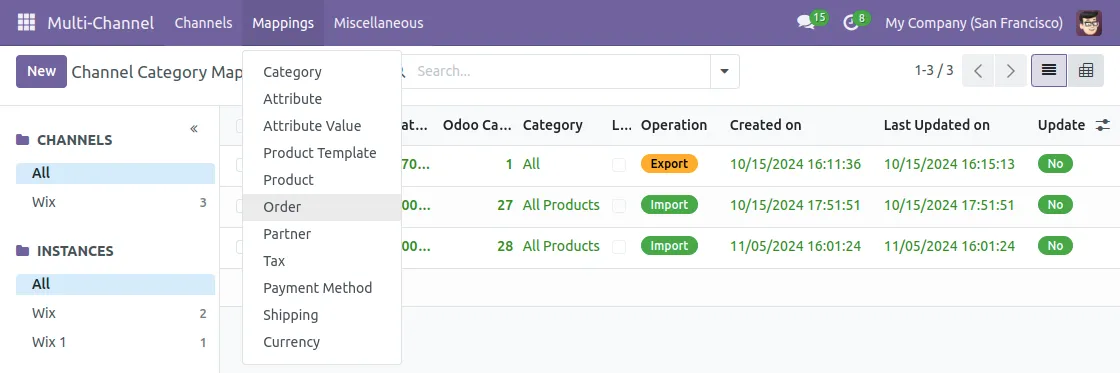
You can view the mapping of all the imported and exported data, such as products, categories, orders, customers, and shipping methods, in Odoo.
On opening any page from the mapping menu, you can view the list view of every mapping. On clicking any, you can view the details of that particular mapping.

DATA SYNCHRONISATION
DATA IMPORT
You can import data from the connection’s operation tab. You can also use the import button on the dynamic dashboard.
Note: Order of importing data: categories >> product >> order.
To import the order, your product must be imported, and similarly, to import the product, your categories should be imported from Wix to Odoo.
Moreover, you can only import the following data from Wix to Odoo.
- Products– You can import products using filters like all, ID, and Date updated after.
- Order– Import using filters like all, ID, Date updated after and Date created after.
- Category– Import categories using filters like all, ID, and date updated after.
- Customer– Import them using the filters like all, ID, Date updated after and Date created after.
You can import all of this data using the filters mentioned above. Moreover, for data import, you must select the ‘channel instance, object, and filter’ in the import wizard.
Customer Import
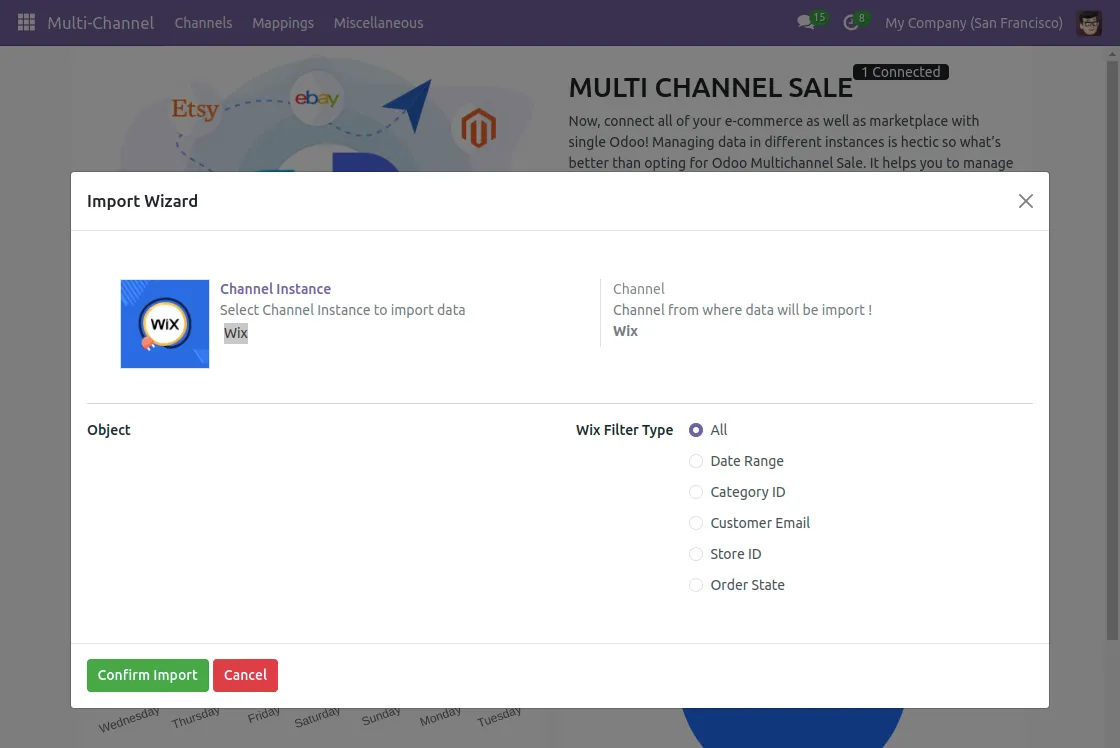

Category Import


Product Import
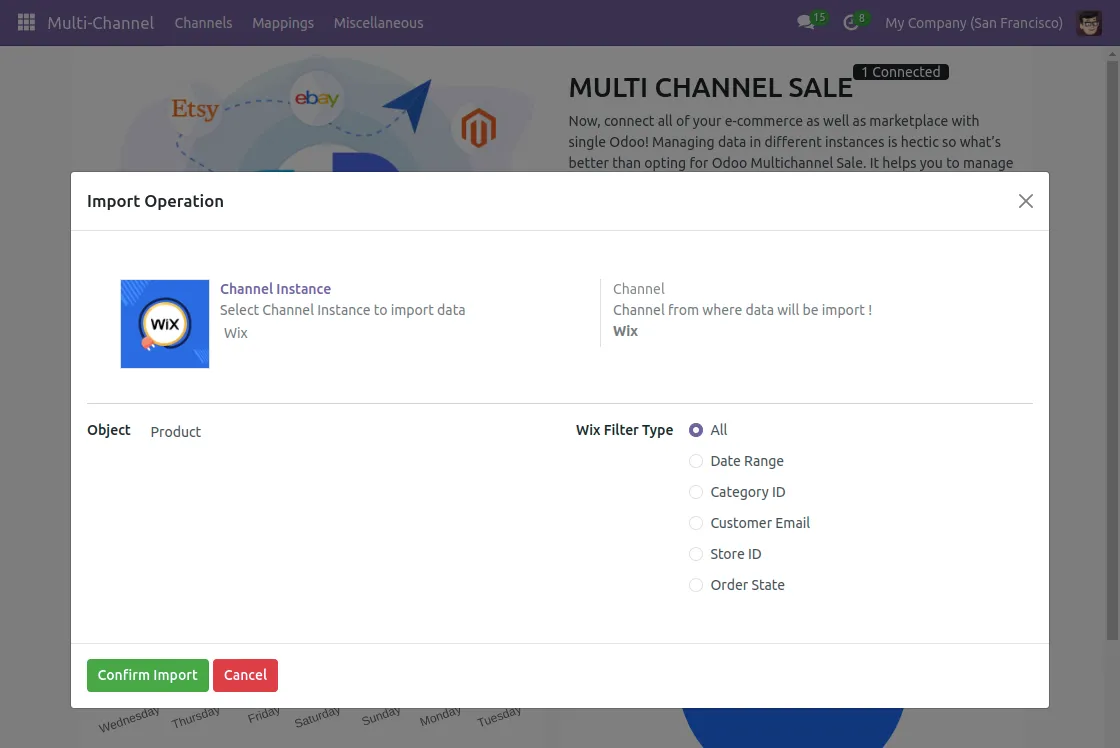

Order Import
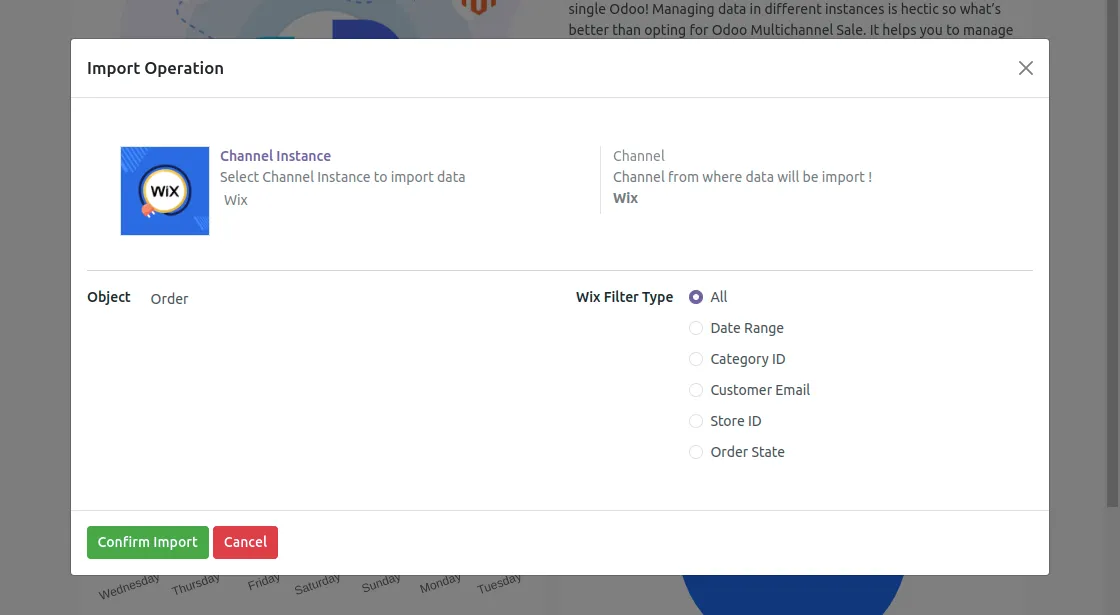

Shipping method Import: In the Odoo Wix connector shipping method is not imported
DATA EXPORT
Navigate to the Wix Odoo connector dashboard and select the export button.
For exporting, choose the ‘channel ID, operation (Export/Update), and object’ in the Export wizard.

Our module provides you with two objects for export/update:
1. You can export/update the category from Odoo to Wix.
2. You can export/update the product template from Odoo to Wix. It includes the product information.
NEED HELP?
Hope you find the guide helpful! Please feel free to share your feedback in the comments below.
If you still have any issues/queries regarding the same, please raise a ticket at the UV Desk.
I hope this helps. In case of any further queries, contact us at our support mail.
Thanks for paying attention!!
Current Product Version - 1.0.0
Supported Framework Version - Odoo 17, 16, 15

2 comments
We have created a ticket on your behalf and soon you will get a resolution to your queries over that.
Ticket URL – https://webkul.uvdesk.com/en/customer/ticket/view/531468
Thanks and Regards,
Team Webkul