Considering the convenience of managing the product information using Akeneo, Webkul has introduced Shopware 6 Akeneo Connector.
You can easily create products & export product data, categories & product variations from Akeneo to Shopware & can also connect multiple Shopware instances from Akeneo.
Check a brief overview of the plugin –
Note:
- This module is Compatible with Shopware 6 Tier Pricing Akeneo Extension Addon.
- This module is also compatible with Shopware 6 Akeneo Bulk Synchronization.
- Compatible with Akeneo Category Image and Description
Basic Requirement:
- The module has been compatible with the latest version of Shopware 6.6.x.x.
- This module works with Akeneo 2.0.x, 2.1.x, 2.2.x, 2.3.x, 3.0.x, 3.1.x, 3.2.x, 4.0.x, 5.0.x, 6.0.x and 7.0.x.
- This module is compatible with the Akeneo PIM Community Edition, Growth Edition, and Enterprise Edition.
- If you want to use this extension on Akeneo EE Serenity mode, please contact us.
- For the Akeneo installation, your Akeneo server should meet these system requirements.
Features
- Export the Categories from Akeneo to Shopware6.
- Export Attributes and attribute options from Akeneo to Shopware6.
- Import Manufacturer, Tax, Sales Channel, Scale Unit, Delivery Time value from Shopware6 to Akeneo.
- Export Products from Akeneo to Shopware6.
- Import Categories, Attribute, Attribute Options, Product, Product Model from Shopware6 to Akeneo.
- Export Product Model from Akeneo to Shopware6.
- Filter data to be Exported based on Category, family, Completeness, Identifier(SKU), Language, and Currency for Product Export.
- Export 2-level variants product.
- Credentials must be selected on the basis of the Shopware version.
- Export Dynamic Groups from Akeneo to Shopware6.
- Use UI to change the media folder.
- With the help of UI, users can select the product listings of variants.
- Shopware 6 Akeneo Connector is compatible with the latest Akeneo version 7.0.x.
- Export Product Images.
- Export custom attributes value from Akeneo to Shopware6.
- Users can export metric-type product models.
- Users can export metric-type attributes.
- Multi Credentials Configuration using UI.
- You can export products with quick export.
- Export Tags from Akeneo to Shopware6.
- Customizable Attribute Mapping with the default value.
Composer Installation
Before beginning the composer installation.
1: Get the ACCESS KEYS [Create a support ticket]
2: In Akeneo composer.json, add our repository as well as the installation script.
For Akeneo 6 and 7
{
  "scripts": {
        "post-update-cmd": [
           "vendor/webkul/shopware6bundle/src/Webkul/ShopWare6Bundle/install/config.sh COMPOSER=true NO_DOCKER=true"
        ],
        "post-install-cmd": [
           "vendor/webkul/shopware6bundle/src/Webkul/ShopWare6Bundle/install/config.sh COMPOSER=true NO_DOCKER=true"
        ],
        "post-create-project-cmd": [
          "vendor/webkul/shopware6bundle/src/Webkul/ShopWare6Bundle/install/config.sh COMPOSER=true NO_DOCKER=true"
       ]
   },
  "repositories": [{
    "type": "composer",
    "url": "https://akeneorepo.webkul.com/"
  }]
}
For Akeneo <=5.x
{
  "scripts": {
        "post-update-cmd": [

"vendor/webkul/shopware6bundle/composer_install.sh"
        ],
        "post-install-cmd": [

"vendor/webkul/shopware6bundle/composer_install.sh"
        ],
        "post-create-project-cmd": [

"vendor/webkul/shopware6bundle/composer_install.sh"
       ]
   },
  "repositories": [{
    "type": "composer",
    "url": "https://akeneorepo.webkul.com/"
  }]
}
3: Use composer to install the extension.
For Akeneo 5:
composer require webkul/shopware6bundle:2.1.1
Akeneo 6:
composer require webkul/shopware6bundle:3.1.1
For Akeneo 7:
composer require webkul/shopware6bundle
4: Complete the authentication form.
5: Send a Message of Success
6: Delete your browser’s cache.
Installing Module for Version 6.0.x and 7.0.x
- After unzipping the appropriate extension zip, merge the “src” folder into the akeneo project.
- From the PIM directory, run the following command over the NO-DOCKER Instance.
./src/Webkul/ShopWare6Bundle/install/config.sh COMPOSER=false NO_DOCKER=true
- Run the command below over the PIM directory’s DOCKER instance.
./src/Webkul/ShopWare6Bundle/install/config.sh COMPOSER=false NO_DOCKER=false
Installing Module for Version 4.0.x to 5.0.x:
Please follow these steps for installing the Shopware6 Akeneo PIM Connector module in your Akeneo PIM platform.
Step 1 – Unzip the respective extension zip then merge the “src” folder into the Akeneo project root directory.

Step 2 – Goto config/Bundles.php then add the line:
Webkul\ShopWare6Bundle\ShopWare6Bundle::class => ['all' => true],

in the return array.
3 – Copy the “config” folder into the Akeneo project root directory for routing.

4 – To run the Quick export in Akeneo 5.0.x, you need to run the below command.
Install composer dependency
php -d memory_limit=4G /usr/local/bin/composer --prefer-dist --no-scripts require navneetbhardwaj/akeneo-quickexport-configurator;
After that, register the bundle in config/bundles.php
Webkul\QuickExportConfiguratorBundle\QuickExportConfiguratorBundle::class => ['all' => true],
Then define routing to create a file in the config/routes/wk_quick_export.yml
wk_quick_expoort:
        resource: "@QuickExportConfiguratorBundle/Resources/config/routing.yml"
        prefix:   /
Step 4 – Run this command after ssh to your Akeneo server by the terminal
php bin/console cache:clear--env=prod && php bin/console shopware6:setup:install
Step 5. If you are using PHP-fpm. Then you need to restart the PHP-fpm services and apache web server.
For Akeneo 5
sudo service php-fpm7.4 restart
For Akeneo 4
sudo service php-fpm7.3 restart
Docker Installation Command
For Akeneo 5
alias docker_php='docker-compose run -u www-data --rm php php';
alias docker_yarn='docker-compose run -u node --rm node yarn';
docker_php bin/console cache:clear --env=prod;
docker_php bin/console pim:installer:assets --symlink --clean --env=prod;
docker_php bin/console d:s:u --force;
docker_yarn run webpack;
docker_yarn run update-extensions;
docker_yarn run less;
For Akeneo 4
alias docker_php='docker-compose run -u www-data --rm php php';
alias docker_yarn='docker-compose run -u node --rm node yarn';
docker_php bin/console cache:clear --env=prod;
docker_php bin/console pim:installer:assets --symlink --clean --env=prod;
docker_php bin/console d:s:u --force;
docker_yarn run webpack;
docker_yarn run less;
Installing Module for Version 2.x to 3.x:
Please follow these steps for installing the Shopware6 Akeneo PIM Connector module in your Akeneo PIM platform.
Step 1 – Unzip the respective extension zip then merge the “src” folder into the Akeneo project root directory.

Step 2 – Goto app/AppKernel.php. Then add a line in function registerProjectBundles()
new Webkul\ShopWare6Bundle\ShopWare6Bundle(),

Step 3 –Goto app/config/routing.yml. Then add these lines at top of the file.
shop_ware6:
    resource: "@ShopWare6Bundle/Resources/config/routing.yml"
    prefix: /

Step 4 –Run this command after ssh to your Akeneo server by the terminal.
php bin/console cache:clear--env=prod; && php bin/console shopware6:setup:install
Step 5 – If you are using PHP-fpm. Then you need to restart the PHP-fpm services and apache web server.
sudo service php-fpm7.2 restart
Common Issues After Installation
It might happen that even after proper installation, upon opening your Akeneo admin dashboard, you see a loading screen. While in that case, do check for the following solution:
- Webpack Installation: If you get the below error.

It means that a web pack is not installed in your system. Run the following command.
npm install --save-prod webpack
npm install
- Module routing.yml is not configured properly. Re-check the routing.yml file as mentioned in the 3rd step of Module Installation
- Clear your browser cache.
Uninstall Module: For Akeneo 6 and 7
- From the PIM directory, run the command below over the NO-DOCKER Instance.
./src/Webkul/ShopWare6Bundle/uninstall/uninstall.sh COMPOSER=false NO_DOCKER=true
- Then run the command below over the PIM directory’s DOCKER instance.
./src/Webkul/ShopWare6Bundle/uninstall/uninstall.sh COMPOSER=false NO_DOCKER=false
Extension to Export Images
After installation, you need to add an extension in your shopware6 instance to export the images from Akeneo to Shopware6.
1 – For that, you have to go to the Shopware6 backend and then navigate to Extensions >> My Extensions.

2 – For installing the extension, the user can click on the Upload extension button. The user can upload the extension zip.

3 – After uploading the extension zip, after that, the user can see the extension in the list.

4 – Now the user can click on the install icon to install the Shopware 6 Akeneo Connector extension.
5 – After the installation of the extension, the user can click to activate the extension.

Shopware 6 API Integration:
The admin can easily generate API keys from the Admin backend. For this, the admin will navigate to Setting>>System>>Integration as per the below image.
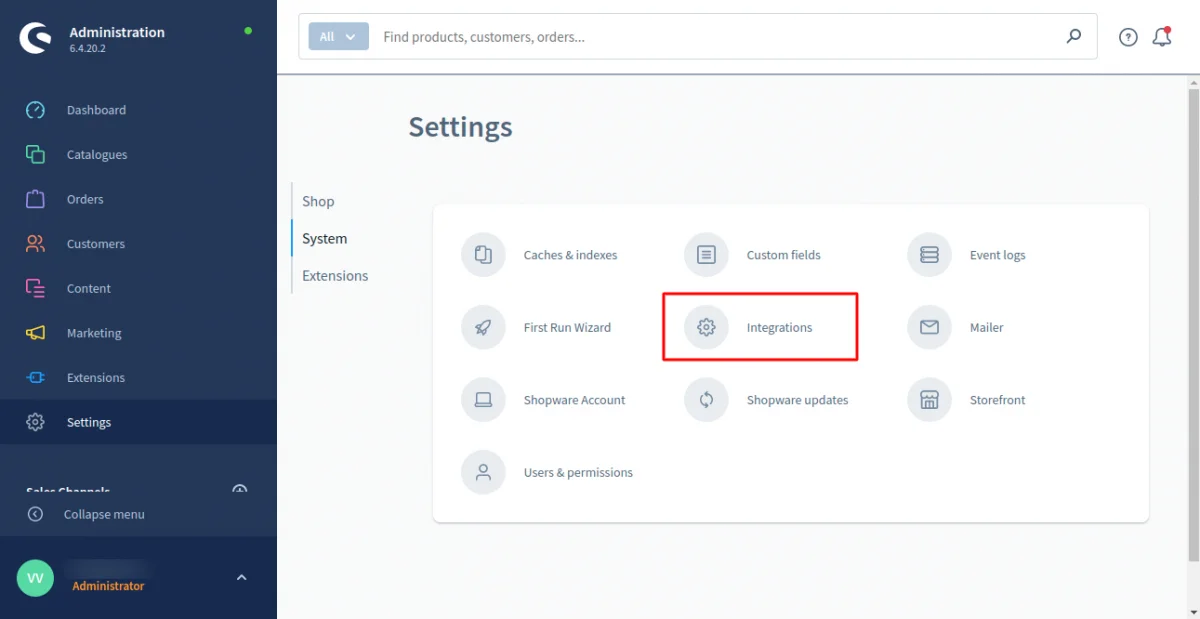
After that click on Add Integration to create new API keys.
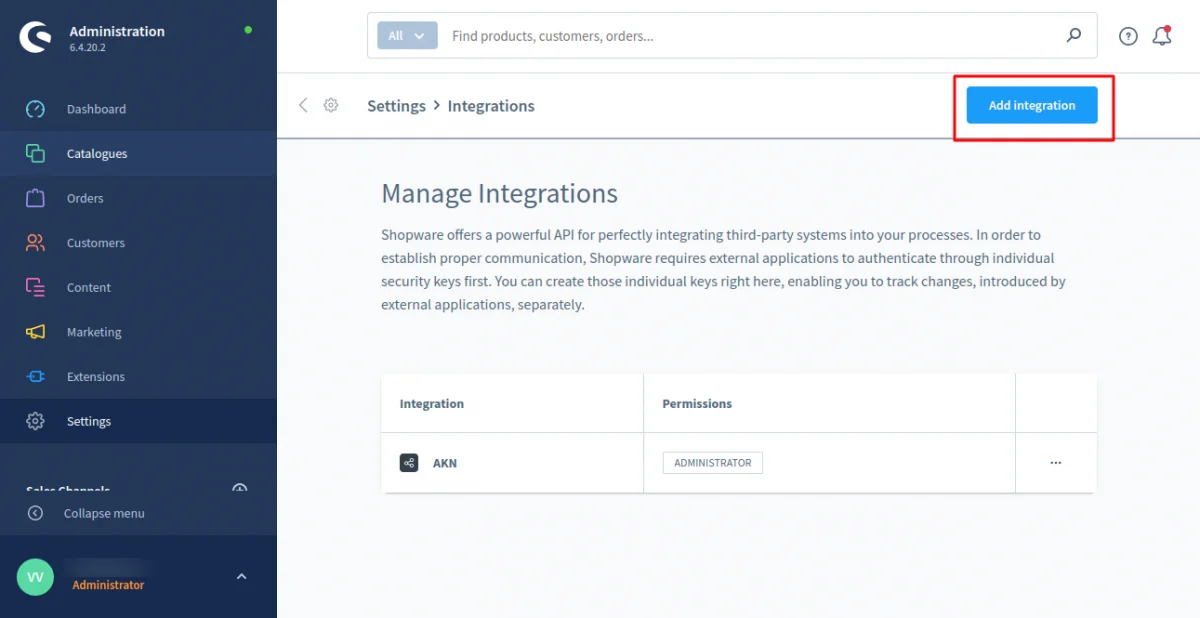
Then after clicking on Add Integration you have to fill in the API key name.
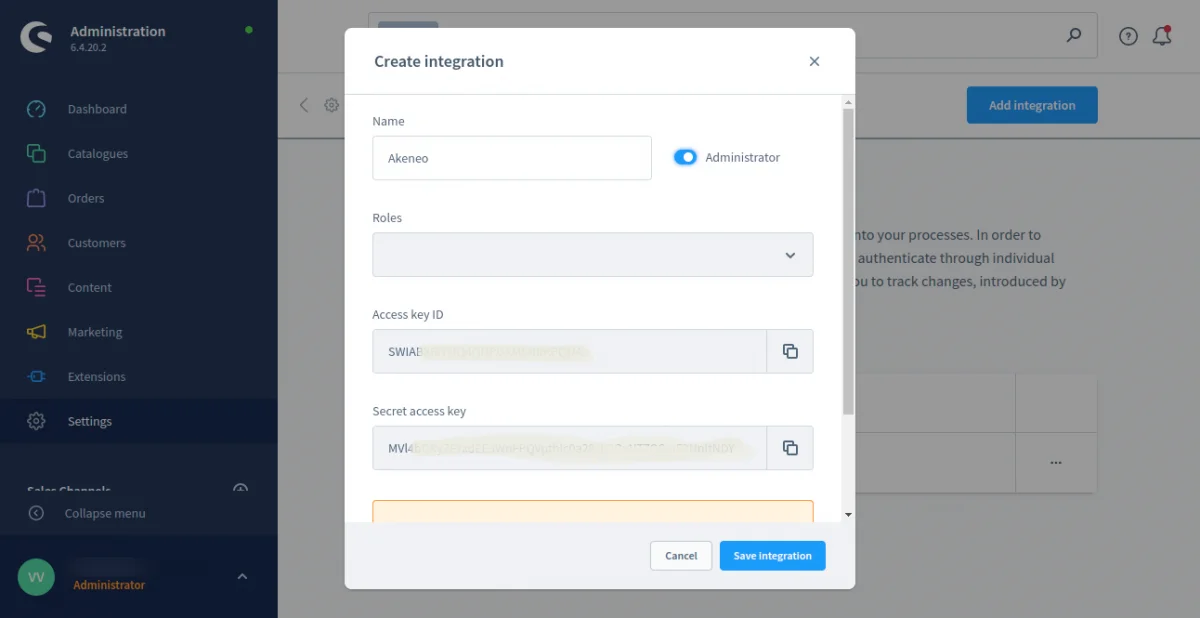
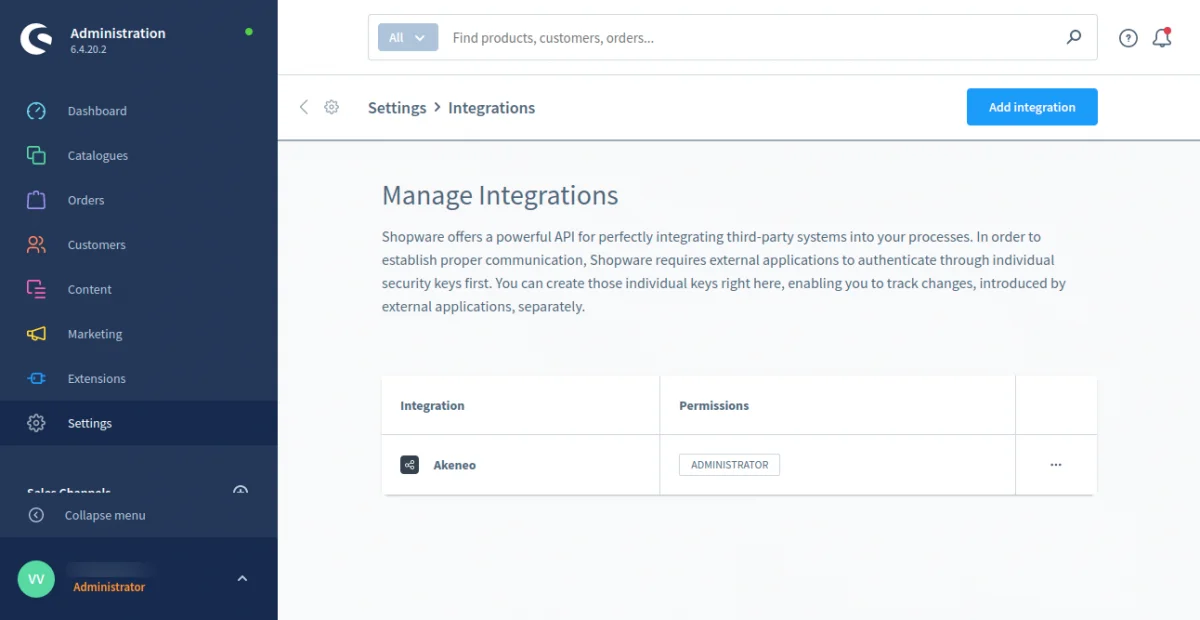
Copy the API Key then click to Save Integration.
Note:
1) For shopware version 6.6.x.x
use plugin v3.0.0 Shopware-API-Plugins
2) For shopware version 6.5.x.x
use plugin v2.0.0 Shopware-API-Plugins
3) For shopware version < 6.5.x
use plugin v1.0.0 Shopware-API-Plugins
Setup Credentials In Akeneo
After installing the module in Akeneo, you need to set up the Shopware6 API keys in Akeneo.

Therefore, log into Akeneo then navigate to Shopware6 Connector > Setup Credentials.

After that click on create credentials there you need to enter the following details:
- URL
- Access Key ID
- Secret Access Key
- Shopware Version

Click to Save button.

Locale Mapping:
In the Locale Mapping section, you can add locales for your Shopware6 store.

Attribute Mapping
After setting up the Shopware6 API keys in Akeneo, next you need to map the product fields between Shopware6 and Akeneo as per the below image.
Fields in Akeneo – In this the admin can map the value of the product and product model.
Variants fields in Akeneo – In this, the admin can map the value of product variants.

Map More Standard Attribute
If your products have lots of information, you can enter Shopware6 attribute code ID and then click Add Field. The Shopware6 Akeneo Connector module supports various attributes of Shopware6 products.
Note- Please make sure to use the same attribute code of Shopware6 in Akeneo.
As well as can also add a Shopware Custom attribute code enter the Shopware attribute code ID then click Add Field.

Other Mapping:
Attributes to be used as Cover Images – The selected Akeneo image attributes will be used as the cover image of the product.
Attributes to be used as Images – The selected Akeneo image attributes will be visible as Shopware6 product gallery images.
Family and Attribute to be used as Tags-All Akeneo attributes and family will be exported to Shopware6 from Akeneo.
Attributes to be used as Images(For variants) – The selected Akeneo image attributes will be used as the variant image of the product.
Attribute To be used as Properties Values(For Export) –
The select type, multi-select and metric type attribute of Akeneo properties value(color, material, brand, etc) will be exported to Shopware6 from Akeneo.
Display in listing attributes – All select type attributes are will be exported to Shopware6 from Akeneo.

You must select a rule mapping in the rule section.
The tier price requires rule mapping, which should be a simple select type.

Import Settings
Set Family For Import Products – In this admin can select a family in which all the products from Shopware will be imported in Akeneo.

Other Setting:
Mapping for boolean Tags
In this, you have to select
- Yes/NO
- True/False
Export Metric Unit:
In this, you can select yes or no to export matric tags unit with metric value or not.
Media Folder ID:
In this, you need to enter the folder id in which media will be exported in Shopware 6. For that, you have to copy the folder Id from Shopware Store in which the media will be exported.

Shopware Backend –
Exported Metric Unit.
Media Folder ID:
Media from Akeneo will be exported to the folder of the Shopware store.

Credentials
You need to activate the credentials to export the products from Akeneo to Shopware6. The active credential will be visible at the time of creating an export profile.
You can also enable the option to Quick Export the products from the Akeneo product grid.
- Activated
- Default for QuickExport

Create Simple Product In Akeneo
You can also create a product in Akeneo. Therefore, navigate to Products. Then click the Create button.
Now, you need to choose your action – as Product or Product Model as per the below image. You can select-
- Product – if you want to create simple products.
Enter the SKU, choose a family, then click the Save button as per the below image.
Product Family – This is a set of attributes that will be the same for all products belonging to a family.
The product family represents product type, imposes product information structure, and defines the list of attributes for a product that it belongs to.
Add Product Details
Now you need to provide information about the product.
After that, enter the details like color, cost, and country of manufacturer, and upload the product image.
Select Attribute
In order to add product information, select the attribute options you require. Therefore, you can also create new options for the attribute.
The following Attributes from Akeneo are supported for export:
- Text
- Text Area
- Number
- Date
- Yes/No
- Select
- Price
- Metric
- Image
Multi-Lingual Information
Once you will be done with attributes then Add information for other languages and store views.
Select Category
After entering all the product information. Then you can also select Categories for the created product.
Shopware6 Export Job:
There are 7 types of export jobs in Shopware 6 Akeneo Connector –
- Export All to Shopware6
- Attribute Export to Shopware6
- Attribute Options Export to Shopware6
- Category Export to Shopware6
- Dynamics Group to Shopware6
- Product Export to Shopware6
- Product Model Export to Shopware6
Note For Dynamics Group Export –
To export Associate products you need to follow this First you need to export the main product and their associate product separately to Shopware from Akeneo .
once all the products will be exported to Shopware.
In the second step, you need to run the job Dynamics Group to Shopware so that the products are formed in a group.
After that in the third step export the main product then the product will be exported as the associated product from Akeneo to Shopware

In order to export the products, first of all, you need to create the Export Profile. Therefore, navigate to Exports -> Create Export Profile as per the above image.
Tapping on create an export profile button will redirect you to the Export Profile page. Therefore, you will enter a unique code, the label then select a job profile.
In the Job field, you need to select the Shopware6 Product Export Job. Then click Save.
Filter The Data:
You can export the filtered data. Therefore, navigate to the Content section as per the below image.
You can filter the data as per-
- Channel – This selects the relevant channel of products to export.
- Locales – Depending as per your choice multiple locals can be selected.
- Currency – Select the default currency which you want to export.
- Attributes – select the product attributes that you want to export. You can either select all attributes else click the edit button to select the attributes.
After that click the Save button.
Note -: Before exporting products from Akeneo to Shopware you need to export attribute, attribute option, and category.
Export Now:
After creating the export profile, click on the Export Now button as per the below image.
Execution Process:
After the execution of the export process, you can check the process summary and errors if present.
Shopware6 Backend:
After the completion of the export process, you can check the products in the Shopware6 catalog.
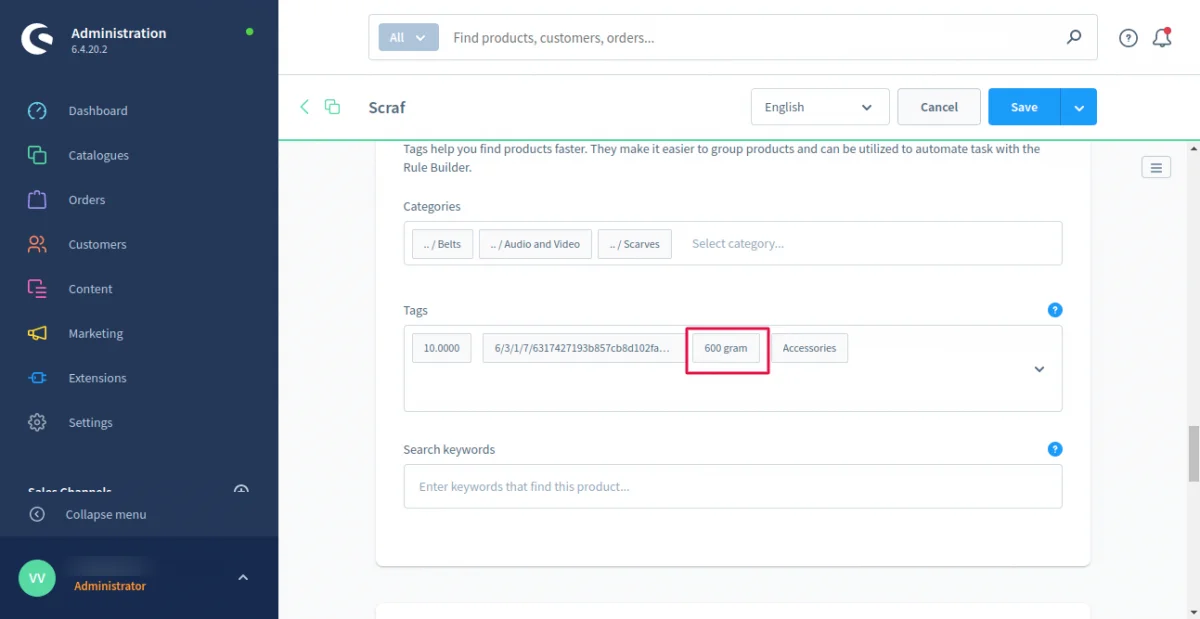
The admin can view the products so if there will be any changes in the product edit form of Shopware6 as per the below image.


Store View:
Once the product exported from Akeneo will appear on the storefront as per the image.

Creating Variant Product in Akeneo
You can also create a variant product in Akeneo, for this click on the product option then click to create
Then select the product model.
- Product Model – If you want to create a variant product with variations.
Select Product Family
This is a set of attributes that will be the same for all products belonging to a family in which variants are added.
Enter the code, choose a family, then click the Save button as per the below image.
Add Product Details
Now you need to provide information about the product. Similarly to the simple product.
Then add variant
Click on the selected variants as per the below image.
Fill in the variant and code
Select the variant which is available then give them some specific code.
Select the variant then click the Save.
Then export the product to Shopware.
Shopware6 Import Job
There are 4 types of import jobs in Shopware 6 Akeneo Connector
- Attributes And Attribute Options Import
- Category Import
- Options Import(tax, manufacture, delivery time, sales, and scale)
- Product Import
Now to import data from Shopware6 to Akeneo. Create the import profile for that you have to navigate to Import>>Create Import Profile.
After that create an import profile fill code, label, then select the job.
Then after creating an import profile click on the Import button.
Note – To export some of the product details like tax, manufacture, delivery time, sales, and scale.
You need to first import those attributes so that the attribute id of shopware6 will also be imported to Akeneo. After that, there will be no error while exporting the product.
After that, you can check the import execution details.
Product Import
To import products from Shopware to Akeneo you need to create an import profile fill code, label, then select the job.
Then after creating the import profile click on the Import button.
After that, you can check the import execution details.
Quick Export Job
After that select the Quick Export option. Then that small slide notification will be stating the Quick Export job has been launched.
You can check the progress of the job, by going to Activity>Process Tracker. Also, once the quick export job is complete, then you can see the notification message on top.
Support
For any issues related to this module, please create a support ticket at https://webkul.uvdesk.com/en/customer/create-ticket.
You can also check other Akeneo Modules. Also, for any pre-sales queries or customization discussions, please drop an email to [email protected].
Please explore our Akeneo Development Services and Quality Akeneo Extensions.
Please explore our Shopware development services and Quality Shopware extensions
Current Product Version - Akeneo 3 to 5 ||2.1.1, Akeneo 6 || 3.1.1 and Akeneo 7 || 4.2.0
Supported Framework Version - Akeneo Version: 7.x.x | Shopware Version: 6.3.x.x, 6.4.x.x , 6.5.x.x and 6.6.8.x.

should be Create the import profile instead of “Create the export profile” right?