Multivendor Marketplace app for Shopify: Ask a Question- We have introduced an additional feature in our multivendor marketplace app
Through which, if the customer has any doubt related to any product or order, then they can directly ask questions from the sellers of the products.
Multivendor Marketplace: Ask a Question Features
- Admin can view all the communication happening between the seller and the customer.
- Admin can also reply to the customer for any query from their admin panel.
- Sellers can reply to customers’ questions from their account.
- Sellers get an advantage as this feature “Ask a Question” increases their sales.
- Customers can directly communicate with the sellers/vendors.
- Customers can have most of their doubts sorted out regarding the products and their orders.
Now, you can also check our video tutorial on Youtube and here as well.
So let’s understand its workflow:-
ACTIVATION
Firstly, enable the “ASK A QUESTION” feature from the “Features Section” by clicking on (…) three dots of the main menu.

After clicking on the enable button, just agree to additional charges, which are over and above to your current multivendor Market Plan.

Once you agree to the additional charges, a new menu called “Ask a Question Configuration” will be added to the configuration section of your Multivendor Marketplace app.

Ask A Question Configuration
Options available in this menu:-
1. RESTRICT CUSTOMER TO RAISE QUERY ON SPECIFIC PRODUCT
Enabling this tab allows customers to raise queries on specific products, restricting the “Ask a Question” option to the product page.

Once enabled, visit the “Edit Product” section and enable the tab to let customers raise queries on the particular product.

2. ALLOW TO RAISE QUERY ON ORDER
By enabling this tab, both you and your sellers can raise queries related to orders.
You/seller will be able to raise a question to the customer from the order detail page, for any product, that is in the order.
To enable this configuration, go to the Multivendor Marketplace Admin Panel and navigate to Configuration > Ask a Question Configuration > Order Configuration.

Once enabled, both admin & seller will get the option to raise queries from the order detail section to their respective panels.
Seller can raise query on order by visiting Seller Panel>>Orders>>Order Listing>>View>>Click Raise Query.

Clicking the Raise Query button, the seller will fill the form and submit it.

Furthermore, you can also select the corresponding shop name (Admin shop or Seller shop) that you want to display on seller replies.
Moreover, select whether you want to use the feature as “Ask a Question”, “FAQ” or both.
3. RESTRICT CUSTOMER TO VIEW AND EDIT FAQ
You can restrict your customers to view and edit the FAQs.
To enable this configuration, go to the Multivendor Marketplace Admin Panel and navigate to Configuration > Ask a Question Configuration > General Configuration.

Note: This configuration will appear when you select either the FAQ or Both options from the ‘Select Ask a Question used for’ dropdown.
To access and choose this option, go to the Multivendor Marketplace Admin Panel, then navigate to Configuration > Ask a Question Configuration > Product Configuration.

4. ALLOW CUSTOMERS TO RE-OPEN QUERIES
By enabling this configuration, the Admin can allow customers to re-open queries.
To enable this configuration, go to the Multivendor Marketplace Admin Panel and navigate to Configuration > Ask a Question Configuration > General Configuration.

5. ALLOW SELLERS TO RE-OPEN QUERIES
By enabling this configuration, the Admin can allow sellers to re-open queries.
To enable this configuration, go to the Multivendor Marketplace Admin Panel and navigate to Configuration > Ask a Question Configuration > General Configuration.

Restrict Queries on the Basis of Specific Keywords (New Feature)
This new configuration allows the admin to control customer queries by restricting specific keywords.
Path to enable: Configuration > Ask a question configuration > General Configuration
Enable “Restrict Queries on the Basis of Specific Keywords” and then select a restriction type.
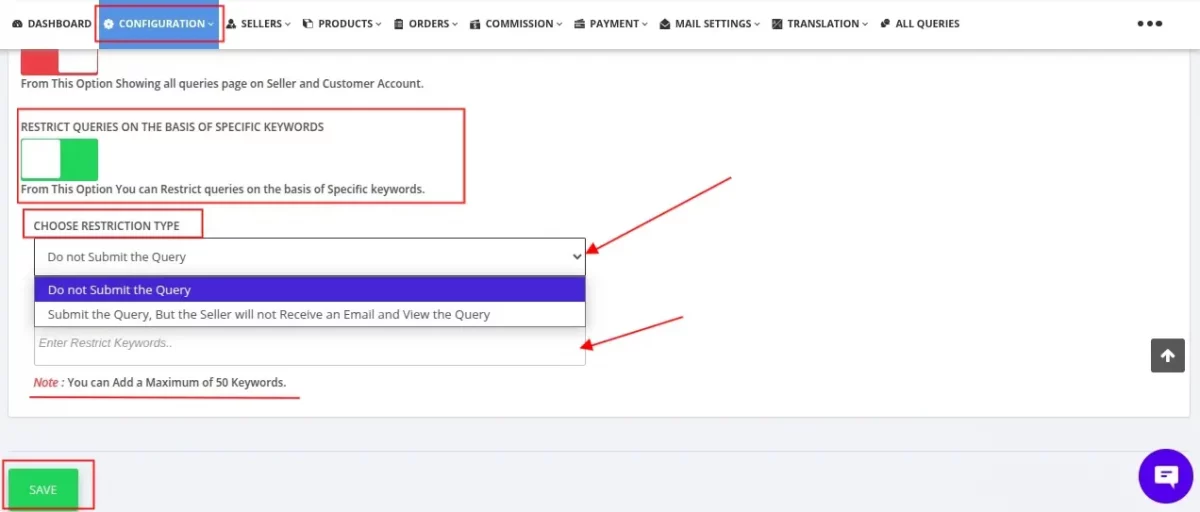
Choose Restriction Type
1. Do Not Submit the Query
If a customer enters any restricted keyword in the query:
- The query will not be submitted
- The user will be blocked from sending the query
- No query will be created in the system
This option is useful for completely preventing unwanted or restricted queries.
2. Submit the Query, But the Seller Will Not Receive an Email and View the Query
If restricted keywords are detected:
- The query will be submitted
- The seller will not receive any email notification
- The seller will not be able to view the query
This option helps in silently filtering sensitive or restricted queries without blocking submission.
Click Save to apply the configuration
Note: You can add up to 50 restricted keywords.
Captcha Code Configuration for Customer Verification
When this configuration is activated, customers will need to enter a Captcha code on the website’s front end. This enhances security by preventing automated spam and unauthorized access.
To enable this configuration, go to the Multivendor Marketplace Admin Panel and navigate to Configuration > Ask a Question Configuration > General Configuration.

On the frontend, the Captcha code configuration will display as shown in the below image:

From here you can edit “Ask a question” label values for the front end.


Also, a new menu name”ASK a question” will be added in the “Products” section of both the ADMIN Panel as well as SELLER Panel.
Ask a Question button on the seller profile page
Visit Multivendor Admin Panel > Configuration > Seller Configuration > Enable this option:

By enabling this, customers will have the following button on the seller profile page:

ASK A QUESTION REGARDING THE PRODUCT
ADMIN PANEL:-
Admin can view the list of all asked questions asked by customers in the “ASK A QUESTION” section under the “Products ” menu of the app.


Also, admin can see the complete history of seller and customer conversation by clicking on the “Open” section under the “Status button” in front of the customer name.


SELLER PANEL:-
Sellers can also view the list of all asked questions asked by customers in the “ASK A QUESTION” section under the “Products” menu from their account in the app.

Sellers can even close the query from here once the conversation between the seller and the customer has ended.

FRONT END DISPLAY
To display the “Ask a Question” button at the product description page as well as on the customer account page, follow the below:
Copy the below code and paste into ‘product.liquid’ template
<div id="wk-askme"> {% if customer %} <input id="wk-is-login" type="hidden" value="{{ customer.email }}"> <input id="wk-cust-name" type="hidden" value="{{ customer.name }}"> {% endif %} <input id="wk-id-product" type="hidden" value="{{ product.id }}"> </div>
Note:- Please make sure that you add the code outside the “Add to Cart” form in the suggested template file.
Copy the below code and paste into ‘customers/account.liquid’ template
<div id="wk-customer-queries"> <input id="wk-customer-email" type="hidden" value="{{ customer.email }}"> </div>
FRONT END VIEW
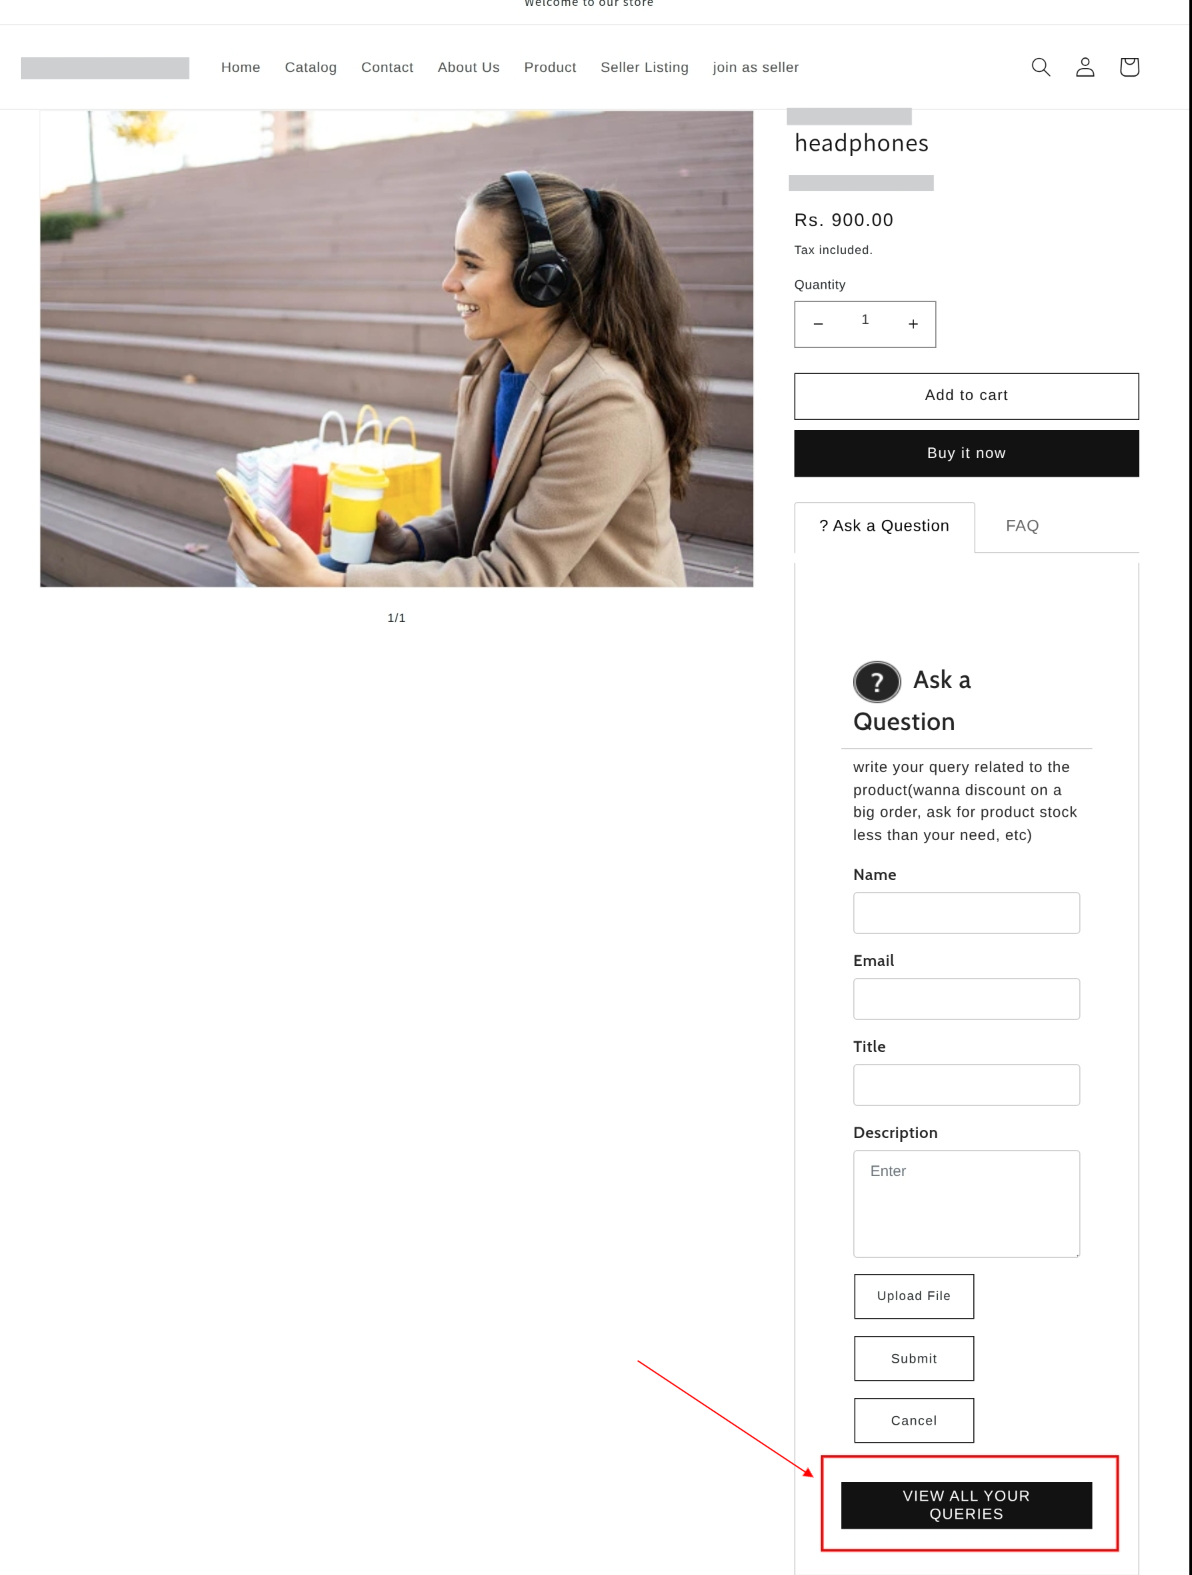
Ask A Question
Therefore, “Ask a question” button will appear like this at the front end. Refer to the below screenshot.

Clicking the “Ask a Question” button will display several text fields to fill out:
Name (Enter your name), Email (Enter your email ID), Title (specify the title of your query), and Description (write the details of your query).
Once completed, click the “Submit” button to send your query. To view all your submitted queries, click the “View All Your Queries” button.
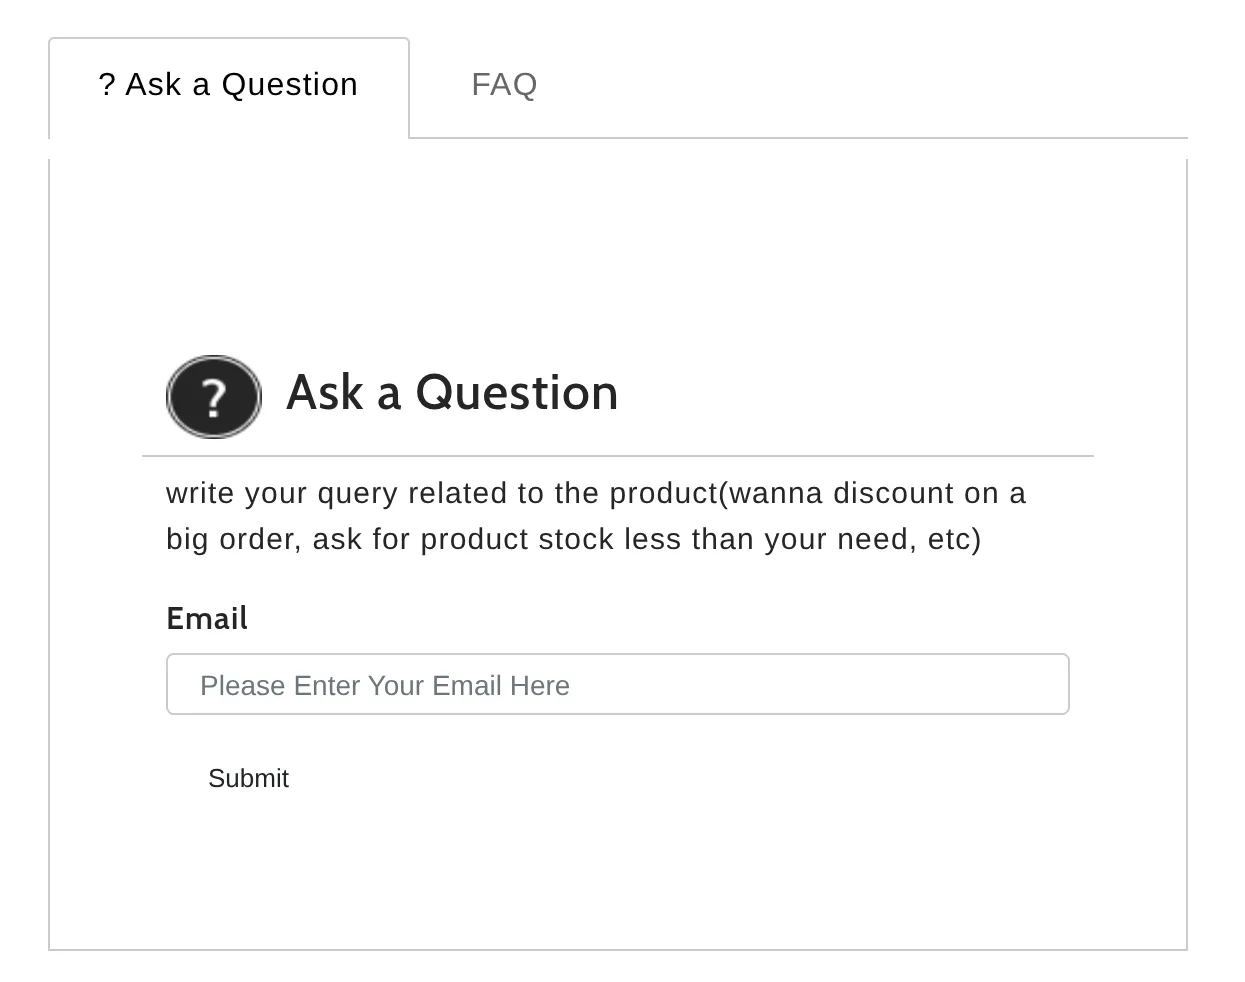
FAQ
You can submit your query directly through the FAQ section by writing your query in the provided field and clicking the submit button. To view recently asked queries, simply click the arrow button.

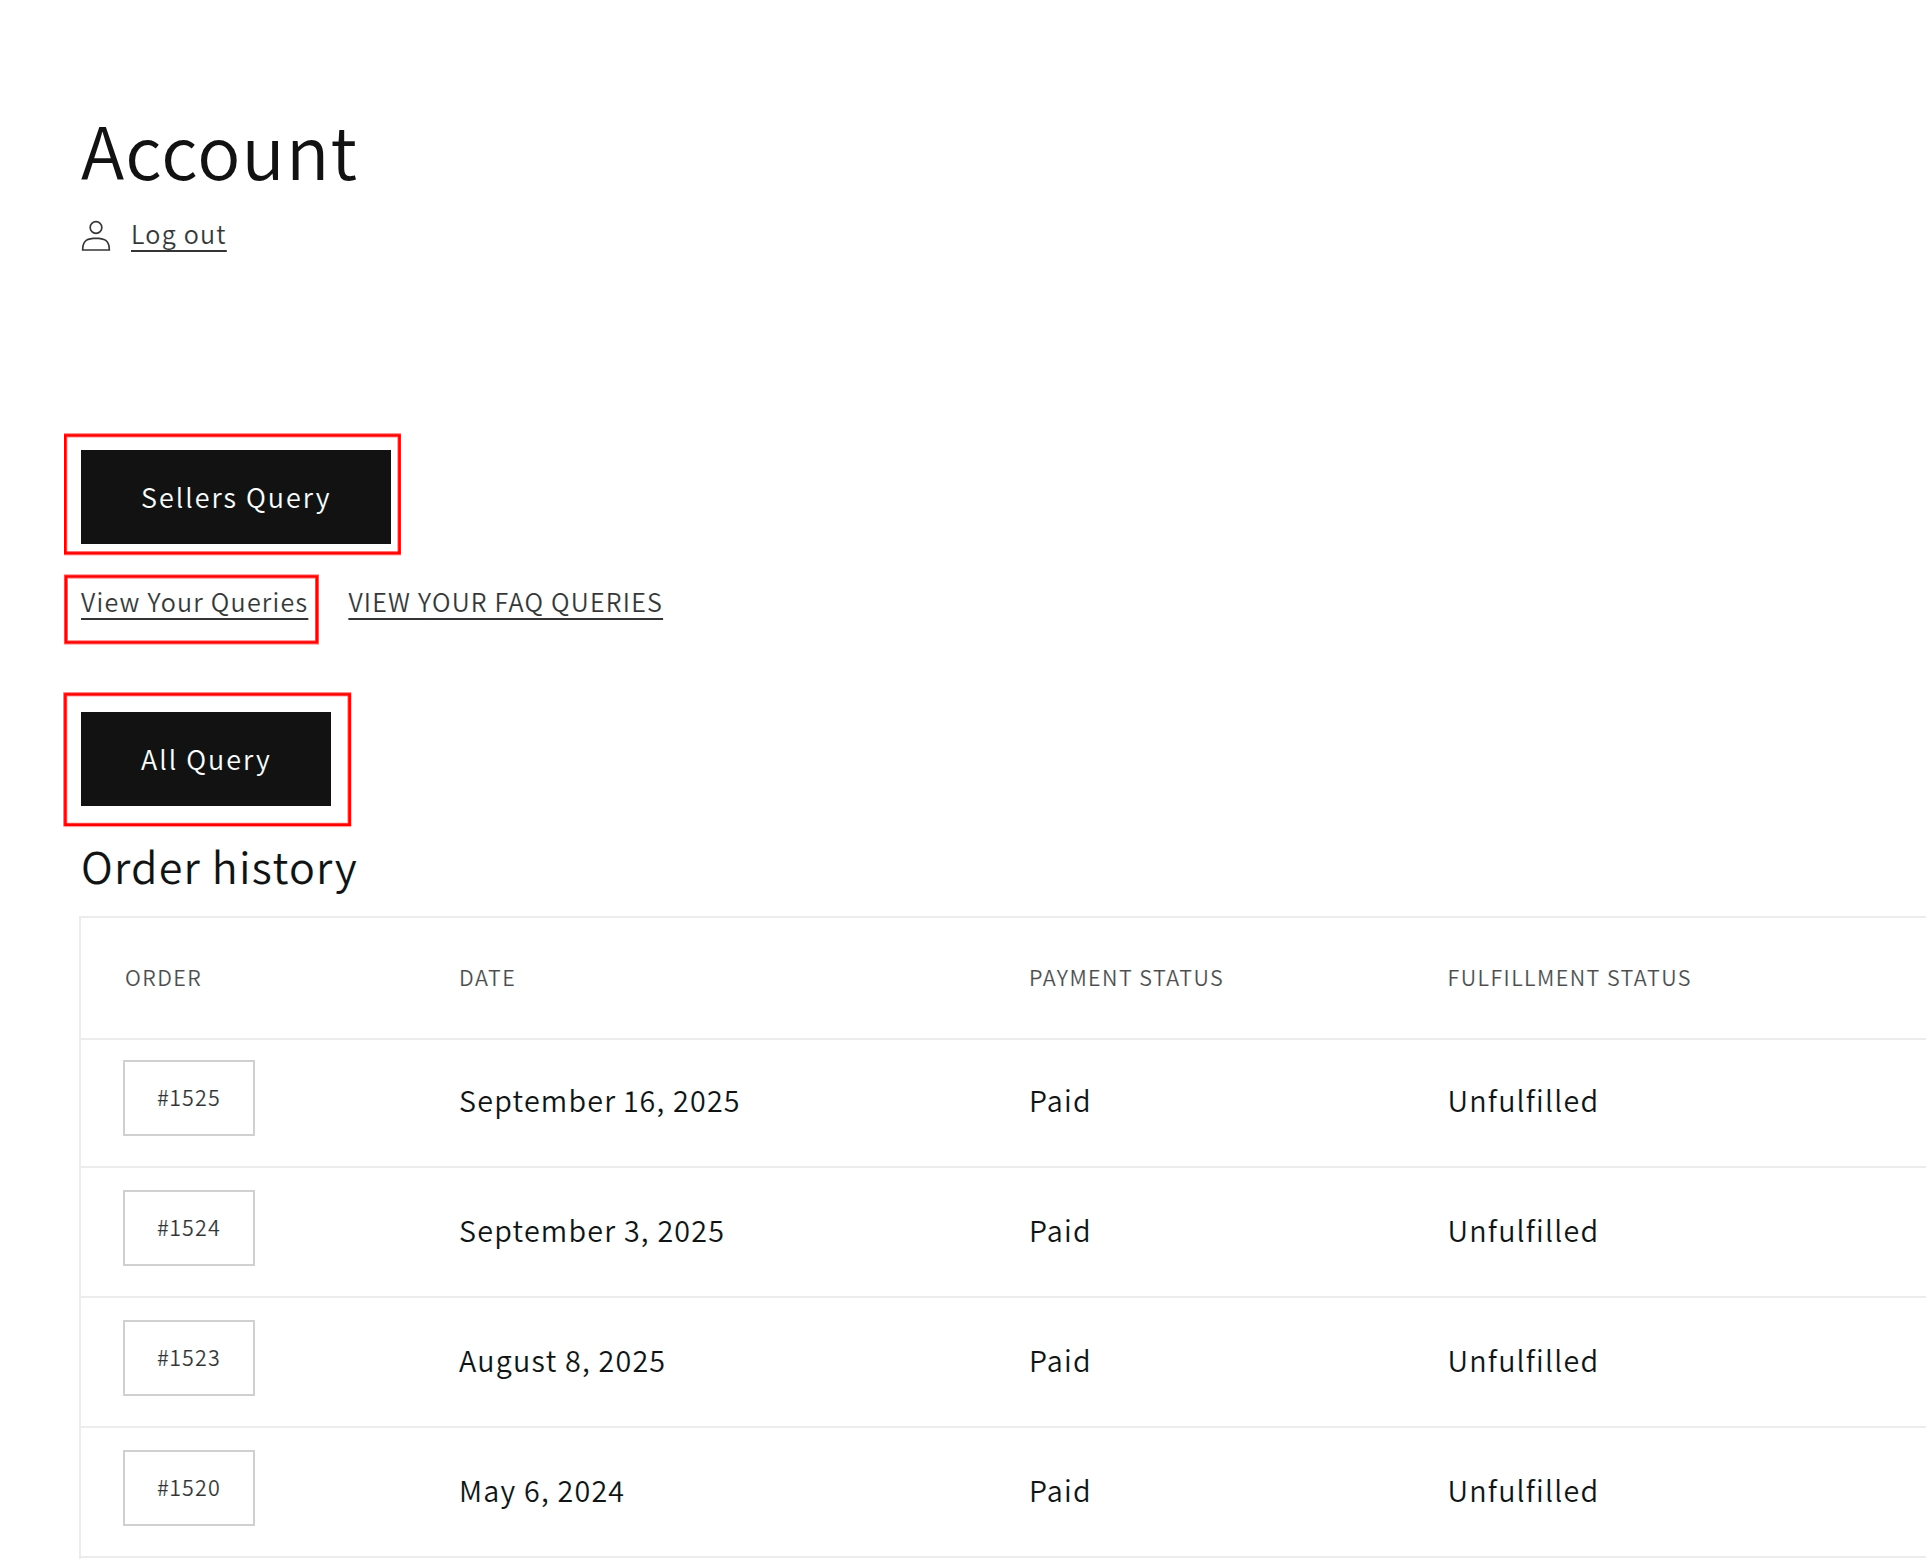
View all queries
We’ve made it easier for customers to access and manage all their queries in one place!
By clicking on “All Queries”, customers can view every query related to products and orders together.
Product Queries: Click on “View Your Query” to see the complete list of product inquiries.
Seller Queries: Click on “Sellers’ Queries” to see all queries raised for sellers.
Now, customers can also view queries separately for better clarity.
Even the guest customer can view all queries that they have asked before. Just click on view all queries and follow the steps below.
After clicking on View all your queries, the email text field will appear. Enter your email ID and click on the submit button.
Now, one OTP will be sent to the customer’s email ID. Enter that OTP for verification, and the customer can see all his queries asked before.


ASK A QUESTION REGARDING THE ORDERS
The customers will be able to ask about the orders that they have placed.
The admin needs to display the ‘Raise a Query’ button.
For this, the admin needs to paste the following code in the ‘customers/order.liquid‘ template file.
<div id="wk-askme"> {% if customer %} <input id="wk-is-login" type="hidden" value="{{ customer.email }}"> <input id="wk-cust-name" type="hidden" value="{{ customer.name }}"> {% endif %}; </div><script>var orders = JSON.stringify({{order.line_items|json}});</script>
Get the code from the multivendor admin panel > Configuration > Instructions for Marketplace.
Refer:

Once done with the code pasting, a ‘raise a query‘ button will start displaying in the account details page of the customer, i.e., the frontend.
Now, the customer will raise the query.
The customer, after placing an order, can raise a query. Note that he can only raise a query for products that he has purchased.
So, after placing an order, the customer needs to visit the My Account section.
Further, click on the order number regarding which he wants to raise the query. Refer:
On the redirected page, click on the ‘raise a query‘ button. Refer:

Now, choose the product for which the query is. The drop-down list of products will only include the products for which the customers have placed the orders.

The customer will get a form to enter their query like so:

The customer can further view his questions and the conversation going on a query by clicking on the ‘View Your Queries‘ button, which will take him to this page:

Further, clicking on the view button, the customer can view all the conversations going over the created query and reply there. Refer:


Admin can monitor the queries from the admin panel.
Admin can view & reply to the queries by visiting the multivendor admin panel > Orders > Order queries:

The admin can view the Store Order ID in the order queries list.
Clicking on a particular query will take the admin to a query detail page. Here, the admin can view all the conversations, reply to the query, and can also close the query. Refer:

The seller can monitor queries from the seller panel.
The seller can view & reply to the queries by visiting multivendor seller panel > Orders > Ask a Question:

On the redirected page, the seller can view all the conversations, reply to the query, and can also close the query. Refer:

Ask a Question As FAQ
With the Multi-vendor Ask a Question feature, you can get the customer’s queries published as FAQ on the product page of your store.
When a seller responds to the customer’s query from his/her seller panel backend, the question & answer will be automatically published as a FAQ on the product page
And the Q/A thread will be closed.
To enable this feature in the app, please visit the Multi-vendor admin panel>>Configuration>>Ask a Question Configuration.

To access and select the “FAQ” option from the dropdown list under ‘Select Ask a Question Used for,’ navigate to the Multivendor Marketplace Admin Panel.
Then, go to Configuration > Ask a Question Configuration > Product Configuration.

To make the FAQ option visible on the front end, you need to add the codes suggested above.
This is how the FAQ button appears on the front end:-

NOTE: The customers need to have an account on the admin’s store to ask a question to be published as FAQ.
Clicking the FAQ button, the customers log in to their Shopify account and ask a question to the seller of this product.

And after that as a question to the seller of that product.
Immediately, the seller will receive an email regarding this. Now, the seller will check the query from his/her seller panel.

Clicking over the query, the seller will get the option to respond to the customer’s query.

As soon as the seller responds to the customer query, it will get published automatically as FAQ on the product page.

Once the query is published as FAQ, the query status will be closed on the seller panel.
This is how the recently asked query will appear on the product page.

The customers can check and edit their queries from their respective “My Account” section.

The customer can click the View button to check the query details.

Customer’s Query Details:-

This way, the customer’s query can be published as FAQ on the product page automatically once the seller responded to the query.
Upload Image Files in Products
You can now allow customers to upload Image Files while asking questions related to products.
Sellers can also upload files while replying to the customer query.
To access and enable this configuration, go to the Multivendor Marketplace Admin Panel and navigate to Configuration > Ask a Question Configuration > Product Configuration.

Once enabled, the customer can upload the file while asking questions about the product.

Seller uploading file:

Restrict customer to raise query without login

When you enable the ‘Restrict customer to raise query without login’ configuration, customers must log in to raise a query.
Without logging in, they will not be able to submit a query.

When this configuration is enabled, customers who try to submit a query without logging in will see a message on the product page stating, “Please login, to raise a query.”
Custom fields in Ask a Question
You can also add custom fields in the Ask a Question label on the product page to procure data and queries from the customers.
Admin/sellers can then provide the customer with suitable reverts.
To create a custom field, the admin needs to go to the admin panel > configuration >custom fields > Add custom field.

Once you click on the “add custom field” button, the custom field page will open and you need to select Ask a Question in “FIELD FOR*”

Now, you need to fill in the data in the given fields.
FIELD NAME: Here you need to enter the custom field name.
INPUT TYPE: You can select in what input you want the data from the customer (text or number)
SEQUENCE: Here you need to select the sequence for the custom field

After clicking on the “save” button, the custom field for ask a question will be created and can be viewed from the custom field list.

Frontend
The customer can view and fill in the data in the Ask a Question form via custom fields on the product page.

After submitting the query, the admin or the seller can reply to the query raised by the customer.
Admin can monitor the queries from the admin panel.
The Admin can easily view all queries from the “Ask a Question” section in the “Product” menu through the Admin panel.
To view the queries, visit the Admin panel>Products> Ask a Question>click on the respective query to view it.

The Admin can provide a response to the customer’s query and then click on the “Reply” button to submit it.

Additionally, the Admin has the option to export the details of all queries based on their preferred time duration.

The exported CSV file will be visible as

The CSV file will have the following columns –
Custom Fields: The data entered by the customer will be visible; if not entered, the custom field will remain empty.
Date of query: The data will be visible, on which date the customer raised the query.
Product Name: Now the product will also be visible on the exported CSV file.
Note – The exported CSV will have the queries in the sequence in which they were created.
Sellers can monitor the queries from their seller panel.
Sellers can view all the queries from the “Ask a question” section in the “product” menu through their respective seller panel.
The seller can visit the marketplace seller panel>Products> Ask a Question>click on the respective query to view it.

The sellers can first provide a response to the customer’s query and then proceed by clicking on the “Reply” button.

Customers can manage queries from the customer account
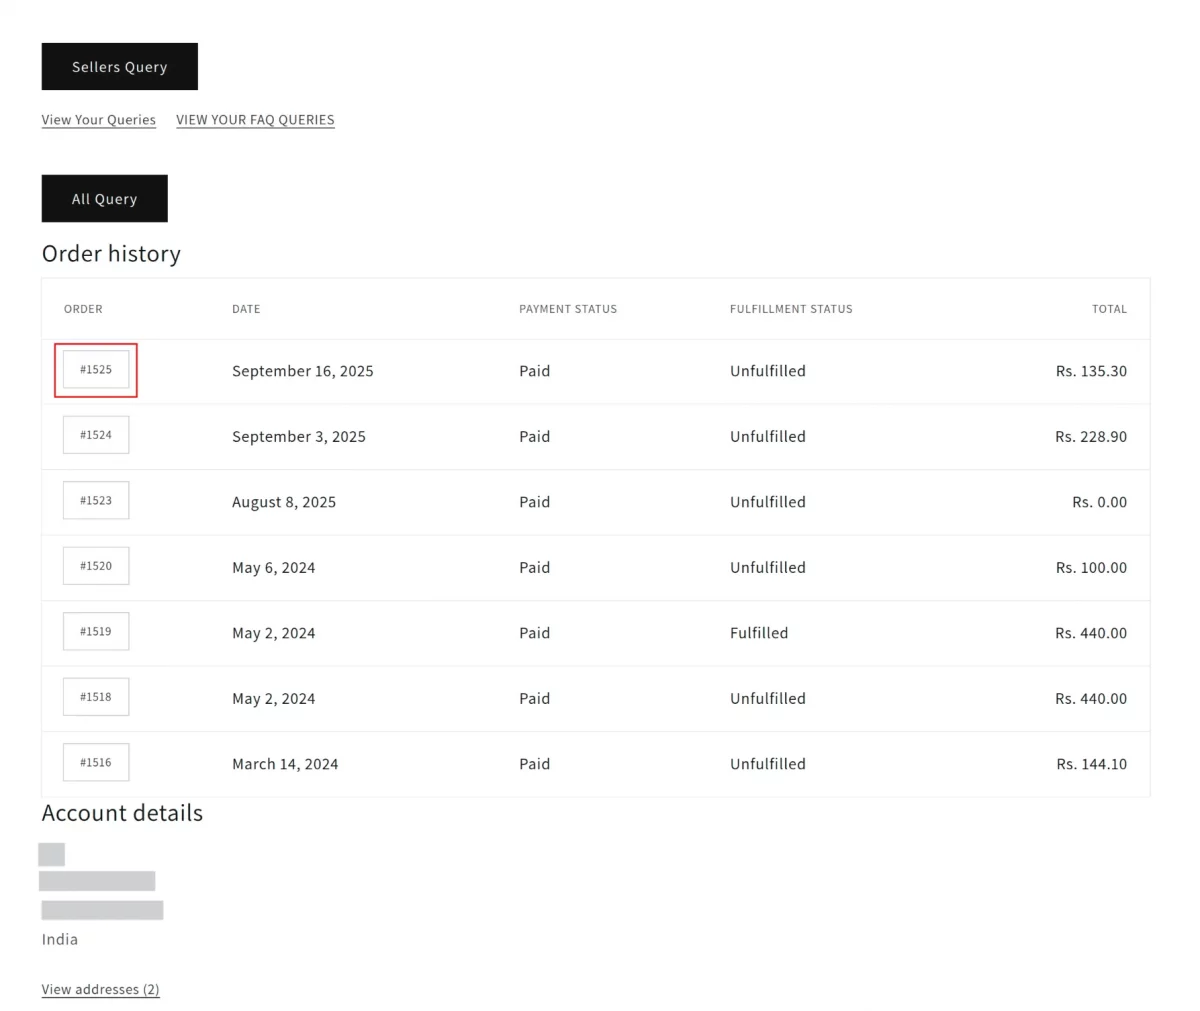
Customers can manage all their queries from their respective Shopify customer accounts.
They can simply click on the “View All Queries” button on the customer account page to easily access all queries they have raised.

Now, they will have the list of the queries here.

Customers can click on the “view” button to view the complete conversation.

Allow Seller to Manage Queries (Close, Mark as Unread, Mark as Spam)
We have added a new configuration in the Ask a Question feature, which allows sellers to Close, Mark as Unread, or Mark as Spam queries. By default, the admin can perform all these actions.
In the “All Queries” listing page:
- If the last reply is from the seller, the query will be shown as bold/highlighted in the customer account.
- If the last reply is from the customer, the query will be shown as bold/highlighted in the seller account.
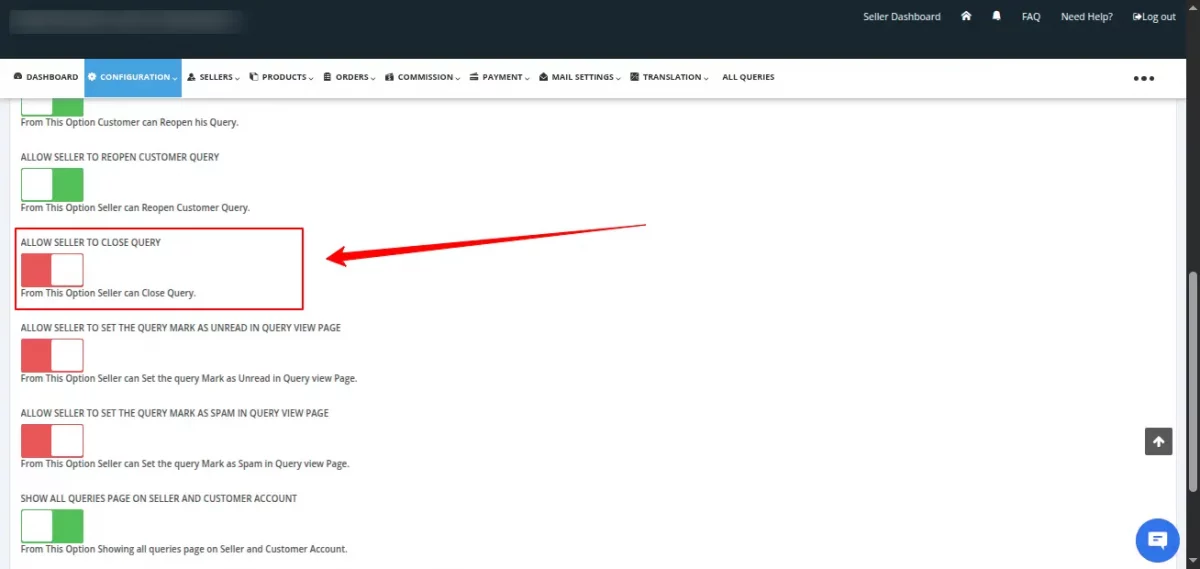
Allow Seller to Close Query
If Admin enables “Allow Seller to Close Query”, your sellers will be able to close queries.
To enable this feature:
- Navigate to the Admin Panel of the marketplace.
- Go to Configuration → Ask a Question Configuration → General Configuration.
- Enable “Allow Seller to Close Query”.

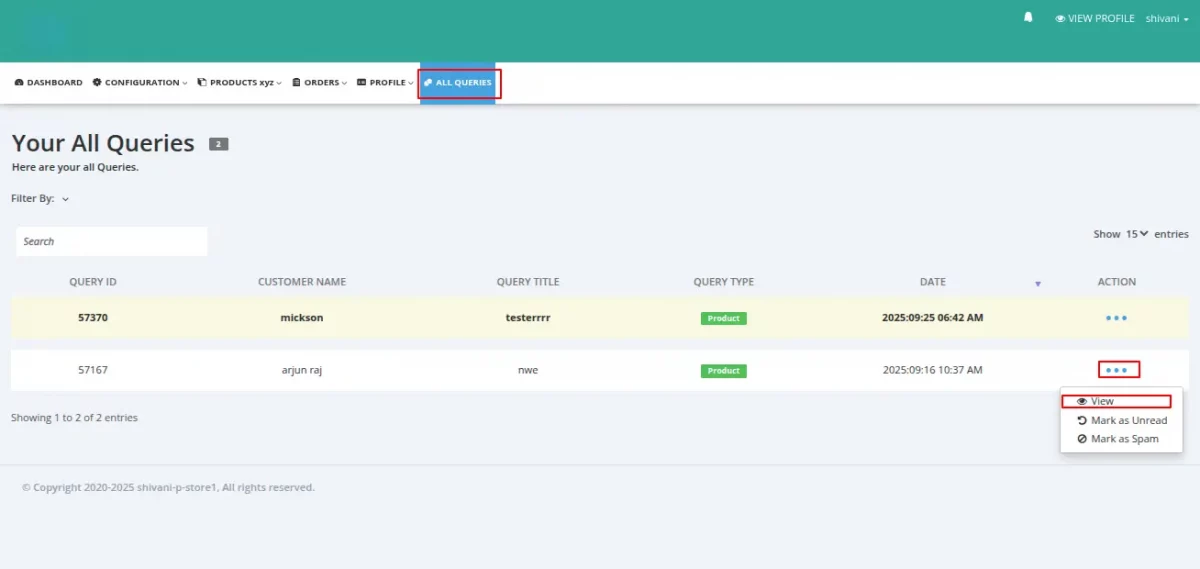
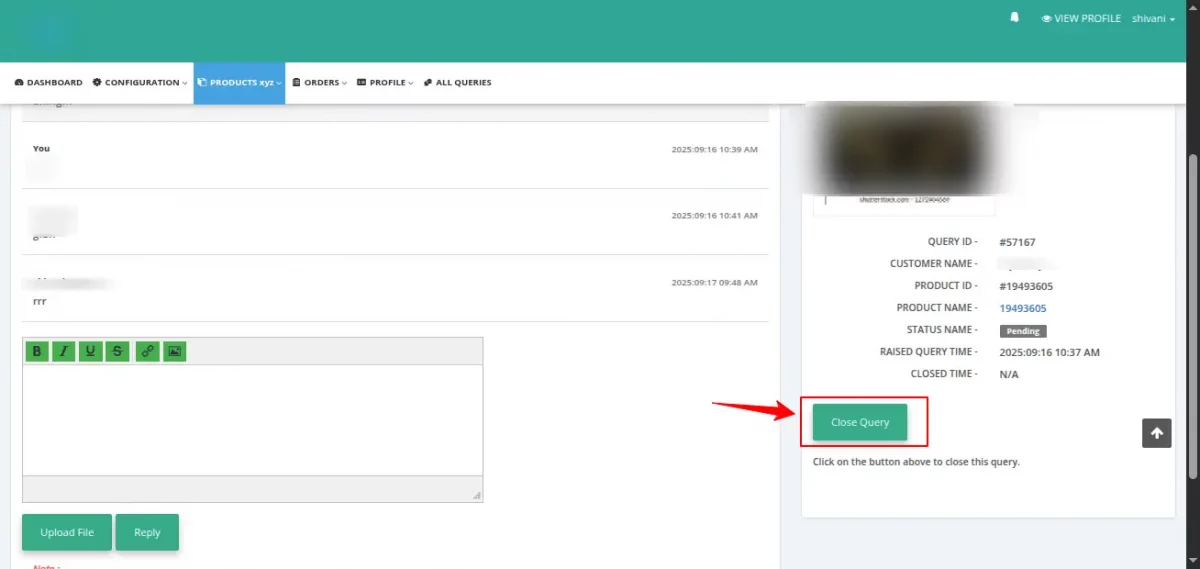
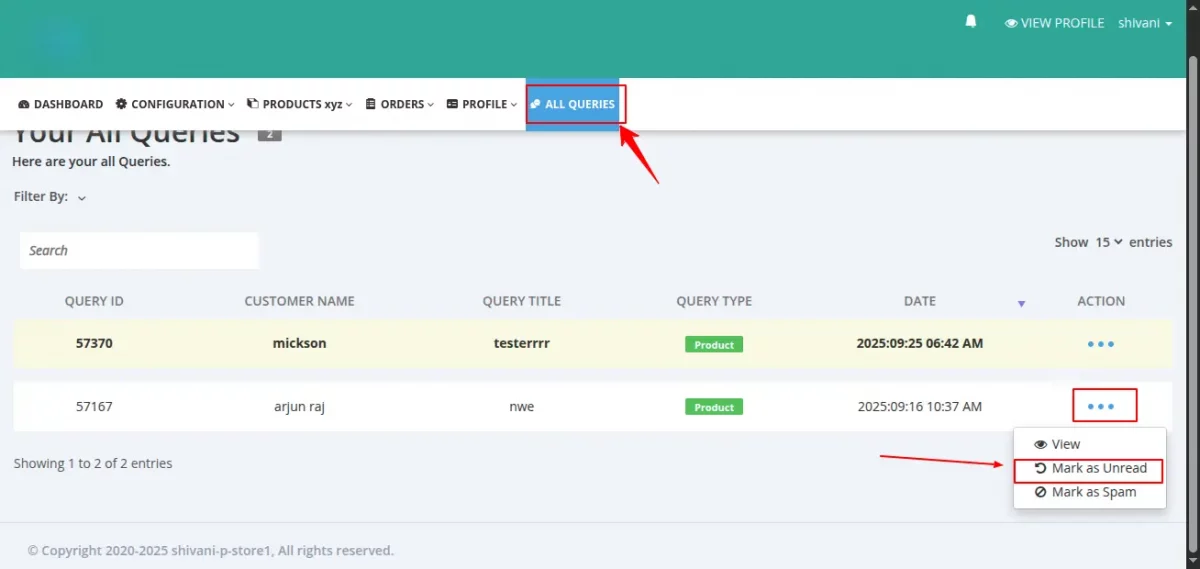
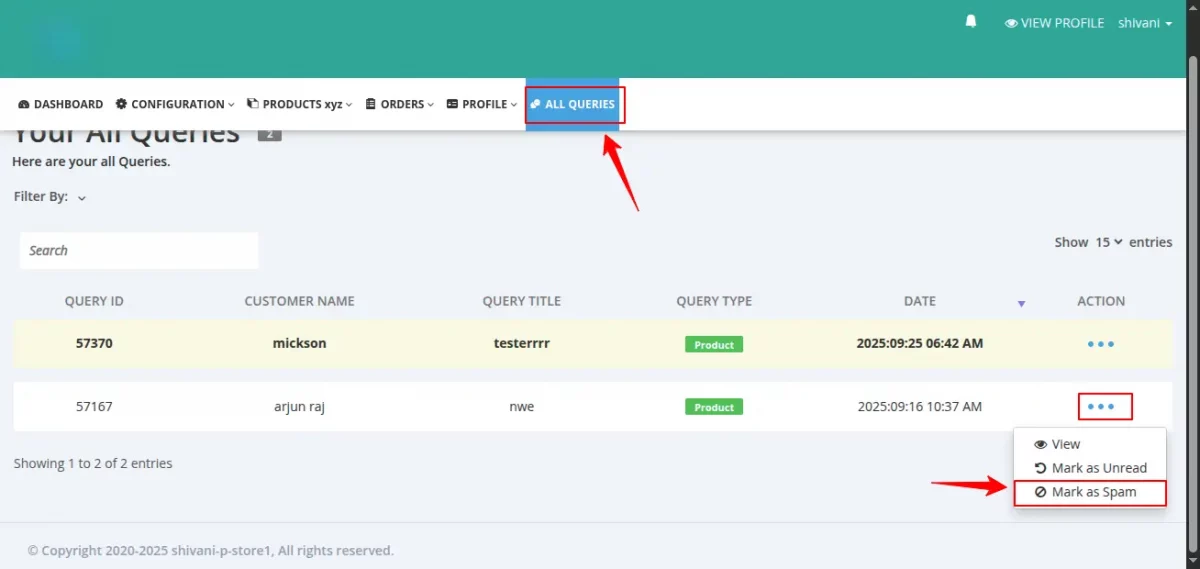
On seller’s end, to close a query, the seller should:
- Navigate to the Seller Panel of the marketplace.
- Go to All Queries.
- Select the query they wish to close and click the View button under the Action menu.
- On the redirected page, the seller can close the query.
Allow Seller to Set the Query “Mark as Unread” in Query View Page
If Admin enables “Allow Seller to Set the Query “Mark as Unread” in Query View Page”, your sellers will be able to mark queries as unread in the query view page.
To enable this feature:
- Navigate to the Admin Panel of the marketplace.
- Go to Configuration → Ask a Question Configuration → General Configuration.
- Enable “Allow Seller to Set the Query “Mark as Unread” in Query View Page
- ”.

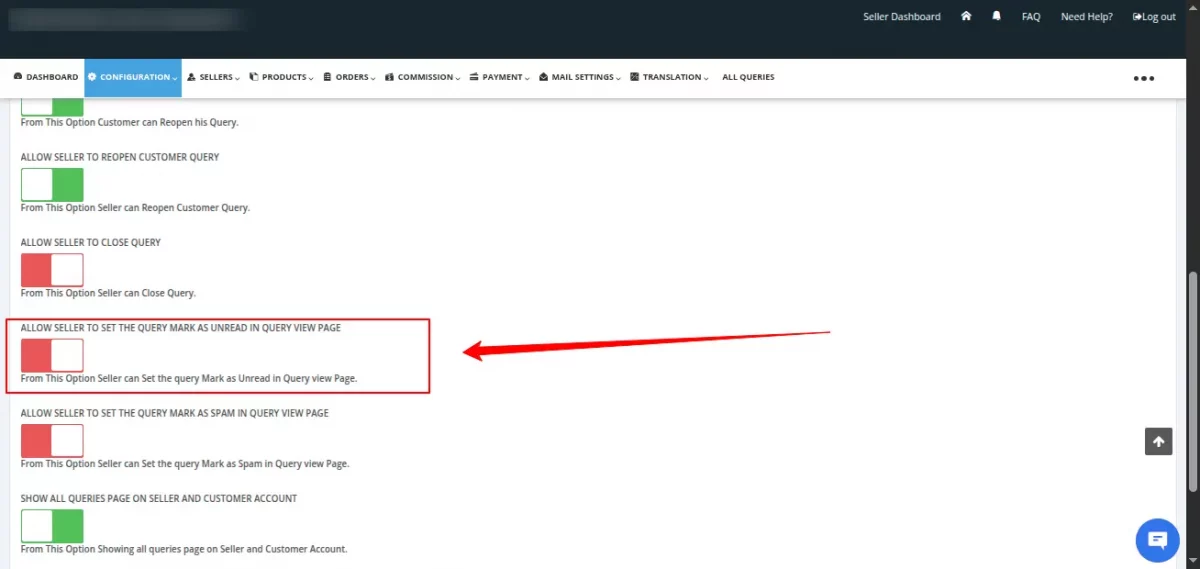
On the seller panel
Allow Seller to Set the Query “Mark as Spam” in Query View Page
If Admin enables “Allow Seller to Set the Query “Mark as Spam” in Query View Page”, your sellers will be able to mark queries as spam in the query view page.
To enable this feature:
- Navigate to the Admin Panel of the marketplace.
- Go to Configuration → Ask a Question Configuration → General Configuration.
- Enable “Allow Seller to Set the Query “Mark as Spam” in Query View Page”.

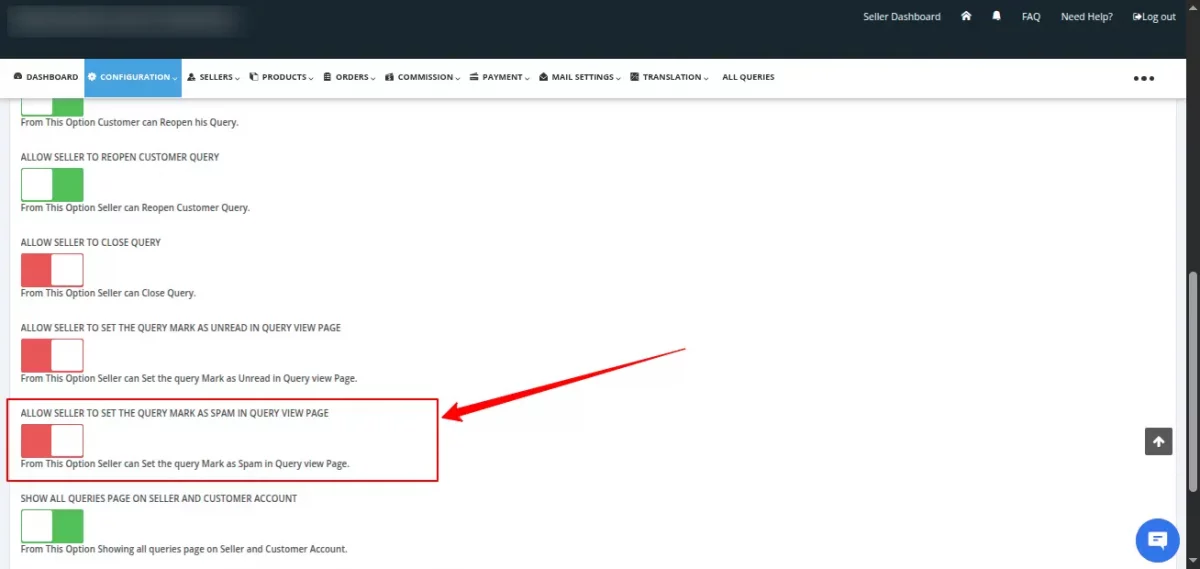
On seller panel,
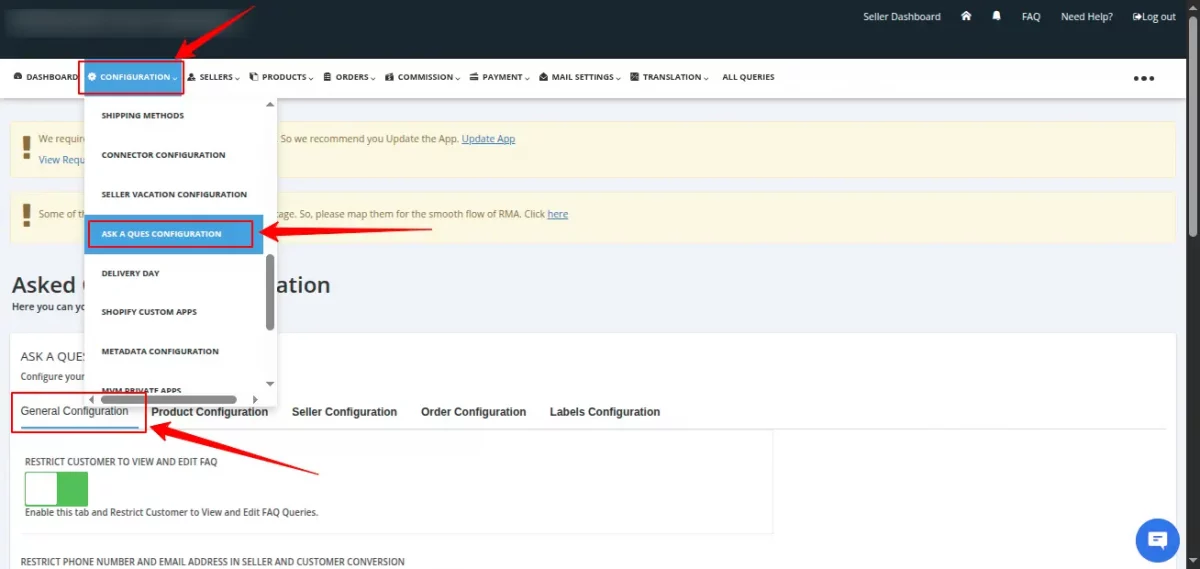
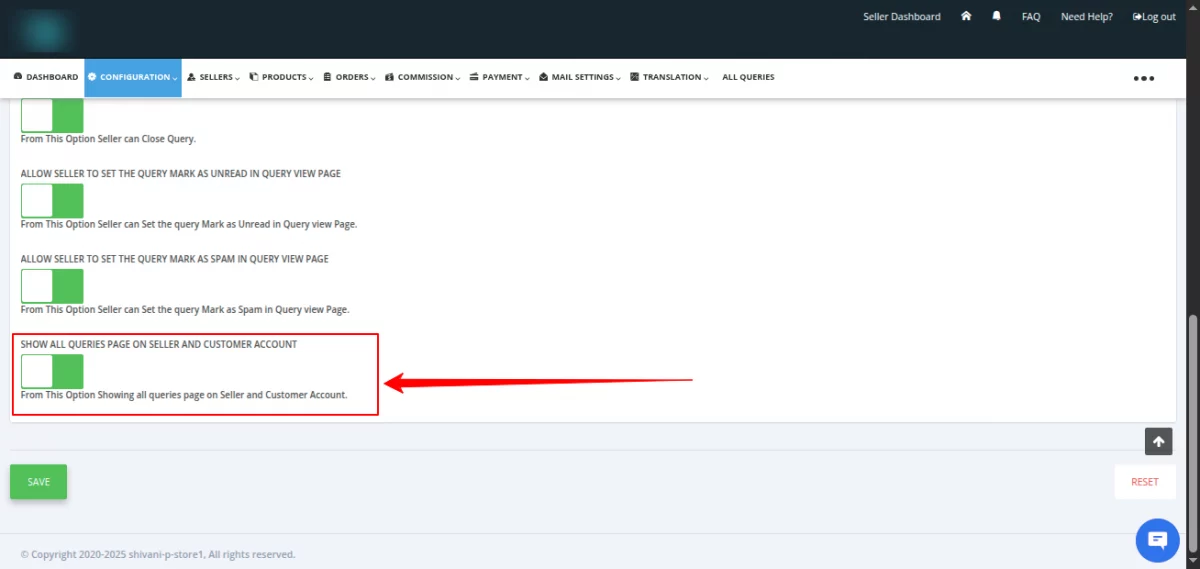
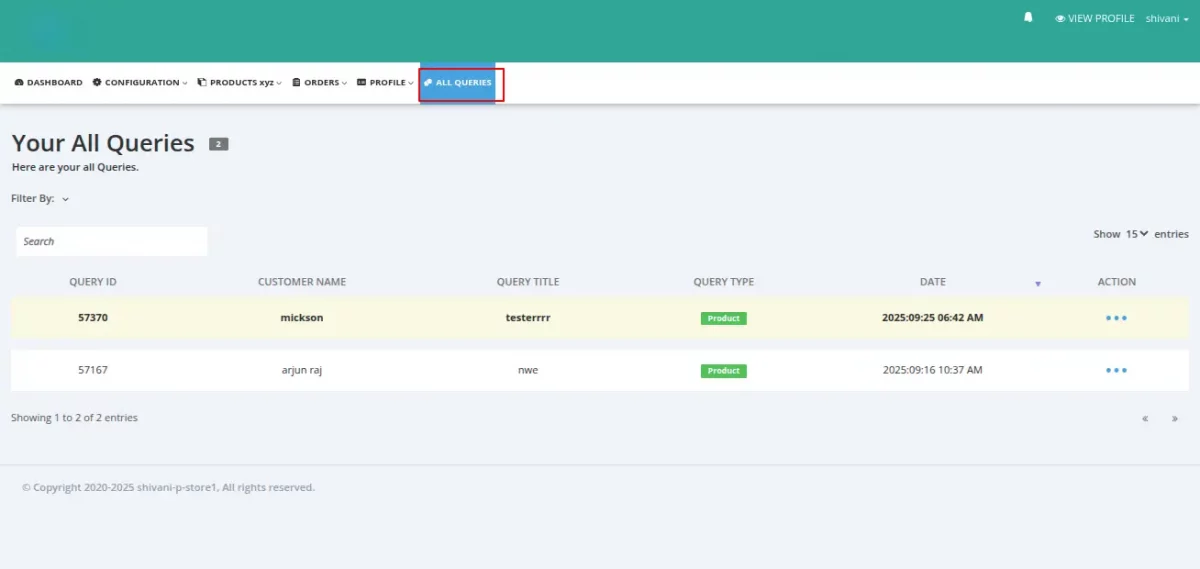
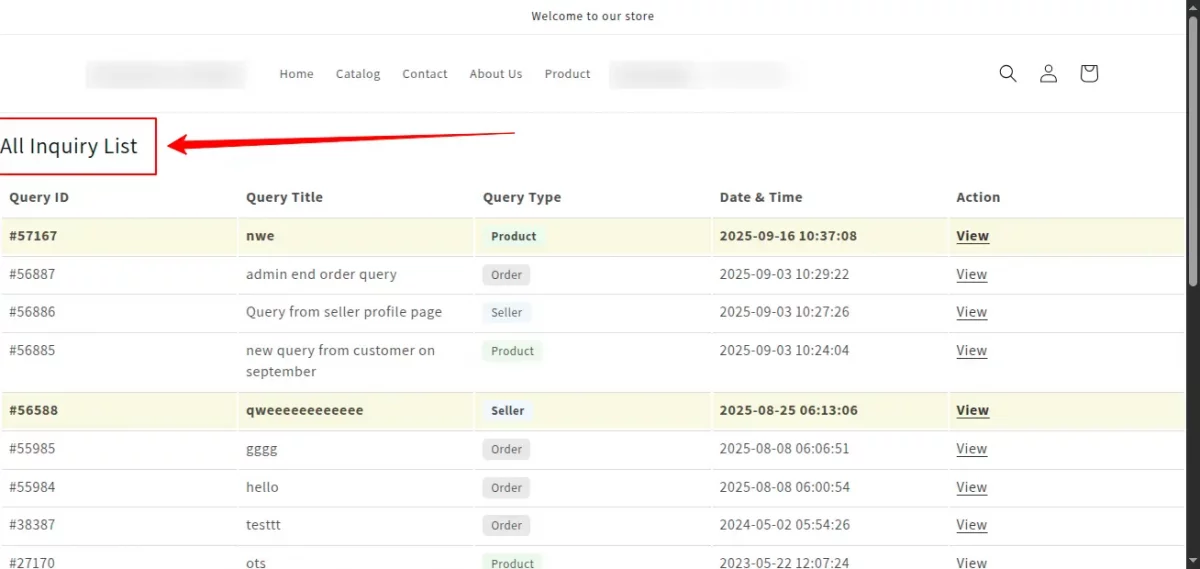
Show All Queries Page on Seller and Customer Account
By enabling this configuration, both sellers and customers will be able to view the “All Queries” page, which lists all queries related to their account.
To enable this feature:
- Navigate to the Admin Panel of the marketplace.
- Go to Configuration → Ask a Question Configuration → General Configuration.
- Enable “Show All Queries Page on Seller and Customer Account”.
On customer end,

Shopify Multivendor Marketplace: Ask a Question DEMO DETAILS
Go to the below link to use the demo: https://multivendor-ask-a-question.myshopify.com/pages/demo
SUPPORT
Furthermore, if you come across any query/issue,
Feel free to raise a ticket at http://webkul.uvdesk.com/ or send us an email at [email protected]

2 comments
Thanks for writing to us..!!
Yes, sellers do receive the email notification when any customer ask the questions for their products.
Admin can check this email template from “Mail Configuration” section of the app. Refer: https://qsnapnet.com/snaps/y3msn0k1qvk
Let us know in case of any questions. We would be very happy to assist you.
Best Regards,
Pooja Ishpuniyani
Webkul Software Pvt. Ltd.