Introduction
Opencart Hyperlocal Mobile app converts your Opencart Marketplace Hyperlocal web store to a native app.
With the help of this app, the customer can easily view localized market products without the hassle of exploring each store physically. It will not only help the customer to choose and compare the best products but also saves time.
With the help of this app, the customer location gets auto-detected or the buyer can even enter it manually.
This will help the customer in the filtration of the products and the sellers based on the availability in that particular region. Begin a native app implementation of such features becomes easy.
Thus, the app offers a perfect solution for both customers and sellers where you can access the hyperlocal marketplace anytime from anywhere with just a touch on the mobile.
Check the overview of the mobile end –
Check the backend configuration of the hyperlocal mobile app –
What Is a Hyperlocal Marketplace?
New buzzwords encounter daily in our lives. I always feel it’s important to understand their meaning exactly in the way they are used, else we may have a different take on the statement itself. One of which is the Hyperlocal Marketplace.
In simple words, it is an e-commerce platform based extension built to serve nearby target audiences for their varied and instant needs within stipulated time duration by local offline business and services.
So, in the Hyperlocal the seller and buyer operate in the vicinity, it includes dealing with a General merchant shop, Restaurant, Market, Mall, and other products and service providers.
GDPR Compliance
All the Mobikul apps are having GDPR compliance which doesn’t force its customer to share their personal data.
The app asks the customer to accept the terms and conditions on various pages. Thus, helping them to know the information which app owner is saving.
This GDPR feature is freely available in the app. So, if your store is having an EU customer then you need not worry about the issue of GDPR compliance in the app.
This App is an add-on of the following modules that are listed below. It means you need to purchase and install the following modules in order to use the app.
Note- The banner image, category icon, and banner and featured category can be edited from the admin panel. So, to know more about kindly refer to the LINK
Features
The native app is having multiple features that keep the user engaged and help in sales incrementation.
Customer-Centric Features-Ease them to buy a product from the app
- The customer can change the current location manually(selection by auto-suggestion), or locate the location on Google maps or select the current location as suggested by GPS.
- Multilingual functionality is supported in the app.
- The app user can easily checkout with the product in the cart without any hassle.
- The app user can also delete his account.
Seller Centric Features-Effective Store Management from the app-
- CSV upload with the Shipping Rate details in the Shipping list section
- The seller origin can be entered to identify the shipping charges.
- The seller can manage the store orders, total buyers, and total sales.
- Easy and quick management of products and orders using the application by sellers.
- The seller can add a delivery time slot as well for their products.
- App has support towards AI-based features like- AR Product Visualisation.
- Display delivery time slots on the product page
- The list of the sellers will be visible on the homepage and manage by the admin end.
Admin Configuration
If you have an Opencart Multi seller Mobile App module working on Web Module, then you can add and modify many functionalities in your application through your admin panel.
So here we cover all the extra functionalities provided by the Mobikul back-end module.

1st Part: Banner
With the help of the Opencart Multi Vendor Mobile App, ee can set the Banners on top of the Home page in Application. The ideal size for banners is in ration 2:1 (width: height).
You can add any number of banners and attach a redirect property to them. And can also add different images for the same banner as per languages.

- Title: Set the title of the Banner in different languages.
- Type- Product/Category: Attach the redirect property to your banner either product Type or Category type.
- Product Type: If you select the product type, then you have to attach any Product with the banner. If you click the banner by App, then it opens that specific Product which you have attached to the banner.
- Category Type: If you select the category type, then you have to attach any category with the banner. If you click the banner by App, then it opens that specific category that you have attached to the banner.
- Link (Auto-Complete): Here we can attach the product or category.
- Image: We can set the image or delete the attached image banner.
- Add button: We can add more banner.
Thus, in this way, the banner can be added.
2nd Part: Notification
From this part of the panel, you can send push notifications to all the app users.
Just Create a new Notification and add the desired action like want to open. Such as Product or category or custom collection. Then select a particular product and category and send it to everyone.

There is a + symbol to add the notification,
Notification:

- Title: Set the notification title in different languages.
- Content: This the description part of the push notification.
- Type: Here you can select the type of notification like the Banner type (Product/Category) but here you can send the notification of custom category type.
- Custom Category: Here we can set the random set products and send it to the app.
- Custom Category: Here we can set the random set products and send it to the app.
- Product/Category ID: Attached the product.category id with the push notification like in the banner part.
- Notification Status: You can enable and disable the notification.
- Banner: Also set the banner to your push notification.
Notification Emoji
The admin may also include an emoji in the notification’s Title and content. The administrator will choose an emoji from the field. The following image will display the emoji collection:

When the customer receives this, these emojis will also be available.
Note: Notification Emoji is an add on to the Opencart Mobikul App. To use this feature please install the OpenCart Mobile Emoji Push Notification module first.
Then click on “Send & Save” (send the notification as well as save your notification for the next time) and “Save”.
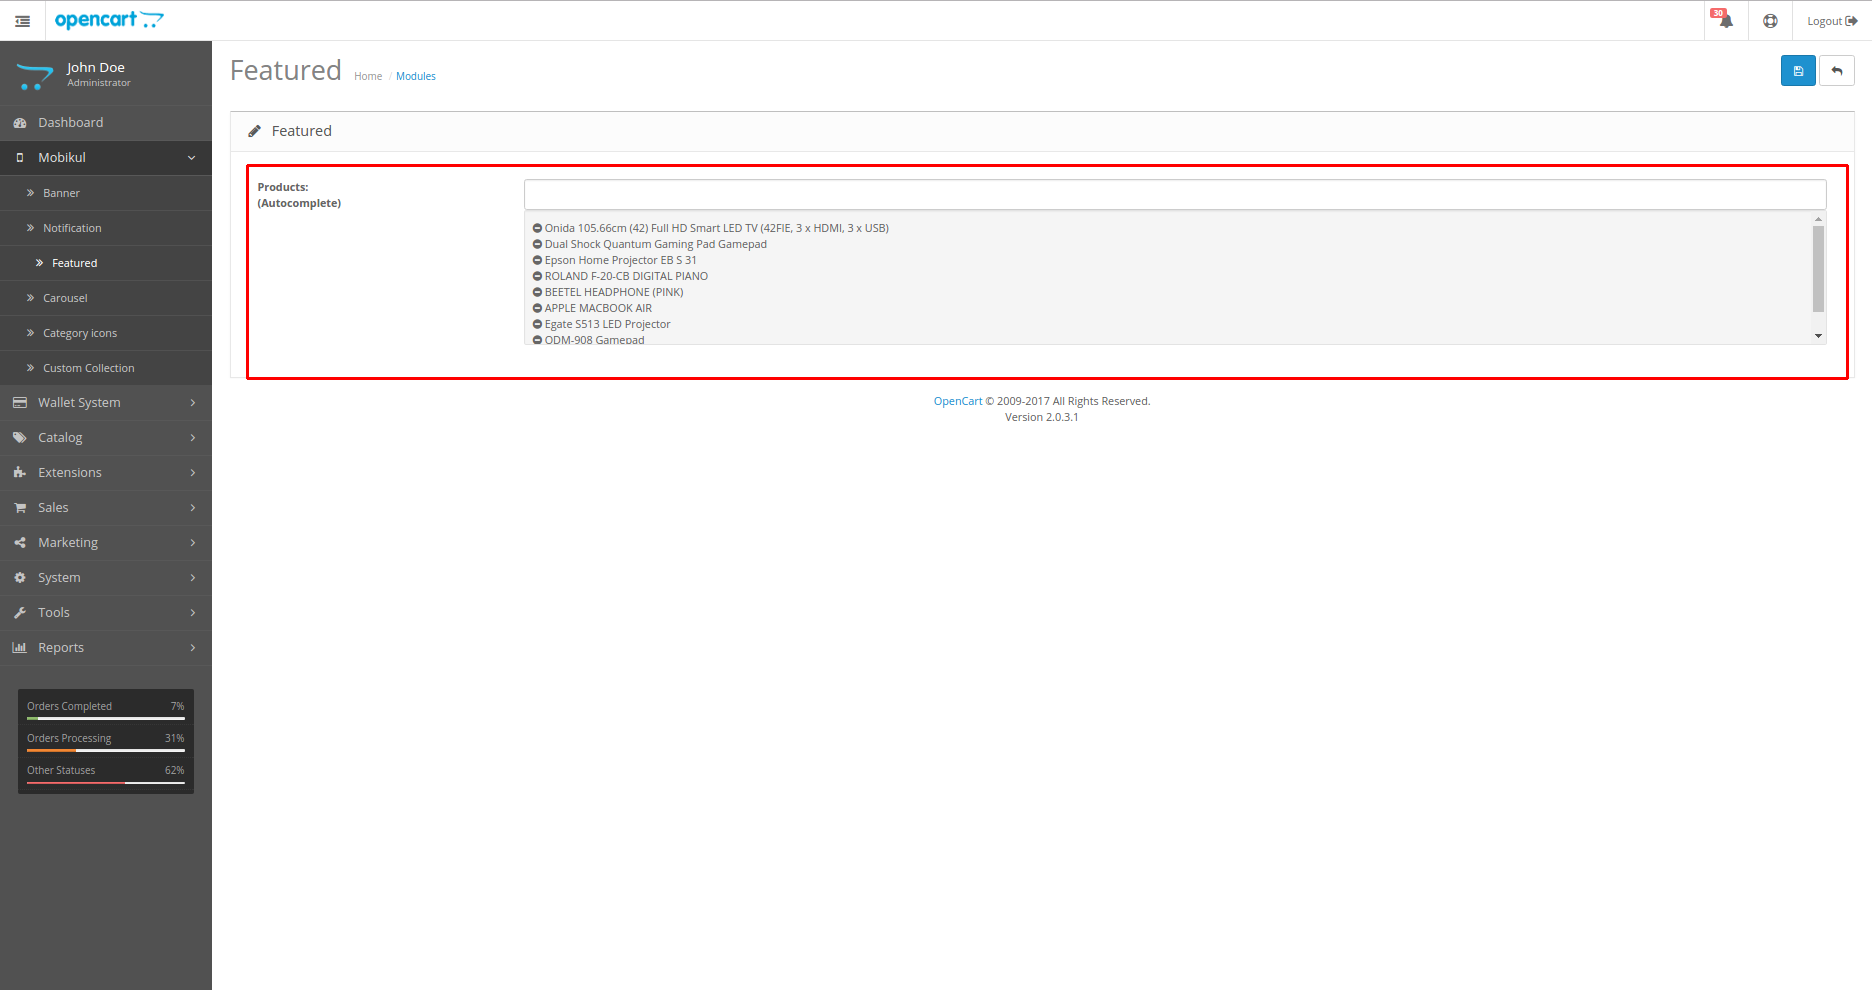
3rd Part: Featured
By this part of the panel, you can set the list of products that are shown on the application home page.
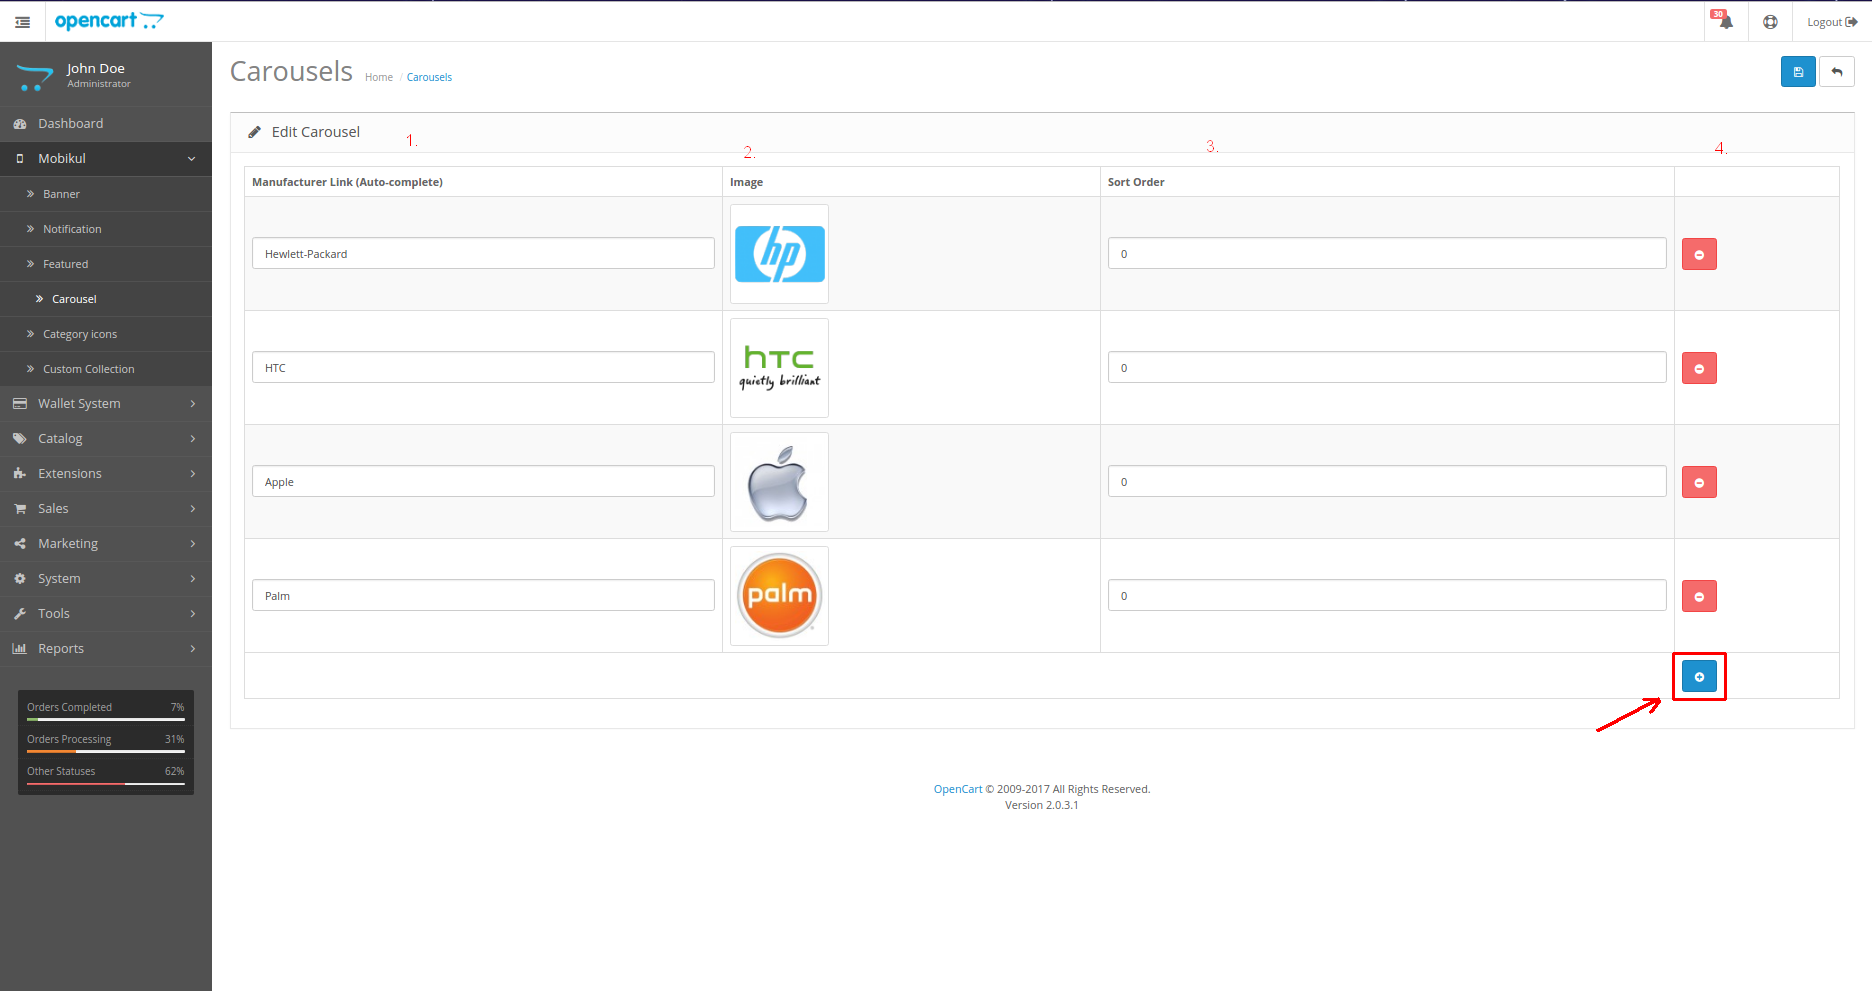
4th Part: Carousel
This is the part where we can set the brands which are shown at the bottom of the Application same as open cart store.

in the admin panel,
By the help of this add button, we can add the multiple carousel for the app.
5th Part: Category Icons
We can set the icons corresponding to the categories which is shown in the app left drawer and also on the home page.

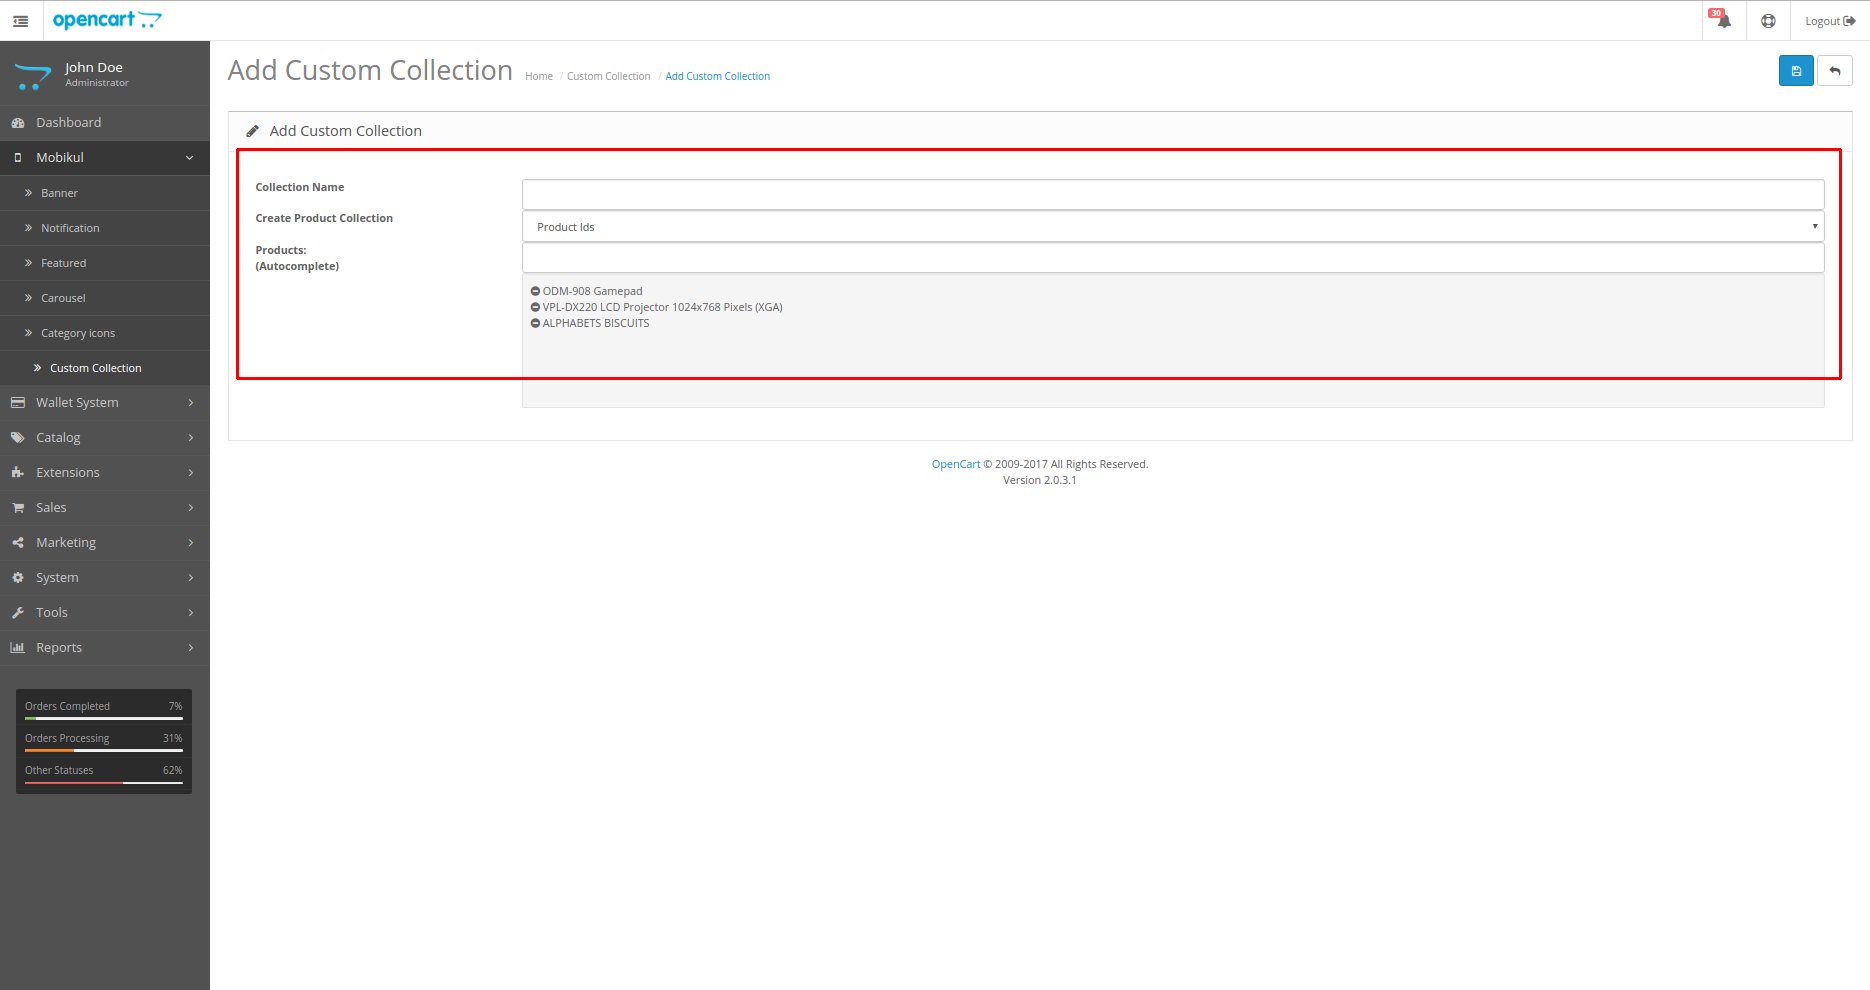
6th Part: Custom Collection
The admin may also submit a push notification to the customer with a list of products from a particular category. Under the Mobikul > Custom Collections Tab, the administrator can build some custom collections for this purpose.

The admin will create a new set by clicking the + button. The administrator must choose the products that belong to that list and give them a suitable name, as shown in the image below:

7th Part: Augmented Reality
With the support of the mobile application, e-commerce customers will be able to try products in 3D visualisation.

When you click on the “+” button on the right side. The Android 3D model and the IOS 3D model can both be uploaded by the administrator.

Under this tab following options will appear.
- Product Name – Add the name of the product.
- Upload for Android – The admin needs to upload the .glb file which will contain a 3D image of the product.
- Upload for iOS –The admin needs to upload the .usdz file which will contain a 3D image of the product.
- Status – Admin can Enabled/Disabled the status.
The customer will display the product in the frontend of the app after the admin configures all of the product’s information. The AR icon can also be used by the customer to better visualise the product.
8th Part: The Configuration part
The last part of the admin panel is the configuration part. Here we can manage all the functions which we want to show on the Home page.


- Status: Enable the Mobikul API status.
- Edit General Settings: API key and password which is used for the authentication of the request.
- API Key: Enter the API key for the application.
- API Password: The admin will enter the API password for the app.
- FCM Key: To enable the notification we have to use the FCM authorization key.
- Edit Application Settings:
- Display Playstore Link: The admin will Enable this to display the play store link to the application.
- Display AppStore Link: The admin will Enable this to display the AppStore link to the application.
- Playstore Link: The admin will enter the play store link.
- AppStore Link: The admin will enter the AppStore link.
- Visible on Top: The admin will enable this to display the links on top position.
- Visible on Bottom: The admin will enable this to display the links on the bottom position.
- Frontend Text: Enter the text that will visible in the frontend with the app links.
- Shipping Methods: Here the admin will select the shipping methods that will be available for the customer in the frontend.f
- Payment Methods: The admin will select the available payment methods for customers.
Part 9: Home Page Settings
On the app’s homepage, the admin can change the sort order of the app’s banner, product, and category carousels. The administrator can do so by going to the Extensions > Modules > Mobikul > Home Page Settings tab.
The admin can find three parts under this, the first of which is for adding some new carousel.
The second column is used to manage the carousel sorting orders that will appear on the homepage. The administrator can uninstall any carousel by clicking the delete icon. The deleted carousel will no longer be visible in the app.
By clicking the + button in the first column, the admin may add a new or removed carousel to the second column. By dragging and dropping it to the desired position, you may adjust the sort order.

Homepage
The homepage of the application is empowered with features that could increase user engagement and influence the sales of the store.
- Search Option.
- Location Search.
- My Wishlist.
- Cart.
- Left Navigation Drawer.
- Banner Sliders.
- Category Carousel.
- Featured Product List.
- Latest Product List.
- Browse By Brand Option.
- Partners


Search
The seller can add a search for various products with the help of this section. The search can be in two formats:
- Voice search- Through this option, the app user just needs to speak a keyword. A relevant set of results would be fetched and displayed.
- Search by typing Keywords- In this case, the app user needs to type the keyword(s) which will display the result required.
With the help of these searches, the products can be shortlisted easily without any hassle.


Location Search
The customer can add location-based on which the respective products will be displayed.
This can be done in three ways-
- Enter your location-The buyer can type the location name and select the location from the auto-suggestions appearing there.
- Get current location- The buyer can even locate the current location from Google maps.
- Location Using Map- The third option with the buyer is to select the location as detected by the GPS.

My Wishlist
My Wishlist section allows the customer to shortlist the products from the listed once. If in case, the customer needs to purchase the same product in the near future.
Thus, avoiding the customer to search for the product in the complete store.

Cart
The cart contains all the products which the user wishes to buy immediately. It can be said something similar to the shopping bag on a retail physical store. The customer keeps on adding the products which they want to purchase in a bag.

Left Notification Drawer
The left navigation drawer is enriched with details that are visible to both ‘logged in‘ as well as ‘guest customers‘. It mainly comprises of-
- All Categories- This section has a list of categories that are associated with sub-categories or products.
- Language- The app user can change the language as per the requirement for making the app more familiar for the users.
- Currency- The app user can select among multiple currencies type.
- Seller Page-This section shows information about the longtime sellers & the latest products that have been added to the Marketplace.


Seller Page
One of the most important and beneficial features for the Mobikul Opencart Hyperlocal Mobile Application. So this feature displays the list of sellers present in the marketplace.
Thus, here a customer can check the profile of the seller or can go through the products listed to add them to his wish list or add them to cart for purchase.

Hence, on clicking a seller the customer can easily view the seller profile. All the information regarding the seller will be displayed on the profile page.
Thus, in this section we have all the details about the Seller like Seller Name, Average rating, Contact us, Profile details, About shop, and the collection of his products. Here customers can write reviews & ratings about the seller.
If there are any product reviews they will be displayed on the seller profile page. Seller location is also displayed using Google maps.

Profile
The app user can click on the Profile tab to view the profile related detail. For that, the user must first sign-in the app through a registered account id.
Post-sign-in the profile tab is enabled with multiple subsections which have details of the account owner-
- My Wishlist
- Address Book
- My Orders
- My Dashboard
- Edit Your Account Information
- Change the Password
- My Downloadable Products
- Add location
- Shipping list
- Time Slot
- Your Reward Points
- Your Transactions
- Return
- Seller Dashboard
- Seller Orders
- Logout option.

Address Book
The Address book section will contain a list of addresses of the customer. In addition, it has the facility to edit and delete the existing address and add a new address.

Dashboard
The dashboard section contains the customer’s information like the billing and shipping address and order placed by the customer as well. So, this section contains-
- My Address-This section will save the default billing and shipping address, along with the other address as an Additional Address. Hence, creating an address directory in the app can be selected at the time of checkout.
- My Order-This will contain details of various orders placed by the customer. Thus, allowing the customer to view the status of the order from the app.


Account Information
This account section contains the detail of the account holder like- first name, last name, email address, and a facility to change the e-mail address.
Hence, allowing the app user to easily manage the basic account-related data. The admin can change the password from the Change your Password section as shown in the image below.

Now the user has the option to delete his account.
The admin can change the password from the Change your Password section as shown in the image below.

My Downloadable Products
This section contains all the downloadable products purchased by the app user from the store. However, if we have any downloadable product then this section will be like this as in the below screenshot.

Add Location
The customer can add and delete the location in the Add Location section as shown in the image below.


Shipping List
The seller can add/upload the CSV file for the shipping charges based on the distance and weight of the product. The seller can also filter, sort, and even delete the shipping as shown in the image below.
Time Slot
The seller can enable and add a time slot as shown in the image below.

Order Page:
A time slot will be visible on the order page as per the below image:

Product Page
Customer can view the time slot as per the below image:

Your Reward Points
This section shows the total reward points in the customer account along with the description for which the reward points are being given to them. The rewards points are given against any purchase or the first service availed, or as defined by the admin.

Your Transactions
The seller can see the list of transactions in this section which will display the money earned by the seller post deletion of commission along with the required detailed description and amount. The total current balance is displayed on the top of the page as shown in the image below.

Returns
All the refunds that are approved from the back end by the admin are shown under the following section as shown in the image below.


Seller Dashboard
This section is for the seller to view Income, Seller location, latest orders, and reviews. Hence, this seller dedicated section will help the seller to know about the sales on the store and will help in improvising the services rendered by the seller.
In Your Income Section, the seller will be able to analyze the sales on a daily, weekly, monthly, and yearly basis. The seller will also be able to see the total orders, total sales, and the total number of buyers as shown in the image below.


Seller Order
The seller can easily check their orders by using this mobile application as this will give an area in the seller panel to view and manage their orders in a very efficient way. This section has a list of all the orders that have been placed by different customers.
The vendor can view any order and can see different information like Order id, Shipping address, Payment method used, description of the item ordered, and the Order status with the date. The seller can add comments to their order and allow the notification for the customer or the admin.
Vendors can also “Add History” for an order if the history exists for that order. The seller can filter the order list by Order Id, Date Added, Order Status, & Customer name.

Category
This tab will open up to a list of categories and sub-categories, by clicking the sub-category the app user will re-directed towards a list of products(Default Opencart products- Simple and Downloadable Products).


The customer can even sort the category result by many sorting options provided by the Opencart. They can also opt for a grid and list view of the sub-category pages. That means, all the categories (Root category with their Sub- Categories) and all the products will be displayed on this app to the customers.
In the category page, the customer can see Main Category and their respective sub-categories. The customer can sort the category result by many sorting options provided by the Opencart. They can also opt for a grid and list view of the sub-category pages. In the sub-category page, the customer can see various products with options like
- Add to cart
- Add to Wishlist
On the product page, the customer can see the product image, description, specification, reviews with quantity box and Add to cart button.


Notifications
Under this section, many new arrivals, offers, and much more information are shared to the customer by the admin. On selection of any of the offer, the related products appear for that particular selection.
Thus, the app user can easily refer to the notifications without the need of scrolling through the Notification tab.


Checkout
The customer can easily purchase the product using the app. So, the app user can simply click on Add To Cart button either from Product page or collection page or via quick view from Homepage.
After the product is selected and clicked on continue shopping. The products can be seen in the Shopping Cart section, where the buyer can view options like –
- Continue Shopping
- Update Cart
- Empty Cart
Thus, allowing ease of managing the cart without any trouble of click back button again and again.
After the complete finalization product, the customer can proceed to the next step of selecting the billing and shipping address. Now, once the address details are set the customer can select the desired shipping method from available shipping methods.
Then the customer can select the payment method for the payment of the order. Henceforth, the customer can click on Place Order to complete the process.


After the purchase, the customer can view the order details in the My Order section on the dashboard.
So, that’s all for the Hyperlocal Mobile App. If you still have any issue feel free to add a ticket and let us know your views to make the module better [email protected].
Current Product Version - 1.17
Supported Framework Version - 3.x.x.x

2 comments
Currently, the required feature is not available on this module.
Please mail us at [email protected] with complete requirement so that we can assist you accordingly. Thanks